Adobe Creative Suite 6 Design and Web Premium All-in-One For Dummies (2012)
Book VIII
Fireworks CS6
Contents at a Glance
Chapter 1: Introducing Fireworks CS6
Chapter 2: Free to Create
Chapter 3: Livening Up Your Artwork with Color
Chapter 4: Creating Text in Fireworks
Chapter 5: Getting Images In and Out of Fireworks
Chapter 6: Hotspots, Slices, and CSS Layouts
Chapter 7: Using Buttons and Symbols
Chapter 8: Don’t Just Sit There — Animate!
Chapter 9: Building a Wireframe Using Fireworks
Chapter 1: Introducing Fireworks CS6
In This Chapter
![]() Understanding when you should use Fireworks
Understanding when you should use Fireworks
![]() Discovering the workspace
Discovering the workspace
![]() Finding out about the tools
Finding out about the tools
![]() Looking into the views
Looking into the views
![]() Using the basic selection tools
Using the basic selection tools
Adobe Fireworks is an incredible application that offers solutions to meet the needs of designers creating onscreen presentations, including business presentations and presentations for the web or mobile devices. Using Fireworks, you can experiment with different optimization settings to preview your artwork and make sure it looks great no matter where it appears. You can also build prototypes (or wireframes) to make sure that your site is organized before investing lots of time in the nitty-gritty details.
 A wireframe is essentially a mock-up or rough draft created to demonstrate or test a website. In web design, wireframes are basic visual guides used to suggest the layout and placement of fundamental design elements.
In this chapter, you’re introduced to the Fireworks software and its workspace. You also discover how to use selection tools so that you can start to manipulate graphics in Fireworks right away.
Why Use Fireworks?
Because you can use the Save for Web feature in Adobe Photoshop or Adobe Illustrator to create onscreen graphics, why do you need a separate application like Fireworks? Mostly because Fireworks offers several benefits that aren’t offered in Illustrator and Photoshop, including the following:
![]() Live optimization preview: As you work and make changes in Fireworks, you can simultaneously view the effect of those changes on your final optimized artwork.
Live optimization preview: As you work and make changes in Fireworks, you can simultaneously view the effect of those changes on your final optimized artwork.
![]() Easily create clickable regions: Using the image map feature, you can set up regions of your graphics to be clickable.
Easily create clickable regions: Using the image map feature, you can set up regions of your graphics to be clickable.
![]() Create rollovers: You can demonstrate the effect of a user rolling over a graphic in order to demonstrate interactivity on the screen.
Create rollovers: You can demonstrate the effect of a user rolling over a graphic in order to demonstrate interactivity on the screen.
![]() Work intuitively by taking advantage of its logical interface: This interface provides panels and features that relate to the web and that offer you the easiest way to optimize (make web-ready) graphics.
Work intuitively by taking advantage of its logical interface: This interface provides panels and features that relate to the web and that offer you the easiest way to optimize (make web-ready) graphics.
Many of these features, such as image maps and rollovers, are used in the prototyping stage to show a client or team how the final site or application will work. Such features are useful, but they’re best used only during the prototyping stage. For the final product, most developers prefer to use standard coding methods, such as Cascading Style Sheets. If you’re the designer, you can use Fireworks to design and create your online experience, and then allow a developer (if it isn’t you) to build the site by using CSS or JavaScript.
Working in Fireworks CS6
One of Fireworks’s big advantages is that it’s built specifically for creating onscreen graphics. When working onscreen, you’re working strictly with pixels — not messy dpi (dots per inch) or lpi (lines per inch), which are typical printing concerns.
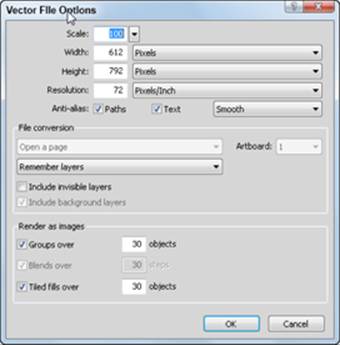
Figure 1-1 shows the dialog box that appears when you choose File⇒Open to open a vector graphic that was created in Adobe Illustrator. The dialog box offers conversion choices but emphasizes pixel dimensions.
Figure 1-1:Pixel dimensions play an important role in Fireworks.
 Anytime you’re working with web images, you should know the approximate width, in pixels, of your final screen display. The width of a typical web page ranges from 650 to 1,000 pixels, but most designers stick with a screen built to span approximately 960 pixels. When you create images, you must think about how those images will fit within the context of the total screen. An image 600 pixels wide would fill three-quarters of a screen, whereas an image 1,200 pixels wide would force the viewer to scroll to see the entire image.
When you launch Fireworks CS6, you notice right away that its workspace is similar to the workspaces in the other CS6 applications. Adobe has done a good job of organizing each application so that the learning curve from one application to another is quick and integration is easy.
As you might expect, the toolbox is to the left of the workspace and the panels are to the right. The tools even look much like the tools in other CS6 applications.
Using the tools
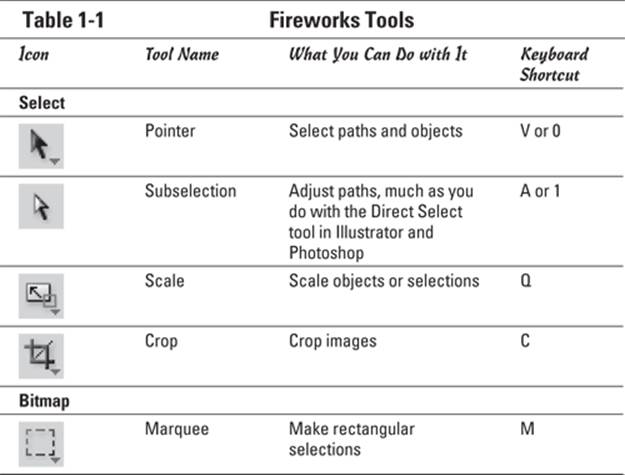
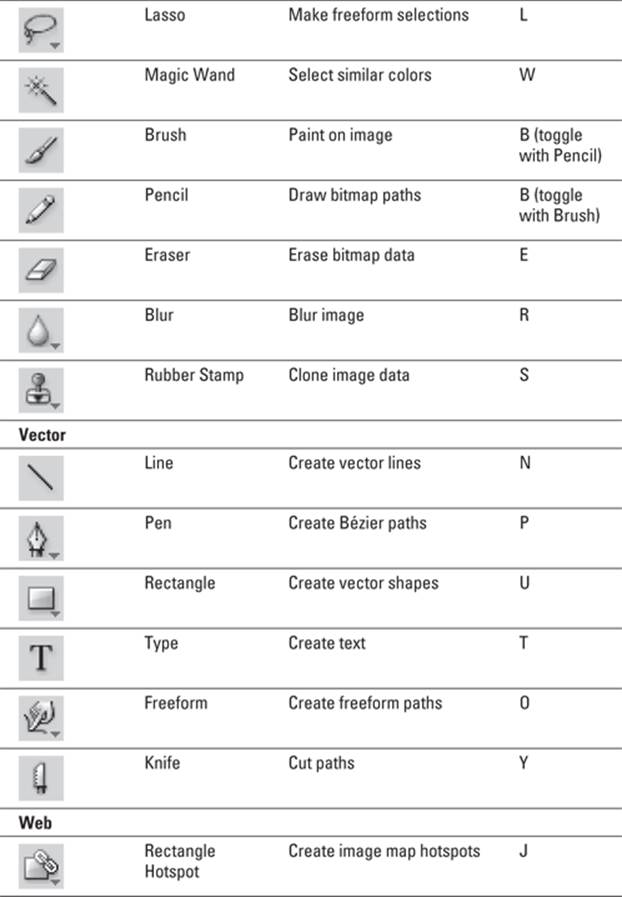
The Tools panel is sorted into six categories: Select, Bitmap, Vector, Web, Colors, and View. Table 1-1 lists the tools by category and the keys you can press to access them.
As you select each tool, the Properties panel displays additional options. (If your Properties panel isn’t visible, choose Window⇒Properties.)
Understanding the views
The tabs at the top of an image window give you the opportunity to view it in four ways:
![]() Original displays your image as it appears before being optimized for the web.
Original displays your image as it appears before being optimized for the web.
![]() Preview displays the image as it will appear when it’s saved for the web, based on your current settings. (You can find out more about those settings in Chapter 5 of this minibook.)
Preview displays the image as it will appear when it’s saved for the web, based on your current settings. (You can find out more about those settings in Chapter 5 of this minibook.)
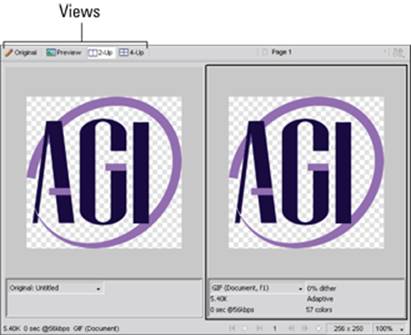
![]() 2-Up offers the opportunity to see an image in two windows, with different settings applied in each one. Most users tend to compare the original and optimized images in this view. (See Figure 1-2.)
2-Up offers the opportunity to see an image in two windows, with different settings applied in each one. Most users tend to compare the original and optimized images in this view. (See Figure 1-2.)
Figure 1-2:Compare the original (left) and optimized (right) images in 2-Up view.
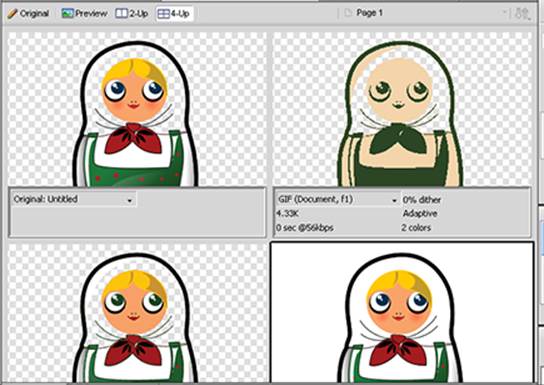
![]() 4-Up offers you four separate views from which you can experiment with settings. You don’t necessarily need to compare different formats when you use this view; you can experiment with different options for one format, such as pushing the limit with the amount of colors you want to keep in a GIF file, as shown in Figure 1-3.
4-Up offers you four separate views from which you can experiment with settings. You don’t necessarily need to compare different formats when you use this view; you can experiment with different options for one format, such as pushing the limit with the amount of colors you want to keep in a GIF file, as shown in Figure 1-3.
Figure 1-3: In 4-Up view, you can experiment with ways to optimize an image.
Investigating the panels
Not unlike the other CS6 applications, Fireworks allows you to detach panels from the docking area on the right side of the workspace. This procedure is similar to the methods you use to dock and undock panels in other CS6 applications. You can find out more about docking and undocking panels in Book I, Chapter 3.
If you can’t locate a panel, choose its name from the Window menu.
Working with Basic Selection Tools
You can work in Fireworks using the same selection tools for both vector and bitmap images.
Making a selection in a bitmap image
If you’re familiar with Photoshop selection techniques, you’ll have no problem using the same tools in Fireworks. Here’s how to make selections with the Marquee and Lasso tools:
![]()
 Marquee: To make a selection with the Marquee tool, simply select it from the Tools panel and then click and drag to surround the area you want to select. You can add to the selection by holding down the Shift key and dragging another marquee region, or deselect a portion of the active selection by holding down the Alt (Windows) or Option (Mac) key while dragging with the Marquee tool.
![]()
 Lasso: To use the Lasso tool, select it from the Tools panel and click and drag to create a path that then becomes your selection. As mentioned in the Marquee bullet, you can add to the selection by holding down the Shift key and creating another selection region, or subtract from the selection by holding down the Alt (Windows) or Option (Mac) key while dragging a selection region with the Lasso tool.
 You can use both the Marquee and Lasso tools interchangeably when making a selection.
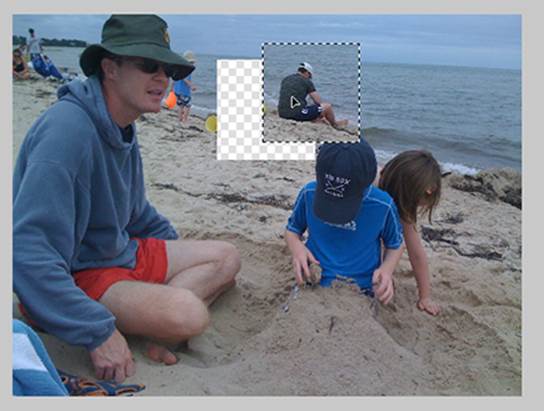
![]() By making a selection with the Marquee tool or Lasso tool and then clicking and dragging with the Pointer tool, you can move one part of an image to another, as shown in Figure 1-4. If you make no selection before you drag, everything on the existing layer is moved.
By making a selection with the Marquee tool or Lasso tool and then clicking and dragging with the Pointer tool, you can move one part of an image to another, as shown in Figure 1-4. If you make no selection before you drag, everything on the existing layer is moved.
Figure 1-4:Drag a selection to move it.
Switch to the Subselection tool and notice that if you have an existing selection, the pointer changes to a double arrow, indicating that you will clone (copy) the selection when you click and drag it.
Making a selection in a vector image
By using the same tools you use to select bitmap images, you can adjust vector paths. Use the Pointer tool to move an entire vector shape, as shown in Figure 1-5.
Use the Subselection tool to move the individual points on the path.
Figure 1-5: The Pointer tool lets you move a vector shape.

All materials on the site are licensed Creative Commons Attribution-Sharealike 3.0 Unported CC BY-SA 3.0 & GNU Free Documentation License (GFDL)
If you are the copyright holder of any material contained on our site and intend to remove it, please contact our site administrator for approval.
© 2016-2026 All site design rights belong to S.Y.A.