Adobe Creative Suite 6 Design and Web Premium All-in-One For Dummies (2012)
Book VIII
Fireworks CS6
Chapter 3: Livening Up Your Artwork with Color
In This Chapter
![]() Defining colors for the web
Defining colors for the web
![]() Finding and applying colors to graphics
Finding and applying colors to graphics
![]() Creating your own colors in Fireworks
Creating your own colors in Fireworks
![]() Using gradient fills
Using gradient fills
Like most other Creative Suite applications, Fireworks lets you define an object’s fill and stroke. You can use some unique tools for that task. You can also take advantage of some hidden features that might be new to you.
In this chapter, you find out how to apply a fill or stroke color to your artwork, and you also discover the basic steps for working with gradient fills.
Choosing Web Colors
Colors appear differently on a monitor from the way they do when you view them offscreen, but this issue isn’t as serious now as it was in the past. Years ago, you had to base your color selections on the lowest common denominator. Most viewers now have monitors that can display thousands, if not millions, of colors.
 When you’re choosing a color for the web, don’t fret over the exactness of a color viewed on different monitors unless precision is critical. Critical color can apply to your company logo or to fabrics (for clothing websites) that viewers might be comparing onscreen.
In Fireworks, you can choose colors from several panels, with each panel offering a different model from which to create them. Even though you’re working in RGB (Red, Green, Blue), you can still enter CMYK (Cyan, Magenta, Yellow, Key or Black) or HSB (Hue, Saturation, Brightness) values.
Finding Colors in Fireworks
Perhaps you want to create a simple shape with a fill, which seems easy, but if you’re unfamiliar with Fireworks, you may need a little direction to get this task done.
You can find most Fireworks color functions in the Colors section of the Tools panel. This section features an Eyedropper tool for sampling color, as well as color boxes that help you easily stroke and fill both bitmap and vector graphics.
You can set additional attributes for color in the Properties panel, including textures you can apply from the Texture drop-down list.
Applying Colors to Vector Objects
To create and color a vector object, follow these steps:
1. Choose File⇒New to create a new blank document.
2. Create a path or a shape with the vector drawing tools and leave that object selected.
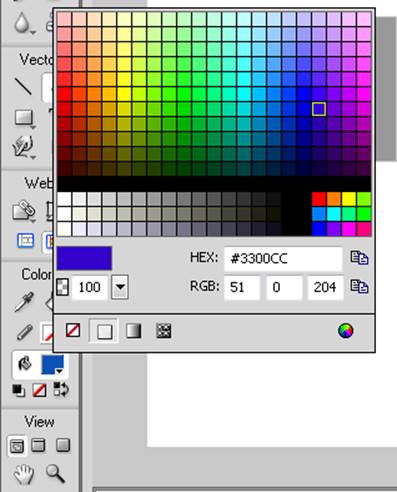
3. To apply a fill color, click the Fill Color box located in the Colors section of the Tools panel and then click the color you want to apply from the pop-up Swatches panel. (See Figure 3-1.)
4. To apply a stroke color, click the Stroke Color box in the Tools panel and then select the color you want to apply from the pop-up Swatches panel.
Figure 3-1:Take advantage of the Fill Color options.
Adding Colors to Fireworks
Assigning a fill or stroke color to graphics is relatively simple. But what if the color you want to use isn’t in the default Swatches panel? In that case, you need to create a color and add it to the panel. You can accomplish this task in several ways. In the following sections, we cover using the Eyedropper tool and the Color Palette panel.
Adding a color with the Eyedropper tool
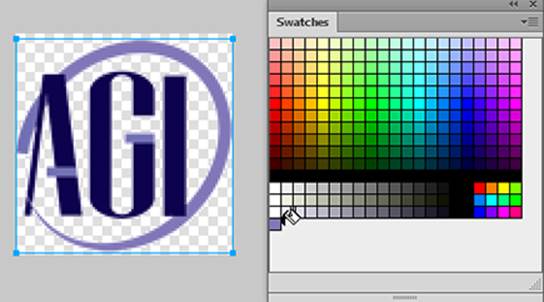
The Eyedropper tool is useful when you have a color to sample. Just select the tool, click any color (in your working document or in any other open Fireworks document), and then choose Window⇒Swatches. When the Swatches panel pops up, as shown in Figure 3-2, click an empty area, and your sample color is added.
Figure 3-2:Select a color with the Eyedropper tool and then click the Swatches panel to save the color.
 To remove a color from the Swatches panel, position the mouse pointer over the color you want to delete and press Ctrl+Alt (Windows) or
 ![]() +Option (Mac). When the scissors pointer appears, click the mouse button; the color is deleted.
+Option (Mac). When the scissors pointer appears, click the mouse button; the color is deleted.
Adding a color with the Color Palette panel
The color palette is a dynamic and fun way to set color. Each of its three tabs offers the opportunity to choose a stroke or fill color and a different method of selecting that color.
You can open the Color palette by choosing Windows⇒Others⇒Color Palette.
The three color palette tabs are
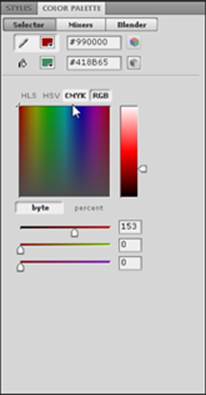
![]() Selector: The Selector tab (see Figure 3-3) lets you pick a color in any of four color models: HLS (Hue, Lightness, Saturation), HSV (Hue, Saturation, Value), CMYK, and RGB. Click the large color panel and then enter color values by using the sliders or text boxes at the bottom. To adjust the tonal value, use the slider to the right of the large color panel.
Selector: The Selector tab (see Figure 3-3) lets you pick a color in any of four color models: HLS (Hue, Lightness, Saturation), HSV (Hue, Saturation, Value), CMYK, and RGB. Click the large color panel and then enter color values by using the sliders or text boxes at the bottom. To adjust the tonal value, use the slider to the right of the large color panel.
Figure 3-3: The color palette’s Selector tab gives you a choice of four color models.
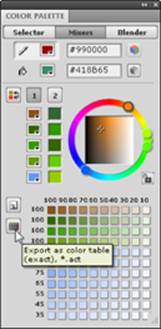
![]() Mixers: The Mixers tab (see Figure 3-4) lets you assign multiple colors by using the color wheel. You can also create a tint build at the bottom of the window so that you can build combinations of colors. In addition, you can export the colors as a bitmap or a table using the Export buttons on the left side of the Mixer tab, which makes it easy to reference them later.
Mixers: The Mixers tab (see Figure 3-4) lets you assign multiple colors by using the color wheel. You can also create a tint build at the bottom of the window so that you can build combinations of colors. In addition, you can export the colors as a bitmap or a table using the Export buttons on the left side of the Mixer tab, which makes it easy to reference them later.
Figure 3-4: On the Mixers tab, create colors with the color wheel or the tint builder.
![]() Blender: The Blender tab (see Figure 3-5) lets you select two colors and then view and choose combinations of those colors.
Blender: The Blender tab (see Figure 3-5) lets you select two colors and then view and choose combinations of those colors.
Figure 3-5:Blend two colors using the Blender tab in the Color Palette panel.

To blend colors, enter two color values in the text boxes at the bottom of the Blender tab and then use the slider to view various combinations of the two selected colors.
Creating Gradients
You can add some dimension to a graphic by filling it with a gradient. To create a gradient in Fireworks, follow these steps:
1. Create a shape that you want to fill with a gradient.
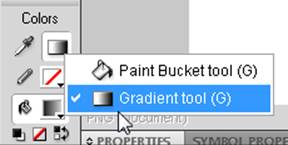
2. With the shape selected, click and hold the Paint Bucket tool in the Colors section of the Tools panel and then select the hidden Gradient tool, as shown in Figure 3-6.
Figure 3-6:Select the Gradient tool.
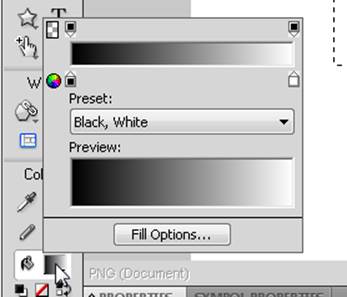
3. Click the Fill Color box in the Tools panel to assign colors to the gradient.
The Fill Options window appears, as shown in Figure 3-7.
Figure 3-7:Assign the gradient colors.
4. To assign colors to the gradient, simply click the existing color stops and choose a color from the pop-up palette.
5. Click anywhere on the gradient ramp to add a stop, and edit the color.
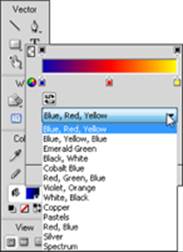
If you don’t want to create your own gradient, use the Preset drop-down list to select from existing gradients, as shown in Figure 3-8.
Figure 3-8:Pick a preset gradient from this drop-down list.
All materials on the site are licensed Creative Commons Attribution-Sharealike 3.0 Unported CC BY-SA 3.0 & GNU Free Documentation License (GFDL)
If you are the copyright holder of any material contained on our site and intend to remove it, please contact our site administrator for approval.
© 2016-2026 All site design rights belong to S.Y.A.