iOS Components and Frameworks: Understanding the Advanced Features of the iOS SDK (2014)
Chapter 21. Introduction to TextKit
Both the iPhone and, later, the iPad have supported a number of text presentation elements from their inception. Text fields, labels, text views, and Web views have been with the OS since its release. Over time these classes have been expanded and improved with the goal of giving developers more flexibility with rich text.
In the beginning the only practical way to display attributed text was to use a UIWebView and use HTML to render custom attributes; however, this was slow and carried with it terrible performance. iOS 3.2 introduced Core Text, which brought the full power of NSAttributedString to the platform from the Mac. Core Text, however, was complex and unwieldy and was largely shunned by developers who were not coming from the Mac or did not have an abundance of time to invest in text rendering for their apps.
Enter TextKit. Announced as part of iOS 7, TextKit is not a framework in the traditional sense. Instead, TextKit is the nomenclature for a set of enhancements to existing text-displaying objects to easily render and work with attributed strings. Although TextKit adds several new features and functionalities beyond what Core Text offered, a lot of that functionality is re-created in TextKit, albeit in a much easier fashion. Existing Core Text code likewise is easily portable to TextKit, often needing no changes or only very minor changes through the use of toll-free bridges.
An introduction to TextKit is laid out over the following pages. It will demonstrate some of the basic principles of text handling on iOS 7; however, working with text on modern devices is a vast topic, worthy of its own publication. Apple has put considerable time and effort into making advanced text layout and rendering easier than it has ever been in the past. The techniques and tools described will provide a stepping stone into a world of virtually limitless text presentation.
Sample App
The sample app (Figure 21.1) is a simple table view–based app that will allow the user to explore four of the many features of iOS 7’s TextKit. There is very little overhead for the sample app not directly related to working with the new TextKit functionality. It consists of a main view built on a UINavigationController and a table view that allows the selection of one of four items. The sample app provides demos for Dynamic Link Detection, which will automatically detect and highlight various data types; Hit Detection, which enables the user to select a word from aUITextView; and Content Specific Highlighting, which demos TextKit’s capability to work with attributed strings. Lastly, the sample app exhibits Exclusion Paths, which exhibits the capability to wrap text around objects or bezier paths.
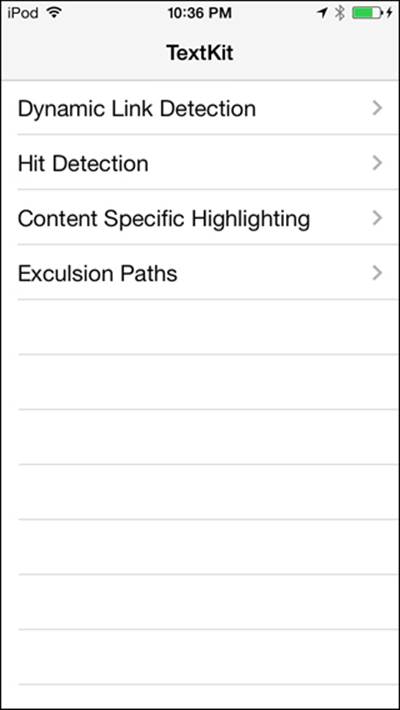
Figure 21.1 A look at the sample app showing a table view with options for different TextKit functionalities.
Introducing NSLayoutManager
NSLayoutManger was first introduced with iOS 7. It can be used to coordinate the layout and display of characters held in an NSTextStore, which is covered in the following section. NSLayoutManager can be used to render multiple NSTextViews together to create a complex text layout. NSLayoutManager contains numerous classes for adding, removing, aligning, and otherwise working with NSTextContainer that are covered more in depth in a later section.
NSTextStore
Each NSLayoutManager has an associated NSTextStorage that acts as a subclass of NSMutableAttributedString. Readers familiar with Core Text or Mac OS X text rendering might be familiar with an attributed string, which is used for storage of stylized text. AnNSTextStorage provides an easy-to-interact-with wrapper for easily adding and removing attributes from text.
NSTextStorage can be used setAttributes:range: to add new attributes to a string; for a list of attributes see Table 21.1. Polling the text for currently enabled attributes can be done using attributesAtIndex:effectiveRange:.
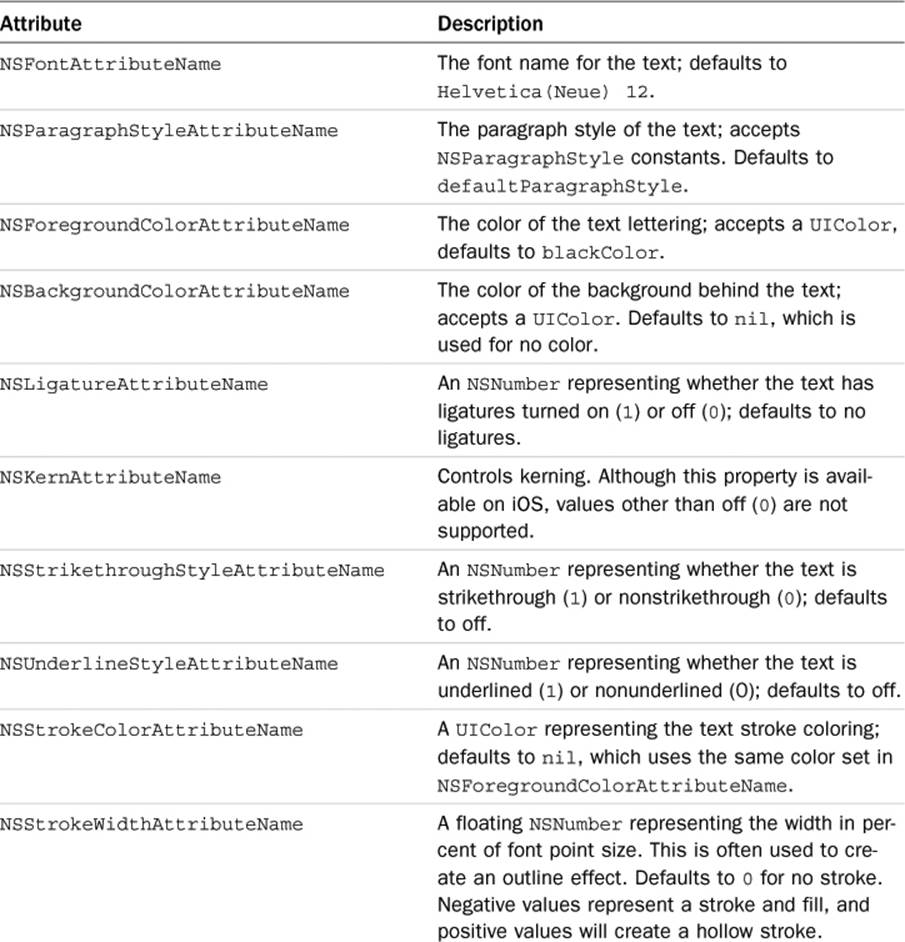
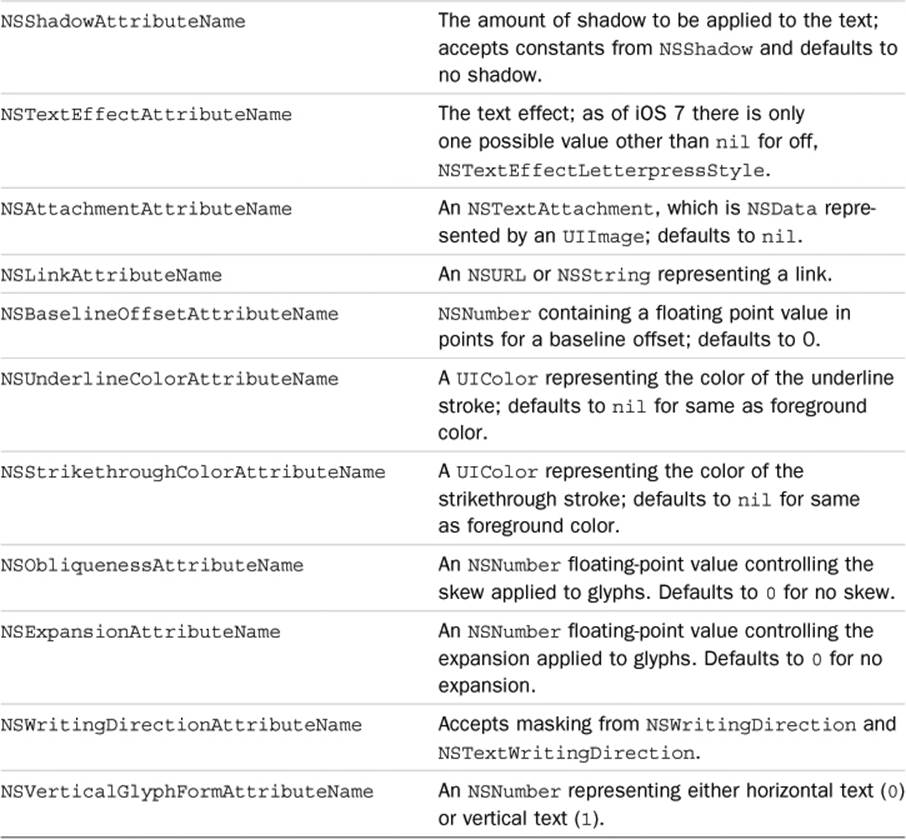
Table 21.1 Available Text Attributes
NSLayoutManagerDelegate
NSLayoutManager also has an associated delegate that can be used to handle how the text is rendered. One of the most useful sets of methods deals with the handling of line fragments that can be used to specify exactly how the line and paragraphs break. Additionally, methods are available when the text has finished rendering.
NSTextContainer
The NSTextContainer is another important new addition to iOS 7’s TextKit. An NSTextContainer defines a region in which text is laid out; NSLayoutManagers discussed in the preceding section can control multiple NSTextContainers. NSTextContainers have support for number of lines, text wrapping, and resizing in a text view. Additional support for exclusion paths is discussed in the section “Exclusion Paths.”
Detecting Links Dynamically
Dynamic Link Detection is very easy to implement and provides a great user experience if the user is working with addresses, URLs, phone numbers, or dates in a text view. The easiest way to turn on these properties is through Interface Builder (shown in Figure 21.2).
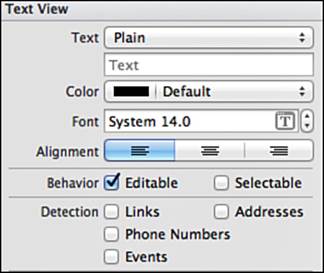
Figure 21.2 Dynamic Link Detection controls in Xcode 5.
These properties can also be toggled on and off using code.
[textView setDataDetectorTypes: UIDataDetectorTypePhoneNumber | UIDataDetectorTypeLink | UIDataDetectorTypeAddress | UIDataDetectorTypeCalendarEvent];
iOS 7 added a new delegate method as part of UITextViewDelegate to intercept the launching of events. The following example detects the launch URL event on a URL and provides an alert to the user:
- (BOOL)textView:(UITextView *)textView shouldInteractWithURL:(NSURL *)URL inRange:(NSRange)characterRange
{
toBeLaunchedURL = URL;
if([[URL absoluteString] hasPrefix:@"http://"])
{
UIAlertView *alert = [[UIAlertView alloc] initWithTitle:@"URL Launching" message:[NSString stringWithFormat:@"About to launch %@", [URL absoluteString]] delegate:self cancelButtonTitle:@"Cancel" otherButtonTitles:@"Launch", nil];
[alert show];
[alert release];
return NO;
}
return YES;
}
Detecting Hits
Hit detection has always been complex to implement and often required for elaborate text-driven apps. iOS 7 added support for per-character hit detection. In order to support this functionality a subclassed UITextView is created, called ICFCustomTextView in the sample project. TheUITextView implements a touchesBegan event method.
When a touch begins, the location in the view is captured and it is adjusted down the y axis by ten to line up with the text elements. A method is invoked on the layoutManager that is a property of the text view, characterIndexForPoint: inTextContainer: fractionOfDistanceBetweenInsertionPoints:. This returns the index of the character that was selected.
After the character index has been determined, the beginning and end of the word that it is contained within are calculated by searching forward and backward for the next white-space character. The full word is then displayed in a UIAlertView to the user.
- (void)touchesBegan:(NSSet *)touches withEvent:(UIEvent *)event
{
UITouch *touch = [touches anyObject];
CGPoint touchPoint = [touch locationInView:self];
touchPoint.y -= 10;
NSInteger characterIndex = [self.layoutManager characterIndexForPoint:touchPoint inTextContainer:self.textContainer fractionOfDistanceBetweenInsertionPoints:0];
if(characterIndex != 0)
{
NSRange start = [self.text rangeOfCharacterFromSet:[NSCharacterSet whitespaceAndNewlineCharacterSet] options:NSBackwardsSearch range:NSMakeRange(0,characterIndex)];
NSRange stop = [self.text rangeOfCharacterFromSet: [NSCharacterSet whitespaceAndNewlineCharacterSet] options:NSCaseInsensitiveSearch range:NSMakeRange(characterIndex,self.text.length- characterIndex)];
int length = stop.location - start.location;
NSString *fullWord = [self.text substringWithRange:NSMakeRange (start.location, length)];
UIAlertView *alert = [[UIAlertView alloc] initWithTitle:@"Selected Word" message:fullWord delegate:nil cancelButtonTitle:@"Dismiss" otherButtonTitles: nil];
[alert show];
[alert release];
}
[super touchesBegan: touches withEvent: event];
}
Exclusion Paths
Exclusion Paths (shown in Figure 21.3) allow text to wrap around images or other objects that appear inline. iOS 7 added a simple property in order to add an exclusion path to any text container.
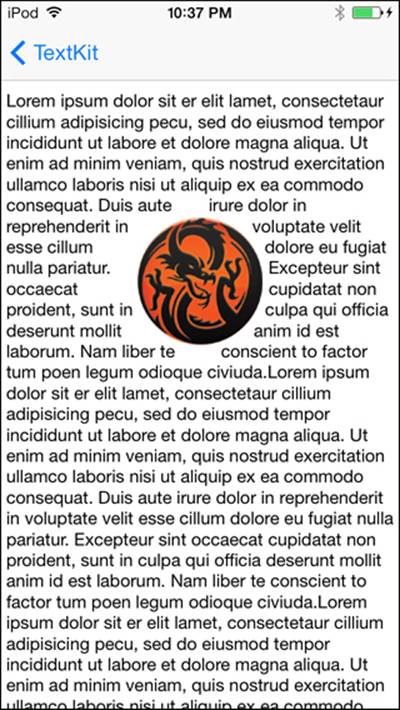
Figure 21.3 Text wrapping around a UIImage using iOS 7’s exclusion paths.
To specify an exclusion path, a UIBezierPath representing the area to be excluded is first created. To set an exclusion path, an array of the avoided areas is passed to the exclusionPaths property of a textContainer. The text container can be found as a property of theUITextView.
- (void)viewDidLoad
{
[super viewDidLoad];
UIBezierPath *circle = [UIBezierPath bezierPathWithOvalInRect:CGRectMake(110, 100, 100, 102)];
UIImageView *imageView = [[[UIImageView alloc] initWithFrame:CGRectMake(110, 110, 100, 102)] autorelease];
[imageView setImage: [UIImage imageNamed: @"DF.png"]];
[imageView setContentMode:UIViewContentModeScaleToFill];
[self.myTextView addSubview: imageView];
self.myTextView.textContainer.exclusionPaths = @[circle];
}
Content Specific Highlighting
One of the most interesting features of TextKit is Content Specific Highlighting. Before iOS 7, using CoreText to modify the appearance of specific strings inside of a text view was elaborate and cumbersome. iOS 7 brings many improvements to rich text rendering and definition.
To work with custom attributed text, a subclass of an NSTextStorage is created, called ICFDynamicTextStorage in the sample project. This approach will allow the developer to set tokens for different attributed strings to be rendered per string encountered. A classwideNSMutableAttributedString is created, which will hold on to all the associated attributes for the displayed text.
- (id)init
{
self = [super init];
if (self)
{
backingStore = [[NSMutableAttributedString alloc] init];
}
return self;
}
A convenience method for returning the string is also created, as well as one for returning the attributes at an index.
- (NSString *)string
{
return [backingStore string];
}
- (NSDictionary *)attributesAtIndex:(NSUInteger)location effectiveRange:(NSRangePointer)range
{
return [backingStore attributesAtIndex:location effectiveRange:range];
}
The next four methods deal with the actual inputting and setting of attributes, from replacing the characters to making sure that text is being properly updated.
- (void)replaceCharactersInRange:(NSRange)range withString:(NSString *)str
{
[self beginEditing];
[backingStore replaceCharactersInRange:range withString:str];
[self edited:NSTextStorageEditedCharacters| NSTextStorageEditedAttributes range:range changeInLength:str.length - range.length];
textNeedsUpdate = YES;
[self endEditing];
}
- (void)setAttributes:(NSDictionary *)attrs range:(NSRange)range
{
[self beginEditing];
[backingStore setAttributes:attrs range:range];
[self edited:NSTextStorageEditedAttributes range:range changeInLength:0];
[self endEditing];
}
- (void)performReplacementsForCharacterChangeInRange: (NSRange)changedRange
{
NSRange extendedRange = NSUnionRange(changedRange, [[self string] lineRangeForRange:NSMakeRange(changedRange.location, 0)]);
extendedRange = NSUnionRange(changedRange, [[self string] lineRangeForRange:NSMakeRange(NSMaxRange(changedRange), 0)]);
[self applyTokenAttributesToRange:extendedRange];
}
-(void)processEditing
{
if(textNeedsUpdate)
{
textNeedsUpdate = NO;
[self performReplacementsForCharacterChangeInRange:[self editedRange]];
}
[super processEditing];
}
The last method in the subclassed NSTextStore applies the actual tokens that will be set using a property on the NSTextStore to the string. The tokens are passed as an NSDictionary, which defines the substring they should be applied for. When the substring is detected using theenumerateSubstringsInRange: method, the attribute is applied using the previous addAttribute:range: method. This system also allows for default tokens to be set when a specific attribute has not been set.
- (void)applyTokenAttributesToRange:(NSRange)searchRange
{
NSDictionary *defaultAttributes = [self.tokens objectForKey:defaultTokenName];
[[self string] enumerateSubstringsInRange:searchRange options:NSStringEnumerationByWords usingBlock:^(NSString *substring, NSRange substringRange, NSRange enclosingRange, BOOL *stop)
{
NSDictionary *attributesForToken = [self.tokens objectForKey:substring];
if(!attributesForToken)
{
attributesForToken = defaultAttributes;
}
[self addAttributes:attributesForToken range:substringRange];
}];
}
After the subclass of NSTextStore is written, modifying text itself becomes fairly trivial, the results of which are shown in Figure 21.4. A new instance of the customized text store is allocated and initialized, followed by a new instance of NSLayoutManager, and lastly anNSTextContainer is created. The text container is set to share its frame and bounds with the text view, and is then added to the layoutManager. The text store then adds the layout manager.
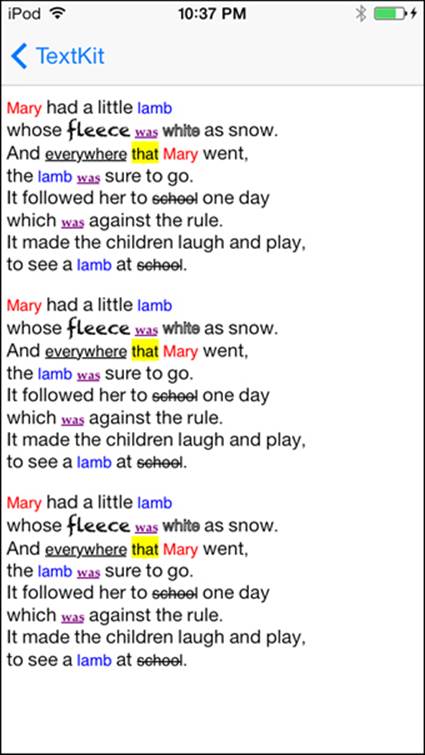
Figure 21.4 Content Specific Highlighting showing updated attributes for several keywords.
A new NSTextView is created and set to the frame of the view, and its text container is set to the previously created one. Next, the auto-resizing mask for the text view is configured to be scalable for screen sizes and other adjustments. Finally, scrolling and keyboard behavior for the text view are configured, and the text view is added as a subview of the main view.
The tokens property of the customized text field is used to set a dictionary of dictionaries for the attributes to be assigned to each substring encountered. The first example, "Mary", will set the NSForegroundColorAttributeName attribute to red. A complete list of attributes was given earlier in Table 21.1. The sample demonstrates multiple types of attributes on various keywords. The example for "was" shows how to add multiple attributes together using a custom font, color, and underlining the text. A default token is also set that specifies how text not specifically assigned will be displayed.
After the attributes have been set, some static text is added to the text view in the form of the poem “Mary Had a Little Lamb;” the resulting attributed text appears in Figure 21.4. Typing into the text view will update the attributes in real time and can be seen by typing out any of the substrings in which special attributes were configured.
- (void)viewDidLoad
{
[super viewDidLoad];
ICFDynamicTextStorage *textStorage = [[[ICFDynamicTextStorage alloc] init] autorelease];
NSLayoutManager *layoutManager = [[[NSLayoutManager alloc] init] autorelease];
NSTextContainer *container = [[[NSTextContainer alloc] initWithSize:CGSizeMake(myTextView.frame.size.width, CGFLOAT_MAX)] autorelease];
container.widthTracksTextView = YES;
[layoutManager addTextContainer:container];
[textStorage addLayoutManager:layoutManager];
myTextView = [[[UITextView alloc] initWithFrame:self.view.frame textContainer:container] autorelease];
myTextView.autoresizingMask = UIViewAutoresizingFlexibleHeight | UIViewAutoresizingFlexibleWidth;
myTextView.scrollEnabled = YES;
myTextView.keyboardDismissMode =
UIScrollViewKeyboardDismissModeOnDrag;
[self.view addSubview:myTextView];
textStorage.tokens = @{ @"Mary":@{ NSForegroundColorAttributeName: [UIColor redColor]}, @"lamb":@{ NSForegroundColorAttributeName:[UIColor blueColor]}, @"everywhere":@{ NSUnderlineStyleAttributeName:@1}, @"that":@{NSBackgroundColorAttributeName : [UIColor yellowColor]}, @"fleece":@{NSFontAttributeName:[UIFont fontWithName:@"Chalkduster" size:14.0f]}, @"school":@{NSStrikethroughStyleAttributeName:@1}, @"white":@{NSStrokeWidthAttributeName:@5}, @"was":@{NSFontAttributeName:[UIFont fontWithName:@"Palatino-Bold"size:10.0f], NSForegroundColorAttributeName:[UIColor purpleColor], NSUnderlineStyleAttributeName:@1}, defaultTokenName:@{ NSForegroundColorAttributeName : [UIColor blackColor], NSFontAttributeName: [UIFont systemFontOfSize:14.0f], NSUnderlineStyleAttributeName : @0, NSBackgroundColorAttributeName : [UIColor whiteColor], NSStrikethroughStyleAttributeName : @0, NSStrokeWidthAttributeName : @0}};
NSString *maryText = @"Mary had a little lamb\nwhose fleece was white as snow.\nAnd everywhere that Mary went,\nthe lamb was sure to go.\nIt followed her to school one day\nwhich was against the rule.\nIt made the children laugh and play,\nto see a lamb atschool.";
[myTextView setText:[NSString stringWithFormat:@"%@\n\n%@\n\n%@", maryText, maryText, maryText]];
}
Changing Font Settings with Dynamic Type
iOS 7 added support for Dynamic Type, which enables the user to specify a font size at an OS level. Users can access the Dynamic Type controls under the general section of iOS 7’s Settings.app (shown in Figure 21.5). When the user changes the preferred font size, the app will receive a notification named UIContentSizeCategoryDidChangeNotification. This notification should be monitored to handle updating the font size.
[[NSNotificationCenter defaultCenter] addObserver:self selector:@selector(preferredSizeDidChange:) name:UIContentSizeCategoryDidChangeNotification object:nil];
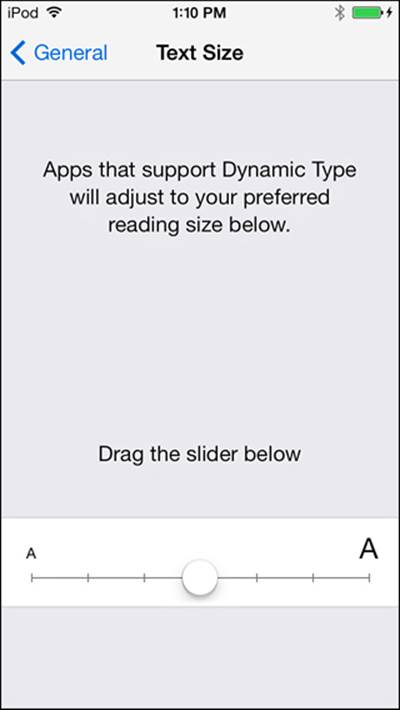
Figure 21.5 Changing the systemwide font size using Dynamic Type settings in iOS 7’s Settings.app.
To display text at the user’s preferred font settings, the font should be set using one of the attributes from Font Text Styles, which are described in Table 21.2.
self.textLabel.font = [UIFont preferredFontForTextStyle:UIFontTextStyleBody];
This will return a properly sized font based on the user settings.
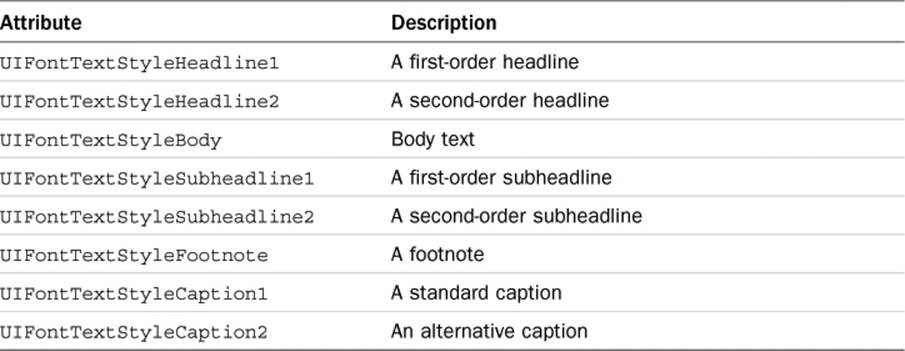
Table 21.2 Font Text Styles as Defined in iOS 7
Summary
Text rendering on iOS is a deep and complex topic made vastly easier with the introduction of TextKit. This chapter merely broke the surface of what is possible with TextKit and text rendering in general. Hopefully it has created a topic not nearly as intimidating as text render has been in the past.
Several examples were explored in this chapter, from hit detection to working with attributed strings. In addition, the building blocks that make up text rendering objects should now be much clearer. Although text rendering is a vast topic, worthy of its own dedicated book, the information in this chapter should provide a strong foot forward.
Exercises
1. Modify the Exclusion Paths demo to add a pan gesture to allow the image to be dragged around the screen and update the exclusion paths in real time.
2. Explore the Content Specific Highlighting in more depth, and see how different attributes discussed in Table 21.1 work together. Add the capability to detect a username beginning with an @ symbol and color or otherwise denote it.