iOS Components and Frameworks: Understanding the Advanced Features of the iOS SDK (2014)
Chapter 22. Gesture Recognizers
What if an app needed a quick and easy way to handle taps, swipes, pinches, and rotations? Back in the Dark Ages (before the iPad was released), a developer had to subclass UIView, implement the touchesBegan:/touchesMoved:/touchesEnded: methods, and write custom logic to determine when any of these actions was taking place. It could take all day!
Apple introduced UIGestureRecognizers to address this need with iOS 3.2 when the original iPad was released. UIGestureRecognizer is an abstract class that puts a common architecture around handling gestures. There are several concrete implementations to handle the everyday gestures that are commonly used, and even subclassing guidelines to create your own gestures using the same architecture. With these new classes, complex gesture handling can be implemented much more quickly than in the past.
Types of Gesture Recognizers
Gesture recognizers fall into two general categories, as defined by Apple:
![]() Discrete: Discrete gesture recognizers are intended to handle cases in which the interaction is quick and simple, like a tap. In that case, the app really needs to know only that the tap occurred, and then can complete the desired action.
Discrete: Discrete gesture recognizers are intended to handle cases in which the interaction is quick and simple, like a tap. In that case, the app really needs to know only that the tap occurred, and then can complete the desired action.
![]() Continuous: Continuous gesture recognizers handle cases in which the interaction needs to keep getting information as the gesture proceeds, as in a pinch or rotation. In those cases, the app will likely require information during the interaction to handle UI changes. For example, it might need to know how far a user has pinched so that it can resize a view accordingly, or it might want to know how far a user has rotated her fingers and rotate a view to match.
Continuous: Continuous gesture recognizers handle cases in which the interaction needs to keep getting information as the gesture proceeds, as in a pinch or rotation. In those cases, the app will likely require information during the interaction to handle UI changes. For example, it might need to know how far a user has pinched so that it can resize a view accordingly, or it might want to know how far a user has rotated her fingers and rotate a view to match.
Six predefined gesture recognizers are available, as listed in Table 22.1. They are actually versatile, and can handle pretty much all the standard touch interactions that are familiar in iOS.
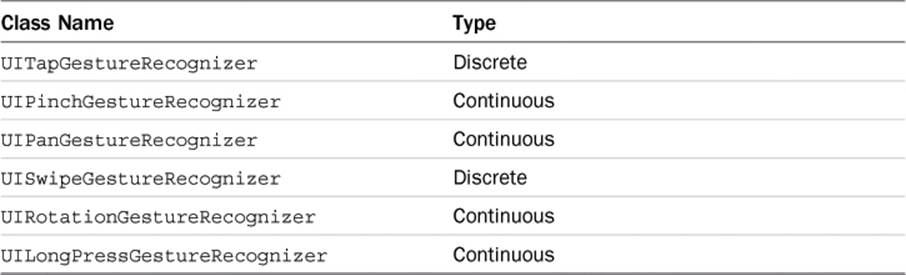
Table 22.1 List of Built-In UIGestureRecognizers
Basic Gesture Recognizer Usage
A basic gesture recognizer is simple to set up. Typically, a gesture recognizer would be set up in a view controller where there is visibility to the view of interest, and a logical place to put a method that can accomplish what is wanted. All that needs to be determined is what view the tap recognizer should belong to, and what method should be called when the recognizer has succeeded.
UITapGestureRecognizer *tapRecognizer =
[[UITapGestureRecognizer alloc] initWithTarget:self
action:@selector(myGestureViewTapped:)];
[myGestureView addGestureRecognizer:tapRecognizer];
[tapRecognizer release];
Some gesture recognizers will accept more parameters to refine how they act, but for the most part, all that is needed is a view and a method to get going. When the gesture has been recognized in the specified view, the method will get called with a reference to the gesture recognizer if desired.
Introduction to the Sample App
The sample app for this chapter is called Gesture Playground. It has only one view, called myGestureView (shown in Figure 22.1), which will be manipulated by the gestures as they are introduced in the chapter. All the code needed is present in the project; certain sections will need to be commented or uncommented as described to see each gesture. To get started, open the project in Xcode.

Figure 22.1 View of Gesture Playground’s view controller in Interface Builder.
Tap Recognizer in Action
The code to set up the tap gesture recognizer is in the viewDidLoad method in the sample app’s view controller.
Now, all that is left to do is something interesting after a tap is received—let’s just present a UIAlertView, as follows:
(void)myGestureViewTapped:(UIGestureRecognizer *)tapGestureRecognizer
{
UIAlertView *alert = [[UIAlertView alloc] initWithTitle:@"Tap
Received"
message:@"Received tap in myGestureView"
delegate:nil
cancelButtonTitle:@"OK Thanks"
otherButtonTitles:nil];
[alert show];
[alert release];
}
Run the project and tap the view. An alert view will be presented, as shown in Figure 22.2.
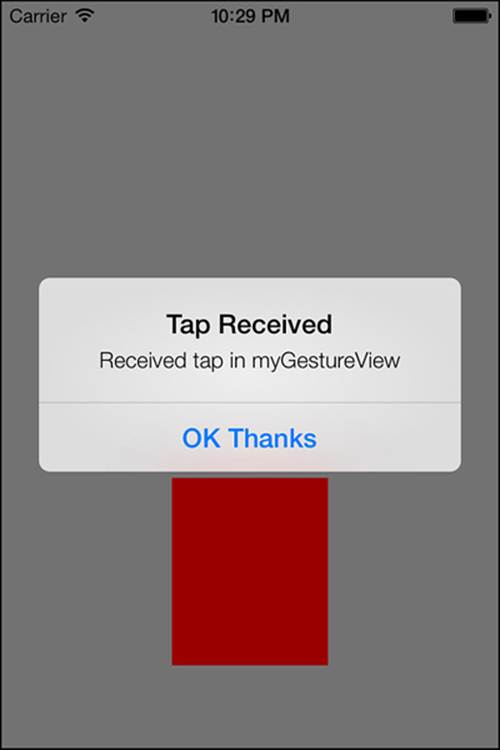
Figure 22.2 Single tap received.
Try tapping around the outside of the view. Notice that the alert view does not get displayed unless a tap actually occurs in the view.
Tap Recognizer Versus Button
So why couldn’t a button be used for that? It’s quicker and easier, and could be set up in Interface Builder with no code! True. In a lot of cases, using a UIButton is the best approach. However, there are times when a tap recognizer is ideal. One example is when there are several input text fields that need to slide up and down with the keyboard, and you want to be able to tap anywhere to dismiss the keyboard. If you place all the fields in a UIView, a tap recognizer can be added to that view to easily dismiss the keyboard.
Pinch Recognizer in Action
The tap recognizer was pretty simple. Now, let’s do something more interesting with a pinch recognizer. A pinch recognizer will be set up to resize myGestureView. In the viewDidLoad method for the view controller, comment out the code that sets up the tap gesture, and uncomment the following code to set up the pinch gesture recognizer:
UIPinchGestureRecognizer *soloPinchRecognizer =
[[UIPinchGestureRecognizer alloc] initWithTarget:self
action:@selector(myGestureViewSoloPinched:)];
[myGestureView addGestureRecognizer:soloPinchRecognizer];
[soloPinchRecognizer release];
Next, create the method specified as the target for the pinch recognizer. Note that the method will have to inspect the pinch gesture recognizer to know how far a user has pinched. Happily, iOS will pass a reference to the gesture recognizer to your method, so an instance variable or property is not needed to store it. UIPinchGestureRecognizer instances also have a method called scale, which turns out to be perfect for setting up a scale affine transform on your view:
- (void)myGestureViewSoloPinched:(UIPinchGestureRecognizer
*)pinchGesture {
CGFloat pinchScale = [pinchGesture scale];
CGAffineTransform scaleTransform =
CGAffineTransformMakeScale(pinchScale, pinchScale);
[myGestureView setTransform:scaleTransform];
}
Run the project, pinch in and out over the view, and note that it resizes with the pinch.
Note
To perform a two-finger pinch in the iOS Simulator, hold down the Option key and notice that two circles appear, which represent fingers. As the mouse pointer is moved, the fingers will get closer or farther apart. The center point between the fingers will be the center of the app’s view. In Gesture Playground, this is a little inconvenient, because myGestureView is near the bottom of the screen. To reposition the center point, just hold down the Shift key while still holding the Option key and move the mouse pointer.
What if the view is small and hard to pinch on? Add the gesture recognizer to the parent view, and it will pick up the pinch anywhere in that view. Just change the setup like so:
UIPinchGestureRecognizer *soloPinchRecognizer =
[[UIPinchGestureRecognizer alloc] initWithTarget:self
action:@selector(myGestureViewSoloPinched:)];
//[myGestureView addGestureRecognizer:soloPinchRecognizer];
[[self view] addGestureRecognizer:soloPinchRecognizer];
[soloPinchRecognizer release];
Run the project, and notice that you can pinch anywhere in the app and your view will scale. That is one of gesture recognizer’s underrated features: the capability to easily decouple the touch action from the view that you want to affect. A touch can be detected anywhere in the app, and the touch data can be used or transformed to affect other views. To be more precise with this method, the touch location for the gestures can be examined using the locationInView: method, to determine whether it is close enough to the view to process.
Multiple Recognizers for a View
There are times when more than one recognizer will be needed on a view; for example, if the user wants to be able to scale and rotate myGestureView at the same time. To illustrate this, add a rotation gesture recognizer to see how it interacts with a pinch gesture recognizer. In the Gesture Playground sample app, view controller viewDidLoad method, comment out the current code to set up the pinch gesture recognizer. Then uncomment the following code to set up both the pinch recognizer and the rotation gesture recognizer:
UIPinchGestureRecognizer *pinchRecognizer =
[[UIPinchGestureRecognizer alloc] initWithTarget:self
action:@selector(myGestureViewPinched:)];
//[pinchRecognizer setDelegate:self];
[myGestureView addGestureRecognizer:pinchRecognizer];
[pinchRecognizer release];
UIRotationGestureRecognizer *rotateRecognizer =
[[UIRotationGestureRecognizer alloc] initWithTarget:self
action:@selector(myGestureViewRotated:)];
//[rotateRecognizer setDelegate:self];
[myGestureView addGestureRecognizer:rotateRecognizer];
[rotateRecognizer release];
Now, to handle both rotation and scaling at the same time, a new method to build a concatenated affine transform to apply to our view is needed. For that method to work, the last and current scale and rotation factors will need to be stored so that nothing is lost between gestures. Notice that these properties have been established in the view controller.
@property (nonatomic, assign) CGFloat scaleFactor;
@property (nonatomic, assign) CGFloat rotationFactor;
@property (nonatomic, assign) CGFloat currentScaleDelta;
@property (nonatomic, assign) CGFloat currentRotationDelta;
Back in viewDidLoad, initialize the scaleFactor and rotationFactor: to prevent flickering when the view is initially resized.
[self setScaleFactor:1.0];
[self setRotationFactor:0.0];
Set up the method to handle the rotation recognizer, which conveniently has a property called rotation to let you know how far the user has rotated his fingers:
- (void)myGestureViewRotated:(UIRotationGestureRecognizer *)rotateGesture {
CGFloat newRotateRadians = [rotateGesture rotation];
[self updateViewTransformWithScaleDelta:0.0 andRotationDelta:newRotateRadians];
if ([rotateGesture state] == UIGestureRecognizerStateEnded) {
CGFloat saveRotation = [selfrotationFactor] +
newRotateRadians;
[self setRotationFactor:saveRotation];
[self setCurrentRotationDelta:0.0];
}
}
This method will get the amount of rotation from the gesture recognizer, expressed in radians. It will then call a custom method to create a scale and rotate affine transformation to apply to the view. If the touch is ended, the method will calculate the last rotation amount based on the current state and new rotation amount, and save it in the rotation factor property. Then the method will clear the calculated rotation delta amount—which is used to keep the rotation transformation from getting out of whack between touches. The method to create the scale and rotate transformation looks like this:
- (void)updateViewTransformWithScaleDelta:(CGFloat)scaleDelta andRotationDelta:(CGFloat)rotationDelta;
{
if (rotationDelta != 0) {
[self setCurrentRotationDelta:rotationDelta];
}
if (scaleDelta != 0) {
[self setCurrentScaleDelta:scaleDelta];
}
CGFloat scaleAmount = [self scaleFactor]+[self currentScaleDelta];
CGAffineTransform scaleTransform =
CGAffineTransformMakeScale(scaleAmount, scaleAmount);
CGFloat rotationAmount =
[self rotationFactor]+[self currentRotationDelta];
CGAffineTransform rotateTransform =
CGAffineTransformMakeRotation(rotationAmount);
CGAffineTransform newTransform =
CGAffineTransformConcat(scaleTransform, rotateTransform);
[myGestureView setTransform:newTransform];
}
This method will properly account for scale changes and rotation changes from touches. The method will check to see whether the amount of scale or rotation change is not equal to zero, since the gesture recognizer will return the scale or rotation as the amount of change from where the touch began. That amount is called the delta. Since the view should maintain its current state when a touch begins, the method cannot immediately apply the reported touch delta; rather, it must add the delta to the current state to prevent the view from jumping around.
Run Gesture Playground, touch with two fingers and rotate, and watch how the view turns. Also note that pinching still works, but that pinching and rotating at the same time does not. We will explain that later in the chapter. First a bit more about how gesture recognizers handle touches.
Gesture Recognizers: Under the Hood
Now that basic gesture recognizers have been demonstrated in action and the first issue has been encountered with them, it is a good time to walk through, in a little more detail, how gesture recognizers work.
The first thing to understand is that gesture recognizers operate outside the normal view responder chain. The UIWindow will send touch events to gesture recognizers first, and they must indicate that they cannot handle the event in order for touches to get forwarded to the view responder chain by default.
Next, it is important to understand the basic sequence of events that takes place when an app is trying to determine whether a gesture has been recognized:
The window will send touch events to gesture recognizer(s).
The gesture recognizer will enter UIGestureRecognizerStatePossible state.
For discrete gestures, the gesture recognizer will determine whether the gesture is UIGestureRecognizerStateRecognized or UIGestureRecognizerStateFailed.
If it is UIGestureRecognizerStateRecognized, the gesture recognizer consumes that touch event and calls the delegate method specified.
If it is UIGestureRecognizerStateFailed, the gesture recognizer forwards the touch event back to the responder chain.
For continuous gestures, the gesture recognizer will determine whether the gesture is UIGestureRecognizerStateBegan or UIGestureRecognizerStateFailed.
If the gesture is UIGestureRecognizerStateBegan, the gesture recognizer consumes the touch events and calls the delegate method specified. It will then update to UIGestureRecognizerStateChanged every time there is a change in the gesture and keep calling the delegate method until the last touch ends, at which point it will become UIGestureRecognizerStateEnded. If the touch pattern no longer matches the expected gesture, it can change to UIGestureRecognizerStateCancelled.
If it is UIGestureRecognizerStateFailed, the gesture recognizer forwards the touch event(s) back to the responder chain.
It is important to note that the time elapsed between UIGestureRecognizerStatePossible and UIGestureRecognizerStateFailed states can be significant and noticeable. If there is a gesture recognizer in the user interface that is experiencing an unexplained slowdown with touches, that is a good place to look. The best approach is to add logging into the gesture handling methods—log the method and state each time the method is called. Then, there will be a clear picture of the state transitions with timestamps from the logging so that it is clear where any delays are taking place.
Multiple Recognizers for a View: Redux
Now that the chapter has explained how the gesture recognizers receive and handle touches, it is clear that only one of the gesture recognizers is receiving and handling touches at a time. To get them both to handle touches simultaneously, there is a UIGestureRecognizerDelegateprotocol that can be implemented to have a little more control over how touches are delivered to gesture recognizers. This protocol specifies three methods:
![]() (BOOL)gestureRecognizerShouldBegin:(UIGestureRecognizer *)gestureRecognizer: Use this method to indicate whether the gesture recognizer should transition from UIGestureRecognizerStatePossible toUIGestureRecognizerStateBegan, depending on the state of the application. If YES is returned, the gesture recognizer will proceed; otherwise, it will transition to UIGestureRecognizerStateFailed.
(BOOL)gestureRecognizerShouldBegin:(UIGestureRecognizer *)gestureRecognizer: Use this method to indicate whether the gesture recognizer should transition from UIGestureRecognizerStatePossible toUIGestureRecognizerStateBegan, depending on the state of the application. If YES is returned, the gesture recognizer will proceed; otherwise, it will transition to UIGestureRecognizerStateFailed.
![]() (BOOL)gestureRecognizer:(UIGestureRecognizer *)gestureRecognizer shouldReceiveTouch:(UITouch *)touch: Use this method to indicate whether the gesture recognizer should receive a touch. This provides the opportunity to prevent a gesture recognizer from receiving a touch based on developer-defined criteria.
(BOOL)gestureRecognizer:(UIGestureRecognizer *)gestureRecognizer shouldReceiveTouch:(UITouch *)touch: Use this method to indicate whether the gesture recognizer should receive a touch. This provides the opportunity to prevent a gesture recognizer from receiving a touch based on developer-defined criteria.
![]() (BOOL)gestureRecognizer:(UIGestureRecognizer *)gestureRecognizer shouldRecognizeSimultaneouslyWithGestureRecognizer:(UIGestureRecognizer *)otherGestureRecognizer: Use this method when there is more than one gesture recognizer that should simultaneously receive touches. Return YES to have everything operate simultaneously, or test the incoming gesture recognizers to decide whether they meet criteria for simultaneous handling.
(BOOL)gestureRecognizer:(UIGestureRecognizer *)gestureRecognizer shouldRecognizeSimultaneouslyWithGestureRecognizer:(UIGestureRecognizer *)otherGestureRecognizer: Use this method when there is more than one gesture recognizer that should simultaneously receive touches. Return YES to have everything operate simultaneously, or test the incoming gesture recognizers to decide whether they meet criteria for simultaneous handling.
To get the gestures to handle touches simultaneously in Gesture Playground, implement the shouldRecognizeSimultaneously... method:
- (BOOL)gestureRecognizer:(UIGestureRecognizer *)gestureRecognizer
shouldRecognizeSimultaneouslyWithGestureRecognizer:
(UIGestureRecognizer *)otherGestureRecognizer
{
return YES;
}
Be sure to set the delegate for each of the gesture recognizers, by uncommenting the setDelegate calls in the project.
UIPinchGestureRecognizer *pinchRecognizer =
[[UIPinchGestureRecognizer alloc] initWithTarget:self
action:@selector(myGestureViewPinched:)];
[pinchRecognizer setDelegate:self];
[[self view] addGestureRecognizer:pinchRecognizer];
[pinchRecognizer release];
UIRotationGestureRecognizer *rotateRecognizer =
[[UIRotationGestureRecognizer alloc] initWithTarget:self
action:@selector(myGestureViewRotated:)];
[rotateRecognizer setDelegate:self];
[[self view] addGestureRecognizer:rotateRecognizer];
[rotateRecognizer release];
Then, run Gesture Playground and touch with two fingers to pinch and rotate. The view will now resize and rotate smoothly (see Figure 22.3).
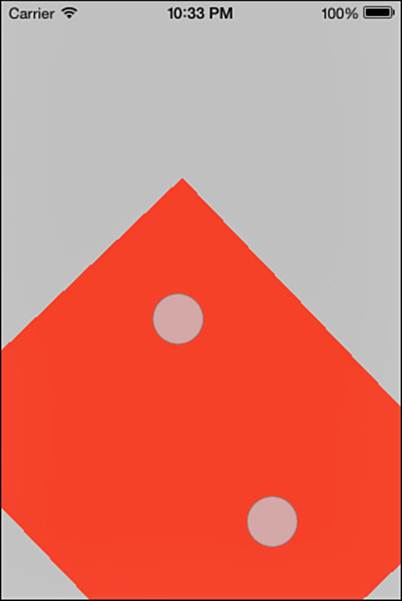
Figure 22.3 Simultaneously rotating and scaling.
Requiring Gesture Recognizer Failures
In some cases, a gesture recognizer needs to fail in order to meet an app’s requirements. A great example is when a tap and a double tap need to work on the same view. By default, if a single-tap gesture recognizer and a double-tap gesture recognizer are attached to the same view, the single-tap recognizer will fire even if a double tap occurs—so both the single-tap and the double-tap target methods will get called. To see this in action, comment out the initial tap recognizer in viewDidLoad in the sample project.
/*
UITapGestureRecognizer *tapRecognizer =
[[UITapGestureRecognizer alloc] initWithTarget:self
action:@selector(myGestureViewTapped:)];
[myGestureView addGestureRecognizer:tapRecognizer];
[tapRecognizer release];
*/
Then, in viewDidLoad uncomment out the following lines:
UITapGestureRecognizer *doubleTapRecognizer =
[[UITapGestureRecognizer alloc] initWithTarget:self
action:@selector(myGestureViewDoubleTapped:)];
[doubleTapRecognizer setNumberOfTapsRequired:2];
[myGestureView addGestureRecognizer:doubleTapRecognizer];
UITapGestureRecognizer *singleTapRecognizer =
[[UITapGestureRecognizer alloc] initWithTarget:self
action:@selector(myGestureViewTapped:)];
//[singleTapRecognizer requireGestureRecognizerToFail:doubleTapRecognizer];
[myGestureView addGestureRecognizer:singleTapRecognizer];
[singleTapRecognizer release];
[doubleTapRecognizer release];
Note that the handling methods now being called in the project are using NSLog statements for illustration instead of UIAlertView, which will block the UI.
- (void)myGestureViewSingleTapped:(UIGestureRecognizer *)tapGestureRecognizer {
NSLog(@"Single Tap Received");
}
- (void)myGestureViewDoubleTapped:(UIGestureRecognizer *)doubleTapGestureRecognizer {
NSLog(@"Double Tap Received");
}
Both the single-tap and the double-tap methods get called with a double tap:
2012-02-29 15:53:51.460 Gesture Playground[7911:fe03] Single Tap Received
2012-02-29 15:53:51.644 Gesture Playground[7911:fe03] Double Tap Received
If that is not desired, the double-tap recognizer would need to fail before calling the single-tap target method. There is a method on UIGestureRecognizer called requireGestureRecognizerToFail. To prevent both from firing, carry out these steps:
1. Set up the double-tap recognizer.
2. Set up the single-tap recognizer.
3. Call requireGestureRecognizerToFail from the single-tap recognizer, passing the double-tap recognizer as the parameter.
Here is the code (just uncomment the requireGestureRecognizerToFail line):
UITapGestureRecognizer *doubleTapRecognizer =
[[UITapGestureRecognizer alloc] initWithTarget:self
action:@selector(myGestureViewDoubleTapped:)];
[doubleTapRecognizer setNumberOfTapsRequired:2];
[myGestureView addGestureRecognizer:doubleTapRecognizer];
UITapGestureRecognizer *singleTapRecognizer =
[[UITapGestureRecognizer alloc] initWithTarget:self
action:@selector(myGestureViewTapped:)];
[singleTapRecognizer requireGestureRecognizerToFail:doubleTapRecognizer];
[myGestureView addGestureRecognizer:singleTapRecognizer];
[singleTapRecognizer release];
[doubleTapRecognizer release];
Try it with a double tap first, and the single-tap method no longer fires on a double tap.
2012-02-29 16:00:11.854 Gesture Playground[7965:fe03] Double Tap Received
Custom UIGestureRecognizer Subclasses
When an app needs to recognize a gesture that falls outside of the standard gestures provided by Apple, UIGestureRecognizer needs to be subclassed. The first decision to be made is whether the custom recognizer should follow the discrete or continuous pattern. With that in mind, the subclass will need to implement the following methods:
- (void)reset;
- (void)touchesBegan:(NSSet *)touches withEvent:(UIEvent *)event;
- (void)touchesMoved:(NSSet *)touches withEvent:(UIEvent *)event;
- (void)touchesEnded:(NSSet *)touches withEvent:(UIEvent *)event;
- (void)touchesCancelled:(NSSet *)touches withEvent:(UIEvent *)event;
In the subclass, build logic in the touchesBegan:/touchesMoved:/touchesEnded: methods that recognize the gesture, and then update the subclass to the right state as the touches proceed. Remember to set the state to UIGestureRecognizerStateFailed as soon as possible to avoid UI delays, and to check the state in those methods to avoid doing any unnecessary logic. For example, if two touches are needed for the gesture, immediately fail in touchesBegan: if there are more or fewer touches. If the state is alreadyUIGestureRecognizerStateFailed, return immediately from touchesMoved: and touchesEnded:.
In the reset method, update any instance variables used to track the gesture to their initial state so that the recognizer is ready to go with the next touch.
Note
For more detail on creating UIGestureRecognizer subclasses, check out Apple’s Event Handling Guide for iOS: Gesture Recognizers athttps://developer.apple.com/library/ios/#DOCUMENTATION/EventHandling/Conceptual/EventHandlingiPhoneOS/GestureRecognizers/GestureRecognizers.html. It has all the detail needed, and links to the relevant class references as well.
Summary
In this chapter, gesture recognizers were introduced, including the difference between a discrete and a continuous gesture recognizer, as were the six gesture recognizers that are available in iOS. The chapter walked through basic usage of a gesture recognizer, and then dived into some more advanced use cases with multiple gesture recognizers. Lastly, the concept of a custom gesture recognizer was introduced.
At this point, the reader should be comfortable creating and using the built-in gesture recognizers, and exploring some of the features that were not discussed (for example, how to handle a three-finger swipe). The reader should also understand the basics of how gesture recognizers work under the hood, and be ready to attempt a custom subclass.
Exercise
Create a UIGestureRecognizer subclass that will recognize a Z gesture (like Zorro!). (Hint: This should be a discrete gesture, but you’ll need to have logic in all three touch methods to get it to work. Don’t forget your state changes!)