iOS Components and Frameworks: Understanding the Advanced Features of the iOS SDK (2014)
Chapter 23. Accessing Photo Libraries
All current iOS devices come with at least one camera capable of taking photos and videos. In addition, all iOS devices can sync photos from iTunes on a computer to the Photos app and organize them in albums and events. Before iOS 4, the only method for developers to access user photos was UIImagePickerController. This approach has some drawbacks; namely, you can select only one photo at a time, and you have no control over the appearance of the UI. With the addition of the AssetsLibrary classes, Apple provides much more robust access to the user’s photos, videos, albums, and events in your app.
Sample App
The sample app, Asset Navigator, is a minimal reproduction of the iOS Photos app. The sample app will display a table of all the albums available on the device, including the album name, number of photos, and videos included in the album, and a representative image. If you tap an album, it will show thumbnails of all the photos and videos in the album. Tapping a thumbnail will show a large representation of the photo. Before running the sample app, prepare your device by syncing some photos to it and taking some photos. That way, you will have photos in albums and the Camera Roll. If you use iCloud, turn on Photo Stream as well.
Note
To use the AssetsLibrary classes, add the AssetsLibrary framework to the project, and import the asset classes as needed.
The Assets Library
The Assets Library consists of a group of classes to navigate through the albums and photos on the device:
![]() ALAssetsLibrary: The base class for accessing all groups and assets. It provides methods for enumerating groups, directly accessing groups and assets with URLs, and writing new assets to the Saved Photos album. Any ALAsset or ALAssetsGroup instances accessed through an instance of ALAssetsLibrary are valid only while that instance of ALAssetsLibrary remains a valid object.
ALAssetsLibrary: The base class for accessing all groups and assets. It provides methods for enumerating groups, directly accessing groups and assets with URLs, and writing new assets to the Saved Photos album. Any ALAsset or ALAssetsGroup instances accessed through an instance of ALAssetsLibrary are valid only while that instance of ALAssetsLibrary remains a valid object.
![]() ALAssetsGroup: Represents a group of photos and videos. It can either be synced from a photo album in iTunes, or can be the user’s Camera Roll or Saved Photos album. It provides methods for enumerating assets in the group, displaying a poster image, filtering assets in the groups (ALAssetsFilter), and getting information about the group.
ALAssetsGroup: Represents a group of photos and videos. It can either be synced from a photo album in iTunes, or can be the user’s Camera Roll or Saved Photos album. It provides methods for enumerating assets in the group, displaying a poster image, filtering assets in the groups (ALAssetsFilter), and getting information about the group.
![]() ALAsset: Represents a photo or video. It provides methods to get available ALAssetRepresentation instances for the asset, thumbnails, and information about the asset, such as date, location, type, and orientation.
ALAsset: Represents a photo or video. It provides methods to get available ALAssetRepresentation instances for the asset, thumbnails, and information about the asset, such as date, location, type, and orientation.
![]() ALAssetRepresentation: An ALAsset can have more than one “representation” or format. For example, there might be a RAW version and a JPEG version of the same photo. This class represents one representation of an asset. It provides methods to get images (full resolution, full size, or sized to your specifications); raw data; and image information, such as scale, orientation, and filename.
ALAssetRepresentation: An ALAsset can have more than one “representation” or format. For example, there might be a RAW version and a JPEG version of the same photo. This class represents one representation of an asset. It provides methods to get images (full resolution, full size, or sized to your specifications); raw data; and image information, such as scale, orientation, and filename.
Note
Do not release your instance of ALAssetsLibrary until you are done with your Assets Library processing. Doing so will create some challenging bugs.
Enumerating Asset Groups and Assets
A common design pattern when dealing with ALAssetsLibrary is enumeration. Because the user’s permission is required to access asset groups and assets, you typically need to enumerate the groups and assets to put them in a data structure to use in your user interface. The sample app will enumerate the groups on the device first to gather information about them to present in ICFAssetLibraryViewController. To do this, create an instance of ALAssetsLibrary, and then call the method to enumerate groups.
ALAssetsLibrary *al =
[[[ALAssetsLibrary alloc] init] autorelease];
...
[al enumerateGroupsWithTypes:ALAssetsGroupAll
usingBlock:enumerateAssetGroupsBlock
failureBlock:assetGroupEnumErrorBlock];
Note
Many of the AssetsLibrary methods return void, and accept success and failure blocks. The reason for this is that these methods require explicit user permission, since the images can contain location information. So these methods all act asynchronously, and return the success block if permission is granted, or the failure block without permission.
Permissions
The first time an app tries to access the ALAssetsLibrary, the device will ask the user for permission (as shown in Figure 23.1).
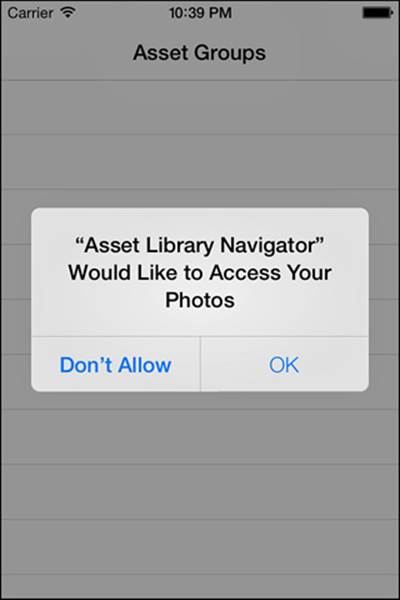
Figure 23.1 Access Permission dialog in the Asset Navigator sample app.
If permission is granted, the enumerateAssetGroupsBlock block will be executed; this is described in detail later in the section “Groups.” If permission is not granted, the assetGroupEnumErrorBlock block will be executed.
void (^assetGroupEnumErrorBlock)(NSError*) =
^(NSError* error) {
NSString *msgError =
@"Cannot access asset library groups. \n"
"Visit Privacy | Photos in Settings.app \n"
"to restore permission.";
UIAlertView* alertView =
[[UIAlertView alloc] initWithTitle:nil
message:msgError
delegate:self
cancelButtonTitle:@"OK"
otherButtonTitles:nil];
[alertView show];
[alertView release];
};
If the user denies permission to access the photo library, the alert view presented will explain to the user how to restore permission later if desired. To restore permissions, the user would need to navigate to the right spot in Settings.app (see Figure 23.2).
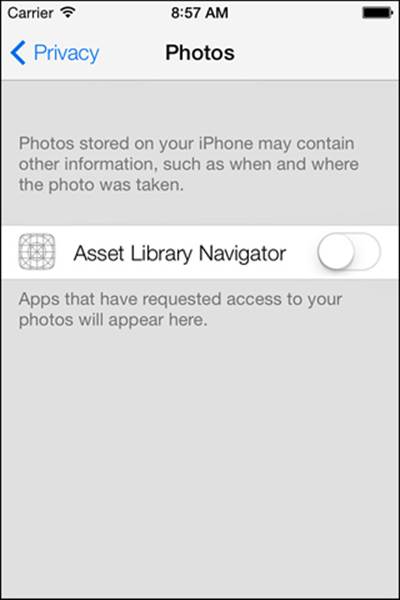
Figure 23.2 Settings.app: photo privacy.
When the user changes the setting, iOS will kill the sample app so that it will launch again rather than coming out of the background and requiring an adjustment to the new privacy setting.
Groups
When permission has been granted by the user, the enumerateAssetGroupsBlock block will be executed. The block will be executed on the main thread, but there is no guarantee when the block will be called since it might be waiting for permission. So any logic in that block needs to take that into consideration. The block signature accepts an instance of ALAssetsGroup and a pointer to a BOOL. If you want to immediately stop iterating, set the BOOL pointer stop to YES.
void (^enumerateAssetGroupsBlock)(ALAssetsGroup*, BOOL*) =
^(ALAssetsGroup* group, BOOL* stop)
{
if (group)
{
...
}
else
{
[self setAssetGroupArray:
[NSArray arrayWithArray:setupArray]];
[setupArray release];
[assetGroupTableView reloadData];
}
};
The block will be executed once for each available group, and then one additional time. So the method needs to check for an instance of ALAssetsGroup, since the last iteration of the block will be executed without one. In that case the method knows that the enumeration is complete, so the array used as the data source for the assetGroupTableView can be initialized using the setupArray.
The sample app will display several pieces of information about each group, such as the name of the group, the number of photos and videos in the group, and a representative image for the group. Capture each of those pieces of data from each group, and create an NSDictionary for each group to store in the table view data source array.
NSUInteger numAssets = [group numberOfAssets];
First, capture the number of assets in the group. This is the total number of photos and videos in that group.
Note
An asset can belong to more than one group, so adding up the photos and videos in the groups might not give you the true total number of photos and videos.
NSString *groupName =
[group valueForProperty:ALAssetsGroupPropertyName];
NSURL *groupURL =
[group valueForProperty:ALAssetsGroupPropertyURL];
NSString *groupLabelText =
[NSString stringWithFormat:@"%@ (%d)",groupName, numAssets];
Next, the sample app gets the name of the group and the URL for the group, and then formats the name with the number of assets for display. The URL will be used later to directly access the group without having to enumerate all of them.
UIImage *posterImage =
[UIImage imageWithCGImage:[group posterImage]];
The group exposes a poster image, which you can use as a representative thumbnail for the group. The posterImage is returned as a CGImageRef, which can be used to create an instance of UIImage.
[group setAssetsFilter:[ALAssetsFilter allPhotos]];
NSInteger groupPhotos = [group numberOfAssets];
[group setAssetsFilter:[ALAssetsFilter allVideos]];
NSInteger groupVideos = [group numberOfAssets];
NSString *info = @"%d photos, %d videos in group";
NSString *groupInfoText =
[NSString stringWithFormat:info, groupPhotos, groupVideos];
To determine how many videos and photos are in a group, use ALAssetsFilter. ALAssetsFilter provides three class methods to filter photos, videos, or all assets. To utilize the filter, call setAssetsFilter: on the group instance, and then call numberOfAssets to get the filtered number of assets. The group can be enumerated using a filter as well if only photos or videos are desired.
NSDictionary *groupDict =
@{kGroupLabelText: groupLabelText,
kGroupURL:groupURL,
kGroupPosterImage:posterImage,
kGroupInfoText:groupInfoText};
[setupArray addObject:groupDict];
After all the information about the group has been gathered, create an NSDictionary and add it to the setupArray. This will be the data source for the table view. After all the groups have been enumerated and all the data has been collected in the assetGroupArray, the table view is ready to display (see Figure 23.3).
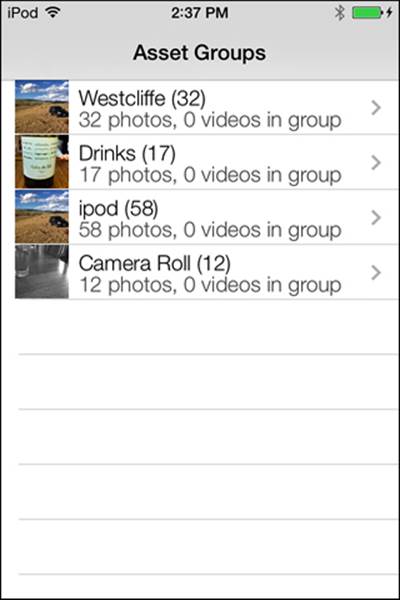
Figure 23.3 Asset Groups in the Asset Navigator sample app.
The sample app implements the UITableViewDataSource protocol method tableView:numberOfRowsInSection: to tell the UITableView to display one row per item in the assetGroupArray.
- (NSInteger)tableView:(UITableView *)tableView
numberOfRowsInSection:(NSInteger)section
{
NSInteger returnCount = 0;
if (assetGroupArray)
{
returnCount = [assetGroupArray count];
}
return returnCount;
}
The sample app implements the UITableViewDataSource protocol method tableView:cellForRowAtIndexPath: to populate group information in each cell.
- (UITableViewCell *)tableView:(UITableView *)tableView
cellForRowAtIndexPath:(NSIndexPath *)indexPath
{
NSString *cellID = @"ICFAssetLibraryTableCell";
ICFAssetLibraryTableCell *cell = (ICFAssetLibraryTableCell *)
[tableView dequeueReusableCellWithIdentifier:cellID];
NSDictionary *cellDict =
[assetGroupArray objectAtIndex:indexPath.row];
[cell.assetGroupNameLabel
setText:[cellDict objectForKey:kGroupLabelText]];
[cell.assetGroupInfoLabel
setText:[cellDict objectForKey:kGroupInfoText]];
[cell.assetGroupTopImageView
setImage:[cellDict objectForKey:kGroupPosterImage]];
return cell;
}
This will display the customized label including the group name and total number of images, the number of photos and videos in the group, and the poster image for the group.
When the user touches a group, the sample app will display all the assets for that group. Since the sample project uses storyboarding for navigation, a segue is set up from the table cell to the ICFAssetGroupViewController. The segue is named ViewAssetGroup (see Figure 23.4).
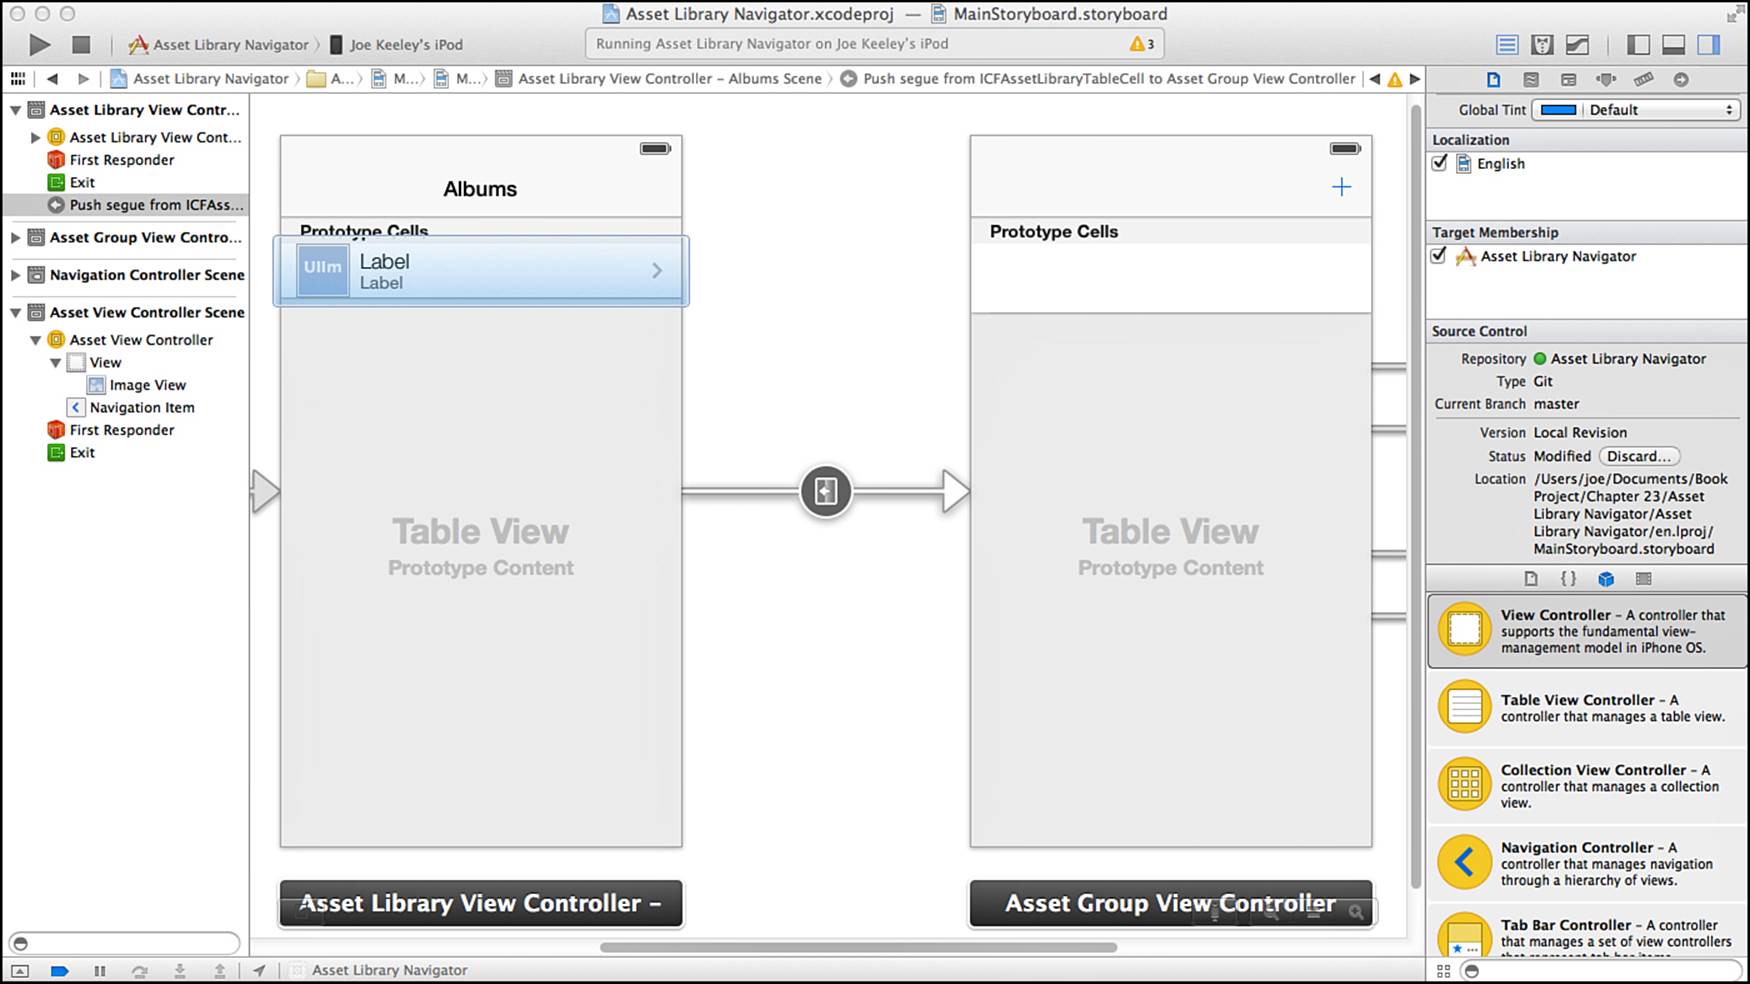
Figure 23.4 View Asset Group storyboard segue.
In ICFAssetLibaryViewController implement the prepareForSegue:sender: method to set up the destination view controller.
- (void)prepareForSegue:(UIStoryboardSegue *)segue
sender:(id)sender
{
if ([segue.identifier isEqualToString:@"ViewAssetGroup"])
{
NSIndexPath *indexPath =
[assetGroupTableView indexPathForSelectedRow];
NSDictionary *selectedDict =
[assetGroupArray objectAtIndex:indexPath.row];
[self setSelectedGroupURL:
[selectedDict objectForKey:kGroupURL]];
ICFAssetGroupViewController *aVC =
segue.destinationViewController;
[aVC setAssetGroupURL:[self selectedGroupURL]];
[aVC setAssetGroupName:
[selectedDict objectForKey:kGroupLabelText]];
[assetGroupTableView
deselectRowAtIndexPath:indexPath animated:NO];
}
}
In the prepareForSegue:sender: method, first check that the segue’s identifier is equal to ViewAssetGroup, since this method will be called for any segue set up for ICFAssetLibraryViewController. Then, determine the index path for the tapped row in the table—use the row to get the associated dictionary of group information. Set the group URL and group name in the destination view controller, and then deselect the tapped row so that it does not stay selected.
Assets
In the ICFAssetGroupViewController viewDidLoad method, start by displaying the group name as the view title, and set up an ALAssetsLibrary property so that it will be available throughout the life cycle of the view controller. Prepare an empty mutable array that will bepopulated with ALAsset instances. Also check whether the selected group is the Camera Roll; if so, enable the Add button so that the user can take a picture with the camera and see it.
- (void)viewDidLoad
{
[super viewDidLoad];
[self setTitle:self.assetGroupName];
NSRange cameraRollLoc =
[self.assetGroupName rangeOfString:@"Camera Roll"];
if (cameraRollLoc.location == NSNotFound)
{
[self.addButton setEnabled:NO];
}
ALAssetsLibrary *setupAssetsLibrary =
[[ALAssetsLibrary alloc] init];
[self setAssetsLibrary:setupAssetsLibrary];
[setupAssetsLibrary release];
NSMutableArray *setupArray = [[NSMutableArray alloc] init];
[self setAssetArray:setupArray];
[setupArray release];
[self retrieveAssetGroupByURL];
}
Next, retrieve the selected asset group using the URL provided. To retrieve the asset group by URL, you need to set up a result block and an error block. The result block accepts an ALAssetsGroup instance, and the error block accepts an NSError instance.
- (void)retrieveAssetGroupByURL
{
void (^retrieveGroupBlock)(ALAssetsGroup*) =
^(ALAssetsGroup* group)
{
if (group)
{
[self enumerateGroupAssetsForGroup:group];
}
else
{
NSLog(@"Error. Can't find group!");
}
};
void (^handleAssetGroupErrorBlock)(NSError*) =
^(NSError* error)
{
NSString *errMsg = @"Error accessing group";
UIAlertView* alertView =
[[UIAlertView alloc] initWithTitle:nil
message:errMsg
delegate:nil
cancelButtonTitle:@"OK"
otherButtonTitles:nil];
[alertView show];
[alertView release];
};
[self.assetsLibrary groupForURL:self.assetGroupURL
resultBlock:retrieveGroupBlock
failureBlock:handleAssetGroupErrorBlock];
}
If the group cannot be found, a log entry will be written to the console. If permission has been denied, the error block will present an alert view. If no error is encountered and the group is found, the block will call the enumerateAssetsForGroup: method.
- (void)enumerateGroupAssetsForGroup:(ALAssetsGroup *)group
{
NSInteger lastIndex = [group numberOfAssets] - 1;
void (^addAsset)(ALAsset*, NSUInteger, BOOL*) =
^(ALAsset* result, NSUInteger index, BOOL* stop)
{
if (result != nil)
{
[self.assetArray addObject:result];
}
if (index == lastIndex)
{
[self.assetTableView reloadData];
}
};
[group enumerateAssetsUsingBlock:addAsset];
}
In this method, you calculate the last index to know when it is time to reload the table view’s data. While the block enumerates the assets, add each ALAsset to the view controller’s assetArray property.
Displaying Assets
Asset Navigator will display the assets in a group in a UITableView, similar to the way that Apple’s Photos app does with four images per row. To do this, determine how many rows are needed.
- (NSInteger)tableView:(UITableView *)tableView
numberOfRowsInSection:(NSInteger)section
{
NSInteger returnCount = 0;
if (assetArray && ([assetArray count] > 0))
{
if ([assetArray count] % 4 == 0)
{
returnCount = ([assetArray count] / 4);
}
else
{
returnCount = ([assetArray count] / 4) + 1;
}
}
return returnCount;
}
If the number of assets in the group is evenly divisible by four, divide the number of assets by four. Otherwise, divide by four and add one to get the right number of rows. Since you are using integer division, you will always have at least one row.
When setting up the table view cells, you can safely assume with this logic that each row will have at least one image. A custom UITableViewCell subclass is used, called ICFAssetGroupTableCell. This custom table cell has four images and four buttons:
- (UITableViewCell *)tableView:(UITableView *)tableView
cellForRowAtIndexPath:(NSIndexPath *)indexPath
{
NSString *cellID = @"ICFAssetGroupTableCell";
ICFAssetGroupTableCell *cell = (ICFAssetGroupTableCell *)
[tableView dequeueReusableCellWithIdentifier:cellID];
ALAsset *firstAsset =
[assetArray objectAtIndex:indexPath.row * 4];
[cell.assetButton1 setImage:
[UIImage imageWithCGImage:[firstAsset thumbnail]]
forState:UIControlStateNormal];
[cell.assetButton1 setTag:indexPath.row * 4];
if (indexPath.row * 4 + 1 < [assetArray count])
{
ALAsset *secondAsset =
[assetArray objectAtIndex:indexPath.row * 4 + 1];
[cell.assetButton2 setImage:
[UIImage imageWithCGImage:[secondAsset thumbnail]]
forState:UIControlStateNormal];
[cell.assetButton2 setTag:indexPath.row * 4 + 1];
[cell.assetButton2 setEnabled:YES];
}
else
{
[cell.assetButton2 setImage:nil
forState:UIControlStateNormal];
[cell.assetButton2 setEnabled:NO];
}
if (indexPath.row * 4 + 2 < [assetArray count])
{
ALAsset *thirdAsset =
[assetArray objectAtIndex:indexPath.row * 4 + 2];
[cell.assetButton3 setImage:
[UIImage imageWithCGImage:[thirdAsset thumbnail]]
forState:UIControlStateNormal];
[cell.assetButton3 setTag:indexPath.row * 4 + 2];
[cell.assetButton3 setEnabled:YES];
}
else
{
[cell.assetButton3 setImage:nil
forState:UIControlStateNormal];
[cell.assetButton3 setEnabled:NO];
}
if (indexPath.row * 4 + 3 < [assetArray count])
{
ALAsset *fourthAsset =
[assetArray objectAtIndex:indexPath.row * 4 + 3];
[cell.assetButton4 setImage:
[UIImage imageWithCGImage:[fourthAsset thumbnail]]
forState:UIControlStateNormal];
[cell.assetButton4 setTag:indexPath.row * 4 + 3];
[cell.assetButton4 setEnabled:YES];
}
else
{
[cell.assetButton4 setImage:nil
forState:UIControlStateNormal];
[cell.assetButton4 setEnabled:NO];
}
return cell;
}
For the second, third, and fourth images, check to see whether the assetArray has an entry. If so, set the image from the ALAsset, enable the button, and set the tag to the index of the asset; otherwise, set the corresponding image to nil and disable the button. Note that ALAsset has a method called thumbnail that returns a CGImageRef. This method returns a 75-pixel-by-75-pixel thumbnail. You can use this to create a UIImage and populate the UIImageView in the cell (see Figure 23.5).
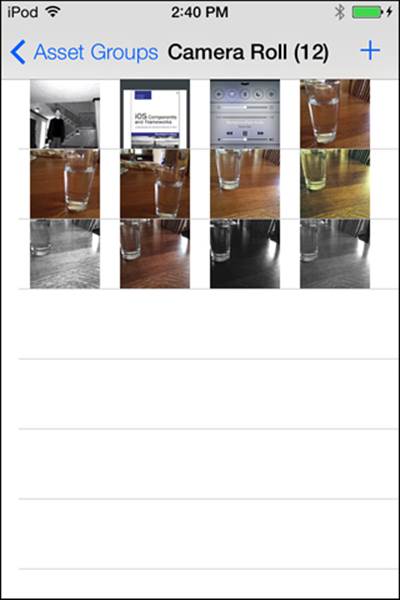
Figure 23.5 Asset Groups: Camera Roll.
Next, you need to set up navigation to the full-screen view for an asset. Since the sample project uses storyboarding for navigation, a segue is set up from each of the four buttons in the table cell to the ICFAssetViewController. The segues are named ViewAssetImage (see Figure 23.6).
Figure 23.6 View Asset Image storyboard segue.
In ICFAssetGroupViewController implement the prepareForSegue: method.
- (void)prepareForSegue:(UIStoryboardSegue *)segue
sender:(id)sender
{
if ([segue.identifier isEqualToString:@"ViewAssetImage"])
{
NSInteger indexForAsset = [sender tag];
ALAsset *selectedAsset =
[assetArray objectAtIndex:indexForAsset];
ICFAssetViewController *aVC =
segue.destinationViewController;
ALAssetRepresentation *rep =
[selectedAsset defaultRepresentation];
UIImage *img =
[UIImage imageWithCGImage:[rep fullScreenImage]];
[aVC setAssetImage: img];
}
}
In that method, first check that the segue’s identifier is equal to ViewAssetImage. Then, determine the asset’s index for the tapped button by using the button’s tag. You will get the default representation for the asset, from which you can then get a full-screen image to display. EachALAsset can have one or more ALAssetRepresentations, which are different formats of the same asset. Note that the default representation for a video is an image instead of the actual video. Set that image on the destination view controller. Tap an image from the group view to see the full-screen view of an image (see Figure 23.7).
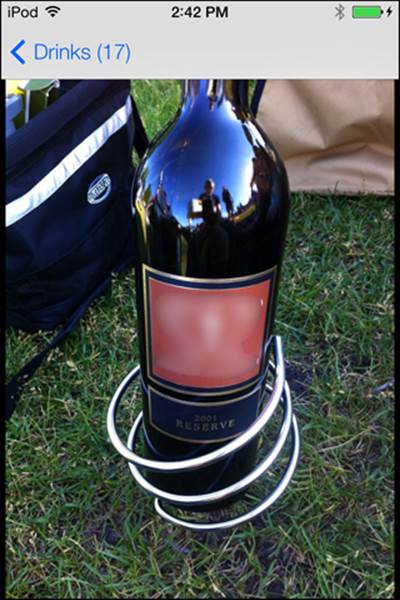
Figure 23.7 Asset detail view.
Saving to the Camera Roll
To save an image so that the user can see it in Photos.app, an image first needs to be acquired. The simplest approach is to utilize UIImagePickerController. iOS will allow saving an image only to the Saved Photos album, which is called “Saved Photos” on a device that does not have a camera, or “Camera Roll” on a device that does have a camera. The sample app assumes that a device with a camera is being used.
In ICFAssetGroupViewController there is a UIButton called addButton that is wired in the storyboard to call addButtonTouched: when it is touched. This button is made visible only when viewing the Camera Roll album. When tapped, the method will present an instance of UIImagePickerController that is configured to only access the camera. If the device does not have a camera, a UIAlertView is presented.
- (IBAction)addButtonTouched:(id)sender
{
if ([UIImagePickerController isSourceTypeAvailable:
UIImagePickerControllerSourceTypeCamera])
{
UIImagePickerController *ip =
[[UIImagePickerController alloc] init];
[ip setSourceType:
UIImagePickerControllerSourceTypeCamera];
[ip setDelegate:self];
[self presentViewController:ip
animated:YES
completion:nil];
[ip release];
}
else
{
NSString *errMsg = @"Camera Not Available";
UIAlertView* alertView =
[[UIAlertView alloc] initWithTitle:nil
message:errMsg
delegate:nil
cancelButtonTitle:@"Dismiss"
otherButtonTitles:nil];
[alertView show];
[alertView release];
}
}
When the user picks an image, the UIImagePickerController delegate method will be called with an NSDictionary of information. Note that the user might have edited the image in the picker, so the method needs to check whether there is an edited image in the returnedNSDictionary. If not, the original image provided can be used.
- (void)imagePickerController:(UIImagePickerController *)picker
didFinishPickingMediaWithInfo:(NSDictionary *)info
{
UIImage *selectedImage =
[info objectForKey:UIImagePickerControllerEditedImage];
if (!selectedImage)
{
selectedImage =
[info objectForKey:UIImagePickerControllerOriginalImage];
}
UIImageWriteToSavedPhotosAlbum(selectedImage, self,
@selector(image:didFinishSavingWithError:contextInfo:),
NULL);
[self dismissModalViewControllerAnimated:YES];
}
After an image is obtained, call the UIImageWriteToSavedPhotosAlbum function. Specify an image, and if desired a delegate, selector, and context information. In the sample app, a delegate is specified to refresh the list of assets and update the table view with the newly saved image.
- (void)image:(UIImage *)image
didFinishSavingWithError:(NSError *)error
contextInfo:(void *)contextInfo
{
if(error != nil)
{
NSLog(@"Error Saving:%@",[error localizedDescription]);
return;
}
[self.assetArray removeAllObjects];
[self retrieveAssetGroupByURL];
}
Dealing with Photo Stream
Photo Stream is a photo-syncing feature that is part of Apple’s iCloud service. When an iCloud user adds a photo to a Photo Stream–enabled device, that photo is instantly synced to all the user’s other Photo Stream–enabled devices. For example, if the user has an iPhone, an iPad, and a Mac, and takes a photo on the iPhone, the photo will be visible immediately on the iPad (in the Photos app) and the Mac (in iPhoto or Aperture) with no additional effort required.
To use Photo Stream, the user needs to have an iCloud account. An iCloud account can be created free on an iOS device. Visit Settings, iCloud. Create a new account or enter iCloud account information. After the iCloud account information is entered on the device, Photo Stream can be turned on (see Figure 23.8).
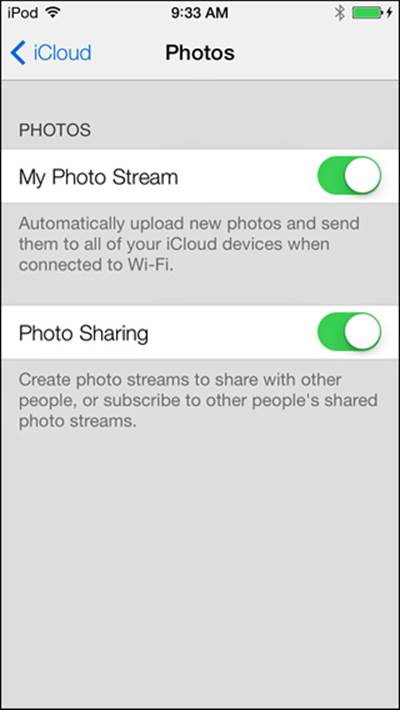
Figure 23.8 Settings: iCloud.
When Photo Stream is enabled, a new album called My Photo Stream will be visible in the list of albums (see Figure 23.9). No additional code is required in the sample app to display or handle the Photo Stream group.
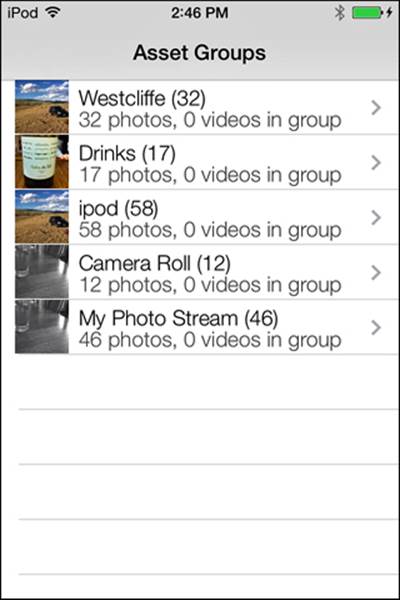
Figure 23.9 Asset Groups, including Photo Stream.
If you take a photo on your device, it will be visible both in the Camera Roll album and in the Photo Stream album.
Summary
This chapter explained how to access the photo libraries using the Asset Library classes. It showed how to enumerate asset groups, and display asset group names and counts of photos and videos inside an asset group. This chapter demonstrated how to enumerate the assets in an asset group, and display the thumbnail associated with an asset, as well as the full-screen image for an asset.
In addition, the chapter explained how to save an acquired image into the Saved Photos/Camera Roll album, and how to enable Photo Stream and view the Photo Stream asset group.
Exercises
1. Add a Play icon to the center of thumbnails for videos in the asset group view, and play videos in the asset detail view.
2. Add the capability to add an album (group), and add assets to the new album.