iOS Components and Frameworks: Understanding the Advanced Features of the iOS SDK (2014)
Chapter 24. Passbook and PassKit
With iOS 6 Apple introduced a new standard app called Passbook, which is a place to keep and have easy access to a user’s event tickets, traveling tickets, coupons, and store cards (like gift cards, prepaid cards, or rewards cards). Passbook is currently available only on iPhone and iPod touch devices, not on iPad devices.
Passbook has special access to the lock screen. If a user is within a geofence, defined by a location or set of locations listed in the pass, on a relevant date specified in a pass, the pass will be displayed on the lock screen so that the user can slide and open it directly in the Passbook app.
The Passbook app displays passes like a stack so that the user can see the top part of each pass. The top section contains a logo and colored background, and can contain some custom information. When a user taps on the top part of a pass, the pass will expand to display the entire pass, which can contain several areas of custom fields, a background graphic, and a barcode. The user can delete a pass when it is no longer needed, and Passbook will delete it with a shredder animation. The Passbook app has support built in to leverage a Web service and push notifications to handle seamless updates to a pass already in Passbook.
Using Passbook requires building a “pass” in a prescribed format and delivering the pass to a user. The pass needs to be built somewhere other than the user’s device, typically on a server, since it is a signed archive of files including icons and logos for display, a file with information about the pass, a signature file, and a manifest.
There are a few options available to deliver the pass to the user. Mail.app and Safari.app can recognize a pass and import it into Passbook, or a custom app can utilize PassKit to add a new pass or update an existing pass. For testing passes, the iOS Simulator can display a pass when it is dropped onto it.
PassKit is part of the iOS SDK that can be used by custom apps to import or update a pass in Passbook, check whether a pass is new or updated, and display some information about existing passes.
This chapter describes the design considerations relevant to different pass types, and how to build and test passes for Passbook. It demonstrates how to use PassKit to interact with passes from an app. Lastly, it describes how Passbook can handle updates from a Web service.
The Sample App
The sample app is called Pass Test. It includes pre-signed sample passes for each pass type (see Figure 24.1). The user can add a new pass to Passbook in the app using PassKit, can simulate updating an existing pass with new information, can view the pass directly in Passbook, and can remove the pass from Passbook all from the app. The sample app is covered in more detail in the section “Interacting with Passes in an App.”
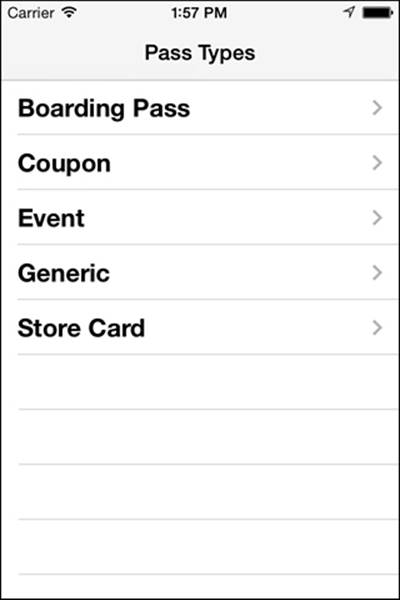
Figure 24.1 Pass Test sample app.
Designing the Pass
Before a pass can be sent to any users, the pass needs to be designed and configured. The pass provider needs to determine what type of pass should be used and how the pass should look. This includes figuring out what fields of information should be presented on the pass, where the fields should be placed, whether a barcode should be used, and what information will be provided to determine whether the pass should be displayed on the lock screen. An individual pass is actually a signed bundle of files, including some images, a JSON file called pass.json with information about the pass and display information, and a signature and manifest.
Pass Types
Apple has provided several standard pass types, each of which can be customized:
![]() Boarding Pass: A boarding pass is intended to cover travel situations, such as an airline boarding pass, train ticket, bus pass, shuttle voucher, or any other ticket required to board a conveyance with a defined departure location and destination.
Boarding Pass: A boarding pass is intended to cover travel situations, such as an airline boarding pass, train ticket, bus pass, shuttle voucher, or any other ticket required to board a conveyance with a defined departure location and destination.
![]() Coupon: A coupon is a pass that handles a discount for a vendor. The coupon is designed to be flexible enough to handle a wide variety of permutations, such as percentage or dollar-off discounts, or discounts specific to a product or group of products, or no product at all, at a specific location, group of locations, or any location for a vendor.
Coupon: A coupon is a pass that handles a discount for a vendor. The coupon is designed to be flexible enough to handle a wide variety of permutations, such as percentage or dollar-off discounts, or discounts specific to a product or group of products, or no product at all, at a specific location, group of locations, or any location for a vendor.
![]() Event: An event pass is a ticket for entry to any event, such as a theater production, movie, sporting event, or special museum event—anything with limited access granted by a ticket.
Event: An event pass is a ticket for entry to any event, such as a theater production, movie, sporting event, or special museum event—anything with limited access granted by a ticket.
![]() Store Card: A store card pass is similar to a gift card, in that the user can buy a preset amount of money on the pass, display the pass to the vendor for payment, and have the payment amount decremented from the pass. The vendor might allow refilling the pass or might require the purchase of a new pass when the amount has been fully depleted. Store cards can also be used as reward or loyalty cards, in which points are collected with each purchase until a threshold is reached and a reward is given.
Store Card: A store card pass is similar to a gift card, in that the user can buy a preset amount of money on the pass, display the pass to the vendor for payment, and have the payment amount decremented from the pass. The vendor might allow refilling the pass or might require the purchase of a new pass when the amount has been fully depleted. Store cards can also be used as reward or loyalty cards, in which points are collected with each purchase until a threshold is reached and a reward is given.
![]() Generic: A generic pass can be used for anything that does not fit into the prebuilt pass types, or where the prebuilt pass types are not sufficient. Generic passes include a thumbnail image so that they can be used for an organization-specific ID card like a gym membership card.
Generic: A generic pass can be used for anything that does not fit into the prebuilt pass types, or where the prebuilt pass types are not sufficient. Generic passes include a thumbnail image so that they can be used for an organization-specific ID card like a gym membership card.
Each pass type has a specialized layout to be considered when designing the pass. Passes are divided into sections where fields of data can be presented: header, primary, secondary, auxiliary, and back. Passes can also use custom images in some instances. The following sections describe the layouts for each pass type.
Pass Layout—Boarding Pass
A boarding pass has the layout shown in Figure 24.2.

Figure 24.2 Boarding pass layout.
For a boarding pass, the departure location and destination are typically specified as the primary fields (a boarding pass can have up to two primary fields). Secondary and auxiliary fields are laid out beneath the primary fields. The footer image is optional.
Pass Layout—Coupon
A coupon pass has the layout shown in Figure 24.3.
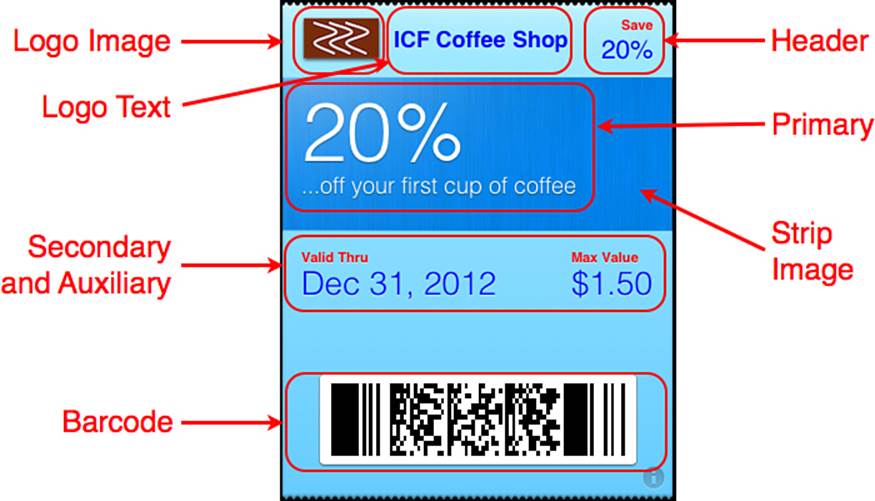
Figure 24.3 Coupon pass layout.
A coupon can have only one primary field, and can optionally display a strip image behind the primary field. A coupon can have up to four total secondary and auxiliary fields.
Pass Layout—Event
An event pass has the layout shown in Figure 24.4.
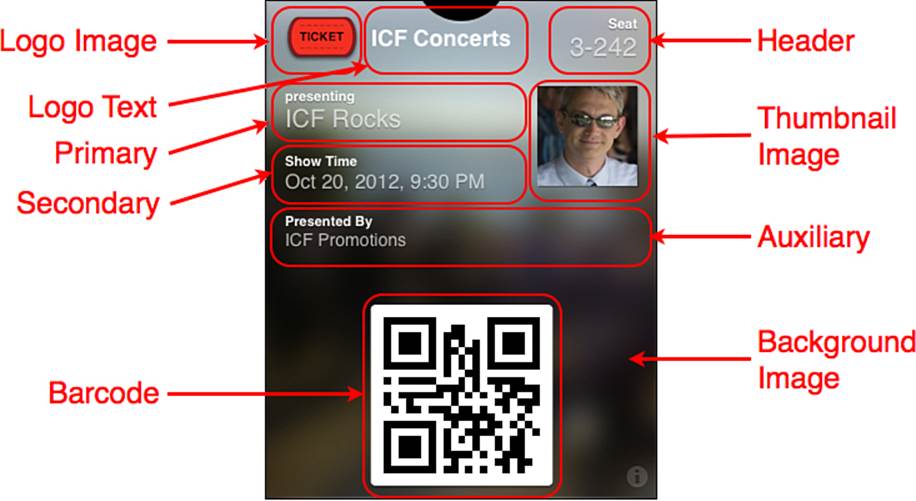
Figure 24.4 Event pass layout.
An event pass can have only one primary field, and can optionally display a background image behind all the fields and the barcode. If provided, the background image is automatically cropped and blurred. An event can also optionally display a thumbnail image to the right of the primary and secondary fields.
Pass Layout—Generic
A generic pass has the layout shown in Figure 24.5.
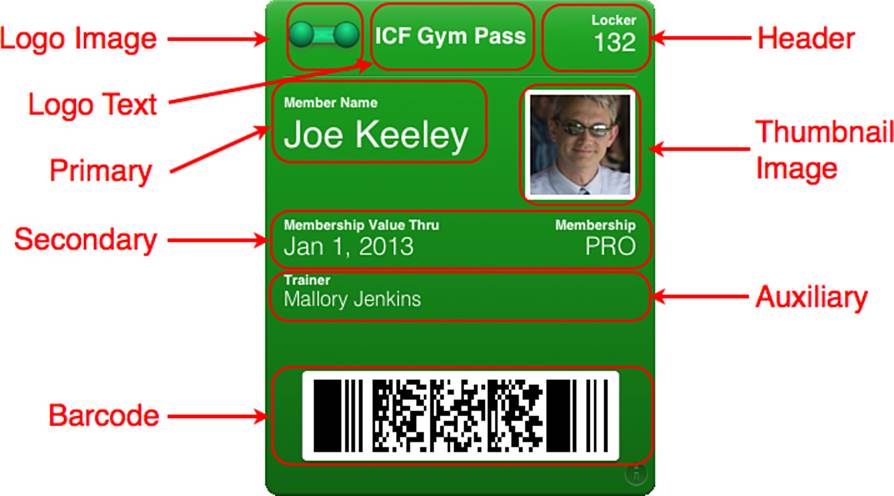
Figure 24.5 Generic pass layout.
A generic pass can have only one primary field, and can optionally display a thumbnail image to the right of the primary field. Secondary and auxiliary fields are presented below the primary field.
Pass Layout—Store Card
A store card pass has the layout shown in Figure 24.6.
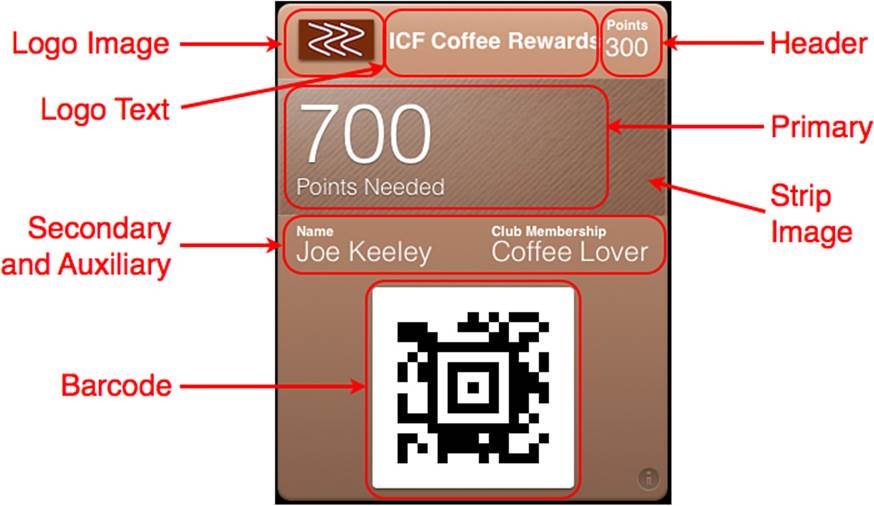
Figure 24.6 Store card pass layout.
A store card can have only one primary field, and can optionally display a strip image behind the primary field. A store card can have up to four total secondary and auxiliary fields, presented below the primary field.
Pass Presentation
Passes are presented to users in several situations outside Passbook, and it is important to understand which parts of the pass can be customized to handle that presentation. When a pass is distributed to a user via email, it looks like the screenshot displayed in Figure 24.7.
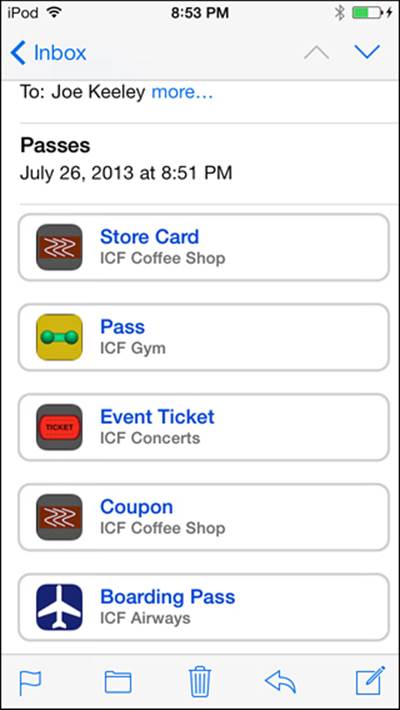
Figure 24.7 Passes distributed in email.
The image presented is icon.png from the pass bundle. The top line of text in blue is derived automatically from the type of pass as specified in the pass.json file, and the bottom line of text is the organization name specified in the pass.json file.
When the device is near a relevant location specified in the pass, or the date is a relevant date specified in the pass, the pass is visible on the device’s lock screen much like a push notification, as shown in Figure 24.8. More information about this is available in the section “Building the Pass,” in the “Pass Relevance Information” subsection.
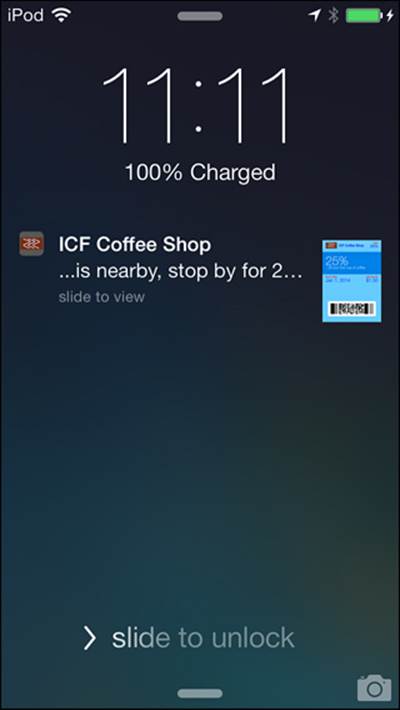
Figure 24.8 Pass displayed on the lock screen.
The image presented is icon.png in the pass bundle. The top line of text is the organization name specified in the pass.json file, and the bottom line of text is the relevantText specified in the pass.json file, with the relevant locations.
Building the Pass
A pass will typically be built by an automated server. This section and the next section of the chapter describe building a pass manually so that the steps necessary are clear; automating the process would depend on the choice of server environment and is left as an exercise for the reader.
Several steps are required to build a pass. Apple recommends creating a folder to hold all the files required for an individual pass, for example, a folder called Boarding Pass.raw.
Place all the required and desired images in the pass folder. Passes support retina and nonretina versions of images using standard “@2x” naming syntax. The images that need to be provided are these:
![]() icon.png (required): A 29×29-pixel PNG image (and retina version), which will be displayed in any PassKit-capable app (like Mail.app or Safari.app) when the app has detected a pass and is displaying the pass as something that can be used. The image is also displayed for the pass on the lock screen. The icon is automatically given rounded edges and a shine effect like an app icon.
icon.png (required): A 29×29-pixel PNG image (and retina version), which will be displayed in any PassKit-capable app (like Mail.app or Safari.app) when the app has detected a pass and is displaying the pass as something that can be used. The image is also displayed for the pass on the lock screen. The icon is automatically given rounded edges and a shine effect like an app icon.
![]() logo.png (required): A logo PNG image, with maximum dimensions of 160×50 pixels (and retina version), that will be placed on the header of the pass in Passbook. Apple recommends using only an image in the logo, and recommends avoiding any stylized text in the logo. When the logo is presented, it will be presented with the standardized header (with customizable text) that will look uniform in Passbook.app.
logo.png (required): A logo PNG image, with maximum dimensions of 160×50 pixels (and retina version), that will be placed on the header of the pass in Passbook. Apple recommends using only an image in the logo, and recommends avoiding any stylized text in the logo. When the logo is presented, it will be presented with the standardized header (with customizable text) that will look uniform in Passbook.app.
![]() background.png (optional, available only for event passes): A PNG image with maximum dimensions of 180×220 pixels can be specified for the entire background of the front of the pass. This image is automatically cropped and blurred.
background.png (optional, available only for event passes): A PNG image with maximum dimensions of 180×220 pixels can be specified for the entire background of the front of the pass. This image is automatically cropped and blurred.
![]() strip.png (optional, available only for coupon, event, and store card passes): A PNG image can be specified to go behind the primary fields on the pass. The strip image has shine applied by default, which can be turned off. Maximum dimensions are 312×84 pixels for Event passes, 312×110 pixels for Coupons and Store Card passes with a square barcode, and 312×123 pixels for Coupons and Store Cards with a rectangular barcode.
strip.png (optional, available only for coupon, event, and store card passes): A PNG image can be specified to go behind the primary fields on the pass. The strip image has shine applied by default, which can be turned off. Maximum dimensions are 312×84 pixels for Event passes, 312×110 pixels for Coupons and Store Card passes with a square barcode, and 312×123 pixels for Coupons and Store Cards with a rectangular barcode.
![]() thumbnail.png (optional, available only on event and generic passes): A PNG image can be displayed on the front of the pass. Apple recommends this for a person’s image for a membership card, but it could also be used as a membership level indicator or graphical way of presenting pass data.
thumbnail.png (optional, available only on event and generic passes): A PNG image can be displayed on the front of the pass. Apple recommends this for a person’s image for a membership card, but it could also be used as a membership level indicator or graphical way of presenting pass data.
![]() footer.png (optional, available only for boarding passes): A PNG image can be specified to go just above the barcode on the pass.
footer.png (optional, available only for boarding passes): A PNG image can be specified to go just above the barcode on the pass.
The majority of work building an individual pass is in creating the pass.json file. This file defines all the information for the pass, including unique identification of the pass, type of pass, relevance information, and layout and visual customizations for the pass in a JSON hash. Create a plain text file called pass.json in the pass folder, and prepare it with all the desired information for a pass.
Note
Refer to Chapter 7, “Working with and Parsing JSON,” for more information on building a JSON hash. Also note that you can unzip any existing pass and examine its pass.json file for a starting point.
Basic Pass Identification
The pass requires several fields to identify it, as shown the following example from a pass:
"description" : "Event Ticket",
"formatVersion" : 1,
"passTypeIdentifier" : "pass.explore-systems.icfpasstest.event",
"serialNumber" : "12345",
"teamIdentifier" : "59Q54EHA9F",
"organizationName" : "ICF Concerts",
The required fields are:
![]() description (required): A localizable string used by iOS accessibility to describe the pass.
description (required): A localizable string used by iOS accessibility to describe the pass.
![]() formatVersion (required): The Passbook format version, which must be the number 1 currently.
formatVersion (required): The Passbook format version, which must be the number 1 currently.
![]() passTypeIdentifier (required): An identifier, provided by Apple, for the pass type. See section “Signing and Packaging the Pass,” specifically the subsection “Creating the Pass Type ID,” for more info on how to obtain a Pass Type ID.
passTypeIdentifier (required): An identifier, provided by Apple, for the pass type. See section “Signing and Packaging the Pass,” specifically the subsection “Creating the Pass Type ID,” for more info on how to obtain a Pass Type ID.
![]() serialNumber (required): A unique identifier for the Pass Type ID. The combination of Pass Type ID and serial number makes an individual pass unique.
serialNumber (required): A unique identifier for the Pass Type ID. The combination of Pass Type ID and serial number makes an individual pass unique.
![]() teamIdentifier (required): A team identifier provided by Apple for the organization. It can be found in the Developer Member Center, under Organization Profile, in Company/Organization ID.
teamIdentifier (required): A team identifier provided by Apple for the organization. It can be found in the Developer Member Center, under Organization Profile, in Company/Organization ID.
![]() organizationName (required): A localizable string for the name of the organization providing the pass. This is displayed when the pass is presented in Mail.app on an iOS 6 device, and when the pass is displayed on the lock screen as being relevant.
organizationName (required): A localizable string for the name of the organization providing the pass. This is displayed when the pass is presented in Mail.app on an iOS 6 device, and when the pass is displayed on the lock screen as being relevant.
Pass Relevance Information
A pass can optionally supply relevance information, including locations that are relevant to the pass, and a date that is relevant to the pass as shown in this example from a pass:
"locations" : [
{
"latitude" : 39.749484,
"longitude" : -104.917513,
"relevantText" : "...is nearby, stop by for 20% off a coffee!"
}
],
"relevantDate" : "2012-10-20T19:30:00-08:00"
The relevance fields that can be used are:
![]() locations (optional): An array of relevant location information. A location can have latitude, longitude, altitude, and relevantText. The relevantText will be displayed on the lock screen when the device is in proximity to a relevant location. The size of the radius used for the proximity check depends on the pass type.
locations (optional): An array of relevant location information. A location can have latitude, longitude, altitude, and relevantText. The relevantText will be displayed on the lock screen when the device is in proximity to a relevant location. The size of the radius used for the proximity check depends on the pass type.
![]() relevantDate (optional): An ISO 8601 date expressed as a string.
relevantDate (optional): An ISO 8601 date expressed as a string.
Different rules are applied depending on the pass type:
![]() Boarding pass: Uses a wide radius for the location check. Relevant if a location or date matches.
Boarding pass: Uses a wide radius for the location check. Relevant if a location or date matches.
![]() Coupon: Uses a small radius for the location check and ignores the relevant date.
Coupon: Uses a small radius for the location check and ignores the relevant date.
![]() Event: Uses a wide radius for the location check. Relevant if a location and date match.
Event: Uses a wide radius for the location check. Relevant if a location and date match.
![]() Generic: Uses a small radius for the location check. Relevant if a location and date match, or if a location matches and no date is provided.
Generic: Uses a small radius for the location check. Relevant if a location and date match, or if a location matches and no date is provided.
![]() Store card: Uses a small radius for the location check and ignores the relevant date.
Store card: Uses a small radius for the location check and ignores the relevant date.
Barcode Identification
To display a barcode on the pass, provide a message, a barcode format, and a message encoding parameter. Optionally, provide an alternative text parameter that will display a human-readable version of the message.
"barcode" : {
"message" : "123456789",
"format" : "PKBarcodeFormatQR",
"messageEncoding" : "iso-8859-1"
"altText" : "123456789",
},
The fields used to display a barcode are:
![]() format (required): A string representing a PassKit constant specifying the barcode format the barcode should be displayed in. Passbook currently supports QR (PKBarcodeFormatQR), PDF 417 (PKBarcodeFormatPDF417), and Aztec (PKBarcodeFormatAztec). PDF 417 is a rectangular barcode format, whereas QR and Aztec present square barcodes.
format (required): A string representing a PassKit constant specifying the barcode format the barcode should be displayed in. Passbook currently supports QR (PKBarcodeFormatQR), PDF 417 (PKBarcodeFormatPDF417), and Aztec (PKBarcodeFormatAztec). PDF 417 is a rectangular barcode format, whereas QR and Aztec present square barcodes.
![]() message (required): A string message that will be encoded into a barcode.
message (required): A string message that will be encoded into a barcode.
![]() messageEncoding (required): A string representing the IANA character set used to convert the message from a string to data. Typically, iso-8859-1.
messageEncoding (required): A string representing the IANA character set used to convert the message from a string to data. Typically, iso-8859-1.
![]() altText (optional): Human-readable representation of the message encoded, which will be displayed near the barcode.
altText (optional): Human-readable representation of the message encoded, which will be displayed near the barcode.
Pass Visual Appearance Information
A pass can customize the colors of the background, field values, and field labels, as well as the text displayed with the logo.
"logoText" : "ICF Concerts",
"foregroundColor" : "rgb(79, 16, 1)",
"backgroundColor" : "rgb(199, 80, 18)",
"labelColor" : "rgb(0,0,0)",
The fields that can be used to customize the appearance of the pass are:
![]() logoText (optional): A localizable string, displayed in the header to the right of the logo image.
logoText (optional): A localizable string, displayed in the header to the right of the logo image.
![]() foregroundColor (optional): A string specifying a CSS-style RGB color to be used for the field values on the pass.
foregroundColor (optional): A string specifying a CSS-style RGB color to be used for the field values on the pass.
![]() backgroundColor (optional): A string specifying a CSS-style RGB color to be used for the background of the pass. Ignored on an Event pass where a background image is specified.
backgroundColor (optional): A string specifying a CSS-style RGB color to be used for the background of the pass. Ignored on an Event pass where a background image is specified.
![]() labelColor (optional): A string specifying a CSS-style RGB color to be used for the field labels on the pass. Apple recommends using white to give passes a degree of uniformity.
labelColor (optional): A string specifying a CSS-style RGB color to be used for the field labels on the pass. Apple recommends using white to give passes a degree of uniformity.
![]() suppressStripShine (optional): A Boolean (true or false) indicating whether to suppress applying shine effects to a strip image (available only for a couple, event, or store pass). The default value is false, meaning shine effects are applied.
suppressStripShine (optional): A Boolean (true or false) indicating whether to suppress applying shine effects to a strip image (available only for a couple, event, or store pass). The default value is false, meaning shine effects are applied.
Pass Fields
Pass fields are specified in an element with a key indicating the type or style of pass; options are boardingPass, coupon, eventTicket, generic, and storeCard. Inside that element are additional elements that organize the fields on the pass.
"boardingPass" : {
"transitType" : "PKTransitTypeAir",
"headerFields" : [
...
],
"primaryFields" : [
...
],
"secondaryFields" : [
...
],
"auxiliaryFields" : [
...
],
"backFields" : [
...
]
}
The fields that can be used to convey pass specific information are:
![]() transitType (required for boarding pass, not allowed for other passes): Identifies the type of transit for a boarding pass, using a string representing a pass kit constant. Choices are PKTransitTypeAir, PKTransitTypeTrain, PKTransitTypeBus,PKTransitTypeBoat, and PKTransitTypeGeneric. The pass will display an icon specific to the transit type.
transitType (required for boarding pass, not allowed for other passes): Identifies the type of transit for a boarding pass, using a string representing a pass kit constant. Choices are PKTransitTypeAir, PKTransitTypeTrain, PKTransitTypeBus,PKTransitTypeBoat, and PKTransitTypeGeneric. The pass will display an icon specific to the transit type.
![]() headerFields (optional): Header fields are displayed on the front of the pass at the very top. This section is also visible when the pass is in a stack, so it is important to be picky about what is shown here.
headerFields (optional): Header fields are displayed on the front of the pass at the very top. This section is also visible when the pass is in a stack, so it is important to be picky about what is shown here.
![]() primaryFields (optional): Primary fields are displayed on the front of the pass just below the header, and typically in a larger, more prominent font.
primaryFields (optional): Primary fields are displayed on the front of the pass just below the header, and typically in a larger, more prominent font.
![]() secondaryFields (optional): Secondary fields are displayed on the front of the pass just below the primary fields, and typically in a normal font size.
secondaryFields (optional): Secondary fields are displayed on the front of the pass just below the primary fields, and typically in a normal font size.
![]() auxiliaryFields (optional): Auxiliary fields are displayed on the front of the pass just below the secondary fields, and typically in a smaller, less prominent font.
auxiliaryFields (optional): Auxiliary fields are displayed on the front of the pass just below the secondary fields, and typically in a smaller, less prominent font.
![]() backFields (optional): Back fields are displayed on the back of the pass.
backFields (optional): Back fields are displayed on the back of the pass.
Inside each of the fields elements is an array of fields. A field at minimum requires a key, value, and label.
{
"key" : "seat",
"label" : "Seat",
"value" : "23B",
"textAlignment" : "PKTextAlignmentRight"
}
For each field, the following information can be provided:
![]() key (required): The key must be a string identifying a field that is unique within the pass; for example, "seat".
key (required): The key must be a string identifying a field that is unique within the pass; for example, "seat".
![]() value (required): The value of the field, for example "23B". The value can be a localizable string, a number, or a date in ISO 8601 format.
value (required): The value of the field, for example "23B". The value can be a localizable string, a number, or a date in ISO 8601 format.
![]() label (optional): A localizable string label for the field.
label (optional): A localizable string label for the field.
![]() textAlignment (optional): A string representing a pass kit text alignment constant. Choices are PKTextAlignmentLeft, PKTextAlignmentCenter, PKTextAlignmentRight, PKTextAlignmentJustified, and PKTextAlignmentNatural.
textAlignment (optional): A string representing a pass kit text alignment constant. Choices are PKTextAlignmentLeft, PKTextAlignmentCenter, PKTextAlignmentRight, PKTextAlignmentJustified, and PKTextAlignmentNatural.
![]() changeMessage (optional): A message describing the change to a field, for example "Changed to %@", where %@ is replaced with the new value. This is described in more detail later in the chapter, in “Interacting with Passes in an App,” in the subsection “Simulate Updating a Pass.”
changeMessage (optional): A message describing the change to a field, for example "Changed to %@", where %@ is replaced with the new value. This is described in more detail later in the chapter, in “Interacting with Passes in an App,” in the subsection “Simulate Updating a Pass.”
For a date and/or time field, a date style and time style can be specified. Both the date and the time style must be specified in order to display a date or time.
{
"key" : "departuretime",
"label" : "Depart",
"value" : "2012-10-7T13:42:00-07:00",
"dateStyle" : "PKDateStyleShort",
"timeStyle" : "PKDateStyleShort",
"isRelative" : false
},
The fields needed to specify a date and time are:
![]() dateStyle (optional): Choices are PKDateStyleNone (corresponding to NSDateFormatterNoStyle), PKDateStyleShort (corresponding to NSDateFormatterShortStyle), PKDateStyleMedium (corresponding to NSDateFormatterMediumStyle),PKDateStyleLong (corresponding to NSDateFormatterLongStyle), and PKDateStyleFull (corresponding to NSDateFormatterFullStyle).
dateStyle (optional): Choices are PKDateStyleNone (corresponding to NSDateFormatterNoStyle), PKDateStyleShort (corresponding to NSDateFormatterShortStyle), PKDateStyleMedium (corresponding to NSDateFormatterMediumStyle),PKDateStyleLong (corresponding to NSDateFormatterLongStyle), and PKDateStyleFull (corresponding to NSDateFormatterFullStyle).
![]() timeStyle (optional): Choices are PKDateStyleNone (corresponding to NSDateFormatterNoStyle), PKDateStyleShort (corresponding to NSDateFormatterShortStyle), PKDateStyleMedium (corresponding to NSDateFormatterMediumStyle),PKDateStyleLong (corresponding to NSDateFormatterLongStyle), and PKDateStyleFull (corresponding to NSDateFormatterFullStyle).
timeStyle (optional): Choices are PKDateStyleNone (corresponding to NSDateFormatterNoStyle), PKDateStyleShort (corresponding to NSDateFormatterShortStyle), PKDateStyleMedium (corresponding to NSDateFormatterMediumStyle),PKDateStyleLong (corresponding to NSDateFormatterLongStyle), and PKDateStyleFull (corresponding to NSDateFormatterFullStyle).
![]() isRelative (optional): true displays as a relative date, false as an absolute date.
isRelative (optional): true displays as a relative date, false as an absolute date.
For a number, a currency code or number style can be specified.
{
"key" : "maxValue",
"label" : "Max Value",
"value" : 1.50,
"currencyCode" : "USD"
}
The fields used to specify a number or currency style are:
![]() currencyCode (optional): An ISO 4217 currency code, which will display the number as the currency represented by the code.
currencyCode (optional): An ISO 4217 currency code, which will display the number as the currency represented by the code.
![]() numberStyle (optional): Choices are PKNumberStyleDecimal, PKNumberStylePercent, PKNumberStyleScientific, and PKNumberStyleSpellOut.
numberStyle (optional): Choices are PKNumberStyleDecimal, PKNumberStylePercent, PKNumberStyleScientific, and PKNumberStyleSpellOut.
Tip
When constructing a pass.json file, test the JSON to confirm that it is valid. This can prevent lots of trial-and-error testing and frustration. Visit www.jslint.com and paste the JSON into the source area. Click the JSLint button and the site will validate the pasted JSON, and highlight any errors. If it says “JSON: good,” the JSON is valid; otherwise, an error message will be presented.
After the pass.json file is ready and the other graphics are available, the pass can be signed and packaged for distribution.
Signing and Packaging the Pass
Passbook requires passes be cryptographically signed to ensure that a pass was built by the provider and has not been modified in any way. To sign a pass, a Pass Type ID needs to be established in the iOS Provisioning Portal and a pass signing certificate specific to the Pass Type ID needs to be generated. After the Pass Type ID and certificate are available, passes can be signed. For each unique pass instance a manifest file with checksums for each file in the pass needs to be built so that Passbook can verify each file.
Creating the Pass Type ID
The Pass Type ID identifies the type or class of pass that a provider wants to distribute. For example, if a provider wants to distribute a coupon and a rewards card, the provider would create two Pass Type IDs, one for the coupon and one for the rewards card. To create a Pass Type ID, visit the iOS Dev Center (https://developer.apple.com/devcenter/ios/index.action), and choose Certificates, Identifiers & Profiles in the menu titled iOS Developer Program on the right side of the screen. Click Identifiers and then the Pass Type IDs item in the left menu (see Figure 24.9).
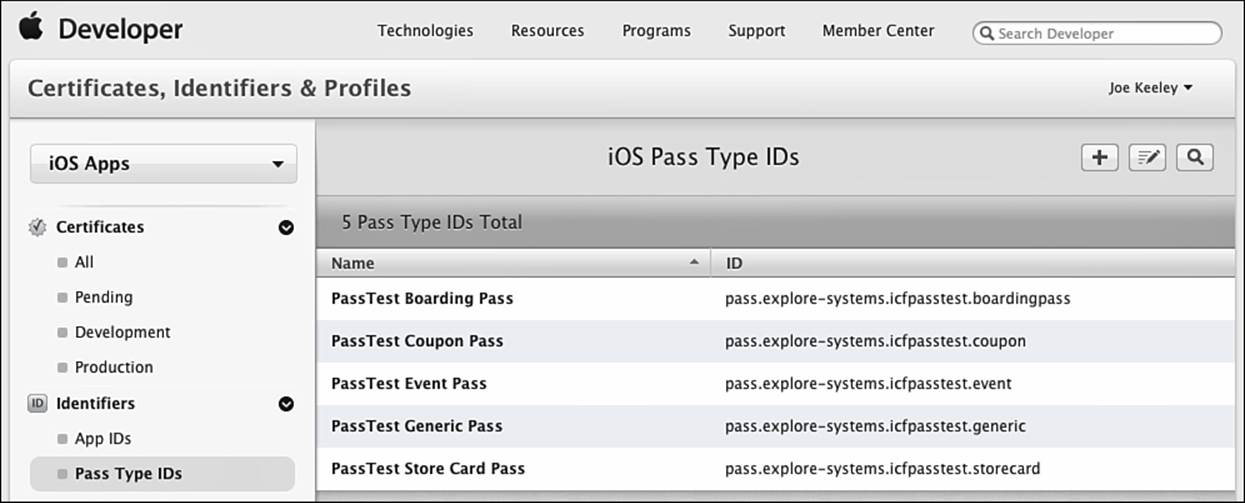
Figure 24.9 iOS Provisioning Portal: Pass Type IDs.
To register a new Pass Type ID, click on the button with the plus sign in the upper-right corner. A form to register a new Pass Type ID will be presented (see Figure 24.10).

Figure 24.10 iOS Provisioning Portal: register a Pass Type ID.
Specify a description and an identifier for the Pass Type ID. Apple recommends using a reverse DNS naming style for Pass Type IDs, and Apple requires that the Pass Type ID begin with the string "pass.". Click the Continue button, and a confirmation screen will be presented, as shown in Figure 24.11.
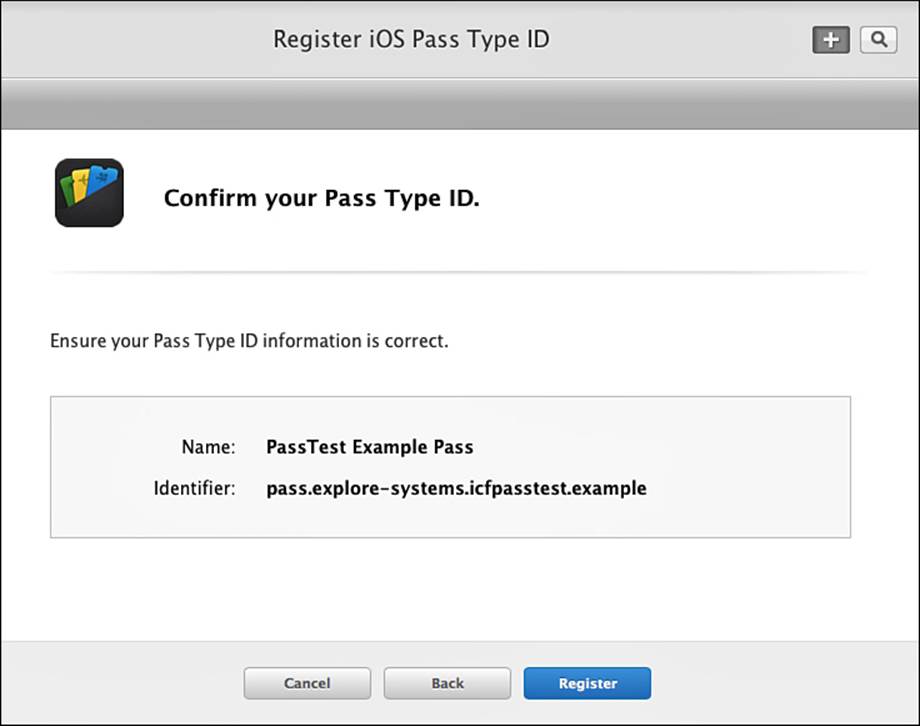
Figure 24.11 iOS Provisioning Portal: confirm Pass Type ID.
Click the Register button to confirm the pass type settings and register the Pass Type ID. After the Pass Type ID has been registered, a certificate must be generated in order to sign passes with the new ID.
Creating the Pass Signing Certificate
To see whether a Pass Type ID has a certificate configured, click on the Pass Type ID in the list, and then click the Edit button. If a certificate has been created for the Pass Type ID, it will be displayed in the Production Certificates section. There will also be an option to create a new certificate for the Pass Type ID, as shown in Figure 24.12.
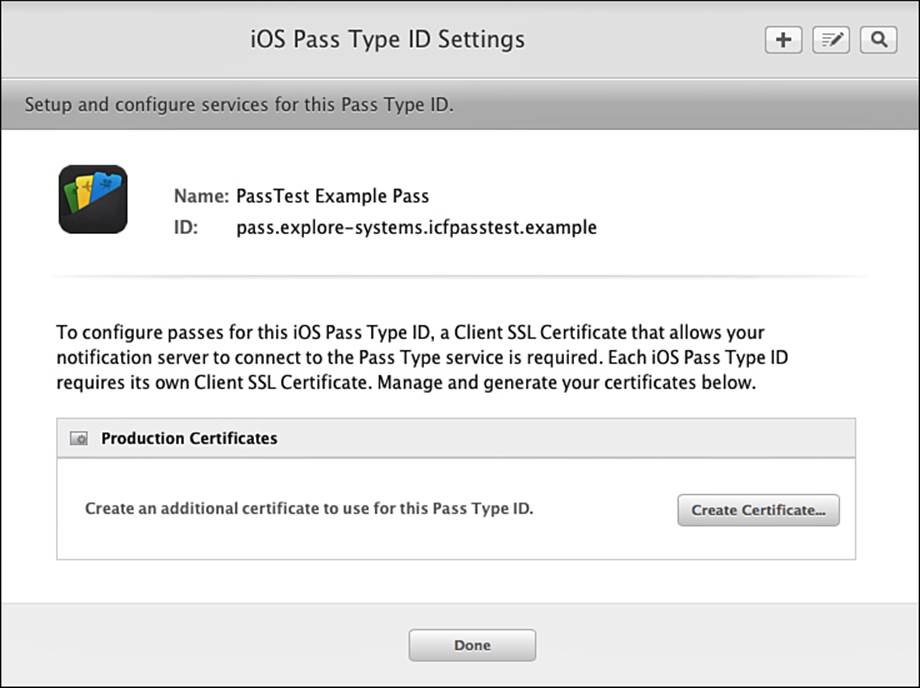
Figure 24.12 iOS Provisioning Portal: Pass Type ID list.
Click the Create Certificate button to start the certificate generation process. The iOS Provisioning Portal will present instructions to generate the certificate request (see Figure 24.13).
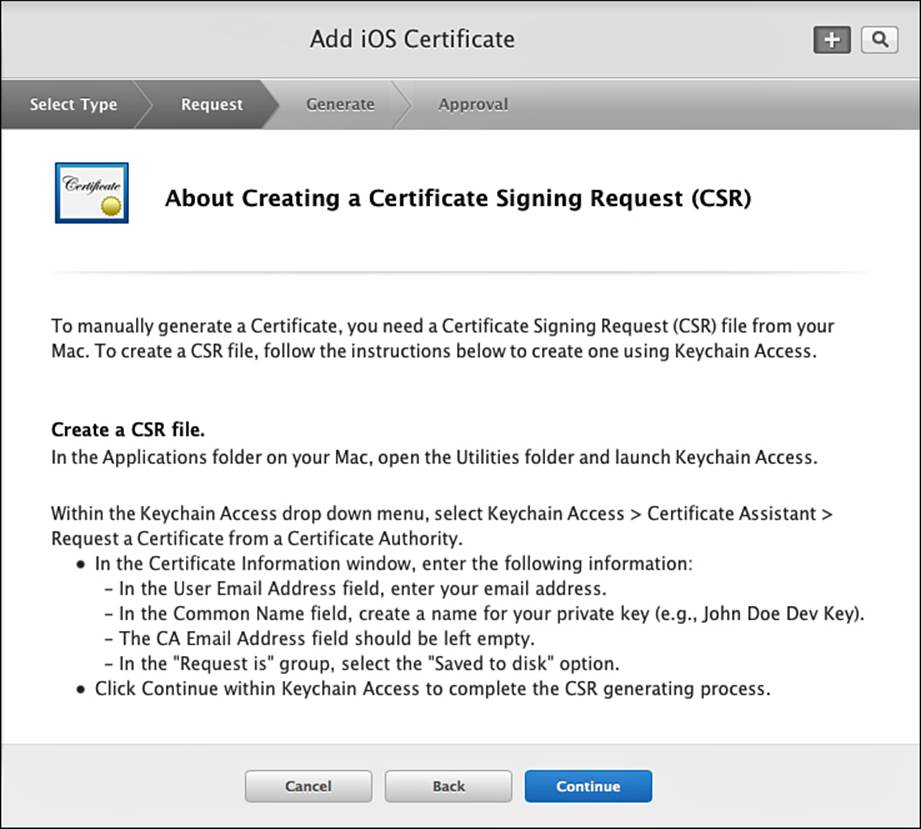
Figure 24.13 iOS Provisioning Portal: Pass Certificate Assistant, generate a Certificate Signing Request.
To generate a certificate request, leave the Pass Certificate Assistant open in your browser, and open Keychain Access (in Applications, Utilities). Select Keychain Access, Certificate Assistant, Request a Certificate from a Certificate Authority from the application menu. You will see the form shown in Figure 24.14.
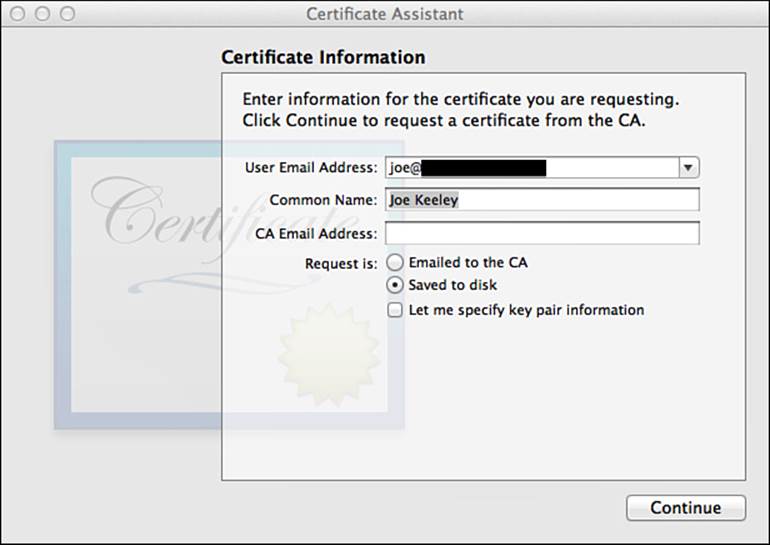
Figure 24.14 Keychain Access Certificate Assistant.
Enter your email address and common name (typically your company name or entity name—it’s safe to use whatever name you use for your Apple Developer account), and then select Saved to Disk. Click Continue, and specify where you would like the request saved. After that step is complete, return to the iOS Provisioning Portal and click Continue. The assistant will ask you to select the request that you just saved, as shown in Figure 24.15.
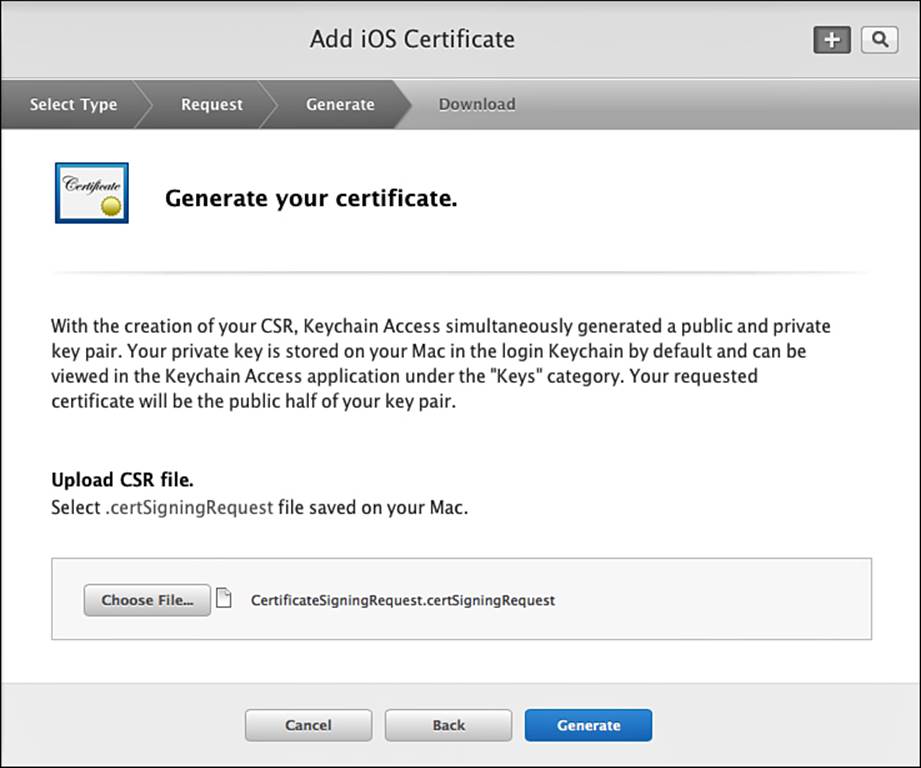
Figure 24.15 iOS Provisioning Portal: Pass Certificate Assistant, submit a Certificate Signing Request.
After you have selected your saved request, click Generate and your SSL certificate will be generated, as shown in Figure 24.16.
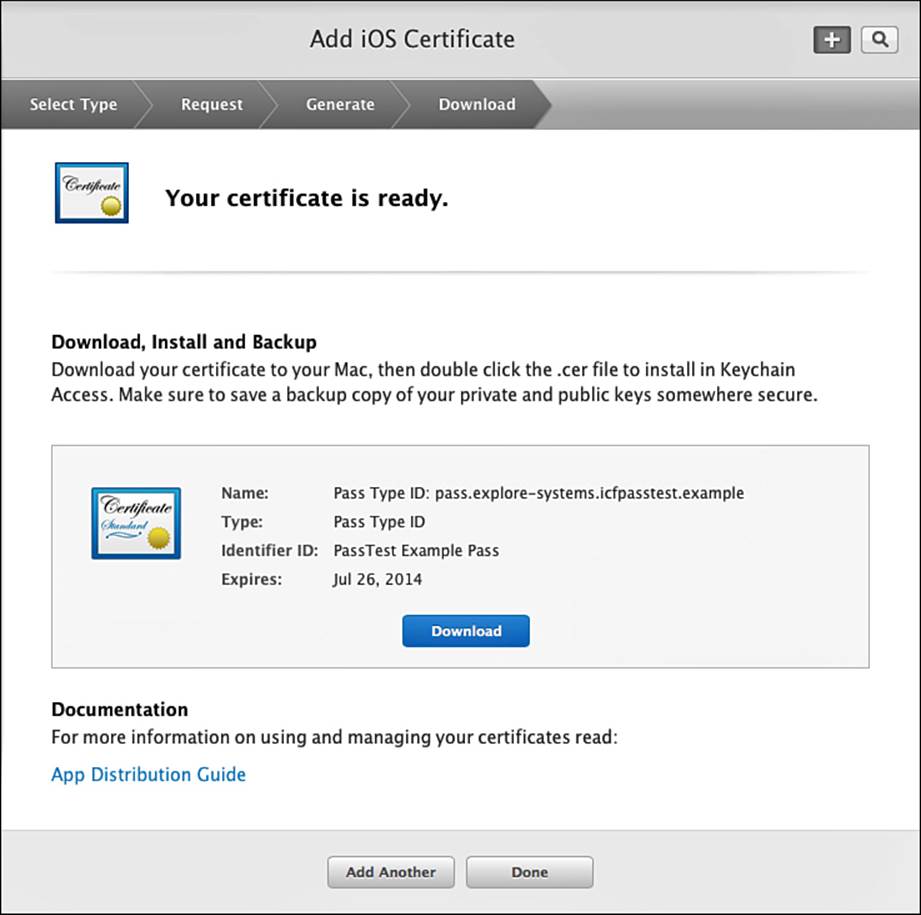
Figure 24.16 iOS Provisioning Portal: Pass Certificate Assistant, generate your Pass Certificate.
After your certificate has been generated, you need to download it so that you can use it to sign passes. Click the Download button to download your certificate. After it has successfully downloaded, you can hit the Done button to dismiss the Certificate Assistant. Double-click the downloaded certificate file, and it will automatically be installed in Keychain Access. It should be visible in your list of certificates in Keychain Access, as shown in Figure 24.17. Click on the triangle to confirm that your private key was delivered with the certificate.
![]()
Figure 24.17 Keychain Access: pass certificate and private key.
To use the certificate for signing from the command line, it must be exported and converted to PEM format. Note that the certificate as displayed in Keychain Access actually contains a private key and a public key. The private key is what is used for signing the pass, and must be kept secret to prevent fraudulent signatures. The public key is used for external verification of the signature. To export the certificate, highlight it, right-click, and select Export; then select a destination for the file. Keychain Access will prompt for a password to protect the file—if it is to be used locally and deleted when done, it is acceptable to skip the password. If the file will be distributed at all, it is highly recommended to protect it with a strong password. Keychain Access will then export the private and public key into a file with a .p12 extension. Execute the following command to extract the public key and save it in PEM format:
$ openssl pkcs12 -in BoardingPassCerts.p12 -clcerts -nokeys -out boardcert.pem -passin pass:
Execute this command to extract the private key and save it in PEM format. Select a password to replace mykeypassword.
$ openssl pkcs12 -in BoardingPassCerts.p12 -nocerts -out boardkey.pem -passin pass: -passout pass:mykeypassword
The last item needed to sign is the Apple Worldwide Developer Relations Certification Authority certificate. The certificate will already be available in Keychain Access (under Certificates) if Xcode has been used to build and deploy an app to a device (see Figure 24.18).
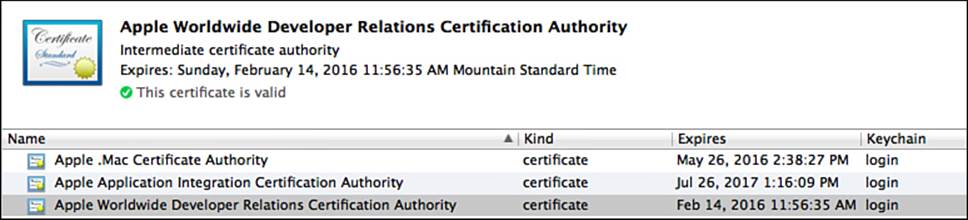
Figure 24.18 Keychain Access: Apple Worldwide Developer Relations Certification Authority certificate.
If that certificate is not visible in Keychain Access, download it from www.apple.com/certificateauthority/ and install in Keychain Access. Right-click on the certificate, and select Export. Give the certificate a short name (like AppleWWDRCert), select PEM format, and save the certificate.
Creating the Manifest
A manifest file must be created for each individual pass. The manifest is a JSON file called manifest.json. It contains an entry for each file that makes up a pass with a corresponding SHA1 checksum. To create the manifest, create a new file in a text editor. Since the file represents a JSON array, it should start with an open bracket and end with a close bracket. For each file, put the file in quotation marks, a colon, the SHA1 checksum in quotation marks, and separate items with a comma. To get the SHA1 checksum for a file, perform the following command in a terminal window from the directory where the pass files exist:
$ openssl sha1 pass.json
SHA1(pass.json)= b636f7d021372a87ff2c130be752da49402d0d7f
The manifest file should look like this example when complete:
{
"pass.json" : "09040451676851048cf65bcf2e299505f9eef89d",
"icon.png" : "153cb22e12ac4b2b7e40d52a0665c7f6cda75bed",
"icon@2x.png" : "7288a510b5b8354cff36752c0a8db6289aa7cbb3",
"logo.png" : "8b1f3334c0afb2e973e815895033b266ab521af9",
"logo@2x.png" : "dbbdb5dca9bc6f997e010ab5b73c63e485f22dae"
}
Signing and Packaging the Pass
The manifest file must be signed so that Passbook can validate the contents of the pass. To sign the manifest, use openssl from a terminal prompt. Specify the certfile as the Apple Worldwide Developer Relations certificate, the PEM version of the certificate created earlier as the signer, the PEM version of the key created earlier as the key, and the password set for the private key in place of mykeypassword.
$ openssl smime -binary -sign -certfile ../AppleWWDRCert.pem -signer ../boardcert.pem -inkey ../boardkey.pem -in manifest.json -out signature -outform DER -passin pass:mykeypassword
A file called signature will be created (-out signature). Any changes to any of the files listed in the manifest require updating the SSA signature for that file in the manifest and re-signing the manifest.
To package the pass, use the zip command from a terminal prompt, from the raw directory of pass files. Specify the destination file for the pass, and list the files to be included in the pass.
$ zip -r ../boarding_pass.pkpass manifest.json pass.json signature icon.png icon@2x.png logo.png logo@2x.png footer.png footer@2x.png
That will zip up all the files listed in an archive called boarding_pass.pkpass in the parent directory.
Note
Apple provides a tool called signpass with the Passbook information in the iOS Developer Portal. It comes in an Xcode project—just build the project and put the build product where it can be found in the terminal path. Then execute signpass, providing a pass directory, and it will automatically create and sign the manifest and package the pass in one step. It will utilize your keychain for all the needed certificates, so the steps to export all those are not needed during development. For example, $ ./signpass -p Event.raw will produceEvent.pkpass.
Testing the Pass
To test the pass, drag and drop the file called boarding_pass.pkpass into the running Simulator. The Simulator will attempt to load the pass in Safari. If there is a problem with the pass, Safari will present an error message, as shown in Figure 24.19.
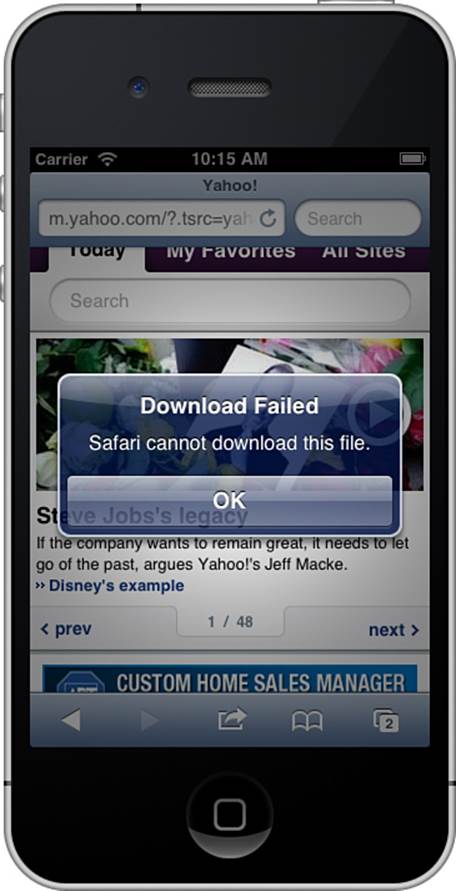
Figure 24.19 Safari in iOS Simulator: error loading pass.
Safari will log any problems with the pass to the console. To find out what is wrong with the pass, open Applications, Utilities, Console and look for an error message, as shown in Figure 24.20.

Figure 24.20 Console: displaying pass error.
In this example, the error indicates that the pass must contain a key called transitType. This key is required for boarding passes, and is not allowed for any other types of passes. Ensure that there is a key called transitType inside the boardingPass section of pass.json, re-sign the pass, and drop it into the Simulator again to determine whether the error is fixed.
Be certain to tap Add to add the pass to Passbook in the Simulator, because not all pass errors are caught by just displaying the pass. There will be an animation when Add is tapped indicating that the pass has been added to Passbook. If that animation does not occur and the pass just fades away, there was an error with the pass and it will not be added to Passbook. Check the console for any additional errors.
Interacting with Passes in an App
Passes can exist completely outside the confines of an app—in fact, a custom app is not needed at all for the life cycle of a Pass. However, there are use cases in which a custom app is appropriate for getting new passes, handling updates to existing passes, and removing existing passes. The sample app demonstrates how to perform all these tasks.
Preparing the App
Several steps need to be completed to prepare the app to interact with Passbook. First ensure that PassKit.framework has been added to the project, and import PassKit/PassKit.h in any classes that need to use the PassKit classes. Next return to the iOS Provisioning Portal and click the App IDs item in the left menu. Click the button with a plus sign to create a new App ID, as shown in Figure 24.21.
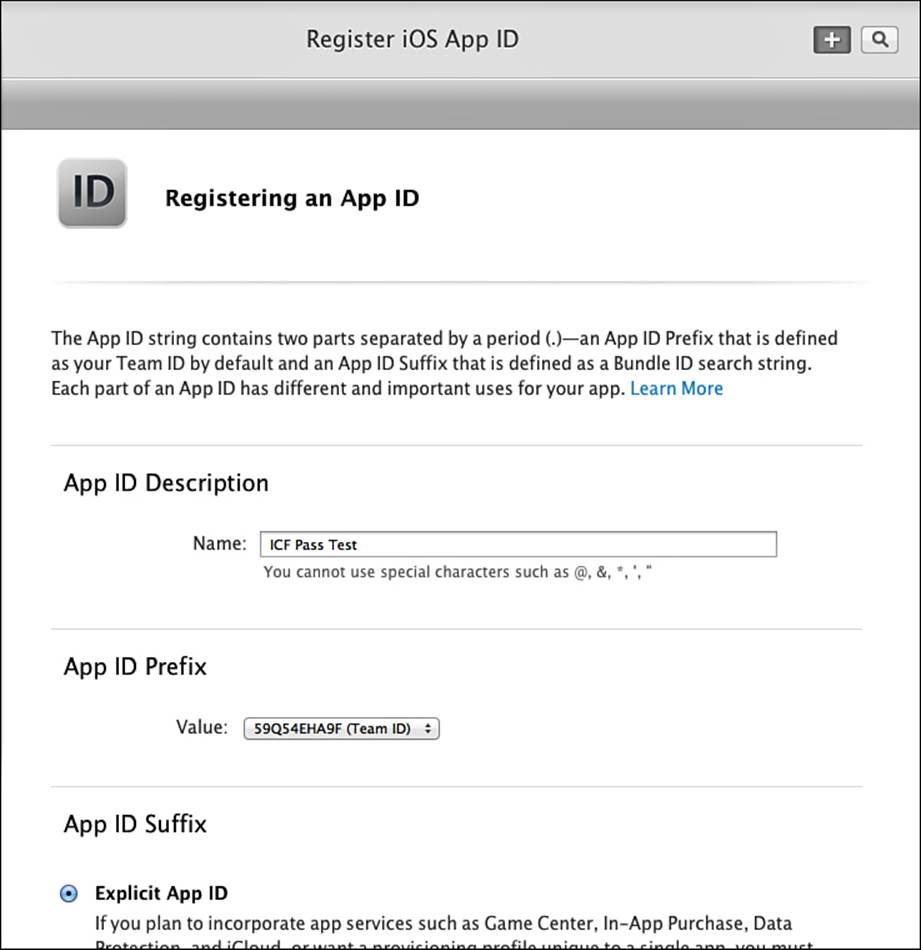
Figure 24.21 iOS Provisioning Portal: create a new App ID.
The new app can be set to enable Passbook while it is being created, or can be updated to enable Passbook after it has been created. To enable Passbook for an existing App ID, click on the App ID on the list, and click the Edit button. Check the Enable Passes option. The iOS Provisioning Portal will present a dialog warning that any existing provisioning profiles created for the App ID must be regenerated in order to be enabled for passes, as shown in Figure 24.22.
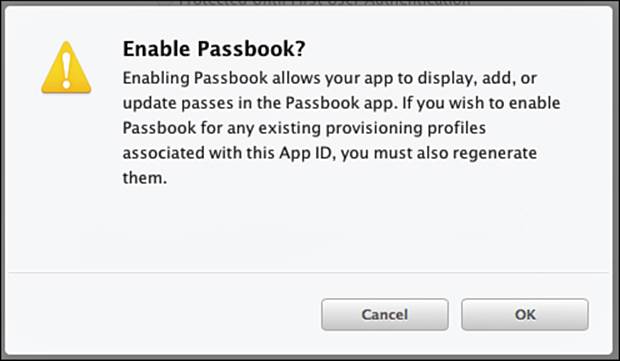
Figure 24.22 iOS Provisioning Portal: App ID enabled for passes.
In Xcode, select the project, then the target, and then the Capabilities tab, as shown in Figure 24.23. Setting Passbook to On will have Xcode check that the PassKit framework is linked to the project, the entitlements needed are configured correctly, and the needed provisioning profiles are set up correctly.

Figure 24.23 Xcode showing the Passbook section on the Capabilities tab.
Note
These steps to prepare the app are required only for running the app on a device. Interacting with Passbook works fine in the Simulator without completing these steps.
Now the app is set up to access passes in Passbook. The sample app includes samples of each type of pass in the main bundle for demonstration. Passes would typically not be distributed this way; rather, a pass would more likely be downloaded from a server after some information was provided about the pass recipient. To see how to programmatically interact with Passbook, start the sample app and tap any pass type (this example will demonstrate the boarding pass). The app will check how many passes it can see in Passbook, and will determine whether the selected pass is already in Passbook (see Figure 24.24).

Figure 24.24 Pass Test sample app: boarding pass.
To get this information, the view controller needs to communicate with the pass library. For convenience, a property is set up to keep an instance of PKPassLibrary, which is instantiated in the viewDidLoad method.
- (void)viewDidLoad
{
[super viewDidLoad];
self.passLibrary = [[PKPassLibrary alloc] init];
[self refreshPassStatusView];
}
In the refreshPassStatusView method, the view controller first checks whether the pass library is available.
if (![PKPassLibrary isPassLibraryAvailable])
{
[self.passInLabel setText:@"Pass Library not available."];
[self.numPassesLabel setText:@""];
[self.addButton setHidden:YES];
[self.updateButton setHidden:YES];
[self.showButton setHidden:YES];
[self.deleteButton setHidden:YES];
return;
}
If the pass library is not available, no further action can be taken, so the method updates the UI and hides all the buttons. If the pass library is available, the method gets the information from the passLibrary to update the UI. To determine how many passes are in the library, access thepasses property on the passLibrary.
NSArray *passes = [self.passLibrary passes];
NSString *numPassesString =
[NSString stringWithFormat:
@"There are %d passes in Passbook.",[passes count]];
[self.numPassesLabel setText:numPassesString];
The passLibrary provides a method to access a specific pass using a pass type identifier and a pass serial number. This can be used to determine whether a specific pass is in the pass library.
PKPass *currentBoardingPass =
[self.passLibrary passWithPassTypeIdentifier:self.passIdentifier
serialNumber:self.passSerialNum];
If the pass is present in the library, currentBoardingPass will be a valid instance of PKPass; otherwise, it will be nil. The refreshPassStatusView method will check that and update the UI accordingly.
Adding a Pass
Tap on the Add Boarding Pass to Passbook button, which will call the addPassTouched: method. This method will first load the pass from the main bundle (again, this would typically be loaded from an external source).
NSString *passPath =
[[NSBundle mainBundle] pathForResource:self.passFileName
ofType:@"pkpass"];
NSData *passData = [NSData dataWithContentsOfFile:passPath];
NSError *passError = nil;
PKPass *newPass = [[PKPass alloc]
initWithData:passData error:&passError];
PassKit will evaluate the pass data and return an error in passError if there is anything wrong with the pass. If the pass is valid and does not already exist in the pass library, the method will present a PKAddPassesViewController, which will display the pass as it will appear in Passbook, and manage adding it to the library based on whether the user chooses Add or Cancel (see Figure 24.25). Otherwise, the method will display an alert view with an appropriate error message.
if (!passError && ![self.passLibrary containsPass:newPass])
{
PKAddPassesViewController *newPassVC =
[[PKAddPassesViewController alloc] initWithPass:newPass];
[newPassVC setDelegate:self];
[self presentViewController:newPassVC
animated:YES
completion:^(){}];
}
else
{
NSString *passUpdateMessage = @"";
if (passError)
{
passUpdateMessage =
[NSString stringWithFormat:@"Pass Error: %@",
[passError localizedDescription]];
}
else
{
passUpdateMessage = [NSString stringWithFormat:
@"Your %@ has already been added.",
self.passTypeName];
}
UIAlertView *alert =
[[UIAlertView alloc] initWithTitle:@"Pass Not Added"
message:passUpdateMessage
delegate:nil
cancelButtonTitle:@"Dismiss"
otherButtonTitles:nil];
[alert show];
}
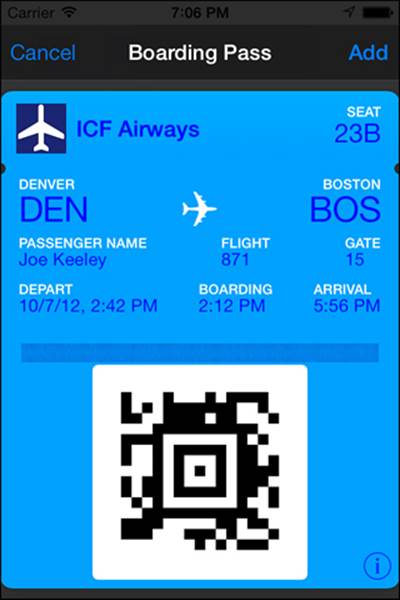
Figure 24.25 Sample app displaying PassKit Add Passes View Controller.
After the user has chosen to add the pass, the PKAddPassesViewController will call the delegate method if a delegate is set.
-(void)addPassesViewControllerDidFinish:
(PKAddPassesViewController *)controller
{
[self dismissViewControllerAnimated:YES completion:^{
[self refreshPassStatusView];
}];
}
The delegate is responsible for dismissing the PKAddPassesViewController. After it is dismissed, the UI is updated to reflect the addition of the pass, as shown in Figure 24.26.
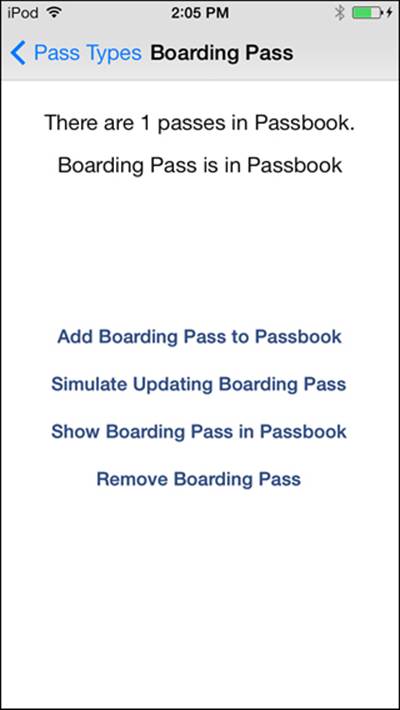
Figure 24.26 Pass Test sample app: boarding pass in the pass library.
Simulate Updating a Pass
Tap on the Simulate Updating Boarding Pass button, which will call the updatePassTouched method. This method will first load the updated pass data from the main bundle (this is simulated in that the updated pass would typically be loaded from a server in response to a change), and then instantiate a PKPass object.
NSString *passName =
[NSString stringWithFormat:@"%@-Update",self.passFileName];
NSString *passPath =
[[NSBundle mainBundle] pathForResource:passName ofType:@"pkpass"];
NSData *passData = [NSData dataWithContentsOfFile:passPath];
NSError *passError = nil;
PKPass *updatedPass = [[PKPass alloc] initWithData:passData
error:&passError];
The method will check whether there are any errors instantiating the pass, and whether the pass library already contains the pass. If there are no errors and the pass exists, it will replace the existing pass with the updated pass.
if (!passError && [self.passLibrary containsPass:updatedPass])
{
BOOL updated = [self.passLibrary
replacePassWithPass:updatedPass];
if (updated)
{
NSString *passUpdateMessage = [NSString stringWithFormat:
@"Your %@ has been updated.",self.passTypeName];
UIAlertView *alert =
[[UIAlertView alloc] initWithTitle:@"Pass Updated"
message:passUpdateMessage
delegate:nil
cancelButtonTitle:@"Dismiss"
otherButtonTitles:nil];
[alert show];
}
else
{
NSString *passUpdateMessage = [NSString stringWithFormat:
@"Your %@ could not be updated.",self.passTypeName];
UIAlertView *alert =
[[UIAlertView alloc] initWithTitle:@"Pass Not Updated"
message:passUpdateMessage
delegate:nil
cancelButtonTitle:@"Dismiss"
otherButtonTitles:nil];
[alert show];
}
}
The replacePassWithPass: method will indicate whether the pass was successfully updated, and an appropriate alert will be displayed to the user.
If the update is time sensitive and critical information for the user to be aware of immediately, a changeMessage can be specified in the pass.json of the updated pass.
"headerFields" : [
{
"key" : "seat",
"label" : "Seat",
"value" : "14C",
"textAlignment" : "PKTextAlignmentRight",
"changeMessage" : "New Seat: %@"
}
],
When a change message is specified, Passbook will display a notification to the user when the pass has been updated (as shown in Figure 24.27). The notification will display the icon included in the pass, the organization name specified in the pass, and a message. If %@ is specified in thechangeMessage, then the changeMessage specified will be presented in the notification to the user, and %@ will be replaced with the new value of the field. If %@ is not in the changeMessage, a generic message like "Boarding Pass changed" will be presented.
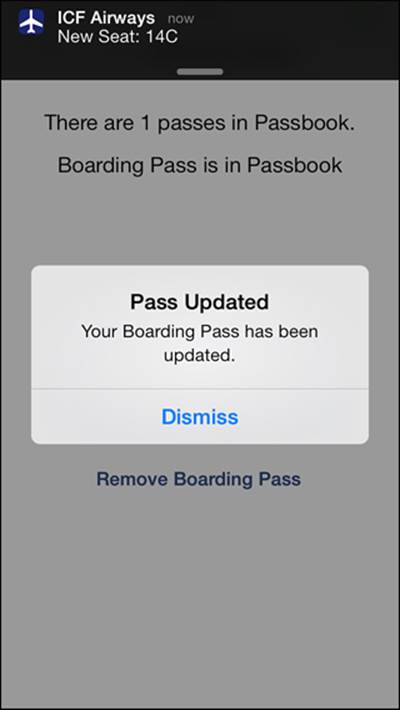
Figure 24.27 Pass change notification.
That notification will also remain in Notification Center until removed by the user.
Showing a Pass
To show an existing pass, tap on the Show Boarding Pass in Passbook button, which will call the showPassTouched method. Since PassKit does not support displaying a pass inside an app, the method needs to get the pass’s public URL, and ask the application to open it. That will open the desired pass directly in Passbook.
PKPass *currentBoardingPass =
[self.passLibrary passWithPassTypeIdentifier:self.passIdentifier
serialNumber:self.passSerialNum];
if (currentBoardingPass)
{
[[UIApplication sharedApplication]
openURL:[currentBoardingPass passURL]];
}
Removing a Pass
To remove a pass directly from the app, tap on the Remove Boarding Pass button, which will call the deletePassTouched method. The method will get the pass using the pass identifier and serial number, and remove it from Passbook.
PKPass *currentBoardingPass =
[self.passLibrary passWithPassTypeIdentifier:self.passIdentifier
serialNumber:self.passSerialNum];
if (currentBoardingPass)
{
[self.passLibrary removePass:currentBoardingPass];
[self refreshPassStatusView];
NSString *passUpdateMessage =
[NSString stringWithFormat:@"Your %@ has been removed.",
self.passTypeName];
UIAlertView *alert =
[[UIAlertView alloc] initWithTitle:@"Pass Removed"
message:passUpdateMessage
delegate:nil
cancelButtonTitle:@"Dismiss"
otherButtonTitles:nil];
[alert show];
}
Updating Passes Automatically
One of the key features of Passbook is the capability to automatically update passes without the use of an app. This is an overview of the feature, since implementing it requires a server capable of building and updating passes and is beyond the scope of this chapter to fully illustrate.
If updating a pass will be supported, the pass.json needs to specify a webServiceURL and an authenticationToken. When the pass is first added, Passbook will call the webServiceURL to register the device and pass with the server, and will provide a push token for use in the next step.
When information related to a pass is updated on the server, the server needs to notify the device with the pass that an update is available. To do this, the server sends a push notification utilizing the push token received in the registration step to the device with the pass, and includes the pass type ID in the push.
Note
Refer to Chapter 9, “Notifications,” for more information on sending push notifications.
After the device receives the push notification, Passbook will request a list of passes that have been changed from the server for the specified pass type ID and last updated tag. The server will respond with a list of serial numbers and a new last-updated tag.
The device will then iterate through the serial numbers, and request updated versions of passes from the server for each serial number. If the updated pass includes a changeMessage (described in more detail in the earlier section “Simulate Updating a Pass”), then Passbook will display a notification to the user for it.
Using this mechanism, a user’s passes can be kept up-to-date with the latest information, and users can selectively be notified when critical, time-sensitive information is changed.
Summary
This chapter provided an in-depth look at Passbook. It covered what Passbook is and what types of passes are supported by Passbook. It explained how to design and build a pass, and the steps needed to sign and package an individual pass. The chapter demonstrated how to interact with passes and Passbook using PassKit from an app, and discussed how to use a Web server to keep passes up-to-date.
Exercises
1. In the sample app, minimal information is displayed about each pass. Enhance the app to display more detail about each pass when it exists in Passbook, utilizing the localizedName, localizedDescription, localizedValueForFieldKey, relevantDate, andorganizationName methods of a PKPass object.
2. Create custom passes for each type. Start with a new design, implement the design, sign and package the pass, and test it in the Simulator.