iOS 6 Application Development For Dummies (2013)
Part V. Adding the Application Content
In this part . . .
Now that you have the application foundation and the user experience architecture in place, Part V takes you into the world of applications that contain major functionality. You see how to display the weather using a web page right off the Internet, allow the user to page through local events as if he were reading a book, display a map of where the user is going and where he is right now, find a location that he has always wanted to visit and display it on a map, and even change where he is going (limited in the RoadTrip app to New York and San Francisco, but it’s incredibly easy to add other destinations). You don’t yet have to slog through every detail of every detail, but you see almost all the technology you need to master in order to create a compelling application like this on your own.
Chapter 15. How’s the Weather? Working with Web Views
In This Chapter
![]() Having your application actually deliver content
Having your application actually deliver content
![]() Displaying a web page
Displaying a web page
![]() Understanding the ins and outs of Web views
Understanding the ins and outs of Web views
![]() Encountering some interesting runtime errors
Encountering some interesting runtime errors
Getting the framework (no pun intended) in place for a new app is certainly a crucial part of the development process, but in the grand scheme of things, it’s only the spadework that prepares the way for the really cool stuff. After all is said and done, you still need to add the content that the users see or interact with. Content (and functionality) is, after all, the reason they will buy the application.
Now that you have created the storyboard scenes by specifying the view controllers and have spiffed up the Master View controller, it’s time to make those new view controllers earn their keep. As I’ve explained more than once, view controllers are the key elements here. They’re the ones that get the content from the Trip model object and send it to the view to display. In this chapter, you create a view controller that lets the Weather view know where to get the weather information it needs.
The Plan
You will be adding a custom view controller for displaying the weather, which is actually pretty easy. But you will have to do the job twice — once for your iPad storyboard and again for your iPhone storyboard.
The iPad storyboard
The Weather-related part of the iPad storyboard is shown in Figure 15-1.
The control flow through the iPad storyboard goes like this:
1. The iPad user interface is controlled by an instance of Apple’s UISplitViewController, which manages a Master View controller and a Detail View controller.
2. The Master View controller, displayed on the left in Landscape orientation, has a relationship to a UINavigationController. This relationship is shown as an object in the storyboard file.
3. The Detail View controller, which is always displayed, has a relationship with the custom WeatherController that you’ll develop in this chapter.
4. You need a navigation controller as a wrapper around the Table view that is displayed in the Master View controller (there is another navigation controller used with the Events controller).
5. The first navigation controller has a relationship to your custom RTMasterViewController.
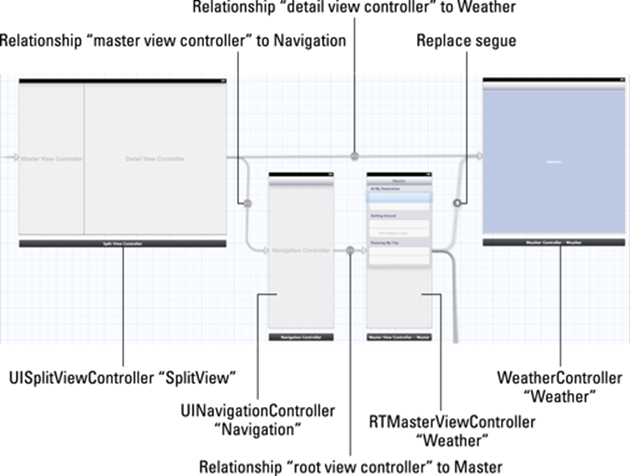
Figure 15-1: Weather-related part of the iPad storyboard.
6. The RTMasterViewController manages the Table view that you provide to let the user decide what should be displayed in the Detail view.
7. You’ll create a Replace segue to connect the first (Weather) item in the Table view to your weather scene.
8. You’ll use a UIWebView to display the contents of a web page inside your custom WeatherController. Voilà — the user can see a weather forecast.
The iPhone storyboard
The Weather-related part of the iPhone storyboard is shown in Figure 15-2.
The control flow through the iPhone storyboard goes like this:
1. The iPhone user interface is controlled by an instance of Apple’s UINavigationController. The Navigation controller is needed to allow the user to pop (for example, return from) any view controller that is pushed using the Push segue in Step 4.
2. Your UINavigationController has a relationship to your Master View controller.
3. The RTMasterViewController manages the Table view that you are using to let the user decide what should be displayed when a table element is selected.
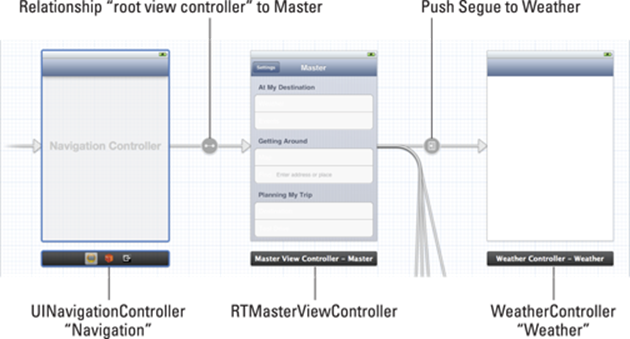
Figure 15-2: Weather-related part of the iPhone storyboard.
4. You’ll connect the first item in your RTMasterViewController to your WeatherController using a Push segue.
5. You’ll use a UIWebView to display the contents of a web page inside your custom WeatherController. Voilà — the user can see a weather forecast.
Setting Up the Weather Controller
If the user selects Weather from the Master view in the RoadTrip application, he comes face-to-face with an Internet site displaying weather information. (You’ll start with the URL specified in the Destination.plist, but you can use any site that you’d like.)
In this section, you add the initial Objective-C code for WeatherController class, and then add the logic it needs to get the right URL for the weather from the Trip object and send it on to the Weather (Web) view to load.
You’ll use the same WeatherController class in both the iPad and iPhone storyboard files. Add the WeatherController to the iPad storyboard first. After that, you can use the same class in the iPhone storyboard.
Adding the custom view controller
Although you have a view controller defined in the storyboard, it’s a generic view controller — in this case, a UIViewController — and it’s clueless about what you want to display in a view, much less the model it will need to get the data from. In this section, you create a custom controller that does know about its view and the model. So, let’s replace the generic controller with a custom one. Follow these steps:
1. In the Project navigator, select the ViewController Classes group and then right-click and choose New File from the contextual menu that appears.
Or choose File⇒New⇒New File from the main menu (or press ![]() +N).
+N).
Whatever method you choose, the New File dialog appears.
2. In the left column of the New File dialog, select Cocoa Touch under the iOS heading, select the Objective-C class template in the top-right pane, and then click Next.
You’ll see a dialog that will enable you to choose the options for your file.
3. In the Class field of the dialog, enter WeatherController, choose or enter RTDetailViewController in the Subclass Of field, make sure that the Target for iPad check box is selected and that the With XIB for User Interface is deselected, and then click Next.
4. In the Save sheet that appears, click Create.
You’ve got yourself a new a custom view controller.
Setting Up WeatherController in the MainStoryboard_iPad file
Adding a new custom view controller is a good start, but you still need to tell the storyboard that you want it to load the new custom view controller rather than a UIViewController. Follow these steps:
1. In the Project navigator, select MainStoryboard_iPad and, in the Document Outline, select View Controller – Weather in the View Controller – Weather Scene.
The Weather View controller is selected on the canvas.
 2. Open the Utility area and then click the Identity Inspector icon in the Inspector selector bar to open the Identity inspector in the Utility area. Choose WeatherController from the Class drop-down menu (replacing UIViewController) in the Custom Class section, as I have in Figure 15-3.
Doing so means that, when Weather is selected in the Master View controller, WeatherController will now be instantiated and initialized and will receive events from the user and connect the view to the Trip model.
3. Drag in a Web view from the Utility area’s Library pane and position it in the Weather controller, just under the toolbar, as shown in Figure 15-4.
For the RoadTrip application, you want to use a UIWebView to display the weather information. This makes sense, because you’ll be using a website to display the weather. (As you’ll see in Chapter 16, it makes sense to display the events with the help of a UIWebView as well.)
 As I explain in Chapter 4, the UIWebView class provides a way to display HTML content. These views can be used as the Main view, or as a subview of another view; wherever they’re used, they can access websites.
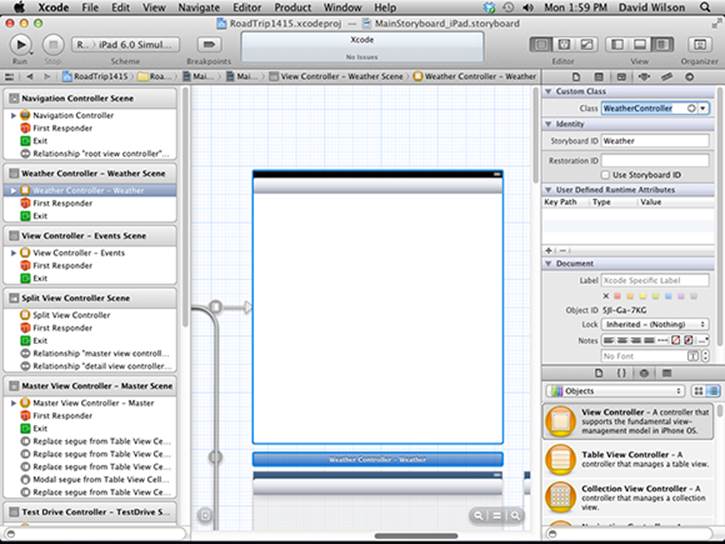
Figure 15-3: Now the storyboard Weather controller is connected to WeatherController.
 Because of constraints imposed by the fact that I’m presenting this material within the pages of a printed book rather than on a lovely display monitor, I find it easier to position and size the user interface elements in Interface Builder using the Size inspector, as you can see back in Figure 15-4. The origin (x,y) coordinate is (0,44) with a width of 704 and a height of 704.
 4. Click the Size inspector icon in the Inspector selector to open the Size inspector in the Utility area.
Just as you did with the toolbar in Chapter 13, and the car in Chapter 5, you are going to have to adjust the Autosizing settings.
Figure 15-2 shows that the Web view is currently configured to be a fixed size. The springs — the two indicators, each with an arrowhead in the inner square — are both disabled (when they’re enabled, they’re solid and bright red, and when disabled, dim and dashed). Configured this way, the Web view will be sized correctly for the Detail view in Landscape orientation, but won’t expand to fill the larger Detail view in Portrait orientation. You need to fix that.
5. Select both springs, as I have in Figure 15-5, to enable them. Also select the bottom and right-side struts (the indicators with two perpendicular lines at each end) to enable them.

Figure 15-4: Adding the Web view.
Interestingly enough, you may have noticed that you don’t always have to adjust the Autosizing settings. For example, you didn’t have to do it for the Image view in Chapter 5 — that’s because Image views come out of the box automatically sized the way we need.
Finally, you need to set up two outlets: one to the Web view so that WeatherController can tell the Web view what website to load and a second one to the toolbar so it can place the button there.
 6. Close the Utility area and select the Assistant from the Editor selector in the Xcode toolbar.
7. If the WeatherController.h file isn’t the one that’s displayed in the Assistant editor, go up to the Assistant’s Jump bar and select it, as I have done in Figure 15-6.
8. Control-drag from the Web view (either on the Canvas or in the Document Outline) to the WeatherController interface and create an IBOutlet (just as you do in Chapter 9) named weatherView.
9. Control-drag from the Web view in the storyboard Canvas (or in the Document Outline) to the WeatherController object in the Document Outline and then choose Delegate (see Figure 15-7) from the Outlets menu that appears.
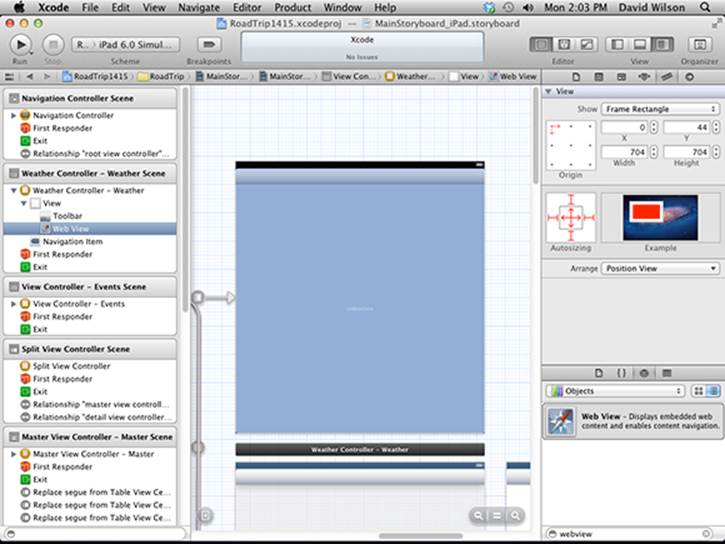
Figure 15-5: The corrected Autosizing settings.
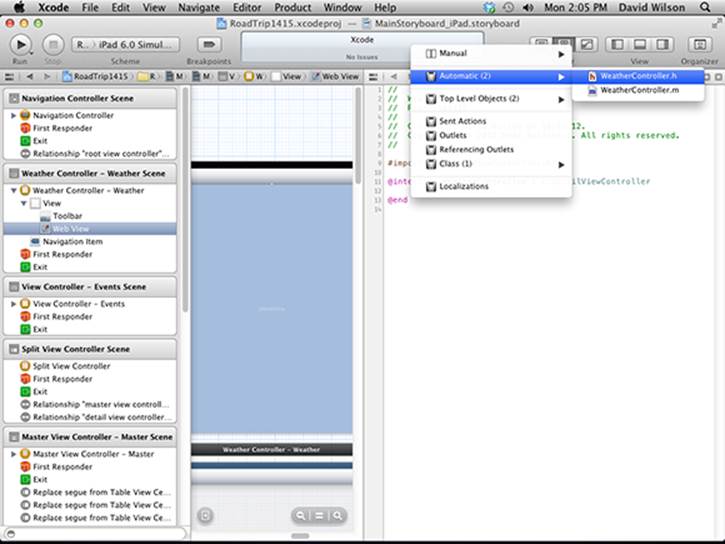
Figure 15-6: Displaying the correct file in the Assistant.
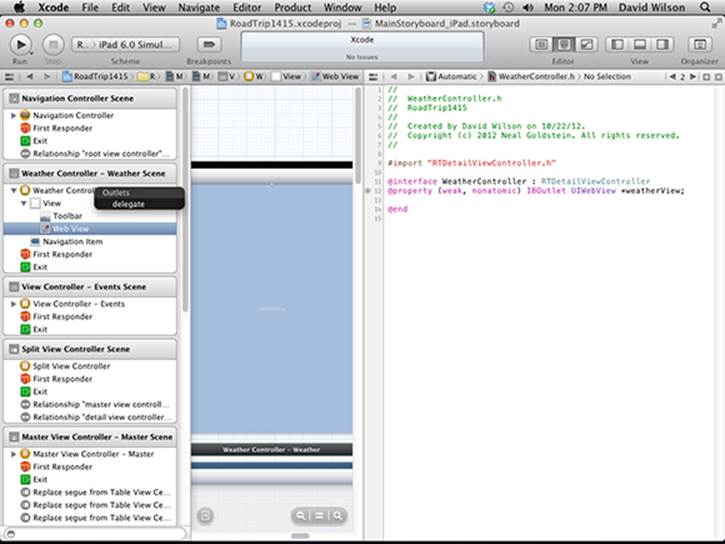
Figure 15-7: Make the WeatherController a Web view delegate.
I’m showing you this to illustrate that you can do all this dragging either on the Canvas or in the Document Outline.
Because you have an outlet set up, you could make WeatherController a delegate in your code. I actually prefer to do it that way because it’s more obvious when it is there in your code; in fact, you get to do it that way in the next chapter. (It’s up to you, though.)
You still need to connect the toolbar to the RTDetailViewController, the WeatherController’s superclass. You take care of that in the next step.
 10. Select the Standard editor in the Editor selector on the toolbar, select Weather Controller in the Document Outline, and open the Connections inspector using the Inspector selector, as I have in Figure 15-8.
You could also right-click or Control-click WeatherController in the Document Outline to get a similar menu.
11. Drag from the toolbar Outlet in the Connections inspector to the toolbar in the Weather Controller on the canvas. (See Figure 15-8.)
You didn’t need to create the toolbar Outlet because it had already been created along with UIViewController. The idea here is that you can use the same click-and-drag technique you used to create an outlet to modify which object an existing outlet connects to.
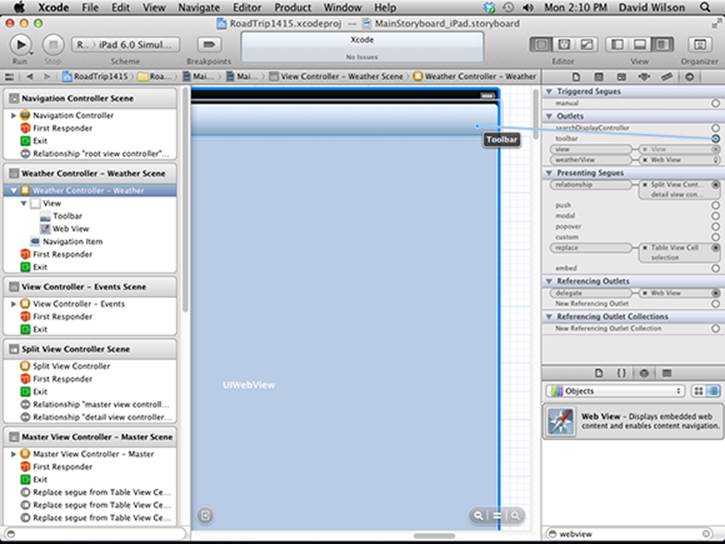
Figure 15-8: Connecting the toolbar to the RTDetailViewController base class.
If you were to compile and run the RoadTrip project, you’d see the blank screen displayed at application launch, but with a functioning toolbar. You could select Weather or Test Drive in the Master View controller (in Portrait or Landscape orientation, mind you), but you’d just see a blank screen if you selected Weather. You’ll fix that next.
But keep in mind this is a major step forward. You now have a fully functioning application structure that can, with equal aplomb, use a Navigation controller and its Navigation bar (as you’ll see in the next chapter), or simply replace the controller in the Detail view and use a toolbar.
At this point, you have the WeatherController class set up and you’ve arranged for the storyboard to create a UIWebView object and set all the outlets (the toolbar and weatherWebView) for you when the user selects Weather for the view he or she wants to see.
Because the Trip object owns the data — in this case, the data is provided by the website you’re using to display the weather information — you add the methods necessary to the Trip model to provide this to WeatherController.
 Select the Standard editor in the Editor selector on the toolbar and select Trip.h in the Project navigator. (If you managed to close the Project navigator at some point in your travels, select its icon in the View selector or choose View⇒Navigators⇒Show Project Navigator to open it again.)
Add the declaration for the weather method (the bolded code) to the Trip interface in Trip.h, as shown in Listing 15-1.
Listing 15-1: Updating the Trip.h Interface
#import <Foundation/Foundation.h>
#import <mapKit/MapKit.h>
@interface Trip : NSObject
- (id)initWithDestinationIndex:(int)destinationIndex;
- (UIImage *)destinationImage;
- (NSString *) destinationName;
- (CLLocationCoordinate2D) destinationCoordinate;
- (NSString *)weather;
@end
Add the weather method in Listing 15-2 to Trip.m.
Listing 15-2: Adding the weather Method
- (NSString *)weather {
return destinationData[@”Weather”];
}
All the Trip object does here is return the URL that the Web view will use to download the weather HTML page for the site. It got the URL for that site from the dictionary you create in Chapter 11 when you load the Destination plist that provides the data for this destination.
The Weather Controller
Now that you have the Trip object set up to deliver the data you need, the WeatherController needs to pass on to the view to load the web page.
You need to add some #import compiler directives so that WeatherController can access RTAppDelegate to get the Trip reference and request the data it needs.
To do that, add the bolded code in Listing 15-3 to WeatherController.m.
Listing 15-3: Updating the WeatherController Implementation
#import “RTDetailViewController.h”
#import “RTAppDelegate.h”
#import “Trip.h”
The template provides a viewDidLoad method stub when you create the controller file. You may recall from previous chapters that this is where you want to have the Web view (or any other view) load its data. Add the bolded code in Listing 15-4.
Listing 15-4: Adding to viewDidLoad
- (void)viewDidLoad
{
[super viewDidLoad];
self.title = @”Weather”;
self.weatherView.scalesPageToFit = YES;
RTAppDelegate *appDelegate =
[[UIApplication sharedApplication] delegate];
[self.weatherView loadRequest:
[NSURLRequest requestWithURL:[NSURL
URLWithString:[appDelegate.trip weather]]]];
}
The first thing you do in Listing 15-4 is set the title to Weather.
The title won’t be showing up on the toolbar, however, because this just sets the title in the Navigation bar. I’ll use it when I add a Return to Whatever button in the next section.
Because what gets loaded is going to be a website, you set self.weatherView.scalesPageToFit to YES.
scalesPageToFit is a UIWebView property. If it’s set to YES, the web page is scaled to fit inside your view, and the user can zoom in and out. If it’s set to NO, the page is displayed in the view, and zooming is disabled.
I might set it to NO when I’m not displaying a web page and the HTML page I created fits just fine and I don’t want it to be scalable. You may want to do something else here, of course; I did it this way to show you how (and where) you have control of web page properties.
You then create the NSURLRequest object that the Web view needs to load the data. To do that, you first create an NSURL object (an object that includes the utilities necessary for downloading files or other resources from web and FTP servers) using the URL you get from Trip. The code uses this NSURL and creates an NSURLRequest from it. The NSURLRequest is what the WeatherController needs to send to the Web view in the loadRequest: message, which tells it to load the data associated with that particular NSURL.
The NSURLRequest class encapsulates a URL and any protocol-specific properties, all the time keeping things protocol-independent. It also provides a number of other things that are beyond the scope of this book, but are part of the URL loading system — the set of classes and protocols that provide the underlying capability for an application to access the data specified by a URL. This is the preferred way to access files both locally and on the Internet.
The loadRequest message is sent to the Web view, and the Weather website is displayed in the window. This causes the Web view to load the data and display it in the window.
Managing links in a Web view
An interesting thing about the Weather view — or any other view that does (or can) load real web content into your application instead of using a browser — is that the links are live and users can follow those links from that view if you let them.
After the user is at the weather website, as you can see in Figure 15-9, the user might want to look at the NWS New York, NY link in the upper-left corner. If the user were to follow that link, though, he wouldn’t have a way to get back to the originating page.
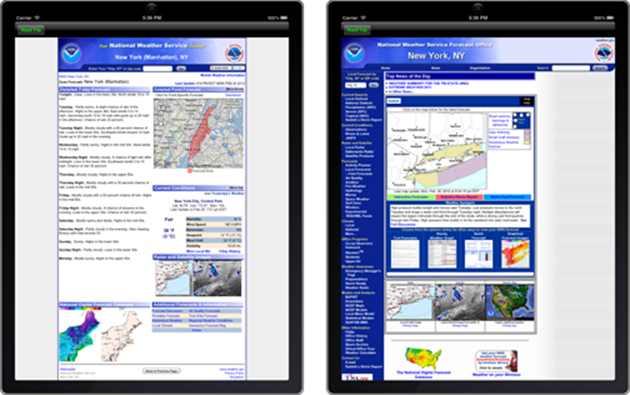
Figure 15-9: You can select a link (left) to look at National Weather Service info for New York (right) — but you have no way to get back to the originating view.
Hmm.
To be able to navigate back to the originating view, you need to create another button and label it Back to Weather (or whatever the previous controller is) so that the user knows that she can use it to get back to the previous view. Creating this button is pretty easy to do, as you’ll see inListing 15-6.
Of course, I don’t want to have that button pop up if the user is at the originating web page because, at that point, there’s no going back. So, how do you keep track of who’s where in the whole navigational link structure? Here, you’re assisted by two Web view delegate methods,webView:shouldStartLoadWithRequest:navigationType: and webViewDidFinishLoad:.
webView:shouldStartLoadWithRequest:navigationType: is a UIWebView delegate method. It’s called before a Web view begins loading content to see whether the user wants the load to proceed.
First, adopt the UIWebViewDelegate protocol by adding the bolded code in Listing 15-5 to WeatherController.h.
Listing 15-5: Updating the WeatherController Interface
#import “RTDetailViewController.h”
@interface WeatherController : RTDetailViewController
<UIWebViewDelegate>
@property (weak, nonatomic)
IBOutlet UIWebView *weatherView;
@end
Remember that when you adopt a delegate protocol, the compiler will then check to make sure that all required methods are in fact there and that all types are correct — so do it!
Next, add the code in Listing 15-6 to WeatherController.m.
Listing 15-6: Implementing the webView:shouldStartLoadWithRequest:navigationType: Method
- (BOOL)webView:(UIWebView *)webView shouldStartLoadWithRequest:
(NSURLRequest *)request navigationType:
(UIWebViewNavigationType)navigationType {
if (navigationType == UIWebViewNavigationTypeLinkClicked){
UIBarButtonItem *backButton = [[UIBarButtonItem alloc] initWithTitle:[NSString stringWithFormat:
@”Back to %@”, self.title] style:UIBarButtonItemStyleBordered target:self
action:@selector(goBack:)];
if ([[UIDevice currentDevice]
userInterfaceIdiom] == UIUserInterfaceIdiomPad) {
NSMutableArray *itemsArray =
[self.toolbar.items mutableCopy];
UIBarButtonItem *flexibleSpace=
[[UIBarButtonItem alloc] initWithBarButtonSystemItem:
UIBarButtonSystemItemFlexibleSpace target:self
action:@selector(goBack:)];
flexibleSpace.width = 1.0;
[itemsArray addObject:flexibleSpace];
[itemsArray addObject:backButton ];
[self.toolbar setItems:itemsArray animated:NO];
}
else {
self.navigationItem.rightBarButtonItem = backButton;
}
}
return YES;
}
Early on in Listing 15-6, you check to see whether the user has touched an embedded link. (You have to see whether a link is clicked because this message is sent to the delegate under several different circumstances.)
if (navigationType == UIWebViewNavigationTypeLinkClicked){
You create the Back to Whatever button, using the view controller title, and return YES to tell the Web view to load from the Internet. The action:@selector(goBack:) argument is the standard way to specify Target-Action. It says that when the button is tapped, you need to send thegoBack: message to the target:self, which is the WeatherController.
UIBarButtonItem *backButton = [[UIBarButtonItem alloc]
initWithTitle:[NSString stringWithFormat:
@”Back to %@”, self.title]
style:UIBarButtonItemStylePlain target:self
action:@selector(goBack:)];
self.navigationItem.rightBarButtonItem = backButton;
return YES;
I think it looks better if the button appears on the right side of the toolbar, especially in Portrait orientation when you have the Road Trip button as well.
To do that, you first add a flexible space — space that’s distributed equally between the other Bar Button items in the toolbar — and then add the Back to Whatever button.
UIBarButtonItem *flexibleSpace= [[UIBarButtonItem alloc]
initWithBarButtonSystemItem:
UIBarButtonSystemItemFlexibleSpace target:self
action:@selector(goBack:)];
flexibleSpace.width = 1.0;
[itemsArray addObject:flexibleSpace];
[itemsArray addObject:backButton];
[self.toolbar setItems:itemsArray animated:NO];
You’re creating a UIBarButtonItem that’s a flexible space. This adds a space that’s distributed equally between the other Bar Button items on the toolbar (other properties are ignored).
Next, add the goBack: method in Listing 15-7 to the WebViewController.m file. This is the message sent when the Back to Whatever button is tapped.
Listing 15-7: Adding the goBack: Method
- (void)goBack:(id)sender {
[self.weatherView goBack];
}
 Note that you don’t need to declare this method in WeatherController.h because it’s used only in the Target-Action, which is resolved at runtime, not compile time.
The UIWebView actually implements much of the behavior you need here. The Web view keeps a Backward and Forward list. When you send the UIWebView the message (goBack:), it reloads the previous page.
Finally, you want to get rid of the Back to Whatever button when you’re displaying the original page. The code to do that is shown in Listing 15-8.
Listing 15-8: Implementing webViewDidFinishLoad:
- (void)webViewDidFinishLoad:(UIWebView *) webView {
if ([self.weatherView canGoBack] == NO ) {
if (([[UIDevice currentDevice] userInterfaceIdiom] == UIUserInterfaceIdiomPad) &&
([self.toolbar.items count] >= 3)){
NSMutableArray *itemsArray =
[self.toolbar.items mutableCopy];
[itemsArray removeLastObject];
[itemsArray removeLastObject];
[self.toolbar setItems:itemsArray animated:NO];
}
else {
self.navigationItem.rightBarButtonItem = nil;
}
}
}
The delegate is sent the webViewDidFinishLoad: message after the view has loaded. At this point, you check to see whether there’s anything to go back to (the Web view keeps track of those sorts of things). If not, remove the button from the toolbar or Navigation bar.
 That being said, the Apple Human Interface Guidelines say it’s best to avoid creating an application that looks and behaves like a mini–web browser. As far as I’m concerned, making it possible to select links in a Web view doesn’t do that.
But if you really don’t want to enable the user to follow links (either because of Apple’s suggestion that you not make your app act as a mini-browser or if you’d just prefer that your app users stick around for a bit and don’t go gallivanting around the Internet), you have to disable the links that are available in the content. You can do that in the shouldStartLoadWithRequest: method in the WeatherController.m file by replacing the code you added in Listing 15-6 with the code shown in Listing 15-9.
Listing 15-9: Disabling Links
- (BOOL)webView:(UIWebView *)webView
shouldStartLoadWithRequest:(NSURLRequest *)request
navigationType:(UIWebViewNavigationType)navigationType {
if (navigationType ==
UIWebViewNavigationTypeLinkClicked){
return NO;
}
else return YES;
}
You should add an alert to inform the user of the fact that no Internet gallivanting is to be had here.
More Opportunities to Use the Debugger
A couple of runtime errors are easy to get. Two that pop up frequently are unrecognized selector sent to instance and NSUnknownKeyException. Although the former error is pretty easy to track down if you actually read the error message, the latter can be a real mystery (it was to me), especially the first time you encounter it. So I want to explain both of them now.
Unrecognized selector sent to instance
The unrecognized selector sent to instance runtime error is probably the most common one I get e-mails about; it (understandably) throws many people for a loop. But if you take time to read the error message, you can make sense of it.
2011-12-07 19:34:07.166 RoadTrip[1202:12503] ***
Terminating app due to uncaught exception
‘NSInvalidArgumentException’, reason: ‘-[WeatherController
goBack]: unrecognized selector sent to instance 0xb7331f0’
This error occurs when you thought you created a selector in your code but it’s not (really) there.
If, in the webView shouldStartLoadWithRequest:navigationType: method, you mistakenly typed goBack (without a colon, designating a method with no arguments) rather than goBack: (a method with a single argument) when you allocated and initialized the backButton:
UIBarButtonItem *backButton = [[UIBarButtonItem alloc]
initWithTitle:[NSString stringWithFormat:
@”Back to %@”, self.title]
style:UIBarButtonItemStylePlain target:self
action:@selector(goBack)];
and then you ran the application, selected Weather, selected a link, and then tapped the Back to Weather button, what you will see in the Debugger Console pane is
2011-12-07 19:34:07.166 RoadTrip[1202:12503] ***
Terminating app due to uncaught exception
‘NSInvalidArgumentException’, reason: ‘-[WeatherController
goBack]: unrecognized selector sent to instance 0xb7331f0’
You get this error message because you’re sending the goBack message (not the goBack: message) to the target — the WeatherController. The WeatherController does have a fully functional goBack: method implemented, but it doesn’t have a goBack method implemented — as the debugger so clearly informs you.
Repeat for the iPhone Storyboard
The good news is that you can use the same custom WeatherController class in your iPhone storyboard as you used in the iPad storyboard file. You can also reuse the changes you made to the Trip model. You can update the iPhone Storyboard file the same way that you did in Chapter 12.
Adding the WeatherController to the iPhone storyboard file
The following steps show how to update the iPhone Storyboard file.
1. Select the MainStoryboard_iPhone.storyboard file in the Project Navigator.
2. Select the generic UIViewController scene in your storyboard.
3. Open the Utility area, and select the Identity inspector.
4. Change the class name to WeatherController in the Class drop-down menu, just as you did in Figure 15-3.
5. With the WeatherController scene selected in the storyboard file, select the view in the document outline.
6. Change the class name of the view from UIView to UIWebView.
7. In the Document Outline, Control-drag from the WeatherController to the Web view and select weatherView from the pop-up menu.
This step connects the weatherView outlet in the WeatherController class to the instance of UIWebView that you’ll use to display the weather.
Test in the iPhone Simulator
Run the iPhone app in the Simulator. You should see the web page displayed in Figure 15-10.
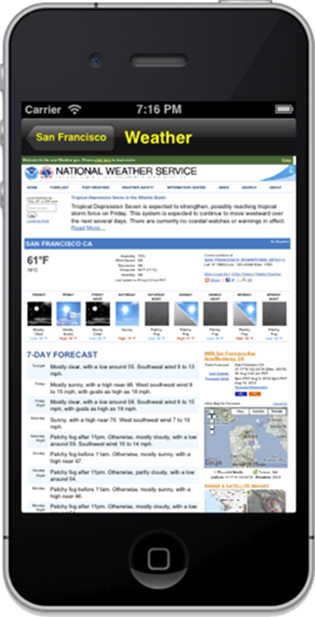
Figure 15-10: The WeatherController display on the iPhone.