Macs All-in-One For Dummies, 4th Edition (2014)
Book V. Taking Care of Business
Chapter 4. Presenting with Keynote
In This Chapter
![]() Creating a presentation
Creating a presentation
![]() Adding, editing, and formatting text
Adding, editing, and formatting text
![]() Working with shapes, charts, and tables
Working with shapes, charts, and tables
![]() Inserting photos and movies
Inserting photos and movies
![]() Changing the order of slides
Changing the order of slides
![]() Using transitions and effects
Using transitions and effects
![]() Customizing themes with masters
Customizing themes with masters
![]() Giving a presentation
Giving a presentation
Presentations used to be confined to the realm of professional conferences and shareholder meetings. With or without a projector, the combination of your Mac and Keynote ($19.99 at the App Store), makes it cost effective and time efficient to give presentations at weekly staff meetings, set up an interactive kiosk at the local small-business fair, or even post your presentation on your website. Keynote syncs with iCloud so you can access your presentations on all your devices such as an iPhone or iPad or on another computer from the iCloud website. Keynote enhances your creativity with ready-made templates so you can concentrate more of your time on talking to an audience and less of your time fumbling around with jammed slide projectors, whiteboards, and felt markers that stain your fingertips.
Best of all, you can spice up your presentation with tables, charts, and audio and visual effects, from playing music and movies to showing visually interesting effects — stuff like text sliding across the display or dissolving away into nothingness. Such effects help get your point across and hold an audience’s attention.
In this chapter, we begin our presentation (pardon the pun) with the Keynote basics: working with themes and slide layouts, replacing placeholder text and media with your text and media, and adding charts, tables, and animation. At the end of the chapter, we give you tips for practicing your presentation and tell you about the options you have for running the presentation even without being present. When you’re up to speed on the basics, check out Book V, Chapter 6, which shows you some nifty tricks that work across all three iWork applications.
 Keynote is part of the iWork suite. If you bought a new Mac after November 2013, the iWork apps are included. If you have an older Mac, you can purchase and download Keynote from the App Store for $19.99.
Creating a Presentation
A Keynote presentation consists of one or more slides, where typically each slide displays information to make a single point. Although our sample slide in Figure 4-1 shows only text and a graphic, a slide can include charts, graphics, photos, video, and audio as well.
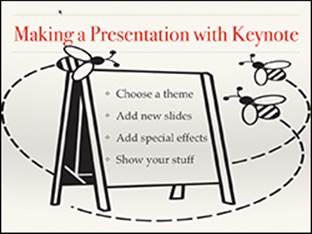
Figure 4-1: The appearance of a typical slide.
To make your presentation even more interesting to watch, you can add transition effects that appear when you switch from one slide to another. To emphasize the information on a particular slide, you can add individual visual effects, known as builds, to specific items, such as making text rotate or making a graphic image glide across the screen and halt in place.
We explain how to add all these embellishments to your presentation in the sections that follow; however, the basic steps to creating a presentation in Keynote are:
1. Pick a theme to use for your presentation.
2. Create one or more slides.
3. Type text or place graphics and images on each slide.
4. (Optional) Add an audio or video file to each slide.
5. (Optional) Add visual effects to animate an entire slide or just the text or graphics that appear on that slide.
Of course, you have to open the Keynote app to begin. Click the Keynote icon in the Dock or on the Launchpad. One of the following happens:
· If you didn’t turn on Keynote in iCloud, the themes chooser opens and you can skip ahead to the next section.
· If you turned Keynote on in the Documents & Data section of iCloud, (refer to Book III, Chapter 2) you have to first choose where you want to work: iCloud or Mac. When you open Keynote to create a new document or work on an existing one, the window shown in Figure 4-2opens.
Click iCloud or On My Mac to choose where you want to save your document, and then click New Document to open the Choose a Theme dialog and proceed as explained in the next section.
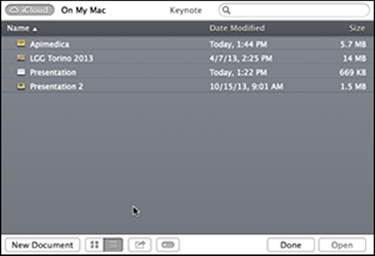
Figure 4-2: Save your Keynote presentations on iCloud or On My Mac.
Choosing a theme and saving your presentation
A presentation consists of multiple slides. Although a black-and-white presentation can be elegant in a retro sort of way, color helps attract and keep your audience’s attention. To make the creation of your presentation easier, Keynote provides themes that give your slides a consistent appearance, such as the font, size, style, and background color. Within each of the 30 themes, there are multiple slide layouts, which are templates for your slides. Each slide layout in a theme is a master slide, which defines the look of each slide you create based on the layout. We explain how to work with, and create, master slides in the section “Using Masters” later in this chapter. Most themes have the following slide layouts:
· Title, top or center
· Title and subtitle
· Title and bullets
· Title, bullets, and photo
· Bullet list
· Photo (horizontal, vertical, three-up, or full-page photo)
· Quote
· Blank
Each theme offers a standard and wide (HD) format. Make sure you decide which you want to use before creating your presentation.
 If you want to create a presentation without using a theme — say you want your presentation to reflect your corporate color scheme and font family — pick a simple theme, such as Black or White, to start so you have multiple slide layouts to which you can apply your desired color scheme, fonts, and so on.
To pick a theme, follow these steps:
1. Open Keynote from the Dock or Launchpad.
(If you use Keynote in iCloud, choose the destination for your presentation, and then click New Document.)
The Choose a Theme dialog opens, as shown in Figure 4-3.
2. Choose the slide format from the tabs at the top of the window: Standard (4:3) format or Wide (16:9) format.
Standard size slides echo traditional, square-ish 35mm slides and work well if you connect a projector to your Mac. Choose the Wide format when you plan to connect your Mac to a wide-screen HD monitor. If you’re not sure which you’ll be using, choose Wide as most projectors can accommodate wide but you don’t risk having black horizontal borders on your slides when projected on a wide-screen monitor.
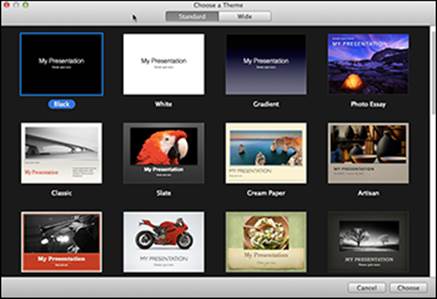
Figure 4-3: Keynote provides a variety of themes for your presentations.
3. Click a theme and click the Choose button or double-click a theme.
Keynote creates the first slide of your presentation, using your chosen theme. At this point, you can add text, graphics, audio, or video to the slide or you can add new slides.
4. Choose File⇒Save.
A Save As dialog opens.
5. Type a name for your presentation.
6. Type any tags you want to attach to the file or choose existing ones from the pop-up menu.
 You can use tags to find files in Spotlight Search.
7. Click the Where pop-up menu if you want to switch the destination between Mac and iCloud or choose another destination folder or volume. If you don’t see the folder where you want to save your presentation, follow Step 8.
8. (Optional) If you’re saving to your Mac, click the disclosure triangle next to the Save As field to see the directories and folders on your Mac or local network and choose the location where you want to store the file.
9. Click Save.
 If you want to save a copy of your presentation to another location, choose File⇒Save and then select where you want to save a copy from the pop-up menus.
If, instead, you want to move the presentation from your Mac to iCloud or vice versa, or to an external disk or flash drive, choose File⇒Move To and then select the new location from the pop-up menu. This action removes the presentation from its original location and places it on the new one.
Opening an existing file
If you’re working on a document on one source, such as your Mac, and you want to open a document from another source, such as iCloud or an external drive, choose File⇒Open, and do one of the following:
· From iCloud: Click iCloud, click one of the documents in the list, and then click Open. (You need an Internet connection to work on iCloud documents.)
· From your Mac or external drive: Click On My Mac, scroll through the directories and folders to find an existing document you want to work on, click it, and then click Open. Choose On My Mac to access external drives and volumes shared on your local network, too.
You can also use Keynote to open a presentation created in another presentation app, and then use it as is, make changes, even save it as a Keynote file. To open a non-Keynote presentation, such as Microsoft’s PowerPoint, drag the file you want to open over the Keynote icon in the Dock or follow the steps outlined in the preceding paragraphs.
Finding your way around Keynote
After you create a presentation, the Keynote slide editor window opens as shown in Figure 4-4. Across the top of the Keynote window, you see the Toolbar, which holds buttons for the most frequently used functions. Below the Toolbar is the Format bar, which has pop-up menus for formatting the text and objects on your slides. We explain both the Toolbar and Format bar functions throughout this chapter.
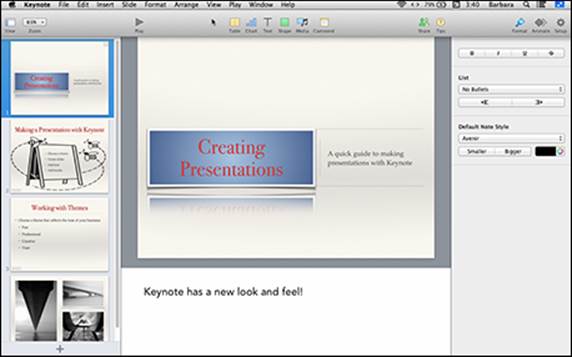
Figure 4-4: Navigator view gives you an overview of your presentation while working on a specific slide.
The window can have between one and three panels in the four available views. To switch to a different view, choose the View icon on the Keynote toolbar and then choose Navigator, Outline, Slide Only, or Light Table.
This is what you see in each view:
· Navigator: Useful for editing individual slides and manipulating all the slides in an entire presentation. Referring to Figure 4-4, you can see that thumbnails of your slides are displayed in the Slide Navigator in the left pane, the slide you’re editing is in the center panel, and the Format pane is on the right.
· Slide Only: Useful for editing the text and graphics of a single slide. The Slide Navigator pane closes, but you still have all the formatting tools available in the Format pane.
· Light Table: You see all your slides together, as in Figure 4-5. You can click and drag slides to a new position or change the slide layout by choosing a new one from the Format pane. Move the slider at the bottom of the left pane to show more, but smaller, slides or fewer, larger slides. When you double-click a slide in Light Table, it opens in the most recent of the three other views you used. This view is particularly useful for manipulating a large number of slides in a presentation,
 In both Navigator and Light Table views, slides with audio or movie media have three empty circles in the lower-left corner of the slide thumbnail image.
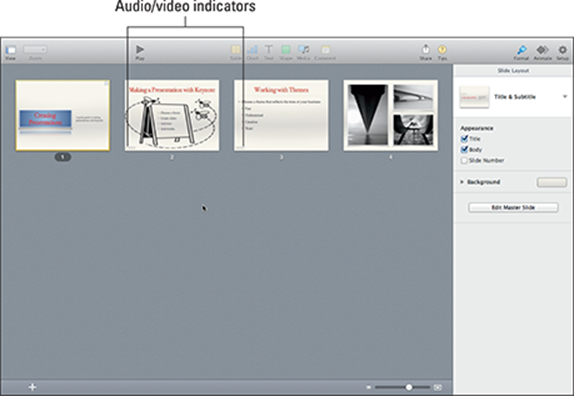
Figure 4-5: Light Table view displays slides in rows and columns for easy rearranging.
· Outline: Similar to Navigator view but instead of seeing thumbnail images in the Slide Navigator, you see the text of each slide, which you can edit, and the edits are reflected on the slides. Choose Keynote⇒Preferences⇒General to choose the font size you want to use in Outline View.
In addition to the presentation views, you can choose additional items you may want to see in the window. Choose View and then choose from these options:
· Show/Hide Rulers (not available in Light Table view): Use the rulers as a reference when working with objects on your slide.
· Show/Hide Comments: This is useful if other people comment on your presentation before or after you give it.
· Show/Hide Presenter Notes (not available in Light Table view): These are notes that you can view when giving your presentation. You see the notes on your computer below the slide preview, which helps you remember what you want to say, but the projected presentation displays only your slides. When you select Show Presenter Notes, you can type your speech or reminders on each slide.
To change the font or create a list format of notes, click the Presenter Notes section, and then click the Format icon in the toolbar (refer to Figure 4-4); make your choices from the buttons and menus you see.
Adding slides
When you create a new presentation, that presentation starts out containing just one slide. Because getting your idea across usually needs more than one slide, you probably want to add more slides. If you go overboard and add too many slides, you can always winnow a few.
Adding a blank slide
To add a blank slide to a presentation, do one of the following:
· Choose Slide⇒New Slide on the menu bar (any view). The new, blank slide appears at the end of the presentation.
· Control-click a slide, and choose New Slide (all but Full Slide view). The new blank slide appears after the slide you clicked.
· Click a slide in the Slide Navigator or Light Table view and press Return. The new blank slide appears after the slide you clicked.
Adding predefined slides
Each Keynote theme has a selection of slide layouts that you can use to build your presentation. When you use a slide layout, you need only insert your text and images in the existing placeholders, and that makes presentation creation a snap. The slide layout structures are more or less the same for each theme, but the colors, style, and fonts that have been applied make each theme different.
To create a new slide with a slide layout, click the slide before the location where you want to insert a new slide, and then click the New (+) icon in Slide Navigator, Light Table, or Outline view. Choose the slide layout you want, as shown in Figure 4-6. You can change the slide layout later, even after you add your own text and images — we tell you how in just a bit.
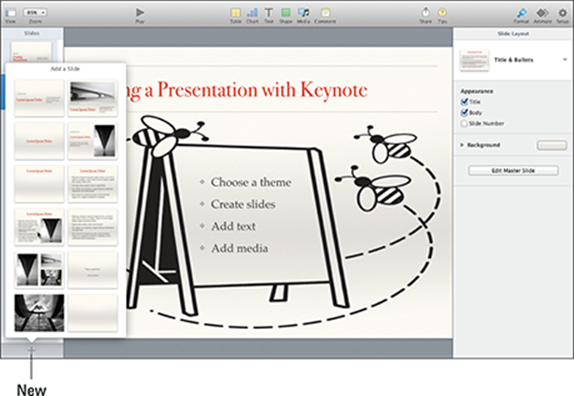
Figure 4-6: The Slide Layout menu is a quick way to create new slides.
Making duplicate slides
Making duplicate slides is helpful if you want to use the exact same header or layout on multiple slides. Even if you use slide layouts, you may tweak them and want to duplicate your efforts. Here’s how:
· Duplicate one slide. Click the slide you want to duplicate and choose Edit⇒Duplicate, or Control-click and choose Duplicate. The new, duplicate slide appears immediately after the original.
· Duplicate multiple slides. To duplicate more than one slide at once, hold down the Shift key and click the first and last slides of a series you want to duplicate, or hold the ![]() key and click individual, noncontiguous slides; then do either of the previous commands to duplicate all the slides you chose. The dupes will be inserted after the last selected slide.
key and click individual, noncontiguous slides; then do either of the previous commands to duplicate all the slides you chose. The dupes will be inserted after the last selected slide.
 If you want to create a duplicate of your entire presentation, choose File⇒Duplicate.
Manipulating Text
Whether it’s a title, subtitle, bulleted list, quote, or descriptive paragraph, text on a slide is written in a text box — although the box borders can be invisible. Most slides contain at least one text box that holds the title of the slide. Other text may be free-flowing or even a bulleted list that’s inserted in a graphic, like you see earlier in Figure 4-1.
Entering text
When you create a new slide, unless you choose the blank slide, the slide layout has text placeholders in text boxes and perhaps placeholder media, depending on the layout you choose. You replace the placeholders with your own words and images. For now, we’re going to talk about text. To place text on a slide, follow these steps:
1. Choose View⇒Navigator on the menu or toolbar.
2. In the Navigator, click the slide that you want to edit or create a new slide using one of the methods we outlined previously.
Your chosen slide appears.
3. Double-click the placeholder text that appears in the Title, Subtitle, or Bullet Point text box.
4. Type text or use the arrow keys and Delete key to edit existing text.
The text style matches that shown in the placeholder text.
Inserting text boxes
Even when you work with a slide layout that contains text boxes, you can add your own. Click the slide where you want to place the text box. Click the Text icon in the Toolbar, and then click the text style you want to use. A text box appears on the slide in that style. Click and drag the text box to the position you want on the slide. Resize the text box by clicking and dragging the resizing handles (those small boxes that appear on the corners and in the middle of each edge). Double-click the word text to erase it, and then type the text you want on your slide.
If you want to delete a text box, click it once and then press the Delete key on the keyboard.
Editing text
To edit text that you’ve already entered, you have two choices:
· In Outline view: Select the text you want to edit in the Slide Navigator, as shown in Figure 4-7. You can change the titles, and add and delete bullets. Select a bulleted item and click and drag it by the bullet to move it up or down in the list or move it to another slide. Double-click the slide icon to collapse and hide the text.
· In Navigator or Slide Only view: Double-click a word to highlight and change it or click and drag to select blocks of text you want to edit within the text boxes on the slide. Make the changes you want.
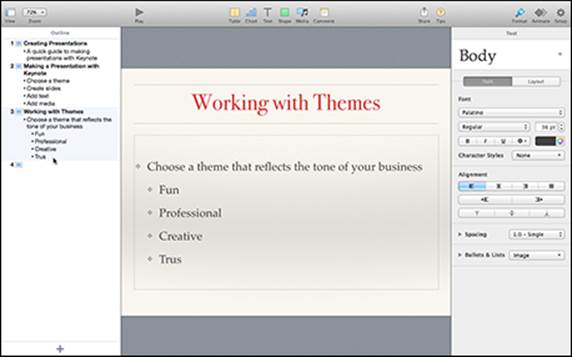
Figure 4-7: Edit text in the Slide Navigator in Outline view.
 To ensure that you don’t give a presentation filled with typos and misspelled words, check the spelling in your presentation by choosing Edit⇒Spelling and Grammar⇒Check Spelling While Typing.
Formatting text and text boxes
Themes have predefined fonts, font sizes, and colors that create a coordinated design throughout the presentation and, quite frankly, make creating a presentation a snap. Nonetheless, you can format the text if you want by changing fonts, font sizes, or colors.
 Use fonts and colors sparingly. Using too many fonts or colors can make text harder to read. When choosing text colors, make sure that you use colors that contrast with the slide’s background color. For instance, light yellow text against a white or light-colored background is nearly impossible to read.
 Any time you want to edit or change the style of an object, be it text, a shape, photo, chart, or table, click the object, and then click the Format icon in the toolbar. Click the tabs in the Format panel to see the editing and style options you can apply to the selected object. See the following sections for more details on formatting fonts, paragraphs, bullets, and backgrounds.
Changing fonts
Most likely, you’ve changed fonts in other programs, and the procedure in Keynote is fairly similar. If you’d like to select a different font, and/or change the font size or color, follow the instructions here.
 Changing a font on a slide will change only that slide. If you want to make the same change to all slides in your presentation, you want to change the Master Slide, and we dedicate a section to that topic further along in this chapter.
After you’ve selected the text, you can edit fonts with the Format menu or follow these steps:
1. Click the Text tab and then the Style button in the Format pane.
2. If you want to use a different font style that’s part of your chosen theme, click the disclosure triangle next to the sample font to open the Paragraph Styles menu.
A list of styles appears from which you can choose a different one.
Or
3. If you want to change the typeface, size, or style, in the Font section, scroll through the Family menus to select the options you want.
The Family menu shows the typefaces as they are to help you imagine your presentation using that font.
4. Click the font family when you find it, and then click the Typeface, Size, and Style menus and buttons to make those changes to your type.
The text on your slide changes to reflect the typeface, style, and size.
5. (Optional) Click the gear icon to open the Advanced Options menu, as shown in Figure 4-8.
6. (Optional) Click the Colors icon to change the color of the font.
The color swatch opens a chooser that displays colors used in the theme. The color-wheel icon next to the color swatch opens the Colors window, as shown in Figure 4-9. Here’s how to choose colors in the Colors window:
1. Click the color picker you prefer: Wheel, (which is the default), Slider, Palette, Spectrum, or Crayons. The color pickers give you different ways to choose colors. Click through to see which you’re most comfortable using.
2. Click the desired color in the color picker that appears in the Colors window.
3. (Optional) In the color wheel, make the color lighter or darker by dragging the slider on the right side up and down.
4. (Optional) In any of the color pickers, adjust the opacity by dragging the opacity slider left and right or type in a precise percentage in the text box to the right.
5. When you have a color you like, drag the color from the color box at the top to the color palette at the bottom. Your color is saved in the palette for future use.
6. Click the close window button or choose View⇒Close Colors.
Keynote immediately uses your selected color to color the text you selected in Step 3. You can play around until you find a color you like.
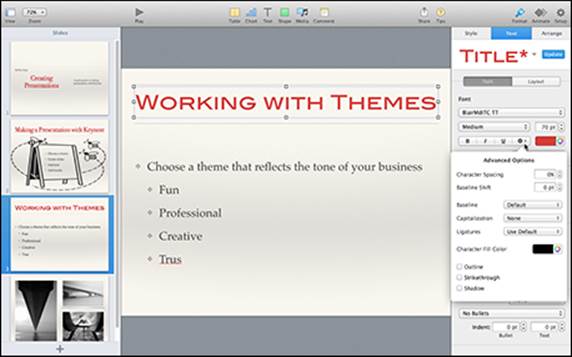
Figure 4-8: The Text section of the Format panel lets you modify text.
The name in the Paragraph Styles menu changes to reflect the new settings you choose and an asterisk appears next to the name along with an update button (refer to Figure 4-8). You can take the following actions:
· Click Update. All slides that use that layout will reflect the changes you made.
· Click somewhere else. Only the slide where you made the change will be changed.
· Click the name in the Paragraph Styles menu. Choose the original style from the menu to revert to that style, or choose Edit⇒Undo to cancel your change.
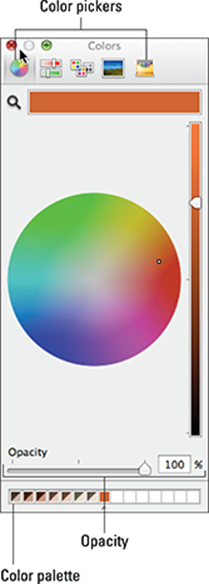
Figure 4-9: The Colors window lets you choose a text color.
 Fonts aren’t part of your presentation, but they reside on the computer from which you give the presentation. If you intend to use your presentation on a different computer, make sure that the fonts you use in your presentation are installed on the other computer, or Keynote will choose what it considers the closest font. So not only could the substitute font be ugly, but words may not fit within text boxes and may be cut off or dropped to a second line that could push lower text off the slide. If you use symbols or special characters, and they aren’t available in the substitute font, they’ll be replaced by a different symbol or an empty square.
 Giving your presentation that something extra
Capitalizing whole words or phrases in your presentation, especially in titles, is EYE-CATCHING. With Keynote, you don’t have to use Caps Lock and retype everything if you change your mind. Click Format⇒Font⇒Capitalization (or choose Capitalization in the Advanced Options window), then choose one of the following
· Title: Capitalizes the first letter of each word in your selected text, including articles and prepositions.
· All Caps: Capitalizes all the letters in your selected text.
· Small Caps: Capitalizes all the letters in your selected text — but in a small size. Any letters you type while holding the Shift key will be big capital letters.
If your text is just a little too long for the space it’s in, you can scrunch it together, just barely, so that it fits without using a smaller font size. Choose Format⇒Font⇒Character Spacing⇒Tighten. For more precision, choose Character Spacing in the Advanced Options window and pick a specific percentage to tighten. If the typeface has a condensed variant, choose that for the best results.
Finally, turn on font smoothing. Choose ![]() ⇒System Preferences⇒General and select the Use LCD Font Smoothing when Available option. Font smoothing makes the curves and lines of fonts seem less pixelated so they’re more recognizable and easier on your eyes.
⇒System Preferences⇒General and select the Use LCD Font Smoothing when Available option. Font smoothing makes the curves and lines of fonts seem less pixelated so they’re more recognizable and easier on your eyes.
Formatting paragraphs
Although you may not create paragraphs with your text, Keynote considers even a single line a paragraph as far as formatting alignment and vertical spacing of the text in your text boxes. Select the text you’d like to modify and follow these steps:
1. Click the Text tab and then the Style button in the Format pane.
2. Click the horizontal and vertical alignment buttons in the Alignment section and choose one of the following
· Left Alignment (default): Text is aligned on the left and has a ragged edge on the right.
· Center Alignment: Moves your text to the center, but any bullets you have remain at the left edge of the text box.
· Right Alignment: Aligns your text on the right, and the left edge is ragged; bullets remain on the left edge of the text box.
· Justified: Adjusts the text to have straight edges on the left and right.
· Minor adjustment: Those two buttons below the alignment buttons shift the text one space at a time to the left or to the right.
· Upper Alignment: Moves the text to the top of the text box.
· Middle Alignment: Moves the text to the middle of the text box.
· Lower Alignment: Moves the text to the bottom of the text box.
3. To change the vertical spacing between the lines of your text, click the disclosure triangle next to Spacing to see the menus shown in Figure 4-10, and choose the distance you want between the lines and before and after paragraphs, if your text box has more than one paragraph.
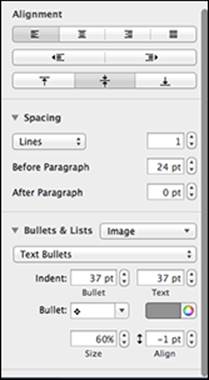
Figure 4-10: Choose the distance between lines with the spacing menu.
 Text boxes adjust to the amount of text you type, so if you type more text than space allows, the text box grows as much as it can and then the font size begins to shrink to accommodate the text; delete text, and the font size grows again.
Formatting bullets
As we mention earlier in this chapter, themes come with predefined fonts, colors, styles, and bullets as part of the package. But Keynote offers such a variety of bullets, you may want to have some fun and change them. Select the text and follow these steps to change bullets:
1. Click the Text tab and then the Style button in the Format pane.
2. Click the disclosure triangle next to Bullets to see your choices (refer to Figure 4-10).
3. Click the Bullets & Lists pull-down menu to choose the list style you want: Bullet, Image, Lettered, or Numbered.
4. Click the next menu to choose the bullet style: None, Text, Image, or Numbers.
5. Use the other pop-up menus to make adjustments; menus differ slightly from one bullet style to another:
· Bullet/Number Indent: Adjusts the distance from the outer edge of the text box and the bullet. The text moves with the bullet.
· Text Indent: Adjusts the distance from the outer edge of the text box and the text. The greater the difference between the bullet indent and the text indent, the farther the text is from the bullet.
· Align: Sets the vertical position of the bullet in relation to the text.
· Size: Alters the size of the bullet.
· Color/Image: Lets you edit the color of text or number bullets and the icon used for image bullets.
· Numbered bullets: Lets you choose from Arabic, Roman, and outline format, with and without parentheses.
Changing backgrounds and borders
Some text boxes have a background color that’s different from the slide background or the box may be outlined by a border or frame. Again, the preset styles are in keeping with the theme you choose, but if you want to change them or you’re creating your own custom theme, select the text and follow these steps:
1. Click the Style tab in the Format pane.
2. Click the disclosure triangles next to each option and then choose the options you want from the pop-up menus.
You see a preview of your choices on the slide, as shown in Figure 4-11.
· Fill: Puts a color, gradient, or image behind your text. Depending on the choice, you’re presented with tools for choosing the color, the spectrum and direction (gradient), and scaling (image).
· Border: Surrounds your text with a Line and Picture Frame; define the width, color, and scale of your choice.
· Shadow: Creates one of three types of shadows — Drop, Contact, or Curved — behind the entire text box. Blur, offset, and opacity settings add more special effects.
· Reflection: Adds a mirrored effect of your text box under it.
· Opacity: Affects the entire text box and changes the intensity of all components: the text, fills, and borders.
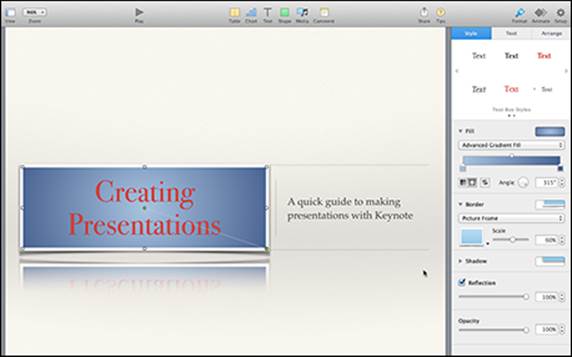
Figure 4-11: Fills, borders, and shadows make text boxes stand out.
Adding Shapes, Charts, and Tables
One basic principle of a good presentation is giving the audience something interesting to look at. Here’s where you get a look at how to use the visual-aid options offered in Keynote.
Inserting predrawn shapes
Shapes can help draw your viewers’ eyes to the thing you want them to notice. An arrow can connect your first point to your second; a star makes a key success stand out visually. Keynote comes with three types of simple, straightforward lines, and 12 ready-to-go shapes that you can stretch, shrink, and twist like Silly Putty. If you’re an artistic type, there’s also a tool for drawing your own shape. Each theme offers the three lines and 12 shapes in a selection of colors associated with the theme, as well as clear. Follow these steps to insert a shape on your slide:
1. Create a new slide or select the slide you want to put the shape on.
2. Click the Shape icon in the Toolbar and click the left and right arrows to flip through the color selection. Choose the shape you want, as shown in Figure 4-12.
Your selected shape appears on the slide with active resizing handles.
Most shapes have green grabber dots that you drag to change the shape or size of the shape (the cursor in Figure 4-12 points to the grabber dot). Hover the cursor over one of the green dots until it changes from an arrow to a plus sign, and then click and drag to see how the shape changes. For example, dragging clockwise or counter-clockwise on the star or polygon increases or decreases the number of points on the star and the number of sides on the polygon. The grabber dot on the quote bubble or square moves the direction of the angle that points to another object.
3. Click the shape and grab a resizing handle — one of the squares on the box that surrounds the shape — to enlarge or reduce the shape to the size you want.
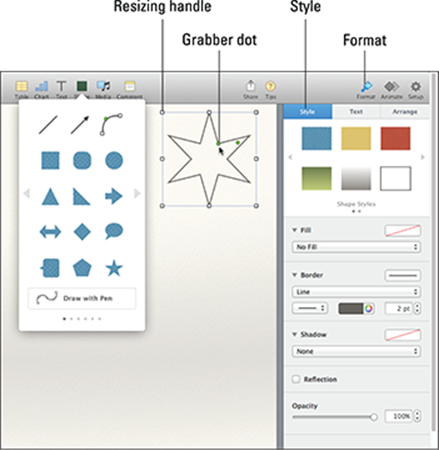
Figure 4-12: Keynote offers a dozen shapes to add to your presentation.
4. Click and drag the shape to where you want it on your slide.
5. Click the shape and then select the Format icon in the Toolbar and the Style tab in the Format pane.
Click the options you see to change the color of the shape or add special effects such as fill, shadow, and borders to the shape.
 To add text to your shape, create a text box as explained previously and drag it over your shape, and then edit the text. See the next section to learn about aligning objects.
Aligning and arranging objects
When working with multiple shapes, objects, images, and text boxes, you may want to align or overlap them. To align your shapes or objects, do the following:
1. Hold down the Shift key and click the objects you want to align.
Resizing handles appear around each selected object.
2. Choose Arrange⇒Align Objects to align the left, right, top, or bottom sides of the objects, or the vertical or horizontal centers.
Do it twice to choose the vertical alignment and then the horizontal alignment.
3. Choose Arrange⇒Distribute Objects to evenly distribute the centers of the selected objects (whatever their size) between the two farthest objects; choose horizontal or vertical.
Think about the objects on your slide as single pieces of paper, one on top of the other. If the largest piece is on top of the others, you can’t see the others. On the other hand, if the largest piece is transparent, you can see what’s underneath. You have to rearrange the order in which overlapping objects are stacked. For instance, in Figure 4-13, you can see that you’d want the text box object on the top of the stack. If, instead, the shape were on the top of the stack, you wouldn’t see the text — unless, of course, the shape were transparent.
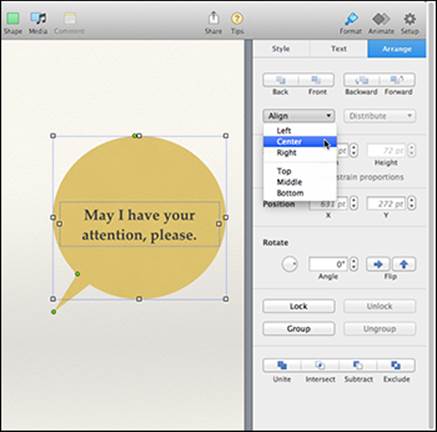
Figure 4-13: Rearrange and group objects to your liking.
To reveal objects that may be hidden by others, follow these steps:
1. Click the object that you want to arrange on the bottom of the stack.
2. Choose Arrange⇒Send to Back.
Anything that was hidden by that object now appears on top of it.
3. Click the other objects one at a time and choose Arrange⇒Send to Back or Arrange⇒Bring to Front, or Arrange⇒Bring Forward until you’re satisfied with the appearance of your slide.
 Text boxes work best as the top item on the stack, so most of the time you want to choose Arrange⇒Bring to Front for text boxes that rest on top of other shapes or images.
4. After you have the objects in the positions you like, you can create groups or lock the objects.
You have these options:
· Select your objects, and then choose Arrange⇒Group.
The objects stay together and move together.
· Select a single object, a group, or multiple objects, and then choose Arrange⇒Lock.
The objects become unmovable, undeletable, and uneditable. You can, however, copy or duplicate the locked object.
Choose Arrange⇒Unlock to unlock previously locked objects.
 Instead of using the menus, click the text boxes and shapes you want to work with and then click Format in the toolbar and the Arrange tab in the Format pane. Use the buttons and menus to make adjustments to how the objects are aligned and arranged, as shown earlier in Figure 4-13. You can also resize, reposition, rotate, or flip the objects.
Adding a chart
Sometimes presenting your information as a chart makes your information easier to understand. Essentially, you choose a chart type and then input the information you want to represent. To add a chart to a presentation, follow these steps:
1. Create a new slide or open an existing slide.
2. Click the Chart icon in the Toolbar and click the left and right arrows to flip through the color selection. First click a tab for the type of chart you want (2D, 3D, or Interactive); then choose the chart you want, as shown in Figure 4-14.
The chart appears on your slide.
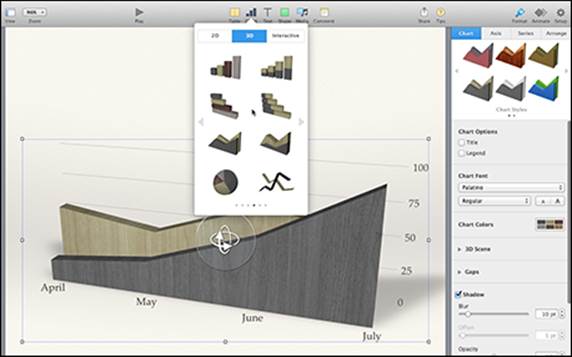
Figure 4-14: Charts can make your data easier to understand.
3. Click the chart on the slide, and then click the Edit Chart Data button.
A grid appears where you enter the data for your chart.
4. Double-click the Row and Column field headers of the Chart Data Editor to select the placeholder text and enter the information you want on your chart.
5. Click the cells below the headers to enter the number values you want the chart to show.
The data entered appears in the chart and titles on the slide.
 Interactive charts are created the same way as 2D or 3D charts but during the presentation, the data is animated. While preparing the animated chart, use the slider at the bottom to see how each part will be displayed. Click the Play button in the toolbar to preview the animation; press Return when the slide presentation opens and press Esc to return to the Keynote editing screen.
6. Click Format in the toolbar and then go through the tabs in the Format pane to edit the appearance and position of the chart and data:
· Chart: Gives you tools for changing the colors and fonts of the chart, as well as adding special effects such as shadow or opacity and a title and/or legend. At the bottom of the panel you find a Chart Type menu; click to change to a different type of chart — any data you entered will appear on the new type.
· Axis: Lets you name the axes and change the scale. (This tab is available for all charts except pie charts.) Here you also find the menus for defining the value labels with percentage, currency, or others.
· Series: Offers menus for naming the value labels on charts, excluding pie charts.
· Wedges: Shows check boxes and menus for adding labels and defining the value data format in pie charts only. You can move the labels off the chart itself and separate the pieces of the pie by setting a greater distance from center with the respective slider bars.
· Arrange: Lets you reposition the chart in relation to other objects on the slide or align it on the slide itself. This doesn’t change parts of the chart. (Refer to the previous section “Aligning and arranging objects” to understand how this works.)
· Axis/Wedge Labels: Double-click any of the text on the chart and the Axis or Wedge Labels tab appears in the Format panel. Here you can define the label (number, percentage, and so on) and also change the font family, size, style, and color.
7. (Optional) If you decide that you want to remove a chart, click it, and then press Delete.
Adding a table
When you add a table in Keynote, it’s a fully functioning, calculable table, much as if it had been created in Numbers. These are the steps for adding a table to a slide in your presentation:
1. Click the Table icon in the Toolbar and click the left and right arrows to flip through the color selection. Click the table you like, and it appears on your slide.
2. Change the size of your table by clicking the table and then doing the following:
· Resize the table. Click and drag the Resize button in the upper-left corner to resize the table. This doesn’t add rows and columns but proportionately changes the table size.
· Add a row or column. Click the add button (it has two parallel lines in a circle) at the bottom-left corner to add rows or the upper-right corner to add columns. A mini menu appears. The number indicates the current number of rows or columns; use the up and down arrows to increase or decrease the number. Rows and columns are added to the chart automatically.
· Insert or delete a row or column. Hover the cursor over the row or column identifier (letters for columns, numbers for rows) of the column to the left of, or above, where you want to insert a new row or column. Click the disclosure arrow that appears to open a menu that gives you choices to insert a row or column before or after the one you selected. You can also delete the row or column you selected.
· Adjust row height or column width. Follow the steps for inserting, but choose Fit Height/Width to Content to adjust the height or width of the row or column to accommodate the contents of the cells in that row or column. Or, click the column or row and then hover the cursor over one of the edges of the row or column header until the cursor becomes a double-sided arrow. Click and drag the cursor/arrow to adjust the height or width of the row or column.
3. Edit the appearance of your table with the fields in the Format pane. Select the cells, rows, or columns you want to edit and click the tab for the things you want to change:
· Table: Has menus and buttons to adjust the color, font size, grid lines and number of header and footer cells. These changes affect the entire table.
· Cell: Makes changes to the cells, rows, or columns you select either singly or in multiples. Define how the data is formatted, such as currency or percentage, and assign fill and border colors and styles.
· Text: Lets you define the text color, style, and alignment of text in selected cells, rows, or columns.
· Arrange: Lets you reposition the table in relation to other objects on the slide or align it on the slide itself. (Refer to the previous section Aligning Objects to understand how this works.)
4. To place formulas or functions in a cell, press the equals (=) key.
The functions menu appears in the Format pane.
5. (Optional) If you decide that you want to remove a table, click the Resize button, and then press Delete.
 You can also use the Keynote menu to add objects to your slides. Choose Insert⇒Table/Chart/Shape/Line, and then choose the specific type from the submenu that opens.
Adding Media Files
Text by itself can be as monotonous and confusing to read as the flight arrival and departure displays at an airport. Adding sound, still images, and movies makes your presentation appealing and communicative. Sound can be an audio recording of a song stored in iTunes or edited in GarageBand; photos can be digital photographs stored in iPhoto; and movies can be short video clips you’ve edited and stored in iMovie.
Adding sound
You can add any audio file stored in iTunes or GarageBand to a slide in your presentation or to the entire presentation. To add sound to a slide, follow these steps:
1. Click the slide with which you want to play an audio file.
2. Click the Media button on the Keynote toolbar.
The Media Browser appears.
3. Click the Music tab.
The Media Browser displays your iTunes library, as shown in Figure 4-15. (You see GarageBand, too, if you have music stored there.)
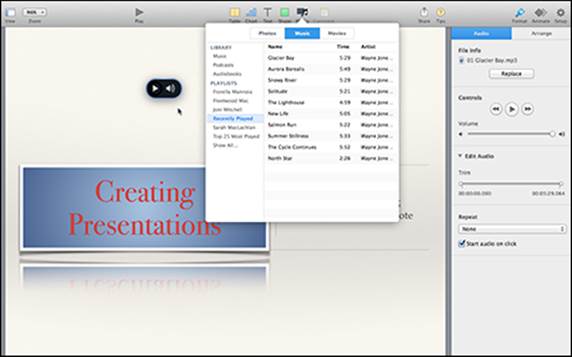
Figure 4-15: The Media Browser lets you choose an audio file from iTunes.
4. Click the library, playlist, or folder where your audio resides.
The Media Browser displays all the available files you can choose.
5. Click the audio file you want to use.
Keynote displays an audio icon directly on your slide to let you know audio is inserted here.
6. Click the audio icon on the slide and then select or deselect Start Audio On Click in the Format pane.
When deselected, the audio will begin as soon as the slide appears in the presentation; when selected, you have to click any key to start playback.
 In the Format pane, you can also replace the audio with a different file, set the playback volume, and trim the audio file so only a portion plays with your slide.
7. To delete the audio, click it, and then press the Delete button.
To add background audio that plays during the entire slideshow, do the following:
1. Click the Setup icon in the toolbar.
2. Click the Audio tab in the Setup pane, shown in Figure 4-16.
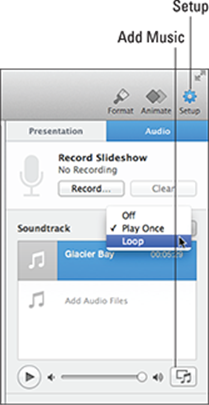
Figure 4-16: Add background audio to your entire presentation.
3. Click the Add Music button at the bottom right of the Soundtrack section.
The Media Browser opens.
4. Select the audio you want, as explained in the preceding steps list.
5. Choose Play Once or Loop from the pop-up menu next to Soundtrack.
· Play Once: The track stops playing if the audio ends before the presentation is over.
· Loop: Plays the audio again from the beginning if the track ends before the presentation is over.
 You can add voiceover to accompany your presentation so when people view it without you, they have the benefit of hearing what you want to say about each slide. Choose Play⇒Record Slideshow and begin speaking. Click the right arrow to move to the next slide. Click the Esc key when you finish. Choose Play⇒Play Slideshow to hear how you did.
Adding photos or movies
If you store digital photos in iPhoto, you can place those photos on any slide in a Keynote presentation by following these steps:
1. Create a new slide or click the slide where you want to insert a photo.
2. Open the Media Browser.
· If you’re replacing a placeholder image, click the Photo icon in the lower-right corner of the image to open the Media Browser.
Or
· Click the Media icon on the Keynote toolbar.
The Media Browser appears.
3. Click the Photos or Movies tab.
The Media Browser displays all the pictures stored in iPhoto or all the movies stored in iPhoto or iMovie. Click an album or event to narrow your choices and more easily find the image or movie you want, as shown in Figure 4-17.
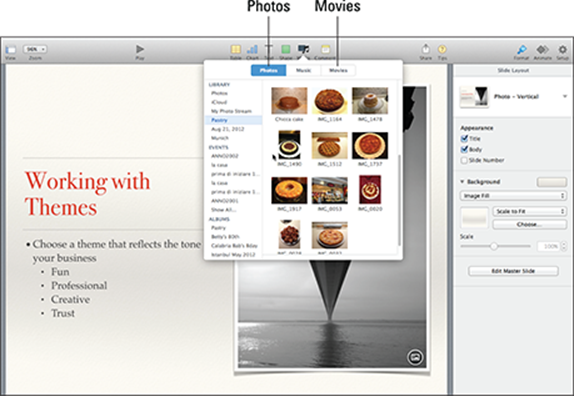
Figure 4-17: Use the Photos pane in the Media Browser to choose a picture from iPhoto.
4. Click the photo or movie you want from the Media Browser.
It immediately replaces the placeholder image, maintaining any border, shadow, and fill styles.
If there is no placeholder media, the photo or movie fills your slide. Resize the photo or movie by clicking it, and then dragging the resize handles. Click and drag to position the photo where you want.
With movies, you may be asked if you want to optimize the file (depending on your preferences in Keynote⇒Preferences⇒General). Optimizing the file will make adjustments so it displays nicely on a iOS device — if you plan to show your presentation on an iPad, this is a good idea, otherwise it’s a step you can probably skip.
 Holding down the Shift key while resizing a photo or movie retains the height and width proportions.
5. Edit the photo or movie by clicking it and then clicking Format in the toolbar. Click the tabs as follows:
· Style: Offers menus to choose one of the predefined image styles associated with the theme or change the borders, shadows, opacity, and reflection in the same way as explained for text boxes.
· Image: Gives options for replacing the photo, masking and adjusting it, which we explain in Book V, Chapter 6 because it’s a task that is the same for all iWork apps.
· Movie: Lets you replace the movie, adjust the volume, or trim the movie. You can also select or deselect Start Movie On Click. When deselected, the audio will begin as soon as the slide appears in the presentation; when selected, you have to press any key to start playback.
· Arrange: With text boxes, charts, and tables, gives you options to position the image in relation to other objects and the slide itself.
 If you plan to use your presentation on a different computer, choose Keynote⇒Preferences⇒General. Next to Saving, select the Copy Audio and Movies into Document check box so your media files are part of the presentation.
Rearranging Slides
After you create your slides, chances are, they aren’t in the exact order you want to give your presentation, or you may have a few that you aren’t sure you want to use but aren’t ready to delete. Keynote displays slides in the order they appear in the Navigator, Outline, or Light Table view. In Navigator and Outline view, the top slide appears first, followed by the slide directly beneath it, and so on, whereas in Light Table view, they’re arranged left to right in a grid. After you create two or more slides in a presentation, you may want to rearrange their positions.
To rearrange slides in a presentation, follow these steps:
1. Choose one of the following:
· View⇒Navigator or Outline (displays slides vertically in the Slide Organizer pane.)
· View⇒Light Table (displays slides in rows and columns.)
2. Click and drag a slide in either the Slide Navigator, Outline, or Light Table to its new position.
In Light Table view, Keynote moves slide icons out of the way to show you where your new slide will appear, but a grayed rectangle remains in the original position until you release the mouse button or lift your finger from the trackpad.
3. Release the mouse button or lift your finger from the trackpad when you’re happy with the new position of the slide in your presentation.
Creating groups of slides
Keynote offers you the possibility of creating groups of slides within your presentation. You may want to create a group of related slides, much like an outline that has topics and subtopics. Groups make editing your presentation easier because you can move a group of related slides from one place to another without losing the order of the individual slides within the group.
To create a group, follow these steps:
1. Choose View⇒Navigator.
2. Click the slide you want to be the first of the group.
3. Add a new slide. Or, if you want to group existing slides, arrange them in the order you want with the head of the group first and subsequent slides below, and then click the first slide you want to be in the group.
4. Press Tab or click and drag the slide toward the right.
The slide is indented to the right, and a disclosure triangle appears next to the head of the group. You can also have subgroups, as shown in Figure 4-18; Slide 2 is the head, Slide 3 is in the group, and Slide 4 is the first of a subgroup of Slide 3.
5. Repeat for other slides.
Clicking the disclosure triangle opens and closes the group.
To move a slide out of a group, click and drag the slide to the left or click the slide, and then hold down the Shift key and press Tab; the slide moves to the left.
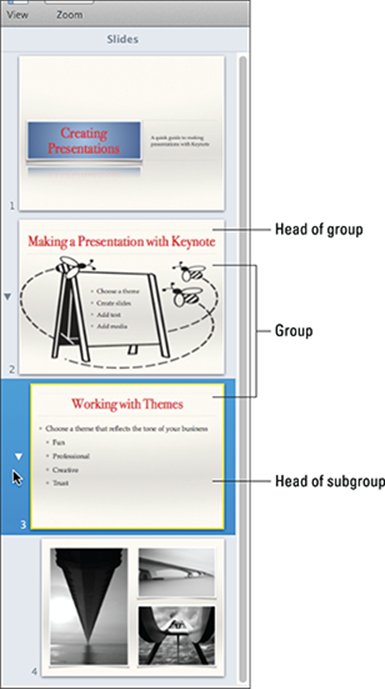
Figure 4-18: Create groups and subgroups of slides within your presentation.
Deleting a slide
Eventually, you may find that you don’t need a slide anymore. Deleting a slide is easy, and deleting a slide group is, perhaps, too easy.
 In groups, if you delete the head slide when the group is closed, the entire group is deleted. If you delete the head slide when the group is open, only that slide is deleted; slides in the group or subgroups move one step to the left.
To delete a slide, go to the Navigator, Outline, or Light Table view, select the slide(s) that you want to delete, and then do one of the following:
· Press Delete.
· Choose Edit⇒Delete on the menu bar.
· Control-click a slide and choose Delete.
 If you delete a slide by mistake, choose Edit⇒Undo Delete on the menu bar (or press
 ![]() +Z).
+Z).
Skipping a slide
You may use the same presentation multiple times but with different audiences or time allowances, so you may not want to use every slide every time. You can suppress slides without deleting them, which gives you the flexibility of using the same presentation in different settings. To skip a slide, go to Navigator, Outline, or Light Table view, select the slide(s) you want to skip, and then Control-click the slide and choose Skip Slide. To add the skipped slide back in the presentation, Control-click the slide and choose Don’t Skip Slide.
Creating Transitions and Effects
To make your presentations visually interesting to watch, you can add transitions and effects. Slide transitions define how a slide appears and disappears from the display. Text and graphic effects define how the text or graphic initially appears on or disappears from the slide and how it moves around a slide. You can also add hyperlinks to your presentation.
Creating a slide transition
To create a slide transition, follow these steps:
1. Choose View⇒Navigator on the menu bar.
2. In the Slide Navigator, click the slide that you want to display with a transition.
3. Click the Animate icon to open the Transitions pane.
4. Click the Add an Effect button to see the Transitions menu (as shown in Figure 4-19).
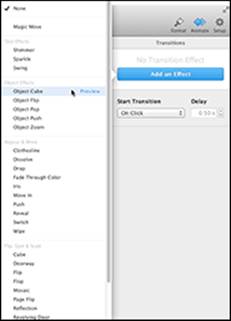
Figure 4-19: Use the Transition tab in the Slide Inspector to define a transition.
5. Choose an effect, such as Shimmer or Confetti.
Depending on the transition effect you choose, you may need to define other options, such as the direction or duration of your transition.
The Magic Move effect lets you add animation to your presentation without hiring a designer. It animates an object, moving it from its location on one slide to a new location on the next slide. The object must be the same on both slides. Place the object at the starting point on the first slide and then on the end point on the second slide. The Magic Move feature moves the object when the slide transitions from the first slide to the second slide.
A preview of your transition in action appears in the central slide pane.
 Click the Change button to use a different transition or add another one; choose None in the Effect pop-up menu to remove a transition.
6. Click the Animate button to close the Transitions pane.
Creating text and graphic effects
Sometimes you want your bullets to show up one at a time. Instead of creating separate slides — the first with one bullet, the second with two bullets, the third with three, and so on — create your slide with the bullets you want, and then choose how Keynote “builds” your slide during your presentation. Keynote offers three ways to create text and graphic effects in over 25 types of transitions:
· Build In: Defines how text and graphics enter a slide. (If you choose the Build In transition, initially, the text and graphics won’t appear on the slide.)
· Build Out: Defines how text and graphics exit a slide.
· Action: Defines how text and graphics move on a slide.
Creating builds
To define an effect for text or graphics, follow these steps:
1. Choose View⇒Navigator on the menu or toolbar.
2. In the Navigator, click the slide that contains the text or graphic you want to display with a visual effect.
3. Click the text or graphic you want to modify; for example, a text box with a bulleted list or a table with several rows.
 Choose animated charts to add action to those.
4. Click Animate in the toolbar.
5. Click the Build In or Build Out tab.
6. Click Add an Effect and choose an option from the pop-up menu.
7. Set the Delivery options to build your bullet list, chart, or table, one item at a time.
8. Click Preview to see how the build will display during your presentation.
9. Click Change to use a different effect or delete the effect (None).
10. (Optional) Click another object and assign a build to that object as in Steps 6 and 7.
1. Click the Build Order button to open the Build Order window (refer to Figure 4-20).
2. Click and drag the objects in the list to set the order they’ll be added to the slide.
3. Choose when to start the builds and the delay between each object.
4. Click Preview to see how it will look during your presentation.
5. Click the close button to exit the Build Order window.
11. Click Animate in the Toolbar to close the Builds pane.
Making text and graphics move on a slide
If you choose the Action button for text or graphics, you can choose the Move Effect, which lets you define a line that the text or graphic follows as it moves across a slide. To define a line to move text or graphics on a slide, follow these steps:
1. Follow Steps 1 through 4 in the preceding section for creating builds.
2. Click the Action tab.
3. Click Add an Effect.
4. Choose Move from the Effect pop-up menu.
Keynote displays a red line that shows how your chosen text or graphic will move, as shown in Figure 4-21.
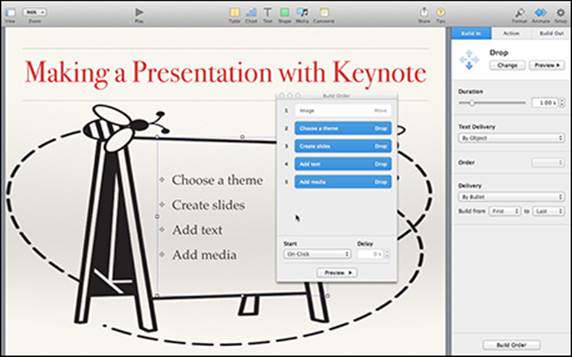
Figure 4-20: Builds are a great way to show information one piece at a time.
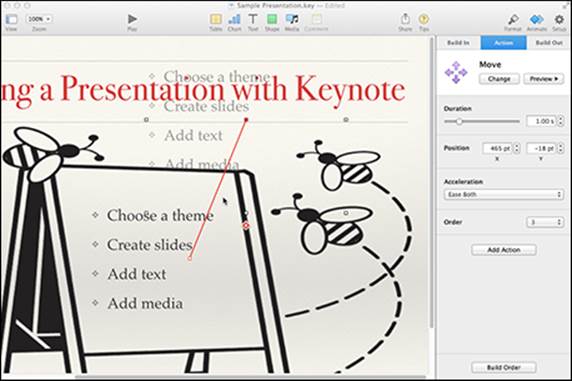
Figure 4-21: Keynote displays the path connecting text or graphics on a slide.
5. (Optional) Click and drag the handle at the beginning or end of the red line to move the line or change the line length.
Moving the red line changes the direction your chosen text or graphic moves. Changing the line length determines how far your chosen text or graphic moves.
6. (Optional) Click the Add Action button to add another action to the same object.
7. (Optional) Click another object to add an action or build to that object.
For example, you could have an easel slide across the slide, bounce or jiggle, and then the bulleted list appears on the easel, building one item at a time with the blur effect. Use the Build Order window to adjust the order in which the action and builds take place (refer to Figure 4-20).
 The Action feature moves an object or text on a slide. The Magic Move feature animates objects or text from one slide to the next during the slide transition.
Adding hyperlinks to your presentation
Like links in a web page, hyperlinks within your presentation connect to another point in the presentation, connect to a website, or open an outgoing e-mail message. They’re particularly useful for creating presentations that a viewer will watch alone — say, at a kiosk or even on your website. You don’t have to be present for the viewer to see your presentation. Hyperlinks are also helpful if you want to access media stored remotely, such as a video that would take up storage on your computer.
Here’s how to create a hyperlink:
1. Choose View⇒Navigator on the menu or toolbar.
2. Click the slide that contains the text or graphic you want to use as the departure point for the hyperlink.
3. Select the text or graphic that will act as the hyperlink button.
4. Click Format⇒Add Link.
The Hyperlink window opens.
5. Click the Link To pop-up menu, as shown in Figure 4-22, to choose what you want the hyperlink to link to:
· Slide: Use the check boxes to choose another slide within the presentation, or fill in the slide number.
· Webpage: Type in the URL of the web page you want to link to.
· Email: If the hyperlink is for an outgoing e-mail message, type in the address to whom the message should be sent, along with a subject line.
· Exit Slideshow: Clicking the hyperlink will close the presentation.
To delete the hyperlink, click the hyperlink button on the object, and then click Remove.
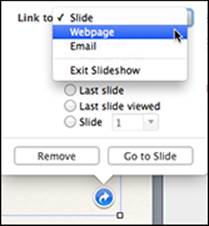
Figure 4-22: Link to another slide, website, or e-mail address.
Using Masters to Customize Themes
Instead of tweaking a slide layout and then duplicating the slide or duplicating a whole presentation and then redoing the text and images, you can make changes to the slide master or create a new Keynote theme. Masters are the templates used to create new slides based on the slide layout. When you change a master, you can then update all slides that use that master within the presentation. Changes you make to slide masters within a presentation only affect that specific presentation. See the tip after these steps about how to create a new theme. To edit masters, follow these steps:
1. In any view, click the Edit Master Slide button in the Format pane.
In the same view, you see the master slide and the format tools. We find Navigator view easiest for editing masters because you can see all the slide layouts in the left panel.
2. Click the slide you want to edit.
3. Click the part you want to change (text or image), and then make the changes you want in the Format pane.
For example, you can simply choose a different predefined style for that placeholder by clicking the menus in the Format pane, or you can change the font itself, the color, size, and alignment.
For text, you can also add new styles to the list or rename or delete existing styles, and then use those new or renamed styles on subsequent slide masters. Click text on any slide, and then click the Text tab in the Format pane. Click the text name to open the paragraph styles menu and then click the plus sign at the top to add a new style or click a style to delete or rename it, as shown in Figure 4-23.
For text boxes or image placeholders, you can change the borders and shadows. Click and drag to change the position of placeholders.
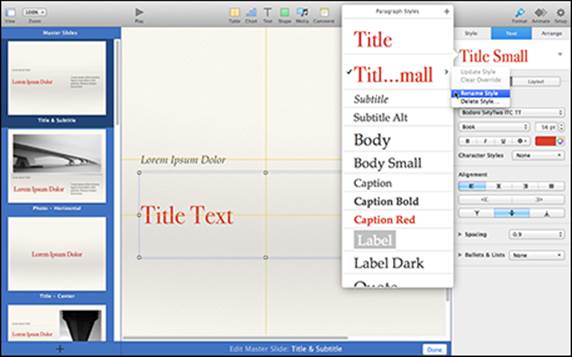
Figure 4-23: Create your own slide layout masters.
4. Repeat Steps 2 and 3 for other slides.
5. Rename the slide by clicking to select the name in the Master Slide navigator and type a new name.
6. Add or duplicate Master Slides in the same way as you would for regular slides, and then edit them.
For example, if you frequently use a specific type of chart, you could add a Master Slide to the theme you use most often and insert a chart on that Master Slide.
7. Click Done when you finish.
 To make your own personalized theme, create a new presentation from a plain theme or one that’s similar to the end result you want. Edit the master slides, and then save it as a new theme by choosing File⇒Save Theme. If you’re creating a theme you’ll use often, consider putting your company name or logo in the theme so it’s one less task you have to do when creating presentations.
Polishing Your Presentation
When you finish modifying the slides in your presentation, you need to show your presentation to others. You may give a presentation in person or post it on YouTube or your website so people can view it at their leisure.
Viewing a presentation
After you finish creating a presentation, you need to view it to see how it actually looks. The slide order or visual effects may have looked good when you put your presentation together, but when viewed in its entirety, you may suddenly notice gaps or repetitions in your presentation. To view a presentation, follow these steps:
1. In the Navigator, Outline, or Light Table view, click the first slide you want to view.
If you click the first slide of your presentation, you’ll view your entire presentation. If you click a slide in the middle of your presentation, your slide show begins from that slide and proceeds until it reaches the last slide.
2. Click the Play icon on the Keynote toolbar or choose Play⇒Play Slideshow on the menu bar.
The slide you chose in Step 1 appears.
3. Click the mouse button or trackpad, press the spacebar, or use the right arrow key to view each successive slide — the left arrow key takes you back a slide.
If you’re at the last slide of your presentation, click the mouse button or trackpad, or press the spacebar, to exit your presentation.
4. (Optional) Press Esc if you want to stop viewing your presentation before reaching the last slide.
 If you don’t want to click through the presentation, click the Setup icon in the toolbar and choose Self-Playing in the Presentation Type pop-up menu.
Rehearsing a presentation
Viewing a presentation lets you make sure that all the slides are in the right order and that all effects and transitions work as you expect. Before giving your presentation, you may want to rehearse it and let Keynote approximate how much time you spend on each slide.
 Rehearsing can give you only a general estimate of the time needed to give your presentation. In real life, various conditions — for example, an impatient audience sitting in a stuffy conference room where the air conditioning suddenly breaks down — may make you nervous or speed up your timing.
To rehearse a presentation, follow these steps:
1. In the Navigator, Outline, or Light Table view, click the first slide you want to view.
2. Choose Play⇒Rehearse Slideshow on the menu bar.
Keynote displays your slides. Click the tool button in the upper right and you see the tools windows, as shown in Figure 4-24. We activated all the viewing options except the clock, so you see how much time has elapsed, the current and upcoming slide, the slide navigator, and presenter notes.
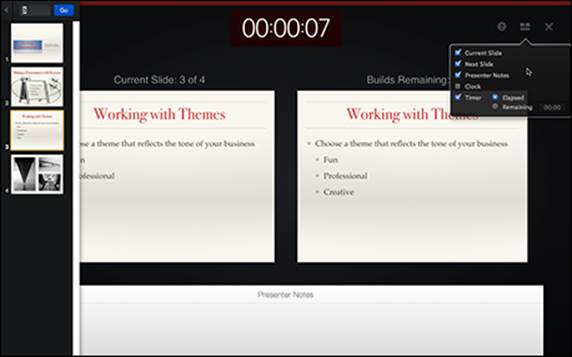
Figure 4-24: Keynote tracks how much time you spend on each slide.
3. Practice what you’re going to say when presenting each slide and press the spacebar or click the mouse button to advance to the next slide.
Preparing for your big event
When the day arrives that you have to give your presentation, Keynote has some tools to help you there, too. As long as your presentation will be presented with a second projection system — that is, not viewed directly on your Mac while you’re giving it — you can display your notes and stopwatch next to your slides on your Mac while the audience sees only your slides.
To set up the Presenter Display, follow these steps:
1. Choose Keynote⇒Preferences.
2. Click the Slideshow tab.
3. Click Enable Presenter Display.
When your computer is connected to a projection system, you see the presenter display, which looks like Figure 4-24.
4. Select the items you see onscreen, such as the pointer, in the Interacting section as shown in Figure 4-25.
5. Click the close button on the preferences window.
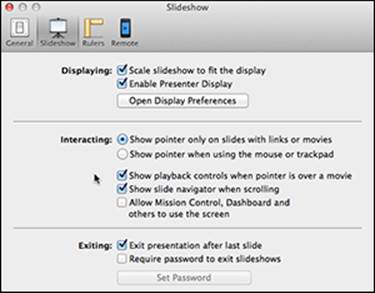
Figure 4-25: Choose how you want to interact with your presentation.
 If you use an iOS device such as an iPhone or iPad, you can download the iOS version of Keynote from the App Store and then use your device as a remote control for Keynote presentations on your Mac. If you use an Android or Windows handheld device, you’ll find remote control apps in their stores too.
Letting others run your presentation
When you give a presentation, you’ll probably do it directly from your Mac. However, there may come a time when you need to save your presentation to run on a different type of computer or you want to give others the opportunity to see your presentation on your website, on YouTube, or on one of the presentation sharing websites like SlideShare (www.slideshare.net). Fortunately, Keynote lets you export a Keynote presentation in six different formats and share your presentation in several ways, such as by e-mail or on social media sites.
Exporting your Keynote presentation
To export a Keynote presentation, follow these steps:
1. Choose File⇒Export To on the menu bar.
2. Click one of the following options:
· PDF: Saves your presentation as a series of static images stored in the Adobe Acrobat Portable Document File (PDF) format that can be viewed by any computer with a PDF viewing application. Any interesting visual or transition effects between slides will be lost.
· PowerPoint: Saves your presentation as a PowerPoint file that you can edit and run on any computer that runs PowerPoint. (Certain visual effects and transitions may not work in PowerPoint.)
· QuickTime: Saves your presentation as a movie that can play on a Windows PC or Mac computer that has the free QuickTime player. This movie preserves all transitions and visual effects.
· HTML: Saves each slide as a separate web page. Any interesting visual or transition effects between slides will be lost.
· Images: Saves each slide as a separate graphic file.
· Keynote ’09: Saves your presentation as a file that’s compatible with the previous version of Keynote.
 If you want to preserve your visual effects and transitions, save your presentation as a QuickTime movie, which also allows you to play your presentation on a TV connected to an iOS device. If you want to preserve and edit your presentation on a Mac or Windows PC running Microsoft PowerPoint, save your presentation as a PowerPoint file.
3. (Optional) The Export Your Presentation dialog opens, as shown in Figure 4-26. Depending on the option you choose in Step 2, you may see additional ways to customize your presentation.
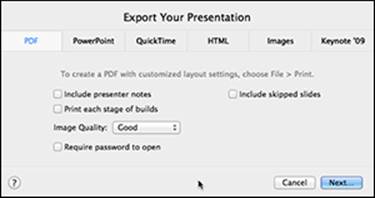
Figure 4-26: Choose a format in which to save your Keynote presentation.
4. Click Next.
Another dialog appears, showing all the drives and folders on your hard drive.
5. Click the folder where you want to store your presentation.
You may need to switch drives or folders until you find where you want to save your file.
6. Click the Export button.
 When you export a presentation, your original Keynote presentation remains untouched in its original location.
Sharing your Keynote presentation
You have two ways to share your presentation: Upload the presentation to iCloud.com and then share the link, or share the actual presentation. When you share the link, anyone who opens it can make changes to it, and those changes will sync to your Mac and iOS devices that access the presentation.
Here’s how you can share your presentation via iCloud:
1. Make sure that you’ve saved your presentation on iCloud.
If you aren’t sure how to save your presentation on iCloud, see the “Choosing a theme and saving your presentation” section.
 Your presentation must be saved on iCloud for this option to work.
2. Click Share in the toolbar, and then choose Share Link via iCloud.
Choose one of the options:
· Email: Opens a new message with a link to your presentation. Address the message and click Send.
· Messages: Opens a new message with a link to your presentation. Address the message and click Send.
· Twitter: Opens a dialog so you can tweet a link to the presentation. If you aren’t logged in or don’t have a Twitter account, you’re prompted to log in or create an account.
· Facebook: Share the link to your presentation in a status update.
· LinkedIn: Share your presentation with your connections.
· Copy Link: Places the link in the Clipboard so you can paste it somewhere else, such as on your website or in another presentation.
Here’s how you can send a copy of your presentation to the person who wants to see it:
· Click Share in the toolbar, and then choose Send a Copy, which sends a copy of your entire Keynote presentation to the destination you choose. Depending on your choices, the results are slightly different:
· The Email, Messages, and AirDrop choices open a dialog that lets you send the presentation as a Keynote file or as a PDF, QuickTime, or PowerPoint file. Click the file type and then click Next. The file is converted if you chose an option other than Keynote. Depending on your choice, the following happens:
· Email or Messages: A new E-mail or Message opens. Type in the address(es) to which you want to send the presentation, and then click Send.
· AirDrop: A file is created that other people with Macs using AirDrop can see and access.
Choose YouTube, Facebook, or Vimeo, and Keynote converts your presentation to a self-playing movie and a dialog lets you choose the delay time for slides and builds. Click Next.
The movie is created. A dialog prompts you to either sign in to your YouTube, Facebook, or Vimeo account or to post directly, giving the access level that each social network allows.
 Click View Share Settings to see the link as well as who else is editing it, click the Stop Sharing button to remove the link from any place that you’ve shared it, or click the Send Link button to share it via Mail, Message, Twitter, Facebook, or LinkedIn.
 For more tips on using iWork and Keynote, go to Book V, Chapter 6.