iOS Game Development Cookbook (2014)
Chapter 7. Physics
If, like us, you’ve existed on a planet that has gravity, you’ll be familiar with the fact that objects react to forces and collide with other objects. When you pick up an object and let go, it falls down until it hits something. When it hits something, it bounces (or shatters, depending on what you dropped). In games, we can make objects have this kind of behavior through physics simulation.
Physics simulation lets you do things like:
§ Make objects have gravity and fall to the ground
§ Give objects properties like weight, density, friction, and bounciness
§ Apply forces to objects, and make them move around realistically
§ Attach objects together in a variety of configurations
In short, adding physics simulation to your game often gives you a lot of realism for free.
Sprite Kit has built-in support for simulating physics in two dimensions, and we’ll mostly be talking about physics in Sprite Kit in this chapter. (If you’re not familiar with Sprite Kit yet, go check out Chapter 6.) Before we get to the recipes, though, let’s go over some terminology.
Reviewing Physics Terms and Definitions
Physics simulation has its basis in math, and math people tend to like giving everything its own name. These terms are used by the physics simulation system built in to iOS, and it’s important to know what’s being referred to when you encounter, say, a polygon collision body.
In this section, before we get stuck into the recipes themselves, we’re going to present a list of definitions that you’re very likely to run into when working with physics. Some of these are terms that you’ve probably heard in other contexts, and others are fairly specific to physics:
World
A physics world is the “universe” in which all of your objects exist. If an object isn’t in the world, it isn’t being physically simulated, and nothing will interact with it. A physics world contains settings that apply to all objects in the world, such as the direction and strength of gravity.
Mass
Mass is a measure of how much stuff is inside an object. The more mass there is, the heavier it is.
Velocity
Velocity is a measure of how quickly an object is moving, and in which direction. In 2D physics, velocity has two components: horizontal velocity, or “x-velocity,” and vertical velocity, or “y-velocity.”
Body
A body is an object in the physics simulation. Bodies react to forces, and can collide with other bodies. Bodies have mass and velocity. You can optionally make a body be static, which means that it never reacts to forces and never moves.
Force
A force is something that causes a body to move. For example, when you throw a ball, your arm is imposing a force on the ball; when your hand releases the ball, the ball’s got a large amount of built-up velocity, and it flies out of your hand. Gravity is another force, and it applies to all objects in your physics world. The amount of force needed to make an object move depends on how much mass is in that object. If you apply the exact same force to a heavy object and to a light object, the light object will move further.
Friction
When an object rubs against something else, it slows down. This is because of friction. In the real world, friction converts kinetic energy (i.e., movement) into heat, but in Sprite Kit, the energy is just lost. You can configure how much friction an object has. For example, if you make an object have very low friction, it will be slippery.
Collider
A collider defines the shape of an object. Common shapes include squares, rectangles, circles, and polygons. In Sprite Kit, all bodies have a collider, which you define when you create the body. (In some other physics engines, bodies and colliders are separate entities.)
Edge collider
An edge collider is a collider that is composed of one or more infinitely thin lines. Edge colliders are useful for creating walls and obstacles, because they’re simple to create and very efficient to simulate. A body with an edge collider never moves; they’re always static.
Collision
A collision is when two objects come into contact. Note that a collision is different from a collider: A collision is an event that happens, while a collider is a shape. When a collision happens, you can get information about it, such as which objects collided, where they collided, and so on.
Joint
A joint is a relationship between two objects. Several different kinds of joints exist; some common ones include “pin” joints, in which one object is allowed to rotate freely but isn’t allowed to move away from a certain point relative to another body, and “spring” joints, in which one object is allowed to move away from another but, if it moves beyond a threshold, begins to be pushed back toward the first object.
Adding Physics to Sprites
Problem
You want to make sprites be affected by gravity and other physical forces.
Solution
To make an SKSpriteNode be physically simulated, create an SKPhysicsBody and then set the sprite’s physicsBody property to it:
SKScene* scene = ... // an SKScene
SKSpriteNode* sprite = [SKSpriteNode spriteNodeWithColor:[SKColor whiteColor]
size:CGSizeMake(100, 50)];
sprite.position = CGPointMake(CGRectGetMidX(scene.frame),
CGRectGetMidY(scene.frame));
sprite.physicsBody = [SKPhysicsBody bodyWithRectangleOfSize:sprite.size];
[scene addChild:sprite];
Discussion
When you add an SKPhysicsBody to an SKSpriteNode, Sprite Kit physically simulates the sprite’s movement in the scene.
This has the following effects:
§ The physics engine will start keeping track of physical forces that apply to the body, such as gravity.
§ The position and rotation of the body will be updated every frame, based on these forces.
§ The body will collide with other SKPhysicsBody objects.
When you run the sample code, you’ll notice that the sprite falls off the bottom of the screen. This is because there’s nothing for the sprite to land on—the physics body that you added to the sprite is the only physically simulated body in the entire scene. To learn how to create objects for your sprite’s body to land on, see Creating Static and Dynamic Objects.
Creating Static and Dynamic Objects
Problem
You want to create an immobile object—one that never moves, but that other objects can collide with.
Solution
Set the dynamic property of your SKPhysicsBody to NO:
SKScene* scene = ... // an SKScene
SKSpriteNode* staticSprite = [SKSpriteNode spriteNodeWithColor:
[SKColor yellowColor]
size:CGSizeMake(200, 25)];
staticSprite.position = CGPointMake(CGRectGetMidX(scene.frame),
CGRectGetMidY(scene.frame));
staticSprite.physicsBody = [SKPhysicsBody bodyWithRectangleOfSize:
staticSprite.size];
staticSprite.physicsBody.dynamic = NO;
[scene addChild:staticSprite];
Discussion
There are two kinds of physics bodies used in Sprite Kit:
§ Dynamic bodies respond to physical forces, and move around the scene.
§ Static bodies don’t respond to physical forces—they’re fixed in place, and dynamic bodies can collide with them.
When you set the dynamic property of an SKPhysicsBody to NO, the body immediately stops responding to forces and stops moving and rotating. However, you can still reposition it by setting the sprite’s position and rotation, or by using actions (see Moving Sprites and Labels Around to learn how to do this).
Defining Collider Shapes
Problem
You want to specify a custom shape for physics bodies.
Solution
To make your physics bodies use a shape other than a rectangle, you create them by using a different method, such as bodyWithCircleOfRadius: or bodyWithPolygonFromPath:, as shown here:
SKScene* scene = ... // an SKScene
SKShapeNode* circleSprite = [[SKShapeNode alloc] init];
circleSprite.path = [UIBezierPath bezierPathWithOvalInRect:CGRectMake(-50, -50,
100, 100)].CGPath;
circleSprite.lineWidth = 1;
circleSprite.physicsBody = [SKPhysicsBody bodyWithCircleOfRadius:50];
circleSprite.position = CGPointMake(CGRectGetMidX(scene.frame)+40,
CGRectGetMidY(scene.frame) + 100);
[scene addChild:circleSprite];
Discussion
There are a number of different ways that you can create an SKPhysicsBody. When you create one, you specify what sort of collider the body is using—that is, the actual shape of the body (a circle, a rectangle, or some other shape).
The easiest way to create a body is with the bodyWithRectangleOfSize: method, which lets you (as you might expect, given the name), create a rectangle given a size (you don’t set the position of the body—that’s determined by the position of the node that the body’s attached to):
// A box, 100x100
CGSize size = CGSizeMake(100,100);
sprite.physicsBody = [SKPhysicsBody bodyWithRectangleOfSize:size];
You can also create a body with a circular collider like so:
sprite.physicsBody = [SKPhysicsBody bodyWithCircleOfRadius:50];
NOTE
A circular collider is the simplest possible collider, and requires the least amount of computation to simulate. If you need to create a large number of colliders, consider making them circular where possible.
In addition to creating rectangular or circular colliders, you can define your own custom shapes by defining a path and creating an SKPhysicsBody with it:
UIBezierPath* path = [[UIBezierPath alloc] init];
[path moveToPoint:CGPointMake(-25, -25)];
[path addLineToPoint:CGPointMake(25, 0)];
[path addLineToPoint:CGPointMake(-25, 25)];
[path closePath];
sprite.physicsBody = [SKPhysicsBody bodyWithPolygonFromPath:path.CGPath];
You can learn more about creating paths using UIBezierPath in Using Bézier Paths.
When you create a path for use as a polygon body, the points in the path need to be defined in clockwise order. For example, the following code will not work:
UIBezierPath* path = [[UIBezierPath alloc] init];
[path moveToPoint:CGPointMake(-25, -25)];
[path addLineToPoint:CGPointMake(-25, 25)];
[path addLineToPoint:CGPointMake(25, 0)];
[path closePath];
sprite.physicsBody = [SKPhysicsBody bodyWithPolygonFromPath:path.CGPath];
Additionally, the path you provide isn’t allowed to contain any curves—it can only contain straight lines. (You won’t get any crashes if you use curves, but the resulting shape will behave strangely.)
If you want to more easily visualize the custom shapes you’re creating for use with physics bodies, you can attach the same path that you’ve created to an SKShapeNode, as illustrated in Figure 7-1. See Using Shape Nodes for more information about this.
NOTE
You can’t change the shape of a body’s collider after it’s been created. If you want a sprite to have a different shape, you need to replace the sprite’s SKPhysicsBody.
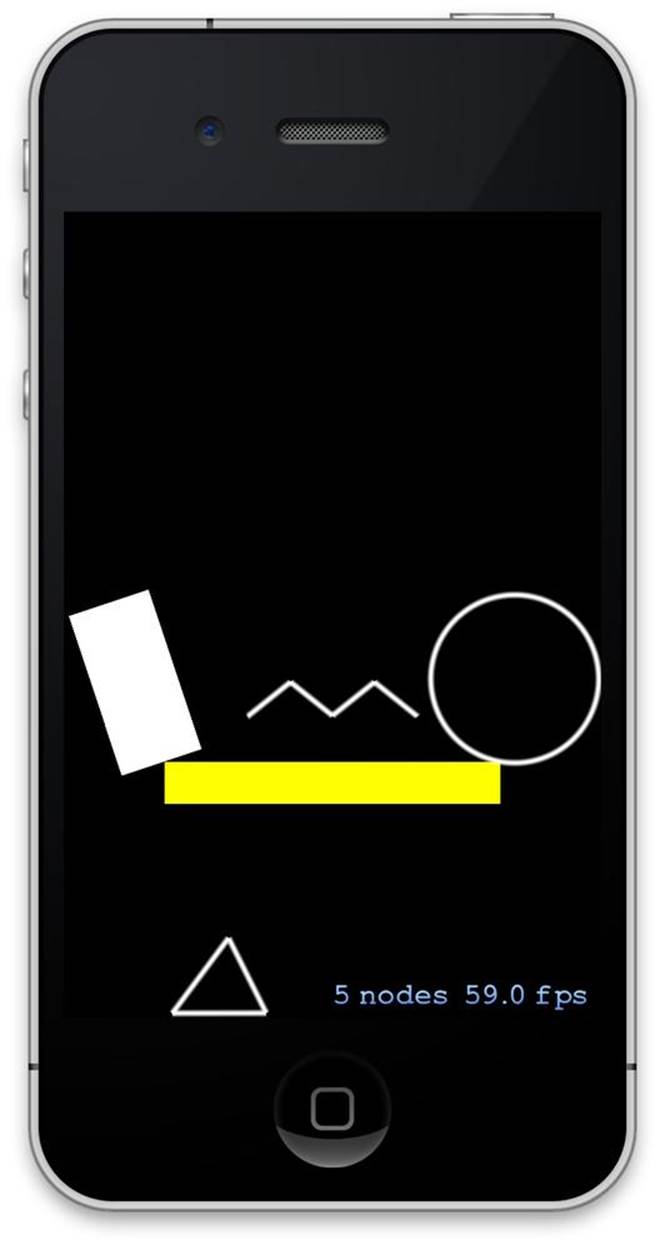
Figure 7-1. SKShapeNodes being used to visually represent custom collider shapes
Setting Velocities
Problem
You want to make an object start moving at a specific speed and in a specific direction.
Solution
To change the velocity of an object, you modify the velocity property:
SKSpriteNode* sprite = ... // an SKSpriteNode
sprite.physicsBody = [SKPhysicsBody bodyWithRectangleOfSize:sprite.size];
// Start moving upward at 100 pixels per second
sprite.velocity = CGVectorMake(0, -100);
Discussion
The simplest way to change the velocity of a physics body is to directly set the velocity property. This is a CGVector that represents the velocity, in pixels per second, at which the body is moving.
Note that directly setting the velocity tends to have the best-looking results when you use the technique to set the initial velocity of an object. For example, if you want to create rockets that come out of a rocket launcher, those rockets should start out moving quickly. In this case, you’d create the rocket sprite, and then immediately set the velocity of its physics body to make it start moving.
If you want things to change their movement in a realistic way, consider using forces on your bodies (see Working with Forces). Alternatively, if you want precise frame-by-frame control over how your objects move, make the physics bodies static (see Creating Static and Dynamic Objects), and manually set the position of the objects or use actions (see Moving Sprites and Labels Around.)
Working with Mass, Size, and Density
Problem
You want to control how heavy your objects are.
Solution
Set the density or mass properties of your physics bodies to control how heavy they are:
SKSpriteNode* sprite = ... // an SKSpriteNode
sprite.physicsBody = [SKPhysicsBody bodyWithRectangleOfSize:sprite.size];
// Make this object be twice as massy
sprite.physicsBody.density = 2.0;
// Alternatively, make the object be a fixed mass regardless of its size
sprite.physicsBody.mass = 4.0;
Discussion
An object’s mass is how much matter the object is composed of. Note that this is different from how much the object weighs, which is the amount of force applied to an object by gravity, dependent on the object’s mass and how strong gravity is.
Objects with more mass require more force to move around. If you apply the same force to an object with low mass and one with high mass, the object with lower mass will move further.
The mass of an object is calculated based on the volume of the object (i.e., its size) and the object’s density. The mass of an object is automatically calculated when you create the body, based on the size of the body and a default density of 1; however, you can change an object’s mass and density at any time you like.
NOTE
The initial mass of an object is calculated like this:
Mass = Area x Density
The default density of an object is 1.0. The area depends on the shape of the body:
§ The area of a rectangle is width × height.
§ The area of a circle is π × r2 (where r is the radius).
§ The area of a polygon depends on its shape; search the Web for “irregular polygon area” for different kinds of formulae. A common strategy is to break the polygon into triangles, calculate the area for each one, and then add them together.
The actual units you use for density and mass don’t matter—you can use pounds, kilograms, or grapnars (if you are from Venus). However, the values you choose should be consistent across the objects in your scene. For example, if you create two crates, both of the same size, and you set the mass of the first to 2 (kilograms) and the second to 4 (pounds), it won’t be apparent to the user why one appears lighter than the other.
NOTE
Because mass and density are linked, if you change an object’s density, the mass will change (and vice versa).
Creating Walls in Your Scene
Problem
You want to create walls for your collision scene.
Solution
The most efficient way to create walls is to use edge colliders:
SKScene* scene = ... // an SKScene
SKNode* wallsNode = [SKNode node];
wallsNode.position = CGPointMake(CGRectGetMidX(scene.frame),
CGRectGetMidY(scene.frame));
// Reposition the rectangle so that it's centered on (0,0)
CGRect rect = CGRectOffset(self.frame, -scene.frame.size.width / 2.0,
-scene.frame.size.height / 2.0);
wallsNode.physicsBody = [SKPhysicsBody bodyWithEdgeLoopFromRect:rect];
[scene addChild:wallsNode];
Discussion
An edge collider is a collider that’s just a single line, or a collection of connected lines. Edge colliders are different from other kinds of colliders in that they have no volume, no mass, and are always treated as static colliders.
There are two different types of edge colliders: edge loops and edge chains. An edge chain is a linked collection of lines; an edge loop always links from the end point to the start point.
Edge colliders can have almost any shape you want. The easiest ways to create them are either to create a single line from one point to another:
CGPoint point1 = CGPointMake(-50, 0);
CGPoint point2 = CGPointMake(50, 0);
SKPhysicsBody* line = [SKPhysicsBody bodyWithEdgeFromPoint:point1
toPoint:point2];
or with a rectangle:
CGRect rect = CGPointMake(0, 0, 50, 50);
SKPhysicsBody* box = [SKPhysicsBody bodyWithEdgeLoopFromRect:rect]
In addition to lines and rectangles, you can create arbitrary shapes. These can be either edge chains or edge loops.
You create these shapes using a path, much like when you make polygon bodies (see Defining Collider Shapes). In this case, though, there’s a difference: you don’t have to close your paths, since edge chains don’t have to form a closed polygon:
UIBezierPath* path = [UIBezierPath bezierPath];
[path moveToPoint:CGPointMake(-50, -10)];
[path addLineToPoint:CGPointMake(-25, 10)];
[path addLineToPoint:CGPointMake(0, -10)];
[path addLineToPoint:CGPointMake(25, 10)];
[path addLineToPoint:CGPointMake(50, -10)];
SKPhysicsBody* body = [SKPhysicsBody bodyWithEdgeChainFromPath:path.CGPath];
Controlling Gravity
Problem
You want to customize the gravity in your scene.
Solution
To change the gravity in your scene, you must first get access to your scene’s physicsWorld. Once you have that, you can change the physics world’s gravity property:
SKScene* scene = ... // an SKScene
SKPhysicsWorld* world = scene.physicsWorld;
world.gravity = CGPointMake(0, -0.45); // half normal gravity
Discussion
For the purposes of a physics simulation, gravity is a constant force that’s applied to all bodies. (Gravity in the real universe is quite a bit more complex than that, but this simplification is more than adequate for most games.)
NOTE
A game that deals with gravity in a much more realistic way than “gravity equals down” is Kerbal Space Program, in which players launch rockets and use orbital mechanics to travel to other planets. In this kind of game, the force of gravity depends on how close you are to various planets, each of which has a different mass.
By default, the gravity in a scene is set to (0, –9.81). That is to say, all bodies have a constant force that’s pushing them down (i.e., toward the bottom of the screen), at a rate of 9.81 pixels per second per second. By changing this property, you can make gravity nonexistent:
world.gravity = CGPointMake(0, 0);
Or, you can reverse gravity:
world.gravity = CGPointMake(0, 9.81); // note the lack of a minus sign
You can also make an individual physics body be unaffected by gravity by changing the body’s affectedByGravity property:
SKPhysicsBody* body = ... // an SKPhysicsBody
body.affectedByGravity = NO;
Note that a body that isn’t affected by gravity still has mass, and still responds to other forces. A really heavy object that’s floating in the air will still require quite a bit of force to move.
Keeping Objects from Falling Over
Problem
You want to prevent certain objects, such as the player, from rotating.
Solution
Change the allowsRotation property of your body:
SKPhysicsBody* body = ... // an SKPhysicsBody
body.allowsRotation = NO;
Discussion
In many games with 2D physics, it’s useful to have some objects that move around, but never rotate. For example, if you’re making a platform game, you almost never want the player to actually rotate.
Locking the rotation of a body means that it won’t ever rotate, no matter how many forces are applied to it. However, you can change the angle of the body by manually setting the zRotation of the node, or by using an action (see Moving Sprites and Labels Around.)
Controlling Time in Your Physics Simulation
Problem
You want to pause or speed up the physics simulation.
Solution
Change the speed property of your scene’s SKPhysicsWorld to control how quickly time passes in your scene’s physics simulation:
SKScene* scene = ... // an SKScene
SKPhysicsWorld* world = scene.physicsWorld;
world.speed = 2.0; // double the simulation speed
world.speed = 0.0; // pause all physics simulation
Discussion
The speed property of your scene’s SKPhysicsWorld controls the rate at which time passes in your physics simulation. For example, setting the speed to 2.0 makes things move twice as fast (note, however, that increasing the speed of the simulation can lead to some instability in your simulation).
You can also use this to create slow-motion effects: if you set the speed property to a value between 0 and 1, time will be slowed down, which you can use to highlight totally sweet stunts or explosions.
Detecting Collisions
Problem
You want to detect when objects collide.
Solution
First, make your SKScene subclass conform to the SKPhysicsContactDelegate protocol.
Next, implement the didBeginContact: and didEndContact: methods in your SKScene:
- (void)didBeginContact:(SKPhysicsContact *)contact {
NSLog(@"Contact started between %@ and %@", contact.bodyA, contact.bodyB);
}
- (void)didEndContact:(SKPhysicsContact *)contact {
NSLog(@"Contact ended between %@ and %@", contact.bodyA, contact.bodyB);
}
When you’re setting up your scene’s contents, set the contactDelegate property of your scene’s physicsWorld to the scene:
self.physicsWorld.contactDelegate = self;
Next, make every physics body for which you want to get notifications about collisions set its contactTestBitMask to 0x01:
SKNode* node = ... // an SKNode
node.physicsBody = [SKPhysicsBody bodyWithRectangleOfSize:node.size];
node.physicsBody.contactTestBitMask = 0x01;
Now, every object collision that occurs will make your didBeginContact: and didEndContact: methods get called.
Discussion
If you want an object to be notified about objects coming into contact with each other, you make that object conform to the SKPhysicsContactDelegate protocol, and then set the scene’s physicsWorld to use the object as its contactDelegate.
The contact delegate methods, didBeginContact: and didEndContact:, will only be called when two objects that have an intersecting contactTestBitMask come into contact with each other.
The contact test bitmask lets you define categories of objects. By default, it’s set to zero, which means that objects aren’t in any collision category.
The contact delegate methods receive an SKPhysicsContact object as their parameter, which contains information about which bodies collided, at which point they collided, and with how much force.
Finding Objects
Problem
You want to find physics objects in the scene.
Solution
Use the enumerateBodiesInRect:usingBlock:, enumerateBodiesAtPoint:usingBlock:, and enumerateBodiesAlongRayStart:end:usingBlock: methods to find SKPhysicsBody objects in your world:
SKScene* scene = ... // an SKScene
CGRect searchRect = CGRectMake(10, 10, 200, 200);
[scene.physicsWorld enumerateBodiesInRect:searchRect usingBlock:^(SKPhysicsBody
*body, BOOL *stop) {
NSLog(@"Found a body: %@", body);
}];
CGPoint searchPoint = CGPointMake(40, 100);
[scene.physicsWorld enumerateBodiesAtPoint:searchPoint usingBlock:^(
SKPhysicsBody *body, BOOL *stop) {
NSLog(@"Found a body: %@", body);
}];
CGPoint searchRayStart = CGPointMake(0, 0);
CGPoint searchRayEnd = CGPointMake(320, 480);
[scene.physicsWorld enumerateBodiesAlongRayStart:searchRayStart end:searchRayEnd
usingBlock:^(SKPhysicsBody *body, CGPoint point, CGVector normal, BOOL *stop)
{ NSLog(@"Found a body: %@ (normal: %.1f, %.1f)", body, normal.dx,
normal.dy);
}];
Discussion
You can use these methods to find SKPhysicsBody objects in a rectangle, at a certain point, or along a line. When you call them, you pass in the location you want to search, as well as a block; this block is called for each body that is found.
All of the results blocks used by these methods receive as parameters the body that was found and stop, which is a pointer to a BOOL variable. If you set this variable to YES, the search will stop. This means that if you’re looking for a specific body, you can stop the search when you find it, which saves time:
[scene.physicsWorld enumerateBodiesAtPoint:searchPoint usingBlock:^(
SKPhysicsBody *body, BOOL *stop) {
if (body == theBodyWeWant) {
*stop = YES; // note the asterisk!
}
}];
Note that when you call enumerateBodiesAlongRayStart:end:usingBlock:, the results block takes three parameters: the block, a normal, and the stop variable. The normal is a vector that indicates the direction at which the line bounces off the body it hit. (This is useful for determining, for example, the directions that sparks should fly in when something hits a surface.)
If you’re looking for a single body and don’t care which one, you can use the bodyAtPoint:, bodyInRect:, and bodyAlongRayStart:end: methods, which just return the first body they find:
SKPhysicsBody* body = [self.physicsWorld bodyAtPoint:searchPoint];
or
SKPhysicsBody* body = [self.physicsWorld bodyInRect:searchRect];
or
SKPhysicsBody* body = [self.physicsWorld bodyAlongRayStart:searchRayStart
end:searchRayEnd];
These methods won’t find nodes that don’t have an SKPhysicsBody attached to them—they only check the physics simulation. If you’re looking for nodes that have no physics body, use the nodeAtPoint:, nodesAtPoint:, childNodeWithName:, orenumerateChildNodesWithName:usingBlock: methods on your SKScene.
Working with Joints
Problem
You want to connect physics objects together.
Solution
Use one of the several SKPhysicsJoint classes available:
SKScene* scene = ... // an SKScene
// Create a static body and add it
SKSpriteNode* anchor = [SKSpriteNode spriteNodeWithColor:[SKColor whiteColor]
size:CGSizeMake(100, 100)];
anchor.position = CGPointMake(CGRectGetMidX(scene.frame),
CGRectGetMidY(scene.frame));
anchor.physicsBody = [SKPhysicsBody bodyWithRectangleOfSize:anchor.size];
anchor.physicsBody.dynamic = NO;
[self addChild:anchor];
SKSpriteNode* attachment = [SKSpriteNode spriteNodeWithColor:[SKColor
yellowColor] size:CGSizeMake(100, 100)];
attachment.position = CGPointMake(CGRectGetMidX(self.frame) + 100,
CGRectGetMidY(self.frame) - 100);
attachment.physicsBody = [SKPhysicsBody bodyWithRectangleOfSize:attachment.size];
[self addChild:attachment];
SKPhysicsJointPin* pinJoint = [SKPhysicsJointPin jointWithBodyA:
anchor.physicsBody bodyB:attachment.physicsBody anchor:anchor.position];
[self.physicsWorld addJoint:pinJoint];
Discussion
A joint is an object that constrains the movement of one or more objects. Joints are pretty straightforward to work with: you create your joint object, configure it, and then give it to your scene’s SKPhysicsWorld.
In this example, we’re using a pin joint, which pins two bodies together at a point, and lets them rotate around that point. There are several different types of joints available:
§ Pin joints, as we’ve just mentioned, let you pin two objects together. The objects can rotate around that pin point.
§ Fixed joints fuse two objects together. Once they’re joined, they’re not allowed to move relative to each other, and they’re not allowed to rotate relative to each other. This is very useful for creating larger objects that you want to break apart later.
§ Slider joints let you create objects that can move away from or closer to each other, but only along a certain line.
§ Limit joints make it so that the two objects can move freely relative to each other, but aren’t allowed to move past a certain radius. This makes them act as if they’re tethered with a rope.
Once you’ve created your joint, you add it to the physics simulation by using the addJoint: method:
[self.physicsWorld addJoint:myJoint];
You can remove a joint from an SKPhysicsWorld by using the removeJoint: method. Once you remove a joint, the bodies that it affected are able to move freely once again:
[self.physicsWorld removeJoint:myJoint];
A body can have multiple joints acting on it at once. Try connecting several bodies together with joints, and see what you come up with!
Working with Forces
Problem
You want to apply a force to an object.
Solution
Use the applyForce: or applyTorque: methods:
SKNode* node = ... // An SKNode
// Move it up
[node.physicsBody applyForce:CGVectorMake(0, 100)];
// Rotate counter-clockwise
[node.physicsBody applyTorque:0.5];
Discussion
When you apply a force, you change the movement of a body. When you’re using the Sprite Kit physics engine, there’s a constant gravitational force being applied to all bodies in the scene, which makes them move downward.
You can apply your own forces to bodies using the applyForce: method, which takes a CGVector that describes the amount of force you’d like to apply. Forces get applied immediately.
When you call applyForce:, the force is evenly applied across the entire body. If you need to apply the force to a specific point on the body, you can use applyForce:atPoint::
// Apply a force just to the right of the center of the body
CGPoint position = CGPointMake(10, 0);
[node.physicsBody applyForce:CGVectorMake(0, 100) atPoint:position];
The point that you provide to applyForce:atPoint: is defined in scene coordinates.
In addition to force, which changes the position of a body, you can also apply torque, which is a change to the angular movement (i.e., the spin) of a body.
NOTE
The units that you use with applyForce: and applyTorque: don’t really matter as long as they’re consistent. Technically, they’re measured in newtons and newton-meters, respectively.
Adding Thrusters to Objects
Problem
You want to make an object move continuously in a certain direction.
Solution
First, add this property to your SKScene subclass:
@property (assign) float lastTime;
Then, in your scene’s update: method, apply whatever forces and torque you need:
- (void)update:(NSTimeInterval)currentTime {
if (self.lastTime == 0)
self.lastTime = currentTime;
float deltaTime = currentTime - self.lastTime;
SKNode* node = [self childNodeWithName:@"Box"];
[node.physicsBody applyForce:CGVectorMake(0 * deltaTime, 10 * deltaTime)];
[node.physicsBody applyTorque:0.5 * deltaTime];
}
Discussion
The update: method is called on your SKScene subclass every frame, immediately before physics simulation and rendering. This is your opportunity to apply any continuous forces to your objects.
The update: method receives one parameter: a float named currentTime. This variable contains the current system time, measured in seconds. To apply an even amount of force per second, you need to know how long each frame takes to render. You can calculate this by subtracting the system time at the last frame from the system time at the current frame (you can learn more about this in Calculating Delta Times):
deltaTime = time at start of current frame - time at start of last frame
Once you have that, you can multiply forces by that number.
Creating Explosions
Problem
You want to apply an explosion force to some objects.
Solution
Add this method to your SKScene:
- (void) applyExplosionAtPoint:(CGPoint)point radius:(float)radius power:
(float)power{
// Determine which bodies are in range of the explosion by creating a
// rectangle
CGRect explosionRect = CGRectMake(point.x - radius, point.y - radius,
radius*2, radius*2);
// For each body, apply an explosion force
[self.physicsWorld enumerateBodiesInRect:explosionRect usingBlock:^(
SKPhysicsBody *body, BOOL *stop) {
// Determine the direction we should apply the force in for this body
CGVector explosionOffset = CGVectorMake(body.node.position.x -
point.x, body.node.position.y - point.y);
// Calculate the distance from the explosion point
CGFloat explosionDistance = sqrtf(explosionOffset.dx *
explosionOffset.dx + explosionOffset.dy * explosionOffset.dy);
// Normalize the explosion force
CGVector explosionForce = explosionOffset;
explosionForce.dx /= explosionDistance;
explosionForce.dy /= explosionDistance;
// Multiply by power
explosionForce.dx *= power;
explosionForce.dy *= power;
// Finally, apply the force
[body applyForce:explosionForce];
}];
}
When you want an explosion to happen, call this method like so:
CGPoint explosionPoint = CGPointMake(100,100);
[self applyExplosionAtPoint:explosionPoint radius:100 power:150];
Discussion
An explosion is simply a force that’s applied to a group of nearby bodies, which pushes those bodies away from a point.
So, to make an explosion, you need to do the following:
1. Determine which bodies are affected by the explosion.
2. Decide which direction each body should be sent in.
3. Calculate how much force should be applied.
4. Apply that force to each body!
Simple, right?
You can determine which bodies are affected by the explosion by using the enumerateBodiesInRect:usingBlock: method on your scene’s SKPhysicsWorld. This calls a block for each body that it finds, which gives you your opportunity to calculate the forces for each body.
To calculate the amount of force you need to apply to each body, you do the following:
1. Subtract the body’s position from the explosion’s position. This is the explosion offset, calculated as follows:
2. CGVector explosionOffset = CGVectorMake(body.node.position.x - point.x,
body.node.position.y - point.y);
3. Determine the distance from the body’s position by normalizing the explosion offset. This means calculating the length (or magnitude) of the vector, and then dividing the vector by that magnitude.
To calculate the magnitude of the vector, you take the square root of the sums of the squares of the components of the offset vector:
CGFloat explosionDistance = sqrtf(explosionOffset.dx * explosionOffset.dx
+ explosionOffset.dy * explosionOffset.dy);
Once you have that, you divide the offset by this length, and then multiply it by the power. This ensures that all affected objects get the same total amount of power, regardless of their position:
CGVector explosionForce = explosionOffset;
explosionForce.dx /= explosionDistance;
explosionForce.dy /= explosionDistance;
explosionForce.dx *= power;
explosionForce.dy *= power;
4. Finally, you apply this calculated force vector to the body:
[body applyForce:explosionForce];
Using Device Orientation to Control Gravity
Problem
You want the direction of gravity to change when the player rotates her device.
Solution
First, make your application only use the portrait orientation by selecting the project at the top of the Project Navigator, selecting the General tab, scrolling down to “Device Orientation,” and turning off everything except Portrait.
Next, add the Core Motion framework to your project. Scroll down to “Linked Frameworks and Libraries,” click the + button, and type “CoreMotion”; then double-click “CoreMotion.framework.”
Next, open your SKScene subclass. Import the Core Motion header file:
#import <CoreMotion/CoreMotion.h>
and add a new instance variable to your class:
@implementation PhysicsScene {
CMMotionManager* motionManager;
}
Finally, when your scene is being set up, add the following code:
motionManager = [[CMMotionManager alloc] init];
[motionManager startDeviceMotionUpdatesToQueue:[NSOperationQueue mainQueue]
withHandler:^(CMDeviceMotion *motion, NSError *error) {
CGVector gravityVector = CGVectorMake(motion.gravity.x, motion.gravity.y);
gravityVector.dx *= 9.81;
gravityVector.dy *= 9.81;
self.physicsWorld.gravity = gravityVector;
}];
Discussion
When you create a CMMotionManager and call startDeviceMotionUpdatesToQueue:withHandler:, the motion system will call a block that you provide and give it information on how the player’s device is moving.
To get the direction of gravity, you ask the motion object that gets passed in as a parameter for its gravity property. Gravity has three components: x, y, and z. These correspond to how much gravity is pulling on the sides of the device, the top and bottom edges of the device, and the front and back of the device.
In a 2D game, there are only two dimensions you care about: x and y. Therefore, we can just discard the z component of gravity.
However, the values contained in the gravity property are measured in gravities—that is, if you lay your phone perfectly flat with the back of the phone pointed down, there will be precisely one gravity of force on the z-axis. In Sprite Kit, however, gravity is measured in meters per second (by default). So, you need to convert between the two units.
The conversion is very easy: one gravity is equal to 9.81 meters per second. So, all that needs to happen is to multiply both the x and y components of the gravity vector by 9.81.
Finally, this updated gravity vector is given to the scene’s physicsWorld, which in turn affects the physics objects in the scene.
Dragging Objects Around
Problem
You want the player of your game to be able to drag physics objects on the screen.
Solution
First, create two new instance variables: an SKNode object called dragNode, and an SKPhsyicsJointPin called dragJoint.
In the code for your SKScene, add the following methods:
-(void)touchesBegan:(NSSet *)touches withEvent:(UIEvent *)event {
// Called when a touch begins
// We only care about one touch at a time
UITouch* touch = [touches anyObject];
// Determine which node got touched
CGPoint touchPosition = [touch locationInNode:self];
SKNode* touchedNode = [self nodeAtPoint:touchPosition];
// Make sure that the user is touching something that can be dragged
if (touchedNode == nil || touchedNode == dragNode)
return;
// Make sure that the object we touched has a physics body
if (touchedNode.physicsBody == nil)
return;
// Create the invisible drag node, with a small static body
dragNode = [SKNode node];
dragNode.position = touchPosition;
dragNode.physicsBody = [SKPhysicsBody bodyWithRectangleOfSize:
CGSizeMake(10, 10)];
dragNode.physicsBody.dynamic = NO;
[self addChild:dragNode];
// Link this new node to the object that got touched
dragJoint = [SKPhysicsJointPin jointWithBodyA:touchedNode.physicsBody
bodyB:dragNode.physicsBody
anchor:touchPosition];
[self.physicsWorld addJoint:dragJoint];
}
- (void)touchesMoved:(NSSet *)touches withEvent:(UIEvent *)event {
UITouch* touch = [touches anyObject];
// When the touch moves, move the static drag node. The joint will drag
// the connected object with it.
CGPoint touchPosition = [touch locationInNode:self];
dragNode.position = touchPosition;
}
- (void)touchesEnded:(NSSet *)touches withEvent:(UIEvent *)event {
[self stopDragging];
}
- (void)touchesCancelled:(NSSet *)touches withEvent:(UIEvent *)event {
[self stopDragging];
}
- (void) stopDragging {
// Remove the joint and the drag node.
[self.physicsWorld removeJoint:dragJoint];
dragJoint = nil;
[dragNode removeFromParent];
dragNode = nil;
}
Discussion
The first thing that often comes into people’s heads when they start thinking about how to do this is something like this: “When a touch begins, store a reference to the object that got touched. Then, when the touch moves, update the position property, and it’ll move with it!”
This has a couple of problems, though. First, if you’re only setting the position of the object that the user is dragging when the touch updates, gravity’s going to be dragging the object down. This will have the effect of making the object’s position flicker quite noticeably as it’s moved around.
Second, if you’re directly setting the position of an object, it becomes possible to make an object move through walls or through other objects, which may not be what you want.
A better solution, which is what we’re doing in this recipe, is to create a static, invisible object, and connect it to the object that you want to actually let the user drag around. When the touch moves, you change the position of this static object, not the object you want dragged—as a result, the joint will move the object around. Because we’re not overriding the physics system, the object being dragged around won’t do impossible things like intersect with other objects.
You’ll notice that in both the touchesEnded: and touchesCancelled: methods, a new method called stopDragging is called. It’s important to call stopDragging in both the ended and cancelled phases of the touch—a touch can get cancelled while the user’s dragging the object around (such as when a phone call comes in), in which case you’ll need to act as if the finger has been deliberately lifted up.
Creating a Car
Problem
You want to create a vehicle with wheels.
Solution
A vehicle is composed of at least two main parts: the body of the vehicle, and one or more wheels. In the case of a car (at least, a two-dimensional car) we can model this with a box and two wheels—in other words, a rectangular SKSpriteNode and two SKShapeNodes that are set up to draw circles (see Figure 7-2).
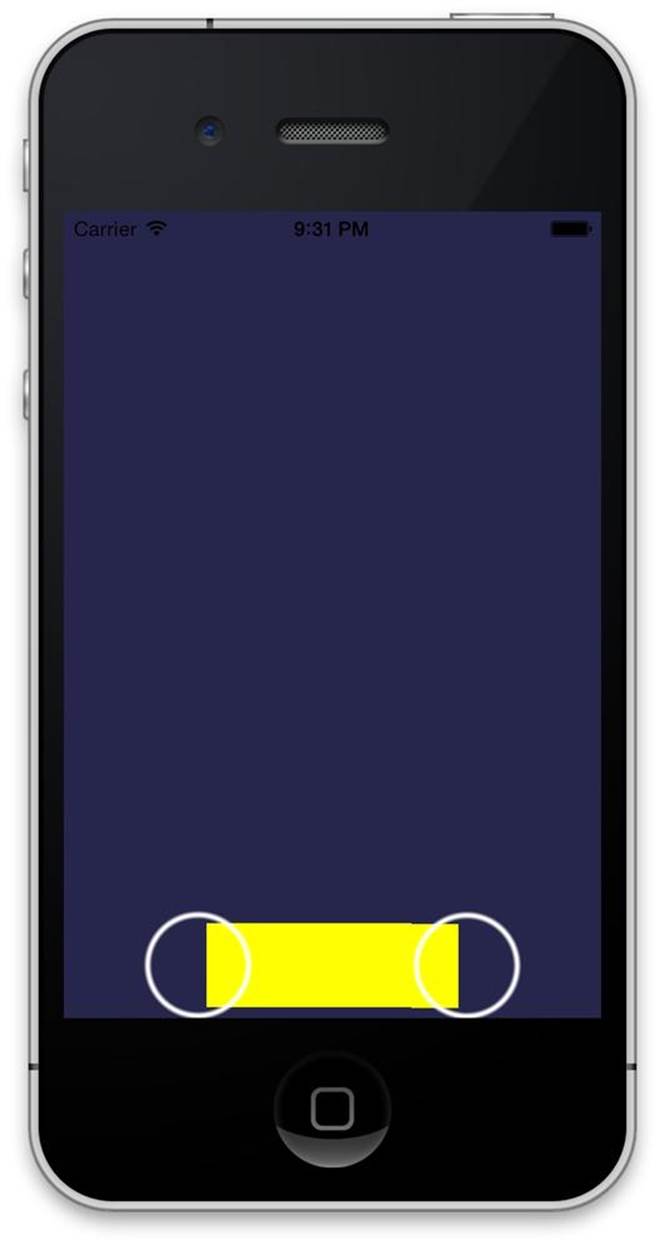
Figure 7-2. The car object described in this recipe, composed of a rectangular main body, two circles for wheels, and two pin joints to connect the wheel to the main body
In addition to creating the nodes, the wheels need to be linked to the body with two SKPhysicsJointPin objects:
- (void) createCar {
// Create the car
SKSpriteNode* carNode = [SKSpriteNode spriteNodeWithColor:[SKColor
yellowColor] size:CGSizeMake(150, 50)];
carNode.position = CGPointMake(CGRectGetMidX(self.frame),
CGRectGetMidY(self.frame));
carNode.physicsBody = [SKPhysicsBody bodyWithRectangleOfSize:carNode.size];
[self addChild:carNode];
// Create the left wheel
SKNode* leftWheelNode = [self createWheelWithRadius:30];
leftWheelNode.position = CGPointMake(carNode.position.x-80,
carNode.position.y);
leftWheelNode.physicsBody = [SKPhysicsBody bodyWithCircleOfRadius:30];
[self addChild:leftWheelNode];
// Create the right wheel
SKNode* rightWheelNode = [self createWheelWithRadius:30];
rightWheelNode.position = CGPointMake(carNode.position.x+80,
carNode.position.y);
rightWheelNode.physicsBody = [SKPhysicsBody bodyWithCircleOfRadius:30];
[self addChild:rightWheelNode];
// Attach the wheels to the body
CGPoint leftWheelPosition = leftWheelNode.position;
CGPoint rightWheelPosition = rightWheelNode.position;
SKPhysicsJointPin* leftPinJoint = [SKPhysicsJointPin
jointWithBodyA:carNode.physicsBody bodyB:leftWheelNode.physicsBody
anchor:leftWheelPosition];
SKPhysicsJointPin* rightPinJoint = [SKPhysicsJointPin
jointWithBodyA:carNode.physicsBody bodyB:rightWheelNode.physicsBody
anchor:rightWheelPosition];
[self.physicsWorld addJoint:leftPinJoint];
[self.physicsWorld addJoint:rightPinJoint];
}
- (SKNode*) createWheelWithRadius:(float)wheelRadius {
CGRect wheelRect = CGRectMake(-wheelRadius, -wheelRadius, wheelRadius*2,
wheelRadius*2);
SKShapeNode* wheelNode = [[SKShapeNode alloc] init];
wheelNode.path = [UIBezierPath bezierPathWithOvalInRect:wheelRect].CGPath;
return wheelNode;
}
Discussion
When you create an SKPhysicsJointPin, the anchor point you define is defined in scene coordinates, not relative to any other body. In this recipe, the pin anchors are set at the center of each wheel, which makes them rotate around their axes; if you set the anchor to be somewhere else, you’ll end up with bumpy wheels (which may actually be what you want!).
WARNING
While writing this recipe, we noticed something that appears to be a bug in Sprite Kit, at least in iOS 7.0: if you set the position of your nodes after you give them physics bodies, your joints will not work correctly. That is, this code won’t work correctly:
carNode.physicsBody = [SKPhysicsBody bodyWithRectangleOfSize:carNode.size];
carNode.position = CGPointMake(CGRectGetMidX(self.frame),
CGRectGetMidY(self.frame));
Instead, you need to set position before setting the physics body, like this:
carNode.position = CGPointMake(CGRectGetMidX(self.frame),
CGRectGetMidY(self.frame));
carNode.physicsBody = [SKPhysicsBody bodyWithRectangleOfSize:carNode.size];
This bug appears to be fixed in iOS 7.1, but keep an eye out.
All materials on the site are licensed Creative Commons Attribution-Sharealike 3.0 Unported CC BY-SA 3.0 & GNU Free Documentation License (GFDL)
If you are the copyright holder of any material contained on our site and intend to remove it, please contact our site administrator for approval.
© 2016-2025 All site design rights belong to S.Y.A.