Learning iCloud Data Management (2014)
Part IV: Using iCloud Documents and Data
14. Working with File Wrappers in iCloud
Part IV of the book gets to the heart of iCloud—the APIs for managing documents and data. You have to go back to the basics and understand how common terms you are familiar with have very specific meanings in iCloud. In particular, you may be among the many people who use “document” and “file” interchangeably. There has always been a distinction between those terms, but it hasn’t mattered too much until iCloud. Now it matters.
This chapter introduces the distinctions between these terms and then explores the APIs you need to use to manage files and file wrappers. The remaining chapters in this part delve into the APIs for managing documents on iOS (Chapter 15) and on OS X (Chapter 16). The Core Data API that was described in Chapter 10 comes into play again in Chapter 17 when it is merged with iCloud and the concept of documents.
The focus in this chapter is on files and file wrappers and how you use them with iCloud. The chapter looks for the iCloud ubiquity container and, if it finds it, uses it. That’s a good start for looking at files and file wrappers, but as you move into chapters 16 and 17, you’ll see how to manage iCloud accounts, availability, and options. Those features are necessary in a shipping app.
As is the case with the other chapters in this part of the book (as well as many chapters in previous parts), this chapter contains an annotated example; you can download it from the author’s website as well as from www.informit.com/title/9780321889119. The project in this chapter is code-named Placid. (The project code names are taken from the names of lakes in northern New York’s Adirondack mountains.) In this chapter, Placid is implemented only for iOS. Chapter 16 explores an OS X version.
Exploring Files, File Wrappers, and Documents
This section explores the distinctions between files and documents and introduces the file wrapper structure. You may be familiar with these topics, and in that case feel free to skim this section or to skip over it entirely. The challenge for both reader and author is that although these and many other iCloud concepts are not particularly new (the NSFileWrapper class goes back to the first release of OS X), you may not have needed to pay attention to them before now.
This is actually a common situation with iCloud. iCloud has been implemented by making changes—often relatively small changes—to existing APIs across the two operating systems. Along the way, many recommendations and best practices have become required. That’s the reason it is necessary to occasionally backtrack to some basics.
Looking at Files
On almost all operating systems, files contain data. They are stored on disks and other storage devices. Users and developers generally access them by name and location—the directory in which they are stored. (Note that folder is the user-facing term for what is technically a directory.)
Files can be of various types; in general, a file of a specific type is linked in some manner to apps that can be used to edit or display it. Typically, this linkage has been accomplished with a file extension that is appended to the file’s name.
As you may have learned (the hard way), this structure is a bit fragile, especially when moving files across platforms. (Is it JPEG or JPG? TEXT or TXT?) Over the last several iterations of Apple’s operating systems and Xcode, a more robust mechanism has been implemented—the Uniform Type Identifier (UTI). It is more robust and flexible, but it also is a little more complicated. Fortunately, much of that complexity has been removed with Xcode 5, as you will see later in this chapter.
As you saw in Chapter 1, “Exploring iCloud and Its User Experience,” iCloud introduces a new file storage structure. No longer are files visibly stored on disks in whatever structure the user wants using folders such as My Projects, Trail Maps, Pictures, Soccer Games, and the like. Instead, as described in Chapter 1, files are stored in areas reserved for individual apps. Within that area, there can be any number of files or directories (subject, of course, to device storage limitations).
In fact, the description in Chapter 1 is the common description presented to users, but it is an oversimplification. The storage area for files is not specific to an app; rather, it is specific to a bundle identifier. In most cases, apps have unique bundle identifiers; however, several apps may share one bundle identifier. Thus, they share a storage area and the files and directories within it.
Exploring File Wrappers
File wrappers (instances of NSWrapper or a subclass thereof) provide a means of working with file-system nodes, which are files, directories, or symbolic links using a common interface. (In the context of iCloud, you typically work only with files and directories.) A file wrapper has a name and a set of file-system attributes (as described in the NSFileManager Class Reference). If a file wrapper wraps a file, the file’s content is available through the regularFileContents method, which returns an NSData object. Thus, file wrappers provide a mechanism that lets you work with files and directories using a common interface for both of them. (In fact, you can argue that this common interface for files and directories is one of the key roles of the Finder on OS X.)
If a file wrapper wraps a directory, that directory itself is a file wrapper within the overall directory file wrapper. You can access the items within a directory file wrapper using the fileWrappers method, which returns an NSDictionary. Where the user sees a folder within a folder, the developer sees a dictionary within a dictionary, and, when using file wrappers, the developer sees a file wrapper within a file wrapper.
File wrappers become very important in the iCloud world. As noted previously, synchronizing data is easiest when the data is structured so that it can be disassembled and reassembled on demand. If it is structured in this way, the sync process can be run only for those specific parts of the data that have changed since the last sync. A file wrapper provides an excellent example of this. What appears to be a single file can actually be multiple files and file wrappers, each of which can be synced separately by iCloud if that is desired.
Exploring Documents
On OS X and iOS, document refers to a specific class of object—either UIDocument on iOS or NSDocument on OS X. A document almost always contains data that can be stored in a file wrapper, in a single file, or in a Core Data persistent store that is part of the document. Both document classes implement a robust and complex user experience for the platform. The document is not the file (or file wrapper). They are related but different.
The differences between UIDocument and NSDocument are significant in many areas, which is why they are discussed in separate chapters. For example, NSDocument builds in an Open dialog, which lets users select files to open from any disk or folder to which access is provided. On iOS, it is the responsibility of the app to display the list of documents that can be opened. Fortunately, that is not too difficult to accomplish.
How Users Manage iCloud Files
In Chapter 13, “Adding the iCloud Infrastructure,” and this chapter, you see what you do to manage files. It’s time to switch roles for a moment and see what the users see as they work with your file management code.
With OS X Mavericks (10.9), users have direct access to their iCloud containers just as you do with developer.icloud.com. This access comes through the iCloud System Preferences pane, as shown in Figure 14.1. Click Manage in the lower right to begin the process.
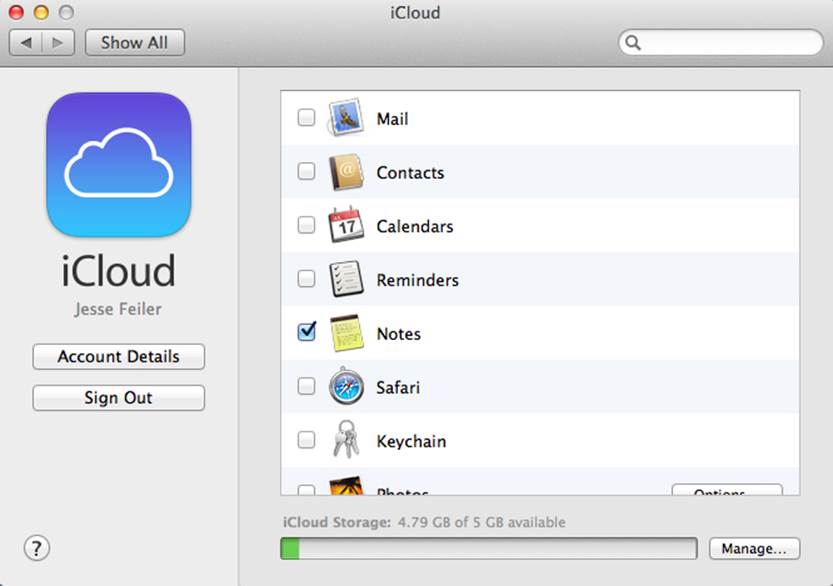
Figure 14.1 Managing iCloud storage
Next, you see the list of apps in your iCloud container just as you do in developer.apple.com, as shown in Figure 14.2.
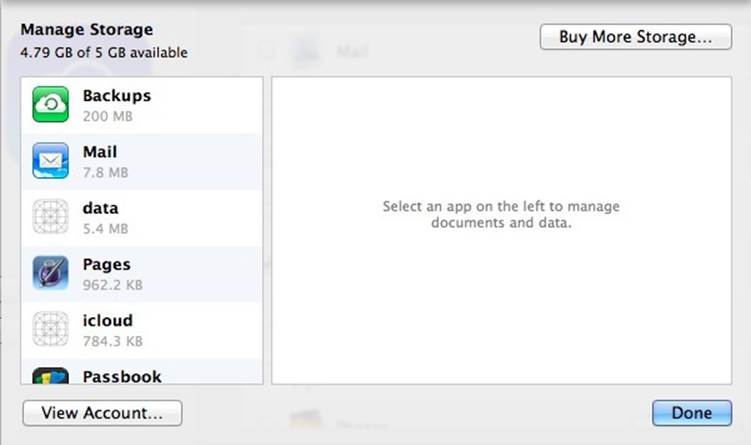
Figure 14.2 Listing apps in iCloud storage
In developer.icloud.com, you have the ability to download a file from the iCloud container, but the user does not have that feature. There is another difference: users can remove files from their iCloud container, but you can’t do that with developer.icloud.com. (There are Delete and Delete All buttons at the bottom of the pane that shows the containers. You reach it with the Manage button at the bottom of Figure 14.1.) Figure 14.3 shows the developer.icloud.com display.
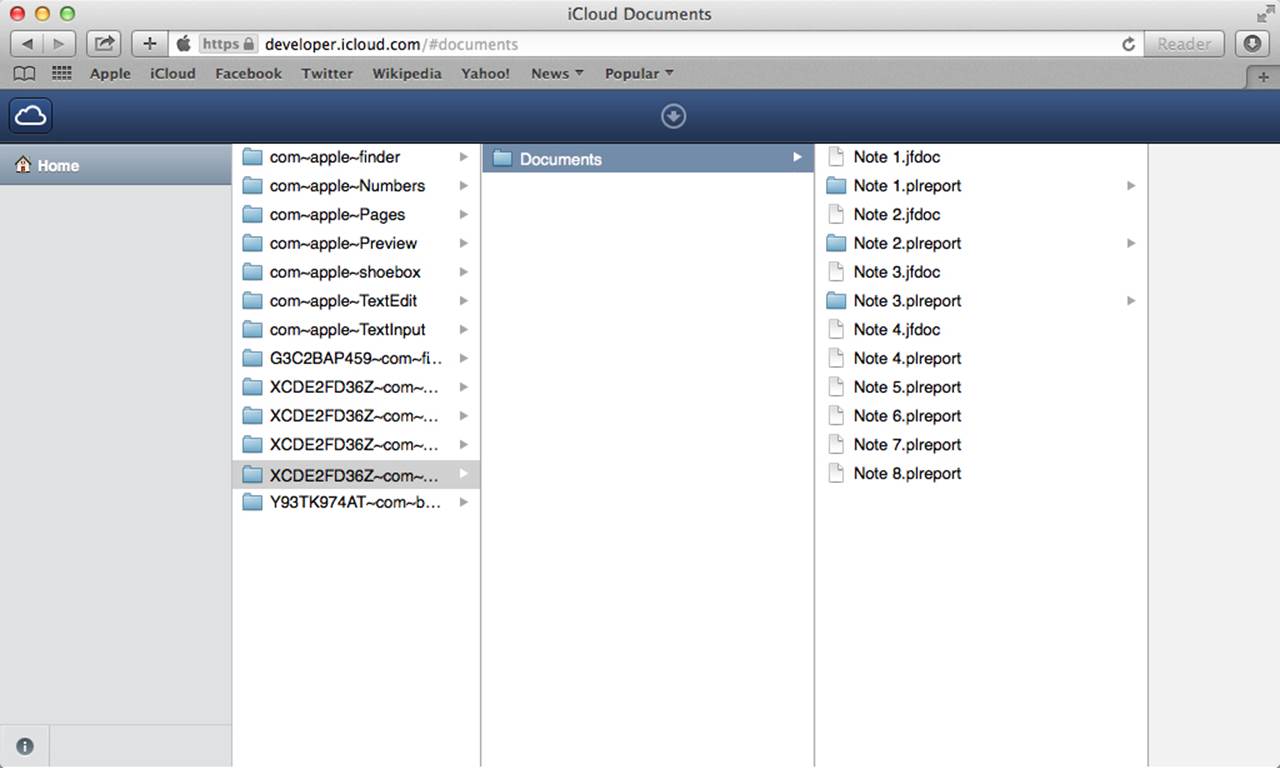
Figure 14.3 Accessing developer.icloud.com
If you download a document from developer.icloud.com, it appears as a single file on your desktop. If it is a file wrapper, control-click the file and you’ll see a contextual menu containing the Show Package Contents command. (This command never appears in the menu bar.) If you use the command, the file will open, as shown in Figure 14.4, and you can see the files contained within the file wrapper (a .png image, a property list, and a text file).
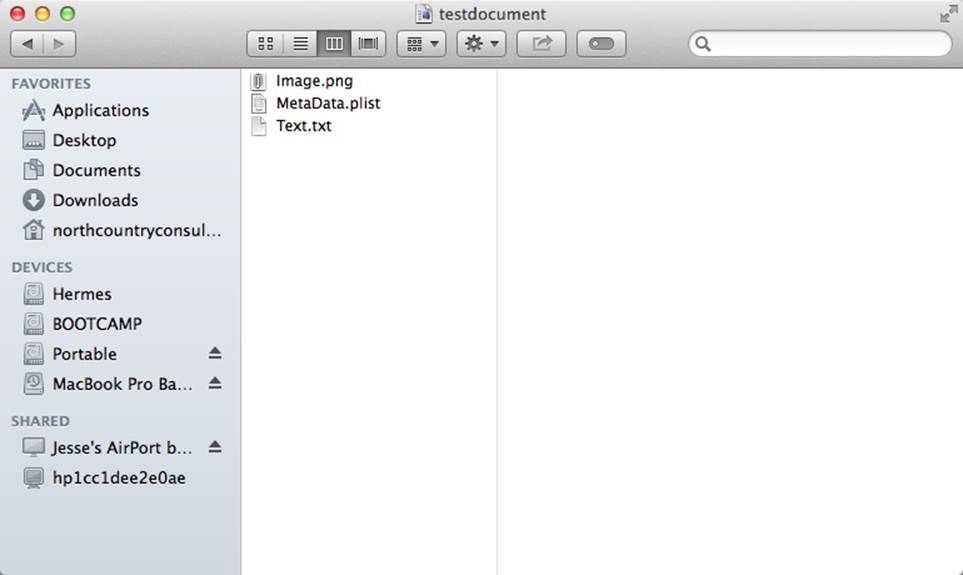
Figure 14.4 Opening a file wrapper document
In this case, the file wrapper contains three files: an image, a plist, and a text file. It could also contain one or more file wrappers. Thus, in various contexts a file wrapper can appear as a single file (the basic Finder display), a package of embedded files and folders (Show Package Contents), or in other formats that your app may implement.
Starting the Placid Project
Like many other iOS projects, Placid starts from the Xcode built-in Master-Detail Application template. It’s always a good idea to build and run a new project as soon as you have created it. The Master-Detail Application template should run at this point. If it doesn’t, backtrack to check your various installations (operating system, Xcode, and developer program). At this time, you can run it in the simulator.
In order to focus on building an iCloud-enabled file wrapper–based app, the version of Placid used in this chapter omits many of the features that you need in a shipping application, such as error messages, and even the basic user choice of whether or not to use iCloud—iCloud is the only data storage that is implemented. Much of the iCloud infrastructure described in the previous chapter is omitted to focus on the file wrapper code.
Like previous examples, Placid is a simple app that lets people keep track of issues that need attention. For each entry in the app, there will be a description (a text field) and a location (another text field). You can expand this model to include more data, including images. Each entry will wind up as a document whose data is stored in a file wrapper. (It is a simplification that the text document contains only a single field.) In practice, you often have a variety of fields as well as data in the overall file wrapper itself in addition to within the inner file wrappers.
This section lists the steps you need to go through to set up your new project. Some are specific to all iCloud projects, and others are not. It may seem as if you’re jumping around, but these steps involve settings that are entered out in various places inside your Xcode project and on developer.apple.com. So if you’re chomping at the bit to get started writing code, just hold on for a little bit. You may be able to carry out these steps in a different sequence, but remember that cutting corners by skipping steps will often come back to haunt you. As many developers have found out the hard way, tracking down configuration issues can be very time consuming.
Here are the sections that follow:
![]() Certificates, Identifiers, Devices, and Profiles on developer.apple.com: These settings are configured on developer.apple.com.
Certificates, Identifiers, Devices, and Profiles on developer.apple.com: These settings are configured on developer.apple.com.
![]() Certificates, Identifiers, Devices, and Profiles on Xcode 5: Some of these can be configured directly from Xcode 5.
Certificates, Identifiers, Devices, and Profiles on Xcode 5: Some of these can be configured directly from Xcode 5.
![]() Adjusting the General Settings: These settings are mostly as they were in Xcode 4, but the interface is drastically different in Xcode 5.
Adjusting the General Settings: These settings are mostly as they were in Xcode 4, but the interface is drastically different in Xcode 5.
![]() Setting Images: One of the major features of Xcode 5 is its ability to manage images as assets without having to worry about file naming conventions.
Setting Images: One of the major features of Xcode 5 is its ability to manage images as assets without having to worry about file naming conventions.
![]() Configuring Capabilities: This is where you set up iCloud access and other capabilities for your app.
Configuring Capabilities: This is where you set up iCloud access and other capabilities for your app.
![]() Setting Document and Universal Type Identifiers: If you are going to be using your own documents and importing or exporting them, this is the section where you do so.
Setting Document and Universal Type Identifiers: If you are going to be using your own documents and importing or exporting them, this is the section where you do so.
![]() Checking Build Settings: This is a final review before you move on to writing the code.
Checking Build Settings: This is a final review before you move on to writing the code.
Certificates, Identifiers, Devices, and Profiles on developer.apple.com
Now is a good time to check your provisioning profiles and to create one for Placid. It may seem as if you’re skipping the basic project setup steps, but you’ll get back to them shortly. The reason for focusing on the certificates, identifiers, devices, and profiles is that they must be set up on your developer account. (Provisioning profiles can be set up either on the developer website or on Xcode 5.) Particularly if you have not done this before or if you have not done it for a while, that process may require a little time (and it might require one of your technical support incidents the first time). So it is a good idea to get these steps out of the way right at the start. If there is a delay in sorting out your developer account, you can move on to configure your app, as described in the next section, while you wait for the resolution.
To recap, following are the documents and certificates you need to create a provisioning profile. You create them on developer.apple.com. For both iOS and OS X, you access them at the right side of the page in the Developer Program section. They are under the link named Certificates, Identifiers & Profiles.
![]() Signing certificates: As a developer, you should have at least one of these. You should not have any duplicates—that is one of the root causes of problems in setting up provisioning profiles. For Placid, you must have at least an iOS Development certificate. You may also have an iOS Distribution certificate (this is for the App Store).
Signing certificates: As a developer, you should have at least one of these. You should not have any duplicates—that is one of the root causes of problems in setting up provisioning profiles. For Placid, you must have at least an iOS Development certificate. You may also have an iOS Distribution certificate (this is for the App Store).
![]() Identifiers: You need to add an App ID for your app. This is another area that has changed recently. If you search the web for information on how to delete an App ID from your account, you will find many references to the fact that you can never delete an App ID. That is not the case today. The rule is that you cannot delete an App ID for any app that has been submitted to the App Store—that is submitted, not necessarily accepted. You can see the reason for this. The App Store software does let you revoke an app or even not resubmit an app that has been rejected. In both cases, the app is not on the App Store after the revocation or rejection. However, to keep the App Store records straight, the App ID must continue to exist for these previously submitted apps. If you are creating an App ID for a test app and have no intention of submitting it to the App Store, you should have no qualms about creating a new App ID and then deleting it. For now, add an App ID for Placid.
Identifiers: You need to add an App ID for your app. This is another area that has changed recently. If you search the web for information on how to delete an App ID from your account, you will find many references to the fact that you can never delete an App ID. That is not the case today. The rule is that you cannot delete an App ID for any app that has been submitted to the App Store—that is submitted, not necessarily accepted. You can see the reason for this. The App Store software does let you revoke an app or even not resubmit an app that has been rejected. In both cases, the app is not on the App Store after the revocation or rejection. However, to keep the App Store records straight, the App ID must continue to exist for these previously submitted apps. If you are creating an App ID for a test app and have no intention of submitting it to the App Store, you should have no qualms about creating a new App ID and then deleting it. For now, add an App ID for Placid.
![]() Devices: Here is where you add devices to your account for testing. You can have up to 100 devices. You may need to add a device for testing if you don’t already have one in your developer account. (The simulator is a special “device,” so don’t worry about adding it.)
Devices: Here is where you add devices to your account for testing. You can have up to 100 devices. You may need to add a device for testing if you don’t already have one in your developer account. (The simulator is a special “device,” so don’t worry about adding it.)
![]() Provisioning profiles: This is where you combine a signing certificate, an App ID, and one or more device IDs. (Don’t worry, you just use checkboxes off your list of up to 100 devices.) Add a provisioning profile for Placid on developer.apple.com, or use the steps in the following section with Xcode 5 on your Mac.
Provisioning profiles: This is where you combine a signing certificate, an App ID, and one or more device IDs. (Don’t worry, you just use checkboxes off your list of up to 100 devices.) Add a provisioning profile for Placid on developer.apple.com, or use the steps in the following section with Xcode 5 on your Mac.
Certificates, Identifiers, Devices, and Profiles on Xcode 5
Once you have everything set up on developer.apple.com, you can use the new Accounts preferences on Xcode 5 to manage that end of things. Choose Xcode, Preferences and select the Accounts tab as shown in Figure 14.5.
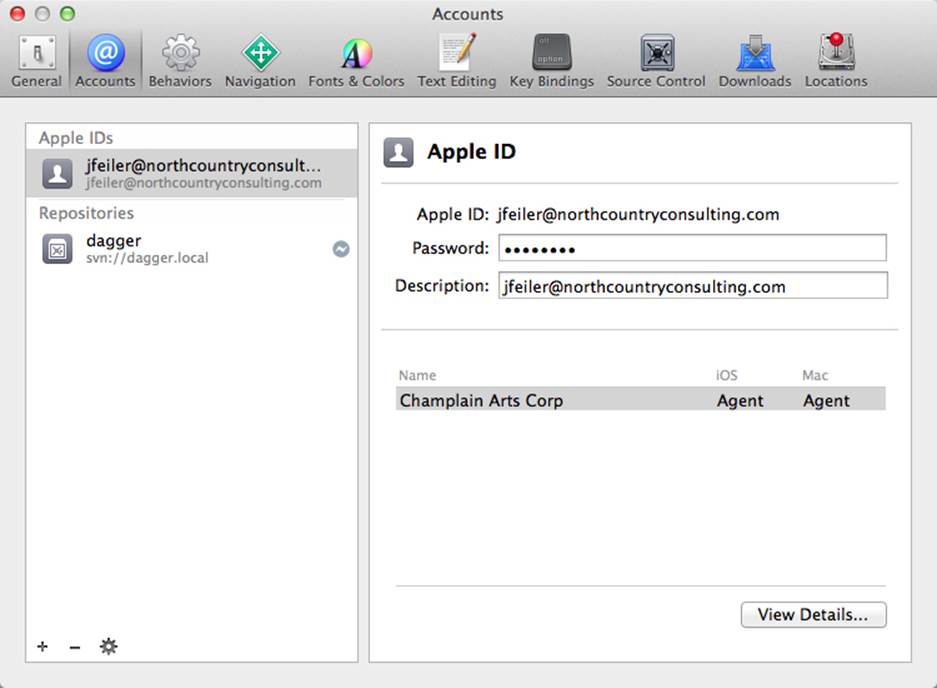
Figure 14.5 The Accounts tab of the project
You can add any number of developer accounts to Xcode as long as you have the proper credentials. Select an account and click View Details to see the information shown in Figure 14.6.
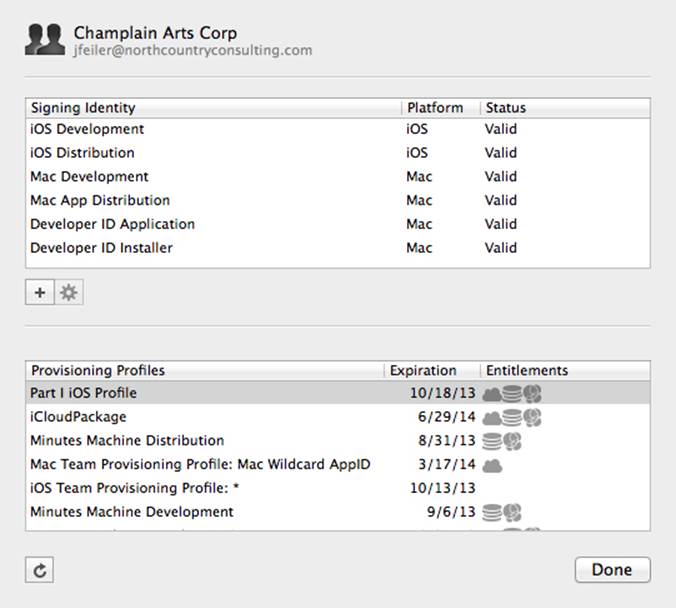
Figure 14.6 Viewing details for a selected account
It is a good idea to compare the account details as shown in Xcode with the details for the same account shown on developer.apple.com. As this system has evolved over the years, many developers have discovered some anomalies that have crept into their account. These are not bugs; rather, they are the result of various misunderstandings some developers have had over time. Now that everything is laid out clearly, get rid of those before you find yourself locked out of the App Store at a crucial moment.
Adjusting the General Settings
Once you have created the project, built it, and run it on your testing device, it’s time to adjust some of the settings in the project. As noted in the Preface, this book is based on Xcode 5, OS X Mavericks (10.9), and iOS 7. Xcode 5 brings some extraordinarily significant improvements to the process of setting up and configuring a project: they are described in this section. If you are using an earlier version of Xcode, your best choice is to update to Xcode 5 (Xcode is free). If you need Xcode 4 to maintain legacy projects, rest assured that you can have both versions installed on a single computer. The only issue you must remember is that opening an Xcode 4 project in Xcode 5 may reformat some storyboard or nib files to the Xcode 5 format. If you want to be doubly safe, create a separate user account on your Mac for your Xcode 5 and Xcode 4 projects and install the appropriate Xcode version in each.
The basic setup for the project is the same process you’re used to. The general information is collected during the process of creating the project as always. In Xcode 5, there are some new features, which are described in this section. In every case, they simplify your work (in some cases, dramatically so). Figure 14.7 shows the General tab of the project settings.
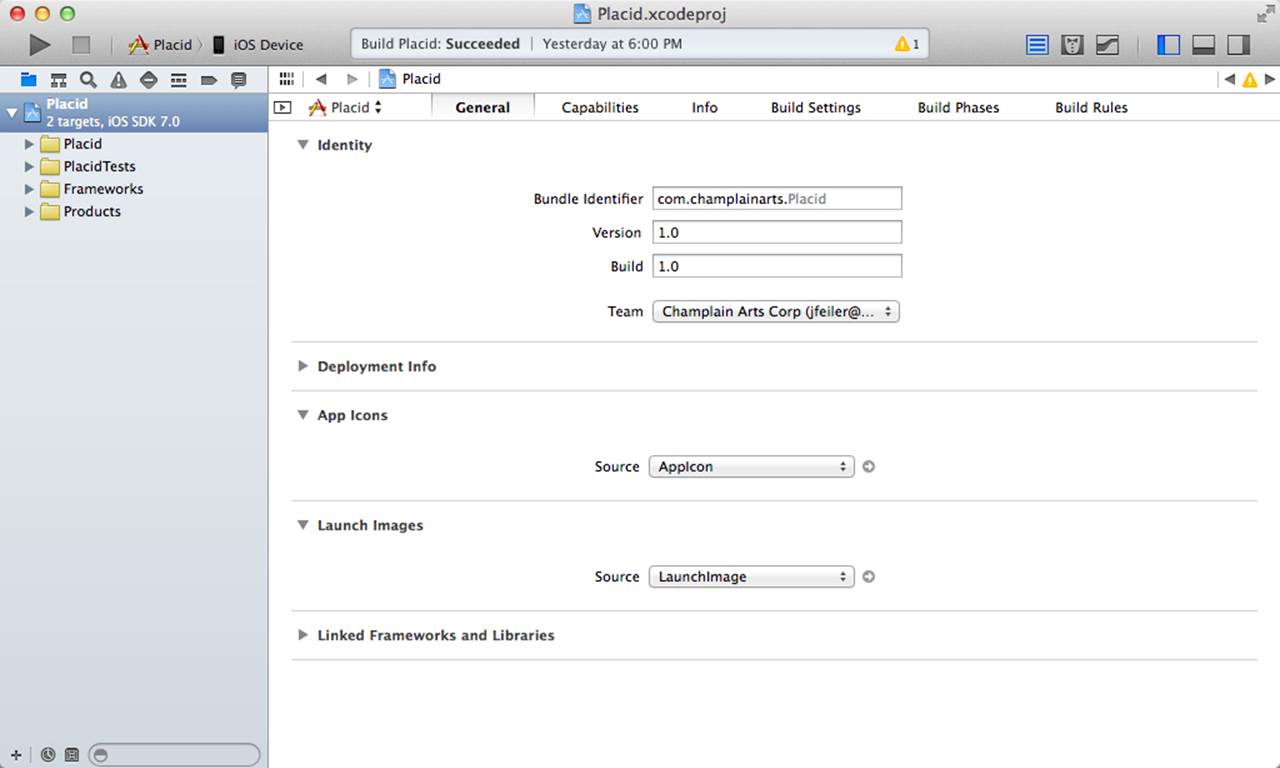
Figure 14.7 The General tab of the project
Setting Images
One of the changes in Xcode 5 is the addition of the xcassets file type for managing assets such as images in asset catalogs. The easiest way to work with assets is to experiment with them yourself. Figure 14.8 shows the editor for the app’s Images.xcassets file. Gone are the days when we relied on dedicated file names to identify what file is what. Furthermore, as you can see in Figure 14.8, critical dimensions for specific files are shown right there on the editor. Note that the dimensions are given in points rather than pixels. Points are and have been measures of length (1/72 of an inch). As you can see in Figure 14.8, you can supply Retina (2x) and non-Retina (1x) versions of your images. Try not to think about how much time you have spent tracking down this information in the past. (And, in all fairness, remember that some of the difficulties in setting up apps before Xcode 5 occurred because the entire app universe is only a few years old now and was evolving as Xcode was evolving.)
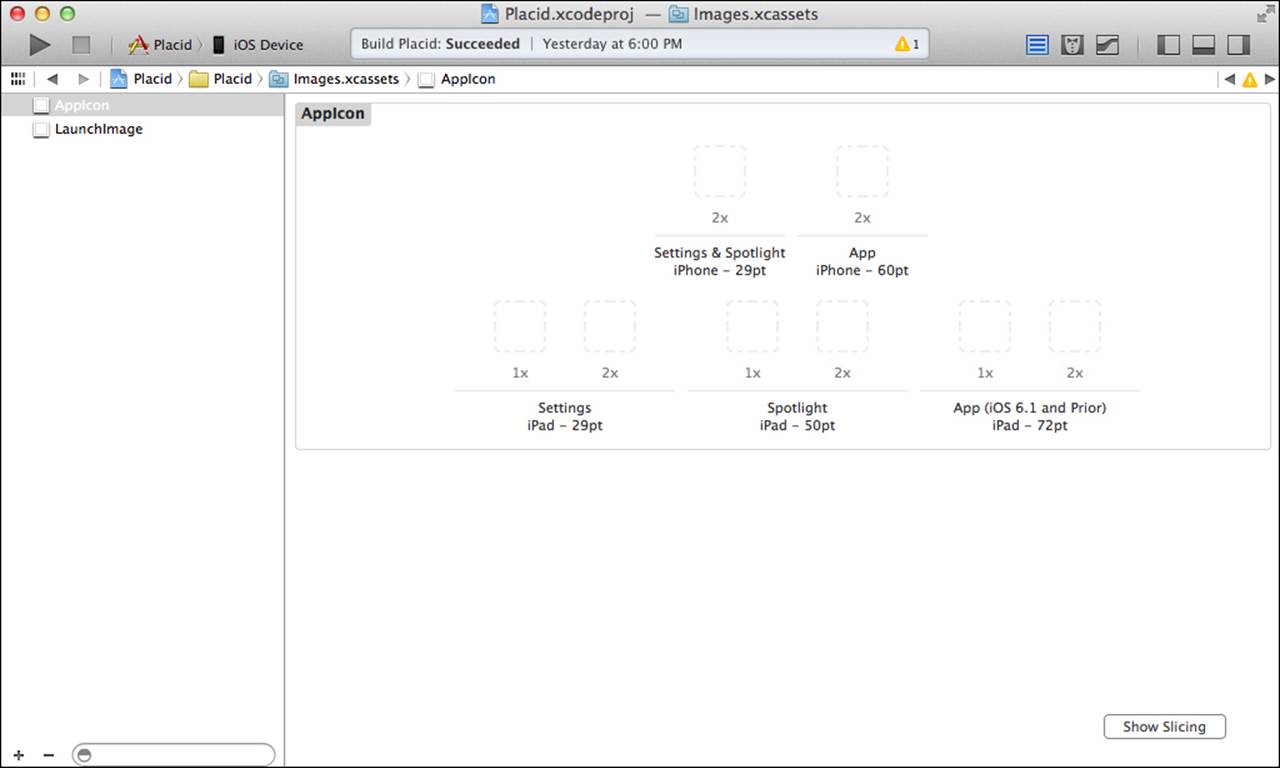
Figure 14.8 Using Images.xcassets
Configuring Capabilities
You really have to have gone through the pre-Xcode 5 process of configuring your app’s capabilities to appreciate the new process of configuring the capabilities in Xcode 5. Here are the capability configuration steps in Xcode 5:
1. Verify your certificates, identifiers, devices, and profiles on developer.apple.com as described previously.
2. Verify them on Xcode, Preferences, Account as described previously. (If the versions on developer.apple.com and those on Xcode don’t match, resolve the conflicts and/or create missing certificates, identifiers, and profiles.)
3. Select your project in the Xcode navigator and choose the target you want to configure.
4. In the Capabilities tab, click to turn iCloud on. That’s it—one mouse click (as long as you’ve done the preparatory work).
Xcode adjusts your App ID to add the iCloud entitlement (this used to be a manual process you had to do), and it updates or creates an entitlements file in your project. Figure 14.9 shows the Capabilities tab.
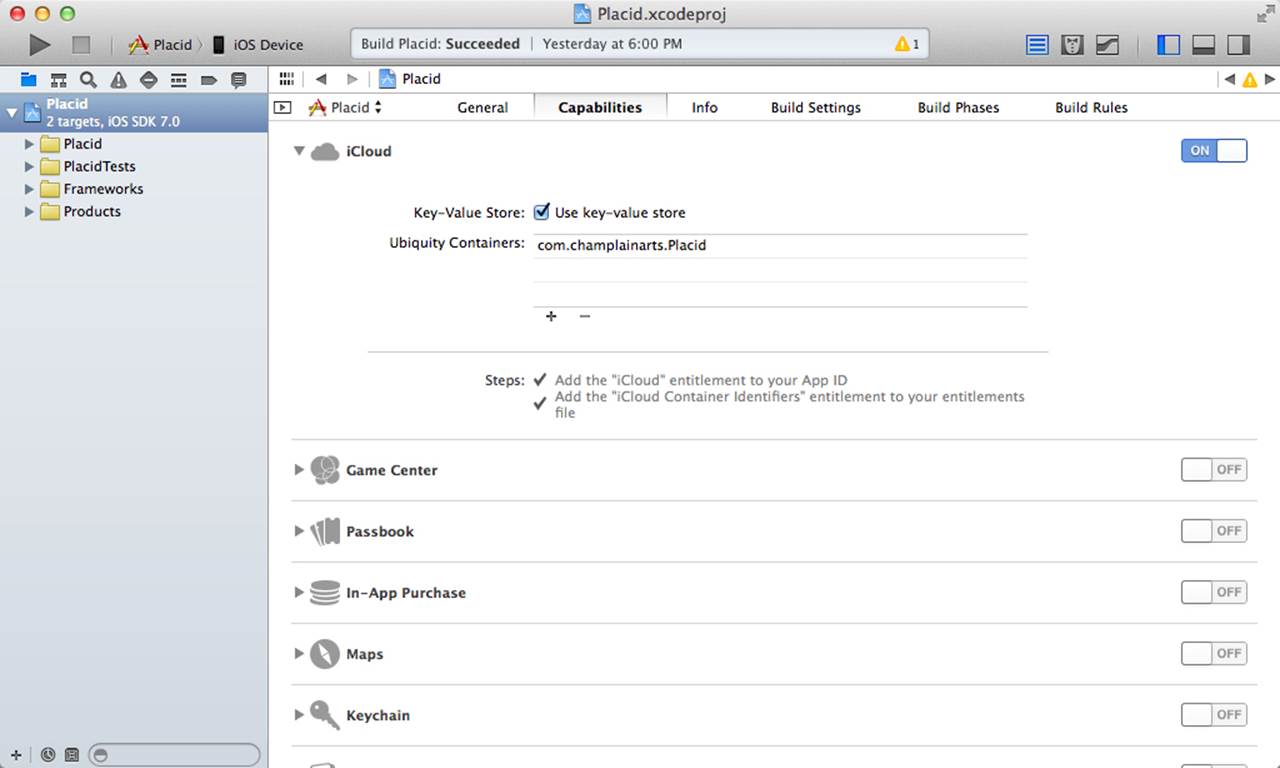
Figure 14.9 Configuring the iCloud capabilities
Note that Capabilities has an extra feature that can come in very handy. If there’s a problem with your credentials, you may have had the experience of tracking down which document is wrong or missing. This is often somewhat a trial-and-error process; more than one developer has managed to cause further difficulties in attempting to rectify the initial problem in this way.
Now, if you have issues such as missing profiles or anything else that prevents compilation or running on a device, your immediate action should be to click Capabilities. If you have already turned on iCloud or any of the other options, you may see a message indicating what is wrong. (This alone can save hours for work.) Even better, you may find a Fix button that you can click to resolve the issue automatically.
Setting Document and Universal Type Identifiers
As described previously, the distinction between files and documents is sometimes not important to users, but it’s critical to developers. In the Info tab of the project’s target(s), you describe the documents with document types. UTIs describe the files your app deals with; you have separate UTIs for imported and exported files—that is, files from other apps that you read and those that you write for other apps to read. UTIs and document types are linked by a common value—type in a document type and identifier in a UTI.
If you use documents in your app, you declare a document type in the Info tab of your project’s target, as shown in Figure 14.10.
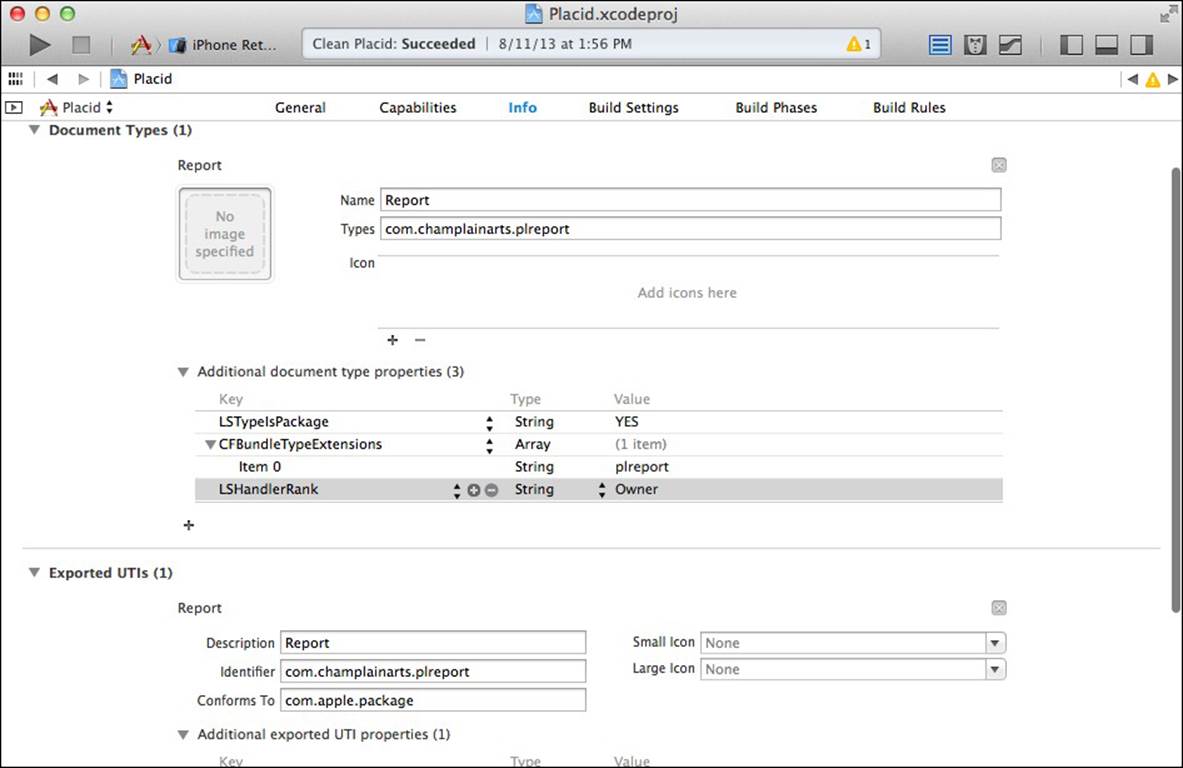
Figure 14.10 Setting up a UTI
Setting Up Document Types
Here are the steps to follow to create a document type:
1. Create a new document type with + in the document types section.
2. Provide a name for the document type. This is a name for you to use in Xcode.
3. Provide a type using reverse-domain name notation. You can provide several types, but you commonly only provide one.
4. Add icons for the document.
5. Open additional document type properties and add three of them, as shown in Figure 14.10:
![]() LSTypeIsPackage: For file wrappers or packages (as described in this chapter), add this string and set its value to YES.
LSTypeIsPackage: For file wrappers or packages (as described in this chapter), add this string and set its value to YES.
![]() CFBundleTypeExtensions: Add an array with the file extensions used for this document type. As you see in Figure 14.10, the extensions are strings; it doesn’t matter what their names are.
CFBundleTypeExtensions: Add an array with the file extensions used for this document type. As you see in Figure 14.10, the extensions are strings; it doesn’t matter what their names are.
![]() LSHandlerRank: This string’s value is usually either Editor or Owner depending on how your app will be using the document.
LSHandlerRank: This string’s value is usually either Editor or Owner depending on how your app will be using the document.
Setting Up UTIs
The UTIs provide information about files you read and write. Here are the steps to follow to set up a UTI either for importing or exporting:
1. Set the description. This is a user- and developer-oriented description. It is not used internally.
2. Provide a unique identifier. Follow the practice of using your reverse-domain name and appending a final term that makes sense to you. This should match a type in a document type.
3. Provide the name of the UTI to which your new UTI conforms. For a file wrapper–based document, you want com.apple.package. The UTI structure is a hierarchical one in which you can specify your own object or inherit from a higher-level one such ascom.apple.package.
4. Add icons for a production version of your app. Use the Images.xcassets file to store them and then select them in defining the UTI.
5. Add a new UTI property called UTTTypeSpecification as a dictionary. Within the dictionary, create an array called public.filename-extension. Within that array, create at least one string, which will be the file extension (it doesn’t matter what the name of it is).
Checking Build Settings
As you can see in Figure 14.11, if you have followed the steps for setting up a UTI, your code signing settings have been set up for you by Xcode. If you need to adjust them, the Build Settings tab is where you do it.

Figure 14.11 Code signing set up automatically
If you have resolved an issue using the Fix button in Capabilities, you may need to revisit your build settings for them to match your new capability settings.
Writing the Code
Now it’s time to move on to the code. As you have seen before, much of the code that you write is a small snippet here and perhaps a tweak to the template code there. Often, the biggest single chuck of “writing” the code is designing the user interface and functionality with Interface Builder in Xcode, as shown in Figure 14.12.
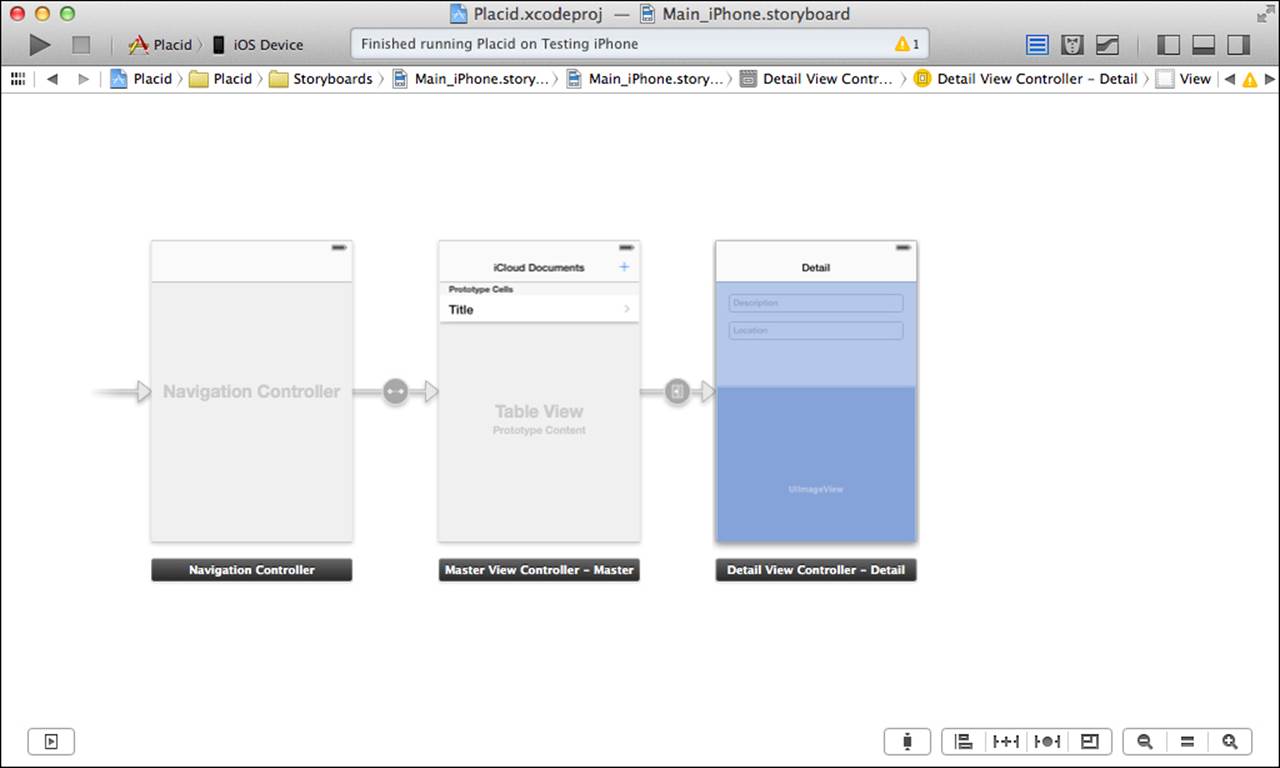
Figure 14.12 The basic app interface
In general these are the sections of code that you will customize or create:
![]() AppDelegate: This is part of the template. You need to add some minor iCloud housekeeping code.
AppDelegate: This is part of the template. You need to add some minor iCloud housekeeping code.
![]() MasterViewController: The master view controller will display the list of documents from iCloud. As is always the case in Master-Detail Application apps, it will allow you to add new documents to the list, so it must have the supporting code to create them, read them, and write them.
MasterViewController: The master view controller will display the list of documents from iCloud. As is always the case in Master-Detail Application apps, it will allow you to add new documents to the list, so it must have the supporting code to create them, read them, and write them.
![]() DetailViewController: As always, this displays the detail information for a selected item in the master view.
DetailViewController: As always, this displays the detail information for a selected item in the master view.
![]() WrappedDocument: This is the document that contains the file wrapper that stores the data for each document created by the app. All of this code is new.
WrappedDocument: This is the document that contains the file wrapper that stores the data for each document created by the app. All of this code is new.
Note that in the examples, the file prefix has been set to JF in setting up the project. You can use your own initials if you want to keep your files separate. You may also want to compare the code in this chapter with the code in Chapter 13. Although both start from the same template, they have different approaches to the overall structure of the app.
There are two projects on developer.apple.com that you can explore to see other approaches to using file wrappers and iCloud:
![]() Your Third iOS App: iCloud (this is under documentation)
Your Third iOS App: iCloud (this is under documentation)
![]() Document Package with iCloud (this is an OS X project under sample code)
Document Package with iCloud (this is an OS X project under sample code)
Placid and these two projects accomplish basically the same goal, but there are some implementation differences. The code annotations in this chapter point out the most important ones. These differences are a matter of style and preference. The only reason for pointing them out is to help you follow the parallel implementations in which different names are used for the same logical elements.
AppDelegate
There are just two changes to AppDelegate.m. There are no changes to AppDelegate.h. Listing 14.1 shows AppDelegate.m. As always, some spacing in the code has been adjusted to the book layout. Most of this file consists of comments in the template reminding you of features you can use and enhance. They are retained here to remind you of what is missing: the focus in this book is on iCloud, so if you move this code to production, check the comments in the template for additional code you might write. Also note that this code is the bare-bones implementation of iCloud access: you will need to monitor account changes, Airplane mode, and the like as shown in the shared iCloud controller in Chapter 13.
Listing 14.1 AppDelegate.m
//
// JFAppDelegate.m
// Placid
//
// Created by Jesse Feiler on 7/3/13.
// Copyright (c) 2013 Champlain Arts. All rights reserved.
//
#import "JFAppDelegate.h"
@implementation JFAppDelegate
#pragma mark - launch and background
- (BOOL)application:(UIApplication *)application
didFinishLaunchingWithOptions: (NSDictionary *)launchOptions
{
//iCloud
[self initializeiCloudAccess]; //1
// Override point for customization after application launch.
if ([[UIDevice currentDevice] userInterfaceIdiom] ==
UIUserInterfaceIdiomPad) {
UISplitViewController *splitViewController =
(UISplitViewController *)self.window.rootViewController;
UINavigationController *navigationController =
[splitViewController.viewControllers lastObject];
splitViewController.delegate =
(id)navigationController.topViewController;
}
return YES;
}
- (void)applicationWillResignActive:(UIApplication *)application
{
// Sent when the application is about to move from active to inactive
// state. This can occur for certain types of temporary interruptions
// (such as an incoming phone call or SMS message) or when the user quits
// the application and it begins the transition to the background state.
// Use this method to pause ongoing tasks, disable timers, and throttle
// down OpenGL ES frame rates. Games should use this method to pause the
// game.
}
- (void)applicationDidEnterBackground:(UIApplication *)application
{
// Use this method to release shared resources, save user data, invalidate
// timers, and store enough application state information to restore your
// application to its current state in case it is terminated later. If
// your application supports background execution, this method is called
// instead of applicationWillTerminate: when the user quits.
}
- (void)applicationWillEnterForeground:(UIApplication *)application
{
// Called as part of the transition from the background to the inactive
// state; here you can undo many of the changes made on entering the
// background.
}
- (void)applicationDidBecomeActive:(UIApplication *)application
{
// Restart any tasks that were paused (or not yet started) while the
// application was inactive. If the application was previously in the
// background, optionally refresh the user interface.
}
- (void)applicationWillTerminate:(UIApplication *)application
{
// Called when the application is about to terminate. Save data if
// appropriate. See also applicationDidEnterBackground:.
}
#pragma mark - iCloud //2
- (void)initializeiCloudAccess { //3
dispatch_async(dispatch_get_global_queue(DISPATCH_QUEUE_PRIORITY_DEFAULT,
0), ^{
if ([[NSFileManager defaultManager]
URLForUbiquityContainerIdentifier:nil] != nil)
NSLog (@"Got iCloud\n"); //4
else
NSLog (@"No iCloud\n"); //5
});
//async
}
@end
1 This code is used to initialize iCloud. Make sure it’s called when the app launches. It calls a method that you add at line 2. The name of this method is up to you.
2 It’s always a good practice to create a pragma for an API you’re using in your app if you can do so. Some pragmas have been added to the basic template.
3 This is the method called from applicationDidFinishLaunchingWithOptions:. It uses the ubiquity container set up in Capabilities, so you don’t need to do any customization there.
4, 5 Log whether you have gotten iCloud or not. This is important for debugging. Note that this call is an async process, so you can’t be certain that the user interface has already been totally created. If you have a problem with iCloud, you’ll have to set a flag and then check it at the end of the launch sequence and display an alert if necessary.
MasterViewController
As always, the master view controller handles the list of items that are shown by the detail view controller. It also handles reading and writing the items. The code is a combination of standard Master-Detail Application code from the template and iCloud-specific additions. Listing 14.2 shows MasterViewController.h
Listing 14.2 MasterViewController.h
#import <UIKit/UIKit.h>
@class JFDetailViewController;
@interface JFMasterViewController : UITableViewController
@property (strong, nonatomic) JFDetailViewController *detailViewController;
@property (weak, nonatomic) IBOutlet UIBarButtonItem *addButton; //1
@end
1 This is the add button on the master view controller. When you create your storyboard, add the button to the scene. Then, with the Assistant, show the storyboard and this file at the same time. Control-drag from the button in the storyboard to this file, and this line of code will be generated automatically after you respond to the request to provide the name.
The beginning of MasterViewController.m is shown in Listing 14.3.
Listing 14.3 MasterViewController.m Declarations
#import "JFMasterViewController.h"
#import "JFDetailViewController.h"
#import "JFWrappedDocument.h"
NSString *JFDocFilenameExtension = @"plreport"; //1
NSString *DisplayDetailSegue = @"showDetail"; //2
NSString *JFDocumentsDirectoryName = @"Documents"; //3
NSString *DocumentEntryCell = @"DocumentEntryCell"; //4
@interface JFMasterViewController () {
NSMutableArray *_objects; //template //5
NSMutableArray *documents; //TE3 //6
NSMetadataQuery *_query;
}
@end
1 This is the file extension. It must match one of the tags in your exported UTI section.
2 In the storyboard, this will be the identifier of the segue from the master view controller to the detail view controller. You set it by selecting the segue in the storyboard and showing the Attributes inspector.
3 This is the directory in the sandbox for the app’s data. You can name it anything you want. If you use Documents, you can make it visible to users with the Application supports iTunes file sharing setting in the Info pane of your project data.
4 This is the identifier of the prototype table cell in the master view controller scene. You can use any name, but it must be the same in this define and in the Attributes inspector for the scene.
5, 6 In the Master-Detail Application template, the individual items are stored in _objects. In Your Third iOS App, they’re stored in documents. In Placid, documents is used. You can delete _objects.
At the beginning of the implementation, standard methods are implemented. There are a number of modifications you need to make but, as you can see in Listing 14.4, they’re not really iCloud issues. You’re just setting up the interface for the app.
Listing 14.4 Master View Controller View Setup
@implementation JFMasterViewController
#pragma mark - load and memory
- (void)awakeFromNib
{
[super awakeFromNib];
if ([[UIDevice currentDevice] userInterfaceIdiom] == UIUserInterfaceIdiomPad) {
self.clearsSelectionOnViewWillAppear = NO;
self.preferredContentSize = CGSizeMake(320.0, 600.0);
}
if (!documents)
documents = [[NSMutableArray alloc] init]; //7
self.navigationItem.leftBarButtonItem = self.editButtonItem; //8
[self setupAndStartQuery]; //9
}
- (void)viewDidLoad
{
[super viewDidLoad];
// Do any additional setup after loading the view, typically from a nib.
self.navigationItem.leftBarButtonItem = self.editButtonItem;
UIBarButtonItem* addButton = [[UIBarButtonItem alloc]
initWithBarButtonSystemItem:UIBarButtonSystemItemAdd
target:self
action:@selector(addDocument:)]; //10
self.navigationItem.rightBarButtonItem = addButton; //11
self.detailViewController = (JFDetailViewController *)
[[self.splitViewController.viewControllers lastObject]
topViewController];
}
- (void)didReceiveMemoryWarning
{
[super didReceiveMemoryWarning];
// Dispose of any resources that can be recreated.
}
7 Create the mutable documents array. It must be mutable because you need to be able to add and remove documents. An alternative structure uses an immutable array, which is temporarily copied into a mutable array when you need to add or remove a document. After the operation, the mutable array is copied back into an immutable array.
8 Add an Edit button at the left.
9 You need to implement a method to run a query to find changes in the list of documents. This will be implemented at line 33 later in this chapter.
10 Create an add button.
11 Add the button to the navigation item.
The next section of the code deals with managing documents. As always, it’s a good idea to use a pragma to set off sections like this. These are the standard document management methods with customization for the Placid app. Only addDocument uses the iCloud APIs.
As you will see in Listing 14.5, addDocument uses two blocks. One runs on the priority queue, and the other one runs on the main queue. The priority queue is used to construct the NSURL for the new document. When that is done, it fires off another block on the main queue that actually adds the document and updates the interface. Frequently, the actual iCloud calls are handed off to another queue rather than the main queue.
Listing 14.5 Master View Controller Managing Documents
#pragma mark - documents
/*
- (void)insertNewObject:(id)sender
{
if (!_objects) {
_objects = [[NSMutableArray alloc] init];
}
[_objects insertObject:[NSDate date] atIndex:0];
NSIndexPath *indexPath = [NSIndexPath indexPathForRow:0 inSection:0];
[self.tableView insertRowsAtIndexPaths:@[indexPath]
withRowAnimation:UITableViewRowAnimationAutomatic];
}
*/
- (IBAction)addDocument:(id)sender { //12
self.addButton.enabled = NO;
dispatch_async (dispatch_get_global_queue(DISPATCH_QUEUE_PRIORITY_DEFAULT,
0), ^{ //13
NSFileManager* fm = [NSFileManager defaultManager];
NSURL *newDocumentURL = [fm URLForUbiquityContainerIdentifier:nil]; //14
newDocumentURL = [newDocumentURL
URLByAppendingPathComponent:JFDocumentsDirectoryName
isDirectory:YES]; //15
newDocumentURL = [newDocumentURL URLByAppendingPathComponent:
[self newUntitledDocumentName]]; //16
dispatch_async(dispatch_get_main_queue(), ^{ //17
[documents addObject:newDocumentURL];
// Update table //18
NSIndexPath* newCellIndexPath =
[NSIndexPath indexPathForRow: ([documents count] - 1) inSection: 0];
[self.tableView insertRowsAtIndexPaths:
[NSArray arrayWithObject: newCellIndexPath]
withRowAnimation:UITableViewRowAnimationAutomatic];
[self.tableView selectRowAtIndexPath:newCellIndexPath animated:YES
scrollPosition:(UITableViewScrollPositionMiddle)];
UITableViewCell *selectedCell = [self.tableView
cellForRowAtIndexPath: newCellIndexPath];
[self performSegueWithIdentifier:DisplayDetailSegue
sender:selectedCell];
self.addButton.enabled = YES; //19
});
});
}
- (NSString *)newUntitledDocumentName { //20
NSInteger docCount = 1;
NSString *newDocName = nil;
// Manage document list updates
BOOL done = NO;
while (!done) {
newDocName = [NSString stringWithFormat: @"Note %d.%@", docCount,
JFDocFilenameExtension];
// Search for first unused docCount value
BOOL nameExists = NO;
for (NSURL *aURL in documents) {
if ([[aURL lastPathComponent] isEqualToString: newDocName]) {
docCount++;
nameExists = YES;
break;
}
}
if (!nameExists)
done = YES;
}
return newDocName;
}
12 This is a new method to add a document. For comparison, the template version insertNewObject: is shown in the commented-out section just above. While you are adding a new document, disable the add button.
13 This block is sent to the priority queue.
14 The file manager is asked to find the ubiquity container NSURL.
15 You then add the directory name set earlier at line 3. You also note that this will be a directory.
16 You get the new document name. The code for this message appears later at line 20.
17 Switch back to the main queue to add the document.
18 Here you do standard table view maintenance.
19 On completion, re-enable the add button.
20 This is the code that finds the next document name. It uses fast iteration to run through documents. It hard-codes the name Note and appends a number to it as it iterates through. If it doesn’t find a match, it returns that string as the new document name. This code enables you to reuse numbers for documents that have been deleted. There is more on document naming in Chapters 15 and 16.
Now that you have created a new document, you’ll need to update the table view in the master view controller. Listing 14.6 shows that code. It is standard table view code with no iCloud features.
One important point to note is that the name of the document is displayed in the table view at line 24 in Listing 14.6. You don’t have to do that. You can modify this code so that the file name is only used internally and the display name is something else.
Listing 14.6 Master View Controller Updating the Table View
#pragma mark - Table View
- (NSInteger)numberOfSectionsInTableView:(UITableView *)tableView
{
return 1; //21
}
- (NSInteger)tableView:(UITableView *)tableView
numberOfRowsInSection:(NSInteger)section
{
return documents.count; //22
}
- (UITableViewCell *)tableView:(UITableView *)tableView
cellForRowAtIndexPath:
(NSIndexPath *)indexPath
{
UITableViewCell *newCell = [tableView
dequeueReusableCellWithIdentifier: DocumentEntryCell
forIndexPath:indexPath];
if (!newCell)
newCell = [[UITableViewCell alloc] initWithStyle:
UITableViewCellStyleDefault \
reuseIdentifier: DocumentEntryCell];
if (!newCell)
return nil;
NSURL *fileURL = [documents objectAtIndex:[indexPath row]]; //23
newCell.textLabel.text = [[fileURL lastPathComponent]
stringByDeletingPathExtension]; //24
return newCell;
}
- (BOOL)tableView:(UITableView *)tableView
canEditRowAtIndexPath:(NSIndexPath *)indexPath
{
// Return NO if you do not want the specified item to be editable.
return YES;
}
- (void)tableView:(UITableView *)tableView commitEditingStyle:
(UITableViewCellEditingStyle)editingStyle
forRowAtIndexPath:(NSIndexPath *)indexPath
{
if (editingStyle == UITableViewCellEditingStyleDelete) {
NSURL *fileURL = [documents objectAtIndex: [indexPath row]]; //25
dispatch_async (dispatch_get_global_queue(DISPATCH_QUEUE_PRIORITY_DEFAULT, 0),
^{ //26
NSFileCoordinator *fc = [[NSFileCoordinator alloc] initWithFilePresenter:nil];
[fc coordinateWritingItemAtURL:fileURL
options:NSFileCoordinatorWritingForDeleting error:nil
byAccessor: ^(NSURL *newURL) {
NSFileManager *fm = [[NSFileManager alloc] init];
[fm removeItemAtURL:newURL error:nil];
}];
});
[documents removeObjectAtIndex:[indexPath row]]; //27
[tableView deleteRowsAtIndexPaths:[NSArray arrayWithObject:indexPath]
withRowAnimation:UITableViewRowAnimationAutomatic]; //28
}
}
21 There’s one section (column) in the table view.
22 The number of rows in the column is the number of documents.
23 Get the appropriate object from documents.
24 Get the last item in the path. (That means you don’t show the directory name.) Set the text of the appropriate cell.
25 Get the filename of the object to delete.
26 Do the deletion on the priority queue. Note that this code asks the file coordinator to delete the file.
27 Now delete the file from the documents array.
28 And delete the row from the table.
The sequence in which you write this code depends on your preferences and style. Somehow or other, you’ll need to have a segue from a selected cell in the master view controller to the detail view controller. You’ll need to implement prepareForSegue: sender: to pass the selected object into the detail view controller. Listing 14.7 shows that code. If you want, you can jump ahead to the storyboard before you write the code. It doesn’t matter in which order you implement these as long as you have the appropriately named segue on the storyboard and in your code.
Listing 14.7 Master View Controller Preparing for the Segue
#pragma mark - Segue
- (void)prepareForSegue:(UIStoryboardSegue *)segue sender:(id)sender
{
if (![segue.identifier isEqualToString:@"showDetail"])
return;
JFDetailViewController *destVC = (JFDetailViewController *)
segue.destinationViewController;
NSIndexPath *cellPath = [self.tableView indexPathForSelectedRow];
UITableViewCell *theCell =
[self.tableView cellForRowAtIndexPath: cellPath];
NSURL *theURL = [documents objectAtIndex: [cellPath row]]; //29
destVC.detailItem = theURL; //30
destVC.navigationItem.title = theCell.textLabel.text; //31
}
29 Get the URL from the documents array. Remember that the objects in the documents array are actually NSURL objects.
30 Pass the NSURL object into the detailItem of the destination view controller (DetailViewController in this case).
31 Set the title of the destination view controller appropriately. theCell was set in tableview cellForRowAtIndexPath: at line 24.
Now it’s back to your iCloud data. You create a NSMetadataQuery that runs on its own. This class provides the functionality of MDQuery that was originally used for Spotlight. You set up a query and start it. Remember that we’re in an asynchronous world much of the time. After you start the query, it will get back to you using notifications. The code in Listing 14.8 references your ubiquity container, but other than that, it’s not iCloud-specific code.
Listing 14.8 Working with the Query
#pragma mark iCloud query
- (NSMetadataQuery *)wrappedDocumentQuery { //32
NSMetadataQuery *aQuery = [[NSMetadataQuery alloc] init];
if (aQuery) {
[aQuery setSearchScopes: [NSArray arrayWithObject:
NSMetadataQueryUbiquitousDocumentsScope]]; //33
NSString *filePattern = [NSString stringWithFormat: @"*.%@",
JFDocFilenameExtension];
[aQuery setPredicate: [NSPredicate predicateWithFormat:@"%K LIKE %@",
NSMetadataItemFSNameKey, filePattern]];
}
return aQuery;
}
- (void)setupAndStartQuery { //34
if (!_query)
_query = [self wrappedDocumentQuery];
[[NSNotificationCenter defaultCenter] addObserver: self selector:@selector
(processFiles) name: NSMetadataQueryDidFinishGatheringNotification
object: nil];
[[NSNotificationCenter defaultCenter] addObserver: self selector:@selector
(processFiles) name: NSMetadataQueryDidUpdateNotification
object: nil];
[_query startQuery];
}
- (void)processFiles { //35
NSMutableArray *discoveredFiles = [NSMutableArray array]; //36
[_query disableUpdates]; //37
NSArray *queryResults = [_query results];
for (NSMetadataItem *result in queryResults) {
NSURL *fileURL = [result valueForAttribute: NSMetadataItemURLKey];
NSNumber *aBool = nil;
[fileURL getResourceValue: &aBool forKey: NSURLIsHiddenKey error: nil];
if (aBool && ![aBool boolValue]) //38
[discoveredFiles addObject: fileURL];
}
[documents removeAllObjects]; //39
[documents addObjectsFromArray: discoveredFiles];
[self.tableView reloadData];
[_query enableUpdates]; //40
}
@end
32 You create the query. You use this code as-is in your project provided that you have set your file extension that in this code is stored in JFDocFilenameExtension.
33 Set the scope of the query to documents.
34 This is the code that was called from AwakeFromNib. If necessary, it creates the query. It then registers to receive notifications about the query. If one arrives, processFiles will be invoked.
35 This is the method that will be invoked by the notifications.
36 discoveredFiles will store the files that the query finds.
37 Stop the query while we process.
38 Add files to discovered files unless they are marked as hidden. (This might be skipped for debugging.)
39 Move discoveredFiles to documents.
40 Re-enable the query updates.
DetailViewController
The master view controller does most of the work, so the detail view controller is typical boilerplate code. You may want to jump ahead to the storyboard to see what it will look like. What matters is that you have two text fields (one for description and one for location).
The detail view controller displays data from a specific instance of WrappedDocument, which is described next. What matters about WrappedDocument is that it contains the data, and it also has a protocol that manages updates.
Listing 14.9 shows the header file. Note that it imports WrappedDocument and conforms to the WrappedDocumentDelegate protocol. The interface views are declared. (Remember that the easiest way to do this is to add them to the storyboard and use the Assistant to control-drag from the views to this file.)
Listing 14.9 DetailViewController.h
#import <UIKit/UIKit.h>
#import "JFWrappedDocument.h" //1
@interface JFDetailViewController : UIViewController
<UISplitViewControllerDelegate, JFWrappedDocumentDelegate>
@property (strong, nonatomic) NSURL *detailItem;
@property (weak, nonatomic) IBOutlet UITextField *textField;
@property (weak, nonatomic) IBOutlet UITextField *locationField;
@end
1 You need to import the WrappedDocument header file because it declares the protocol that is adopted in the interface.
Listing 14.10 shows the detail view controller code. Most of it is standard code with customizations for specific classes such as WrappedDocument.
Listing 14.10 DetailViewController.m
#import "JFDetailViewController.h"
@interface JFDetailViewController ()
@property (strong, nonatomic) UIPopoverController *masterPopoverController;
- (void)configureView;
@end
@implementation JFDetailViewController { //1
JFWrappedDocument *_document;
}
#pragma mark - Managing the detail item
- (void)configureView
{
// Update the user interface for the detail item.
}
- (void)viewDidLoad
{
[super viewDidLoad];
// Do any additional setup after loading the view, typically from a nib.
[self configureView];
}
- (void)viewWillAppear:(BOOL)animated {
[super viewWillAppear:animated];
_document = [[JFWrappedDocument alloc ]
initWithFileURL: self.detailItem]; //2
_document.delegate = self;
NSFileManager *fm = [NSFileManager defaultManager];
if ([fm fileExistsAtPath: [self.detailItem path]])
[_document openWithCompletionHandler:nil];
else
{
[_document saveToURL: self.detailItem
forSaveOperation: UIDocumentSaveForCreating
completionHandler:
^(BOOL success) {
if (success) _textField.text = _document.documentText;
}];
}
}
- (void)viewWillDisappear:(BOOL)animated {
[super viewWillDisappear:animated];
NSString *newText = self.textField.text; //3
NSString *newLocation = self.locationField.text;
_document.documentText = newText;
_document.documentLocation = newLocation
[_document closeWithCompletionHandler:nil]; //4
}
- (void)didReceiveMemoryWarning
{
[super didReceiveMemoryWarning];
// Dispose of any resources that can be recreated.
}
- (void)documentContentsDidChange: (JFWrappedDocument *)document { //5
dispatch_async (dispatch_get_main_queue(), ^{
self.textField.text = document.documentText;
self.locationField.text = document.documentLocation;
});
}
#pragma mark - Split view
- (void)splitViewController:(UISplitViewController *)splitController
willHideViewController:(UIViewController *)viewController
withBarButtonItem: (UIBarButtonItem *)barButtonItem
forPopoverController:(UIPopoverController *) popoverController
{
barButtonItem.title = NSLocalizedString(@"Master", @"Master");
[self.navigationItem setLeftBarButtonItem:barButtonItem animated:YES];
self.masterPopoverController = popoverController;
}
- (void)splitViewController:(UISplitViewController *)splitController
willShowViewController:(UIViewController *)viewController
invalidatingBarButtonItem:(UIBarButtonItem *)barButtonItem
{
// Called when the view is shown again in the split view, invalidating
// the button and popover controller.
[self.navigationItem setLeftBarButtonItem:nil animated:YES];
self.masterPopoverController = nil;
}
@end
1 In the class extension, declare a local wrapped document.
2 Create the document for the view. Then, either open it or create it.
3 When the view will disappear, move data from the interface views into local variables and then into the document for storage.
4 Close and save.
5 This is the WrappedDocumentDelegate protocol implementation.
WrappedDocument
Finally, we get to the data for the app. It is stored in instances of WrappedDocument. Listing 14.11 shows the header file. It has properties for the three data items, and it declares setters that will be implemented for them. It also has a delegate, which is normally set to the detail view controller.
Listing 14.11 WrappedDocument.h
#import <UIKit/UIKit.h>
@protocol JFWrappedDocumentDelegate; //1
@interface JFWrappedDocument : UIDocument
@property (strong, nonatomic) NSFileWrapper *fileWrapper;
@property (strong, nonatomic) NSString *documentText;
@property (strong, nonatomic) NSString *documentLocation;
@property (strong, nonatomic) UIImage *documentImage;
@property (weak, nonatomic) id <JFWrappedDocumentDelegate> delegate; //2
-(void)setDocumentText: (NSString*)newText;
-(void)setDocumentLocation: (NSString*)newText;
-(void)setDocumentImage:(UIImage *)image;
@end
@protocol JFWrappedDocumentDelegate <NSObject> //3
@optional
- (void)documentContentsDidChange: (JFWrappedDocument *)document;
@end
1 You need a forward reference to the protocol because you’ll need it in the interface declaration.
2 This is the line of code that requires the forward reference to the protocol.
3 This is the protocol itself. It contains the documentContentsDidChange method that you saw implemented in the detail view controller at line 5.
Listing 14.12 shows you the beginning of WrappedDocument.m. These are standard declarations of fields, views, and strings. Use your own names if you want, or just reuse these to get started.
Listing 14.12 WrappedDocument.m
#import "JFAppDelegate.h"
#import "JFWrappedDocument.h"
NSString *UbiquityDirectoryComponentForDocuments = @"Documents"; //1
NSString *TextFileName = @"Text.txt"; //2
NSString *LocationFileName = @"Location.txt";
NSStringEncoding kTextFileEncoding = NSUTF8StringEncoding; //3
@interface JFWrappedDocument () //4
@property (strong, nonatomic) NSFileWrapper *wrapperText;
@property (strong, nonatomic) NSFileWrapper *wrapperLocation;
@end
@implementation JFWrappedDocument
+ (BOOL)autosavesInPlace
{
// This gives us autosave and versioning for free in 10.7 and later
return YES;
}
- (id)init
{
self = [super init];
if (self)
{
}
return self;
}
1 This is the name of your top-level directory. It must match JFDocumentDirectoryName in MasterViewController. Alternatively, you can pull both declarations out into a shared file called Constants.h and include it.
2 These are the names of the files you will be putting inside the document wrapper.
3 This is the text encoding you will use for text files.
4 The class extension declares properties for each of the data types.
In Listing 14.13, you see the code that works with fields and views. Most of this is fairly standard, but the accessors for the text and location data show you how to work with data that is enclosed in a wrapper.
Listing 14.13 WrappedDocument Using the Fields and Views
-(void)setDocumentText: (NSString*)newText { //5
NSLog (@" %@ %@ %@", newText, self.documentText, _fwText);
if (newText != _fwText )//self.documentText)
{
NSString *oldText = _fwText;
_fwText = newText;
//register undo and cause autosave
[self.undoManager setActionName: @"Text Change"];
[self.undoManager registerUndoWithTarget:self
selector: @selector(setDocumentText:)
object: oldText];
}
}
-(void)setDocumentLocation: (NSString*)newLocation { //6
if (newLocation != _fwLocation)
{
NSString *oldLocation = _fwLocation;
_fwLocation = newLocation;
[self.undoManager setActionName: @"Location Change"];
[self.undoManager registerUndoWithTarget:self
selector: @selector(setDocumentLocation:)
object: oldLocation];
}
}
-(NSString*)documentText { //7
if (_fwText)
return _fwText;
NSDictionary *fileWrappers = [_fileWrapper fileWrappers]; //8
if (!_wrapperText) {
_wrapperText = [fileWrappers objectForKey: TextFileName]; //9
}
if (_wrapperText != nil)
{
NSData *textData = [_wrapperText regularFileContents]; //10
_fwText = [[NSString alloc] initWithData:textData
encoding:kTextFileEncoding]; //11
} else {
// handle error
}
return _fwText;
}
-(NSString*)documentLocation { //12
if (_fwLocation)
return _fwLocation;
NSDictionary *fileWrappers = [_fileWrapper fileWrappers];
if (!_wrapperLocation) {
_wrapperLocation = [fileWrappers objectForKey: LocationFileName];
}
if (_wrapperLocation != nil)
{
NSData *locationData = [_wrapperLocation regularFileContents];
_fwLocation = [[NSString alloc] initWithData:locationData
encoding:kTextFileEncoding];
} else {
// handle error
}
return _fwLocation;
}
5, 6 These are the custom setters for text and location. Note that undo support is added. This is standard code, but it’s important here. That’s because it is the undo registration that enables auto save, which this app relies on.
7 This is the custom getter for text.
8 The document-level fileWrapper declared in WrappedDocument.h is asked to return its own file wrappers into a dictionary.
9 If we don’t have _wrapperText, get it from the file wrapper dictionary created in line 8.
10 Get the content of the wrapper as NSData.
11 Extract the text as an NSString.
12 This is a similar getter for location.
Finally, Listing 14.14 show the ins and outs of file wrapper support. You have to implement these two methods in order to access your own data. Testing note: contentsForType:error: is dispatched asynchronously. Particularly when testing on Xcode with debugging code, it is very easy to get ahead of the dispatch. Set a breakpoint at the beginning of this method and wait for it to stop before you try to inspect variables. It is not uncommon for it to take a minute to get here.
Listing 14.14 WrappedDocument File Wrapper Support
#pragma mark - File Wrapper/ Package Support
- (BOOL)loadFromContents:(id)contents ofType:(NSString *)typeName
error:(NSError *__autoreleasing *)outError { //13
self.fileWrapper = (NSFileWrapper *)contents; //14
if ([_delegate respondsToSelector: @selector(documentContentsDidChange:)])
{
[_delegate documentContentsDidChange: self]; //15
}
return YES;
}
- (id)contentsForType:(NSString *)typeName error:
(NSError *__autoreleasing *)outError {
if ( _documentFileWrapper == nil) //16
{
self.fileWrapper = [[NSFileWrapper alloc]
initDirectoryWithFileWrappers:nil]; //17
}
NSDictionary *fileWrapperDictionary = [_documentFileWrapper
fileWrappers]; //18
if (self.documentText != nil) //19
{
NSData *textData = [self.documentText
dataUsingEncoding: kTextFileEncoding];
NSFileWrapper *textFileWrapper = [fileWrappers
objectForKey:TextFileName];
if (textFileWrapper != nil) {
[_documentFileWrapper removeFileWrapper: textFileWrapper];
}
textFileWrapper = [[NSFileWrapper alloc]
initRegularFileWithContents:textData];
[textFileWrapper setPreferredFilename: TextFileName];
[self.fileWrapper addFileWrapper: textFileWrapper];
}
if ( self.documentLocation != nil) //20
{
NSData *locationData = [self.documentLocation
dataUsingEncoding: kTextFileEncoding];
NSFileWrapper *locationFileWrapper = [fileWrappers
objectForKey:LocationFileName];
if (locationFileWrapper != nil) {
[self.fileWrapper removeFileWrapper: locationFileWrapper];
}
locationFileWrapper = [[NSFileWrapper alloc]
initRegularFileWithContents:locationData];
[locationFileWrapper setPreferredFilename: LocationFileName];
[self.fileWrapper addFileWrapper: locationFileWrapper];
}
return self.fileWrapper;
}
@end
13 You must implement this method to get data out of the file wrapper. Set a breakpoint here (details in the next section).
14 Get the contents, which is the top-level file wrapper for the document.
15 If this document’s delegate responds to documentContentsDidChange, call it. This is the method in the protocol that is declared in DetailViewController.h.
16, 17 If there is no top-level file wrapper for the document (self.file-wrapper), create one.
18 Get the subsidiary file wrappers out of the top-level file wrapper. If this code looks familiar, you’re right. You saw it in Listing 14.13 at line 7 in the implementation of the documentText getter. Now you’re using it to go through the file wrappers and their data in order to create the snapshot of your content for storage.
19 Check to see if there’s data to store.
20 Do the same for location.
The if statement at line 18 is problematic and requires customization. You have several tests you can make. Certainly, testing whether or not you have data to be included in the content snapshot is a valid test to make in all cases. However, you need to apply your knowledge of the data to determine the other part of that test.
The code here works just fine for a new document. The issue comes up when you have an existing document that already has a file wrapper for text or any other wrapped data. Do you want to remove it and create a new one? Or do you want to just always write out a new one with the current data?
Also, note that the breakpoint that is suggested at line 13 is very important. In order to simplify this example, it uses iCloud and only iCloud. When there’s something to store, you call closeWithCompletionHandler: (line 4 in Listing 14.10). This is all done asynchronously. To really appreciate what’s going on, set a breakpoint there as well as at line 18 in this file. You’ll see that there can be a very significant gap in time. File operations in general take time, and iCloud operations generally take even more so.
Working with the Storyboard
The storyboard from the template is basically set up for you. You just need a few customizations. The template storyboard was shown previously in Figure 14.12.
Here are the steps to customize the storyboard:
1. Add whatever fields you need in the detail view controller.
2. With the Assistant, control-drag from each one to create and connect the property in DetailViewController.h.
3. If you are using Xcode 5, make certain that any constraint warnings are taken care of. (In previous versions of Xcode, constraints were automatically inserted for you, which turned out to make extra work much of the time.)
4. Make certain that the segue name matches the name in MasterViewController.m.
Chapter Summary
This chapter showed you how to save a wrapped document in iCloud. It provided a simplified example that uses no local storage. This not only simplified things but also demonstrated the time delays that you have to work with.
You also saw how to use developer.apple.com to inspect your iCloud documents and other files; you have also seen how to use iCloud in System Preferences to delete files. If you are supporting a production application, you may be called on to guide users through this process.
Exercises
1. After you have built this project, run it and track it using developer.iCloud.com as well as System Preferences on OS X and Settings on iOS. Experiment with adding and deleting documents, paying particular attention to the time lags.
2. Add more fields to the project. Remember that in this example there’s one field per wrapped file, but you can have many—and they can be different types. Particularly on iPhone and iPod touch, it may be useful to make a single screen’s data correspond to a wrapped file.
3. There are no error messages in this sample, although there are some comments. What is the best way to implement those messages? Remember that this is not specifically an iCloud issue. One point to remember is that if you’re dealing with an error in an asynchronous process, you may deal with it after the fact, so you’ll need to keep the relevant information in your app until it is time to talk to the user.