Learning iCloud Data Management (2014)
Part IV: Using iCloud Documents and Data
15. Working with iOS Documents
The word document has a number of meanings, so a few words about its use in the title of this chapter and Chapter 16, “Working with OS X Documents,” are in order. In this chapter, document means a class that you create as a subclass of UIDocument, which is part of the Cocoa Touch framework. In Chapter 16, document means a subclass of NSDocument that you create. NSDocument and UIDocument are similar but different, just as are Cocoa and Cocoa Touch. Fundamentally, the differences are between laptop and desktop computers with keyboards and trackpads on the one side and mobile devices with touchscreens on the other side.
This distinction is important for developers but is not even noticed by most users. Most of those users also make no distinction between the file (or files) that provides the storage for a document’s data and the runtime representation of that data that is visible on their screen. However, for developers, that runtime representation of a document that is provided by a subclass of UIDocument or NSDocument is what we work with. Among the functions that the document classes provide are interaction with the file system for saving and reading document data from a file, the ability to undo and redo commands, and the basic tools for working with iCloud and app sandboxes on both OS X and iOS.
In this chapter, you will see how to work with UIDocument and related classes in iOS. With local storage of data, you work with the app sandbox on iOS, and with iCloud storage, you work with iCloud itself. Part of working with iCloud consists of keeping track of the notifications of changes in iCloud account or preferences, and those changes may entail moving all of the app’s documents to or from the sandbox or iCloud. Those topics are covered in Chapter 18, “Completing the Round Trip.” This chapter focuses primarily on what you have to do to implement yourUIDocument subclass.
The biggest difference between Chapter 14’s Placid project and this chapter’s Loon project is that Placid stores data only in iCloud. Loon stores data either in iCloud or in the app’s local sandbox depending on a user’s preference setting. This is the standard way in which Apple suggests apps use iCloud—either everything in iCloud or everything locally.
This distinction—all in iCloud or both in iCloud and on the device—is the primary difference. Both apps (as well as the apps in chapters 16, 17, and 18) let you record a series of observations. Two demonstration fields are provided where users can enter a description of an issue (a broken streetlight, for example) and the location of the issue. These can obviously be expanded to cover many more types of data, but these apps focus on the basics and the iCloud implementation.
Among the topics covered in this chapter are
![]() Creating a new document
Creating a new document
![]() Saving a document
Saving a document
![]() Storing data into a document
Storing data into a document
![]() Retrieving data from a document
Retrieving data from a document
Those topics are addressed for both iCloud and local documents.
Planning the App’s Structure
Apple’s primary reference for working with documents on iOS is “Document-Based App Programming Guide for iOS.” This chapter organizes the information differently from Apple’s reference. This alternative organization helps you understand your options and choose one approach, the other, or a hybrid. If you talk to developers, you will see that there are still other ways of approaching documents on iOS.
Choosing between Navigation and Split View Controller on iPad
The first issue you have to address is whether or not the Loon app will use a split view controller on iPad. On iPhone, chances are it will use a navigation controller to manage a list of documents and then open a specific one when a document is selected. That’s a job for a master view controller (the list) and a detail view controller (the selected document). You can combine the architectures with a master view controller that itself contains a navigation controller; when you drill down far enough, you can open your selected object in a detail view controller.
On iPad, because the screen is larger, you can keep your master view controller visible either onscreen or in a popover alongside the detail view controller. In fact, the Master-Detail Application template presents exactly these architectures—a split view controller on iPad and a navigation controller on iPhone.
If you want this interface, you have to do a little bit of refactoring to accommodate the different structures. Specifically, you cannot use viewWillAppear or viewWillDisappear to drive your interactions with document data: they are called every time a detail view controller appears or disappears in a navigation controller, but in a split view controller, they are called only at the beginning and end of the app. In between, the data in the detail view controller is updated as needed, but these methods aren’t called.
That is why if you compare the structure of this app to some other apps, you’ll see that the code to manage interactions between the interface and its objects is pulled out into its own methods such as configureView. In this way, the same code is used on both iPhone and iPad, but it is triggered in different ways in the two environments.
Deciding on a Structure
The refactoring described in the previous section is not just a matter of managing views and their data. The structure of Loon is a common approach to managing iCloud functionality. When you first look at the code, it may seem as if it is scattered all over the place. However, there is a logic behind it, and that logic rests on two concepts: managing iCloud availability and working with the Model-View-Controller design pattern.
Managing iCloud Availability
The advice from Apple is that the user should be given a choice between storing app data in iCloud or locally. (Some apps, such as the iWork apps from Apple and other iOS document-based apps, allow users to make that choice on a document-by-document basis.) That is one of the reasons for using a document-based structure. When an app’s data is stored in a single repository—the library or shoebox pattern—it all should reside in one place or another.
However, if you are using iCloud, you need to prepare for the possibility that at any given moment it will be unavailable. As you will see in Chapter 18, “Completing the Round Trip,” using iCloud may mean also using local storage when iCloud is unavailable. Yes, that’s more work than simply writing out to a file that the user can manipulate directly (for good or bad), but the value to the user is much greater.
Confronting the Models in Loon
When you think about iCloud and the fact that it may or may not be available at any given moment regardless of the user’s preference, the structure of iCloud-related functionality in Loon (and many other projects) falls into place. (It is not the only such structure, but it’s the one used in Loon.) Here is an overview of what goes where:
![]() AppDelegate manages the basic iCloud interactions. It determines if iCloud is available, for example.
AppDelegate manages the basic iCloud interactions. It determines if iCloud is available, for example.
![]() MasterViewController manages the list of documents that the app will deal with. (This is how it works in most projects of this type.) MasterView-Controller constructs that list, and it reflects the availability of iCloud and the user’s storage preference. The job ofMasterViewController is to manage that list appropriately. Managing the list includes updating it for new documents as needed. As part of updating the list for new documents, MasterView-Controller creates them appropriately. DetailViewController manages asingle document that has been selected in MasterViewController. (Again, this is typical of this kind of project.) Managing a single document includes moving the data to and from interface elements.
MasterViewController manages the list of documents that the app will deal with. (This is how it works in most projects of this type.) MasterView-Controller constructs that list, and it reflects the availability of iCloud and the user’s storage preference. The job ofMasterViewController is to manage that list appropriately. Managing the list includes updating it for new documents as needed. As part of updating the list for new documents, MasterView-Controller creates them appropriately. DetailViewController manages asingle document that has been selected in MasterViewController. (Again, this is typical of this kind of project.) Managing a single document includes moving the data to and from interface elements.
![]() WrappedDocument is a single document that manages its data. It is a subclass of UIDocument, and it is basically the same document class you created in Chapter 14.
WrappedDocument is a single document that manages its data. It is a subclass of UIDocument, and it is basically the same document class you created in Chapter 14.
![]() FileRepresentation is a lightweight object that represents a file. It contains the NSURL for the document as well as the document name (that is, the last part of the URL such as Note 1).
FileRepresentation is a lightweight object that represents a file. It contains the NSURL for the document as well as the document name (that is, the last part of the URL such as Note 1).
You may be wondering where the reading and writing of documents takes place. Mostly, that’s not done in your code: it’s part of Cocoa Touch provided that you set things up properly. If you have provided a filename and URL for the document, the system knows how to read and write it, so your work is confined to calling closeWithCompletionHandler:, which does the work.
You’ll see the code that is used in “Writing the Code” later in this chapter.
Starting the Loon Project
This chapter’s project, like all the projects in this book, is named after a lake in the Adirondack Mountains of New York—Loon. Set it up as you set up Placid in Chapter 14 in the “Starting the Placid Project” section. After you create the project (using the Master-Detail Application template as in Chapter 14), you select the project at the top of the project navigator; the tabs across the top of the editor are where you configure the project.
Setting Project General Info
As you see in Figure 15.1, the general info is set by default based on the project name you entered when you created the project. Don’t worry that in Figure 15.1 the project name is capitalized and that it has carried through to the first target and then to the default bundle name. The names are case-sensitive, so you can mix upper- and lowercase as long as you are consistent. (In other words, the bundle identifier for this project is com.champlainarts.Loon; com.champlainarts.loon can be used for another project, but most developers avoid that situation.) Typically, developers leave the beginning of the bundle identifier (the reverse domain name section such as com.champlainarts) in lowercase. The name that follows the reverse domain is going to appear in some user-facing contexts such as System Preferences for iCloud, so it will look better if it starts with a capital letter. (Note that Figure 15.1 shows the Loon project after files have been added to it, so if you are just starting out with a new project, not all of these files will be present. They will be present when you have worked through this chapter.)
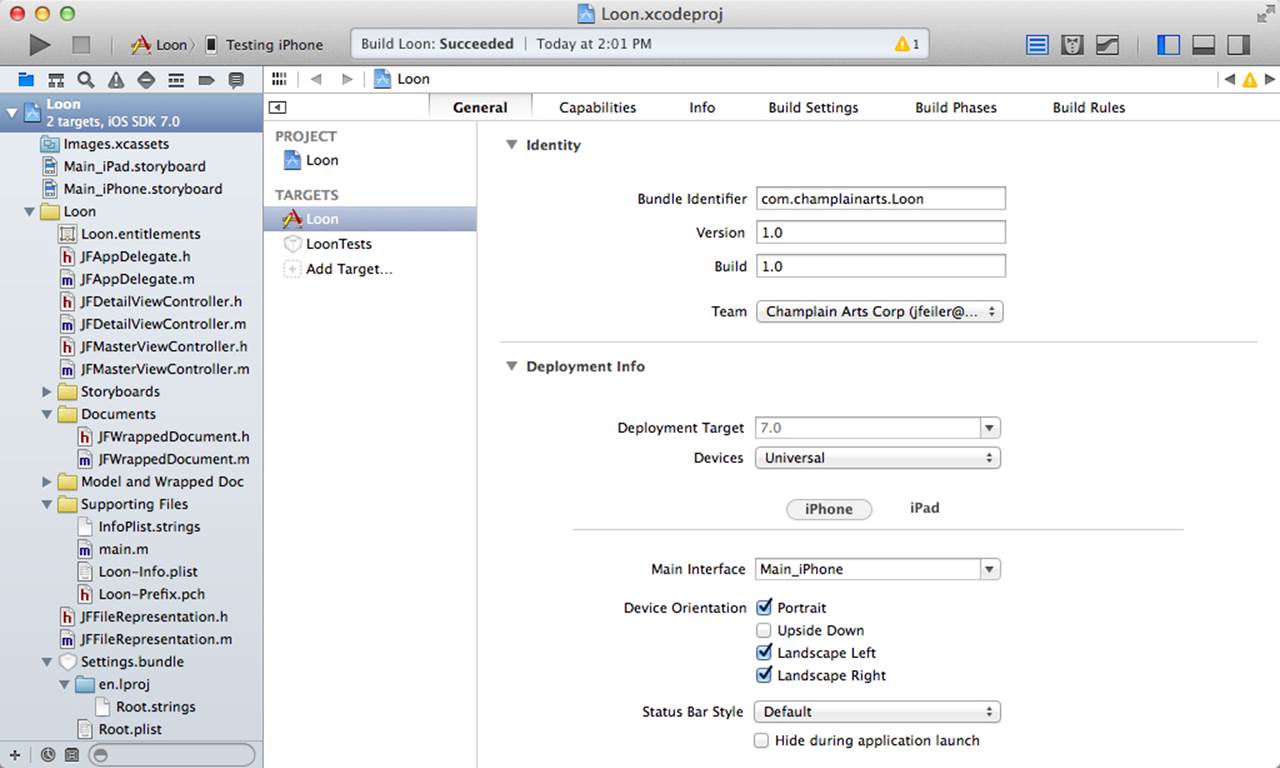
Figure 15.1 Using upper- and lowercase letters in your bundle name
You can usually leave the general info as it is set by Xcode. If you need to change it later, you can do so. However, note that changing names and identifiers can be a bit of a chore once the project has been created. If you need to do so, try selecting the name in question and using Edit, Factor, Rename to do a smart renaming. Not all names can be changed in this way—you may need to actually retype the name or use a standard find/replace command, but Edit, Factor, Rename should be your first choice.
Give some thought to the name you’ll use for your project. It should normally be short and descriptive because in some cases it will be seen by users. It is true that you can customize the string that the user sees, but the project name is used in a number of places in your project’s configuration, and changing it later on can break some settings.
Setting Project Capabilities
You need to turn on iCloud in the Capabilities section, as you see in Figure 15.2. You don’t need a key-value store, but you do need to add a ubiquity container with the + at the bottom of the ubiquity containers section, as you see in the figure. Again, you can go with the default name even if it includes a capitalized project name.
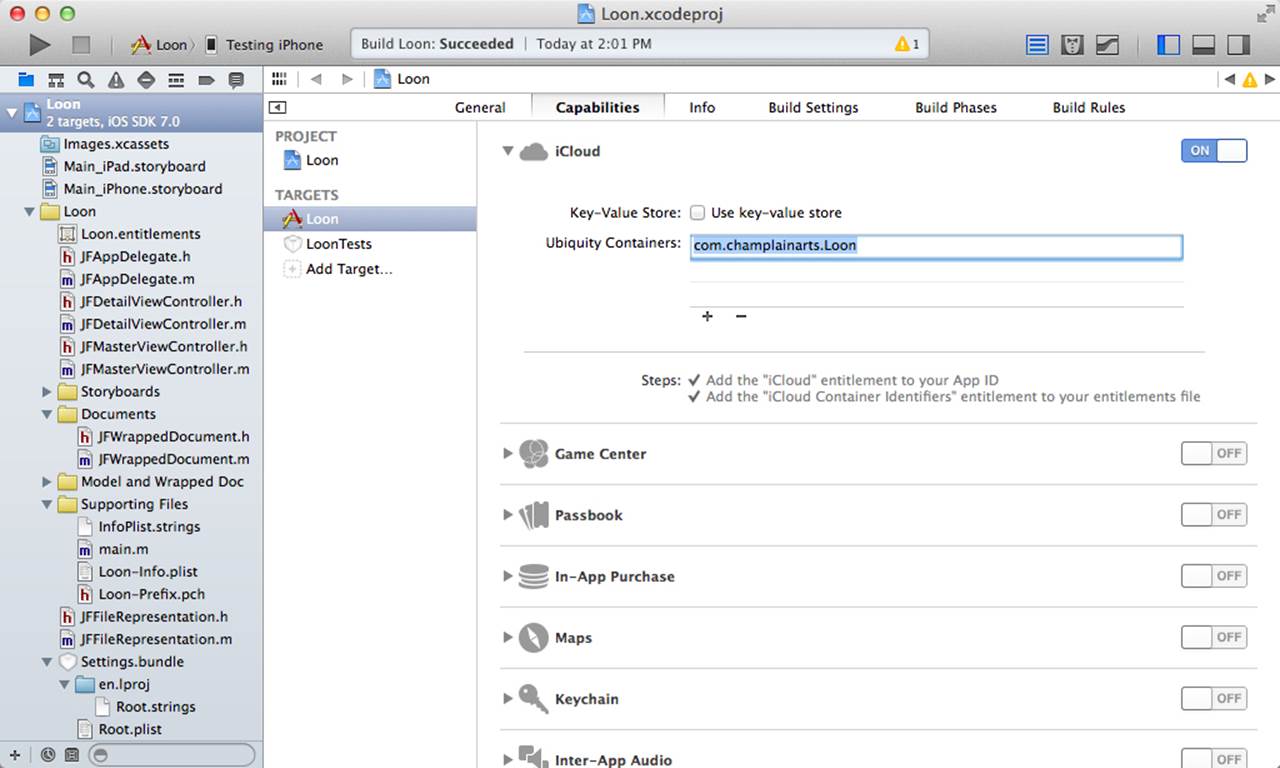
Figure 15.2 Configuring iCloud
The steps section at the bottom of the iCloud section changes as you set up the project. When you first turn iCloud on, the steps describe what will happen. As you configure iCloud, the steps normally change to have checkmarks indicating what has been done. If an error occurs, it will be marked in red. (If you have configured iCloud in Xcode before Xcode 5, you will be very pleasantly surprised. Many manual steps in previous versions of Xcode have been replaced in the Xcode 5 interface.)
An entitlements file will be automatically created after you have configured iCloud. You can find it in the project navigator and view it as you see in Figure 15.3. Normally you don’t need to make any changes to it.
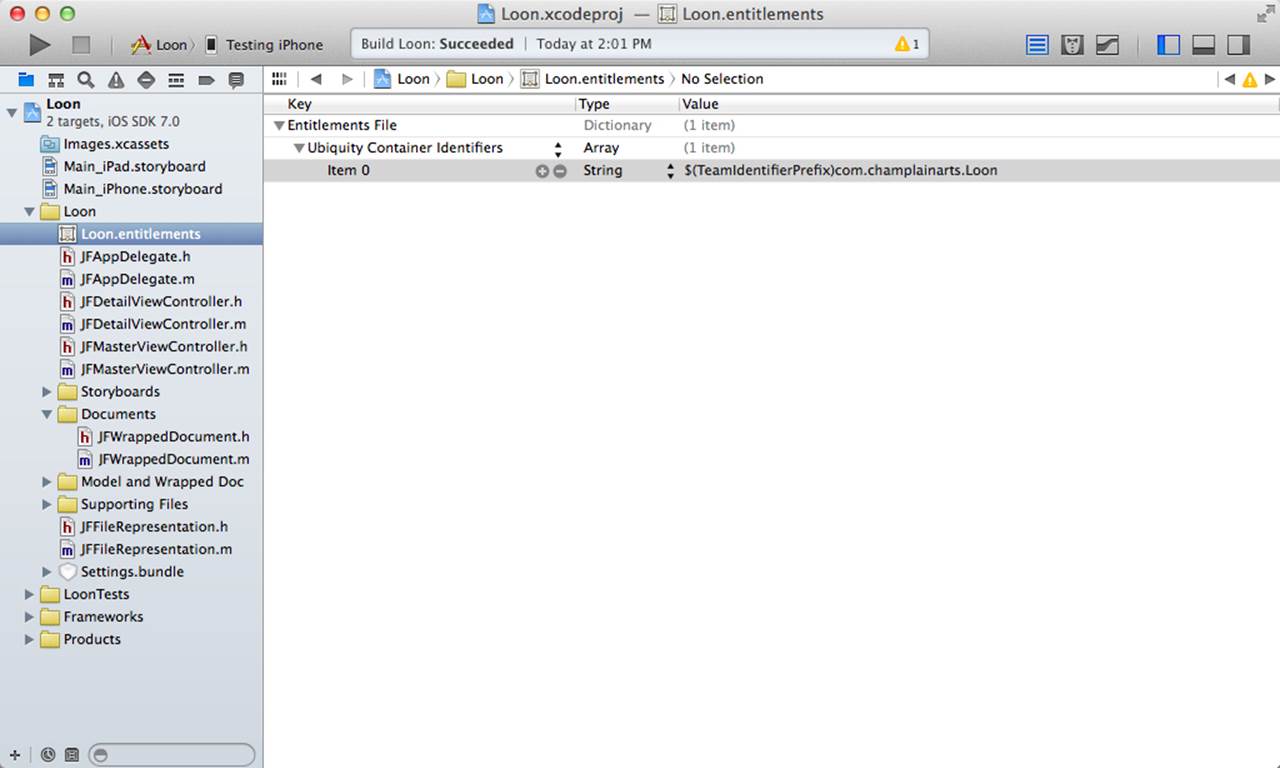
Figure 15.3 Automatically created entitlements file when you enable iCloud in Xcode
Setting Up Documents
In the Info tab, set up your documents just as you did in Chapter 14. You can use the same settings as you did in Chapter 14, but for learning and testing, it can be easier to use a separate document name and extension so that the documents in the two chapters are separate even if their contents and structure are the same. Figure 15.4 shows the Info settings for Loon.
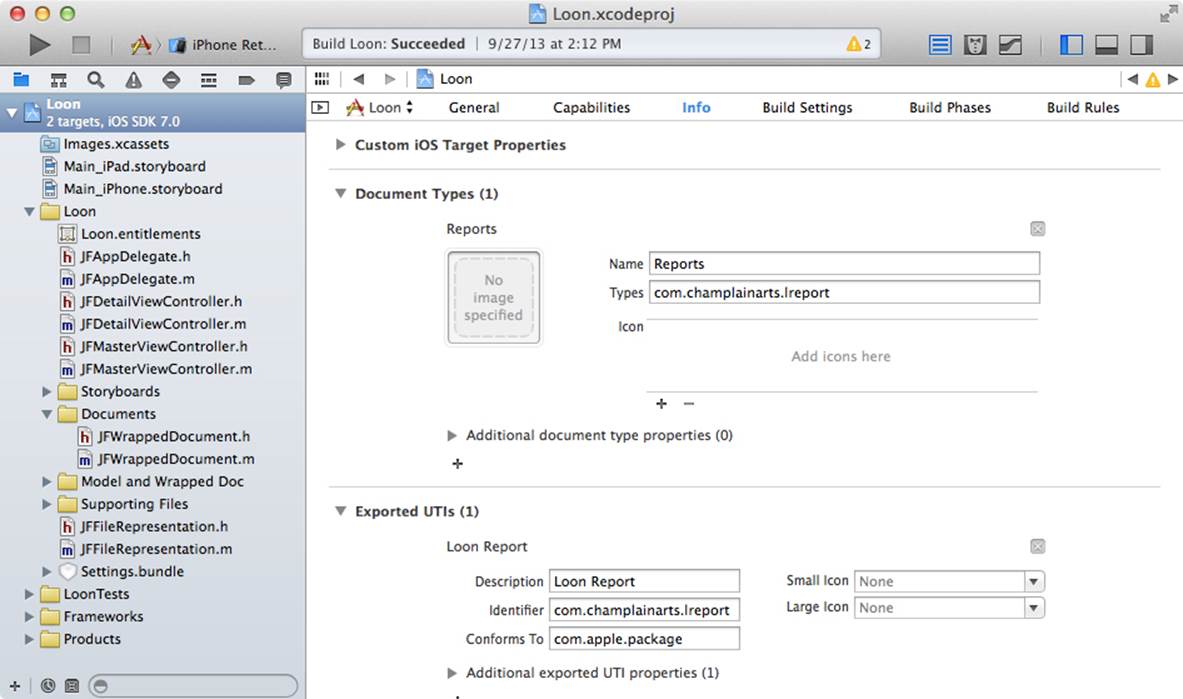
Figure 15.4 Setting up your documents
Adding Settings
For development and testing, you need two settings; you can add them now, as described in Chapter 9, “Using Preferences, Settings, and Keychains with iCloud”:
![]() Use iCloud: This is a yes/no switch that the user can use to choose whether or not iCloud should be used for document storage. This should remain in the finished app.
Use iCloud: This is a yes/no switch that the user can use to choose whether or not iCloud should be used for document storage. This should remain in the finished app.
![]() First Time: This is a yes/no switch that is designed for testing. For production, the first time the app is run, you should ask whether or not the user wants to use iCloud for document storage. The answer should be stored in the Use iCloud preference so that the user can later come back and turn it on or off. The actual code for determining the first time the app runs may make it hard to test this logic. Adding a switch that you can use to determine whether or not you should take the first-time path makes testing easier. Note that this is only for testing.
First Time: This is a yes/no switch that is designed for testing. For production, the first time the app is run, you should ask whether or not the user wants to use iCloud for document storage. The answer should be stored in the Use iCloud preference so that the user can later come back and turn it on or off. The actual code for determining the first time the app runs may make it hard to test this logic. Adding a switch that you can use to determine whether or not you should take the first-time path makes testing easier. Note that this is only for testing.
Writing the Code
With your project set up from the template and configured as described in the previous section, it’s time to write the code. As noted previously, the iCloud functionality is spread among a number of classes in the project. You may wind up jumping around in the code in order to implement the app. For that reason, the example code presented here contains some diagnostics that may be helpful in tracking down bugs.
Don’t spend much time trying to follow the flow of the code presented here. As is true of so much of iCloud (and many other technologies these days), there is no flow in a traditional sense. Notifications fly around, starting some processes and reporting that other processes are complete. If you run the code with breakpoints set at key points (a number of breakpoints are set in the downloadable code), you’ll see these jumps from one part of the code to another part. Particularly when blocks are used as completion handlers, it’s often a good idea to set a breakpoint on the first line within the block because you will almost never execute that line of code after the line above it. It will be executed at the start of the asynchronous process.
Even if you are not going out to iCloud, you will encounter what appear to be lengthy gaps in processing. If you want, you can time them, and you’ll see that they are actually not as long as they may appear to you, although when running a debug version of your app, there are moments when a delay of half a minute or more may occur. More than one developer has wasted a lot of time wondering why some method or another wasn’t firing when the reality was just that the notification hadn’t gotten through yet. Be patient until you get a sense of how long things take.
AppDelegate
AppDelegate manages the most basic iCloud functionality: determining whether the user wants to use it and whether or not it is available. Listing 15.1 shows AppDelegate.h.
Listing 15.1 AppDelegate.h
#import <UIKit/UIKit.h>
@interface JFAppDelegate : UIResponder <UIApplicationDelegate,
UIAlertViewDelegate> //1
@property (strong, nonatomic) UIWindow *window; //2
@property (readonly) BOOL documentsIniCloud; //3
@end
1 This code is almost the same as it was in Placid. You’ll need to conform to UIAlertViewDelegate because you’ll have an alert that asks the user about using iCloud or local storage on the app’s first launch.
2 window is a property that is part of the Master-Detail Application template. It is used to set up the split view.
3 documentsIniCloud is added in Loon. Properties and methods generally start with a lowercase letter and capitalize each word in a multiword name. In example code, Apple tends to leave iCloud as lowercase, which is why this is not documentsInICloud.
You can get to documentsIniCloud directly from elsewhere in the project with the following code:
BOOL usingiCloud = ((JFAppDelegate *)[[UIApplication sharedApplication]
delegate]).documentsIniCloud;
You can also write an accessor. The choice depends on your style and, probably, the number of times you need to get the value.
The implementation in AppDelegate.m falls neatly into two pieces. Listing 15.2 shows the first part. It is followed by stubs and comments that show you what you might want to implement. The code for Loon then follows in Listing 15.3.
Right at the beginning, you see the use of a ubiquity token. This is a lightweight object that you can request from the system when the app starts up. The ubiquity token represents the current active iCloud account for the user (it is not the account itself). You don’t care about the value of a ubiquity token in most cases. Rather, you care about whichever of these situations apply:
![]() If there is no ubiquity token when you ask for it, the user does not have an active iCloud account.
If there is no ubiquity token when you ask for it, the user does not have an active iCloud account.
![]() If the ubiquity token matches a ubiquity token that you have previously stored, the user is using the same iCloud account.
If the ubiquity token matches a ubiquity token that you have previously stored, the user is using the same iCloud account.
![]() If the ubiquity token does not match a previously stored ubiquity token, the user is using a different iCloud account, and you will need to update stored data accordingly (this is addressed in Chapter 18).
If the ubiquity token does not match a previously stored ubiquity token, the user is using a different iCloud account, and you will need to update stored data accordingly (this is addressed in Chapter 18).
Notice that nowhere is it mentioned that iCloud is or is not available. If the user is running in Airplane mode but had an active iCloud account before turning on Airplane mode, the ubiquity token is still returned. A key part of the iCloud architecture is that the availability of iCloud is a separate issue from the current account identifier. You can have an iCloud account identifier when iCloud is not available.
The code in Listing 15.2 is fairly standard. You need to customize it for your own identifiers, but the processing is used in many iCloud apps.
Listing 15.2 AppDelegate.m Part I
#import "JFAppDelegate.h"
@interface JFAppDelegate ()
@property id ubiquityToken; //1
@property NSURL *ubiquityContainer;
@property (readwrite) BOOL documentsIniCloud; //2
@end
@implementation JFAppDelegate
#pragma mark - launch and background
- (BOOL)application:(UIApplication *)application didFinishLaunchingWithOptions
(NSDictionary *)launchOptions
{
if (![[NSUserDefaults standardUserDefaults]
boolForKey: @"com.champlainarts.Loon.hasLaunched"]) { //3
[[NSUserDefaults standardUserDefaults] setBool:YES
forKey: @"com.champlainarts.Loon.hasLaunched"];
[[NSUserDefaults standardUserDefaults] synchronize];
NSString *msg = @"Should documents be stored in iCloud and
available on all your devices?"; //4
UIAlertView *alert = [[UIAlertView alloc] //5
initWithTitle: @"Choose Storage Option"
message: msg
delegate: self
cancelButtonTitle: @"Local Only"
otherButtonTitles: @"Use iCloud", nil];
[alert show];
}
dispatch_async(dispatch_get_global_queue(DISPATCH_QUEUE_PRIORITY_DEFAULT,
0), ^{
_ubiquityContainer = [[NSFileManager
defaultManager]URLForUbiquityContainerIdentifier:nil]; //6
if (_ubiquityContainer != nil) {
NSLog (@"Got iCloud\n");
dispatch_async (dispatch_get_main_queue(), ^(void) { //7
});
}
else
NSLog (@"No iCloud\n");
});
_documentsIniCloud = [[NSUserDefaults standardUserDefaults]
boolForKey: @"com.champlainarts.Loon.documentsIniCloud"]; //8
NSLog (@" %s, %hhd", __PRETTY_FUNCTION__, _documentsIniCloud); //9
if (_documentsIniCloud){
[self initializeiCloudAccess]; //10
};
if (!_documentsIniCloud) { //11
}
// Override point for customization after application launch.
if ([[UIDevice currentDevice] userInterfaceIdiom] ==
UIUserInterfaceIdiomPad) {
UISplitViewController *splitViewController =
(UISplitViewController *)self.window.rootViewController;
UINavigationController *navigationController =
[splitViewController.viewControllers lastObject];
splitViewController.delegate =
(id)navigationController.topViewController;
}
return YES;
}
1 AppDelegate will take care of the ubiquity token and container.
2 Note that the class extension redefines documentsIniCloud. In AppDelegate it is readonly, but here it is readwrite so that only AppDelegate can write to it.
3 This is the code for the first-time launch. It does not use the switch for testing that was discussed in “Adding Settings” previously in this chapter. This is the code you would use in production. The issue it addresses is that if the setting is off, that can mean that the user turned it off or that there is no value. That is why defining a setting so that it is only used if its value is “Yes” is sometimes useful.
4 The string for the alert is stored in its own variable simply to make spacing of the code more readable.
5 This is the alert for the first launch that asks the user to choose a storage location. It can subsequently be changed in Settings.
6 Look for the ubiquity container to find out if iCloud is available. Do this off the main thread because it can be a lengthy process. This is a good place to log the results for testing.
7 Once you have determined the ubiquity container, switch back to the main thread to set up the interface.
8 Get the user storage setting from Settings.
9 Log diagnostic message to console.
10 To use iCloud, send initializeiCloudAccess to self. (The code is in Listing 15.3.)
11 Check again because initializeiCloudAccess may have turned documentsIniCloud off. This code will be completed in Chapter 18.
After the stubs and comments that are always part of the AppDelegate.m template, you add three methods to AppDelegate that are specific to iCloud. These three are fairly common because they deal with iCloud itself. Once you get into the two main view controllers, you’ll deal with your subclass of UIDocument, its data, and the user interface. Listing 15.3 shows those methods.
Listing 15.3 AppDelegate.m Part II
#pragma mark - iCloud
- (void)initializeiCloudAccess {
_ubiquityToken = [[NSFileManager
defaultManager]ubiquityIdentityToken]; //12
// Check for icloud avail and store token
if (_ubiquityToken) { //13
NSData *newTokenData = [NSKeyedArchiver archivedDataWithRootObject:
_ubiquityToken]; // archive
[[NSUserDefaults standardUserDefaults] //defaults
setObject:newTokenData
forKey: @"com.champlainarts.Loon.UbiquityIdentityToken"];
[[NSUserDefaults standardUserDefaults] synchronize];
} else {
[[NSUserDefaults standardUserDefaults] //14
removeObjectForKey: @"com.champlainarts.Loon.UbiquityIdentityToken"];
[[NSUserDefaults standardUserDefaults] synchronize];
}
[[NSNotificationCenter defaultCenter] addObserver:self //15
selector:@selector(manageUbiquityIdentityChange)
name: NSUbiquityIdentityDidChangeNotification
object:nil];
}
#pragma mark - NSUbiquityIdentityDidChangeNotification
- (void) manageUbiquityIdentityChange { //16
}
#pragma mark - UIAlertViewDelegate
- (void)alertView:(UIAlertView *)alertView
didDismissWithButtonIndex:(NSInteger)buttonIndex {
if (buttonIndex == [alertView firstOtherButtonIndex]) { // other button
_documentsIniCloud = YES;
} else {
_documentsIniCloud = NO;
}
NSLog (@" %hhd", _documentsIniCloud);
[[NSUserDefaults standardUserDefaults] //defaults
setBool:_documentsIniCloud
forKey: @"com.champlainarts.Loon.documentsIniCloud"];
}
@end
12 Get the ubiquity token. Unlike getting the ubiquity container, this is a fast operation, so it can happen on the main thread.
13 If there is a ubiquity token, store it in user defaults. Chapter 18 will show you how to check if it is different from the last-used token, but for now, this is the basic processing you should be familiar with.
14 If there isn’t a ubiquity token, remove one that exists. Remember that in Airplane mode, there is still a ubiquity token, but there is no iCloud access.
15 Register for notification of a changed iCloud user.
16 In order to register, you need to provide at least the shell of the method to receive the registration. You may want to set a breakpoint at this time so that when you start testing, you’ll be reminded that the method needs to be implemented (you’ll see that in Chapter 18).
MasterViewController
As is always the case with a master view controller, its primary function is to manage the master view. In the Master-Detail Application, that view is presented in a UITableView. Typically, the elements of the master view controller are stored at runtime in an array. That master view controller lets you create new detail elements; they need to be added to the runtime array and stored appropriately.
MasterViewController.m is the longest file in the app, and because of its central role, it touches on just about every aspect of the app. As noted previously, because control does not flow in a linear way through the app, some of the aspects of MasterView-Controller will not become clear until you drill down into the other classes. You may want to skip around in this chapter, but you may also want to read through quickly to get an overview and then come back to specific parts as they become relevant.
Listing 15.4 shows the header file.
Listing 15.4 MasterViewController.h
#import <UIKit/UIKit.h>
@class JFDetailViewController;
@interface JFMasterViewController : UITableViewController
@property (strong, nonatomic) JFDetailViewController *detailViewController;
@property (weak, nonatomic) IBOutlet UIBarButtonItem *addButton; //1
@end
1 This is a button that is used to add new elements to the list. You can create it either by control-dragging from the storyboard to the .h file or by explicitly typing the code. A third way, which is used here, is to programmatically create the button. You need to expose it because, as you will see, you need to disable adding new items during a part of the iCloud discovery of existing items.
MasterViewController.m is a fairly long file. You can use pragma mark - to divide it into seven sections:
![]() Load and Memory: These are standard methods to manage the view. There is minimal customization here.
Load and Memory: These are standard methods to manage the view. There is minimal customization here.
![]() Documents: Two methods handle the actual adding of a new document and obtaining a name for it. You will learn that these are the basic methods for working with UIDocument and its subclasses.
Documents: Two methods handle the actual adding of a new document and obtaining a name for it. You will learn that these are the basic methods for working with UIDocument and its subclasses.
![]() Table View: Six familiar methods let you manage the UITableView. There is basically nothing about iCloud here.
Table View: Six familiar methods let you manage the UITableView. There is basically nothing about iCloud here.
![]() Segue: This is prepareForSegue:sender:. Note that it is used in the navigation interface for the iPhone version. It sets the detail item for the new detail view controller. For iPad, that is done elsewhere.
Segue: This is prepareForSegue:sender:. Note that it is used in the navigation interface for the iPhone version. It sets the detail item for the new detail view controller. For iPad, that is done elsewhere.
![]() iCloud Query: This is the heart of the iCloud code. It locates documents in the cloud and keeps that local _documents array up to date.
iCloud Query: This is the heart of the iCloud code. It locates documents in the cloud and keeps that local _documents array up to date.
![]() Local Sandbox: This is the code used when iCloud is not being used. Like iCloud Query, it keeps the local _documents array up to date.
Local Sandbox: This is the code used when iCloud is not being used. Like iCloud Query, it keeps the local _documents array up to date.
Before looking into each of those sections in detail, take a look at the beginning of the implementation file, which is shown in Listing 15.5.
Listing 15.5 MasterViewController.m Part I
#import "JFMasterViewController.h"
#import "JFDetailViewController.h"
#import "JFWrappedDocument.h"
#import "JFAppDelegate.h"
#import "JFFileRepresentation.h"
static NSString *JFDocFilenameExtension = @"lreport"; //1
static NSString *DisplayDetailSegue = @"showDetail"; //2
static NSString *JFDocumentsDirectoryName = @"Documents"; //3
static NSString *DocumentEntryCell = @"DocumentEntryCell"; //4
@interface JFMasterViewController () {
NSMetadataQuery *_query; //5
}
@property (strong, nonatomic) NSMutableArray *documents; //6
@end
@implementation JFMasterViewController
1 This is the file extension.
2 For the navigation interface on iPhone, you need a named segue from the prototype cell in the iPhone storyboard to the detail view controller. This name must match the name you set in Interface Builder.
3 This is the name of the documents directory in the local sandbox and in iCloud.
4 This is the name of the reusable prototype cell in the master view controller.
5 The heart of the iCloud discovery process is a query that runs asynchronously to check for new documents. This is that query. You’ll set it up once and then send it off. It is described further in “iCloud Query” later in this chapter.
6 This is the array of documents obtained either from the local sandbox or from iCloud in the “iCloud Query” section. It can be a mutable array, as it is here, because it needs to be modified. Depending on your data and how much it is updated, you may want to use an NSArray(which is immutable) and copy it into a mutable array and then back when needed. You use arrayWithArray: for this. You have to balance whether the faster performance of an immutable array outweighs the cost of the copy, and that depends on your data and particularly how much there is of it. This array stores the names and paths for the documents but not the document contents, so there usually isn’t much of it.
Load and Memory Section
Listing 15.6 is standard code from the template with very few customizations. The one difference is at the end of viewDidLoad where the documents array is filled either from iCloud or from the local sandbox.
Listing 15.6 Load and memory
#pragma mark - Load and memory
- (void)awakeFromNib
{
[super awakeFromNib];
if ([[UIDevice currentDevice] userInterfaceIdiom] ==
UIUserInterfaceIdiomPad) {
self.clearsSelectionOnViewWillAppear = NO;
self.preferredContentSize = CGSizeMake(320.0, 600.0);
}
}
- (void)viewDidLoad
{
[super viewDidLoad];
// Do any additional setup after loading the view, typically from a nib.
self.navigationItem.leftBarButtonItem = self.editButtonItem; //7
UIBarButtonItem* addButton = [[UIBarButtonItem alloc]
initWithBarButtonSystemItem:UIBarButtonSystemItemAdd target:self
action:@selector(addDocument:)]; //8
self.navigationItem.rightBarButtonItem = addButton; //9
self.addButton = addButton; //10
self.detailViewController = (JFDetailViewController *)
[[self.splitViewController.viewControllers lastObject]
topViewController];
BOOL usingiCloud = ((JFAppDelegate *)[[UIApplication sharedApplication]
delegate]).documentsIniCloud;
if (!_documents)
_documents = [[NSMutableArray alloc] init]; //11
if (usingiCloud) {
[self setupAndStartQuery]; //12
} else {
[self fillDocumentsForLocalStorage]; //13
}
}
- (void)didReceiveMemoryWarning
{
[super didReceiveMemoryWarning];
// Dispose of any resources that can be recreated.
}
7 Create an edit button at the left of the navigation bar.
8 Create an add button.
9 Place the add button at the right of the navigation bar.
10 Store a reference to the add button. (This is a property that was added to the template in the header file.)
11 If necessary, create the _documents array and then fill it.
12 Set up and start the query if using iCloud.
13 If not using iCloud, fill the Documents array locally.
Documents
The section for documents consists of two methods: the first adds a new document in response to a user command, and the second calculates the name of the new document. The basics of adding a new document are shown in the default insertNewObject code in the Master-Detail Application template; it is shown in Listing 15.7.
There are two tasks involved in inserting a new object:
![]() Insert the object into the array of objects.
Insert the object into the array of objects.
![]() Update the UITableView interface.
Update the UITableView interface.
This is exactly what the code in Loon does, but it also does a number of other things specific to the project. Don’t let that distract you from the fact that the main purpose is to update the array as well as the table view. You don’t need to actually insert the object into the table view:tableView:cellForRow: takes care of getting data from the mutable array on demand. (Remember also that instead of a mutable array, you can use an immutable array, which is faster, and then use arrayWithArray: to switch the mutable and immutable arrays when you need to.)
Note that the template code to create a new object is provided in Listing 15.7 for comparison purposes. Don’t worry that the method name is different: the functionality is comparable. In Listing 15.7, letters rather than numbers are used to identify the lines of code to underscore the point that this is template code that is separate from the Loon code.
Listing 15.7 Adding a New Object in the Template
#pragma mark - Documents
- (void)insertNewObject:(id)sender
{
if (!_objects) {
_objects = [[NSMutableArray alloc] init]; //A
}
[_objects insertObject:[NSDate date] atIndex:0]; //B
NSIndexPath *indexPath = [NSIndexPath indexPathForRow:0 inSection:0]; //C
[self.tableView insertRowsAtIndexPaths:@[indexPath] //D
withRowAnimation:UITableViewRowAnimationAutomatic];
}
A If the mutable array of objects doesn’t exist, create it.
B Insert the new object at the beginning of the array. This completes the first task.
C Create indexPath for row 0 in section 0.
D Insert a new row in the table view using indexPath.
Now it’s time to look at the Loon implementation of the comparable insertNewObject: code from the template with addDocument:, which is shown in Listing 15.8. A number of NSLog statements are left in the code so that you can follow what’s happening as you test the code. They are useful because a major chunk of the processing happens asynchronously off the main thread, so control jumps around in the code.
You can now see why a property for the add button was added to the template. In many cases, you simply add buttons to the navigation bar at runtime and don’t worry about them. You set them up with the appropriate selectors, and they just work.
In this case, however, you need to disable the add button while you are processing the addition of a new item. Because of the asynchronous processing, there could come a moment in which the add button could be pushed in the middle of an add operation, and the results of that would be at the least undefined. Thus, in order to be able to enable or disable the add button, you need to be able to get to it with a property.
When you are working with UIDocument and subclasses of it, remember that the sequence of steps you may be used to as a user or developer changes. You may be used to creating a blank and untitled document, working with it, and then saving it either with a default name or a name that you provide.
Now, you first name the document (even though this may be a temporary name, such as Untitled-1). The document’s location is determined by the name and by its path. With those pieces of information, the document is savable. The reason for making a distinction between the file name and the path is that the path differs for files in iCloud and files stored locally. When you need the complete location, you often need to construct it from the known location (iCloud or the local sandbox) and the file name.
Thus, a key aspect of adding a new document is constructing its name and assembling an NSURL that combines the appropriate location with the file name. The _documents array actually contains the file name and location for each document: given those, you can retrieve the document itself any time you want it. In order to make this easier, a lightweight class, FileRepresentation, is created later in this chapter. It contains the NSURL and the file name. You’ll see it used in Listing 15.8.
Listing 15.8 Managing Documents
#pragma mark - Documents
- (IBAction)addDocument:(id)sender { //14
NSURL *newDocumentURL;
BOOL usingiCloud = ((JFAppDelegate *)[[UIApplication sharedApplication]
delegate]).documentsIniCloud;
if (usingiCloud) {
self.addButton.enabled = NO;
dispatch_async //15
(dispatch_get_global_queue(DISPATCH_QUEUE_PRIORITY_DEFAULT, 0), ^{
NSFileManager *fm = [NSFileManager defaultManager];
NSString *newFileName = [self newUntitledDocumentName];
NSURL *newDocumentURL =
[fm URLForUbiquityContainerIdentifier:nil]; //16
NSLog (@" %s %@", __PRETTY_FUNCTION__,
[fm URLForUbiquityContainerIdentifier:nil]);
newDocumentURL = [newDocumentURL
URLByAppendingPathComponent:JFDocumentsDirectoryName
isDirectory:YES]; //17
newDocumentURL = [newDocumentURL //18
URLByAppendingPathComponent:newFileName];
NSLog (@" %s %@", __PRETTY_FUNCTION__, newDocumentURL);
JFFileRepresentation *fr = [[JFFileRepresentation alloc]
initWithFileName: newFileName fileURL:newDocumentURL];
[_documents addObject: fr];
NSLog (@" %s %@", __PRETTY_FUNCTION__, _documents);
dispatch_async(dispatch_get_main_queue(), ^{ //19
// Update table //20
NSIndexPath* newCellIndexPath =
[NSIndexPath indexPathForRow: ([_documents count] - 1)
inSection: 0];
[self.tableView insertRowsAtIndexPaths: [NSArray
arrayWithObject: newCellIndexPath]
withRowAnimation:UITableViewRowAnimationAutomatic];
[self.tableView selectRowAtIndexPath:newCellIndexPath animated:YES
scrollPosition:(UITableViewScrollPositionMiddle)];
UITableViewCell *selectedCell = [self.tableView
cellForRowAtIndexPath: newCellIndexPath];
if ([[UIDevice currentDevice] userInterfaceIdiom] !=
UIUserInterfaceIdiomPad) { //21
[self performSegueWithIdentifier:DisplayDetailSegue
sender:selectedCell];
} else {
[self.detailViewController setDetailItemAndConfigure:fr];
_detailViewController.navigationItem.title = [fr fileName];
}
self.addButton.enabled = YES; //22
});
});
} else {
newDocumentURL = [self localDocumentsDirectoryURL]; //23
NSLog (@" %s %@", __PRETTY_FUNCTION__, newDocumentURL);
newDocumentURL = [newDocumentURL URLByAppendingPathComponent: //24
[self newUntitledDocumentName]];
NSLog (@" %s %@", __PRETTY_FUNCTION__, newDocumentURL);
JFFileRepresentation *fr = [[JFFileRepresentation alloc]
initWithFileName:
[self newUntitledDocumentName] fileURL:newDocumentURL];
[_documents addObject: fr]; //25
NSLog (@" %s %@", __PRETTY_FUNCTION__, _documents); //26
NSIndexPath* newCellIndexPath =
[NSIndexPath indexPathForRow: ([_documents count] - 1) inSection: 0];
[self.tableView insertRowsAtIndexPaths: [NSArray
arrayWithObject: newCellIndexPath]
withRowAnimation:UITableViewRowAnimationAutomatic];
[self.tableView selectRowAtIndexPath:newCellIndexPath animated:YES //27
scrollPosition:(UITableViewScrollPositionMiddle)];
UITableViewCell *selectedCell = [self.tableView
cellForRowAtIndexPath: newCellIndexPath];
if ([[UIDevice currentDevice] userInterfaceIdiom] !=
UIUserInterfaceIdiomPad) { //28
[self performSegueWithIdentifier:DisplayDetailSegue
sender:selectedCell];
} else {
[_detailViewController setDetailItemAndConfigure: fr]; //29
_detailViewController.navigationItem.title = [fr fileName];
}
self.addButton.enabled = YES;
}
}
14 Start by declaring newDocumentURL. If using iCloud, disable the add button. (You only need to worry about it if you’re going to be using iCloud and asynchronous processing.) If you are working in iCloud, continue. There’s an else later on at line 23.
15 Switch off the main queue to search iCloud.
16 Call newUntitledDocumentName to get the file name for the new document (it is described in the following section). Combine it with the ubiquity container URL (this is the part that may take time).
17 Append a directory if you use it (see the static declaration at the top of the file).
18 Append the file name. Create a file representation and add it to _documents.
19 Switch back to the main queue.
20 Update the table view.
21 Set the detail view controller detail item explicitly (iPad) or as a result of the segue (iPhone).
22 Enable the add button. You can test if you need to, but it’s easier just to enable it in all cases.
23 For local sandbox storage, get the local documents directory. (This method is described in the section that follows.)
24 Add the file name.
25 Create a file representation and add it to _documents.
26 Insert a new row in the table view.
27 Select the new row.
28, 29 Set the detail view controller with the segue (iPhone) or explicitly (iPad).
Listing 15.9 is the method that gives you a new document name—the name, not the full NSURL or path. This is basic C code with only two lines that even use Objective-C features. It attempts to construct file names such as Note 1, Note 2, and so forth. For each one, it uses fast enumeration to see if that name is used in _documents. If it is not, it returns that name. This technique, which is used in Apple examples (and other places), fills in the gaps as you remove documents. For instance, if you have Note 1, Note 2, and Note 3 and then delete Note 2, the next time you ask for a name, you’ll get Note 2 rather than Note 4. “Note” is hard-coded here; it should be a constant or define for better maintainability in a production system.
Listing 15.9 newUntitledDocumentName
- (NSString *)newUntitledDocumentName {
NSInteger docCount = 1;
NSString *newDocName = nil;
BOOL done = NO;
while (!done) {
newDocName = [NSString stringWithFormat: @"Note %d.%@",
docCount, JFDocFilenameExtension]; //30
BOOL nameExists = NO;
for (JFFileRepresentation *fr in _documents) { //31
if ([[[fr fileName] lastPathComponent] isEqualToString: newDocName]) {
docCount++;
nameExists = YES;
break;
}
}
if (!nameExists)
done = YES;
}
NSLog (@" %s %@", __PRETTY_FUNCTION__, newDocName);
return newDocName;
}
30 Construct the next document name.
31 Check to see if it exists in _documents.
Listing 15.10 shows the delegate methods for UITableViewDelegate, which is adopted by UITableViewController. There are few customizations you’ll need to make to reuse this code. (Note that it is not yet complete: there are some additions you’ll find in Chapter 18.)
Listing 15.10 Table View
#pragma mark - Table View
- (NSInteger)numberOfSectionsInTableView:(UITableView *)tableView
{
return 1; //32
}
- (NSInteger)tableView:(UITableView *)tableView
numberOfRowsInSection:(NSInteger)section
{
return _documents.count; //33
}
- (UITableViewCell *)tableView:(UITableView *)tableView
cellForRowAtIndexPath:(NSIndexPath *)indexPath
{
UITableViewCell *newCell = [tableView
dequeueReusableCellWithIdentifier:DocumentEntryCell //34
forIndexPath:indexPath];
if (!newCell)
newCell = [[UITableViewCell alloc]
initWithStyle: UITableViewCellStyleDefault
reuseIdentifier: DocumentEntryCell]; //35
if (!newCell)
return nil;
JFFileRepresentation *fr =
(JFFileRepresentation*)[_documents objectAtIndex:[indexPath row]]; //36
NSURL *fileURL = [fr fileURL];
NSLog (@" %s %@", __PRETTY_FUNCTION__, fileURL);
newCell.textLabel.text = [[[fr fileURL] lastPathComponent]
stringByDeletingPathExtension]; //37
return newCell;
}
- (BOOL)tableView:(UITableView *)tableView
canEditRowAtIndexPath:(NSIndexPath *)indexPath
{
// Return NO if you do not want the specified item to be editable.
return YES;
}
- (void)tableView:(UITableView *)tableView
didSelectRowAtIndexPath:(NSIndexPath *)indexPath {
JFFileRepresentation *fr = (JFFileRepresentation *)[_documents
objectAtIndex: [indexPath row]]; //38
[self.detailViewController setDetailItemAndConfigure:fr]; //39
}
32 A single column table has only one section.
33 Take the row count out of _documents.
34, 35 Dequeue the reusable prototype cell from the storyboard. This should be a constant or define for easy maintainability.
36, 37 Take the appropriate items out of _documents, get the last path component, and then delete the extension so that you wind up with something like Note 1.
38 On iPad, pick up the file representation for the selected row.
39 On iPad, set the detail view controller detail item. On iPhone, this happens in prepareForSegue:sender:.
On iPhone, prepareForSegue:sender: is where you pass the new detail item to the detail view controller, as shown in Listing 15.11. On iPad, it is done in tableview didSelectRowAtIndexPath:, as you saw in Listing 15.10.
Listing 15.11 Segue
#pragma mark - Segue
- (void)prepareForSegue:(UIStoryboardSegue *)segue sender:(id)sender
{
if (![segue.identifier isEqualToString:@"showDetail"])
return;
JFDetailViewController *destVC = (JFDetailViewController *)
segue.destinationViewController;
NSIndexPath *cellPath = [self.tableView indexPathForSelectedRow];
UITableViewCell *theCell = [self.tableView
cellForRowAtIndexPath: cellPath];
JFFileRepresentation *fr = (JFFileRepresentation *)[_documents
objectAtIndex: [cellPath row]]; //40
destVC.detailItem = fr; //41
destVC.navigationItem.title = theCell.textLabel.text; //42
}
40 Get the document. Compare to line 28 in Listing 15.8.
41 Set the destination view controller’s detail item to the document.
42 Set the navigation bar title to the title of the document.
iCloud Query
A NSMetadataQuery is used to find the iCloud documents. Originally designed for supporting the Spotlight feature on the Mac, these queries are designed to run in the background and report back periodically.
In the class extension, a _query variable was declared (line 5 in Listing 15.5). In viewDidLoad, [self setupAndStartQuery] is sent if iCloud is being used (line 12 in Listing 15.6).
Listing 15.12 shows where that message goes. The first thing that happens is that if _query doesn’t exist, you must create it with wrappedDocumentQuery. Register for notifications from the query—a notification for an update to the query and a notification for completion of the query. Then start the query and sit back.
Once one of those notifications is received, control passes to processFiles, which is also in Listing 15.12. Use fast enumeration to run through the query results and store them in a local array called discoveredFiles. On completion, remove all the elements from _documentsand replace them with discoveredFiles. This is a place where breakpoints and NSLog messages can help you follow the control sequence.
Listing 15.12 Working with the iCloud Query
#pragma mark - iCloud Query
- (void)setupAndStartQuery { //43
if (!_query)
_query = [self wrappedDocumentQuery];
[[NSNotificationCenter defaultCenter] addObserver: self
selector:@selector (processFiles)
name: NSMetadataQueryDidFinishGatheringNotification
object: nil];
[[NSNotificationCenter defaultCenter] addObserver: self
selector:@selector (processFiles)
name: NSMetadataQueryDidUpdateNotification
object: nil];
[_query startQuery];
}
- (NSMetadataQuery *)wrappedDocumentQuery { //44
NSMetadataQuery *aQuery = [[NSMetadataQuery alloc] init];
if (aQuery) {
[aQuery setSearchScopes: [NSArray
arrayWithObject: NSMetadataQueryUbiquitousDocumentsScope]]; //45
NSString *filePattern = [NSString stringWithFormat: @"*.%@",
JFDocFilenameExtension];
NSLog (@" %s %@", __PRETTY_FUNCTION__, filePattern);
[aQuery setPredicate: [NSPredicate predicateWithFormat:@"%K LIKE %@",
NSMetadataItemFSNameKey, filePattern]];
}
return aQuery;
}
- (void)processFiles { //46
//preserve selection listing 4-4 doc
NSMutableArray *discoveredFiles = [NSMutableArray array]; //47
[_query disableUpdates]; //48
NSArray *queryResults = [_query results];
for (NSMetadataItem *result in queryResults) {
NSString *fileName =
[result valueForAttribute: NSMetadataItemFSNameKey];
NSURL *fileURL = [result valueForAttribute: NSMetadataItemURLKey];
NSLog (@" %s %@ %@", __PRETTY_FUNCTION__, fileName, fileURL);
NSNumber *aBool = nil;
[fileURL getResourceValue: &aBool forKey: NSURLIsHiddenKey error: nil];
if (aBool && ![aBool boolValue]) { //49
JFFileRepresentation *fr = [[JFFileRepresentation alloc]
initWithFileName: fileName fileURL:fileURL];
[discoveredFiles addObject: fr];
//[discoveredFiles addObject: fileURL];
}
}
[_documents removeAllObjects]; //50
[_documents addObjectsFromArray: discoveredFiles];
[self.tableView reloadData];
[_query enableUpdates]; //51
}
43 Create the query and register for the notifications. The only changes you make in this code may be if you use different names for _query or the methods.
44 Here is where you create the query.
45 Confine the query to the ubiquitous documents for your app. This code is usable as-is except that you may change your DocFileNameExtension value.
46 This is the code that is triggered by either notification. It updates _documents.
47 Declare a mutable array for the files from the query.
48 Disable updates to the query results so that you don’t get into a deadlock.
49 Using fast enumeration, run through the query results, and add each one to discoveredFiles.
50 Remove everything from _documents and replace with the contents of discoveredFiles.
51 Re-enable updates.
Local Sandbox
The last section of the file has to do with managing the local sandbox on the iOS device. Whereas sandboxing on OS X is optional, on iOS, it is not, so you are obliged to use the code if you use any local storage, as shown in Listing 15.13.
Because you can access the sandbox directory directly, you don’t have to worry about queries and notifications, so the code is somewhat simpler than the iCloud code. Nevertheless, you’re doing the same thing: you’re filling the _documents array.
Listing 15.13 Using the Local Sandbox
#pragma mark - Local Sandbox
- (void)fillDocumentsForLocalStorage {
NSMutableArray *discoveredFiles = [NSMutableArray array]; //52
NSArray *localDocumentsArray = [[NSFileManager defaultManager] //53
URLsForDirectory:NSDocumentDirectory inDomains:NSUserDomainMask];
NSURL *documentsDirectoryURL = localDocumentsArray[0];
NSError *error = nil;
NSArray *properties = @[NSURLNameKey];
NSArray *documents = [[NSFileManager defaultManager]
contentsOfDirectoryAtURL:documentsDirectoryURL
includingPropertiesForKeys:properties
options:NSDirectoryEnumerationSkipsHiddenFiles error:&error];
for( NSURL *myFileURL in documents) { //54
NSString *fileName = [myFileURL lastPathComponent];
NSLog (@" %s %@ %@", __PRETTY_FUNCTION__, fileName, myFileURL);
NSString *filePath = [[documentsDirectoryURL path]
stringByAppendingPathComponent:fileName];
[discoveredFiles addObject: [[JFFileRepresentation alloc]
initWithFileName: fileName
fileURL: myFileURL
]];
}
[_documents removeAllObjects]; //55
[_documents addObjectsFromArray: discoveredFiles];
[self.tableView reloadData];
}
- (NSURL*)localDocumentsDirectoryURL { //56
static NSURL *localDocumentsDirectoryURL = nil;
if (localDocumentsDirectoryURL == nil) {
NSString *documentsDirectoryPath = [NSSearchPathForDirectoriesInDomains(
NSDocumentDirectory, NSUserDomainMask, YES ) objectAtIndex:0];
localDocumentsDirectoryURL =
[NSURL fileURLWithPath:documentsDirectoryPath];
}
return localDocumentsDirectoryURL;
}
@end
52 Declare a mutable array for the files you find.
53 This is used to get the local files. You can use it as-is.
54 Use fast enumeration to add each file to the discovered files.
55 Update _documents and reload the table view.
56 This is the routine that gives you the directory to the local sandbox. It is used at line 23 in Listing 15.8. Compare this to lines 16 and 17 in Listing 15.8.
DetailViewController
The detail view controller is much simpler than the master view controller, and it focuses on the user interface. It has relatively little to do with iCloud: the master view controller handles the direct interaction with iCloud at the document level, and the WrappedFile class manages the transfer of data to and from iCloud after a document has been selected.
The header file is shown in Listing 15.14
Listing 15.14 DetailViewController.h
#import <UIKit/UIKit.h>
#import "JFWrappedDocument.h" //1
#import "JFFileRepresentation.h" //2
@interface JFDetailViewController : UIViewController
<UISplitViewControllerDelegate,
JFWrappedDocumentDelegate> //3
@property (strong, nonatomic) JFFileRepresentation *detailItem;
@property (weak, nonatomic) IBOutlet UITextField *textField;
@property (weak, nonatomic) IBOutlet UITextField *locationField;
@property (weak, nonatomic) IBOutlet UIImageView *imageView;
- (void)setDetailItemAndConfigure: (JFFileRepresentation *)fr;
@end
1, 2 WrappedDocument and FileRepresentation are the document and a lightweight helper class that are discussed later in this chapter.
3 DetailViewController conforms to WrappedDocumentDelegate, which will manage content changes.
The code in DetailViewController addresses the user interface and two delegate implementations that UITableViewController conforms to. As such, they are not particularly related to iCloud. If you compare the code in Listing 15.15 with other code, you’ll notice that it has been changed in some ways. Other sample code uses methods such as ViewWillAppear and ViewWillDisappear to trigger moving of data between the interface and persistent objects (the documents). As pointed out previously, this works well with navigation interfaces, but with split view controllers on iPad, the mechanism breaks down.
Accordingly, the code is structured somewhat differently from much of the sample code. Two new methods are created: configureView and unconfigureView. They move data from the document to the user interface and back again. (configureView appears in a number of sample code projects.) With the user interface code in these methods, they can be called as appropriate for a split view controller interface or a navigation interface.
Listing 15.15 DetailViewController.m Part I
#import "JFDetailViewController.h"
#import "JFFileRepresentation.h"
@interface JFDetailViewController () //1
@property (strong, nonatomic) UIPopoverController *masterPopoverController;
@end
@implementation JFDetailViewController { //2
JFWrappedDocument *_document;
BOOL _createFile;
}
#pragma mark - Managing the detail item
- (void)setDetailItemAndConfigure: (JFFileRepresentation *)fr { //3
[self unconfigureView];
self.detailItem = fr;
[self configureView];
}
- (void)configureView //4
{
// Update the user interface for the detail item.
if (self.detailItem) {
NSURL *URLToSave = [self.detailItem fileURL];
_document = [[JFWrappedDocument alloc ]initWithFileURL: URLToSave]; //5
_document.delegate = self;
if (_createFile) { //6
[_document saveToURL: _document.fileURL forSaveOperation:
UIDocumentSaveForCreating completionHandler:^(BOOL success) {
if (success) { //7
NSLog (@" %s %hhd", __PRETTY_FUNCTION__, success);
}
}];
_createFile = NO;
}
if (_document.documentState & UIDocumentStateClosed) { //8
[_document openWithCompletionHandler:nil];
}
}
}
- (void)unconfigureView { //9
NSString *newText = self.textField.text; //10
NSString *newLocation = self.locationField.text;
_document.documentText = newText; //11
_document.documentLocation = newLocation;
[_document closeWithCompletionHandler:nil]; //12
}
- (void)viewDidLoad
{
[super viewDidLoad];
// Do any additional setup after loading the view, typically from a nib.
[self configureView]; //13
}
- (void)viewWillAppear:(BOOL)animated {
[super viewWillAppear:animated];
[self configureView]; //14
}
- (void)viewWillDisappear:(BOOL)animated {
[super viewWillDisappear:animated];
[self unconfigureView]; //15
}
- (void)didReceiveMemoryWarning
{
[super didReceiveMemoryWarning];
// Dispose of any resources that can be recreated.
}
1 This class extension is from the template.
2 Local variables are the wrapped document and a Boolean indicating whether or not it needs to be created. Remember that the detail item is a FileRepresentation, not the document itself.
3 A method such as setDetailItem can be confused with a setter. This may be what you want, but if you want to avoid confusion, a more meaningful name that cannot be confused with a setter may be a better choice.
4 This is code that in various samples is in viewWillAppear.
5 Create the document from the file representation.
6 If necessary, save the document.
7 Set a breakpoint here. It’s part of a block, so if you are stepping through the code, you’ll jump right over this unless you explicitly set a breakpoint on a line of code within the block.
8 Open the document if necessary.
9 This moves the code to the document from the user interface. Note that there is no reverse code in line 8. That is handled by the delegate at lines 16, 17, and 18 in Listing 15.16.
10, 11 Move the text to the document itself. (The code for the location is similar.)
12 Close the document.
13, 14, 15 viewDidLoad, viewWillAppear, and viewWillDisappear are changed to call configureView and unconfigureView.
Listing 15.16 finishes the detail view controller. It contains unchanged code from the Master-Detail Application template along with the implementation of the WrappedDocumentDelegate. This is yet another asynchronous process. When the document determines that its contents have changed (in WrappedDocument), it posts a notification that responds by running this code. This code is dispatched on the main queue, and it moves the document’s data to the user interface.
Listing 15.16 DetailViewCotroller.m Part II
#pragma mark - JFWrappedDocumentDelegate
- (void)documentContentsDidChange: (JFWrappedDocument *)document { //16
dispatch_async (dispatch_get_main_queue(), ^{ //17
self.textField.text = _document.documentText; //18
self.locationField.text = _document.documentLocation;
});
}
#pragma mark - Split view
- (void)splitViewController:(UISplitViewController *)splitController
willHideViewController:(UIViewController *)viewController
withBarButtonItem:(UIBarButtonItem *)barButtonItem
forPopoverController:(UIPopoverController *)popoverController
{
barButtonItem.title = NSLocalizedString(@"Master", @"Master"); //19
[self.navigationItem setLeftBarButtonItem:barButtonItem animated:YES];
self.masterPopoverController = popoverController;
}
- (void)splitViewController:(UISplitViewController *)splitController
willShowViewController:(UIViewController *)viewController
invalidatingBarButtonItem:(UIBarButtonItem *)barButtonItem
{
// Called when the view is shown again in the split view,
// invalidating the button and popover controller.
[self.navigationItem setLeftBarButtonItem:nil animated:YES];
self.masterPopoverController = nil;
}
@end
16 Implement the WrappedDocumentDelegate.
17 Move to the main thread.
18 Move the data.
19 Add a title to the popover button. “Master” is a good default, but it probably should be customized for the items you’re managing—Reports, Observations, or the like.
This small method is a good way to observe how blocks work. Here’s how to create the demonstration for yourself:
1. Set breakpoints at lines 17 and 18.
2. Change some data so that the notification fires. (You’ll have to do this after you have worked through this chapter because the notification isn’t wired yet. It saves a bit of jumping around to have these steps listed here next to the code that will run.)
3. When you stop at the breakpoint for line 17, step over it. The line you have executed moves to the main thread and schedules the block.
4. When you get to the end of the method, click run in the breakpoint navigator. Control will stop at line 18.
Remember that to set a breakpoint to debug code in a block, you must set a breakpoint on the code itself: you cannot step into a block.
WrappedDocument
WrappedDocument is a continuation of the same class in Placid. The major differences are in the handling of saving and opening because in Placid, the documents were stored only in iCloud. In Loon, documents can be stored either in iCloud or in the local sandbox.
Listing 15.17 shows the header file. It’s a bit more complex than files you’ve seen before; that complexity comes from its use of a protocol and the way in which that protocol is declared. Because this is common, it is worthwhile to look at the issue.
The protocol (WrappedDocumentDelegate) is used in the declaration of the delegate property at line 3 in Listing 15.17. In order to use it there, a forward declaration for the protocol is placed at line 17. The protocol itself is declared at line 3 at the bottom of the file. This is a common issue in which you have two declarations (WrappedDocument and WrappedDocumentDelegate in this case), each of which refers to the other. The standard solution is to use a forward declaration for one of them. You can play around with the header file, and you’ll see that eitherWrappedDocument-Delegate or WrappedDocument needs to be declared in a forward declaration. It’s a matter of style which one you pick. (In cases like this, use a forward declaration for the protocol so that the overall structure of a header file focuses on the class declaration with other items being declared in forward declarations.)
Listing 15.17 WrappedDocument.h
#import <UIKit/UIKit.h>
@protocol JFWrappedDocumentDelegate; //1
@interface JFWrappedDocument : UIDocument
@property (strong, nonatomic) NSFileWrapper *fileWrapper;
@property (strong, nonatomic) NSString *documentText;
@property (strong, nonatomic) NSString *documentLocation;
@property (weak, nonatomic) id <JFWrappedDocumentDelegate> delegate; //2
-(void)setDocumentText: (NSString*)newText;
-(void)setDocumentLocation: (NSString*)newText;
@end
@protocol JFWrappedDocumentDelegate <NSObject> //3
@optional //4
- (void)documentContentsDidChange: (JFWrappedDocument *)document;
@end
1 Declare a forward reference of the protocol.
2 Use the forward reference in the declared property.
3 Declare the protocol.
4 Because documentContentsDidChange triggers saving and user interface interactions, consider if this protocol would ever be used in another context. Making it optional allows this. The choice depends on your preference and app structure. Explicitly indicating which methods are required and which are optional is always a good choice.
WrappedDocument is divided into three sections:
![]() Accessors, Undo/Redo: These methods manage moving the data in and out to and from fields.
Accessors, Undo/Redo: These methods manage moving the data in and out to and from fields.
![]() File Wrapper/Package Support: This code works at the document level rather than the field level.
File Wrapper/Package Support: This code works at the document level rather than the field level.
![]() Saving: This is an override of a single UIDocument method that exists for the sole purpose of being able to set a breakpoint to observe the asynchronous saving of the document.
Saving: This is an override of a single UIDocument method that exists for the sole purpose of being able to set a breakpoint to observe the asynchronous saving of the document.
The top of WrappedDocument.m contains declarations and a class extension. It is shown in Listing 15.18.
Listing 15.18 WrappedDocument.m Declarations and Class Extension
#import "JFAppDelegate.h"
#import "JFWrappedDocument.h"
NSString *UbiquityDirectoryComponentForDocuments = @"Documents"; //1
NSString *TextFileName = @"Text.txt"; //2
NSString *LocationFileName = @"Location.txt";
NSStringEncoding kTextFileEncoding = NSUTF8StringEncoding; //3
@interface JFWrappedDocument () //4
@property (strong, nonatomic) NSFileWrapper *wrapperText;
@property (strong, nonatomic) NSFileWrapper *wrapperLocation;
@property (strong, nonatomic) NSString *fwText;
@property (strong, nonatomic) NSString *fwLocation;
@end
1 This is the directory name to be constructed for iCloud.
2 These are the default file names within the file wrapper.
3 This is the encoding for the text file inside the wrapper.
4 The class extension declares properties for the text, location, and image (the image is still a placeholder at this point). fwText and fwLocation are backing variables for the properties.
The accessors use the private variables declared in the class extension (line 4 in Listing 15.18). On demand, the data is extracted from the wrapped document. Note that the setters are undoable: that causes the document to be autosaved. Also note the comment that error handling needs to be added. That is standard error handling and doesn’t deal with iCloud, so it is omitted.
This section of WrappedDocument is shown in Listing 15.19.
Listing 15.19 WrappedDocument.m—Accessors, Undo/Redo
@implementation JFWrappedDocument
#pragma mark - Accessors, Undo/Redo
-(NSString*)documentText {
if (_fwText)
return _fwText;
NSDictionary *fileWrappers = [_fileWrapper fileWrappers]; //5
if (!_wrapperText) {
_wrapperText = [fileWrappers objectForKey: TextFileName]; //6
}
if (_wrapperText != nil)
{
NSData *textData = [_wrapperText regularFileContents]; //7
_fwText = [[NSString alloc] initWithData:textData
encoding:kTextFileEncoding];
} else {
// handle error
}
return _fwText;
}
-(void)setDocumentText: (NSString*)newText { //8
if (newText != _fwText )
{
NSString *oldText = _fwText;
_fwText = newText;
//register undo and cause autosave
[self.undoManager setActionName: @"Text Change"];
[self.undoManager registerUndoWithTarget:self
selector: @selector(setDocumentText:)
object: oldText];
}
}
-(NSString*)documentLocation { //9
if (_fwLocation)
return _fwLocation;
NSDictionary *fileWrappers = [_fileWrapper fileWrappers]; //10
if (!_wrapperLocation) {
_wrapperLocation = [fileWrappers objectForKey: LocationFileName]; //11
}
if (_wrapperLocation != nil)
{
NSData *locationData = [_wrapperLocation regularFileContents]; //12
NSLog (@" %@", locationData);
_fwLocation = [[NSString alloc] initWithData:locationData
encoding:kTextFileEncoding]; //13
} else {
// handle error
}
return _fwLocation;
}
-(void)setDocumentLocation: (NSString*)newLocation {
if (newLocation != _fwLocation)
{
NSString *oldLocation = _fwLocation;
_fwLocation = newLocation;
[self.undoManager setActionName: @"Location Change"];
[self.undoManager
registerUndoWithTarget:self
selector: @selector(setDocumentLocation:)
object: oldLocation];
}
}
- (IBAction)handleUndo:(id)sender {
[self.undoManager undo];
}
- (IBAction)handleRedo:(id)sender {
[self.undoManager redo];
}
5 Get the file wrappers from the wrapped document.
6 Get the value for the key TextFileName.
7 Get the data as NSData and store it in the NSString that is the backing variable.
8 This is the setter for the text. Note the undo settings that will call this same method for undo.
9 This is the getter for location. It matches the getter for text.
10, 11, 12 Get the file wrappers, the key, and the data.
13 Set the location and register for undo.
The two main methods in Listing 15.20 handle the actual work of reading and writing. loadFromContents:ofType:error: loads the data from content that has been received. contentsForType:error: moves data into an object. As you can see in Listing 15.20, the content is an id, which means any class.
Thus, the sequence from the data store on reading is
1. configureView in DetailViewController.m creates and opens the private _document instance. It sets DetailViewController as the delegate for _document.
2. In WrappedDocument.m loadFromContents:ofType:, the contents are stored in the fileWrapper property of WrappedDocument.
3. Then, still in loadFromContents:ofType: in WrappedDocument.m, the _document delegate’s documentsContentDidChange: is called. (Remember the delegate was set to DetailViewController in step 1.)
4. In documentsContentDidChange of DetailViewController.m, the data is moved to the interface fields that are properties of DetailViewController.
To appreciate how this process plays out, it’s a good idea to set breakpoints at the start of all of these methods. What you’ll see is that when the document is created or opened in line 1, control passes to other parts of the app. If you set a breakpoint at the end of that method and then step over it, you’ll probably be back at the main event loop. Some time later—perhaps even a minute or two—you’ll see that the breakpoint at the start of loadFromContents:ofType: is triggered. It is called asynchronously as a result of the opening of a document. There may be another time lapse before line 4 is carried out.
contents:forType:error: is the companion method. It moves data from your _document object (where it was placed by your user interface fields and storyboard) into an object that is then saved. These two methods are symmetrical: they implement reading and writing.
Listing 15.20 WrappedDocument.m—FileWrapper/Package Support
#pragma mark - File Wrapper / Package Support
- (BOOL)loadFromContents:(id)contents ofType:(NSString *)typeName
error:(NSError *__autoreleasing *)outError { //14
_fwText = nil;
_fwLocation = nil;
self.fileWrapper = (NSFileWrapper *)contents; //15
if ([_delegate respondsToSelector:
@selector (documentContentsDidChange:)]) {
[_delegate documentContentsDidChange: self]; //16
}
return YES;
}
- (id)contentsForType:(NSString *)typeName
error:(NSError *__autoreleasing *)outError {
if (self.fileWrapper == nil) //17
{
self.fileWrapper = [[NSFileWrapper
alloc]initDirectoryWithFileWrappers:nil]; //18
}
NSDictionary *fileWrappers = [self.fileWrapper fileWrappers]; //19
if (self.documentText != nil) //20
{
NSData *textData = [self.documentText
dataUsingEncoding: kTextFileEncoding];
NSFileWrapper *textFileWrapper = [fileWrappers
objectForKey:TextFileName];
if (textFileWrapper != nil) {
[self.fileWrapper removeFileWrapper: textFileWrapper];
}
textFileWrapper = [[NSFileWrapper alloc]
initRegularFileWithContents:textData];
[textFileWrapper setPreferredFilename: TextFileName];
[self.fileWrapper addFileWrapper: textFileWrapper];
}
if ( self.documentLocation != nil) //21
{
NSLog (@" %s locationData %@", __PRETTY_FUNCTION__,
self.documentLocation);
NSData *locationData = [self.documentLocation dataUsingEncoding:
kTextFileEncoding];
NSFileWrapper *locationFileWrapper = [fileWrappers
objectForKey:LocationFileName];
if (locationFileWrapper != nil) {
[self.fileWrapper removeFileWrapper: locationFileWrapper];
}
locationFileWrapper = [[NSFileWrapper alloc]
initRegularFileWithContents:locationData];
[locationFileWrapper setPreferredFilename: LocationFileName];
[self.fileWrapper addFileWrapper: locationFileWrapper];
}
return self.fileWrapper;
}
#pragma mark - Saving
- (void)saveToURL:(NSURL *)url forSaveOperation: //22
(UIDocumentSaveOperation)saveOperation completionHandler:(
void (^)(BOOL))completionHandler {
[super saveToURL:url forSaveOperation:saveOperation completionHandler:^(BOOL
success) {
if (success) { //23
NSLog (@" %s %hhd", __PRETTY_FUNCTION__, success);
}
}];
}
@end
14 It’s a good idea to set a breakpoint here to see when it’s called. It’s an asynchronous call, so you can’t step into it from the code you normally write.
15 Place the contents passed into the method into the fileWrapper property of WrappedDocument.
16 Call the delegate’s documentContentsDidChange method (it is in DetailViewController in this implementation, but it need not be if you restructure the code).
17, 18 The _document fileWrapper property is created if necessary.
19 An NSDictionary fileWrappers is created from the fileWrappers within the outer fileWrapper. File wrappers within file wrappers were explained in Chapter 14.
20, 21 If the text and location properties exist, they are placed in the appropriate internal file wrapper, as in Chapter 14
22 This override is for debugging purposes.
23 You can set a breakpoint here so that you can observe the actual save and its status. As with other cases cited in this chapter, it’s an asynchronous process, so you can’t just step through it: you have to enter it by a breakpoint on the first line that will be executed.
FileRepresentation
FileRepresentation is a lightweight object that stores a fileName and a URL for a file. You could do the same thing with NSURL, but this object allows for future customization and expansion. It was described previously in this chapter. It is shown in Listings 15.21 and 15.22.
Listing 15.21 FileRepresentation.h
#import <Foundation/Foundation.h>
@interface JFFileRepresentation : NSObject
@property (strong, nonatomic) NSString *fileName;
@property (strong, nonatomic) NSURL *fileURL;
- (id)initWithFileName: (NSString*)fileName fileURL:(NSURL*)URL;
@end
Listing 15.22 shows the implementation of FileRepresentation.
Listing 15.22 FileRepresentation.m
#import "JFFileRepresentation.h"
@implementation JFFileRepresentation
- (id)initWithFileName: (NSString*)fileName fileURL:(NSURL*)URL {
self = [super init];
if (self)
{
_fileName = fileName;
_fileURL = URL;
}
return self;
}
@end
Chapter Summary
This chapter showed you how to work with the iOS document version of the app. It built on Placid but extended it so that it can use either local or iCloud storage.
In the next chapter, you’ll find the OS X companion version of this app.
Exercises
1. Work through a string of tests related to iCloud discovery. Experiment with turning Airplane mode on and off, with signing out of iCloud, and with signing in again. In addition, experiment using the debugging switch to indicate whether or not you want iCloud. Compare the results of setting that switch with the code you write to determine whether or not iCloud should be used.
2. Test the app. If you are building on the code from Placid in Chapter 14, test to make certain that everything still works.
3. Experiment on a device as well as on the simulator. Remember that on the simulator, you have to use the Debug menu to trigger an iCloud sync.