Learning iCloud Data Management (2014)
Part IV: Using iCloud Documents and Data
16. Working with OS X Documents
This chapter looks at OS X document–based apps: that is, apps with a document that is managed as a subclass of NSDocument that you create for your specific needs. Just as with UIDocument on iOS, NSDocument takes care of a lot of overhead for you. You wind up writing just the code that differentiates your document from documents in other apps for a very efficient design and development cycle.
That said, it is important to note that although UIDocument and NSDocument have similar roles to play, they are not interchangeable. Many of the differences are due to the major contrasts in OS X, including the presence (or absence) of a menu bar and a tool such as the OS X Finder, which lets users manage files directly. In this chapter, you’ll see more information about how these differences arose and why the two document classes are not interchangeable.
You’ll then see how to set up an OS X app that uses a subclass of NSDocument. This app (codenamed Chazy—another Adirondack lake) is deliberately structured to be somewhat parallel to Loon in the previous chapter. In this way, it diverges somewhat from the structures described in the major documentation on developer.apple.com: “Document-Based App Programming Guide for Mac.” Rest assured that these differences are deliberate.
Evolution of NSDocument and UIDocument Differences
In addition to the differences between NSDocument and UIDocument that arise from the menu bar and the Finder, a less-noticed difference has to do with the evolution of what is now iOS compared to the evolution of OS X. From the beginning, most personal computer operating systems have had open file systems to which the users have access. This has been a mixed blessing because, although it is an important feature for many users, it brings with it some security and stability issues.
Mainframe systems have often been tied to databases rather than documents and user-accessible files. For large-scale systems (particularly multiuser systems), databases provide data storage tools that go far beyond what can be developed in the context of separate documents. With the advent of relational databases on mainframes in the 1970s, application designers embraced that technology and never looked back.
Thus, in the 1970s and early 1980s when personal computers and their operating systems were being developed, some developers understood that as hardware got faster and cheaper (as it always does), eventually they would move to relational databases for storage. A similar understanding took place among some developers when they realized that some of the tried-and-true operating system features they were used to on mainframes would gradually migrate to more-powerful personal computers.
Relational databases were implemented on personal computers, but their use by the operating systems did not occur nearly as quickly as some people had hoped. Perhaps more important, the document model of data storage became a critical part of the user experience. After Apple purchased NeXT and began turning NeXTSTEP/OpenStep into Rhapsody/OS X, there were some heated discussions about whether or not a document object should be added to the document class-less OpenStep. The discussions took a good deal of time, and ultimately NSDocument was born (in Rhapsody Developer Release 2 in 1998).
Part of the issue is that the Model-View-Controller (MVC) design pattern doesn’t work intuitively with a traditional personal computer document. MVC works terrifically with database-based apps. The model is the database schema (or model), the view is the view on the user’s screen, and the controller is a view controller (on iOS) or a window controller (on OS X).
When documents enter the picture, things can get a little murky. A traditional personal computer document contains aspects of the data model (the document’s data) as well as features that could be considered the domain of a controller in the MVC design pattern. You can find detailed discussions of these issues on developer.apple.com. For many people (including the author), MVC is a critically important aspect of Cocoa and Cocoa Touch. However, exactly how it maps to traditional personal computer documents is not on the critical path to developing an app or becoming a proficient Cocoa or Cocoa Touch programmer. What’s important is the apps that you design and write. The discussions about the role of documents in the App Kit took place many years ago, and the issue should be considered settled.
Settled it may be, but there is a theory that part of the reason for the difference between NSDocument and UIDocument may come about from an attempt to clarify the document structure. Certainly, from the standpoint of the MVC design pattern, it appears that when the controller is a view controller (as in iOS) rather than a more complex window controller (as in OS X), things get easier to grasp.
The only point you might want to ponder is whether building a document based on what may be an idiosyncratic structure for your app is the best way to go from the long-term standpoint of the app’s evolution. It appears that using the file wrapper structure discussed in Chapter 15, “Working with iOS Documents,” for iOS and this chapter for OS X, or using the document-based Core Data structure discussed in Chapter 17, “Working with Core Data and iCloud,” may be preferable routes to take in many cases. Nevertheless, in many cases, a subclass of UIDocumentand/or NSDocument is the best development route to take.
Planning the Project
With Xcode 5, planning and setting up the Chazy project follows the same pattern you used in Chapter 15. The biggest difference, of course, is that you start from the Cocoa Application template under OS X and Application in Xcode rather than from the Master-Detail Application template under iOS and Application. Make sure you choose the option to create a document-based application, and do not use Core Data.
The project will be created for you, and, as always when you create a project from an Xcode template, it’s a good idea to build and run it so that you know you have a good starting point. The app should open with a document, as shown in Figure 16.1.
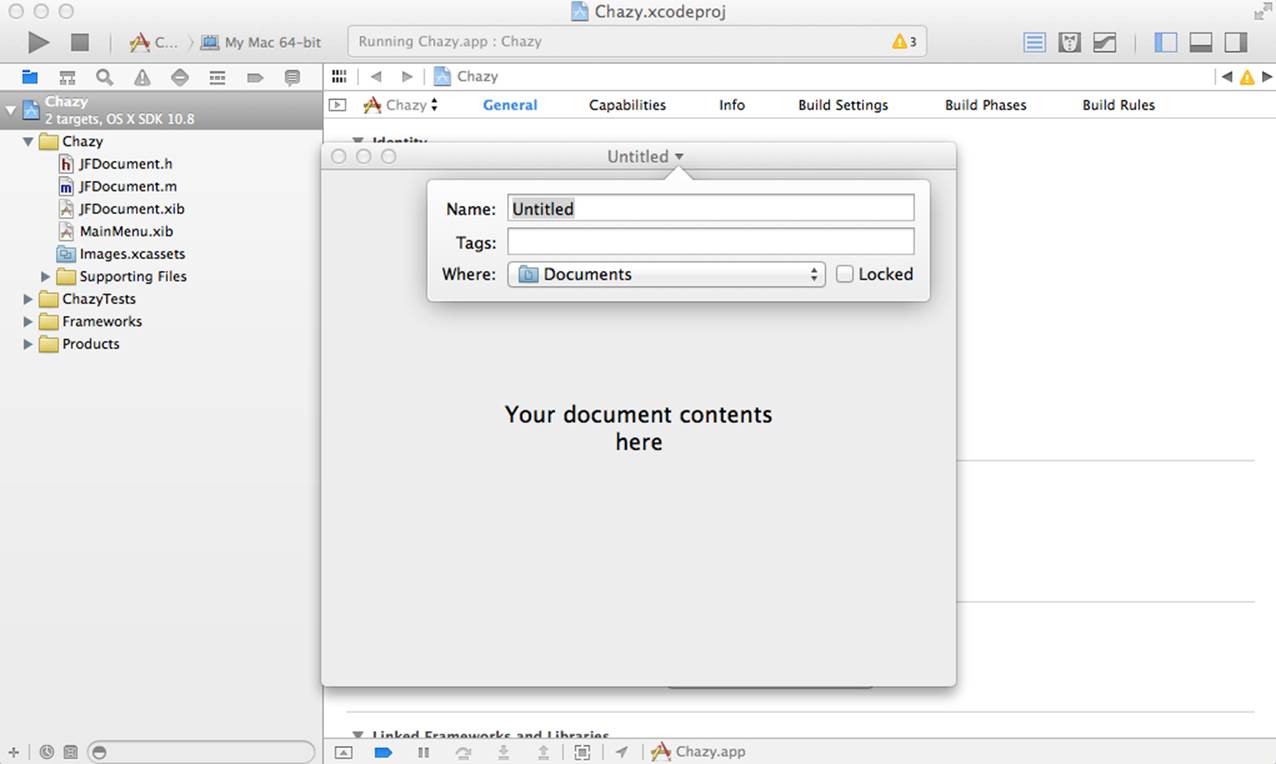
Figure 16.1 Running your new project
As you can see in Figure 16.1, by default your documents will use the OS X Auto Save feature introduced in OS X Lion (10.7) in 2011. Auto Save means less work for users as well as less work for developers. Users can skip saving their documents, and developers can skip supporting a number of user actions that are done behind the scenes by Auto Save.
The template comes with a basic menu bar that already implements basic document functionality. If you choose Open from the File menu, you can browse files locally or in iCloud, as you see in Figure 16.2. (Note that at this point, the actual opening of a document will not happen because the code in the following sections needs to be implemented. This is just a high-level overview of where you will end up by the end of this chapter.)
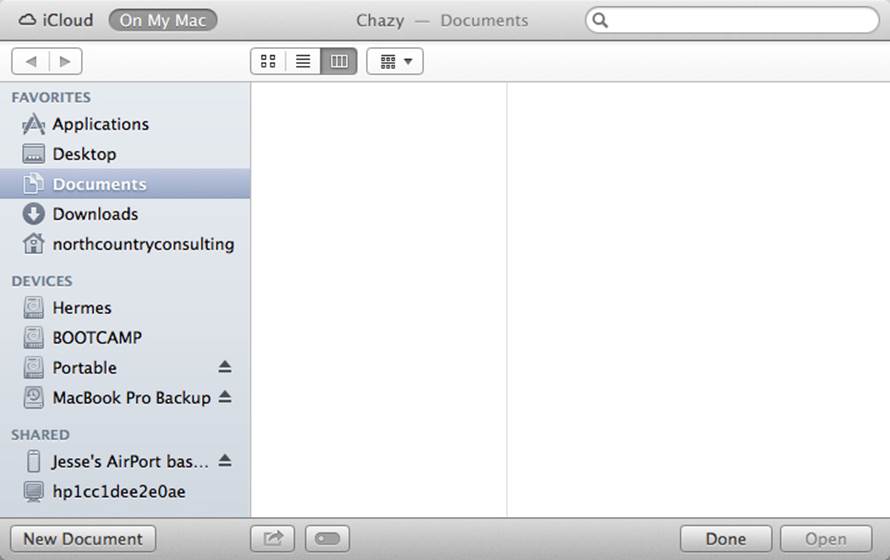
Figure 16.2 Opening files from iCloud or locally
If you choose iCloud, you will see your app’s documents in iCloud. If you don’t yet have apps in iCloud, you see the screen shown in Figure 16.3.
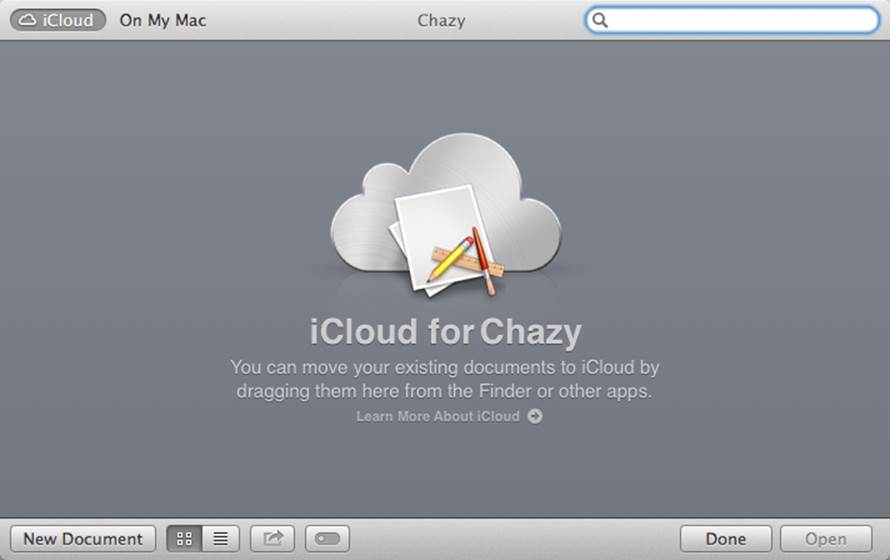
Figure 16.3 Opening a file from iCloud
As the screen says, you can drag a file into this window from the Finder. This built-in behavior is worth noting: when you release the mouse button, the file appears in the iCloud window, and it also is removed from the local disk. This is different from the behavior of copying a file to another disk where the file is copied and remains on both the original disk and the disk to which it was copied.
Starting the Chazy Project
Once you have verified that your new project runs, you can begin to make it ready to run much as you did with Loon in Chapter 15. The biggest difference is that Loon is an iOS app that uses storyboards. They’re not available on OS X, so you work with nib files. Other than that, the process is much the same, so it’s summarized here.
There are two primary tasks to get started. First, you can make the template Document class look a bit like the one in Loon. Then, you may need to add an app delegate if it is not in your template.
Setting Up the App in Xcode
The process of setting up the app in Xcode is similar to the processes you’ve been through for Placid and Loon; it is summarized here.
Select the target in the Project navigator and verify that its name and bundle ID are what you want them to be. You can change them later, but it is easiest to start with them correctly set, as you see in Figure 16.4.
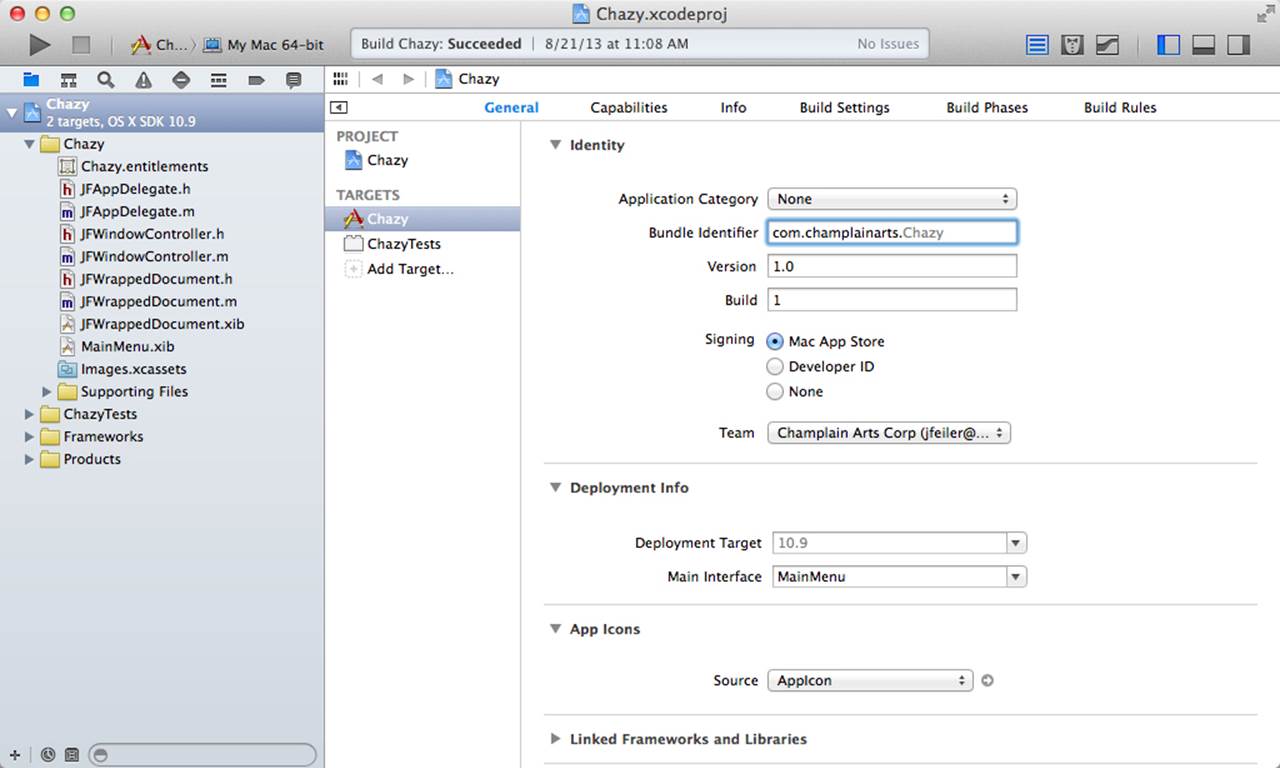
Figure 16.4 Set up the target.
Turn on iCloud in the Capabilities tab, as shown in Figure 16.5. By default, your ubiquity container will be named with your project name—Chazy if you have followed the steps in this section. If you have created Loon in Chapter 15, “Working with iOS Documents,” you may want to change the ubiquity container name in Capabilities to use Loon rather than Chazy. This means that when you first launch Chazy, you’ll be able to see and update the documents you created in Chapter 15. (It’s sort of a sneak preview of the Round Trip.)
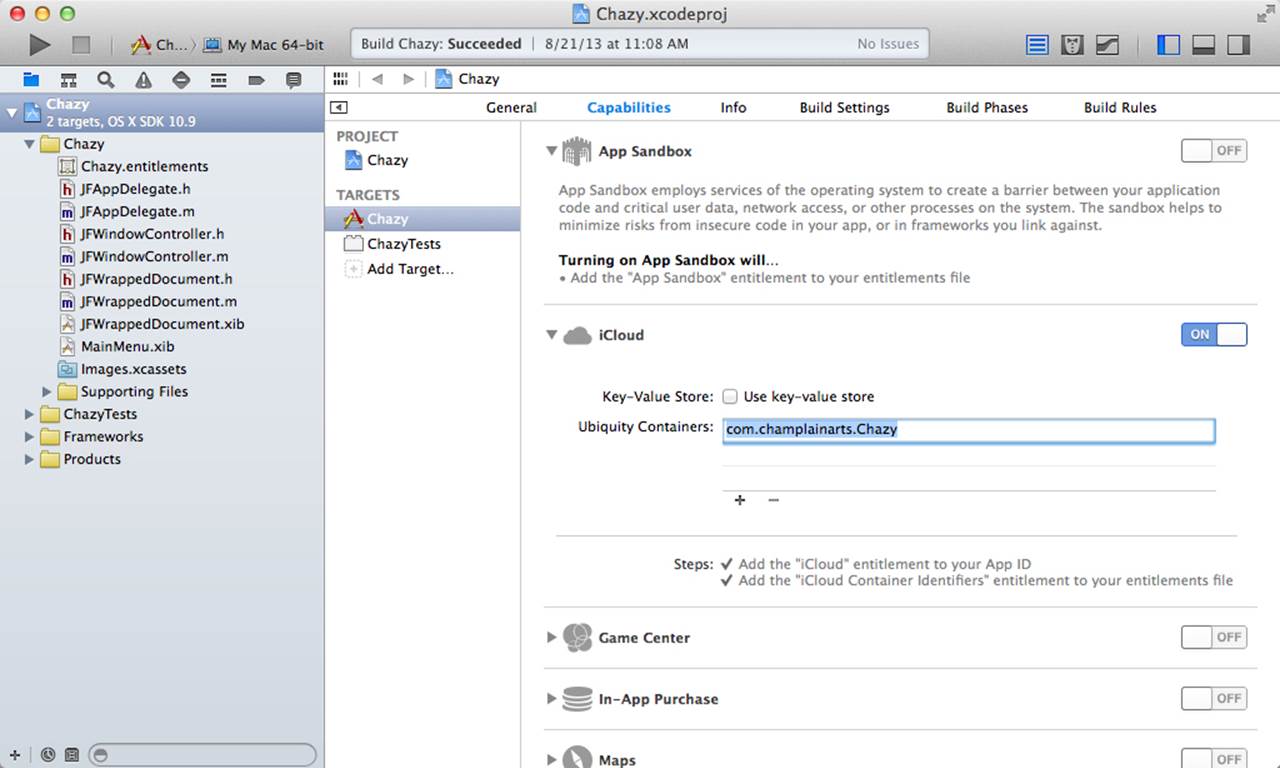
Figure 16.5 Turning on iCloud
Changing Document to WrappedDocument
In Loon, you worked with a new WrappedDocument class rather than a UIDocument. Although you could work directly with NSDocument in Chazy, the code will be easier to compare to Loon if you create WrappedDocument in Chazy. The process is the same except that you’re working with a nib file in OS X rather than with a storyboard.
1. Open Document.h (it may have a prefix if you specified one when you created the project).
2. Highlight Document in the @interface section and choose Edit, Factor, Rename. Rename it to be WrappedDocument and use the option to rename the associated files.
3. Delete the text field from the view in the window in WrappedDocument.xib. It has “Your document contents here” as a placeholder.
4. Add a new text field to the view.
5. If necessary, add a class extension at the top of WrappedDocument.m. (It may or may not be there as part of the template.)
6. Control-drag from the text field to the class extension to create a new NSTextField property, as shown in Figure 16.6. Name it fieldDescription.
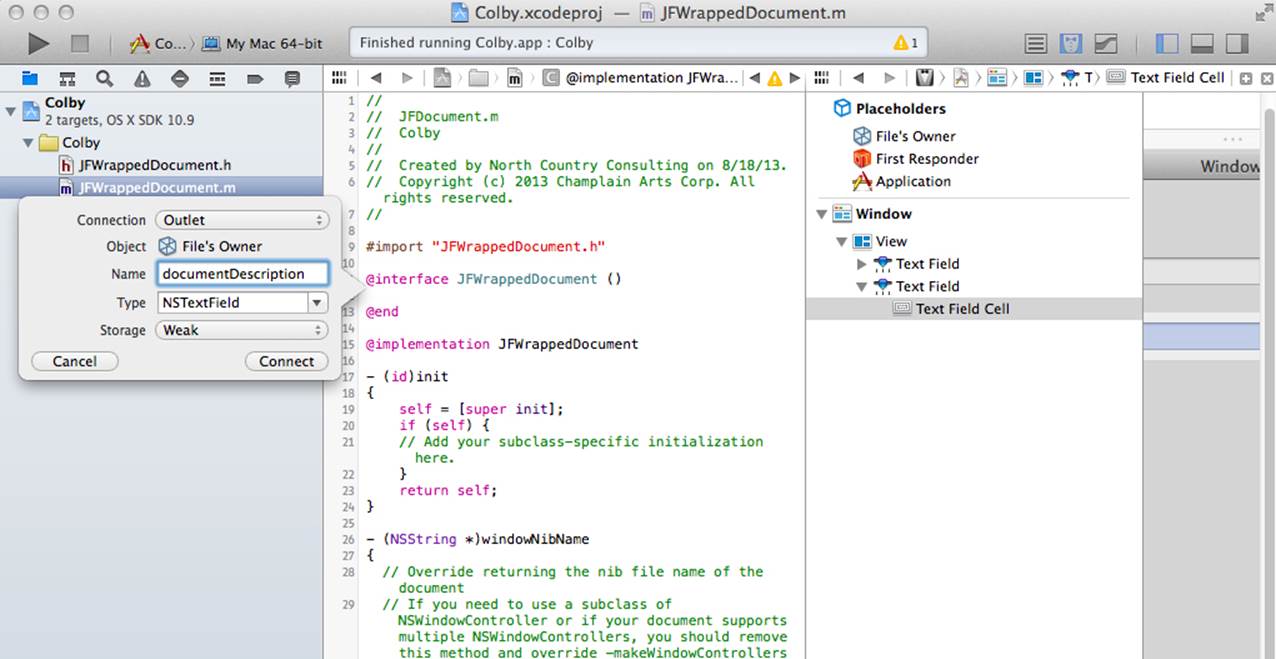
Figure 16.6 Creating a property from the text field in the nib file
7. Repeat steps 3, 4, and 5 for a fieldLocation field.
8. These are the properties for the fields in the interface. Create fields for the data as well: name them fieldDescription and fieldLocation.
Listing 16.1 shows the code in WrappedDocument.m at this point.
Listing 16.1 WrappedDocument.m Class Extension
#import "JFWrappedDocument.h"
#import "JFWindowController.h"
@interface JFWrappedDocument ()
@property (strong, nonatomic) NSFileWrapper *wrapperDescription;
@property (strong, nonatomic) NSFileWrapper *wrapperLocation;
@property (strong, nonatomic) NSString *fwDescription;
@property (strong, nonatomic) NSString *fwLocation;
@end
@implementation JFWrappedDocument
Confirm that the code runs, and then you’ll be ready to write the rest of the code.
Adding an App Delegate (If Necessary)
Review the code you have created to see if it has an app delegate. In recent versions of Xcode, the basic template does not always have an app delegate. It’s very easy to add it once you know how to do so. The key is to create an AppDelegate class that conforms to theNSApplicationDelegate protocol. Add it to main.xib and attach it to the delegate for the application itself.
Many developers make it a routine matter to have an app delegate. In the context of iCloud-enabled apps, it can be important because it gives you a place to initiate iCloud functionality during the app’s launch process.
Here’s how to add the app delegate:
1. To add the new class, choose New, File or command-click on the project in the project navigator and choose Add File.
2. Name the class AppDelegate. This is actually not required: you can name it anything you want, but it’s easiest to use this name because it’s often what people look for.
3. Make the class a subclass of NSObject.
4. Choose the appropriate location for the file (the default location is usually best) and create the class.
5. In the AppDelegate.h file, make it conform to the NSApplicationDelegate protocol, as you see here:
@interface JFAppDelegate : NSObject <NSApplicationDelegate>
6. In MainMenu, drag a blue Object from the library into the document outline, as you see in Figure 16.7.
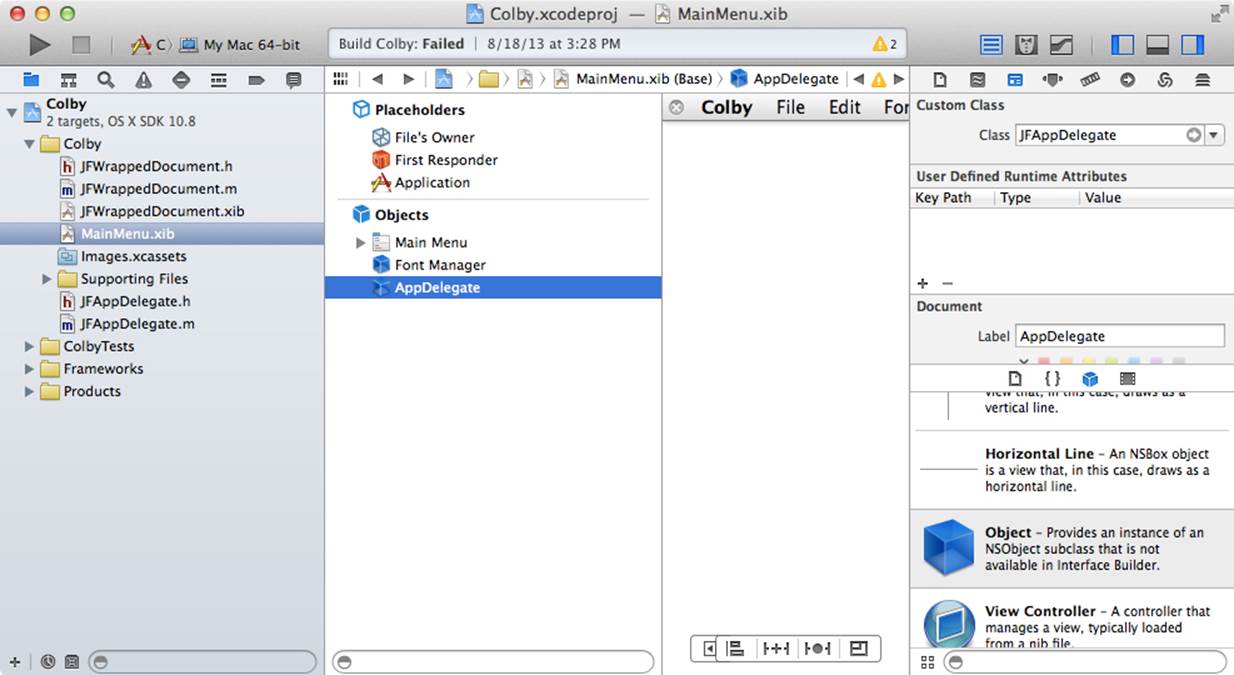
Figure 16.7 Connecting the new AppDelegate object to File’s Owner
7. With the new object selected, set its class to AppDelegate in the Identity inspector.
8. Finally, control-drag from File’s Owner to the new object and connect it as the delegate; this is also shown in Figure 16.7. Because File’s Owner is the application itself (NSApplication), the delegate—your new AppDelegate object—will be loaded when the app launches. This is how you add nonvisual objects to your app in Interface Builder.
Implement applicationWillFinishLaunching: in AppDelegate.m. It will follow the class extension at the top of Listing 16.1. Note that it is comparable in some ways to applicationDidFinishLaunchingWithOptions: in iOS. Its signature is different, and this method is called just before the end of the launch process and before any documents are opened. This might be important for iCloud integration. If you want, you can set a breakpoint in the method to verify that it is being called. Note that this message is part of the AppDelegate protocol, so you are not subclassing anything and you do not call super. This code is shown in Listing 16.2.
Listing 16.2 Creating the AppDelegate Class
@implementation JFAppDelegate
- (void)applicationWillFinishLaunching:(NSNotification*) notification
{
}
@end
For now, this code is a placeholder. If you want to run your app and set a breakpoint in this method, you’ll be able to verify that your app runs and loads the app delegate.
With these two structural additions, you’re ready to start writing code.
Writing the Code
The code for the OS X app is a bit simpler than the code for the iOS app. In part, that is because the discovery and opening of files on OS X is managed by the NSDocument class rather than the app that you write. In addition, the split view controller, which is so useful on iOS, has no parallel on OS X. Of course, nothing would prevent you from constructing such an interface, but in an environment where multiple windows can easily be created, a split view controller is of less use than it is on iOS. You have three basic files to work with on OS X:
![]() AppDelegate
AppDelegate
![]() WrappedDocument
WrappedDocument
![]() WindowController (rather than a detail view controller on iOS)
WindowController (rather than a detail view controller on iOS)
You’re a bit ahead of the game already because the app delegate has been created in Listings 16.1 and 16.2 to show you how the nib file can be used to link a class to a delegate or other property. Remember that storyboards are the preferred way of managing views and view controllers on iOS, but they don’t exist on OS X, so you’ll need to use nib/xib files on OS X.
WrappedDocument
As is the case with Loon, there are two data elements in the app—the location and description of whatever it is the user is interested in. WrappedDocument is a subclass of NSDocument. It is designed to be used with file wrappers, but it encapsulates that functionality so that nothing about file wrappers or the implementation of the data structure is visible.
The model consists of the location and description of data elements. They are defined as properties in WrappedDocument.h: documentDescription and documentLocation. Listing 16.3 shows the header file at this time.
Listing 16.3 WrappedDocument.h
#import <Cocoa/Cocoa.h>
#import "JFWindowController.h"
@interface JFWrappedDocument : NSDocument
@property (strong, nonatomic) NSString *documentDescription; //1
@property (strong, nonatomic) NSString *documentLocation;
@property (weak, nonatomic) JFWindowController *windowController;
@end
1 documentDescription and documentLocation are properties that are exposed to all users of the class. As you will see, they have no direct backing variables in WrappedDocument.m.
The class extension inside WrappedDocument.m declares the basic file wrapper—documentFileWrapper. Also inside the class extension, fwDescription and fwLocation are declared as NSString properties. Thus, within documentFileWrapper, you have thewrapperDescription and wrapperLocation file wrappers, and, as noted, each has a string inside it—fwDescription and fwLocation.
All of this is hidden inside the class extension in WrappedDocument.m as you can see in Listing 16.4.
Listing 16.4 WrappedDocument Class Extension
#import "JFWrappedDocument.h"
#import "JFWindowController.h"
@interface JFWrappedDocument ()
@property (strong, nonatomic) NSFileWrapper *documentFileWrapper;
@property (strong, nonatomic) NSFileWrapper *wrapperDescription;
@property (strong, nonatomic) NSFileWrapper *wrapperLocation;
@property (strong, nonatomic) NSString *fwDescription;
@property (strong, nonatomic) NSString *fwLocation;
@end
@implementation JFWrappedDocument
The first section of WrappedDocument.m contains initialization and management code, as shown in Listing 16.5. You will note several template methods that are provided as shells that you can implement later on.
Listing 16.5 WrappedDocument.m Initialization
@implementation JFWrappedDocument
NSString *UbiquityDirectoryComponentForDocuments = @"Documents"; //1
NSString *descriptionFileName = @"Description.txt"; //2
NSString *locationFileName = @"Location.txt";
NSStringEncoding kTextFileEncoding = NSUTF8StringEncoding; //3
#pragma mark - initialization
- (id)init
{
self = [super init];
if (self) {
// Add your subclass-specific initialization here.
}
return self;
}
/*
- (NSString *)windowNibName //4
{
// Override returning the nib file name of the document
// If you need to use a subclass of NSWindowController or if your document
// supports multiple NSWindowControllers, you should remove this method
// and override - makeWindowControllers instead.
}
*/
- (void)windowControllerDidLoadNib:(NSWindowController *)aController
{
[super windowControllerDidLoadNib:aController];
// Add any code here that needs to be executed once the windowController
// has loaded the document's window.
}
+ (BOOL)autosavesInPlace //5
{
return YES;
}
1 You always set your directory in iCloud. Documents is standard and can be seen by users if you set Application Supports iTunes File Sharing in the Info tab of the target.
2 These file names identify the files within the internal file wrappers that are inside documentFileWrapper.
3 This is the text encoding for the string content.
4 This is not needed, so it has been commented out. We are using a custom view controller, which will be shown in Listing 16.6.
5 autoSavesInPlace must be set to YES to get the behavior that will autosave and move the document to iCloud.
The next section of the code manages windows for WrappedDocument. Because you are overriding NSWindowController with a custom controller, you need to add it to the document, as shown in Listing 16.6.
Listing 16.6 Managing Windows for WrappedDocument
#pragma mark - windows
- (void)makeWindowControllers { //6
JFWindowController *myController;
myController = [[JFWindowController alloc] init];
[self addWindowController: myController];
[myController setDocument: self];
self.windowController = myController;
}
- (void)showWindows { //7
[super showWindows];
[self.windowController documentContentsDidChange:self];
}
6 Instantiate the custom window controller and add it to the document.
7 Override showWindows to call the documentContentsDidChange method of the window controller for this app.
When it comes to reading and writing, the code is also similar to Loon, as you can see in Listing 16.7. There are several stubbed methods in the template that you can remove: you need the readFromFileWrapper:ofType:error: and fileWrapperOfType:error: methods.
The code for reading relies on lazy loading, which is used frequently in Cocoa and Cocoa Touch. The initial read operation is as fast as possible; details are read only on an as-needed basis. (If this reminds you of faulting in Core Data, you’re right: it’s the same basic idea.) As you can see in Listing 16.7, the document file wrapper is passed into that method and dumped into a property without being analyzed. See Listing 16.8 later in this chapter for the accessors that decode it as needed.
As in Loon, you don’t worry about writing. What you do is create the file wrapper for the document that includes the internal file wrappers and the data. Your method is called as needed, and Cocoa takes care of the actual writing.
Listing 16.7 Reading and Writing
#pragma mark - read/write
- (BOOL)readFromFileWrapper: (NSFileWrapper *)fileWrapper //8
ofType: (NSString *)typeName
error: (NSError **)outError
{
self.documentFileWrapper = fileWrapper; //9
return YES;
}
- (NSFileWrapper *)fileWrapperOfType: (NSString *)typeName
error:(NSError **)outError {
if (self.documentFileWrapper == nil) //10
{
self.documentFileWrapper = [[NSFileWrapper alloc]
initDirectoryWithFileWrappers:nil]; //11
}
NSDictionary *fileWrappers = [self.documentFileWrapper fileWrappers]; //12
if (self.documentDescription != nil) //13
NSData *descriptionData = [self.documentDescription
dataUsingEncoding: kTextFileEncoding];
NSFileWrapper *descriptionFileWrapper =
[fileWrappers objectForKey:descriptionFileName];
if (descriptionFileWrapper != nil) {
[self.documentFileWrapper removeFileWrapper: textFileWrapper];
}
descriptionFileWrapper = [[NSFileWrapper alloc]
initRegularFileWithContents:descriptionData];
[descriptionFileWrapper setPreferredFilename: descriptionFileName];
[self.documentFileWrapper addFileWrapper: textFileWrapper];
}
if ( self.documentLocation != nil) //14
{
NSData *locationData = [self.documentLocation
dataUsingEncoding: kTextFileEncoding];
NSFileWrapper *locationFileWrapper = [fileWrappers
objectForKey:locationFileName];
if (locationFileWrapper != nil) {
[self.documentFileWrapper removeFileWrapper: locationFileWrapper];
}
locationFileWrapper = [[NSFileWrapper alloc]
initRegularFileWithContents:locationData];
[locationFileWrapper setPreferredFilename: locationFileName];
[self.documentFileWrapper addFileWrapper: locationFileWrapper];
}
return self.documentFileWrapper; //15
}
8 This is the lazy loading read method.
9 In other examples, this property is called contents.
10 Check to see if you already have self.documentFileWrapper.
11 If you don’t have self.documentFileWrapper, create it.
12 Extract the internal file wrappers from self.documentFileWrapper and save them in a dictionary.
13 Check for documentDescription in the document (see the accessors later in Listing 16.8). If you have it, encode the data, remove the existing textFileWrapper, and then create and add a new one.
14 Repeat line 13 for documentLocation.
15 Return self.documentFileWrapper.
The final section of the file implements the accessors—the other end of lazy loading. In many cases, a declared property is backed by an instance variable. By default, for a property called myProperty, the instance variable that Xcode creates will be _myProperty. Default accessors called myProperty and setMyProperty are created for you. (You’ll find this out if you accidentally forget this fact and declare your own setMyProperty accessor without realizing that it will be invoked automatically. That is why you often will find methods with names likesetMyPropertyForXYZ: that are not going to be confused with custom accessors.)
In Listing 16.7, you saw that the document file wrapper is just passed to a WrappedDocument property without being parsed. Within WrappedDocument, you’ll find fwDescription and fwLocation properties. In a roundabout way, those are the backing variables for the publicWrappedDocument properties documentDescription and documentLocation.
When you set a value with setDocumentLocation: or setDocumentDescription:, _fwLocation or _fwDescription needs to be set and the undo mechanism needs to be set up to reverse that process if necessary. The appropriate getters must check to see if_fwLocation or _fwDescription exists. If it does, it is returned. If it does not exist, the document file wrapper is unpacked, the local variables are set, and the appropriate value is returned. Listing 16.8 shows the accessors.
Listing 16.8 Accessors
#pragma mark - accessors
-(void)setDocumentDescription: (NSString*)newText { //16
if (newText != _fwDescription )
{
NSString *oldText = _fwDescription;
_fwDescription = newText;
//register undo and cause autosave
[self.undoManager setActionName: @"Text Change"];
[self.undoManager
registerUndoWithTarget: self
selector: @selector(setDocumentDescription:)
object: oldText];
}
}
-(void)setDocumentLocation: (NSString*)newLocation { //17
if (newLocation != _fwLocation)
{
NSString *oldLocation = _fwLocation;
_fwLocation = newLocation;
[self.undoManager setActionName: @"Location Change"];
[self.undoManager
registerUndoWithTarget: self
selector: @selector(setDocumentLocation:)
object: oldLocation];
}
}
-(NSString*)documentDescription { //18
if (_fwDescription)
return _fwDescription;
NSDictionary *fileWrappers = [_documentFileWrapper fileWrappers]; //19
if (!_wrapperDescription) {
_wrapperDescription = [fileWrappers
objectForKey: descriptionFileName]; //20
}
if (_wrapperDescription != nil)
{
NSData *descriptionData = [_wrapperDescription regularFileContents]; //21
_fwDescription = [[NSString alloc] initWithData:descriptionData
encoding:kTextFileEncoding]; //22
} else {
// handle error
}
return _fwDescription;
}
-(NSString*)documentLocation { //23
if (_fwLocation)
return _fwLocation;
NSDictionary *fileWrappers = [_documentFileWrapper fileWrappers];
if (!_wrapperLocation) {
_wrapperLocation = [fileWrappers objectForKey: locationFileName];
}
if (_wrapperLocation != nil)
{
NSData *locationData = [_wrapperLocation regularFileContents];
_fwLocation = [[NSString alloc] initWithData:locationData
encoding:kTextFileEncoding];
} else {
// handle error
}
return _fwLocation;
}
@end
16, 17 Custom setters set the internal property and set up undo.
18, 23 Custom getters return the appropriate local property if it exists.
19 If the property doesn’t exist, create a local dictionary of the file wrappers inside the document file wrapper.
20 If there isn’t a wrapper for the description file, create it.
21 Encode the data.
22 Store the encoded data in the _fwDescription property.
23 Repeat lines 18 to 22 for location.
WindowController
The WindowController subclass lets you manage redrawing of the user interface when the text fields change. There are several other ways of accomplishing it, but this method is used because it is reasonably comparable to the structure of the iOS document. Listing 16.9 shows the interface file.
Listing 16.9 WindowController.h
#import <Cocoa/Cocoa.h>
@class JFWrappedDocument;
@interface JFWindowController : NSWindowController <NSTextFieldDelegate> //1
@property (weak, nonatomic) IBOutlet NSTextField *fieldDescription;
@property (weak, nonatomic) IBOutlet NSTextField *fieldLocation;
- (void)documentContentsDidChange: (JFWrappedDocument *)document; //2
@end
1 The class adopts the NSTextFieldDelegate protocol.
2 documentContentsDidChange: must be exposed so that it can be referenced by a notification.
Listing 16.10 shows you the code for the window controller.
Listing 16.10 WindowController.m
#import "JFWindowController.h"
#import "JFWrappedDocument.h"
@interface JFWindowController () //1
@end
@implementation JFWindowController
- (void)setDocument: (NSDocument *)document { //2
[super setDocument:document];
}
- (id)init {
self = [super initWithWindowNibName:@"JFWrappedDocument"]; //3
if (self) {
// Initialization code here.
}
return self;
}
- (void)windowDidLoad //4
{
[super windowDidLoad];
// Implement this method to handle any initialization after your window
// controller's window has been loaded from its nib file.
}
#pragma mark - moving to/from UI
- (void)documentContentsDidChange: (JFWrappedDocument *)document { //5
[self.fieldDescription setStringValue: document.documentDescription];
[self.fieldLocation setStringValue: document.documentLocation];
}
- (void)UIContentsDidChange: (JFWrappedDocument *)document { //6
document.documentDescription = [_fieldDescription stringValue];
document.documentLocation = [_fieldLocation stringValue];
}
#pragma mark - Notifications
- (void)controlTextDidEndEditing:(NSNotification *)aNotification //7
{
NSTextField *textField = [aNotification object];
if (_fieldDescription == textField) {
((JFWrappedDocument *)self.document).documentDescription =
[textField stringValue];
} else if (_fieldDescription == textField) {
((JFWrappedDocument *)self.document).documentLocation =
[textField stringValue];
}
// should check if changed
[self UIContentsDidChange: self.document];
}
@end
1 The class extension may be part of the template, or you may create it. It’s empty here, so not needed, but many developers automatically create the class extension because it is frequently needed later on.
2 This method simply calls super, so it is not needed. However, it is a good place to set a debugging breakpoint to examine the state of the variables.
3 To use a custom window controller, override init and pass the controller class name as shown here.
4 You need not implement this method, but it, too, is often useful as development proceeds.
5, 6 These methods move data from the document to the UI fields, and vice versa.
7 Because this class implements the NSTextFieldDelegate protocol, you can set it as the delegate for your text fields in the nib file. Then register to receive the notification.
Testing the App
The app should now run. With the default Xcode 5 settings, the iCloud report is now visible in the Debug navigator, as you can see in Figure 16.8.
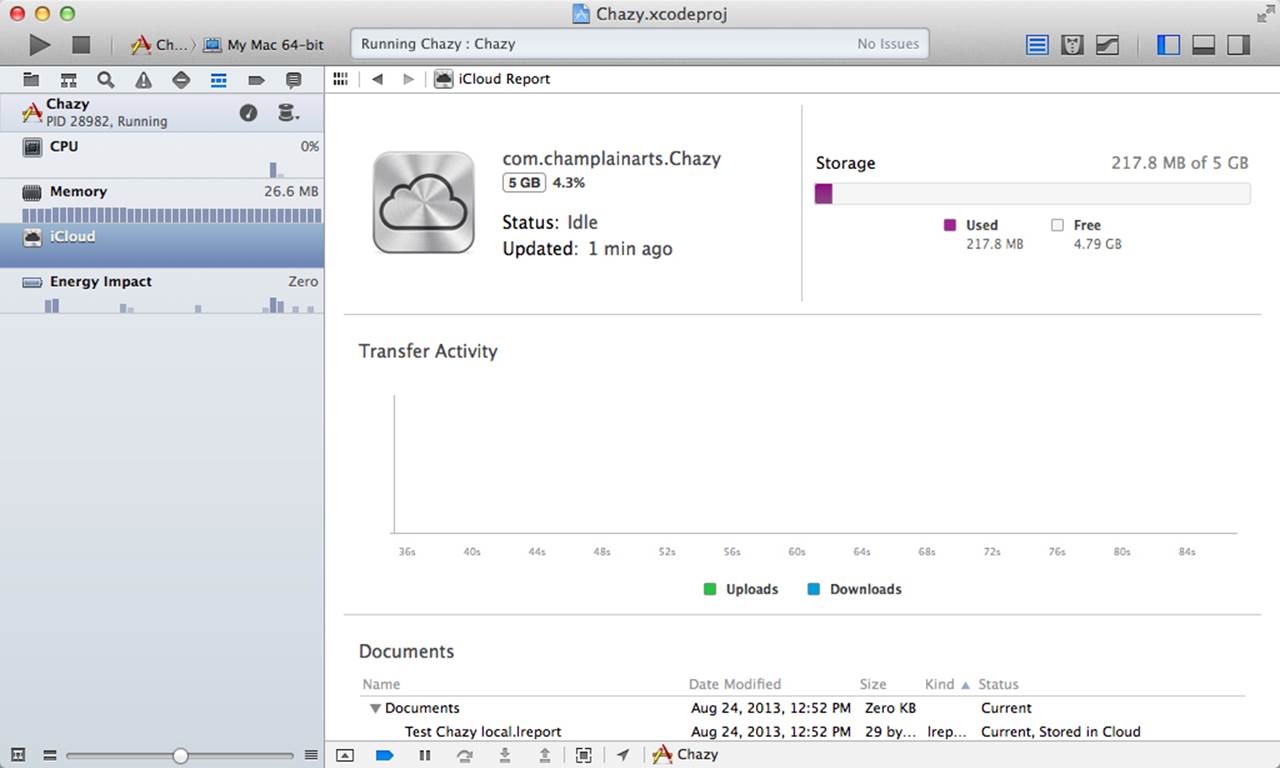
Figure 16.8 Using the iCloud report
You can track the usage of iCloud both in System Preferences and in the iCloud report (only System Preferences is available to users).
Chapter Summary
This chapter completed the sequence that began with Chapter 14, where you worked with an iCloud file wrapper, and continued in Chapter 15, where you worked with an iCloud file wrapper in an iOS document that could be stored either in iCloud or locally. Now you have the final combination: an OS X document.
If you compare the chapters, you’ll see that the closer you get to the heart of the document, the more similar the chapters are. The differences are in the user interface and the environment in which the document lives.
Exercises
1. This chapter and its code are significantly shorter than Chapter 15, which does the same thing on iOS. What are the differences in code and capabilities that account for this difference?
2. Use the structure of this chapter to store a more complex wrapped document. You might start by including an image wrapped in a file wrapper.
3. Continue to use a more complex file wrapper. Use a file wrapper that contains the following wrapped files:
![]() A wrapper for an image.
A wrapper for an image.
![]() A wrapper for three text fields.
A wrapper for three text fields.
![]() A wrapper for a custom object that you create. (Remember that the object must be able to be serialized to NSData and back again.)
A wrapper for a custom object that you create. (Remember that the object must be able to be serialized to NSData and back again.)