Learning iCloud Data Management (2014)
Part I: Introducing iCloud
1. Exploring iCloud and Its User Experience
As is the case with many of Apple’s technologies, iCloud just works: users don’t have to do much of anything to take advantage of its features. As a user, the main thing that you have to do is leave some of your old habits and preconceptions at the door because iCloud can make your life easier and much more productive.
As a developer, things are a bit different. There’s a saying that “all the tedious work can make for one inspired moment” (it’s attributed to various people). Behind the scenes, you do have some work to do so that users can use iCloud easily—it just works after you’ve done your work. This book helps you understand iCloud from the developer’s point of view; it shows you what you can do with iCloud and how to do it. In fact, you’ll see several different ways of using iCloud, and you’ll learn how to pick and choose among them for your various projects.
This chapter is different from the others in the book because it introduces you to iCloud from the user’s point of view. You may be using iCloud now in “it just works” mode, but in this chapter you start to explore details of iCloud that most users never think about. It is these details that you’ll be working with as a developer.
Looking at Cloud Computing
The exact origin and first use of the term cloud computing is unclear (you can find some history in Wikipedia). Basically, the term seems to have arisen as people sketched diagrams of systems that incorporated various computers and storage facilities. It was simple to identify a specific computer by name or a given disk drive by its code. Some diagrams dating back to the 1980s were quite fanciful, as designers used metaphors for the components of systems. (I worked on one rather complex system that incorporated computers in various locations as well as several data transfer processes that were identified as bridges and tunnels.) Sometimes, data storage as well as processing was identified as happening in a cloud—a remote and opaque location about which the designers did not have to worry because it was under the control of other people who worried about issues such as backups, redundancy, and even the licensing of shared software.
The availability of reliable high-speed Internet connections made cloud computing available to vast numbers of people in the early years of the 21st century. Without these speedy connections, storing data or using processing resources in the cloud carried significant performance degradation costs, and cloud computing was used primarily by organizations that had their own high-speed networks. With these high-speed connections widely available, the benefits of cloud computing became widely available. The economies of scale that are available with such shared resources dramatically brought down the costs of processing and storage so that users could use remote storage in the same way that they used an external disk drive that sat next to their computer.
Figure 1.1 shows a desktop environment in the Finder on a Mac. In the Devices section, you see various devices (they happen to be disks in Figure 1.1, but they also could include other computers). Whether these connections are over a wireless network or across the Internet, the same basic structure applies: these devices that are connected over the network (rather than with a local cable) can function very much as if they were wired into the Mac, and you can access their files directly. Below that, in the Shared section of the sidebar, you see a disk that is shared over the network rather than being directly connected to the Mac. (In fact, it’s directly connected to an AirPort Express and is shared over the Internet using an Apple ID.)
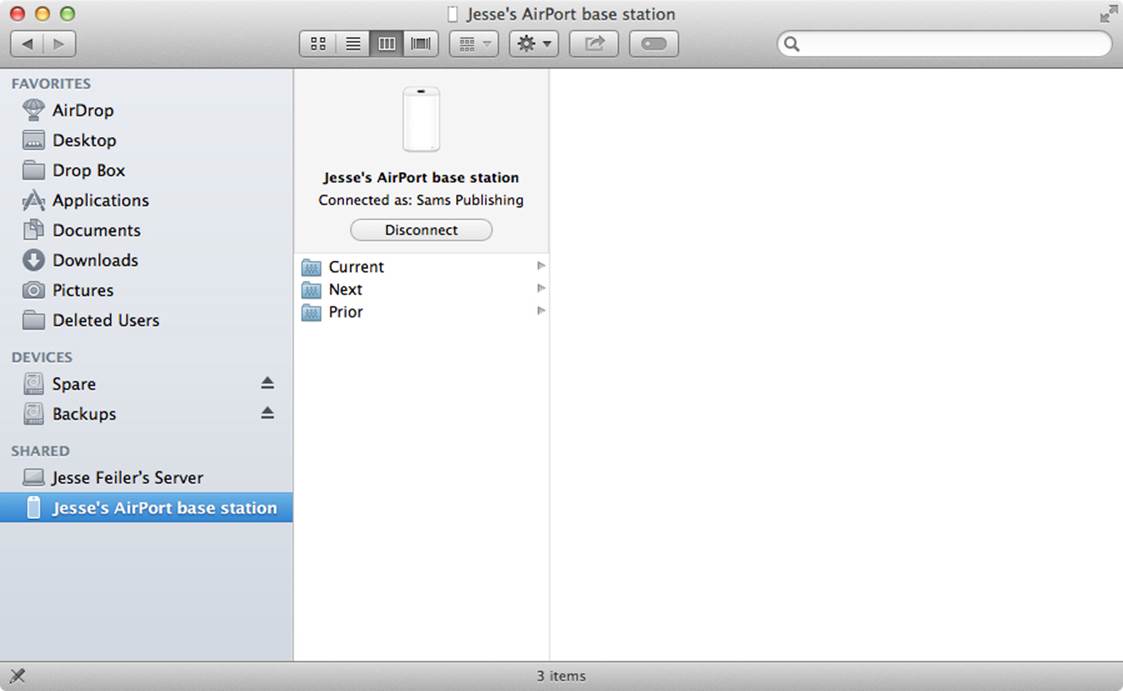
Figure 1.1 Using local and remote devices for storage
As you can see in Figure 1.1, the Finder provides a way to manage files across various devices. You can rename them, move them, and generally do anything you want with those files. If the files are located on a shared server, you may not have to worry about backing them up. If you have set up Time Machine backup, you don’t have to worry about backing them up provided that, periodically, you check to make certain that your backups are running properly.
If you are even a moderately sophisticated computer user, you know all this. It may have taken you a while to get used to the various adventures involved in using files on internal disk drives, external disk drives, shared servers, and in the cloud, but you have learned it.
Congratulations: you’re a power user who can manage your files no matter where they happen to be.
And now, it’s time to forget all that. As generally used, the term cloud computing means putting some of your resources (both data and processing resources) in a network-accessible location. The way in which you work with those resources is basically unchanged. In fact, that’s a big part of cloud computing: you don’t care where those resources are because everything works as if it were local. (You can turn this around and suggest that you don’t care where the resources are because everything behaves as if it were in the cloud.)
iCloud uses cloud technology to implement a new paradigm of resource management. It is important to realize that iCloud is not a synonym for cloud computing: it uses cloud computing to implement this new paradigm.
Understanding the iCloud Paradigm
The iCloud paradigm doesn’t focus on where documents are located—either the disk or the folder within the disk. Instead, iCloud focuses on what app manages the document. As you will see in this section, this has a number of advantages, not the least of which is the capability of implementing sandboxing, which increases overall operating system and stability.
In addition, sandboxing can be handled automatically by the operating system: it organizes files by the apps that manage them. As you will see, iCloud is able to manage documents that are shared by several apps; however, on the way to taking full advantage of iCloud, you may have to change a few organizational tasks you have learned over the years with the Finder. The change basically consists of not bothering with your own organization of documents, folders, and disks.
Organizing Files by App
The Finder, shown in Figure 1.1, lets you manage files, folders, and devices in one place. Now take a look at Figure 1.2, which shows you iCloud and its new paradigm.
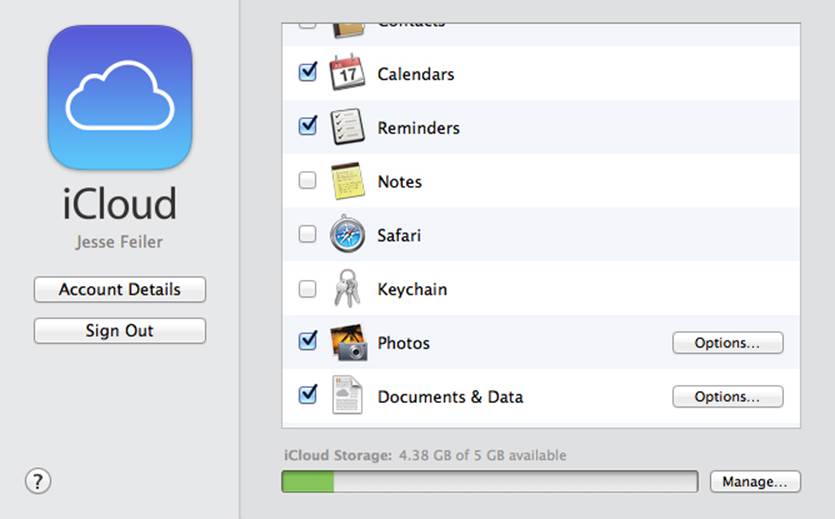
Figure 1.2 Storing documents by app in iCloud
No longer are you concerned with where documents are: instead, you are concerned with what they are and what app can manage them.
What makes this so powerful and important is that when you have iCloud enabled on your various devices, the documents in iCloud are automatically available on each device. Figure 1.3 shows Pages documents as shown in Pages running on a Mac.
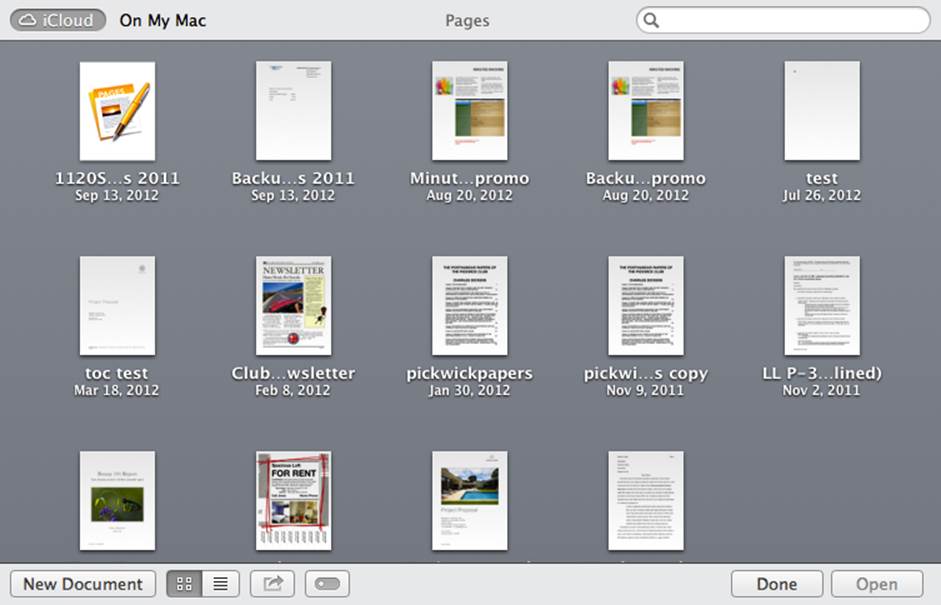
Figure 1.3 Viewing iCloud Pages documents on your Mac
Figure 1.4 shows the same documents in Pages on an iPad.
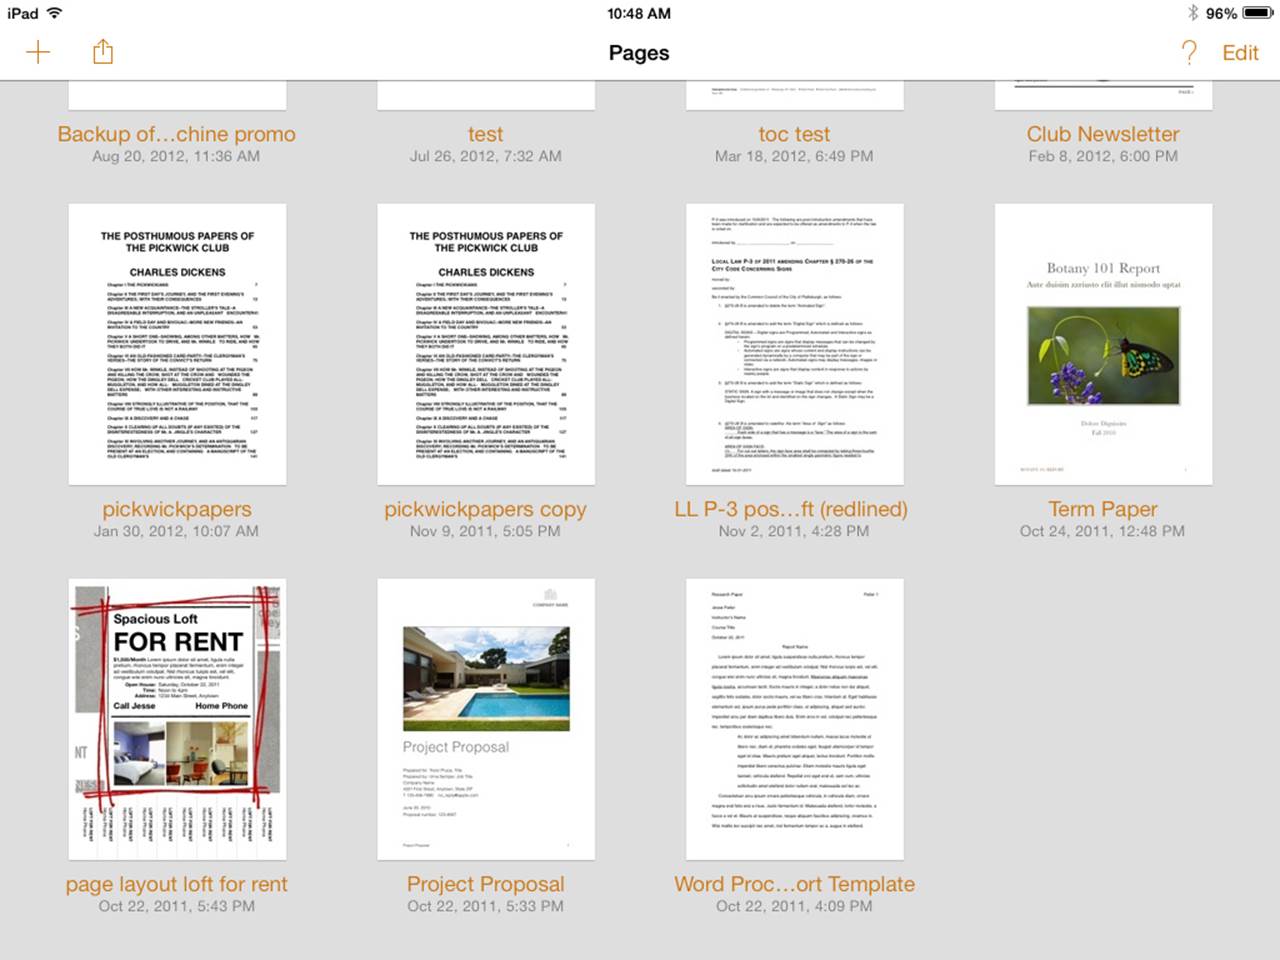
Figure 1.4 Viewing iCloud Pages documents on your iPad
Figures 1.3 and 1.4 are very similar, but there’s an important difference in the top left corner. In Figure 1.3, you can choose between storing documents in iCloud or on your Mac. If you choose to store documents on your Mac, you use the same interface you’re used to: the interface shown in Figure 1.1.
You can also manage the documents for each iCloud-enabled app from iCloud in System Preferences on your Mac, as shown in Figure 1.5. Click Manage in the bottom right of the screen to open this view of your apps and documents in iCloud.
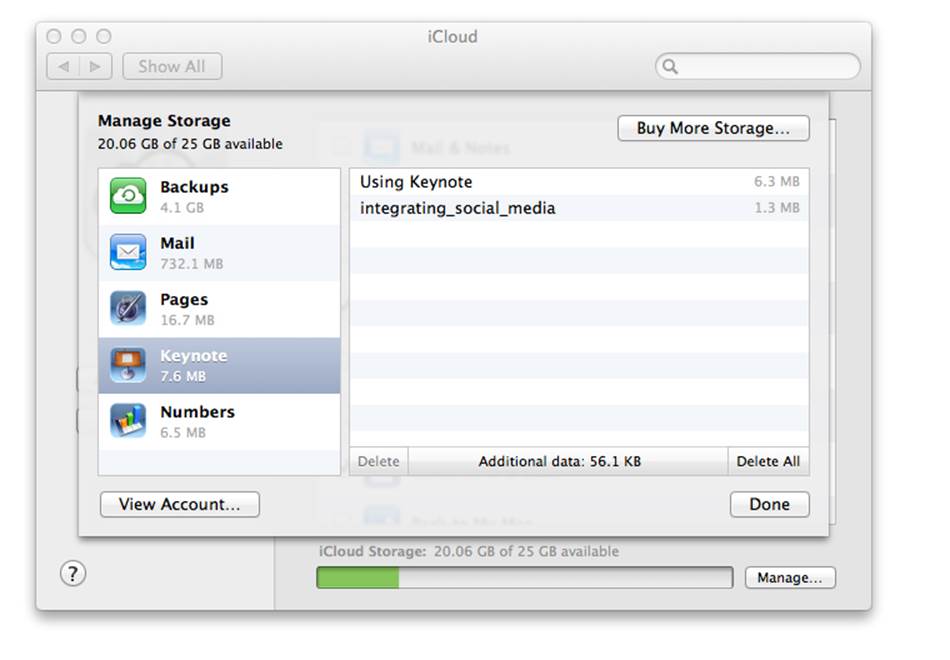
Figure 1.5 Viewing iCloud Keynote documents on your Mac using iCloud in System Preferences
The advantage of using iCloud is that you don’t have to do anything other than click that iCloud button in the upper left of the Mac version of Pages: iCloud does the synchronization work (with a bit of help from Pages). You don’t have to remember where you put the document: what you have to remember is what you want to do with it. (Many iCloud-enabled apps remember where you were in a document so that you can continue reading or listening from where you left off no matter what device you were using.)
Note
Over a period of many years, the engineers at Apple have been working on the technologies that are now packaged together in iCloud. It’s not just a matter of bringing cloud computing to your Apple devices: iCloud and related technologies address a major difficulty with all personal computers—managing files.
Managing Documents with iCloud, Time Machine, and Auto Save
iCloud stores your documents by app and without regard to their physical location. All your data is on all your devices without your having to worry about it. Although, in your role as a developer, you do have to worry about it: you have to do a bit of work so that your users don’t have to worry about it.
While iCloud manages your users’ documents, there are two other document technologies that have been introduced in recent years that work together with iCloud to let users manage their documents almost effortlessly. These technologies are Time Machine and Auto Save.
iCloud by itself is timeless: all of your documents are on all of your devices almost instantaneously. There is a certain latency involved, particularly if you are not connected to the Internet at some point, but by and large, everything is on every device at all times. That is the behavior that most people want and expect most of the time for most of their data.
However, sometimes time matters. Time Machine automatically backs up documents on your Mac at periodic intervals: every hour for a day, every day for a month, and every week thereafter as long as there is space on the backup disk. As part of its operations, Time Machine periodically culls the backup files to get rid of hourly backups after a day, daily backups after a month, and so forth. This enables you to go back to files that have been modified or deleted and recover them. The scope of Time Machine’s backups is your Mac’s hard disk. iCloud files or files on external disk drives are not backed up unless you have copied them to your hard disk (sometimes people do this specifically to get documents into Time Machine).
Auto Save is a feature that appeared first on iPhone and iPad. Data is simply stored as necessary by the operating system and its apps. You don’t have to worry about explicitly saving your data. For decades, computer users have been taught to save their files periodically and to even store backup copies of their files in a safe place. Because Time Machine automates the process of backing up copies of files, you don’t have to worry about backups in the way that you did in the past. Now, with Auto Save, you don’t have to worry about unsaved changes being lost: it’s all done for you.
Part of Auto Save is the ability to create versions of documents. You may have gotten in the habit of doing this yourself by making copies of documents with titles such as Before Conference, After Conference Revisions, and the like. Now, you can use versions to store these versions and then browse them in a Time Machine–like display.
Put together, iCloud, Time Machine, and Auto Save document versions means that you can forget a lot of the document management tasks that you have learned and developed over the years.
Syncing Data Across Devices
There’s another aspect to iCloud that makes it valuable to users beyond the fact that all of your data can be almost instantaneously available to your apps on all your devices. Time Machine and Auto Save provide convenient mechanisms for making copies of entire documents for backup and archival purposes. That’s not something that iCloud does, which is why these products work so well together. What iCloud adds to the mix is the ability to sync data across devices.
Data often lives in documents, but it can be stored in other types of containers, such as key-value coding data stores, preferences, and Core Data persistent stores. iCloud doesn’t just share your data among your devices; it can merge changes together so that the data that winds up being available on all of your devices may actually contain updates that were made separately on two or more devices.
Syncing changes across devices is something that has been supported in the operating systems and apps from Apple for a number of years. By now, you probably don’t give a second thought to the fact that a phone number you enter into Contacts on your Mac shows up on your iPhone very quickly. Other apps from Apple also provide such automatic syncing—these include Calendar and Reminders as well as iPhoto, iTunes, and iBooks.
These syncing apps work quickly and efficiently to keep your data consistent. This process is made possible precisely because the apps do not worry about making complete copies of your contacts, iTunes library, or your iPhoto library as Auto Save and Time Machine do. Instead, your data is divided up into individual photos, contacts, reminders, and songs, and only the ones that have changed are synced.
This is the key to the process, and it bears repeating: you can keep your address book containing 10,000 contacts synchronized across devices because most of the time, what needs to be synced is a single contact that has changed. (In fact, it may be only a single contact’s telephone number.) This divide-and-conquer strategy is the key to fast and efficient synchronization.
This means that your data has to be structured and organized. For most data and most users, that’s not particularly difficult because the data in an address book, calendar, or library of music or photos is logically viewed as collections of specific items. This book helps you navigate through and choose from the wide variety of data management tools you’ll find on iOS and OS X.
Making the Round Trip
This book helps you, the developer, learn how to implement what I call the Round Trip: synchronization of data between iOS and OS X apps. Although iCloud presents users with an app-centric view of their data (rather than a location-centric view), the heart of that app-centric data is a shared data container that iCloud can access directly. You configure your apps to access that shared data, and iCloud does most of the rest. There are many consequences to this that include benefits to the user and a bit more work for the developer. It’s not a great deal of work for you, but the benefits for the user can be great.
In order to make the Round Trip, you need two apps: one to run on OS X and the other to run on iOS. Before you panic, consider what Apple has done in the last few years to make this work easier. First, on the iOS side, storyboards have been implemented to help you build your user interface. Used properly (and that means with Xcode 4.4 or later as well as iOS), this means that you can use separate storyboards for iPhone and iPad, but the differences in code outside the storyboards are minimal. That saves a great deal of time.
In addition, the new Auto Layout system on Cocoa and Cocoa Touch makes it easier to describe dynamic sizing and placing of views to accommodate varying screen sizes and orientations. Its basic concept is defining relationships between views as a series of prioritized constraints. This means that at runtime, the operating system can size and align views using a variety of constraints you have described. This makes UI design much easier than before.
Furthermore, the new (in Xcode 4.4) workspace feature lets you build multiproject workspaces. Projects are structured as they have always been, but you can combine two or more in a single workspace. This means that you can factor your code among an iOS project, an OS X project, and shared classes. Workspaces make developing Round Trip apps much, much easier than would be the case otherwise.
Chapter Summary
In this chapter, you’ve seen the basics of how iCloud looks to the user. The most important feature is that documents are app-centric and can be synchronized across devices and across pairs of apps (OS X and iOS). Apps can choose to use either (or both) ways of storing documents.
In addition, iCloud plays a role in managing data that may not be stored in documents. This data can range from preferences and settings to data that is stored out of sight in Core Data shoebox (or library) apps. (You’ll find out more about Core Data in Chapter 10, “Managing Persistent Storage with Core Data.”)
Exercises
1. If you haven’t done so already, register at developer.apple.com. There are various registration categories that are designed for different types of developers. The paid levels of developer registration include technical support assistance (two incidents for the basic programs). There are also free registrations that provide no support but do allow you to download Xcode or obtain it for free at the Mac App Store.
2. Even though you may be chomping at the bit to start writing your own Objective-C code, take the time to explore several Xcode templates. At the least, on iOS, explore the Master-Detail Application template, and on OS X, explore the Cocoa Application template. Get used to the workspace window, and make certain to build templates with the downloaded settings before you modify them. In the case of the basic Mac OS X Cocoa application (the basis for most of your Mac OS X work), the basic template puts up an empty window. It is supposed to do that, so do not think you have done something wrong. Your job will be to fill that window.
3. Among the earliest iCloud apps are the iWork suite: Pages, Keynote, and Numbers. If you do not have them, buy them from the App Store or the Mac App Store. At the very least, get Mac and iOS versions of one of the apps so that you can see how iCloud synchronizes them across devices.
4. TextEdit supports iCloud documents; it is installed as part of the OS X installation. Experiment with it and particularly note how iCloud has been integrated into the File Save dialog. You can access this dialog from your own code when you instantiate NSDocument objects.
All materials on the site are licensed Creative Commons Attribution-Sharealike 3.0 Unported CC BY-SA 3.0 & GNU Free Documentation License (GFDL)
If you are the copyright holder of any material contained on our site and intend to remove it, please contact our site administrator for approval.
© 2016-2026 All site design rights belong to S.Y.A.