Learning iCloud Data Management (2014)
Part I: Introducing iCloud
2. Setting Up iCloud for Development
In Chapter 1, “Exploring iCloud and Its User Interface,” you saw how iCloud looks to users. For many users, it’s just a logical way of working, and iCloud really isn’t an issue that they think about. For other users who have become used to managing their own files and folders on their various devices and desktops, there can be a significant effort at familiarization—an unlearning process. As technology advances, these unlearning events happen from time to time, but in the long run, the old way of doing things is forgotten. You may have had to configure a dial-up modem with bit rates and parity settings, for example. Now, even dial-up modems are automated and managed with handshakes to adjust their own settings. Dial-up modems are (fortunately) becoming artifacts of the past. And reports are surfacing of mystified children who don’t know what a computer mouse is in the world of touchscreens that they inhabit.
This chapter looks at iCloud from the developer’s perspective. As noted in the Introduction, iCloud isn’t a monolithic API or framework that you just plug into your code. It’s a collection of additions and modifications to many parts of Cocoa and Cocoa Touch. In this chapter, you’ll find a high-level view of those additions and modifications with particular emphasis on setting up iCloud in your app.
iCloud involves synchronizing data across a user’s devices, and as soon as you start thinking about sharing data among various devices, you have to consider the security issues involved. Fortunately, the engineers at Apple have done this: iCloud takes advantage of the security mechanisms that are built into the App Store and the Mac App Store. App security has not changed dramatically over time; however, configuring security has been difficult for many developers. In part, this is because it is a relatively complex process that, for most developers, is done relatively infrequently. That combination is a classic recipe for difficulty.
With the introduction of Xcode 5 in 2013, the implementation and setup of app security has changed insofar as the developer interface is involved (the underlying security mechanism is not changed). The changes make it easier for you to set up your app’s security, but for many developers, it is a new process. Once again, there is an unlearning process involved when you use the new and simpler tools. Because iCloud requires security to be in place and because the way in which you implement it is changed, this chapter begins with an introduction to the new, improved, 2013 version of app security.
Managing App Security on iOS and OS X
The heart of the app security system is digitally signing your code with two digital signatures. Both of these signatures are generated by Apple, and each one references the other. (This is a common security mechanism that you can read about on Wikipedia in articles such as “Code Signing,” which explains the process.) These signatures will not match if either the one identifying Apple or the one identifying the developer has been altered; in addition, part of the digital signature contains a checksum mechanism that causes the security system to fail if the code has been altered since it was signed.
Part of the complexity arises from the use of these digital signatures. The security for apps is built on a combination of developer.apple.com tools, Xcode tools, and Keychain Access tools. It is important to note that Apple IDs are used to identify people, and there are two categories of people (thus Apple IDs) that come into play: During development, you as a developer have an Apple ID. At runtime, the user’s Apple ID comes into play with iCloud.
Identifying Yourself and Your App on developer.apple.com
Along with changes in Xcode 5, during 2013 developer.apple.com was revisited to consolidate the process of managing certificates, identifiers, devices, and provisioning profiles. These are the components of the security system for apps on iOS and OS X. Although the terminology hasn’t changed, the layout of developer.apple.com has changed. Furthermore, with Xcode 5, it is easier to manage these security features, but the process is slightly changed.
Here is an overview of the process. It is required for you to set up your app to use iCloud as well as to ultimately distribute it.
After you register on developer.apple.com, go to Certificates, Identifiers & Profiles (currently at the right of developer.apple.com). It handles security for both your iOS and OS X apps. However, you can now do this through Xcode 5 and later: it’s much easier there.
![]() You must identify yourself as a registered developer with a signing identity.
You must identify yourself as a registered developer with a signing identity.
![]() You must identify your app with an App ID.
You must identify your app with an App ID.
![]() You must identify the devices that you want to use for testing your app during development.
You must identify the devices that you want to use for testing your app during development.
![]() You must create a provisioning profile that brings together your developer ID, your app ID, and the IDs for your test devices.
You must create a provisioning profile that brings together your developer ID, your app ID, and the IDs for your test devices.
Managing Your Developer Signing Identity
A key part of the security mechanism is the certificate that you can download for each signing identity that you create. That is the link between developer.apple.com and Keychain Access on your Mac. The certificate is a portable and secure representation of your signing identity. In developer documentation, you may find the terms used interchangeably.
You can manage your signing identities in Xcode or on developer.apple.com. Xcode 5 introduced the ability to manage one or more Apple IDs for developer accounts, as you can see in Figure 2.1. A given Apple ID does not uniquely identify a specific developer account because a developer can be invited to join one or more development teams. You normally continue to use your developer Apple ID even though you may be working on several teams. Figure 2.1 shows the simplest scenario: a single developer Apple ID working on a single team. For iOS and Mac, one developer can have different roles.
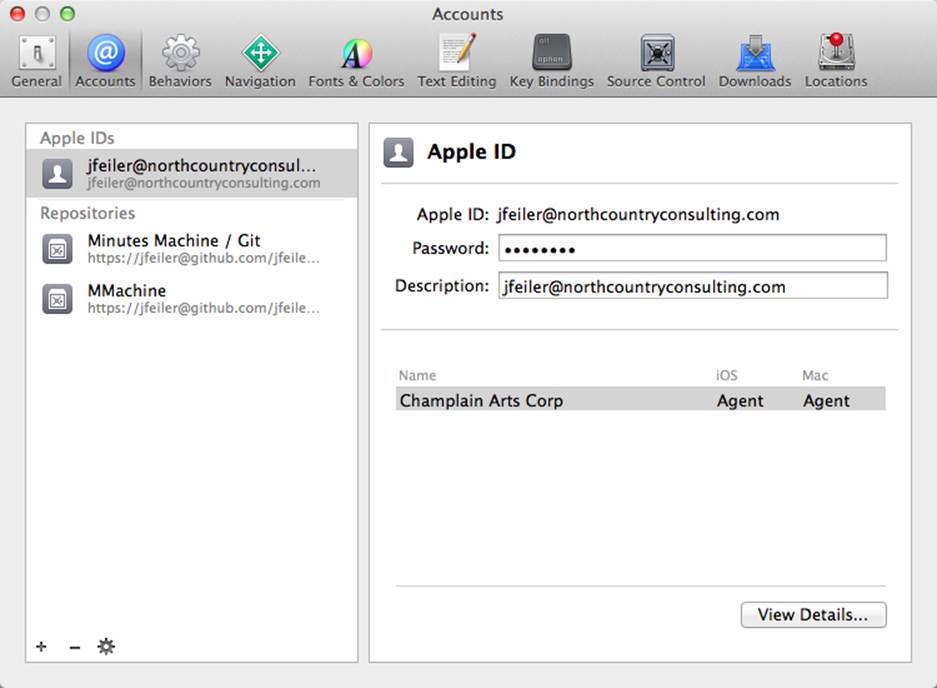
Figure 2.1 Manage your accounts on Xcode
Perhaps the most important point to take away is that you must use your own Apple ID to avoid compromising the security system for apps. Use the tools described on developer.apple.com to manage development teams so that developers can be assigned to the appropriate team without destroying the security structure.
Select the team you want to work with, and click View Details (shown at the lower right of Figure 2.1) to see its signing identities and provisioning profiles, as you see in Figure 2.2.
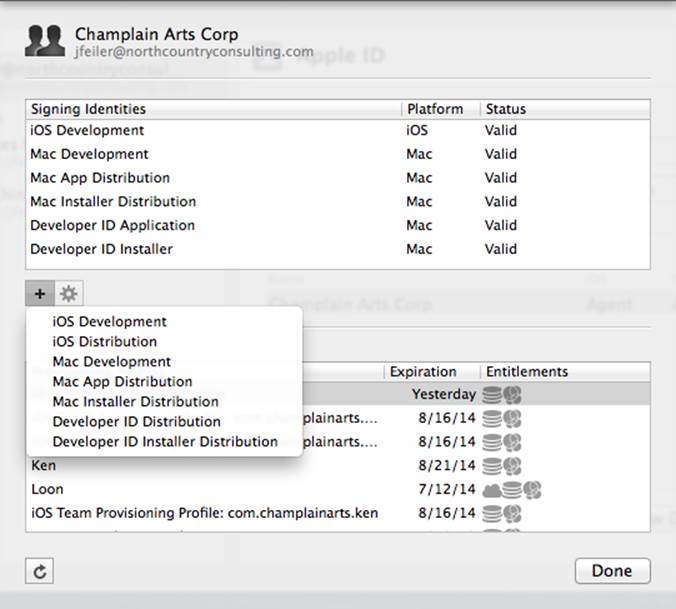
Figure 2.2 Manage certificates in Xcode account preferences
Figure 2.3 shows the list of Mac certificates for a developer on developer.apple.com. Note that each one has a name that you provide, a type that you choose, and an expiration date that is set and enforced by Apple.
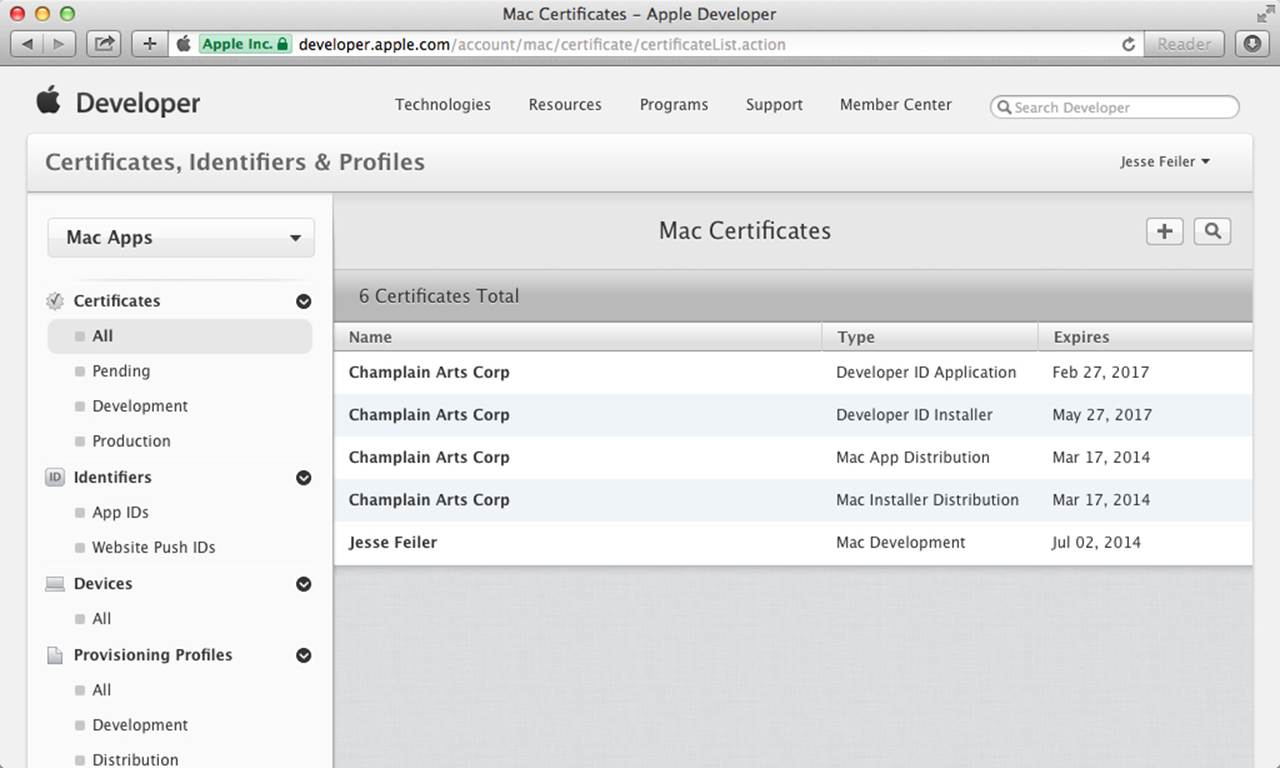
Figure 2.3 Manage certificates on developer.apple.com
Managing Your App ID
Unlike your developer signing identity, which can be edited on developer.apple.com through Xcode accounts, your App ID must be managed for the most part on developer.apple.com. You give the app a name, which can be changed later on if you want. (This is not the name the user sees.) What is important to note is that when you register your App ID, you can enable services that you want to use, such as Game Center, In-App Purchase, Maps, Push Notifications, and most important for this book, iCloud.
Although you cannot create an App ID through Xcode, when you turn on a capability such as iCloud, Xcode offers to update your App ID to add the iCloud capability automatically. (You’ll see this demonstrated in Figure 2.9 later in this chapter.)
Managing Your Devices
You can register a number of devices that can be used for testing your apps. (As of this writing, the number is 100.) When you recruit people to test your app, ask them for the UDID (iOS) or UUID (OS X) of the device they want to test with. These people do not need to be registered developers, and sometimes it’s a good idea to recruit one or two testers who are “real people” as opposed to developers. The rules for managing devices are detailed on developer.apple.com. There are limits to how many times you can change the list: this limit prevents you from allowing your app to be installed on a large number of devices without going through the App Store. (Ad hoc distribution is a specific option you may want to explore in this case.) You have one list of devices for your developer account. The provisioning profiles associate them with App IDs.
Managing Provisioning Profiles
Now that you have your App ID and a list of devices, you can create a provisioning profile to combine the two. As you see at the bottom of Figure 2.2, the provisioning profiles are listed by name and expiration date along with the various entitlements associated with them when you look at them in Xcode accounts. When you look at them in developer.apple.com, you’ll see that some are marked as being managed by Xcode. For the others, you can specify the devices and the services you want to enable on developer.apple.com.
Thus, at this point, you should have your developer signing identity; your app and its App ID; and your provisioning profile that brings together testing devices, your app ID, and the entitlements or services that it uses. You’re ready to start thinking about runtime.
Identifying Your User and Your Ubiquity Container at Runtime
As you saw in Chapter 1, iCloud helps users organize their data by app rather than by file and folder. Users can still work with documents, but those documents aren’t on a visible file system in most cases: they’re in iCloud. But where is iCloud?
As with all cloud computing, the cloud is an artifact of the Internet and large server farms. If you follow the trail of bits, you see that these server farms synchronize and store data so that it is accessible on an as-needed basis by users. The physical location of the data doesn’t matter, and in fact, the actual storage is so often duplicated across servers that there is frequently no single primary data store among the many stores that come into play.
A user’s data is available (subject to security constraints) whenever a user accesses the cloud with the appropriate account information and password. That’s not the model with iCloud. With iCloud, data is available with the presentation of two identifiers:
![]() Apple ID: This identifies the user.
Apple ID: This identifies the user.
![]() A ubiquity container identifier: A ubiquity container is the object that holds the iCloud data for the app. It typically is a bundle identifier such as com.champlainarts.colby. It is prefixed automatically by your developer Team ID.
A ubiquity container identifier: A ubiquity container is the object that holds the iCloud data for the app. It typically is a bundle identifier such as com.champlainarts.colby. It is prefixed automatically by your developer Team ID.
When the user connects to iCloud (usually this happens through the iCloud System Preference panel whenever the user logs in), the Apple ID is made available to all apps that are entitled to use iCloud. The ubiquity container identifier is usually set in the Capabilities tab of the target in Xcode. As you will see in Chapter 18, “Completing the Round Trip,” a shared ubiquity container may have an identifier that does not correspond to an app bundle identifier. In the case of the Round Trip, the two apps are com.champlainarts.ColbyOSX and com.champlainarts.ColbyiOS. They share a ubiquity container called com.champlainarts.Colby. It is the last component of the ubiquity container identifier that shows up in the System Preferences iCloud pane shown previously at the left in Figure 1.5.
With these two pieces of information, you can connect to the appropriate iCloud ubiquity container. That is your first task when your app starts to run.
Looking Inside the iCloud Basics
Bundle identifiers and Apple IDs have been around for a long time, but now they have key roles to play in iCloud. Both of them are needed to gain access to a section of iCloud. This is the implementation of the app-based file structure described in Chapter 1.
You might expect to find standard log-in methods in the iCloud API that enable your app to present an Apple ID and a bundle ID to iCloud in order to gain access to the data. That’s not how it happens. Remember that there is no explicit iCloud API; beyond that, the notion of logging in to iCloud for an app isn’t what happens. (Users do log in to iCloud—often automatically with their settings in the iCloud pane of System Preferences.)
Your app interacts directly with a local copy of the iCloud data for the user and the app. This copy of the iCloud data for the user and app is stored locally in a ubiquity container. The ubiquity containers are stored on the local device, and their contents are synchronized by the local OS and its interaction with iCloud. Just as is the case with any other local data access, you can read and write as necessary, and you can expect (and even check on) the results of those read and write statements.
Because you are not reading and writing to the iCloud data directly in most cases, you can’t expect the changes that you have made to the local ubiquity data to be propagated to iCloud immediately. If you want to get into naming things, iCloud is an asynchronous and declarative implementation of cloud technology.
The key components of iCloud are
![]() Apple ID
Apple ID
![]() Bundle identifier
Bundle identifier
![]() Entitlements and capabilities
Entitlements and capabilities
![]() Ubiquity container
Ubiquity container
The following sections cover the basics of what you need to know about them.
Declarative Programming
As is the case with more and more software today, iCloud relies heavily on declarative programming techniques. Declarative programming is distinguished from other styles that specify what happens and, frequently, in what order. (Common names for that style are imperative,functional, and procedural programming.) Declarative programming simply describes what should be done without specifying a control flow.
You find examples of declarative programming throughout OS X and iOS with more examples showing up with each new iteration of the Cocoa frameworks. Blocks, for example, allow you to specify code that is executed for each element of an enumerator or on completion of some task, but you do not hang around waiting for that trigger to occur. You define the block and then send it off (often as a parameter of a method), and it is executed at the appropriate time. You are out of the traffic-cop business, and, not coincidentally, multithreading at the system level is much easier for the OS to manage in your absence.
If you’re not familiar with declarative programming or are still not comfortable with it, explore the topic online (Wikipedia is a great place to start for this type of research).
Apple ID
We’re now looking at iCloud runtime behavior. The Apple ID discussed here is the user’s Apple ID.
An Apple ID uniquely identifies . . . something. It started in 2000 as an account name on Apple’s early Internet service, iTools, which provided free email accounts as <accountname>@mac.com. Over time, <accountname>@mac.com became <accountname>@me.com (MobileMe) and then <accountname>@icloud.com. With the advent of the iTunes store, customers used an Apple ID for their purchases. The email account name served as the first Apple IDs, but, particularly after Apple began charging for email accounts, Apple IDs no longer consisted of me.com or mac.com addresses. Every Apple ID did have to have an email address associated with it (for verification if for no other reason) and, for purchases in iTunes Store, a credit card number.
The idea that an Apple ID uniquely identifies an individual person has long gone away. An Apple ID has a name, a password, an email address, an optional rescue email address (in case the primary address is unreachable), and, if used for purchases, it may have a credit card associated with it. Apple suggests that people not share Apple IDs, but we know that sometimes a family or even a small business will share one.
Apple suggests that people may like to have one Apple ID to identify themselves to iTunes and another to identify themselves for other purposes such as iCloud, Face-Time, and the like. Developers often have one or more Apple IDs for their personal life and another for their developer account. iBook authors need their own Apple ID, so a developer who is also an iBook author needs two right there.
There is a unique identifier underneath all the attributes, so email address, name, password, and credit card can all be changed without creating a new Apple ID. Every iOS device requires that the user has an Apple ID in order to gain access to downloads of the operating system as well as any purchased apps or music.
On OS X, although the installation process encourages it, you do not need an Apple ID. If you want to use iCloud, you do need an Apple ID. Apple has recognized the proliferation of multi-Apple ID individuals in OS X Mountain Lion (10.8) and later versions of OS X. Figure 2.4 shows part of the Users & Groups pane in System Preferences.
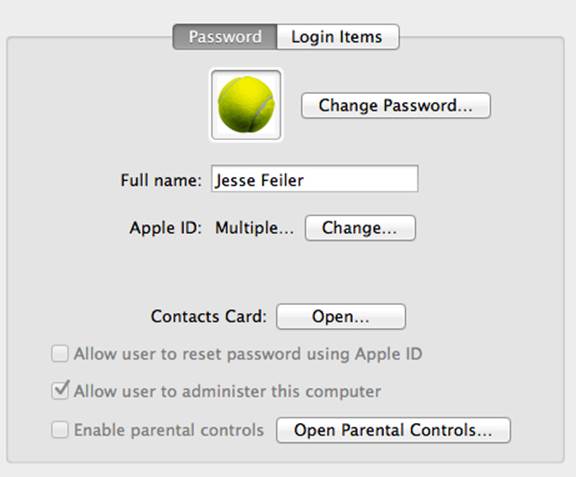
Figure 2.4 You can have multiple Apple IDs on OS X.
If you click Change, you see a list of the Apple IDs you have associated with this account. You can add or delete some and create a new one, as shown in Figure 2.5.
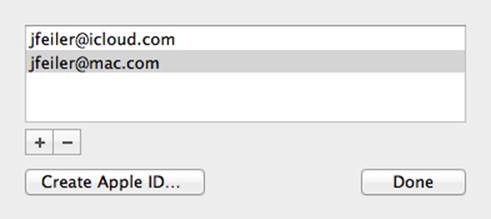
Figure 2.5 Switching Apple IDs on OS X
Most of the time, people don’t pay attention to their Apple ID when they set up a device beyond checking that their email works (if it uses the Apple ID). However, for ongoing support of your iCloud app, remember (and let your tech support people remember) that the Apple ID is a critical part of iCloud access. If someone in an office uses an OS X account for business and another for personal matters, the iCloud documents created under those two OS X accounts may be using different Apple IDs. A Pages document under one account will not be shared with the other, although you can do so with sharing commands implemented in Pages and other apps.
The Apple ID that a user has used to sign into iCloud is available to the operating system at runtime, and that is how the Apple ID part of the iCloud authentication takes place: you don’t do anything.
Bundle Identifier
The bundle identifier is set in your app’s target settings in Xcode (in the General tab of the target). As you step through the process of creating a new project, you are asked for information, including the product name and the company identifier. You provide the product name, and the company identifier is editable (it actually is sticky—you start with the last company identifier you used).
Note
The management of bundle identifiers, product names, and targets, as described in this section, has been a matter of concern for a number of developers over the years. You can find many references on the Internet to what is going on. Unfortunately, some of them (particularly those from several years ago) are misleading. The information in this section is current as of Xcode 5, which is the version released with iOS 7 and OS X Mavericks (10.9).
The bundle identifier that Xcode starts with is the combination of the company identifier (which is usually your reverse domain name) and the product name, as in com.yourcompany.yourproductname.
If you look at the Info tab of your project, as shown in Figure 2.6, you’ll see that the bundle identifier is set to your product name. The product name is also used as the target name, so you begin with identical values for your target and the last component of your bundle identifier. You can change your target name in the left side of the project editor: just double-click and type in a new name. You’ll see that the last component of the bundle name also changes, because, as you see in Figure 2.6, it is picking up the product name.
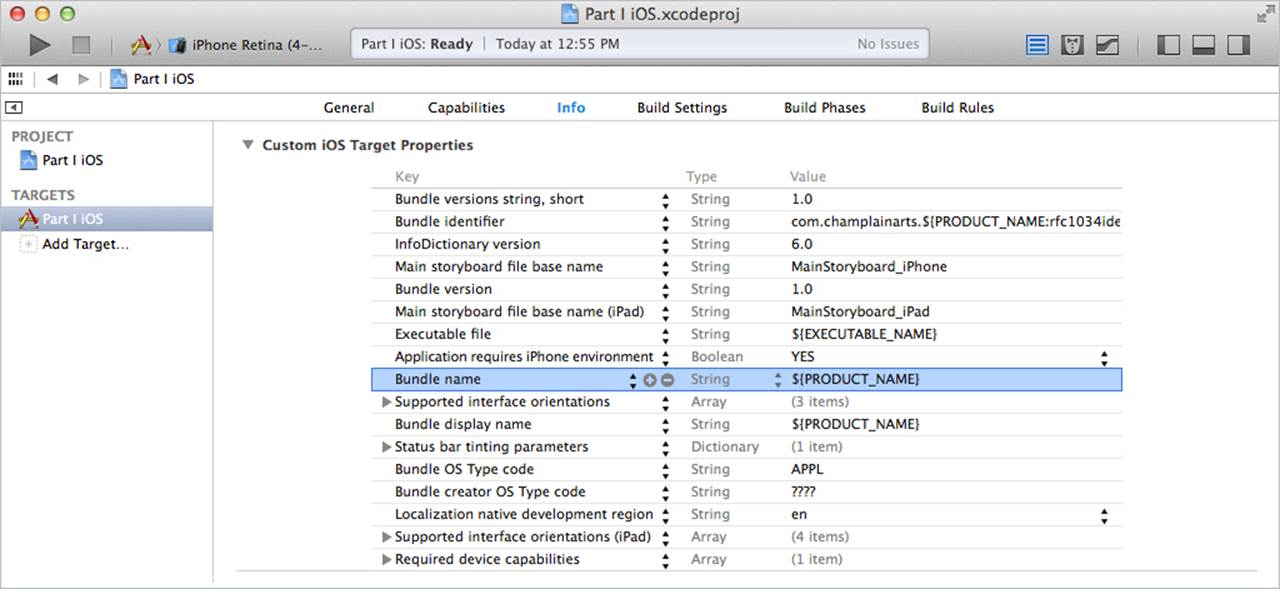
Figure 2.6 Editing the bundle identifier in Info
However, you can edit the bundle identifier itself in the General tab. As initially set up, it is set to com.yourcompany.${PRODUCT_NAME:rfc1034identifier. If you trace through the various settings, you’ll see that product name (in the Packaging section of Build Settings) is set to $(TARGET_NAME). This means that if you change the target name, the product name will change, and because it’s used as the last component in the bundle identifier, that, too, will change. Anywhere along the line, you can double-click to edit the setting. If you change Product Name to be MyProject instead of $(TARGET_NAME), you will change the product name, and indirectly, the last component of the bundle identifier. Generally, the best place to edit a bundle identifier is in the General tab of the project itself rather than in the Info tab. That is because the Info tab sets up the naming structure with placeholders such as $(TARGET_NAME) and the General tab lets you type in the actual name that you want to use, which overrides the placeholders.
Most of the time, the default settings are fine, and you don’t have to worry about them. However, they come into play with iCloud when you need a ubiquity container that is shared among several apps. (Perhaps most commonly, one is a Mac app and the other is an iOS app.)
Entitlements and Capabilities
Entitlements specify what your app can do. The Capabilities tab shown in Figure 2.7 lets you configure the capabilities and the related entitlements and other settings. As you can see, there’s a simple switch for each capability—iCloud, Game Center, Passbook, In-App Purchase, and more (still more are likely to come in the future).
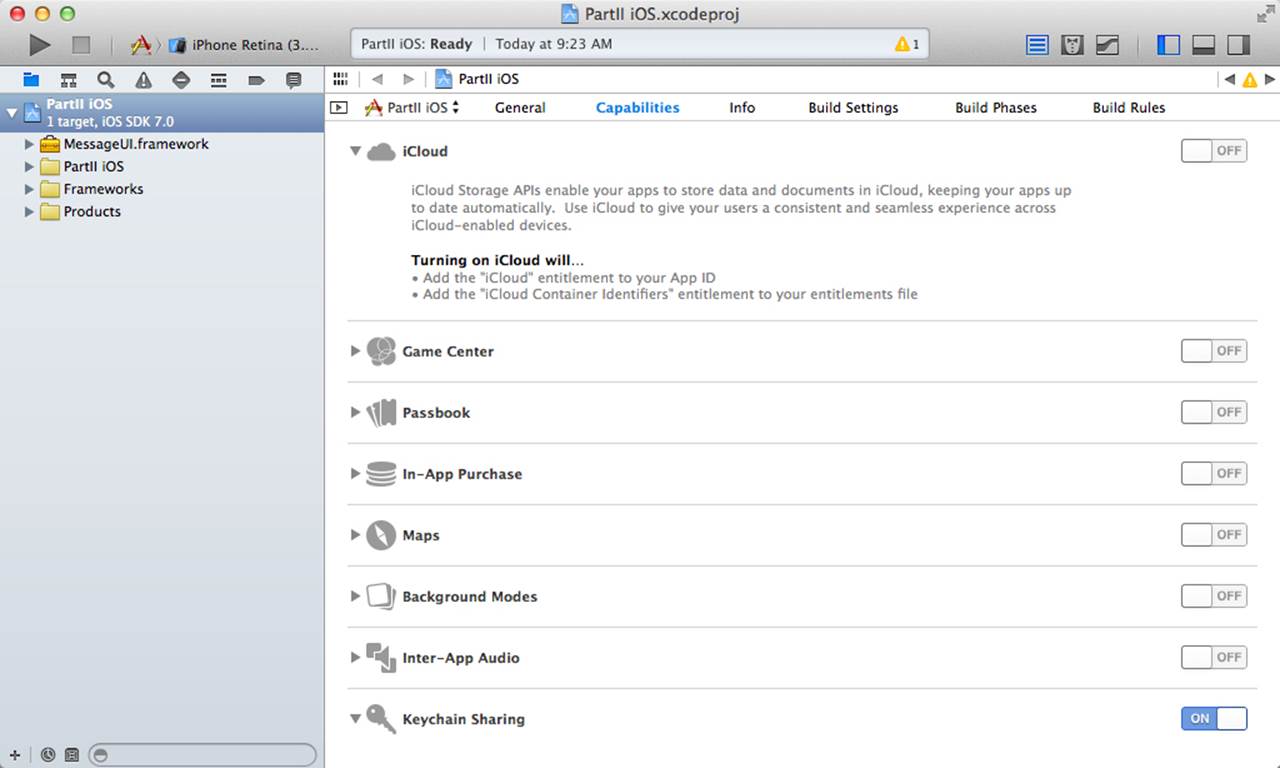
Figure 2.7 Turn capabilities on and off.
Note
The Capabilities tab is new in Xcode 5. It replaces previous entitlements configurations that were different for iOS and OS X. The interface shown here is for iOS apps, but it is almost identical for OS X apps.
If a given capability is off, turning it on will also open the disclosure triangle to show you what additional steps you and/or Xcode must take, as you see in Figure 2.7.
When you turn a capability on, you’ll be asked to choose a development team to use in provisioning, as you see in Figure 2.8.
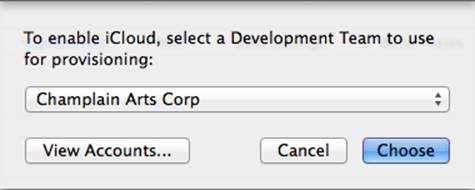
Figure 2.8 Choose a development team.
The steps that need to be taken, as shown in Figure 2.7, are checked off or, if a problem occurred, you are usually given an opportunity to have Xcode fix it, as you see in Figure 2.9.
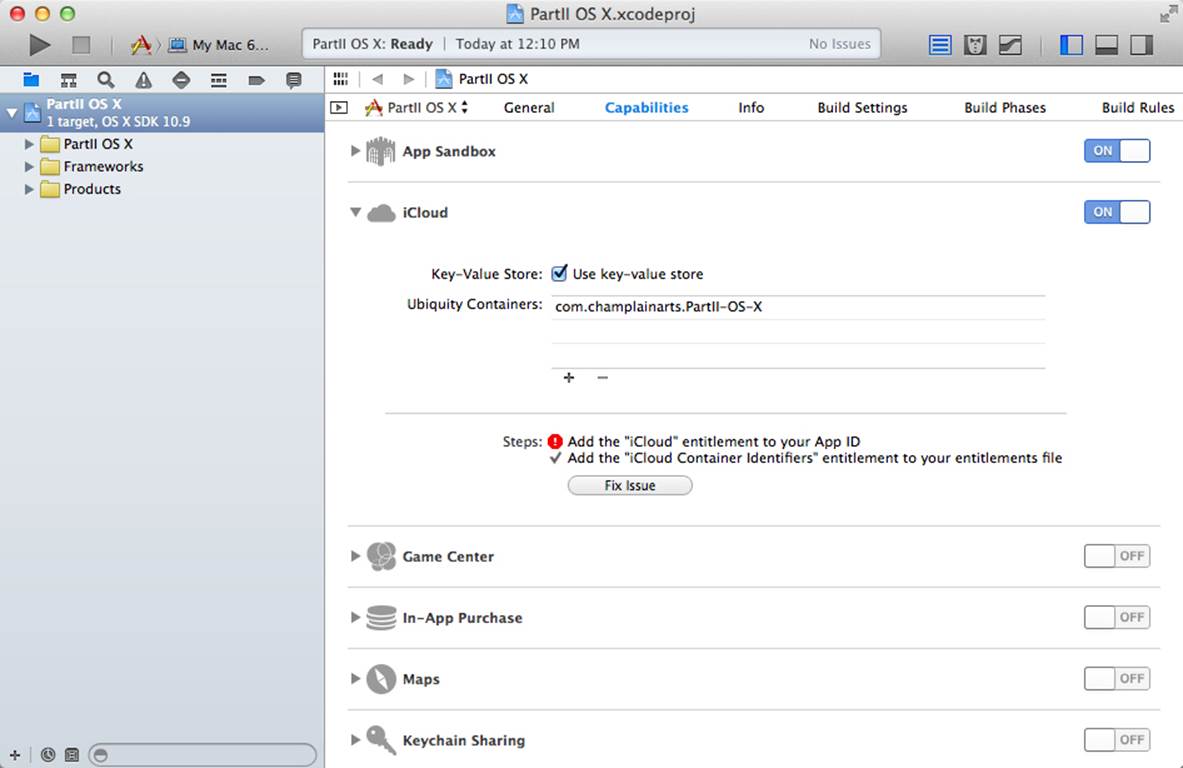
Figure 2.9 Managing Capabilities
Beginning in Xcode 5, this process replaces the manual configuration that you had to do in the past on developer.apple.com. You can still do that, and that is still the best place to actually see the details of your identities, provisioning profiles, and app IDs, but for many if not most of your transactions, Xcode will take care of those tasks. Also note that Xcode sets up the appropriate entries in your project’s plist.
As you can see in Figure 2.9, when you enable iCloud, you’ll be able to choose the entitlements file, but Xcode will begin by naming one for you. If you want to use a key-value store, you can enable it here: that is the topic of Chapter 8, “Using Key-Value Coding (KVC).” For documents (that is, data other than KVC data), you use a ubiquity container. You may have more than one, but the first one is always assumed to be the main one. If you are using KVC without documents, you don’t need a ubiquity container.
Ubiquity Container
As you can see in Figure 2.9, you can specify ubiquity containers for your app. The first one you create has a default name set by Xcode, and it has a special role to play. (You can change the default name if you want, and in some cases, you must, as you’ll see in the next paragraph.) The first ubiquity container is the primary ubiquity container. On OS X, its contents are displayed in the open and save dialogs available in NSDocument. (On iOS, you create your own interface to display documents in iCloud if you use them.)
The default name for the primary ubiquity container is the bundle identifier. In cases where you want to share a ubiquity container among several apps (such as an OS X version and an iOS version), change one of the ubiquity container names to the other one so it is shared. As you will see in Chapter 18, “Completing the Round Trip,” the shared ubiquity container may have any name you want. In Chapter 18, the two apps have bundle identifiers of com.champlainarts.ColbyiOS and com.champlainarts.ColbyOSX. The shared ubiquity container is com.champlainarts.colby.
Using iCloud in Your App
At this point, you’re ready to use iCloud in your app. You will see concrete examples of how to do so starting in Part III, “Using the Technologies.” There is one step that you can take now to confirm that your app has been properly set up and that the entitlements and provisioning are correct.
Create a new app or use an existing app that you want to enable for iCloud (starting from a new app is a simpler way in the long run until you’re more comfortable with iCloud). Set up the entitlements and provisioning as described in the previous sections. Add a single line of code to test if iCloud is available:
id currentiCloudToken = [[NSFileManager defaultManager]
ubiquityIdentityToken];
On OS X, it should go in applicationDidFinishLaunching:, and on iOS, it should go in application:didFinishLaunchingWithOptions:. In both cases, it normally goes after your other initializations. (Note that this method was added in iOS 6 and OS X Mountain Lion (10.8). You can find older and more complex ways of performing this task on the web.)
The iCloud token that is returned is an opaque object identifying the iCloud account (that means that you can’t see inside it). There are two possibilities when you ask for the token:
![]() If it is nil, the user is not signed into an iCloud account.
If it is nil, the user is not signed into an iCloud account.
![]() Although you can’t see the account details, you can check if a token is the same as another token using isEqual:. This lets you check to see if the user has changed iCloud accounts.
Although you can’t see the account details, you can check if a token is the same as another token using isEqual:. This lets you check to see if the user has changed iCloud accounts.
Note that if a user has been signed into an iCloud account and turns on Airplane mode or turns off networking on a Mac, the token is still returned. You can access the local copy of your ubiquity container’s data. When Airplane mode is turned on again, iCloud will take care of syncing the two stores and will let you know if there is anything for you to do. Because the operating systems manage these disruptions in connectivity, resist the temptation to store extra copies of data locally in the app’s sandbox.
Apple recommends as a best practice that you use either iCloud storage or sandbox storage. Mixing the two provides a suboptimal user experience. Along those lines, ask users if they want to use iCloud the first time they run your app. Unless they reinstall the app, don’t ask them again.
The iWork apps are a good example of how to manage documents in iCloud. Over the last few years, they have moved to an explicit Export command, which, among other things, can let you export the contents of an iCloud document to another format and to a non-iCloud location.
Chapter Summary
In this chapter, you’ve seen the basics of how iCloud works. iCloud for document data relies on a ubiquity container, which is identified by a user’s Apple ID and your app’s bundle ID and is enabled by entitlements. You can share ubiquity containers across several apps by using a single app’s bundle ID for all of them.
A high-level overview of the provisioning process has shown you where you enable iCloud for your app. Provisioning is done by registered developers on developer.apple.com and in Xcode accounts. Provisioning profiles as well as identity certificates are then downloaded. You install provisioning profiles in Xcode accounts, while certificates are installed automatically in Key Chain.
Exercises
1. If you have any doubts about the wisdom of Apple’s advice to either use iCloud for all storage or local (sandbox) storage for all storage, try to come up with a user interface of your own to manage them.
2. Set up entitlements for an iCloud-enabled app as described in this chapter. Start by following the steps exactly—either those in this chapter or those on developer.apple.com. Don’t take any shortcuts until your first provisioning profile is running properly. Then you can experiment.
3. TextEdit supports iCloud documents; it is installed as part of the OS X installation. Experiment with it and particularly note how iCloud has been integrated into the File Save dialog. You can access this dialog from your own code when you instantiate NSDocument objects.