iOS Programming: The Big Nerd Ranch Guide (2014)
21. Web Services and UIWebView
For the next two chapters, you are going to take another break from Homepwner to work with web services and split view controllers.
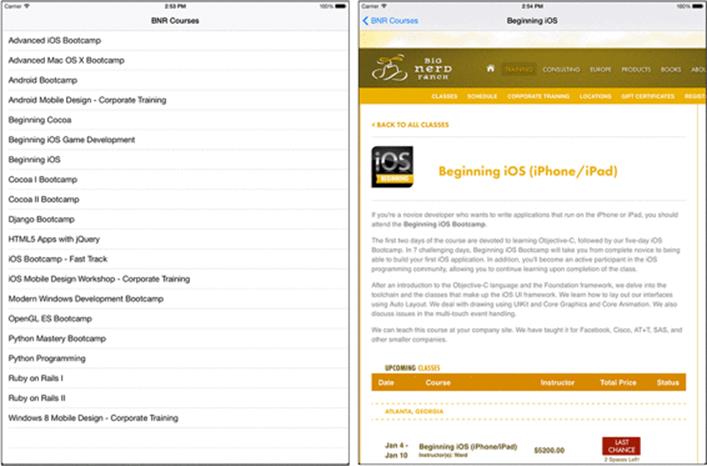
In this chapter, you will lay the foundation for an application named Nerdfeed that reads in a list of the courses that Big Nerd Ranch offers. Each course will be listed in a table view, and selecting a course will open that course’s web page. Figure 21.1 shows Nerdfeed at the end of this chapter.
Figure 21.1 Nerdfeed
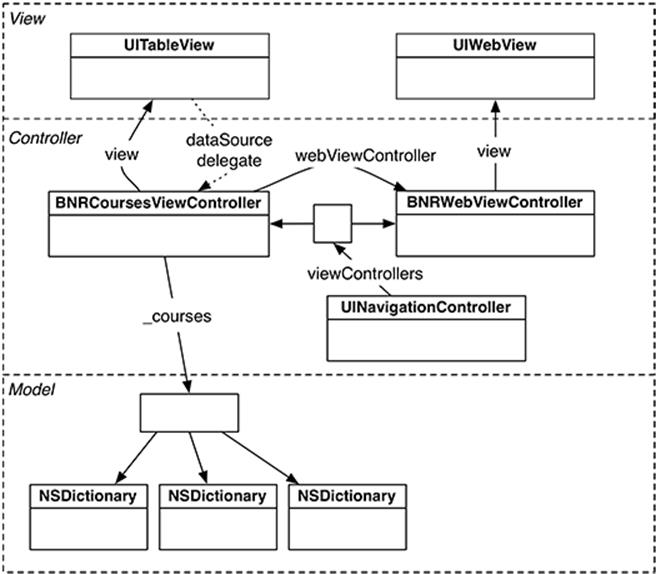
The work is divided into two parts. The first is connecting to and collecting data from a web service and using that data to create model objects. The second part is using the UIWebView class to display web content. Figure 21.2 shows an object diagram for Nerdfeed.
Figure 21.2 Nerdfeed object diagram
Web Services
Your web browser uses the HTTP protocol to communicate with a web server. In the simplest interaction, the browser sends a request to the server specifying a URL. The server responds by sending back the requested page (typically HTML and images), which the browser formats and displays.
In more complex interactions, browser requests include other parameters, like form data. The server processes these parameters and returns a customized, or dynamic, web page.
Web browsers are widely used and have been around for a long time. So the technologies surrounding HTTP are stable and well-developed: HTTP traffic passes neatly through most firewalls, web servers are very secure and have great performance, and web application development tools have become easy to use.
You can write a client application for iOS that leverages the HTTP infrastructure to talk to a web-enabled server. The server side of this application is a web service. Your client application and the web service can exchange requests and responses via HTTP.
Because the HTTP protocol does not care what data it transports, these exchanges can contain complex data. This data is typically in JSON (JavaScript Object Notation) or XML format. If you control the web server as well as the client, you can use any format you like; if not, you have to build your application to use whatever the server supports.
In this chapter, you will create a client application that will make a request to the courses web service hosted at http://bookapi.bignerdranch.com. The data that is returned will be JSON that describes the courses.
Starting the Nerdfeed application
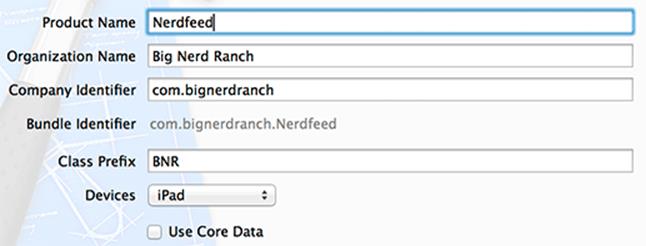
Create a new Empty Application for the iPad Device Family. Name this application Nerdfeed, as shown in Figure 21.3. (If you do not have an iPad to deploy to, use the iPad simulator.)
Figure 21.3 Creating an iPad Empty Application
Let’s knock out the basic UI before focusing on web services. Create a new NSObject subclass and name it BNRCoursesViewController. In BNRCoursesViewController.h, change the superclass to UITableViewController.
@interface BNRCoursesViewController : NSObject
@interface BNRCoursesViewController : UITableViewController
In BNRCoursesViewController.m, write stubs for the required data source methods so that you can build and run as you go through this exercise.
- (NSInteger)tableView:(UITableView *)tableView
numberOfRowsInSection:(NSInteger)section
{
return 0;
}
- (UITableViewCell *)tableView:(UITableView *)tableView
cellForRowAtIndexPath:(NSIndexPath *)indexPath
{
return nil;
}
In BNRAppDelegate.m, create an instance of BNRCoursesViewController and set it as the root view controller of a navigation controller. Make that navigation controller the root view controller of the window.
#import "BNRAppDelegate.h"
#import "BNRCoursesViewController.h"
@implementation BNRAppDelegate
- (BOOL)application:(UIApplication *)application
didFinishLaunchingWithOptions:(NSDictionary *)launchOptions
{
self.window = [[UIWindow alloc] initWithFrame:[[UIScreen mainScreen] bounds]];
BNRCoursesViewController *cvc =
[[BNRCoursesViewController alloc] initWithStyle:UITableViewStylePlain];
UINavigationController *masterNav =
[[UINavigationController alloc] initWithRootViewController:cvc];
self.window.rootViewController = masterNav;
self.window.backgroundColor = [UIColor whiteColor];
[self.window makeKeyAndVisible];
return YES;
}
Build and run the application. You should see an empty UITableView and a navigation bar.
NSURL, NSURLRequest, NSURLSession, and NSURLSessionTask
The Nerdfeed application will fetch data from a web server using four handy classes: NSURL, NSURLRequest, NSURLSessionTask, and NSURLSession (Figure 21.4).
Figure 21.4 Relationship of web service classes

Each of these classes has an important role in communicating with a web server:
· An NSURL instance contains the location of a web application in URL format. For many web services, the URL will be composed of the base address, the web application you are communicating with, and any arguments that are being passed.
· An NSURLRequest instance holds all the data necessary to communicate with a web server. This includes an NSURL object as well as a caching policy, a limit on how long you will give the web server to respond, and additional data passed through the HTTP protocol. (NSMutableURLRequest is the mutable subclass of NSURLRequest.)
· An NSURLSessionTask instance encapsulates the lifetime of a single request. It tracks the state of the request and has methods to cancel, suspend, and resume the request. Tasks will always be subclasses of NSURLSessionTask, specifically NSURLSessionDataTask, NSURLSessionUploadTask, orNSURLSessionDownloadTask.
· An NSURLSession instance acts as a factory for data transfer tasks. It is a configurable container that can set common properties on the tasks it creates. Some examples include header fields that all requests should have or whether requests work over cellular connections. NSURLSession also has a rich delegate model that can provide information on the status of a given task and handle authentication challenges, for example.
Formatting URLs and requests
The form of a web service request varies depending on who implements the web service; there are no set-in-stone rules when it comes to web services. You will need to find the documentation for the web service to know how to format a request. As long as a client application sends the server what it wants, you have a working exchange.
Big Nerd Ranch’s courses web service wants a URL that looks like this:
http://bookapi.bignerdranch.com/courses.json
You can see that the base URL is bookapi.bignerdranch.com and the web application is located at courses on that server’s filesystem, followed by the data format (json) you expect the response in.
Web service requests come in all sorts of formats, depending on what the creator of that web service is trying to accomplish. The courses web service, where each piece of information the web server needs to honor a request is broken up into arguments supplied as path components, is somewhat common. This particular web service call says, “Return all of the courses in a json format.”
Another common web service format looks like this:
http://baseURL.com/serviceName?argumentX=valueX&argumentY=valueY
So, for example, you might imagine that you could specify the month and year for which you wanted a list of the courses having a URL like this:
http://bookapi.bignerdranch.com/courses.json?year=2014&month=11
At times, you will need to make a string “URL-safe.” For example, space characters and quotes are not allowed in URLs; They must be replaced with escape-sequences. Here is how that is done.
NSString *search = @"Play some \"Abba\"";
NSString *escaped =
[search stringByAddingPercentEscapesUsingEncoding:NSUTF8StringEncoding];
// escaped is now "Play%20some%20%22Abba%22"
If you need to un-escape a percent-escaped string, NSString has the method:
- (NSString *)stringByRemovingPercentEncoding;
When the request to the Big Nerd Ranch courses feed is processed, the server will return JSON data that contains the list of courses. The BNRCoursesViewController, which made the request, will then populate its table view with the titles of these courses.
Working with NSURLSession
NSURLSession refers both to a specific class as well as a name for a collection of classes that form an API for network requests. To differentiate the two definitions, the book will refer to the class as just NSURLSession, or an instance thereof, and the API as the NSURLSession API.
In BNRCoursesViewController.m add a property to the class extension to hold onto an instance of NSURLSession.
@interface BNRCoursesViewController ()
@property (nonatomic) NSURLSession *session;
@end
Then override initWithStyle: to create the NSURLSession object.
- (instancetype)initWithStyle:(UITableViewStyle)style
{
self = [super initWithStyle:style];
if (self) {
self.navigationItem.title = @"BNR Courses";
NSURLSessionConfiguration *config =
[NSURLSessionConfiguration defaultSessionConfiguration];
_session = [NSURLSession sessionWithConfiguration:config
delegate:nil
delegateQueue:nil];
}
return self;
}
The NSURLSession is created with a configuration, a delegate, and a delegate queue. The defaults for these arguments are what you want for this application. You get a default configuration and pass that in for the first argument. For the second and third arguments, you simply pass in nil to get the defaults.
In BNRCoursesViewController.m, implement the fetchFeed method to create an NSURLRequest that connects to bookapi.bignerdranch.com and asks for the list of courses. Then, use the NSURLSession to create an NSURLSessionDataTask that transfers this request to the server.
- (void)fetchFeed
{
NSString *requestString = @"http://bookapi.bignerdranch.com/courses.json";
NSURL *url = [NSURL URLWithString:requestString];
NSURLRequest *req = [NSURLRequest requestWithURL:url];
NSURLSessionDataTask *dataTask =
[self.session dataTaskWithRequest:req
completionHandler:
^(NSData *data, NSURLResponse *response, NSError *error) {
NSString *json = [[NSString alloc] initWithData:data
encoding:NSUTF8StringEncoding];
NSLog(@"%@", json);
}];
[dataTask resume];
}
Creating the NSURLRequest is fairly straightforward: create an NSURL instance and instantiate a request object with it.
The purpose of the NSURLSession is a bit hazier. NSURLSession’s job is to create tasks of a similar nature. For example, if your application had a set of requests that all required the same header fields, you could configure the NSURLSession with these additional header fields. Similarly, if a set of requests should not connect over cellular networks, then an NSURLSession could be configured to not allow cellular access. These shared behaviors and attributes are then configured on the tasks that the session creates.
A project may have multiple instances of NSURLSession, but since Nerdfeed only initiates a single, simple request, it will use the sharedSession. The sharedSession is set up with a default configuration.
The session object can now be used to create tasks. By giving the session a request and a completion block to call when the request finishes, it will return an instance of NSURLSessionTask. Since Nerdfeed is requesting data from a web service, the type of task will be an NSURLSessionDataTask. Tasks are always created in the suspended state, so calling resume on the task will start the web service request. For now, the completion block will just print out the JSON data returned from the request.
Kick off the exchange whenever the BNRCoursesViewController is created. In BNRCoursesViewController.m, update initWithStyle:.
- (instancetype)initWithStyle:(UITableViewStyle)style
{
self = [super initWithStyle:style];
if (self) {
self.navigationItem.title = @"BNR Courses";
NSURLSessionConfiguration *config =
[NSURLSessionConfiguration defaultSessionConfiguration];
_session = [NSURLSession sessionWithConfiguration:config
delegate:nil
delegateQueue:nil];
[self fetchFeed];
}
return self;
}
Build and run the application. A string representation of the JSON data coming back from the web service will print to the console. (If you do not see anything print to the console, make sure you typed the URL correctly.)
JSON data
JSON data, especially when it is condensed like it is in your console, may seem daunting. However, it is actually a very simple syntax. JSON can contain the most basic objects we use to represent model objects: arrays, dictionaries, strings, and numbers. A dictionary contains one or more key-value pairs, where the key is a string, and the value can be another dictionary, string, number, or array. An array can consist of strings, numbers, dictionaries, and other arrays. Thus, a JSON document is a nested set of these types of values.
Here is an example of some really simple JSON:
{
"name" : "Christian",
"friends" : ["Aaron", "Mikey"],
"job" : {
"company" : "Big Nerd Ranch",
"title" : "Senior Nerd"
}
}
A JSON dictionary is delimited with curly braces ({ and }). Within curly braces are the key-value pairs that belong to that dictionary. The beginning of this JSON document is an open curly brace, which means the top-level object of this document is a JSON dictionary. This dictionary contains three key-value pairs (name, friends, and job).
A string is represented by using text within quotations. Strings are used as the keys within a dictionary and can be used as values, too. Thus, the value of the name key in the top-level dictionary is the string Christian.
Arrays are represented with square brackets ([ and ]). An array can contain any other JSON information. In this case, the friends key holds an array of strings (Aaron and Mikey).
A dictionary can contain other dictionaries; the final key in the top-level dictionary, job, is associated with a dictionary that has two key-value pairs (company and title).
Nerdfeed will parse out the useful information from the JSON data and store this in its courses property.
Figure 21.5 Model object graph
Parsing JSON data
Apple has a built-in class for parsing JSON data, NSJSONSerialization. You can hand this class a bunch of JSON data and it will create instances of NSDictionary for every JSON object, NSArray for every JSON array, NSString for every JSON string, and NSNumber for every JSON number.
In BNRCoursesViewController.m, modify the NSURLSessionDataTask completion handler to use the NSJSONSerialization class to convert the raw JSON data into the basic foundation objects.
^(NSData *data, NSURLResponse *response, NSError *error) {
NSString *json = [[NSString alloc] initWithData:data
encoding:NSUTF8StringEncoding];
NSLog(@"%@", json);
NSDictionary *jsonObject = [NSJSONSerialization JSONObjectWithData:data
options:0
error:nil];
NSLog(@"%@", jsonObject);
}
Build and run, then check the console. You will see the JSON data, except now it will be formatted slightly differently because NSLog does a good job formatting dictionaries and arrays. The jsonObject is an instance of NSDictionary and it has an NSString key with an associated value of typeNSArray.
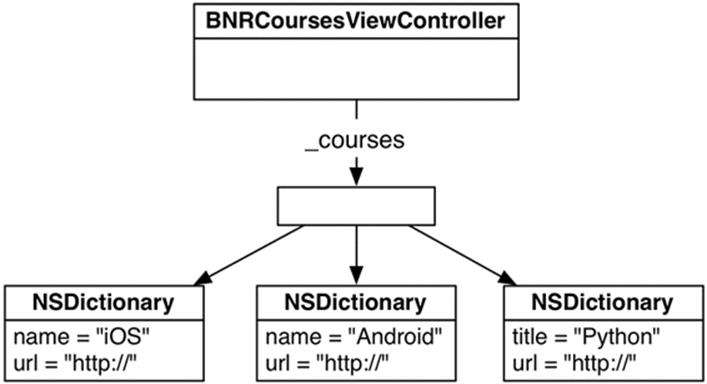
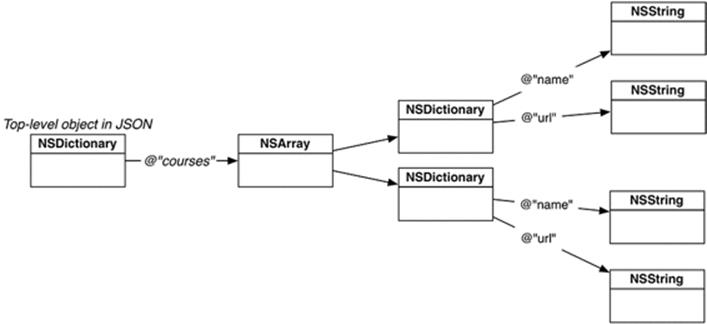
When the NSURLSessionDataTask finishes, you will use NSJSONSerialization to convert the JSON data into an NSDictionary. Figure 21.6 shows how the data will be structured.
Figure 21.6 JSON objects
In BNRCoursesViewController.m, add a new property to the class extension to hang on to that array, which is an array of NSDictionary objects that describe each course.
@interface BNRCoursesViewController ()
@property (nonatomic) NSURLSession *session;
@property (nonatomic, copy) NSArray *courses;
@end
Then, in the same file, change the implementation of the NSURLSessionDataTask completion handler:
^(NSData *data, NSURLResponse *response, NSError *error) {
NSDictionary *jsonObject = [NSJSONSerialization JSONObjectWithData:data
options:0
error:nil];
NSLog(@"%@", jsonObject);
self.courses = jsonObject[@"courses"];
NSLog(@"%@", self.courses);
}
Now, still in BNRCoursesViewController.m, update the data source methods so that each of the course titles are shown in the table. You will also want to override viewDidLoad to register the table view cell class.
- (void)viewDidLoad
{
[super viewDidLoad];
[self.tableView registerClass:[UITableViewCell class]
forCellReuseIdentifier:@"UITableViewCell"];
}
- (NSInteger)tableView:(UITableView *)tableView
numberOfRowsInSection:(NSInteger)section
{
return 0;
return [self.courses count];
}
- (UITableViewCell *)tableView:(UITableView *)tableView
cellForRowAtIndexPath:(NSIndexPath *)indexPath
{
return nil;
UITableViewCell *cell =
[tableView dequeueReusableCellWithIdentifier:@"UITableViewCell"
forIndexPath:indexPath];
NSDictionary *course = self.courses[indexPath.row];
cell.textLabel.text = course[@"title"];
return cell;
}
The main thread
Modern iOS devices have multi-core processors that enable the devices to run multiple chunks of code concurrently. Fittingly, this is referred to as concurrency, and each chunk of code runs on a separate thread. So far in this book, all of our code has been running on the main thread. The main thread is sometimes referred to as the UI (user interface) thread, as any code that modifies the UI has to run on the main thread.
When the web service completes, you need to reload the table view data. By default, NSURLSessionDataTask runs the completion handler on a background thread. You need a way to force code to run on the main thread in order to reload the table view, and you can do that easily using thedispatch_async function.
In BNRCoursesViewController.m, update the completion handler to reload the table view data on the main thread.
^(NSData *data, NSURLResponse *response, NSError *error) {
NSDictionary *jsonObject = [NSJSONSerialization JSONObjectWithData:data
options:0
error:nil];
self.courses = jsonObject[@"courses"];
NSLog(@"%@", self.courses);
dispatch_async(dispatch_get_main_queue(), ^{
[self.tableView reloadData];
});
}
Build and run the application. After the web service completes, you should see a list of Big Nerd Ranch’s courses.
UIWebView
In addition to its title, each course dictionary also keeps a URL string that points to its web page. It would be neat if Nerdfeed could open up Safari to open that URL. It would be even neater if Nerdfeed could open the web page without having to leave Nerdfeed to open Safari. Good news – it can use the class UIWebView.
Instances of UIWebView render web content. In fact, the Safari application on your device uses a UIWebView to render its web content. In this part of the chapter, you will create a view controller whose view is an instance of UIWebView. When one of the items is selected from the table view of courses, you will push the web view’s controller onto the navigation stack and have it load the URL string stored in the NSDictionary.
Create a new NSObject subclass and name it BNRWebViewController. In BNRWebViewController.h, add a property and change the superclass to UIViewController:
@interface BNRWebViewController : NSObject
@interface BNRWebViewController : UIViewController
@property (nonatomic) NSURL *URL;
@end
In BNRWebViewController.m, write the following implementation.
@implementation BNRWebViewController
- (void)loadView
{
UIWebView *webView = [[UIWebView alloc] init];
webView.scalesPageToFit = YES;
self.view = webView;
}
- (void)setURL:(NSURL *)URL
{
_URL = URL;
if (_URL) {
NSURLRequest *req = [NSURLRequest requestWithURL:_URL];
[(UIWebView *)self.view loadRequest:req];
}
}
@end
In BNRCoursesViewController.h, add a new property to hang on to an instance of BNRWebViewController.
@class BNRWebViewController;
@interface BNRCoursesViewController : UITableViewController
@property (nonatomic) BNRWebViewController *webViewController;
@end
In BNRAppDelegate.m, import the header for BNRWebViewController, create an instance of BNRWebViewController, and set it as the BNRWebViewController of the BNRCoursesViewController.
#import "BNRWebViewController.h"
@interface BNRCoursesViewController ()
@property (nonatomic) NSURLSession *session;
@property (nonatomic, copy) NSArray *courses;
@end
@implementation BNRAppDelegate
- (BOOL)application:(UIApplication *)application
didFinishLaunchingWithOptions:(NSDictionary *)launchOptions
{
self.window = [[UIWindow alloc] initWithFrame:[[UIScreen mainScreen] bounds]];
BNRCoursesViewController *cvc =
[[BNRCoursesViewController alloc] initWithStyle:UITableViewStylePlain];
UINavigationController *masterNav =
[[UINavigationController alloc] initWithRootViewController:cvc];
BNRWebViewController *wvc = [[BNRWebViewController alloc] init];
cvc.webViewController = wvc;
self.window.rootViewController = masterNav;
self.window.backgroundColor = [UIColor whiteColor];
[self.window makeKeyAndVisible];
return YES;
}
(Note that you are instantiating the BNRWebViewController in the application delegate in preparation for the next chapter, where you will use a UISplitViewController to present view controllers on the iPad.)
In BNRCoursesViewController.m, import the header files for BNRWebViewController and then implement tableView:didSelectRowAtIndexPath: to configure and push the webViewController onto the navigation stack when a row is tapped.
#import "BNRWebViewController.h"
@implementation BNRCoursesViewController
- (void)tableView:(UITableView *)tableView
didSelectRowAtIndexPath:(NSIndexPath *)indexPath
{
NSDictionary *course = self.courses[indexPath.row];
NSURL *URL = [NSURL URLWithString:course[@"url"]];
self.webViewController.title = course[@"title"];
self.webViewController.URL = URL;
[self.navigationController pushViewController:self.webViewController
animated:YES];
}
Build and run the application. You should be able to select one of the courses, and it should take you to a new view controller that displays the web page for that course.
Credentials
When you try to access a web service, it will sometimes respond with an authentication challenge, which means “Who the heck are you?” You then need to send a username and password (a credential) before the server will send its genuine response.
When the challenge is received, the NSURLSession delegate is asked to authenticate that challenge, and the delegate will respond by supplying a username and password.
Open BNRCoursesViewController.m and update fetchFeed to hit a secure Big Nerd Ranch courses web service. (Do not forget to use https instead of http.)
- (void)fetchFeed
{
NSString *requestString = @"http://bookapi.bignerdranch.com/courses.json";
NSString *requestString = @"https://bookapi.bignerdranch.com/private/courses.json";
NSURL *url = [NSURL URLWithString:requestString];
NSURLRequest *req = [NSURLRequest requestWithURL:url];
The NSURLSession now needs its delegate to be set upon creation. Update initWithStyle: to set the delegate of the session.
- (instancetype)initWithStyle:(UITableViewStyle)style
{
self = [super initWithStyle:style];
if (self) {
self.navigationItem.title = @"BNR Courses";
NSURLSessionConfiguration *config =
[NSURLSessionConfiguration defaultSessionConfiguration];
_session = [NSURLSession sessionWithConfiguration:config
delegate:nil
delegateQueue:nil];
_session = [NSURLSession sessionWithConfiguration:config
delegate:self
delegateQueue:nil];
[self fetchFeed];
}
return self;
}
Then update the class extension in BNRCoursesViewController.m to conform to the NSURLSessionDataDelegate protocol.
@interface BNRCoursesViewController () <NSURLSessionDataDelegate>
@property (nonatomic) NSURLSession *session;
@property (nonatomic, copy) NSArray *courses;
@end
Build and run the application. The web service will complete with an error (unauthorized access), and no data will be returned. Because of this, the BNRCoursesViewController will not have an array of courses to display, and so the table view will remain empty.
To authorize this request, you will need to implement the authentication challenge delegate method. This method will supply a block that you can call, passing in the credentials as an argument.
In BNRCoursesViewController.m implement the NSURLSessionDataDelegate method to handle the authentication challenge.
- (void)URLSession:(NSURLSession *)session task:(NSURLSessionTask *)task
didReceiveChallenge:(NSURLAuthenticationChallenge *)challenge
completionHandler:
(void (^)(NSURLSessionAuthChallengeDisposition, NSURLCredential *))completionHandler
{
NSURLCredential *cred =
[NSURLCredential credentialWithUser:@"BigNerdRanch"
password:@"AchieveNerdvana"
persistence:NSURLCredentialPersistenceForSession];
completionHandler(NSURLSessionAuthChallengeUseCredential, cred);
}
The completion handler takes in two arguments. The first argument is the type of credentials you are supplying. Since you are supplying a username and password, the type of authentication is NSURLSessionAuthChallengeUseCredential. The second argument is the credentials themselves, an instance of NSURLCredential, which is created with the username, password, and an enumeration specifying how long these credentials should be valid for.
Build and run the application and it will behave as it did before you changed to the secure web service, but it is now fetching the courses securely over SSL.
Silver Challenge: More UIWebView
A UIWebView keeps its own history. You can send the messages goBack and goForward to a web view, and it will traverse through that history. Create a UIToolbar instance and add it to the BNRWebViewController’s view hierarchy. This toolbar should have back and forward buttons that will let the web view move through its history. Bonus: use two other properties of UIWebView to enable and disable the toolbar items.
Gold Challenge: Upcoming Courses
In addition to providing general course information, the courses web service also returns information about upcoming courses, such as the date and instructor. Create a new UITableViewCell subclass that displays the course title and the next time the course is being offered. (Note: not all courses have an upcoming offering.)
For the More Curious: The Request Body
When NSURLSessionTask talks to a web server, it uses the HTTP protocol. This protocol says that any data you send or receive must follow the HTTP specification. The actual data transferred to the server in this chapter is shown in Figure 21.7.
Figure 21.7 HTTP request format
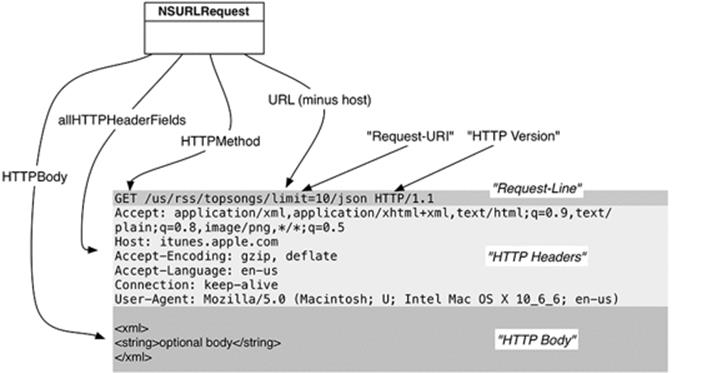
NSURLRequest has a number of methods that allow you to specify a piece of the request and then properly format it for you.
Any service request has three parts: a request-line, the HTTP headers, and the HTTP body, which is optional. The request-line (which Apple calls a status line) is the first line of the request and tells the server what the client is trying to do. In this request, the client is trying to GET the resource at /courses.json. (It also specifies the HTTP specification version that the data is in.)
The command GET is an HTTP method. While there are a number of supported HTTP methods, you most commonly see GET and POST. The default of NSURLRequest, GET, indicates that the client wants something from the server. The thing that it wants is called the Request-URI (/courses.json).
In the early days of the web, the Request-URI would be the path of a file on the server. For example, the request http://www.website.com/index.html would return the file index.html, and your browser would render that file in a window. Today, we also use the Request-URI to specify a service that the server implements. For example, in this chapter, you accessed the courses service, supplied parameters to it, and were returned a JSON document. You are still GETting something, but the server is more clever in interpreting what you are asking for.
In addition to getting things from a server, you can send it information. For example, many web servers allow you to upload photos. A client application would pass the image data to the server through a service request. In this situation, you use the HTTP method POST, which indicates to the server that you are including the optional HTTP body. The body of a request is data you can include with the request – typically XML, JSON, or Base-64 encoded data.
When the request has a body, it must also have the Content-Length header. Handily enough, NSURLRequest will compute the size of the body and add this header for you.
NSURL *someURL = [NSURL URLWithString:@"http://www.photos.com/upload"];
UIImage *image = [self profilePicture];
NSData *data = UIImagePNGRepresentation(image);
NSMutableURLRequest *req =
[NSMutableURLRequest requestWithURL:someURL
cachePolicy:NSURLRequestReloadIgnoringCacheData
timeoutInterval:90];
// This adds the HTTP body data and automatically sets the Content-Length header
req.HTTPBody = data;
// This changes the HTTP Method in the request-line
req.HTTPMethod = @"POST";
// If you wanted to set the Content-Length programmatically...
[req setValue:[NSString stringWithFormat:@"%d", data.length]
forHTTPHeaderField:@"Content-Length"];
All materials on the site are licensed Creative Commons Attribution-Sharealike 3.0 Unported CC BY-SA 3.0 & GNU Free Documentation License (GFDL)
If you are the copyright holder of any material contained on our site and intend to remove it, please contact our site administrator for approval.
© 2016-2026 All site design rights belong to S.Y.A.