Learning iOS Development: A Hands-on Guide to the Fundamentals of iOS Programming (2014)
Chapter 8. Table Views I: The Basics
In previous chapters, the main screen showed only one car at a time. In iOS, it is more common to show several data items and scroll through them. You can see examples on the main screens of Contacts, Music, Settings, and many other apps that show tables of data items.
Table views are a key part of your toolbox for designing and creating apps for iPhone/iPod touch, where space is at a premium. When combined with a UINavigationController, table views make navigating through hierarchical data easy. A table gives your user quick access to a summary list of objects. Tapping moves the user quickly up and down the hierarchy to the required level of detail.
After you learn the basics of table view controllers, you create a small project to solidify and then refine what you have learned. Then you take the experience of building a table view and transform the add/view screen to gain valuable experience in converting existing projects to use new ways of presenting and navigating information.
Next, you implement a common way of adding objects to tables and enable the user to make new cars. Then you learn about editing tables and use that as another way to delete cars.
Then, you go deeper by changing how car details are viewed and adding a new scene showing car details using grouped cells, much as the Settings app does. Then you use a special way of presenting controllers to show one modally, forcing a user to do or cancel an action. You use modal presentation to build a couple of car attribute editors.
By the time you are finished with this chapter, you will have a good understanding of the basics of table views. You can use them in your own projects for showing lists of data. Combined with navigation controllers, your apps can move through hierarchies of detail. Editing parts of the data shown in the table can be done outside the hierarchy by using modals, enabling the user to make or cancel changes.
Introduction to Table Views
Table views are a workhorse for iOS. Even if an app does not use them for the main scenes, you are still likely to use them for preferences or an About screen. They provide all the infrastructure to show small or large numbers of individual data items that optionally use a hierarchy to view and/or edit detailed information. Yet using them for the simplest case requires only a few key classes and methods.
Figure 8-1 shows the basic parts of a table view. The table contains a number of individual table view cells, for items 2 through 12. It also has support for scrolling through and selecting cells. Other possible functionality includes adding headers and footers, sections, section headers and footers, and an index. You explore most of these in this book.
Figure 8-1 Table view parts
The cells in Figure 8-1 are very simple, showing just text. You can use one of the types of cells the system provides, or you can create fully customized cells.
The code for Figure 8-1 requires three classes and two protocols:
![]() UITableViewController is the main view controller and has very few view properties and only one method. Most of the work is done by two protocols adopted by the controller. You implement methods from those protocols for displaying table cells and, in some cases, reacting to user interaction.
UITableViewController is the main view controller and has very few view properties and only one method. Most of the work is done by two protocols adopted by the controller. You implement methods from those protocols for displaying table cells and, in some cases, reacting to user interaction.
![]() UITableViewDataSource provides details about the data from the object to display in each cell to the number of sections and rows in the table. There are a number of optional methods that enable adding, deleting, and reordering cells.
UITableViewDataSource provides details about the data from the object to display in each cell to the number of sections and rows in the table. There are a number of optional methods that enable adding, deleting, and reordering cells.
![]() UITableViewViewDelegate supports the behaviors of a table view. You can do everything from configuring the height of an individual row or header to supporting editing and highlighting.
UITableViewViewDelegate supports the behaviors of a table view. You can do everything from configuring the height of an individual row or header to supporting editing and highlighting.
![]() UITableView implements all the functionality to configure and display the various parts of the table view. It has additional methods and properties for adding, moving, and deleting cells; updating data; manually scrolling content; accessing parts of the view; and configuring the index. As you will see, some of these things are best done in the data source (UITableViewDataSource) or delegate (UITableViewViewDelegate).
UITableView implements all the functionality to configure and display the various parts of the table view. It has additional methods and properties for adding, moving, and deleting cells; updating data; manually scrolling content; accessing parts of the view; and configuring the index. As you will see, some of these things are best done in the data source (UITableViewDataSource) or delegate (UITableViewViewDelegate).
![]() UITableViewCell represents an individual item displayed in the table view. There are four system styles with various mixes of a title and subtitle, including the ability to add an image. In addition, you can create your own fully customized cells.
UITableViewCell represents an individual item displayed in the table view. There are four system styles with various mixes of a title and subtitle, including the ability to add an image. In addition, you can create your own fully customized cells.
The general behaviors of a table view fall into four categories:
![]() Setup—Specify table view values for headers, footers, sections, section headers and/or footers, and number of cells in any visible sections.
Setup—Specify table view values for headers, footers, sections, section headers and/or footers, and number of cells in any visible sections.
![]() Display—Display the visible cells.
Display—Display the visible cells.
![]() Scrolling—Calculate what cells will become visible and load them. The table view manages creating versus reusing cell objects by keeping a pool of created cells and balancing which ones are reused as new data scrolls into view.
Scrolling—Calculate what cells will become visible and load them. The table view manages creating versus reusing cell objects by keeping a pool of created cells and balancing which ones are reused as new data scrolls into view.
![]() Selection—Update the selection state of any cell or cells based on the table view’s configuration. Call any delegate methods based on selection state.
Selection—Update the selection state of any cell or cells based on the table view’s configuration. Call any delegate methods based on selection state.
Behaviors can occur at any time. For example, display occurs after setup and scrolling. Setup occurs any time the data is updated or the table is told to reload.
Project TableTry
The best way to understand table behaviors and the interaction between the five key classes is to create code. Follow these steps to create your own project and let the exploration begin:
1. In Xcode, create a new Empty Application called TableTry. Until now, you have used the Single View application template; this time you will choose Empty Application and only target iPhone. The created project has only one class defined for the app delegate. It has no user interface.
2. In AppDelegate.m, remove all but the last line of the application:didFinishLaunchingWithOptions: method. If you do not remove the code, every time you launch the app, you will see a white screen, no matter what changes you make in the storyboard you create in the next step. The revised method should look like this:
- (BOOL)application:(UIApplication *)application
didFinishLaunchingWithOptions:(NSDictionary *)launchOptions {
return YES;
}
3. Add an iPhone storyboard file by selecting File > New and then choosing the User Interface category. Save the file into the TableTry folder inside the main project folder.
4. Select the new storyboard file and drag a table view controller onto the storyboard. When you are done, it should look like Figure 8-2. Three entities have been added to your storyboard. First is the table view controller. Second is a table view, with the table view controller set as the data source (the object implementing the UITableViewDataSource protocol) and delegate (the object implementing the UITableViewViewDelegate protocol). Third is a table view cell to use as a prototype for the type of cell shown in the table.
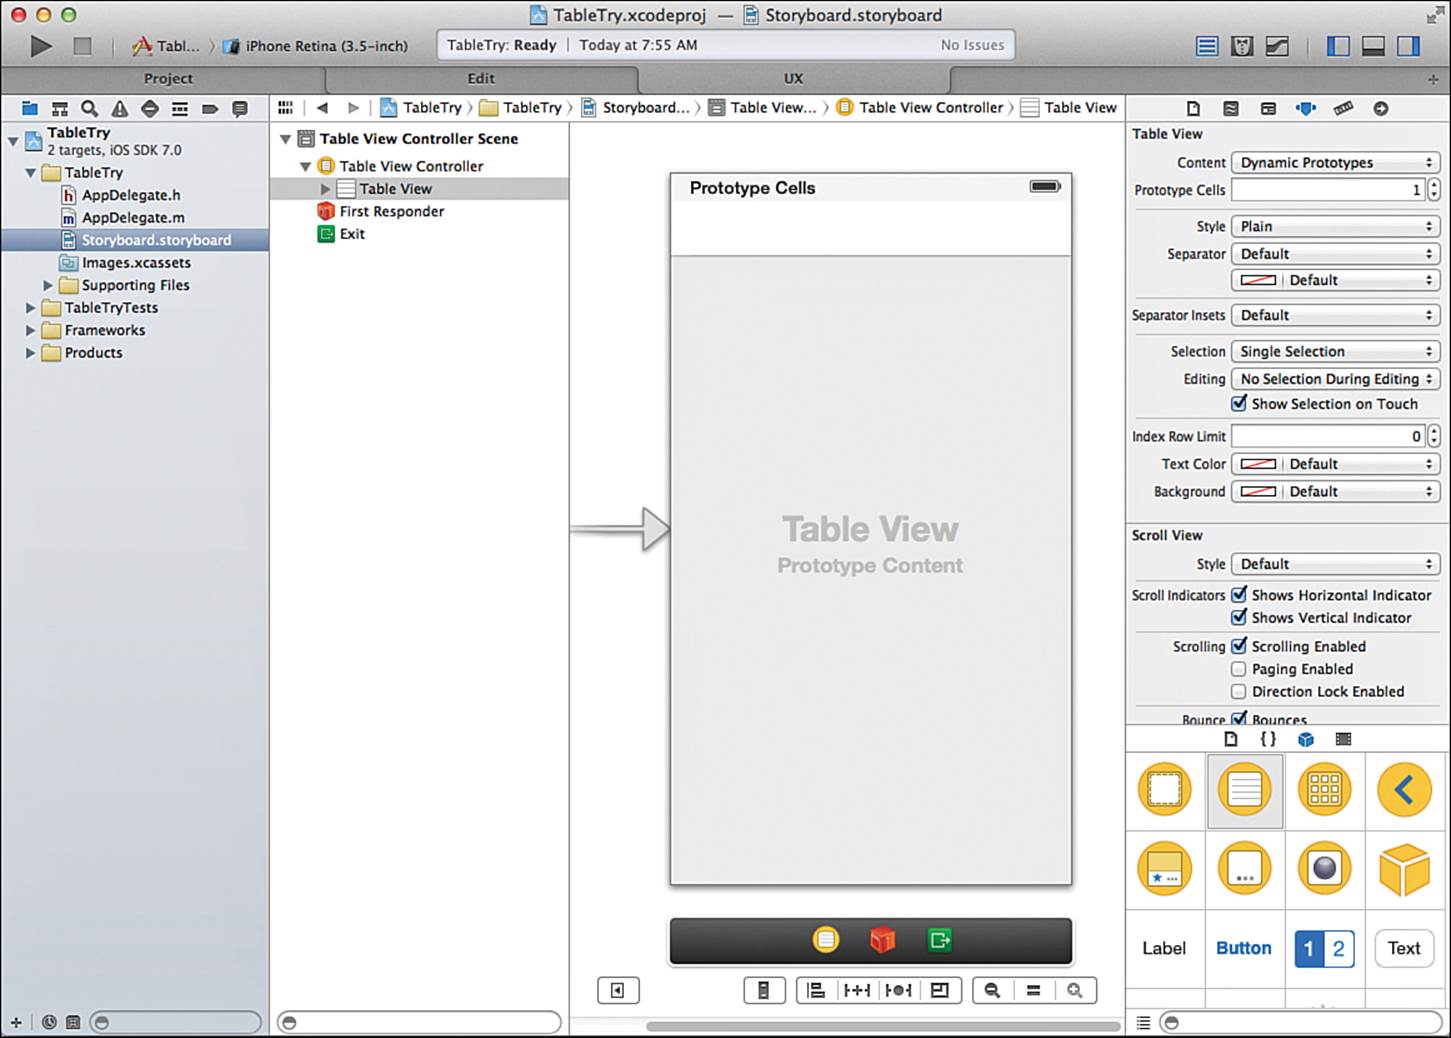
Figure 8-2 Table view controller
5. Open the Project editor and set the Main Interface for the TableTry target to the storyboard you just created.
Try running the app in the simulator, and you get a white screen with lines. The app is not broken; the table view is doing exactly what you tell it to do—in this case, showing placeholders for cells but not creating any.
The simplest thing you can do now is create some predefined cells:
1. Open the main storyboard and select the Attributes inspector for the table view.
2. In the Table View section at the top of the Attributes inspector, set the Content popup to Static Cells, and you see the table view on the storyboard change from the first image in Figure 8-3 to the second. Before you change from dynamic to static cells, the left-hand image in Figure 8-3has a Prototype Cells header with just one prototype cell. After you change to static, the right-hand image has three static cells, all of which look the same.
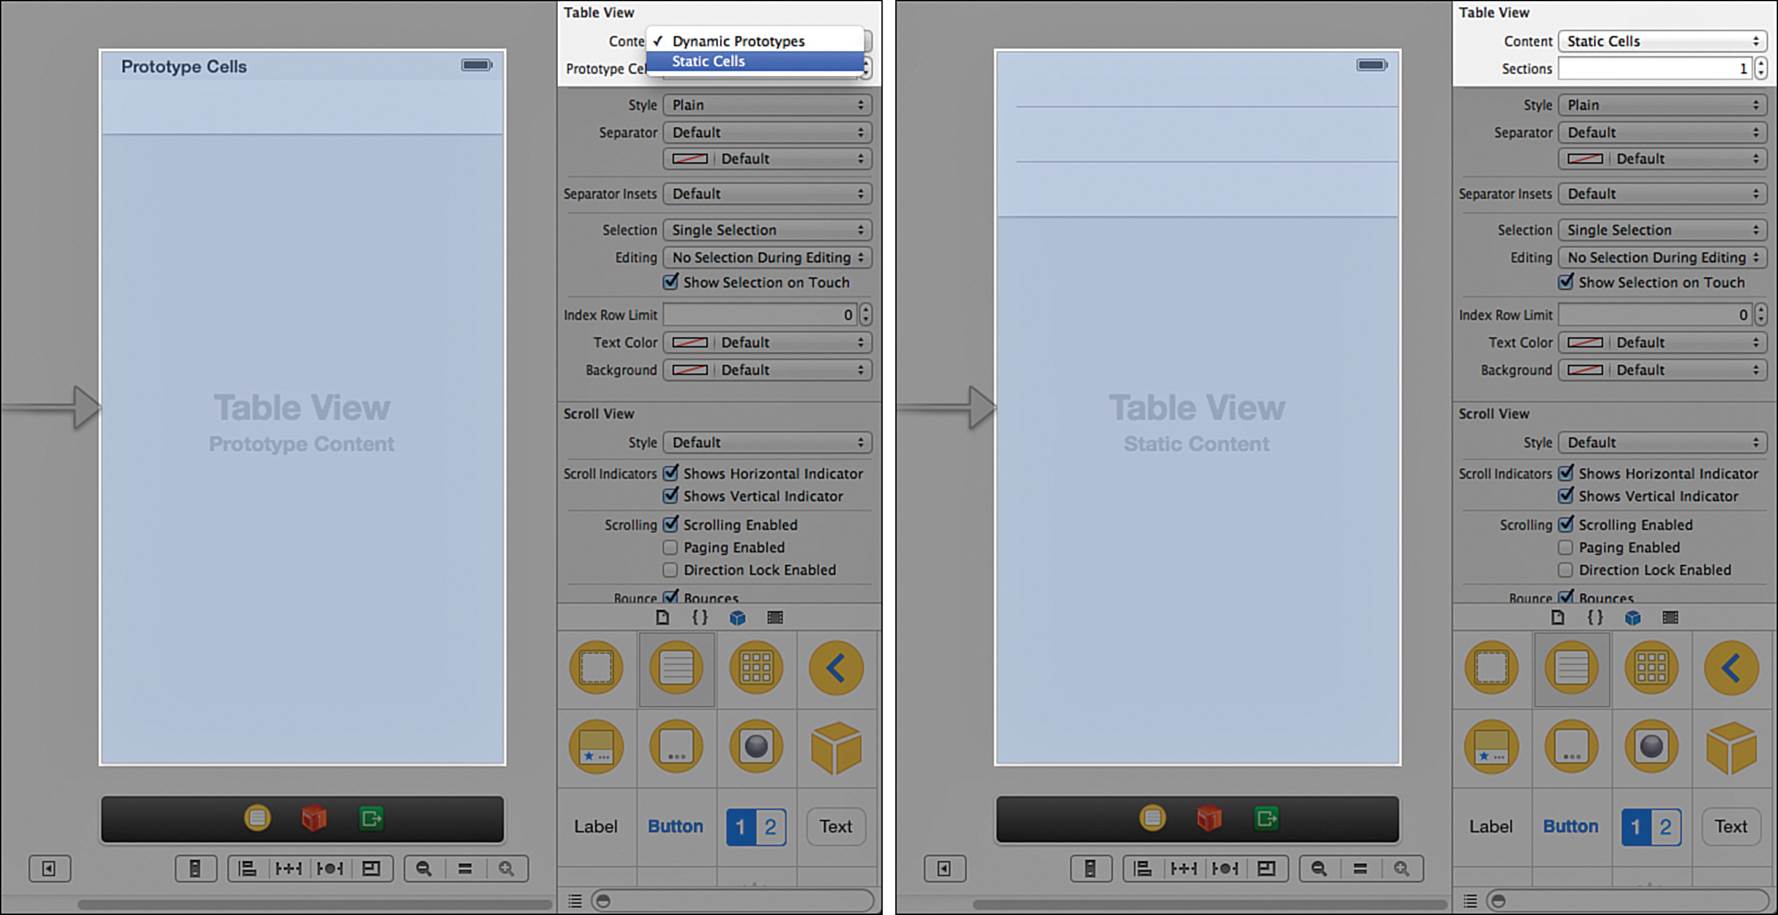
Figure 8-3 Creating static cells
Run the app again. Although it looks the same as before, each of the top three cells can be selected. Notice that the first cell is underneath the status bar. As you tap each of the top three cells, the one you tap is highlighted in gray. Tap the fourth cell, and nothing happens.
Creating Cells
Sometimes you want predefined cells. But more often, you want to show a list of data items that vary in number. The table view you just created used static cells. The number of cells and their basic look is fixed because you know the content in advance. They act like static views in the table. Sometimes you do not know how many cells you will show or how they will be organized. In such instances, instead of using static cells, you can use dynamic prototypes. Which one you choose depends on what you are trying to do:
![]() Static cells are useful when the table layout is fixed, such as most of the Settings app. You set up the number of cells, their content, and even the organization of the table at design time. You can change what information is shown at runtime by changing the contents of elements in the cell, but the basic organization of the table is fixed.
Static cells are useful when the table layout is fixed, such as most of the Settings app. You set up the number of cells, their content, and even the organization of the table at design time. You can change what information is shown at runtime by changing the contents of elements in the cell, but the basic organization of the table is fixed.
![]() Dynamic prototypes are handy when you do not know the number of data items you will show at runtime. A prototype is a template for what you want to show. At runtime, you can create as many cells as you need, using the prototypes. Each one has the same basic look but shows different data, such as an individual car. You can also have more than one prototype.
Dynamic prototypes are handy when you do not know the number of data items you will show at runtime. A prototype is a template for what you want to show. At runtime, you can create as many cells as you need, using the prototypes. Each one has the same basic look but shows different data, such as an individual car. You can also have more than one prototype.
Continue exploring table views by converting your project to use dynamic prototypes. To do so, follow these steps:
1. Change the table view back to using dynamic prototypes.
2. Delete the extra two prototypes. Basically, change things back to the left-hand image in Figure 8-3.
3. Run the app, and you might see a warning that the prototype cell does not have a reuse identifier. This is something the table view controller uses to determine what kind of prototype cell to allocate or reuse.
Open the storyboard and make sure the Attributes inspector is selected for the prototype cell. Set the reuse identifier to MyCell, as shown in Figure 8-4.

Figure 8-4 Cell reuse identifier
Now you need some code to tell the table view how many cells to create, and you need to populate those cells with data. You therefore need a UITableViewDataSource. In this case, you create your own subclass of UITableViewController, which implements the data source and delegate protocols for you. Follow these steps:
1. Choose File > New > File, select the Cocoa Touch category for iOS, and select the Objective-C class.
2. On the next screen, create a subclass of UITableViewController called MyTableViewController and save it in the project, making sure it is part of the TableTry target. (Note that this is the default behavior.)
3. Go back to the storyboard, select the table view controller, and use the Identity inspector to set the class to MyTableViewController.
You see a warning triangle in the navigation bar above the IB canvas. This tells you something is wrong, though the project should still build and run. You can look at all the warnings by clicking on the yellow arrow. In this case, the dropdown shows the warning is inMyTableViewController.m.
One way to find the errors is to open that file and look for the warning flag next to the line. Another is to click an item in the list of issues as you did in Chapter 4, “Auto Layout” (see Figure 4-23). A faster way is to click the black navigation triangles on each side of the yellow warning indicator. This opens the relevant file and takes you straight to the line with the problem. In the case of IB, it selects the UX element with the issue.
Both warnings were created when you created the class. The special #warning marker at the beginning of a line tells Xcode something needs work. Both warnings talk about incomplete implementations and serve as reminders that you have more code to write.
Sections and Rows
Each of the warnings tells you something about how the table view expects data to be organized. It is expecting zero or more sections of data organized into zero or more rows. It sounds strange to start at zero, but it is possible to have either an entirely empty set of data or just an empty section.
A good example is the Contacts app. It can have as many sections as the user has unique first letters for the last names of contacts. Each section has as many contacts as there are people whose last name begins with that letter. (For example, all friends with a last name starting with A.) But what happens if you have no contacts?
As it happens, the simulator version of the Contacts app can show you. Launch the app, tap Groups, and make sure only the Work group is selected. There is a table with the words No Contacts. As soon as you add one contact, such as John Adams, you see the contact, and No Contacts is gone. In this case, you have a table view with one section—contacts with a last name starting with the letter A—and that section has one row, for John Adams.
Your next job is to tell the table view how many sections of data there are and how many rows are in each section. In this case, you have one section with five data items. Follow these steps:
1. In MyTableViewController.m, replace the two methods shown next. The first method tells the table view how many sections of data, and the second tells how many data items for a given section. (Note the first method, numberOfSectionsInTableView: is optional and defaults to 1 if not provided.)
- (NSInteger)numberOfSectionsInTableView:(UITableView *)tableView {
return 1;
}
- (NSInteger)tableView:(UITableView *)tableView
numberOfRowsInSection:(NSInteger)section {
return 5;
}
2. In the method tableView:cellForRowAtIndexPath: below the two methods you just replaced, change the CellIdentifier from @"Cell" to @"MyCell". This tells the table view what prototype to use for creating the new cell.
Run the app again. This time you have five cells you can click, though again, they are not very interesting.
Now it is time to add some data to each cell. In this case, you add a string with the section and row number of the cell.
Generating Cells and Index Paths
Before writing the code in this section, you need to understand what is meant by an index path in a table view. As you have seen, a table view shows data as one or more groups of rows. Each group of rows is called a section. Any cell in the table can be identified by a combination of its section and row. That combination is an index path.
Table views use a specialized version of the more general NSIndexPath object to represent the index path. It is composed of two integers: The first is the section, and the second is the row. Since it is an object, you can send messages or use dot notation to access parts. Table view uses a couple of special assessors, section and row, to make coding easier and more maintainable.
If you have an NSIndexPath called cellIndexPath in a table, you can find the section by using cellIndexPath.section and the row with cellIndexPath.row.
To generate a string in the form Section: <the cell's section> Row: <the cell's row>, you use the following:
NSString *myLabel = [NSString stringWithFormat:@"Section: %d Row: %d",
indexPath.section, indexPath.row];
In fact, this is exactly how you generate unique labels for each of the five cells. Add the following lines in bold to tableView:cellForRowAtIndexPath:
- (UITableViewCell *)tableView:(UITableView *)tableView
cellForRowAtIndexPath:(NSIndexPath *)indexPath {
...
NSString *myLabel = [NSString stringWithFormat:@"Section: %d Row: %d",
indexPath.section, indexPath.row];
cell.textLabel.text = myLabel;
return cell;
}
Run the app and you see five cells, each with a section of 0 and a row of 0 through 4. Note that all index paths are 0-based, not 1-based. This works well with array-based data storage, though it can often be the source of “but I thought I coded it right” bugs.
Adding a Section
The next step is to add a section to the table. Doing so is as simple as changing the number returned from numberOfSectionsInTableView: from 1 to 2. Run the app, and there are two sections of five items each. But there are no section headings.
To add a section heading, you need to add an optional data source protocol method. Insert the following code below the numberOfSectionsInTableView: method:
- (NSString *)tableView:(UITableView *)tableView
titleForHeaderInSection:(NSInteger)section {
return [NSString stringWithFormat:@"Section: %d", section];
}
When you run the app, you see that the code simply uses the section number to create a header. Notice that all you need to do to have the headers appear is add this method and return a non-nil value. That last part is key: You can prevent a header from displaying simply by returning nilfrom this method.
There is a slight issue with the section header being underneath the status bar. That is dealt with later in this chapter.
Experiment with adding more sections and/or more cells per section. Even if the numbers are quite large, the table view still works. Part of the reason is that the table view only keeps around the cells being viewed as well as some others for fast scrolling. If you created a table with thousands of data points, only a few tens would be in memory at a time—if that. A table view creates the cells it needs and recycles the ones no longer onscreen. That is what the reuse identifier you set above is used for.
Phase I: Replacing the Add/View Scene
To learn more about table views, you need cells with data. In this section, you create a car cell along with the code to populate it. You also add a way to create and remove cars. Along the way, you replace the add/view scene with a table view.
First you replace the add/view scene with a table view controller-based scene by following these steps:
1. Open the CarValet project. You can use an existing one or use the one provided in the CH08 CarValet Starter project.
2. Open the Storyboard editor, drag in a table view controller, and move the new view controller just above the existing edit/view scene.
3. Add two new Objective-C classes to your project just below Car.m: Base CarTableViewController on UITableViewController and CarTableViewCell on UITableViewCell. Make sure the classes are added to the CarValet target.
4. In the Storyboard editor, set the class of the table view controller to CarTableViewController, and set the class of the prototype table view cell to CarTableViewCell. While the prototype cell is selected, choose attributes and set the reuse identifier to CarCell.
5. Add a property for a Car object to a car cell. This is used for displaying data in the cell and, eventually, determining what car to view and edit. Open CarTableViewCell.h and add the code shown in bold:
#import <UIKit/UIKit.h>
@class Car;
@interface CarTableViewCell : UITableViewCell
@property (strong, nonatomic) Car *myCar;
6. Import Car.h into CarTableViewCell.m.
7. Open CarTableViewController.m and add the code shown in bold. In addition to importing the car model and car table view cell, you are declaring a data array for the cars, just as you did in ViewController.m:
#import "CarTableViewController.h"
#import "Car.h"
#import "CarTableViewCell.h"
@implementation CarTableViewController {
NSMutableArray *arrayOfCars;
}
8. Copy the newCar: method from ViewController.m to the bottom of CarTableViewController.m, just above the @end statement. Then remove the call to updateLabel:withBaseString:andCount: from the pasted method.
9. In CarTableViewController.m, replace viewDidLoad with the following code from near the end of ViewController.m to allocate the car data array and add an initial car:
- (void)viewDidLoad {
[super viewDidLoad];
arrayOfCars = [NSMutableArray new];
[self newCar:nil];
}
10. Change the number of sections to 1 and the number of rows to be the size of arrayOfCars:
- (NSInteger)numberOfSectionsInTableView:(UITableView *)tableView {
return 1;
}
- (NSInteger)tableView:(UITableView *)tableView numberOfRowsInSection:(NSInteger)section {
return [arrayOfCars count];
}
11. In tableView:cellForRowAtIndexPath:, make sure the static CellIdentifier is set correctly. The line of code should look like this:
static NSString *CellIdentifier = @"CarCell";
12. Switch to the storyboard and change where the navigation controller points by Ctrl-dragging from the body of the navigation controller in the Visual editor to the new car table view controller, as shown in the left part of Figure 8-5. In the popup that appears, choose the root view controller Relationship Segue. The navigation controller root view segue now connects to the car table view controller, as shown in the right half of Figure 8-5.
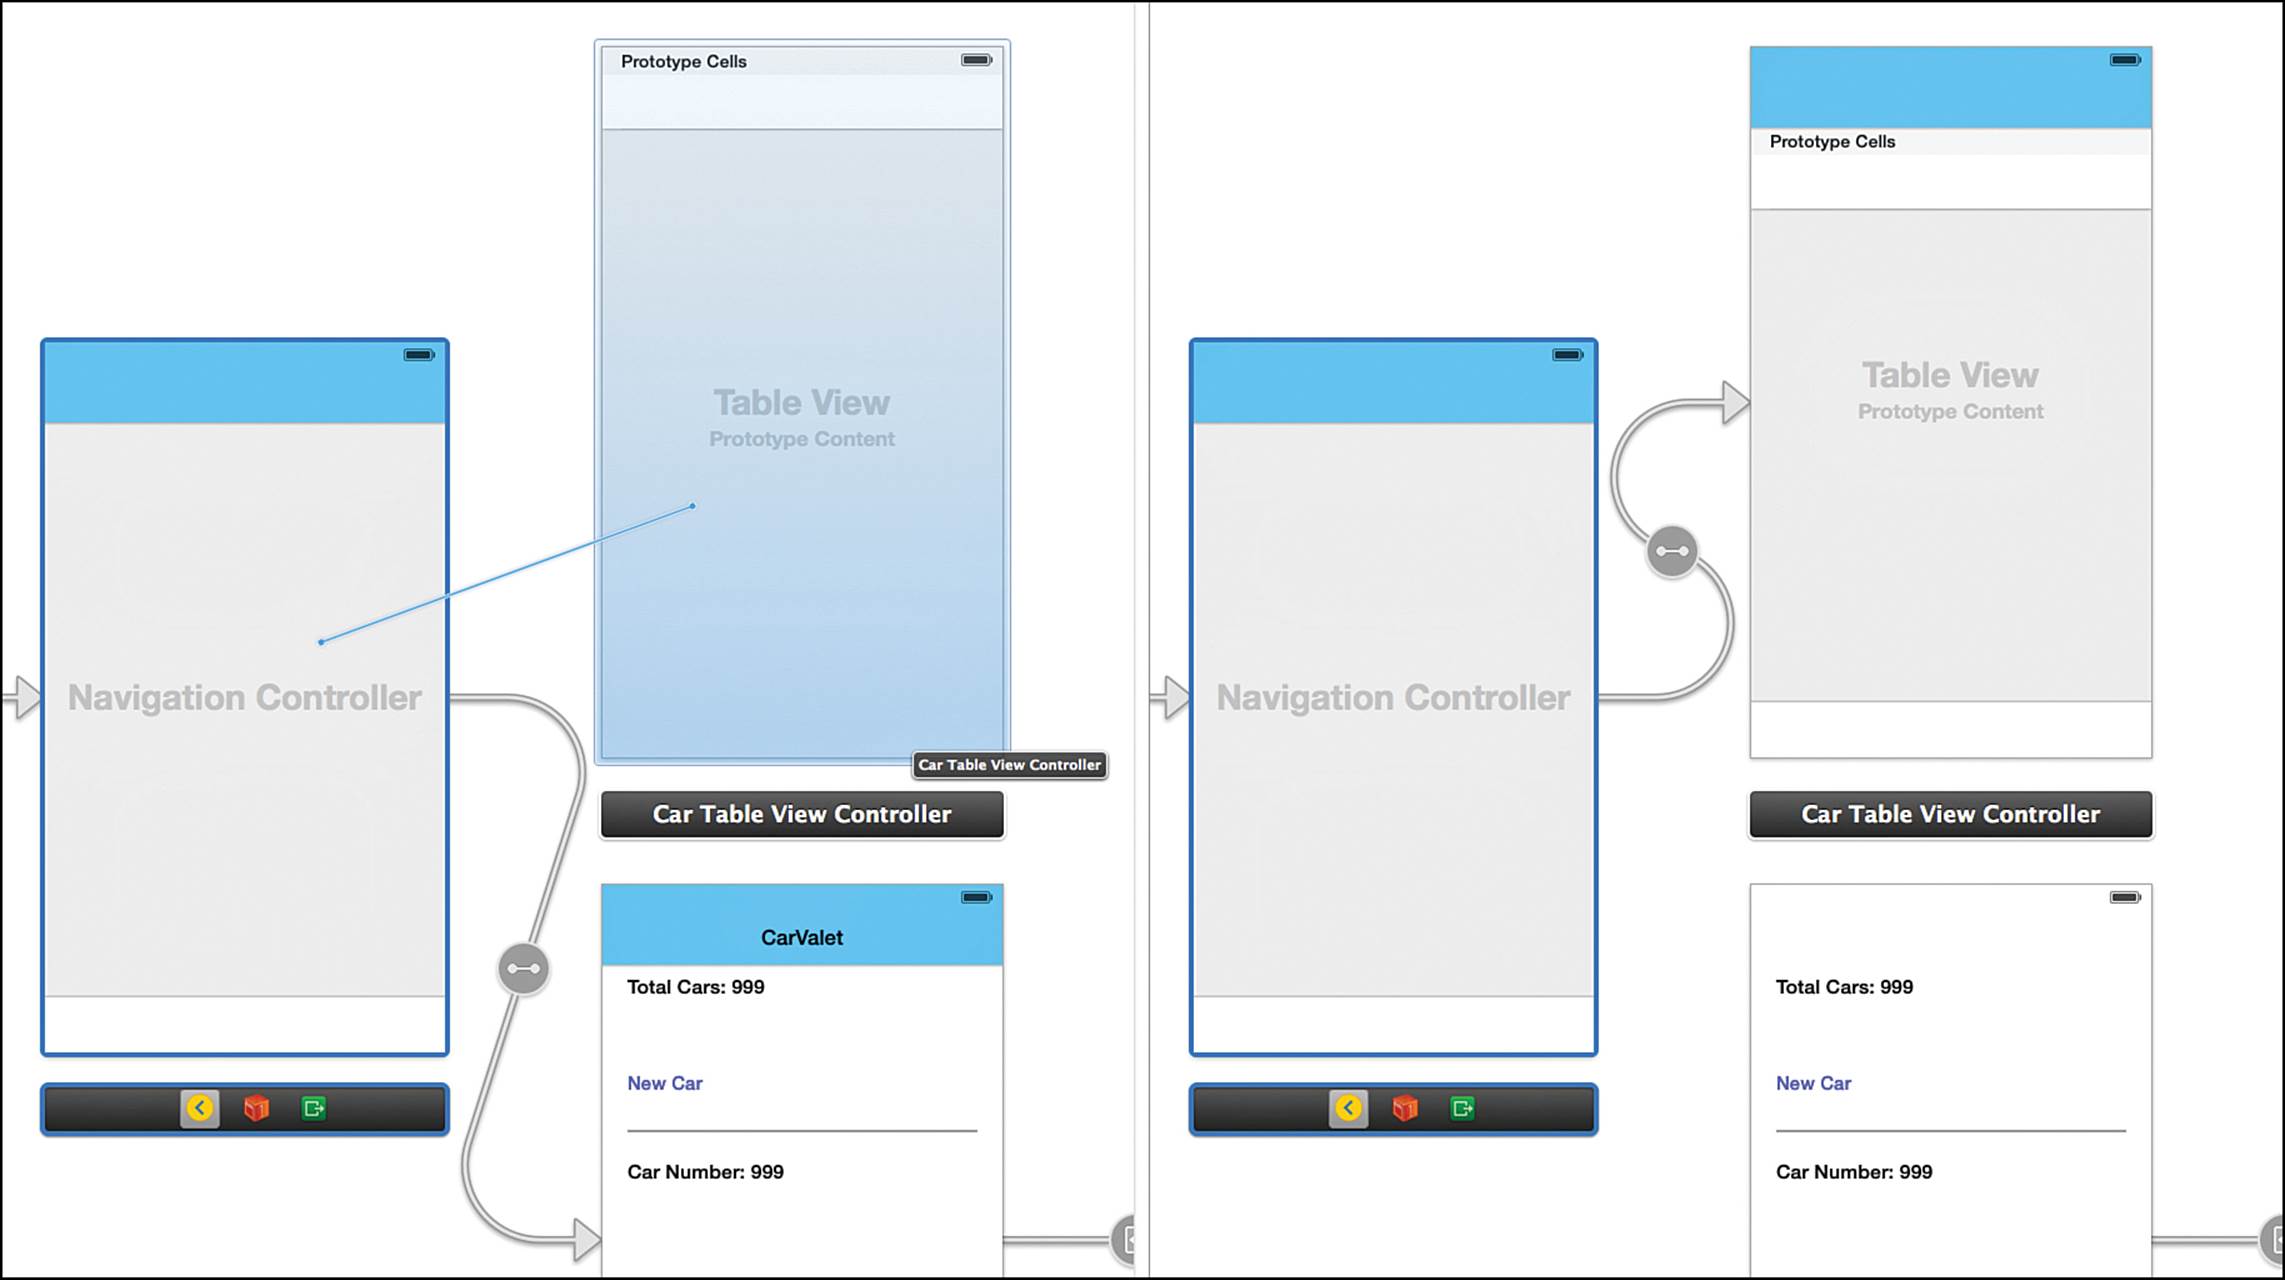
Figure 8-5 Setting a new root view controller
Run the app. The table view controller is now the add/view scene, and there is one car cell, though the only way you can tell is by selecting it. Before going on, change the title in the navigation bar to CarValet. You can do this directly or by copying the localization code fromViewController.m.
Adding a Car View Cell
You have the data for one car and a cell to represent it, but you don’t have any view elements to display the data. The next step is to modify the prototype cell to show car data. Follow these steps:
1. Add the property dateCreated of type NSDate to the Car object. Set it to [NSDate date] in the base class initializer.
2. In the storyboard, open the Attributes inspector for the car table view cell and set it to the style Right Detail. The cell changes to show Title in black on the left and Detail in light gray on the right. Change the font size of Detail to 12 points.
You change the font size by double-clicking the detail label, showing the Attributes inspector, and then using the Font area to change the size.
3. Add a publicly facing method called configureCell to CarTableViewCell, using the code in Listing 8-1. To make it public, you need to declare the method in the .h file.
4. Add code to tableView:cellForRowAtIndexPath: in CarTableViewController.m to set the car data for the cell. Then tell the cell to update itself. The changes are shown below in bold. Note that you have to change the class of cell you are creating so it knows about the myCar property and configureCell method:
- (UITableViewCell *)tableView:(UITableView *)tableView
cellForRowAtIndexPath:(NSIndexPath *)indexPath {
static NSString *CellIdentifier = @"CarCell";
CarTableViewCell *cell = [tableView
dequeueReusableCellWithIdentifier:CellIdentifier
forIndexPath:indexPath];
cell.myCar = arrayOfCars[indexPath.row];
[cell configureCell];
return cell;
}
Listing 8-1 configureCell in CarTableViewCell.m
- (void)configureCell {
NSString *make = (self.myCar.make == nil) ? // 1
@"Unknown" : self.myCar.make;
NSString *model = (self.myCar.model == nil) ?
@"Unknown" : self.myCar.model;
self.textLabel.text = [NSString stringWithFormat:@"%d %@ %@", // 2
self.myCar.year, make, model];
NSString *dateStr = [NSDateFormatter // 3
localizedStringFromDate:self.myCar.dateCreated
dateStyle:NSDateFormatterShortStyle
timeStyle:NSDateFormatterShortStyle];
self.detailTextLabel.text = dateStr; // 4
}
Here’s what happens in the numbered lines in Listing 8-1:
1. The make or model of a car could be nil, so set it to a default value. You can also localize values here. (Chapter 5, “Localization,” covers localization in detail.)
2. Set the main label to the year, make, and model of the car.
3. Get a localized version of the creation date, in as short a form as possible.
4. Set the detail text area to the shortened creation date.
When you run the code, you get a single car cell with data. Adding cars is the next step.
Adding New Cars
You already have a method to add cars. All you need is a user interface item to call it. Look at an app with table views that allow the creation of data items, such as Contacts. Apps like these commonly have an Add button in the navigation bar. Here’s how you implement one in the CarValet app:
1. Open the storyboard and drag a bar button item into the navigation bar of the add/view scene.
2. Select the Attributes inspector for that button and change the identifier to Add. You see the button change to one with a + icon.
3. Ctrl-drag from the button to the car table view controller and choose newCar: under Sent Actions.
Run the app and tap the Add button. Nothing seems to happen. In fact, cars are added, but nothing is telling the table view to update the display. You do this by adding a call at the end of the newCar: method to tell the table view to completely reload itself:
[self.tableView reloadData];
Run the app again. Now each button tap results in a new car item, though the appearance of the new cell does not look as nice as it could. This is because you are telling the table view to redraw itself each time a new car is added. In addition, you are inserting the new cars at the end of the data array, so the most recent cars show up at the bottom.
It would be better to have new cars animate in from the top of the table. All it takes is a few changes to the newCar: method, shown in bold in Listing 8-2.
Listing 8-2 Changes to newCar: for Animating Adding a Car
- (IBAction)newCar:(id)sender {
Car *newCar = [Car new];
[arrayOfCars insertObject:newCar atIndex:0]; // 1
NSIndexPath *indexPath = [NSIndexPath indexPathForRow:0 inSection:0]; // 2
[self.tableView insertRowsAtIndexPaths:@[indexPath] // 3
withRowAnimation:UITableViewRowAnimationAutomatic];
}
Here’s what happens in the numbered lines in Listing 8-2:
1. Insert the car into the front of the data array.
2. Create an NSIndexPath object that specifies the location of the new cell—its section and row.
3. Tell the table view to insert an object at the new index path. This causes the table view to call the data source for the cell at section 0, row 0—in other words, the first element of the data array. Since the array has already been updated, the new cell is returned.
When you run the code and add cars, notice that they appear to slide in from the top, shifting the existing cells down. insertRowsAtIndexPaths:withRowAnimation: did the insertion animation for you. However, there is one very important point to remember: You must update the data before you update the table.
Try moving the call to arrayOfCars below the call to the tableView and then run the app. The result is a crash. The call to update the table tells the table view to insert a new cell at the specified index path. Then the table view asks for each of the cells, including the new one, so it can correctly update. Because the new car has not been inserted into arrayOfCars yet, when the table checks the number of rows, which in turn checks the number of items in the array, it then finds that [arrayOfCars count] is one less than it should be. And that crashes the app.
Removing Cars
You can add cars, but how do you delete them? It turns out that most of the code you need for simple deletion was created when you added the CarTableViewController class. To enable deletion, all you really need to do is uncomment and modify one of the provided methods.
Note that there is another related method, tableView:canEditRowAtIndexPath:, that allows you to optionally enable or disable editing for an individual cell. Although you do not use it in the CarValet app, you should know how to use it. Uncomment the method, and for now, have it return NO for any odd row.
There are many ways to do this. Perhaps the simplest is to use just one line with the modulo operation. Remember that the row index starts at 0, so line 1 has a row of 0, and the index number for odd rows is even (yes, you read that right):
return (indexPath.row % 2 != 0);
You might wonder why you are uncommenting methods with the word edit in their name. There are two possible types of editing for table view cells: deletion and insertion. For this project, you use only deletion. The combination of both methods allows re-ordering cells.
All you really need to support deletion is the method tableView:commitEditingStyle:forRowAtIndexPath:. Uncomment it and change it so it looks like the code below:
- (void)tableView:(UITableView *)tableView
commitEditingStyle:(UITableViewCellEditingStyle)editingStyle
forRowAtIndexPath:(NSIndexPath *)indexPath
{
if (editingStyle == UITableViewCellEditingStyleDelete) {
[arrayOfCars removeObjectAtIndex:indexPath.row];
[tableView deleteRowsAtIndexPaths:@[indexPath]
withRowAnimation:UITableViewRowAnimationFade];
}
// else if (editingStyle == UITableViewCellEditingStyleInsert) {
// Create a new instance of the appropriate class,
// insert it into the array, and add a new row to the table view
// }
}
Run the app, add a few cars, and then swipe left or right on an even cell. A Delete button appears. Tap the button, and the cell is removed. Tap outside the button, and the button goes away. Swiping on an odd cell does not show the button. All the behavior to show or hide the Delete button is handled by the table view and is enabled by implementing tableView:commitEditingStyle:forRowAtIndexPath:.
The most significant addition to the method committing the delete is the line in bold that removes the deleted car from the data array before the table view removes the cell. As with adding a row, it is very important to remove the data element first. If you do not, the table view removes the cell and then checks how many rows there are. Since the data source uses the array of data, and the data for the car has not been removed, the number of cells is one higher than it is supposed to be. Your app crashes. You can try changing the order of the code and running your app to see what the error looks like. Off by one or index out of bounds errors are ones you are very likely to encounter during your development career.
User-Initiated Editing
Swiping is nice, but a novice user may not know that gesture. It would be better to provide a user interface element for editing. To do so, follow these steps for adding Edit and Done buttons to the navigation bar:
1. Open the Storyboard editor and drag two bar button items into the browser for the table view controller below First Responder in the view element list. The bar button items do not show up in the graphical representation of the controller on the right side of IB.
2. Make one bar button item a system Edit button and the other a system Done button.
3. Make sure the Assistant editor is open and showing CarTableViewController.h. Ctrl-drag properties for each button: editButton for Edit and doneButton for Done.
4. Ctrl-drag an action called editTableView: from one of the buttons and hook the other button up to that action. Both buttons call the action.
5. Add the following line to the end of the viewDidLoad method:
self.navigationItem.leftBarButtonItem = self.editButton;
6. Use Listing 8-3 for the editTableView: method.
Listing 8-3 editTableView: Method for Editing Car Cells
- (IBAction)editTableView:(id)sender {
BOOL startEdit = (sender == self.editButton); // 1
UIBarButtonItem *nextButton = (startEdit) ? // 2
self.doneButton : self.editButton;
[self.navigationItem setLeftBarButtonItem:nextButton animated:YES]; // 3
[self.tableView setEditing:startEdit animated:YES]; // 4
}
Here’s what happens in the numbered lines in Listing 8-3:
1. Editing is starting if the Edit button is sending the message.
2. The next button to show is the item not showing: Done if Edit, and Edit if Done.
3. Animate the new navigation bar button.
4. Tell the table view to animate to an editing or nonediting state.
Run the app and try tapping the Edit and Done buttons. When you enter edit mode, you see red circles with lines in them, but only for each even row. This is because of the code in tableView:canEditRowAtIndexPath:. Change that method back to returning YES or simply comment out the method.
Rerun the app, and you should see something similar to Figure 8-6. The left-hand image shows the screen with a few cars before the Edit button is touched. After you tap the Edit button, the right-hand image appears. In this case, the delete wheel of the middle item has been touched. You should be able to delete as few or as many cars as you want. Tap Done, and the table returns to the normal state with the top button saying Edit.

Figure 8-6 Edit and Done buttons
So far you can create and delete cars. However, except for the creation date, every car is the same. You need to provide a way to view and edit the details of a car.
Before doing that, you need to clean up the storyboard. Since the old add/view and edit screens are no longer used, remove their controllers from the storyboard. Now move the new cars table view next to the navigation controller where add/view used to be. You do not need to remove theViewController and CarEditViewController class files as there is still useful code there, such as for localization.
Finally, change the title of the title tab from Add/View to Cars. Remember that the tab bar item for Cars is part of the navigation controller, not the tab bar or table view controllers.
Phase II: Adding an Edit Screen Hierarchy
In this section, you add scenes to view and edit a car. You start by modifying car detail cells to show that there is more. Then you create a car detail scene with an associated class and connect it to a car cell. Next, you add some editing screens and any required classes, and you hook them up to appropriate car view detail cells. Along the way, you add the code for the full edit flow and learn about pickers.
The first step is to let the customer know there is more information. This is as simple as adding a disclosure indicator to the car data cell:
![]() In the storyboard, select the car cell prototype and use the Attributes inspector to set the accessory view to a disclosure indicator.
In the storyboard, select the car cell prototype and use the Attributes inspector to set the accessory view to a disclosure indicator.
Run the app, and now every cell has a right-pointing chevron (which looks like a greater-than symbol) on the right side. This truncates the time and date area, but it won’t matter later on, as you customize the cell in Chapter 10, “Table Views II: Advanced Topics.” If you really want to modify things, modify configureCell to show a short format of only the date or time.
Adding a View Car Scene
You do most of the visual work for creating a car detail screen in the storyboard:
1. Drag in a table view controller and place it to the left of the new cars scene.
2. Select the table view and set the content to Static Cells and the style to Grouped. When you change the style, you see a setting for the number of sections. Give the table three sections.
The table view now looks as shown in Figure 8-7. The groups and cells appear both in the browser and on the storyboard. You can select groups and change the number of cells, and you can also edit each cell.
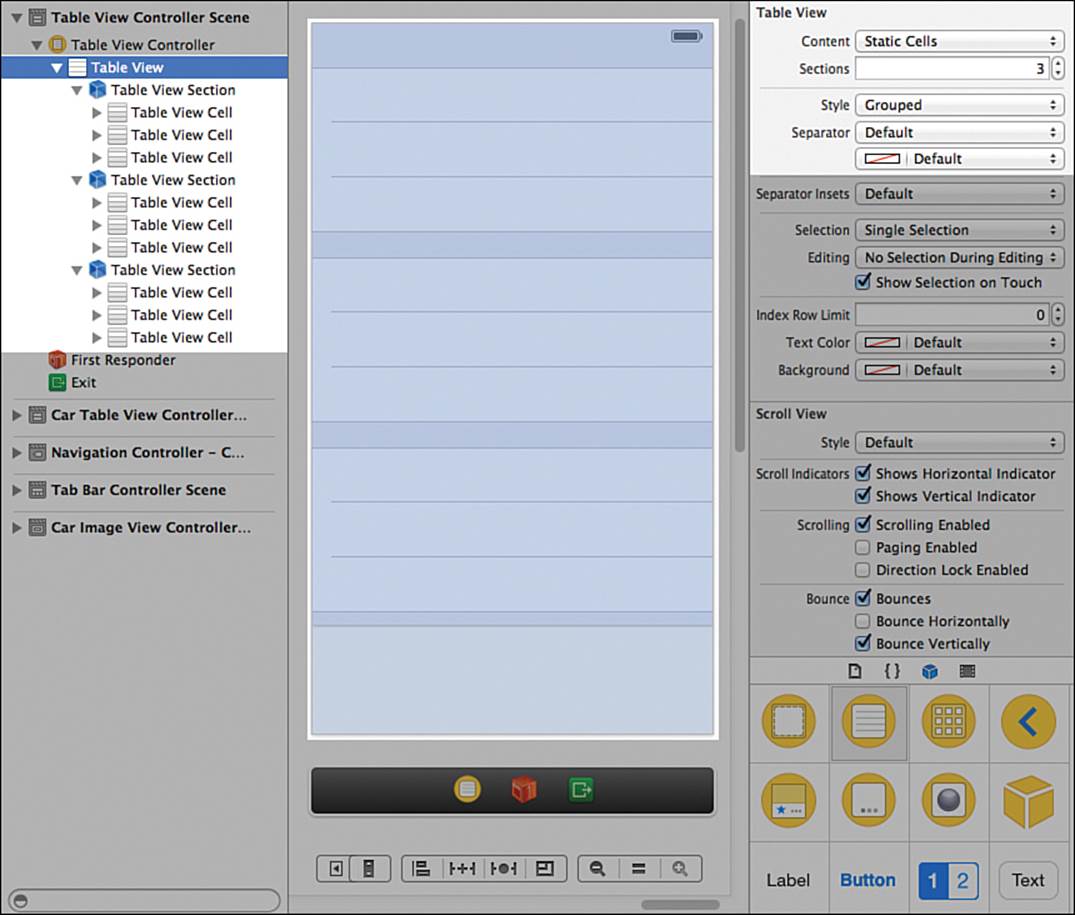
Figure 8-7 A grouped table view
Change the number of cells in each group, based on the number of data items to show for that group:
1. Select the first group, and the Attributes inspector changes to enable editing the number of rows, the header, and the footer. Leave the rows at three and set the header to Make, Model, & Year. The text for the header is added to the group on the storyboard.
2. Set the second group of one cell with a header of Fuel.
3. Set the third group’s header to Date Registered and ensure that it has two cells.
4. For each of the cells, set the type to Basic and the content to the name of the data item it shows. For example, the three cells in the first group should be called Make, Model, and Year. The last group is split into Date and Time. When you are done, the view looks as shown in Figure 8-8.
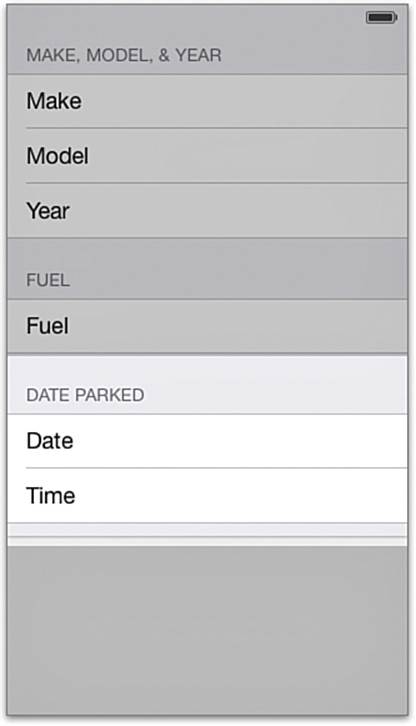
Figure 8-8 Detail view with cells
It is time to see how this view looks:
1. Ctrl-drag a push selection segue from the prototype car cell to the view car table view controller. Make sure you do not select an accessory segue, as they originate from cell accessory controls, not from selecting the cell itself. Also, make sure you are dragging from the cell, not any of the contents.
2. Select the segue and use the Attributes inspector to set the identifier to ViewSegue.
3. Set the navigation bar title of the car detail scene to View Car and run the app.
With very little effort, you have created a view that opens in response to tapping a cell. All the work of highlighting and unhighlighting a cell, transitioning the view, and creating a path back is handled for you.
Populating the View Car Scene with Data
To populate the view car scene with data, you need a custom class for the scene’s view controller. Follow these steps:
1. Add the class ViewCarTableViewController, based on UITableViewController, and make sure it is included in the CarValet target. Set it as the controller class for the view car scene.
2. Add the following code shown in bold to ViewCarTableViewController.h:
#import <UIKit/UIKit.h>
@class Car;
@interface ViewCarTableViewController : UITableViewController
@property Car *myCar;
This code should look very familiar. It is almost identical to the header for the prototype car cell. This is because the view car scene needs a Car object to view and edit.
3. Open the storyboard, select the static table view controller, and set its class to ViewCarTableViewController.
4. Open the Assistant editor and make sure it is showing ViewCarTableViewController.h. Ctrl-drag properties from each of the labels in the static cells to the .h file and name them makeLabel, modelLabel, yearLabel, fuelLabel, dateLabel, and timeLabel. Make sure the properties are of type UILabel. The easiest way to do this is to fully expand the table view in the left-hand browser by Option-clicking the triangle and then Ctrl-dragging from each label.
5. Open ViewCarTableViewController.m in the editor and import Car.h. Because this table shows static cells, you do not need any of the data source protocol methods, so remove them. Instead, you set up any dynamic content in the viewDidLoad method. Use the following code:
- (void)viewDidLoad {
[super viewDidLoad];
self.makeLabel.text = (self.myCar.make == nil) ?
@"Unknown" : self.myCar.make;
self.modelLabel.text = (self.myCar.model == nil) ?
@"Unknown" : self.myCar.model;
self.yearLabel.text = [NSString stringWithFormat:@"%d",
self.myCar.year];
self.fuelLabel.text = [NSString stringWithFormat:@"%0.2f",
self.myCar.fuelAmount];
self.dateLabel.text = [NSDateFormatter
localizedStringFromDate:self.myCar.dateCreated
dateStyle:NSDateFormatterMediumStyle
timeStyle:NSDateFormatterNoStyle];
self.timeLabel.text = [NSDateFormatter
localizedStringFromDate:self.myCar.dateCreated
dateStyle:NSDateFormatterNoStyle
timeStyle:NSDateFormatterMediumStyle];
}
Again, most of this code should look familiar. The conditional assignment statements are the same as those used to create the main label in a car view cell. The date and time labels use the same method as a car view cell, but they use different styles of constants to show either more detail or no detail.
6. Import ViewCarTableViewController.h into CarTableViewController.m and add the following method above viewDidLoad:
- (void)prepareForSegue:(UIStoryboardSegue *)segue
sender:(id)sender {
if ([segue.identifier isEqualToString:@"ViewSegue"]) {
ViewCarTableViewController *nextController;
nextController = segue.destinationViewController;
NSInteger index = [self.tableView indexPathForSelectedRow].row;
nextController.myCar = arrayOfCars[index];
}
}
You created a similar prepareForSegue:sender: method for ViewController. In this case, you are setting the Car object for the incoming ViewCarTableViewController.
Run the app, create a few cars, and tap one of them. The new view car scene opens. You are able to scroll the table, and rotation is handled correctly. In fact, both of the new scenes you created handle rotation, resizing their cells and scrolling as required. When you select a different car, the app shows a new car view screen with the correct data. Of course, the only difference between detail screens is the Date Registered area. Now it is time to add editing of the make, model, and year.
One thing you might notice is a white band at the bottom of both table views. This is the toolbar you added in a previous chapter. Since there is no need for the toolbar, you can remove it:
1. Open the storyboard and select the navigation controller.
2. Select the toolbar in the left-hand view and delete it.
3. Make sure the navigation controller is selected on the canvas, select the Attributes inspector, and set the bottom bar to none.
When you run the app, there is no white bar at the bottom.
Editing Data
Most of the data for a car can be edited. You need to provide scenes for editing the different attributes of a car starting with the make and model. Both items are text-based, at least for now, so both can use the same kind of scene. Follow these steps:
1. Drag a UIViewController to the right of the view car scene.
2. Add a UINavigationBar near the top and set the leading and trailing constraints to 0. Drag from the top of the navigation item into the top area. Depending on how high up the navigation bar is, you will either set the Top Space to Top Layout Guide, or the vertical space to the layout guide. Either way, make the connection and then change the value of the constraint to 0.
Also, give the bar an appropriate tint. You can do this in the Attributes inspector for the navigation item.
3. Drag a bar button item into each side of the navigation bar. Make the left one a system Cancel button and the right one a system Done button.
4. Drag in a label and set the constraints to 20 points below the bottom of the navigation item and the system distance from the leading and trailing edges of the container.
5. Add a text field and set the constraints to the system distance below the label, and aligned with the leading and trailing edges (or 0 space from each edge).
6. With the field still selected, use the Attributes inspector to set the clear button to Appears While Editing. When you are done, the scene should look like Figure 8-9 (although the tints may vary).
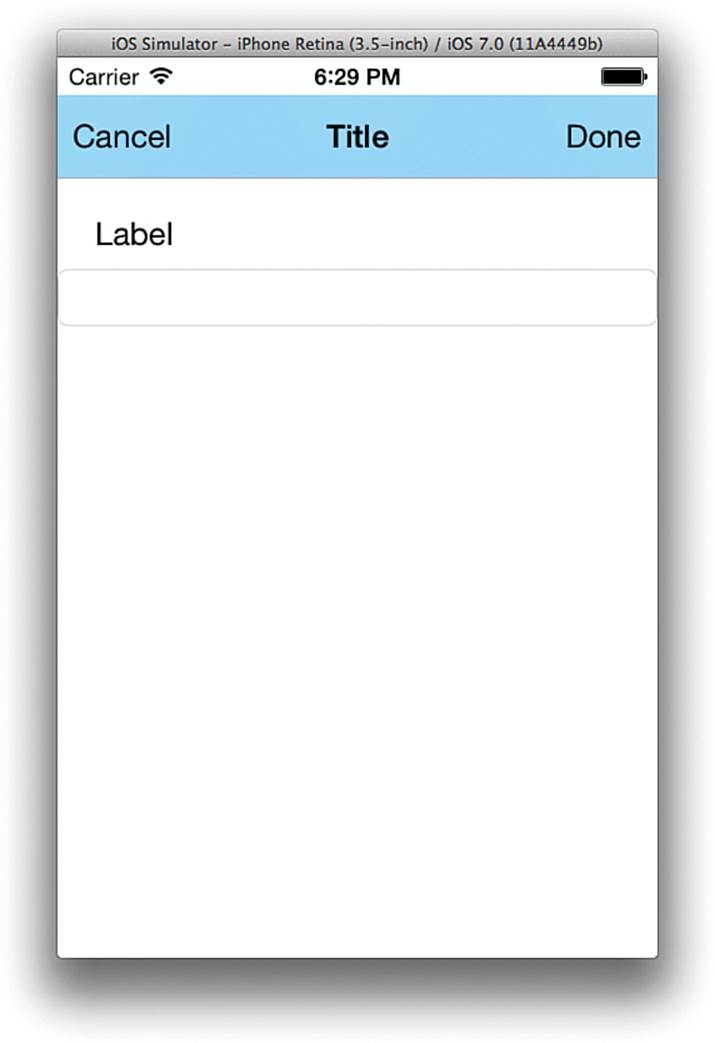
Figure 8-9 Make and model edit scene
Adding the MakeModelEditViewController Class
The new controller is for editing either the make or model of a car. This means the title, label, and field data need to be configured before the view is shown. There are two ways to do this: Either the view car scene can set up properties in prepareForSegue:sender: or you can use a protocol. Using a protocol is the preferred way since it gives greater flexibility and maintainability. It also means you can reuse the elements in other projects.
So far when you change the current screen, you are navigating up or down the hierarchy of views or switching to a new tab or set of views. In a hierarchy, you go from an overview of all cars to the detail on one car. Users see views sliding in from the right as they go deeper and out to the left as they move back up.
Sometimes you want to show something that is outside the hierarchy. Editing a particular attribute of a car is one example. Editing is not just the ability to change something; you also offer the chance to cancel a change, even if the user has already entered a new value.
This kind of operation is different, and it is a good idea to show the user that he or she is not just drilling deeper. You do this with a modal screen, which forces the user to make a choice. The user can either make a change and accept it or cancel. A user cannot navigate anywhere else in the app until that choice is made. Even the visual transition of a modal is different from usual. The default transition for modals is sliding in from the bottom and down and out when they are done.
In iOS, you can show any scene (or view controller) as a modal. You have choices in how you implement the transition. As you will see, you can use either a modal segue or a different call to the current navigation controller.
And when the user has finished, usually by touching either a Done or Cancel button, you need to go back to the scene that originally showed the modal. When you show the modal with a segue, going back is called unwinding.
Use the following steps to create the protocol for exchanging data, as well as turning the scene you just created into an editor for the make or model:
1. Create a subclass of a view controller called MakeModelEditViewController and set it as the class for the scene you just created.
2. Make sure the new make/model edit scene is selected in the storyboard and that the .h file is open in the Assistant view. Ctrl-drag properties from the label called editLabel and the text field called editField.
3. The final property is for setting the navigation bar title. Your initial thought may be to Ctrl-drag from the navigation bar. Although doing that works, it requires more code than connecting directly to the navigation item. Expand the navigation bar in the browser and Ctrl-drag from the navigation item to create a property called myNavigationItem. See the “Note: Why Connect to the Navigation Item?” for an explanation of why you are creating this property.
4. Ctrl-drag from each of the bar button items to create an action in the .h file: editCancelled: for Cancel and editDone: for Done.
5. Add a protocol called MakeModelEditProtocol and set the contents of the file to the code that follows. Each method in the protocol is used to set up a different part of the make/model edit scene, except for the final one, which is used to send the edited value back to the delegate:
#import <Foundation/Foundation.h>
@protocol MakeModelEditProtocol <NSObject>
-(NSString*)titleText;
-(NSString*)editLabelText;
-(NSString*)editFieldText;
-(NSString*)editFieldPlaceholderText;
-(void)editDone:(NSString*)textFieldValue;
@end
6. Import the protocol into MakeModelEditViewController.h and add the following property:
@property (weak, nonatomic) id <MakeModelEditProtocol> delegate;
7. Initialize the title, label, and text edit field using the protocol methods. Open MakeModelEditViewController.m and replace viewDidLoad with the code below, which sets each item in the user interface to whatever the delegate returns:
- (void)viewDidLoad
{
[super viewDidLoad];
self.myNavigationItem.title = [self.delegate titleText] ;
self.editLabel.text = [self.delegate editLabelText];
self.editField.text = [self.delegate editFieldText];
self.editField.placeholder = [self.delegate editFieldPlaceholderText];
}
8. The only other methods required for the make/model controller are cancelTouched: and editTouched:. These methods transition back to the scene that opened the editor. In addition, if the user touches Done, the delegate is sent the current text field value.
You need to close a controller opened from a modal transition and unwind the segue at the same time. You can use the UIViewController method dismissViewController-Animated:completion: to do this. Replace the two IBActions with the following code:
- (IBAction)editCancelled:(id)sender {
[self dismissViewControllerAnimated:YES completion:nil];
}
- (IBAction)editDone:(id)sender {
[self.delegate editDone:self.editField.text];
[self dismissViewControllerAnimated:YES completion:nil];
}
9. Import the protocol into ViewCarTableViewController.h and add the code below just after the @interface declaration line:
<MakeModelEditProtocol>
This code says that ViewCarTableViewController agrees to conform to the protocol.
10. Add the protocol methods to the bottom of ViewCarTableViewController.m, just above @end. The easiest way to do this is to copy the declarations from the protocol file, paste them into the .m file, and then go through each one replacing the ending semicolon (;) with an open curly brace ({) and press the Return key. For example, here is how the titleText method looks after pressing Return:
-(NSString*)titleText {
}
Note: Why Connect to the Navigation Item?
You might wonder why you created a property for the navigation item in the make/model edit view controller. After all, one of the default properties of a view controller is navigationItem.
The reason is that the default navigation bar and item properties are set up and maintained by UINavigationController. In this case, your view controller opens with a modal, not a push segue. The edit view is opened using presentModalViewController:animated, which is a UIViewController method. It is not pushed on the navigation stack, so it is not managed by the navigation controller. You are responsible for adding your own navigation bar, setting up connections, and any required management.
Making View Car a MakeModelEditProtocol Delegate
The Make/Model editor is ready to edit something and let the delegate know the result. The next step is to prepare the delegate, in this case, ViewCarTableViewController. The one unusual part is keeping track of what data field is being edited.
The Make/Model editor really does not care what it is editing. In fact, it can edit any text item. All the context (title, label, placeholder text) is set by the delegate. That means the view car controller needs to keep track of what field is being edited. Follow these steps to complete adding editing of the car make and model:
1. Modify the top of ViewCarTableViewController.m to add a state variable and some state value constants by adding the following code in bold:
...
#define kCurrentEditMake 0
#define kCurrentEditModel 1
@implementation ViewCarTableViewController {
NSInteger currentEditType;
}
...
2. In the storyboard, add a modal selection segue (not accessory action) from the make cell to the make/model edit scene. Select the segue and set the identifier to MakeEditSegue. While setting the identifier, make sure the style is Modal. Repeat the process using the model cell and an identifier of ModelEditSegue.
3. Set up the make/model edit controller using prepareForSegue:sender:. Use the method to set what data field is being edited and set the editor’s delegate. Remember to import the header file for the editor, in this case, MakeModelEditViewController.h.
You created similar code for CarTableViewController. The first two lines of each if case get a reference to the incoming editor, the next sets the delegate, and the final one sets the state:
- (void)prepareForSegue:(UIStoryboardSegue *)segue
sender:(id)sender {
if ([segue.identifier isEqualToString:@"MakeEditSegue"]) {
MakeModelEditViewController *nextController;
nextController = segue.destinationViewController;
nextController.delegate = self;
currentEditType = kCurrentEditMake;
} else if ([segue.identifier isEqualToString:@"ModelEditSegue"]) {
MakeModelEditViewController *nextController;
nextController = segue.destinationViewController;
nextController.delegate = self;
currentEditType = kCurrentEditModel;
}
}
4. Add the body of the protocol methods for setting up the make/model edit scene. Each method needs to determine what field is being edited and return the correct string; they will look almost identical. There are many ways to implement the behavior. In this case, you use a switchstatement to give flexibility for adding more fields (as you do later in the book). The titleText protocol method looks like this:
-(NSString*)titleText {
NSString *titleString = @"";
switch (currentEditType) {
case kCurrentEditMake:
titleString = @"Make";
break;
case kCurrentEditModel:
titleString = @"Model";
break;
}
return titleString;
}
Use this as a template for all the other setup protocol methods. Table 8-1 gives the values for the make and model strings for each method, including titleText.
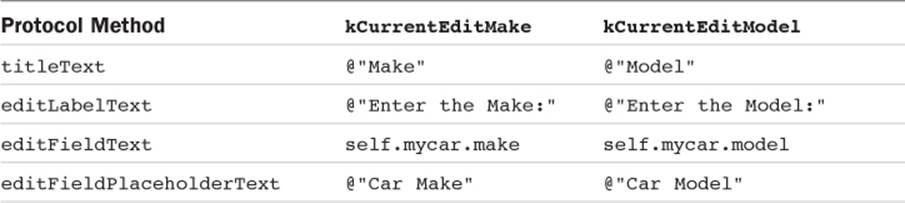
Table 8-1 Return Values for MakeModelEditProtocol Text Setup Methods
5. Update the detail field with any new value from the editDone: protocol method. Note that no action is required if the user cancels the edit, and even if the user taps Done, there might be no change. Use the code in Listing 8-4 for the protocol method.
Listing 8-4 View Car Implementation of the editDone: Protocol Method
-(void)editDone:(NSString*)textFieldValue {
if (textFieldValue != nil &&
[textFieldValue length] > 0) { // 1
switch (currentEditType) {
case kCurrentEditMake:
if ((self.myCar.make == nil) || // 2
!([self.myCar.make isEqualToString:textFieldValue])) {
self.myCar.make = textFieldValue; // 3
self.makeLabel.text = textFieldValue; // 4
}
break;
case kCurrentEditModel:
if ((self.myCar.model == nil) ||
!([self.myCar.model isEqualToString:textFieldValue])) {
self.myCar.model = textFieldValue;
self.modelLabel.text = textFieldValue;
}
break;
}
}
}
Here’s what happens in the numbered lines in Listing 8-4:
1. Update only if there is new text. If the text field was initially set to nil by editFieldText and is still nil, nothing has changed. It could also be an empty string.
2. There is some text from the edit field. Update if there is no current value or if the new value is different from the old value.
3. If there is an update, change the Car object.
4. Change the label in the car view.
Why Not Use an enum for currentEditType?
If you have done much coding in Objective-C, C, or C++, you might wonder why I did not use an enum—that is, an enumerated type—for currentEditType.
The main reason is because it is a simple two-state variable. Defining and using an enum would at least double the code. On the other hand, if I expected the number of states to grow, using an enum would make sense, especially when combined with a switch statement.
To learn more about enums and how to use them, see Learning Objective-C 2.0: A Hands-on Guide for Mac and iOS Developers by Robert Clair.
Run the code, open the car detail view, and try editing the make and model fields. You should test the different cases:
![]() Edit a field and cancel. No change should happen.
Edit a field and cancel. No change should happen.
![]() Edit a field with no set value, shown as “Unknown” in the interface. Make no change and tap Done. No change should happen.
Edit a field with no set value, shown as “Unknown” in the interface. Make no change and tap Done. No change should happen.
![]() Edit a field, make a change, and tap Done. The car view should update.
Edit a field, make a change, and tap Done. The car view should update.
![]() Edit a field, make a change, and then tap Cancel. The car view should not change.
Edit a field, make a change, and then tap Cancel. The car view should not change.
Making this kind of list is a way of specifying test cases for an application. Test cases help you make sure that what you want to happen is what actually happens. Getting practice at turning desired behavior into test cases that confirm that behavior is an important skill. By using test cases to regularly test your code, you can catch bugs early in the process and also catch problems that get introduced. Also note that, while testing on the simulator catches most bugs, testing on a physical device is the only way to know if your app really works.
When you have edited a make and model, go back to the car table. You should find a bug: The cars list doesn’t update with the new information.
Adding a ViewCarProtocol
There is nothing that links the view car controller back to the cars table controller. The only communication happens in prepareForSegue:sender: when CarTableViewController sets myCar for the incoming car view. You need a protocol so the two view controllers can communicate.
The protocol needs two messages: one for setting which car to view and one to tell the delegate if there are any changes to the data. The last part means view car has to track whether there are any changes. That is a good place to begin:
1. In ViewCarTableViewController.m, add another state variable of type BOOL below currentEditType. Call it dataUpdated. Initialize dataUpdated to NO just below the call to super in viewDidLoad.
2. Set dataUpdated to YES any time you update self.myCar in editDone:.
3. Add a new protocol called ViewCarProtocol just below ViewCarTableViewController.m and add the following bold lines:
...
#import <Foundation/Foundation.h>
@class Car;
@protocol ViewCarProtocol <NSObject>
-(Car*)carToView;
-(void)carViewDone:(BOOL)dataChanged;
@end
4. Import ViewCarProtocol.h into ViewCarTableController.h and add a line declaring a delegate that conforms to the protocol:
@property (weak, nonatomic) id <ViewCarProtocol> delegate;
5. Set the myCar property in ViewCarTableController’s viewDidLoad method by adding this line just below the one initializing dataUpdated:
self.myCar = [self.delegate carToView];
6. Set up CarTableViewController to be a delegate by importing ViewCarProtocol.h into the .h file and adding the following line of code just below the @interface line:
<ViewCarProtocol>
7. Add the protocol methods to CarViewTableViewController.m just above newCar:. Leave carViewDone: empty. You no longer set the value of myCar in prepareForSegue:sender:. Enter the code you need so carToView looks like this:
- (Car *)carToView {
NSInteger index = [self.tableView indexPathForSelectedRow].row;
return arrayOfCars[index];
}
8. Set the cars table as the delegate for view car by changing the body of prepareForSegue:sender: to this:
if ([segue.identifier isEqualToString:@"ViewSegue"]) {
ViewCarTableViewController *nextController;
nextController = segue.destinationViewController;
nextController.delegate = self;
}
Catching the Transition Back to the Main Cars Table
Figure 8-10 shows the current transitions and how they occur. You explicitly connect three segues: the push from the cars table to view car and both modal ones from view car to make/model edit. You also explicitly unwind the segue from make/model edit back to view car by usingdismissControllerAnimated:completion:.

Figure 8-10 Scene transitions
You use the editTouched: protocol method to communicate changes from make/model edit back to view car. But how can you communicate from view car back to the cars table?
The transition from view car to the cars table is an implicit unwind of the original push segue originating from a user interface element you do not control. The user taps the back button in the navigation bar, and the segue is unwound, with no storyboard or segue calls.
However, there is another mechanism. The back button is managed by the navigation controller. Each time a view controller is pushed on or popped off the stack, the navigation controller looks for an optional delegate and can send messages both before and after the transition.
To catch the transition from the car view back to the cars table, all you need to do is make the correct controller a delegate of the navigation controller and then implement the appropriate message. The current protocol is centered on the view car table view, so that is the place to listen for the transition:
1. Make the view car table view controller a delegate of the navigation controller by adding the code in bold in ViewCarTableViewController.h:
@interface ViewCarTableViewController : UITableViewController
<MakeModelEditProtocol, UINavigationControllerDelegate>
2. Set the view car table controller to the navigation controller delegate. In ViewCarTableViewController.m, add viewWillAppear: below viewDidLoad:
- (void)viewWillAppear:(BOOL)animated {
[super viewWillAppear:animated];
self.navigationController.delegate = self;
}
3. Add the following method to the top of ViewCarTableViewController.m to send the delegate a carViewDone: protocol message as long as data has been updated and the incoming view controller is the delegate. Also unregister as the delegate by setting the navigation controller’s delegate property to nil:
- (void)navigationController:(UINavigationController *)navigationController
didShowViewController:(UIViewController *)viewController
animated:(BOOL)animated
{
if (viewController == (UIViewController*)self.delegate) {
if (dataUpdated) {
[self.delegate carViewDone:dataUpdated];
}
navigationController.delegate = nil;
}
}
If you don’t unregister as the delegate, you can end up with messages to deallocated objects.
4. Finally, implement carViewDone: in CarTableViewController.m:
-(void)carViewDone:(BOOL)dataChanged {
if (dataChanged) {
[self.tableView reloadData];
}
}
Run the app, add a few cars, and edit one. When you return to the cars table, the values are updated. You can try this for a few cars to make sure the code is viewing and editing the correct car.
Some Update Finesse
When you use reloadTable in carViewDone:, you are telling the table view that all the content in every cell is dirty—all its content is out of date. This causes the table view to update at least all the cells that are visible to the user (and usually more). In your app, this is quite fast because the data is simple. But imagine an app that takes longer to figure out the content of each cell, perhaps because of a lot of calculation or even the need to communicate with a server.
Instead, you could just tell the table to update only the cells that have changed. reloadRowsAtIndexPaths:withRowAnimation: updates just a specified set of cells. To use this method, you must know the index path for the cell being viewed—that is, the selected cell. And you can get the index path for the selected cell by using indexPathForSelectedRow. Follow these steps:
1. Add a state variable below arrayOfCars: with this code:
NSIndexPath *currentViewCarPath;
2. Set the value by changing carToView:
- (Car *)carToView {
currentViewCarPath = [self.tableView indexPathForSelectedRow];
return arrayOfCars[currentViewCarPath.row];
}
3. Finally, change carViewDone to only update the cell being viewed and only if it was changed:
-(void)carViewDone:(BOOL)dataChanged {
if (dataChanged) {
[self.tableView reloadRowsAtIndexPaths:@[currentViewCarPath]
withRowAnimation:YES];
}
currentViewCarPath = nil;
}
Before you run the app, you should make a small user experience tweak that makes it easier to use. The make/model edit scene has only one text field, so there is no need to make the customer tap to open the keyboard. Therefore, in MakeModelEditViewController.m, add the following line of code at the end of viewDidLoad:
[self.editField becomeFirstResponder];
Now run the app and try the full editing path. The keyboard automatically opens when you enter the edit screen, and all data updates. When you return to the cars table, if you modified the car, the new data animates in.
Editing the Year
Make and model are both text-based. You could use text for the year and only show a numeric text keyboard. But that does not help you make sure the user is entering a four-digit year that is within a particular range of years. Instead, you can create a picker-based edit view that is specific to Gregorian dates. (You can even internationalize the picker if you’d like to explore that.)
UIPickerView lets you present longer lists of individual choices or even several side-by-side lists. One place you can find pickers is when you set dates and times for Calendar appointments. Those use the UIDatePicker subclass.
A picker looks like a slot machine with rotors and a number of positions on each rotor. You specify the number of rotors and the number of positions on each rotor. You set up the rotors by implementing the methods in the UIPickerViewDataSource protocol.
You also need to set up the content of each position. It can be as simple as a string or as complex as a custom view with a specified width and height. You set this with methods in the UIPickerDelegateProtocol. The delegate also informs you when rows are selected, which is useful for dynamically updating choices or other parts of the user interface.
Setting Up the Year Editor
Unlike a slot machine, you need only one rotor. You need to put the picker view in a view controller for the Year editor, so follow these steps:
1. Drag a view controller onto the storyboard just below the make/model edit view controller.
2. Add a navigation bar to the top, and also add Cancel and Done bar button items. Set tints as desired.
3. Place a picker view constrained to the leading, trailing, and bottom edge. When you are done, the view controller should look something like Figure 8-11.
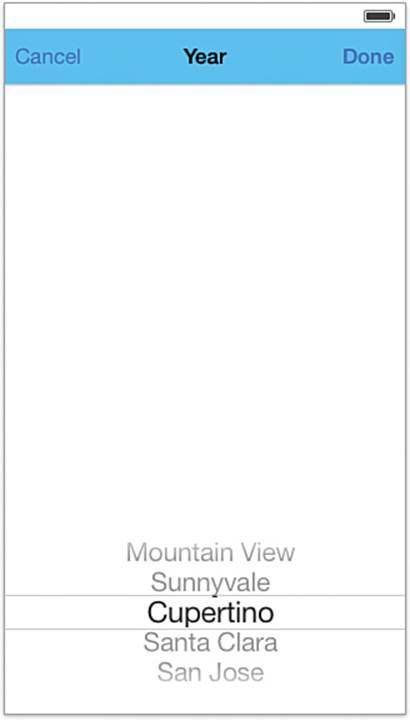
Figure 8-11 Year edit scene
4. Add a YearEditViewController class, inheriting from UIViewController, and make it the class of the new scene.
5. Add the same messages for the Cancel and Done buttons you did for MakeModelEditViewController, but do not fill out the body of the methods yet.
6. Add an editPicker property for the picker view.
Implementing the Model Year Picker
The model year of a car is a bounded number: It is no larger than the year after the current one and no smaller than the first production car. And even then, how many people drive a Model T around?
Before making changes to the Year editor, update the Car object with the new earliest model year:
1. Add the following line of code below the import of Foundation.h in Car.h:
#define kModelTYear 1908
2. Change the init method to use kModelTYear for the year instead of 1900.
3. Import Car.h into YearEditViewController.m.
To generate the picker, you must specify the number of components, the number of rows, and the content for each row. Since the picker is a list of years, there is only one component. How do you calculate the number of rows?
Picker Math
The displayed range can be from 1908, the year of the first mass-produced car, to the year following the current one. If the current year is 2014, the maximum year is 2015—after all, it feels good to buy next year’s model. The number of rows is the maximum year minus the earliest year plus 1. If this were 1910, the math would be (1910 – 1908) + 1, or 3. A formula for that looks like:
NumberOfRows = (MaximumYear – EarliestYear) + 1
The maximum year is whatever this year is plus 1. You can get that by looking at the current date and adding 1 to the current year, as shown in Listing 8-5.
The picker calls a delegate method for the content of each row—in this case, the text of the year. Row indexes start from 0 at the top, to the number of rows less 1 at the bottom; rows are zero-indexed. A slight twist is that you want the maximum year to appear at the top of the picker, at index0.
The year for any row is the maximum year minus the current row. Using 1910, the value for the second row, or row 1, is 1910 – 1, or 1909. You do not have direct access to the maximum year, but you do have access to the total rows as a 1-based number, and you know the earliest year. Therefore, this is the formula:
YearForRow = ((EarliestYear + TotalRows) – 1) – CurrentRow
The final thing you need is the maximum year. You get it by adding 1 to the year of the current date. Doing this requires the integer value of the year for an NSDate, which you can get by breaking the date into components. Listing 8-5 is a method for returning the integer year from the date.
Listing 8-5 YearEditViewController.m getYearFromDate:
-(NSInteger)getYearFromDate:(NSDate*)theDate {
NSCalendar *gregorian = [[NSCalendar alloc] // 1
initWithCalendarIdentifier:NSGregorianCalendar];
NSDateComponents *components;
components = [gregorian components:NSYearCalendarUnit fromDate:theDate]; // 2
return components.year; // 3
}
Here’s what happens in the numbered lines in Listing 8-5:
1. Finding the year requires breaking a date into components, and that requires a calendar. This method works only with Gregorian dates, although you could use the current system calendar to localize the returned value.
2. Return a date component’s object initialized with the year from theDate.
3. Return the year component.
Now you have enough information to add the protocol methods. Here’s what you do:
1. Adopt the two picker protocols by adding this line below the @interface call in YearEditViewController.h:
<UIPickerViewDataSource, UIPickerViewDelegate>
2. Add the method from Listing 8-5 as the first method in the YearEditViewController.m.
3. Insert the data source methods for the number of components and number of rows below viewDidLoad. Remember that the maximum year is the year after the current one:
- (NSInteger)numberOfComponentsInPickerView:(UIPickerView *)pickerView {
return 1;
}
- (NSInteger)pickerView:(UIPickerView *)pickerView
numberOfRowsInComponent:(NSInteger)component {
NSInteger maxYear = [self getYearFromDate:[NSDate date]];
maxYear += 1;
return (maxYear - kModelTYear) + 1;
}
4. Return the display value for each row by implementing the string title–based delegate method. Put the method just below the two you just created:
- (NSString *)pickerView:(UIPickerView *)pickerView
titleForRow:(NSInteger)row
forComponent:(NSInteger)component {
NSInteger totalRows = [pickerView numberOfRowsInComponent:component];
NSInteger displayVal = ((kModelTYear + totalRows) - 1) - row;
return [NSString stringWithFormat:@"%d", displayVal];
}
5. Use the storyboard to connect the dataSource and delegate outlets of the spinner to the year edit view controller. The easiest way to do this is to Ctrl-drag from the picker to the controller below the view and use the popup picker, as shown in Figure 8-12.
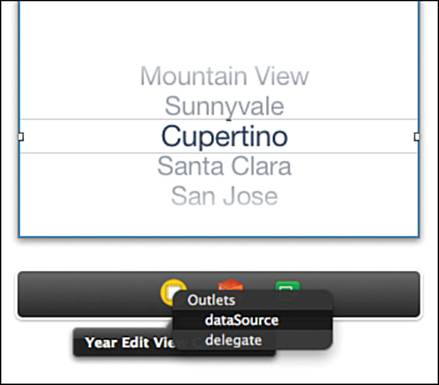
Figure 8-12 Connecting the picker view data source
Before you can test the changes, you need to create a segue to open the Year editor:
1. Add a disclosure accessory indicator to the year cell.
2. Drag a modal selection segue named YearEditSegue from the year cell to the Year editor.
Run the app, view a car, and bring up the Year editor. The picker has all the years from 1908 to the year after the current one, with the highest year selected. Of course there is no way to remove the modal, so that is the next thing to do.
Adding the Year Edit Protocol
The protocol is very simple. The Year editor needs the year to show, and the delegate needs to know the year chosen when Done is selected.
Adding the protocol requires two key formulas. The first formula sets the initial picker row based on the existing year. The maximum year selects the top item, index 0. Your initial thought might be to take the target year and subtract the minimum year to get the row. Unfortunately, that does not work as the larger the year, the larger the difference and, therefore, index. You want to subtract the target year from the maximum year:
Row = MaximumYear – TargetYear
The second formula converts a selected row to a year. Again, this is an inverse problem. A row index of zero is the maximum year: the larger the index, the lower the year. In this case, the year is the maximum year minus the current row:
SelectedYear = MaximumYear – Row
This just leaves finding the maximum year, and that is simply the total number of rows plus the minimum year, minus 1:
MaximumYear = (MinimumYear + TotalRows) – 1
The last choice is what to show as a default year selection for the picker if none has been set—that is, if the car object has a year set to 1908. Since most people are driving cars within a few years of the current year, the best choice is to show that. You could display the default of 1908, but the chance of someone actually driving in a Ford Model T is astronomically small.
Follow these steps to create the protocol and associated properties and methods:
1. Add a new protocol called YearEditProtocol and add the following method declarations:
- (NSInteger) editYearValue;
- (void) editYearDone:(NSInteger)yearValue;
2. Import the protocol into YearEditViewController.h and add a property to conform the delegate, using the following line:
@property (weak, nonatomic) id <YearEditProtocol> delegate;
3. In the .m file, initialize the year picker from viewDidLoad. You can set the selection of a picker by using the selectRow:inComponent:animated call:
- (void)viewDidLoad
{
[super viewDidLoad];
NSInteger yearValue = [self.delegate editYearValue];
if (yearValue == kModelTYear) {
yearValue = [self getYearFromDate:[NSDate date]];
}
NSInteger rows = [self.editPicker numberOfRowsInComponent:0];
NSInteger maxYear = (kModelTYear + rows) - 1;
NSInteger row = maxYear - yearValue;
[self.editPicker selectRow:row inComponent:0 animated:YES];
}
4. Fill out the editCanceled: and editDone: methods:
- (IBAction)editCanceled:(id)sender {
[self dismissViewControllerAnimated:YES completion:nil];
}
- (IBAction)editDone:(id)sender {
NSInteger rows = [self.editPicker numberOfRowsInComponent:0];
NSInteger maxYear = (kModelTYear + rows) - 1;
NSInteger year = maxYear - [self.editPicker selectedRowInComponent:0];
[self.delegate editYearDone:year];
[self dismissViewControllerAnimated:YES completion:nil];
}
5. Import the year edit protocol into ViewCarTableViewController.h and add it to the existing protocols under the @interface line.
6. Open the .m file and import YearEditViewController.h.
7. Add a final else if condition to the prepareForSegue:sender: method so the last part looks like the following code. This sets the year editing delegate to the current view car scene:
} else if ([segue.identifier isEqualToString:@"YearEditSegue"]) {
YearEditViewController *nextController;
nextController = segue.destinationViewController;
nextController.delegate = self;
}
8. Add the protocol methods to the .m file. When the year value changes, remember to update the value of the car, the label, and the data updated state variable:
- (NSInteger)editYearValue {
return self.myCar.year;
}
- (void)editYearDone:(NSInteger)yearValue {
if (yearValue != self.myCar.year) {
self.myCar.year = yearValue;
self.yearLabel.text = [NSString stringWithFormat:@"%d",
self.myCar.year];
dataUpdated = YES;
}
}
Run the app in the simulator and try editing years. Everything should work. You can try adding more cars, as well as editing the make and model.
Summary
This chapter has equipped you to start using table views for lists of data. It has also shown you the power of adding navigation controllers for quickly moving up and down hierarchies of information.
After creating a simple project to explore table views, you converted the add/view scene to a list of cars. You completed the scene by using common patterns for adding and deleting items in a table view, in this case cars, as well as opening the detail for any car. You showed the detail by creating another table view, using a grouped style instead of a list. You created a couple screens to edit car attributes and used modal presentation of those screens to require the user to edit the attribute or cancel.
Along the way, you practiced using protocols for communicating data between controllers, and you were introduced to UIPickerView, a versatile element for picking numbers or choosing from a list.
With the basics of table views, you can design and create many of the standard kinds of iOS apps. You can show lists of objects and use a navigation controller to easily move through more or less detail. Modal presentation is a useful tool for editing attributes. And with UIPickerView, you can add combinations such as number picking and picking an item from a list of choices.
Even though adding and editing cars in CarValet is now easier, it still takes a lot of effort to populate the app with realistic test data. Every time you run the app, you have to start again. Chapter 9, “Introducing Core Data,” introduces you to Core Data, which is not just a way to save your data but also a way to define it, search it, sort it, and much more.
Challenges
1. Add code that displays something when there are no cars. It can be as simple as the kind of label shown in the Contacts app. One approach is to include a view that you show or hide based on a condition. Also note that the user could delete the last car. The quickest way to test your code is to remove the initial car generated by CarTableViewController in viewDidLoad.
2. Add the ability to edit the fuel. You could do this using a new editor, or you could modify the Make/Model editor to work with numbers as well as text. If you take this approach, you need to add a configuration to specify text versus numbers and change what keyboard is brought up. You also need to add another current edit type so view car can do the right thing with the return value. The value is text, but the car object uses a float.
3. Instead of deleting cars, move them to a deleted section in the cars table. The easiest way to do this is to change arrayOfCars to a two-dimensional array. The first subarray is the active cars, and the second array is the deleted, or reclaimed, ones. You can use what you learned about multiple sections, headers for sections, and index paths. Finally, you need to choose what to do about deleting checked-out cars: Can they be deleted? If so, you need to modify the second array. If not, you can prevent cells from being deleted and the associated interface from showing. Take a look at the “Removing Cars” section earlier in this chapter, if you need a refresher.