Learning iOS Development: A Hands-on Guide to the Fundamentals of iOS Programming (2014)
Chapter 9. Introducing Core Data
For many apps, presentation is just one key part of their value. Without data, there is nothing to present. And for many apps, the data has to persist. In the CarValet app, so far the data has been temporary: If you or the system removes the app from memory, the data is gone; build and download, crash, or reboot, and again the data is gone. You need a way to store data between app launches.
iOS offers several ways to do this: You can put the raw objects in a file, translate the objects and relationships into XML and put that in a file, or even create your own SQLite database. No matter which way you choose, there are a bunch of routines to write, including routines for saving a car, reading a car, finding a car, deleting a car, updating a car, and more. With a database, some of the basics are handled, but there is still a lot of work: You need to define the SQL data model, design and write the SQL queries, and even more.
Core Data, Apple’s iOS and Mac storage technology, does most of the work for you. You use a visual editor to define the model—a set of objects that represent your data and the relationships between those objects. You have options of how and where the data is stored. Built-in routines handle initializing the data store (or stores); creating, updating, and deleting objects; and searching. With Core Data, you get access to even more: sorting, filtering (“just show me this year’s Nissan Leafs, please”), and even a special class designed to work with table views. For the cost of a few lines of extra code, you get a multi-element relational database.
After getting a brief introduction to the basics of Core Data, you create the CarValet app’s data model. Then you add the boilerplate code that any app needs, and you convert the cars table view and custom cell to use Core Data. After seeing the results of your work, you apply the same basic process to convert the detail table view.
When the CarValet app is using Core Data, you can make working with cars easier by updating the table to use NSFetchedResultsController, a special class designed to simplify using table views with Core Data. After you set up the fetched results controller, many of the table view delegate methods become simple calls to that controller.
When you are done with this chapter, you will be able to easily add data persistence to any app. And when the app uses a table, accessing and updating that data becomes even easier. First, you need to learn the parts of Core Data.
Introduction to Core Data
Core Data is Apple’s technology for bringing persistence to an app’s data model. It has all the power of a multistore relational database and adds specific areas of integration with the user experience on both iOS and Mac OS. Despite the power of Core Data, you need to do relatively little to begin taking advantage of it (see the “Note: From Basic to Full Use”).
Note: From Basic to Full Use
The goal of this chapter is to get you started with Core Data. By the end of the chapter, you will be using it for adding, deleting, displaying, and editing cars. But this chapter only scratches the surface. To really take advantage of Core Data, you need to learn more about how it works; the associated classes, methods, and properties; and some typical use cases. You can learn all this and more in Learning Core Data for iOS: A Hands-on Guide to Building Core Data Applications by Tim Roadley.
Before looking at Core Data in more detail, it is important to understand where it fits in a typical application. For most applications, Apple recommends an overall architecture called Model–View–Controller (MVC).
The implementation classes are broken up into three areas of functionality. In MVC, the model is all about application data: creating, changing, deleting, and modifying. All this behavior is encapsulated into classes that are independent of any user presentation. When done well, anything to do with the model can happen from a command line or a graphical view. The presentation is up to the view layer.
The view layer is the visual user experience of the app. It includes everything that has to do with accessing and modifying the data, as well as any other visual app elements, such as preferences. The focus is on the look and the feel. What information to show comes from the model. The view layer is how the information is presented. In this book, the focus is on visual presentation. But you could also implement a view layer for printing, text-based, or even spoken output.
Controllers sit between the view and the model. They do everything from coordinate the behavior of the app and control the flow to acting as a go-between for the model and view. Controllers are usually the most complex part of an app. In addition to controllers that sit between the model and user experience, there might be other controllers interacting with the OS, dealing with communications, and a number of other things. And if your app has different view layers for printing or text, there might be other controllers for those specific views.
Core Data is focused on the model layer of MVC, with a few parts providing support for user interface controllers. As in most databases, the data-handling part of Core Data is broken up into three main layers: where the data is stored, the format of the data, and a data access environment.Stores are where the saved data is kept, and there can be more than one store. The data format is specified by a managed object model. Data is accessed through a managed object context, and there can be more than one context active at the same time.
These are the corresponding classes:
![]() NSPersistentStoreCoordinator coordinates all the stores used for your data. For iOS, there is usually just one on-device store.
NSPersistentStoreCoordinator coordinates all the stores used for your data. For iOS, there is usually just one on-device store.
![]() NSManagedObjectModel describes all the kinds of data objects you use in your applications. In database terms, this is the schema.
NSManagedObjectModel describes all the kinds of data objects you use in your applications. In database terms, this is the schema.
![]() NSManagedObjectContext is a manager for a set of data objects. The context includes the rules used for finding actual data elements in the stores, some number of the found data elements, and their current state. It is possible to have multiple contexts active at the same time, with the same objects in different states in each one. Contexts write back to the store only when they are saved.
NSManagedObjectContext is a manager for a set of data objects. The context includes the rules used for finding actual data elements in the stores, some number of the found data elements, and their current state. It is possible to have multiple contexts active at the same time, with the same objects in different states in each one. Contexts write back to the store only when they are saved.
Before you can create any data items, you need to describe them. In Core Data, an entity describes the parts of a data item: the names of the attributes, the attribute types, and any other special properties. In that way, an entity is like a class in Objective-C. In CarValet, there is only one entity: the car. If the app started supporting motorcycles, that would be another entity. There could also be an entity for the owner of the car.
Entities specify attributes and relationships. A car has attributes for the make, model, year, and so on. If CarValet added owners, a car would also have a relationship to an owner and vice versa. You rarely work directly with the system object for entities, NSEntityDescription; instead, you use Xcode to create the entities and their properties and relationships.
The parts of Core Data—the store coordinator, managed object model, managed context, and entity—form a stack, as shown in Figure 9-1.
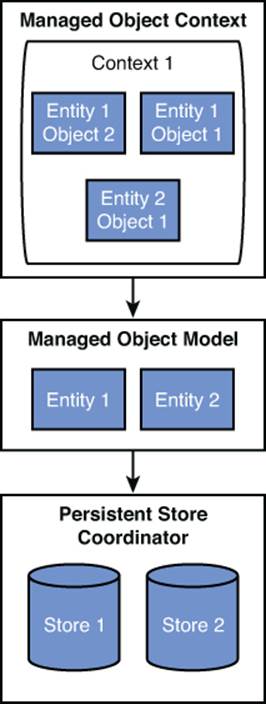
Figure 9-1 Core Data stack
Most of the time you are working with objects in a managed object context. Those objects are each a type of entity, and all possible entities are managed by the object model. At the bottom of the stack is the persistent store coordinator, which accesses objects in one or more stores.
Actual data items in a managed object context are based on NSManagedObject. This class handles all Core Data–related behavior, such as interacting with the entity description, handling updates, observing property value changes, and lazy loading of data from the store. Most subclasses of NSManagedObject are used to access attributes using dot notation. And subclasses are easy to create with a simple menu selection. Later, you do this for the car object to quickly access the make, model, year, and so on.
Moving CarValet to Core Data
The best way to understand Core Data is to use it. In the rest of this chapter, you convert CarValet to use Core Data. First, you add the model and then some boilerplate code to load and access it. Next, you convert the cars table and prototype cell. Then, you update the car data view and make sure any changes are updated. Finally, you learn a better way to use Core Data with data overview tables.
Before you can do any of that, you need to add the CoreData framework to your app. Follow these steps:
1. Open the CarValet project. You can start with your final code from Chapter 8, “Table Views I: The Basics,” or use the CH09 CarValet Starter project provided with the sample code files for this chapter.
Now open the CarValet target editing area by selecting the project at the top of the Xcode Navigator, looking for the Targets section in the Editor area (in this case, the Project Editor), and selecting the CarValet application target. (There should be only one item in the Targets list.) You can see the selected application target in Figure 9-2.
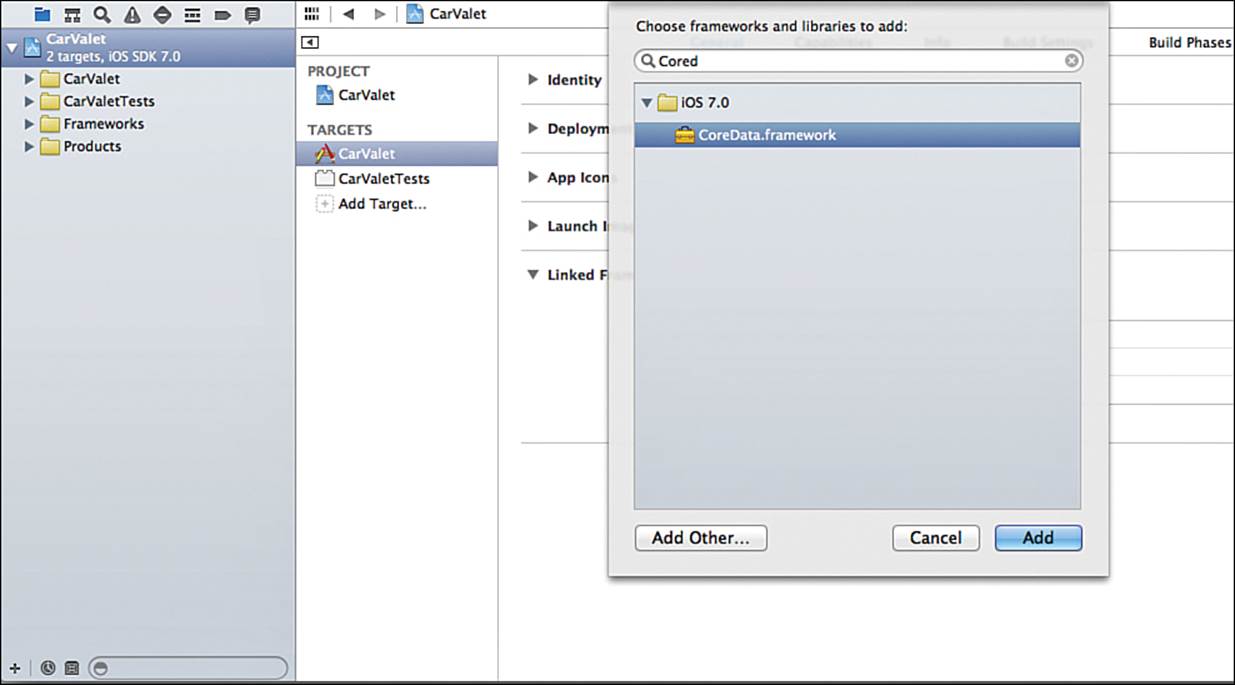
Figure 9-2 Adding the CoreData framework
2. With the target selected, make sure the General tab is showing at the top of the Project Details area in the Project Editor. Now scroll the Project Details area down to Linked Frameworks and Libraries and use the + button to add the CoreData framework. Use the search box to help you find the framework as shown in Figure 9-2.
Adding the CDCar Model
Next, you need to create the file that Core Data uses to set up entities and other configurations. The same description file and editor can be used for anything from a simple single-entity configuration like CarValet to very complex models including multiple entities, entity properties, default values, and relationships.
Adding the car model takes just a few steps:
1. Add a new file to the project by using the Data Model template from the Core Data category. Call the file CarValet and add it just above Car.h.
2. Open the new CarValet.xdatamodeld if it is not already there. You should see an editor similar to the one in Figure 9-3.
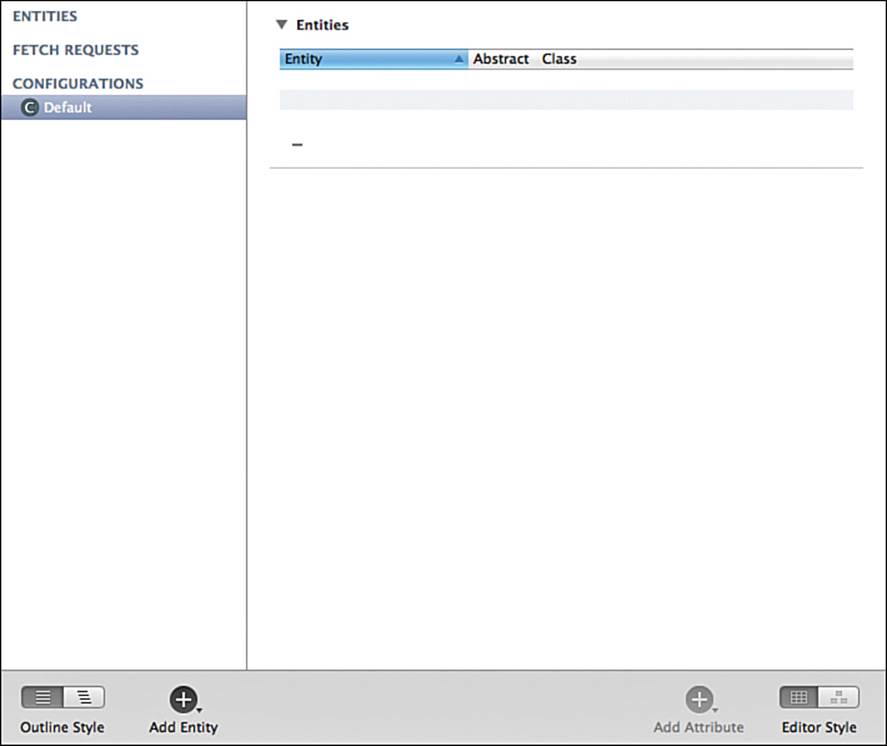
Figure 9-3 Core Data editor
3. Add an entity called CDCar by clicking the Add Entity button in the lower left.
4. Add an attribute for each existing property of the Car object, except carInfo. You can open Car.h in an auxiliary editor to make sure you get all the properties. As you add each property, set its type based on the current model.
The only attribute type that is not obvious is year. You can make that an integer 16, as year numbers are unlikely to get bigger than 32,767 for quite some time, no matter which calendar format you choose. When you are done, the attribute types should look as shown in Figure 9-4.
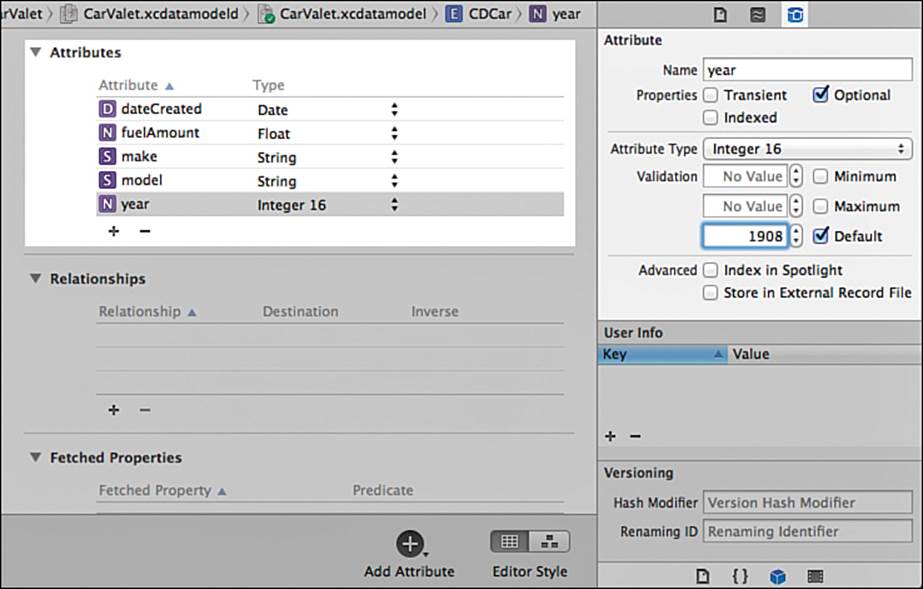
Figure 9-4 CDCar attribute types and year default
Your original Car data object set some default values in init methods. Core Data lets you do the same thing, although in some areas it is not very flexible. Set 1908 as the default for year using the Data Model inspector, also shown in Figure 9-4.
Now that the CDCar entity is defined, you can create a subclass of NSManagedObject to access properties using dot notation. The only caveat is that properties default to subclasses of NSObject. This means any integers, floats, Booleans, and so on are NSNumber. Although the step you are about to perform lets you use scalars such as NSInteger for primitives, there are some undesired results. In this case, Core Data turns the NSDate into NSTimeInterval.
With the Model editor still open, select Editor > Create NSManagedObject Subclass and, if prompted, choose CDCar and then save the file with all the other source files. If needed, put CDCar.h and CDCar.m below the model definition file. Although you can make changes to the generated files, any time you change the model and re-create the CDCar subclass, the old files are replaced.
Adding Code to Model Files
It is inevitable. You add some code to your generated managed object, and some time later, you regenerate the files. Your code is no more. But there is a way to avoid this problem using something called a category.
A category is not really a class, but an extension of an existing class. You specify the class to extend, have Xcode generate the files, and then add to the .h and .m files almost as normal. The one exception is that you cannot add any properties.
Using categories, or class extensions as they are sometimes called, is a powerful technique because you can extend other classes, including system ones such as NSString. It is also a more advanced technique and is a good one to put on your “things to learn soon after I have finished this book” list. Learning Objective-C 2.0: A Hands-on Guide to Objective-C for Mac and iOS Developers, 2nd edition, by Robert Clair, is a good place to start.
Adding Core Data Boilerplate Code
Before you can use any data, you have to initialize Core Data for the app. You need objects for each of the three classes shown in Figure 9-1. When you become more familiar with Core Data, this is something you will probably do in your own helper class, as described in Chapter 1 ofLearning Core Data for iOS: A Hands-on Guide to Building Core Data Applications by Tim Roadley. If you know your app will use Core Data before you create the project, some of the application creation templates provided by Xcode have a check box to use Core Data.
In this chapter, you use code based on the Master–Detail Application template from Xcode. The only modifications are adding an import of CoreData.h and two #defines for the model file and data file names. Follow these steps:
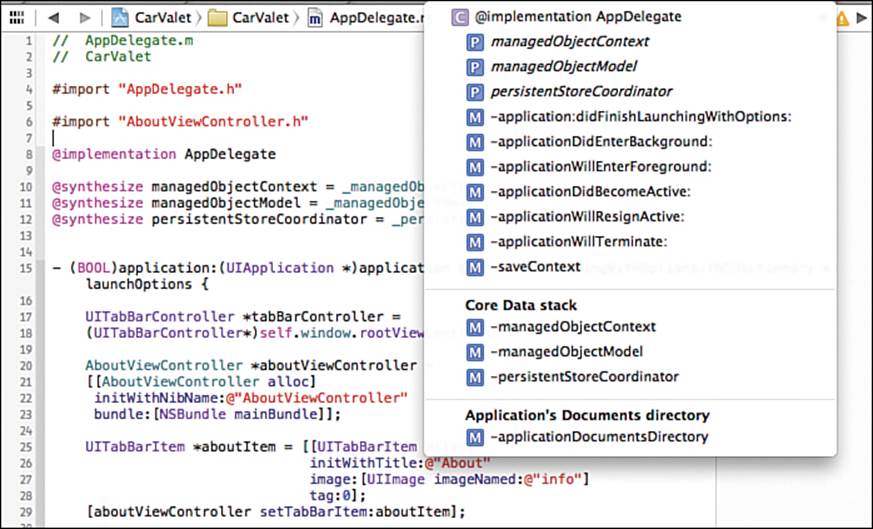
1. Open AppDelegate.m with AppDelegate.h in the Assistant editor. Now select File > Open to open the two CoreData_for_AppDelegate files in the CH09 Assets CoreData Files folder that is part of the code for this chapter. The quickest way to do this is to select the files in the Finder and choose File > Open or Cmd-O. That opens the files in Xcode.
2. Copy the #import and two #define lines from CoreData_for_AppDelegate.h and paste them under the existing import of UIKit.h in AppDelegate.h.
3. Replace the contents of the string for the MyModelURLFile #define with CarValet, the name of the Core Data model file you created earlier.
4. Replace the all-caps portion of the MySQLDataFileName #define with the name CarValet so the entire string is CarValet.sqlite. This is the name of the store managed by the persistent store coordinator, and it is an SQLite database. Do not access the database directly; see the “Warning: Store Files Are in a Proprietary Format.”
5. Now copy and paste the @property and method declarations between the window property declaration and the @end statement.
6. Copy the three @synthesize statements from CoreData_for_AppDelegate.m just under the @implementation in AppDelegate.m. You need these statements to give read/write access to the read-only properties you just copied into the .h file.
7. Remove the methods applicationWillResignActive: and applicationWillTerminate: from AppDelegate.m.
8. Copy everything from applicationWillResignActive: down to the end of the file and paste it above the @end statement.
Warning: Store Files Are in a Proprietary Format
Do not use CarValet.sqlite directly in your app; always go through Core Data. Although CarValet.sqlite is a database and you can likely figure out how Core Data is storing information, all that is subject to change without notice. Relying on the format is a sure way to break your app in the future.
When you run the app now, it does not appear to do anything different. This is because all you have done is define the model and add code to prepare to use Core Data. There is no code creating or displaying a CDCar. That is the next step.
Making Code Easier to Read with #pragma mark
CoreData_for_AppDelegate.m contains two lines that start with a #pragma, a special statement used to give some information to Xcode. In this case, you are using it to bookmark different groupings of code.
This screenshot is from viewController, with the boilerplate code integrated. You can see the two groupings of files near the bottom of the jump bar method dropdown. Each group has a line above the group and then a custom bolded title. Each of those items corresponds to one of the #pragma statements in the code.
Each line and title pair is from a #pragma statement. In this line:
#pragma mark – My Own Title
the dash (–) inserts a line, then the text is inserted in bold below the line, enabling easy grouping of methods. Both the dash (–) that generates the line and the text generating the bold title are optional.
Using #pragma marks is a good way to both quickly see the organization of your classes and quickly get to methods by using the jump bar.
Converting CarTableViewController
Using Core Data changes how data is accessed, created, deleted, and updated. To convert each part of an app, you need to identify those differences and add or change relevant code. Table 9-1 shows the differences and changes needed for CarTableViewController.
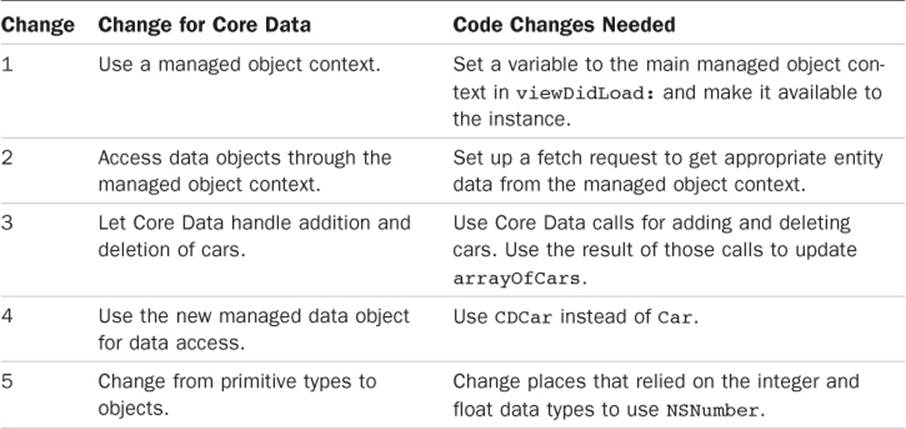
Table 9-1 Changes for Core Data in the Cars Table View
Cars Table Change 1: Adding the Managed Object Context
The first change requires a reference to the managed object context. AppDelegate already has one, so all the cars table controller needs is a reference. Since the managed object context is used in many methods, it is worth setting up an instance variable, though a property is not required. Follow these steps:
1. Import AppDelegate.h and CDCar.h into CarTableViewController.m and remove the import of Car.h.
2. Create an instance variable by adding the following declaration just below arrayOfCars inside the curly braces below @implementation:
NSManagedObjectContext *managedContextObject;
3. Add the following code to viewDidLoad: just below the call to super to set the managed object context:
AppDelegate *appDelegate = [[UIApplication sharedApplication] delegate];
managedContextObject = appDelegate.managedObjectContext;
Cars Table Change 2: Accessing Data with the Managed Object Context
Next, you need to set the contents of an array to the current CDCar objects. This requires a couple changes. First, getting the data from a managed object context requires describing the data you want in a fetch request. This can be as simple as specifying all objects of a particular entity type, or it can be a very complex filter and sort.
The fetch request is used as part of executeFetchRequest:error:, an NSManagedObjectContext method for retrieving an array of managed data objects. The same method is used to get an updated set of data objects whenever there is a change, such as an addition or a deletion. Since the cars array is updated from multiple methods in the cars table controller, the fetch request is another instance variable.
Finally, the method to execute the fetch request returns an array, not a mutable array. The variable type needs to be changed, so follow these steps:
1. Change the declaration of arrayOfCars from NSMutableArray to NSArray. At the same time, add the line for the fetch request below managedObjectContext:
NSFetchRequest *fetchRequest;
2. Update viewDidLoad: to Listing 9-1. In addition to the bold code added for this step, some code has been removed.
Listing 9-1 viewDidLoad: in CarTableViewController.m
- (void)viewDidLoad {
[super viewDidLoad];
AppDelegate *appDelegate = [[UIApplication sharedApplication] delegate];
managedContextObject = appDelegate.managedObjectContext;
NSError *error = nil;
fetchRequest = [NSFetchRequest fetchRequestWithEntityName:@"CDCar"]; // 1
arrayOfCars = [managedContextObject executeFetchRequest:fetchRequest // 2
error:&error];
if (error != nil) {
NSLog(@"Unresolved error %@, %@", error, [error userInfo]); // 3
abort(); // 4
}
self.navigationItem.leftBarButtonItem = self.editButton;
}
Here’s what happens in the numbered lines in Listing 9-1:
1. Set up the fetch request to look for all entities of class CDCar. Other methods and properties can be used to add filters, sorts, and even batching for loading objects.
2. Set the array of cars to all the managed objects in the context that meet the fetch request criteria—in this case, all cars.
3. An error occurred reading objects. Logging to a file is useful for learning, but it would be better to try to recover from the error, if possible; otherwise, inform the user what is going on and what to try.
4. The call to abort() is from the system-provided template. All it does is create a crash log and terminate the app. As the default comments say, abort is not a function you should use in a shipping application.
Cars Table Change 3: Using Core Data for Adding and Deleting Cars
The current way of adding cars simply allocates a new Car object and inserts it into a mutable array. The Car object takes care of setting any required initial values. Deleting is just one call to remove the Car object from the array. Using a mutable array assumes that memory does not run out, errors never happen, and session-to-session saving is done by something else.
Using Core Data brings persistence, error checking, and better memory management. There is some extra work, though mostly for error checking. To make the change for adding a car, replace newCar: with the code in Listing 9-2. The new code is in bold.
Listing 9-2 Updated newCar:
- (IBAction)newCar:(id)sender {
CDCar *newCar = [NSEntityDescription // 1
insertNewObjectForEntityForName:@"CDCar"
inManagedObjectContext:managedContextObject];
newCar.dateCreated = [NSDate date]; // 2
NSError *error;
arrayOfCars = [managedContextObject executeFetchRequest:fetchRequest // 3
error:&error];
if (error != nil) { // 4
NSLog(@"Unresolved error %@, %@", error, [error userInfo]);
abort();
}
NSIndexPath *indexPath = [NSIndexPath indexPathForRow:0 inSection:0];
[self.tableView insertRowsAtIndexPaths:@[indexPath]
withRowAnimation:UITableViewRowAnimationAutomatic];
}
Here’s what happens in the numbered lines in Listing 9-2:
1. Create a new car in the current managed object context.
2. Initialize the car’s creation date. See the following Note.
3. Regenerate the current array of cars to include the new car.
4. See #4 in Listing 9-1. This is not the recommended way to handle fetch errors.
Note
You could eliminate the line of code for initializing the creation date by creating your own custom subclass for CDCar instead of using the automatically generated one. This topic is beyond the scope of this book. You could also add range checking and other validation criteria. For more information on both options, see Learning Core Data for iOS: A Hands-on Guide to Building Core Data Applications by Tim Roadley.
Deleting an object only needs one method call to the managed object context. That marks the object as deleted, although it is not actually removed from the store until the context is saved.
Use Listing 9-3 to modify the delete case of tableView:commitEditingStyle: forRowAtIndexPath:.
Listing 9-3 Updated Delete Car Case
if (editingStyle == UITableViewCellEditingStyleDelete) {
[managedContextObject deleteObject:arrayOfCars[indexPath.row]]; // 1
NSError *error = nil; // 2
arrayOfCars = [managedContextObject executeFetchRequest:fetchRequest
error:&error];
if (error != nil) {
NSLog(@"Unresolved error %@, %@", error, [error userInfo]);
abort();
}
[tableView deleteRowsAtIndexPaths:@[indexPath]
withRowAnimation:UITableViewRowAnimationFade];
}
Here’s what happens in the numbered lines in Listing 9-3:
1. Tell the managed object context to delete the CDCar object.
2. Add the code from Listing 9-1 to update the array of cars.
Cars Table Change 4: Changing to CDCar and Updating the Car Cell
All you need to do now is switch over to the new CDCar object class. There are three view controller classes using the Car object: CarTableViewController, CarTableViewCell, and ViewCarTableViewController.
For both ViewCarTableViewController and CarTableViewCell:
![]() In the .h file, change Car to CDCar in the @class declaration and for the myCar property.
In the .h file, change Car to CDCar in the @class declaration and for the myCar property.
![]() In the .m file, change the import from Car.h to CDCar.h.
In the .m file, change the import from Car.h to CDCar.h.
Now change the return type of carToView:
![]() In ViewCarProtocol.h, change the @class declaration to use CDCar and the return type to CDCar.
In ViewCarProtocol.h, change the @class declaration to use CDCar and the return type to CDCar.
![]() In CarTableViewController.m, modify the return type carToView to CDCar. This only requires changing the declaration line of the method:
In CarTableViewController.m, modify the return type carToView to CDCar. This only requires changing the declaration line of the method:
- (CDCar*)carToView {
Cars Table Change 5: Updating to Using NSNumber
You have probably seen the red error icon in the information area and navigation tab. As you are changing the app from using Car to CDCar, the project can no longer compile. The red hexagon with the exclamation mark not only confirms this, but also can be used to find out why.
Clicking on the error indicator in the navigation bar shows a list of files with warnings and errors. The dropdown will look something like Figure 9-5, though the list might be shorter or longer depending on the last time you built the project.
Figure 9-5 Error and warnings
Selecting CarTableViewCell.m from that list opens the file and takes you to the first warning or error in that file. Xcode might even suggest a fix for the error or warning.
Start by fixing the problems in CarTableViewCell.m:
![]() Use the suggested fix for the first problem in configureCell. This should replace the %d for %@ in the call to set the textLabel.text. If the suggested fix is not showing, click the warning triangle on the left of the code, the one in the editor, not in the column on the right (changed item in the format string shown in bold):
Use the suggested fix for the first problem in configureCell. This should replace the %d for %@ in the call to set the textLabel.text. If the suggested fix is not showing, click the warning triangle on the left of the code, the one in the editor, not in the column on the right (changed item in the format string shown in bold):
self.textLabel.text = [NSString stringWithFormat:@"%@ %@ %@",
Now move to ViewCarTableViewController.m:
1. Use the suggested fix for the year label.
2. For the fuel label, you need a different fix. Although changing from a format string of %0.2f to %@ would work, it does not result in the format you want. The current format shows a float value with only two decimal places. Using the default fix shows more places.
Instead, convert the fuelAmount NSNumber to a float. Make the changes shown in bold:
self.fuelLabel.text = [NSString stringWithFormat:@"%0.2f",
[self.myCar.fuelAmount floatValue]];
3. Modify how editYearValue generates the integer return value (the modified code is bold):
return [self.myCar.year integerValue];
4. Change how editYearDone: checks for a modified value and updates the car object and the displayed year (the modified code is bold):
if (yearValue != [self.myCar.year integerValue]) {
self.myCar.year = [NSNumber numberWithInteger:yearValue];
self.yearLabel.text = [self.myCar.year stringValue];
After making that change, the errors go away. Run the app in the simulator and go through all the test cases. Verify that you can create and delete cars. Try viewing cars and then editing values. Make sure values are updated correctly. Try cancelling an edit and any other cases you have already tried or have thought of.
Stop the app from Xcode and then re-run it. There is no data. This is because you stopped the app from the simulator. The only places application data is saved are from applicationWillResignActive: or applicationWillTerminate:. Neither of these is called when the simulator stops the app.
Instead, before you close the app in the simulator, go to home. Do this either by pressing the simulated home button if one is present or using the Cmd-Shift-h key combination. This is an important step. Try this now by running the app, entering and editing some data, closing the app in the simulator, then re-running it from Xcode. Your data is saved.
The only change to the user experience in this chapter is that car objects are saved between application launches. All the code changes have been to convert the project to use Core Data. And as you are about to see, some of those changes were not necessary.
Reducing Dependencies Between Classes
When you architect, design, and write an app, it is a good practice to keep the dependencies between classes to a minimum. In CarValet, one example is using the Car data object. The only places that rely on the structure of the Car data object are the cars table and the view car table.
For example, the editors for make, model, and year do not use any sort of data model; they just edit a simple variable. More importantly, the value for the variable is exchanged using protocols. The editors are generic. The car model can change completely without requiring any changes to the editors.
This kind of compartmentalization is good coding practice, for both maintainability and reusability. The editors can be used in other projects with little or no change.
Easier Tables: NSFetchedResultsController
So far, after converting the CarValet app to Core Data, you have used a modified version of the car array to manage the table view. Each time there is a change to the data, a new array is generated. This has worked so far because there is not much data. However, it does not work as the number of cars gets larger—for example, if you keep a history of all cars parked. When there are too many data objects, at best you will have performance problems. More likely, you will have memory issues.
It also seems as if there should be less code. After all, if the managed object context can produce the array, it must have information on how many cars there are as well as an order for them. At the moment, you have code for calculating the number of sections and the number of rows in a section; which data item is at a particular index path; and updating the table based on changes to the data.
Instead of writing all that code, the system provides NSFetchedResultsController and associated protocols. They are designed to make tables that overview Core Data–based objects easy to manage by doing the following:
![]() Configuring the section and row count of a table
Configuring the section and row count of a table
![]() Getting the data item represented by an index path
Getting the data item represented by an index path
![]() Returning section header titles
Returning section header titles
![]() Tracking changes in the managed object context and enabling table updates using a delegate protocol
Tracking changes in the managed object context and enabling table updates using a delegate protocol
![]() Retrieving data in batches and optionally caching data to a file for increased performance
Retrieving data in batches and optionally caching data to a file for increased performance
In this section, you convert the cars table to use a fetched results controller for basic table control and display. In Chapter 10, “Table Views II: Advanced Topics,” you add sections, section headers, and sorting. Even when you do that, you only scratch the surface of an incredibly versatile mechanism. For more information, including how to implement a more generic managed table view class, see Chapter 5 of Learning Core Data for iOS: A Hands-on Guide to Building Core Data Applications by Tim Roadley.
Part 1: Integrating NSFetchedResultsController
You need an instance variable to hold the fetched results controller. Add the following declaration below the one for fetchRequest after the @implementation statement at the top of CarTableViewController.m:
NSFetchedResultsController *fetchedResultsController;
Now you need to initialize the fetched results controller. Doing so requires setting up an appropriate fetch request. This is because NSFetchedResultsController maps the result of applying a fetch request to a managed object context into index paths.
In Listing 9-2, you used a simple NSFetchRequest for returning all CDCar entities. A fetched results controller requires at least a filter and a sort. The filter can be nil, but a sort must specify at least one key.
Fetch requests can have an optional batch size, although that is not required for such a small amount of data. With larger data sets, a batch size limits how many data elements are read each time and, therefore, how many are in memory.
Initialize the fetched results controller by modifying viewDidLoad as shown in Listing 9-4 (the new code is bold).
Listing 9-4 Initializing the Fetched Results Controller
- (void)viewDidLoad {
[super viewDidLoad];
AppDelegate *appDelegate = [[UIApplication sharedApplication] delegate];
managedContextObject = appDelegate.managedObjectContext;
fetchRequest = [NSFetchRequest fetchRequestWithEntityName:@"CDCar"];
NSSortDescriptor *sortDescriptor = [[NSSortDescriptor alloc] // 1
initWithKey:@"dateCreated"
ascending:NO];
[fetchRequest setSortDescriptors:@[sortDescriptor]]; // 2
fetchedResultsController = [[NSFetchedResultsController alloc] // 3
initWithFetchRequest:fetchRequest
managedObjectContext:managedContextObject
sectionNameKeyPath:nil
cacheName:nil];
NSError *error = nil;
[fetchedResultsController performFetch:&error]; // 4
if (error != nil) {
NSLog(@"Unresolved error %@, %@", error, [error userInfo]);
abort();
}
self.navigationItem.leftBarButtonItem = self.editButton;
}
Here’s what happens in the numbered lines in Listing 9-4:
1. Set up a simple sort on the creation time, with the most recent at the top.
2. Set the sort descriptors of the fetch request to the new sort. Note that you must set the sort descriptors to an array of descriptors, even if there is only one. That is why the statement uses the @[] array literal constructor.
3. Initialize the fetch results controller using the just-allocated fetch request and the managed object context from the app delegate. There is only one section, so no section names are needed. There is also no caching.
4. Tell the controller to read the initial set of data and deal with any error that might occur. As with comments in previous listings, the code that handles errors should not go in shipping apps.
Updating Basic Table View Data Source Methods
UITableViewDataSource implements three core methods used for returning the number of sections, returning the number of rows in a given section, and returning the cell for a given index path. Each of these methods can now use the fetched results controller. Update the methods by following these steps:
1. Replace the one line of numberOfSectionsInTableView: with this:
return [[fetchedResultsController sections] count];
2. Replace the body of tableView:numberOfRowsInSection: with this:
id <NSFetchedResultsSectionInfo> sectionInfo;
sectionInfo = [fetchedResultsController sections][section];
return [sectionInfo numberOfObjects];
3. Change the line in tableView:cellForRowAtIndexPath: that sets the car object of the cell to this:
cell.myCar = [fetchedResultsController objectAtIndexPath:indexPath];
As you can see, you can use a fetched results controller to access data objects based on index paths. This makes managing tables easy.
Updating Deleting and Viewing of Cars
When you run the app in the simulator, you should see any existing cars. However, trying to add or delete a car results in a crash. Viewing cars also gives unpredictable results. This is because the methods supporting those behaviors still use the old array-based management method and try to manipulate the table directly. Update to using the fetched results controller by following these steps:
1. In tableView:commitEditingStyle:forRowAtIndexPath:, change the code inside the if condition that deals with deletion to the following (with changed code in bold):
[managedContextObject deleteObject:[fetchedResultsController
objectAtIndexPath:indexPath]];
NSError *error = nil;
[fetchedResultsController performFetch:&error];
if (error != nil) {
NSLog(@"Unresolved error %@, %@", error, [error userInfo]);
abort();
}
tableView deleteRowsAtIndexPaths:@[indexPath]
withRowAnimation:UITableViewRowAnimationFade];
2. In newCar:, replace the line that generates the arrayOfCars with this:
[fetchedResultsController performFetch:&error];
3. Replace the return value of carToView with this:
[fetchedResultsController objectAtIndexPath:currentViewCarPath]
4. Delete the declaration of the arrayOfCars instance variable.
When you run the app, everything should work. You can add, delete, and edit cars. Remember to go home before you stop the app in Xcode. Next, you make changes in the car detail view in the cars table.
Part 2: Implementing NSFetchedResultsControllerDelegate
The code in this chapter works so far, but there is one potential problem. Each time the data in the managed object context is updated by an addition, a deletion, or a change, you send performFetch: to the fetch results controller. The call can result in far more work and time than simply updating only the changed data.
The fetched results controller has the ability to observe changes in the managed object context and call methods when those changes occur. All you need to do is support the NSFetchedResultsControllerDelegate protocol. You start by declaring support for the protocol:
1. Open CarTableViewController.h and add the following line of code just below the import of UIKit:
#import <CoreData/CoreData.h>
2. Change the protocol declaration below @interface by adding the code in bold:
<ViewCarProtocol, NSFetchedResultsControllerDelegate>
Adding the NSFetchedResultsControllerDelegate Methods
When you set CarTableViewController as the delegate of the fetched results controller, it sends messages to this delegate whenever a change occurs in the managed object context. In particular, there are three calls to make managing table updates easy:
![]() controllerWillChangeContent: is called when some content is about to change but before the fetched results are changed.
controllerWillChangeContent: is called when some content is about to change but before the fetched results are changed.
![]() controller:didChangeObject:atIndexPath:forChangeType:newIndexPath: is called after the change is complete and the fetched results are updated. The message is sent once for each change and might be called multiple times between the calls tocontrollerWillChangeContent: and controllerDidChangeContent:.
controller:didChangeObject:atIndexPath:forChangeType:newIndexPath: is called after the change is complete and the fetched results are updated. The message is sent once for each change and might be called multiple times between the calls tocontrollerWillChangeContent: and controllerDidChangeContent:.
![]() controllerDidChangeContent: is called after all changes have been complete and the fetched results are updated.
controllerDidChangeContent: is called after all changes have been complete and the fetched results are updated.
These calls work very well with one way of updating a table view. So far you have updated the table view from the same method that changed the data. This works for now because you are making only one change at a time. However, if you wanted to allow deleting multiple items, you would have to delete them one row at a time.
Instead, UITableView provides a way to show the results of any number of updates at the same time. If you wrap all the table updates in beginUpdates and endUpdates, all the updates and associated cell changes and animations occur at once.
Use the three delegate calls with the table view messages to update the content. You begin table updates when the content changes, change the table for each change, and end the table updates when content changes are done. Follow these steps to use fetched results controller delegate methods to update the table contents:
1. Set the current CarTableViewController instance as the fetched results controller delegate by adding the following line of code in viewDidLoad, just below the line that initializes fetchResultsController:
fetchedResultsController.delegate = self;
2. Insert the following code just above carToView. The #pragma is used to easily find the new protocol support:
#pragma mark - NSFetchedResultsControllerDelegate
- (void)controllerWillChangeContent:(NSFetchedResultsController *)controller {
[self.tableView beginUpdates];
}
3. Now tell the table view that updates have finished and it should update. Insert this code below the controllerWillChangeContent::
- (void)controllerDidChangeContent:(NSFetchedResultsController *)controller
{
[self.tableView endUpdates];
}
4. Use Listing 9-5 to add the protocol method that does the work of updating the table based on the type of change. It might be called multiple times between the controllerWillChangeContent and controllerDidChangeContent messages. Add the method after the two you just added.
Listing 9-5 Updating the Table View
- (void)controller:(NSFetchedResultsController *)controller
didChangeObject:(id)anObject
atIndexPath:(NSIndexPath *)indexPath
forChangeType:(NSFetchedResultsChangeType)type
newIndexPath:(NSIndexPath *)newIndexPath {
UITableView *tableView = self.tableView;
switch(type) { // 1
case NSFetchedResultsChangeInsert: // 2
[tableView insertRowsAtIndexPaths:@[newIndexPath]
withRowAnimation:UITableViewRowAnimationFade];
break;
case NSFetchedResultsChangeDelete: // 3
[tableView deleteRowsAtIndexPaths:@[indexPath]
withRowAnimation:UITableViewRowAnimationFade];
break;
// case NSFetchedResultsChangeUpdate: // 4
// code to update the content of the cell at indexPath
// break;
// case NSFetchedResultsChangeMove: // 5
// [tableView deleteRowsAtIndexPaths:@[indexPath]
// withRowAnimation:UITableViewRowAnimationFade];
// [tableView insertRowsAtIndexPaths:@[newIndexPath]
// withRowAnimation:UITableViewRowAnimationFade];
// break;
}
}
Here’s what happens in the numbered lines in Listing 9-5:
1. Determine what kind of update to make, based on the type of change.
2. When a new object is inserted, insert a cell at the appropriate place in the table.
3. An object is deleted, so remove the corresponding cell.
4. This type of change occurs when an object is changed or updated. Here you do anything required to refresh the cell that represents the data.
5. The final change is moving the data cell from one place in the table to another. Usually this means deleting the old cell and inserting a new one.
Neither of the last two change types needs to be supported. Although the update message is sent from edits in the car detail view, the changes occur while the cars table is offscreen, so modified cells will not animate. Of course, this might be what you want. The experience would be returning from the car detail view to a cars table that already reflects any changes.
Enabling Calling of the Delegate Methods
If you run the CarValet app now, the delegate methods are not called. You can see this by adding an NSLog statement or setting a breakpoint in controllerWillChangeContent: and then adding or deleting a car. The table updates, but not because of the delegate method.
Observers are informed of changes only when the managed object context is saved. The only place this currently happens is in the app delegate, when it enters the background or exits. Both of those events call a custom method saveContext, which sends save: to any changed managed object context.
To trigger the delegate methods, you need to save the context whenever you add or delete a car. tableView:commitEditingStyle:forRowAtIndexPath: deletes a car and newCar: adds one. In each of those methods, replace this line:
[fetchedResultsController performFetch:&error];
with this code:
[managedContextObject save:&error];
The original line refreshes all the fetched results controllers data, which can get more expensive as the amount of data grows. The new call saves only the changed cars, which in turn sends one message to the fetched results controller for each updated car.
The save: message triggers the delegate message flow: The initial controllerWillChange-Content: message, as many controller:didChangeObject:atIndexPath:forChangeType:newIndexPath: messages as needed, and then the finalcontrollerDidChangeContent: message.
Running the code now and adding or deleting cars still results in a crash. Looking at the debugger output reveals the problem:
Terminating app due to uncaught exception 'NSInternalInconsistencyException', reason:
'Invalid update: invalid number of rows in section 0. The number of rows contained in
an existing section after the update (3) must be equal to the number of rows contained
in that section before the update (3), plus or minus the number of rows inserted or
deleted from that section (0 inserted, 1 deleted) and plus or minus the number of rows
moved into or out of that section (0 moved in, 0 moved out).'
The exception tells you there is a mismatch between the number of rows the table view expects there to be and the actual number. This makes sense because both your original code and the new delegate methods are updating the table. There are two calls to add or delete the same object. To fix the error, follow these steps:
1. In tableViews:commitEditingStyle:forRowAtIndexPath:, remove the call to deleteRowsAtIndexPaths:withRowAnimation:.
2. Remove the last two lines from newCar:
NSIndexPath *indexPath = [NSIndexPath indexPathForRow:0 inSection:0];
[self.tableView insertRowsAtIndexPaths:@[indexPath]
withRowAnimation:UITableViewRowAnimationAutomatic];
Run the app, and everything should work. Try adding some cars, change one to a BMW, update another to something else, and delete a few. As you do this, the proper animations occur. Not only that, but everything is working with less code.
Summary
In this chapter, you learned how to add data persistence in your apps. After looking at the pieces of Core Data and how they fit together, you built a data model for the car object. You added some boilerplate code for setting up the Core Data environment and then used a repeatable process to convert first the car overview list and then the detail view to use the new data format.
You completed your exploration of the basics by using NSFetchedResultsController to significantly reduce the amount of code needed to manage a table view. Along the way, you learned how to recognize some common errors and make your code a bit more readable.
The ability to save and retrieve data adds many more possibilities for the kinds of apps you can create. Whether you are working with data created purely in an app or caching data from a server, Core Data gives you more flexibility, especially when combined with a fetched results controller.
With your data in a database, searching, sorting, and filtering become easier. In Chapter 10, you extend your knowledge of table views, adding searching, sorting, indexes, and even a custom cell to make your app look better.
Challenges
1. Add a new string attribute to the model called name and display it in the cars table. There are two things you need to know to make this work. First, any update to the model does not work with data created with earlier models unless you create migration code. Doing that is beyond the scope of this book. Instead, you need to delete the application and data from the simulator before running an app with a changed model. Second, to make it easier to display the name and date on the same line, you can use the Storyboard editor to change the prototype cell type from Right Detail to Subtitle. Then you can construct a string for the detail text label with the name followed by the date, in much the same way you do for the year/make/model label.
2. Add the ability to display the name in the car edit view. You need to use the Storyboard editor to add a cell for the name, use a property for the cell, and set the title of that cell in viewDidLoad.
3. Use MakeModelEditViewController and protocols to edit the name. Change the value of the name in the object so that when you return to the cars table, the cell updates.
4. Change the fetched results controller to sort by last name instead of creation date.
All materials on the site are licensed Creative Commons Attribution-Sharealike 3.0 Unported CC BY-SA 3.0 & GNU Free Documentation License (GFDL)
If you are the copyright holder of any material contained on our site and intend to remove it, please contact our site administrator for approval.
© 2016-2026 All site design rights belong to S.Y.A.