Learning iOS Development: A Hands-on Guide to the Fundamentals of iOS Programming (2014)
Chapter 10. Table Views II: Advanced Topics
You started your table view journey in Chapter 8, “Table Views I: The Basics.” But that was only part of the story for one of the central elements in building iOS apps. Many of the built-in Apple apps use more advanced table view features, such as custom cells, grouping, sorting, indexes, and searching. Contacts, Reminders, Mail, and other apps seamlessly integrate those features into the user experience.
In this chapter, you explore the more advanced features of table views, rounding out your ability to use this versatile element in your own apps. You start by creating your own car cell for the CarValet app, using the built-in basic one as a base. And now that app data is preserved, you will also be able to group and sort the table by various car attributes. To do that, you need to expand your knowledge of the fetched results controller and how Core Data makes the tasks easy.
As your app data grows in size, you then add some features to make it easier to get to the right car: adding an index down the right side of the table—not just an alphabetical one like Contacts creates, but one that can also move through the years. Finally, you wire up the table for search and discover the power of layered tables, as well as even more ways to use the fetched results controller.
By the end of the chapter, you will be able to create apps using the full power of tables. You will also know how to group, sort, and search your application data. Your journey into the power of table views begins by creating a custom cell for cars.
Custom Table View Cells
One of the tabs in the CarValet app lets you view images of cars. In a shipping application, those would be pictures of the cars taken with the device’s camera. But you might not need to flip through full images; showing a thumbnail of the car image in the cars table might be enough to identify the car.
In this section, you customize the cell used to display the overview of a car. In addition, you learn how to use cells of a nonstandard height. You can start with an existing project or use the starter project from the folder CH10 CarValet Starter as a starting point for this chapter.
Your goal in this chapter is to create a custom cell that looks like Figure 10-1.
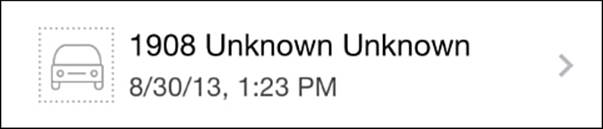
Figure 10-1 Custom car cell
There are a few things you can tell by looking at the desired cell:
![]() It is taller than a typical cell.
It is taller than a typical cell.
![]() There are three subviews: an image and two labels.
There are three subviews: an image and two labels.
![]() The custom content needs to shift when the cell is in delete mode and a user either swipes or taps the Edit button.
The custom content needs to shift when the cell is in delete mode and a user either swipes or taps the Edit button.
![]() It uses a detail disclosure button.
It uses a detail disclosure button.
So far you have not had to do any work to shift the content when a cell enters edit mode. This is because table view cells shift default types of content, including a property called the contentView. This is a UIView with all the content of the cell and, as Figure 10-2 shows, is already part of the prototype cells in IB.
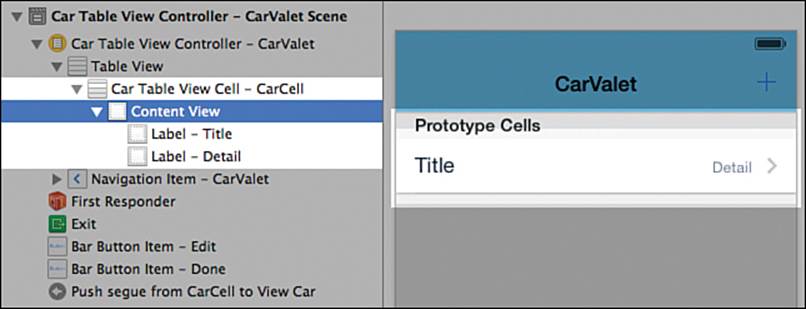
Figure 10-2 contentView in prototype cells
Creating your customized cell uses the same mechanism. In fact, any views you drag into a cell are put into the content view. Start by converting the current prototype cell to a custom one and setting the new size:
1. Select the current prototype cell and use the Attributes inspector to set the style of the cell to Custom, as shown in Figure 10-3.
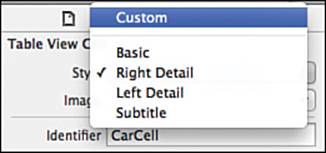
Figure 10-3 Setting cell style to Custom
2. With the prototype cell still selected, choose the Size inspector, check the Custom box, and set Row Height to 68. This changes the cell height but not the height allocated by a UITableView. That number is set in the Size inspector for the table view.
3. With the Size inspector still active, select the table view and set Row Height to 68. You can see steps 2 and 3 in Figure 10-4.
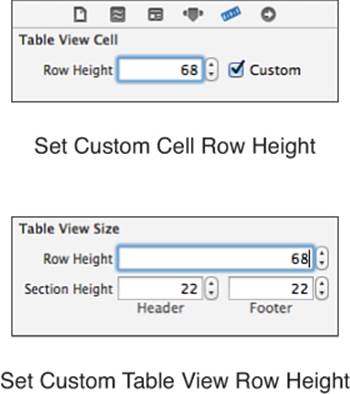
Figure 10-4 Setting a custom row height
Adding the Custom Cell Visual Elements
With the row height set, you have enough room to add the visual elements. To lay out the cell, you need the car placeholder image for the cell, which you can find in the sample code for this chapter. Follow these steps:
1. Choose the Images.xcassets item in Xcode and add the CH10 Assets Placeholder folder included with the sample code for this chapter. You should have one item with two images.
2. Add a UIImageView to the container view and set the image to placeholder.
3. Use the alignment constraint popup to vertically center it in the container (though do not update frames yet).
4. Now, use the pin constraint popup to set the leading edge constraint to the standard distance and the width and height to 40. Set update frames and add the constraints.
5. Add a label roughly next to the image view. Set the font size of the label to 16 points and change the text to “Year Make Model.”
6. Use the pin popup to set it the system distance from the leading and trailing edges. Then, select both the image view and the label and use the pin popup to align the top edges and update frames.
7. Duplicate the label, set the text to “Create Time,” set the font size to 14 points, and the color to Dark Gray.
8. Set the constraints to be the system distance from the leading and trailing nearest neighbor and align the bottom edge with the image view. Once again, update the frames before applying the final alignment constraint.
9. Open the Assistant editor and make sure it is showing CarTableViewCell.h. When working with prototype cells or other kinds of nested views, it is important to make sure the right .h file is showing (if not, refer to step 1 of “Creating an Outlet” in Chapter 3, “Introducing Storyboards,” just before Figure 3-6). The default file in this case is the one for the table view.
Now create the IBOutlet properties shown in Table 10-1 for the new view elements.

Table 10-1 CarTableViewCell Properties
Populating the Cell
Modify configureCell in CarTableViewCell.m to populate the new visual elements. For now, you do not modify the car image. Here’s what you do:
1. Modify the left-hand side of the line to assign the make, model, and year from self.textLabel.text to self.makeModelLabel.text.
2. Change self.detailTextLabel.text to self.dateCreatedLabel.text.
Run the app, and you see a cell similar to the one in Figure 10-1. Try creating, editing, and deleting cars. All this should work, and the new cells should display the correct values.
Note: If the Disclosure Indicator Is Not Showing
In the prerelease version of Xcode used for this book, the detail disclosure indicator did not show up when the cell was converted to a custom type. If this happens, try setting the accessory to None and then setting it back to detail disclosure.
Sections and Sorting
Your current table sort is not really set up with the end customer in mind. The valet might think in terms of time parked, but the end customer remembers his or her car. Helping the valet’s customer, and therefore your customer, means adding the ability to sort by attributes of the car in addition to the park time. This makes four ways you could group the data: park time, car make, car model, or car year.
When you show groups, you need to make sure the sort order makes sense. Each of the four groups in this case has an associated sort: park time and car year are descending by time, and make and model are ascending.
In Chapter 9, “Introducing Core Data,” you saw that a fetched results controller uses a fetch request to find data items. And a fetch request includes sort descriptors. Changing the sort in your table is as simple as changing the sort descriptors used by the fetch request. Try this:
1. Open CarTableViewController.m and go to the viewDidLoad method.
2. In the setup of sortDescriptor, change initWithKey: to @"make" from @"dateCreated".
Run the app, and the list of cars is sorted by make, as shown on the left-hand side of Figure 10-5. The cars are sorted by model in reverse alphabetical order because isAscending: is still NO. You will fix this when you look more at how to sort a little later in this chapter.
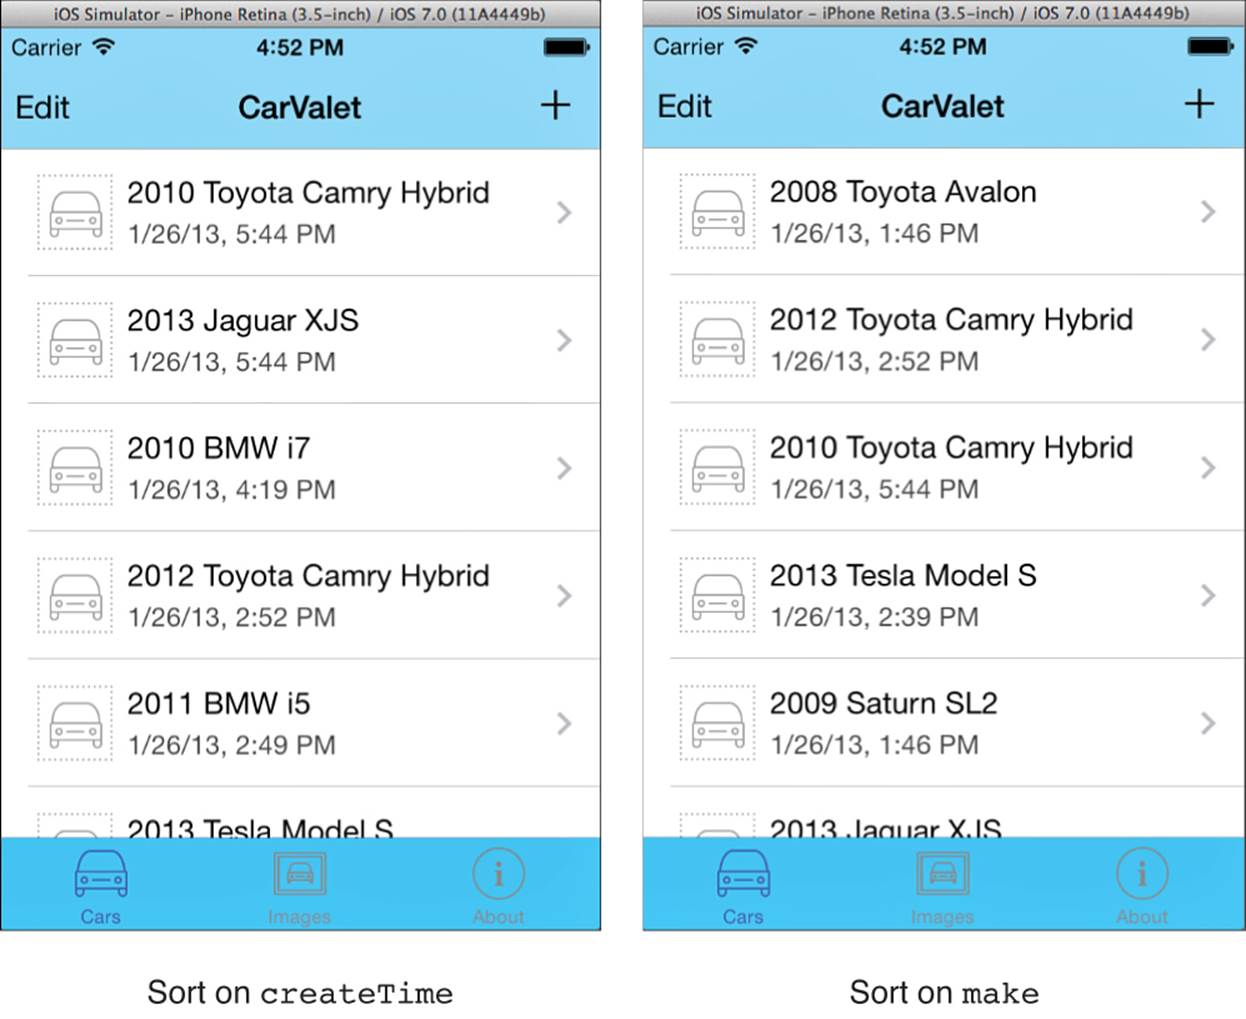
Figure 10-5 Changing sort descriptor key
Section Headers
Sorting is a good first step, though it is still difficult to find where each new car make begins and ends. This is a good place to use table sections and headers. The best way to think of a section is as a group of related data. In the contacts list, groups are based on the first letter of the last name (or first name, if that’s what is set in the Settings app). In your app, all Chevrolets would be in one section, and all Mercedes would be in another.
In tables using a fetched results controller, you need to take only a few steps to show section headers. You already have a table sorted on make, so follow these steps to add the section headers:
1. Open CarTableViewController.m and go to viewDidLoad.
2. In the statement that allocates and initializes fetchedResultsController, change sectionNameKeyPath: to @"make" from nil.
3. Add the method in Listing 10-1 after tableView:cellForRowAtIndexPath.
Listing 10-1 Data Source Method for Section Titles
- (NSString *)tableView:(UITableView *)tableView
titleForHeaderInSection:(NSInteger)section {
id <NSFetchedResultsSectionInfo> sectionInfo;
sectionInfo = [fetchedResultsController sections][section]; // 1
return [sectionInfo name]; // 2
}
Here’s what happens in the numbered lines in Listing 10-1:
1. Get the section information for section from the fetched results controller.
2. Base the name of the section on the value of the data in the sectionNameKeyPath: for every object in that section. In this case, it is the value of the make property.
Run the app in the simulator, and the cars are grouped by make. The header titles are the same as the name of the make for that group. One slight issue is that the table is sorted in reverse alphabetical order. Changing this is as simple as changing the ascending key in the sort descriptor fromNO to YES in viewDidLoad. Run the app, and the sections are now in ascending alphabetical order.
Adding and Deleting Sections
Like rows, sections can be added and deleted. They are added when the first item in a section is created. For example, the cars table is currently grouped by make, and adding the first Chevrolet creates a new section. In the same way, sections are deleted when the last item for that section is deleted. Try this with your current app:
1. Find a section with only one car or, if needed, remove all but one car from a section.
2. Remove the last car from the section.
The app continues to work, but something like the following two errors are printed in the console (bold added for emphasis):
2013-08-30 17:02:47.831 CarValet[19648:a0b] *** Assertion failure in -[UITableView
_endCellAnimationsWithContext:], /SourceCache/UIKit_Sim/UIKit-2891.1/
UITableView.m:1310
2013-08-30 17:02:47.836 CarValet[19648:a0b] CoreData: error: Serious application
error.
An exception was caught from the delegate of NSFetchedResultsController during a call
to -controllerDidChangeContent:. Invalid update: invalid number of sections. The
number of sections contained in the table view after the update (6) must be equal to
the number of sections contained in the table view before the update (7), plus or
minus the number of sections inserted or deleted (0 inserted, 0 deleted). with userInfo
(null)
The first error says something was not right after the table completed an animation—in this case, removing the last cell of a section. The second error sheds more light, as shown by the bold text. The problem is an invalid number of sections. Reading further, you can see that the fetched results controller returns the correct number of sections both before (7) and after (6) deleting the car. However, the table view is never updated, as you can see near the end of the second error: “the number of sections inserted or deleted (0 inserted, 0 deleted).”
You already update the table view when rows are added (inserted) and deleted by using insertRowsAtIndexPaths:withRowAnimation: and deleteRowsAtIndexPaths:withRowAnimation:. Now you can add the similar calls for sections by inserting the code in Listing 10-2. Put the code just below controllerDidChangeContent:.
Listing 10-2 Updating a Table When Sections Are Added/Deleted
- (void)controller:(NSFetchedResultsController *)controller
didChangeSection:(id <NSFetchedResultsSectionInfo>)sectionInfo
atIndex:(NSUInteger)sectionIndex
forChangeType:(NSFetchedResultsChangeType)type {
NSIndexSet *sections = [NSIndexSet indexSetWithIndex:sectionIndex]; // 1
switch(type) {
case NSFetchedResultsChangeInsert: // 2
[self.tableView insertSections:sections
withRowAnimation:
UITableViewRowAnimationFade];
break;
case NSFetchedResultsChangeDelete: // 3
[self.tableView deleteSections:sections
withRowAnimation:
UITableViewRowAnimationFade];
break;
}
}
Here’s what happens in the numbered lines in Listing 10-2:
1. Create a set of the section to be inserted or deleted.
2. You are inserting a new section, so tell the table view to insert the section.
3. You are deleting an existing section, so tell the table view to delete the section.
The code you added also fixes a bug you did not encounter. Before you added the code in Listing 10-2, adding a new section would have caused a crash.
Run the app again and delete the last car from a section. No errors occur. However, there is another related problem. Change the make of a car in one section to the make of a car in a different section. Again, two errors are shown in the console, and although the app continues to run, it is in a strange state. In addition to the edited car not changing, some sections might be missing. Here’s what you see onscreen (bold added for emphasis):
2013-08-30 17:07:09.271 CarValet[19705:a0b] *** Assertion failure in -[UITableView
_endCellAnimationsWithContext:], /SourceCache/UIKit_Sim/UIKit-2891.1/
UITableView.m:1326
2013-08-30 17:07:09.273 CarValet[19705:a0b] CoreData: error: Serious application
error.
An exception was caught from the delegate of NSFetchedResultsController during a call
to -controllerDidChangeContent:. Invalid update: invalid number of rows in section 0.
The number of rows contained in an existing section after the update (2) must be equal
to the number of rows contained in that section before the update (3), plus or minus
the number of rows inserted or deleted from that section (0 inserted, 0 deleted) and
plus or minus the number of rows moved into or out of that section (0 moved in, 0
moved out). with userInfo (null)
Again, the clue is in the second error. This time, the invalid update text is not as helpful as the explanation of why the update was invalid. The rest of the error makes it clear that the change in section was not correctly reported to the table. That is, the index path for the moved data item was not updated to the new section. The code to update the table is already there, although it is commented out.
In controller:didChangeObject:atIndexPath:forChangeType: newIndexPath: uncomment the NSFetchedResultsChangeMove case. That code deletes cells from their old index paths—that is, sections—and adds them to their new ones.
This time when you run the app you can add, delete, and change cars without crashes.
Enabling Changing of Section Groups
Changing the groups shown in sections requires two main changes: an interface for the user to change the grouping and the code to update the sort and sections.
The interface presents four options: Parked, Make, Model, and Year. Parked corresponds to the default order on dateCreated. Using a UISegmentedControl is a good way to present a small number of options. Follow these steps:
1. Open Main_iPhone.storyboard and find the car table view controller.
2. Drag in a UIView between the bottom of the navigation bar and the top of the table view (the first prototype cell). Set the background color of the view to Mercury, and then use the Size inspector to set the height to 30 points.
3. Drag a UISegmentedControl into the new view, change the tint to magnesium, and set the number of segments to 4.
4. Set the constraints to the container to default for leading and trailing, and 6 for top and bottom. Update the frame when you update the constraints.
5. Change the segment names to Parked, Make, Model, and Year. You change a segment name by using the Attributes inspector for the segmented control. Select a segment from the Segment popup and then type in a new name and press Return. When you are done, the control should look as shown in Figure 10-6.
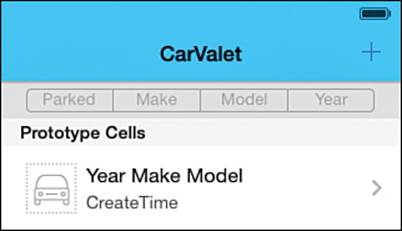
Figure 10-6 Sort selector for table view
6. Show CarTableViewController.h in the Assistant editor and create an IBOutlet property called tableHeader for the UIView and another called carSortControl for the segmented control. Also, create an IBAction carSortChanged: that is sent when the value is changed, as shown in Figure 10-7.
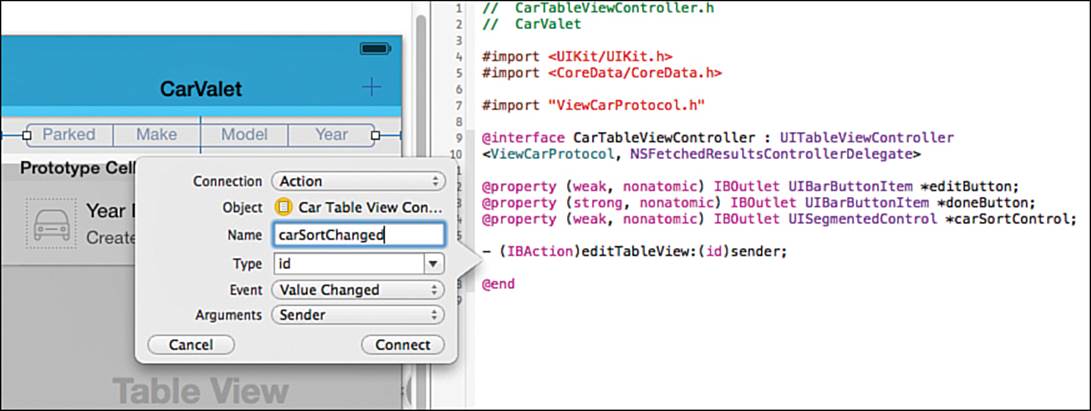
Figure 10-7 Adding carSortChanged: action
Adding Code to Change the Sort and Sections
Changing sections requires two code changes: creating a new sort descriptor using the correct data key and updating sectionNameKeyPath to correctly group the cars in the table view and set the section titles. Unfortunately, you cannot change the section name key path of a fetched results controller after it is allocated.
Because there is not a lot of data in this case, you replace the existing fetch results controller each time the sort order is changed.
Note
For applications with lots of data, creating a new fetch results controller when section groupings change can be inefficient as the required fetch might take too long. In that case, you could create one fetched results controller for each key and switch between them. For more information, see Chapter 5 of Learning Core Data for iOS: A Hands-on Guide to Building Core Data Applications by Tim Roadley.
1. Open CarTableViewController.m in the editor and go to viewDidLoad.
2. Select the code starting with the line that allocates the NSSortDescriptor through the end of the if condition checking for an error with performFetch:, as shown in Figure 10-8.
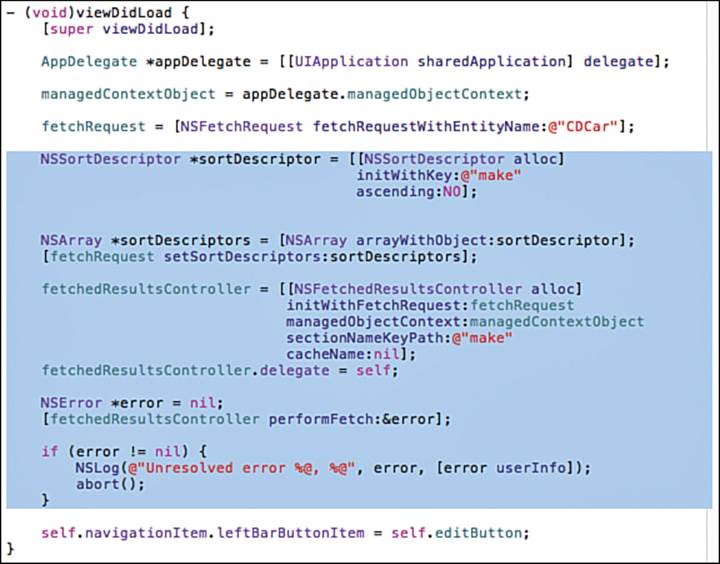
Figure 10-8 Selecting fetched results controller code
3. Cut that code and paste it into the body of carSortChanged:.
4. In place of the code cut from viewDidLoad, type this line:
[self carSortChanged:nil];
5. In CarTableViewController.h, add the following #defines above the interface declaration. These #defines map between the selected segment and the desired sort:
#define kCarsTableSortDateCreated 0
#define kCarsTableSortMake 1
#define kCarsTableSortModel 2
#define kCarsTableSortYear 3
6. Modify carSortChanged: so it looks like Listing 10-3. The code added after the paste is shown in bold.
Listing 10-3 Changing the Table Sections Based on Selected Sort
- (IBAction)carSortChanged:(id)sender {
NSString *sortKey; // 1
NSString *keyPath; // 2
BOOL isAscending; // 3
SEL compareSelector = nil; // 4
switch (self.carSortControl.selectedSegmentIndex) { // 5
case kCarsTableSortMake:
sortKey = @"make";
keyPath = sortKey;
isAscending = YES;
compareSelector = @selector(localizedCaseInsensitiveCompare:);
break;
case kCarsTableSortModel:
sortKey = @"model";
keyPath = sortKey;
isAscending = YES;
compareSelector = @selector(localizedCaseInsensitiveCompare:);
break;
case kCarsTableSortYear:
sortKey = @"year";
keyPath = sortKey;
isAscending = NO;
break;
default: // 6
sortKey = @"dateCreated";
keyPath = nil;
isAscending = NO;
break;
}
NSSortDescriptor *sortDescriptor = [[NSSortDescriptor alloc] // 7
initWithKey:sortKey
ascending:isAscending
selector:compareSelector];
[fetchRequest setSortDescriptors:@[sortDescriptor]];
fetchedResultsController = [[NSFetchedResultsController alloc] // 8
initWithFetchRequest:fetchRequest
managedObjectContext:managedContextObject
sectionNameKeyPath:keyPath
cacheName:nil];
fetchedResultsController.delegate = self;
NSError *error = nil;
[fetchedResultsController performFetch:&error]; // 9
if (error != nil) {
NSLog(@"Unresolved error %@, %@", error, [error userInfo]);
abort();
}
[self.tableView reloadData]; // 10
}
Here’s what happens in the numbered lines in Listing 10-3:
1. Specify a configuration variable for the property name used for sorting the cars.
2. Specify another configuration variable for the property name used for grouping cars into sections and for finding the section titles.
3. Determine whether the sort is ascending for alphabetical items or descending for time-based items.
4. For items that are based on strings, use a localized case-insensitive compare; otherwise, use the default compare: method.
5. Set up the configuration variables depending on how the table is sorted.
6. Setting keyPath to nil results in only one section with no title.
7. Set up the sort descriptor, using the configuration variables.
8. Set up the fetched results controller, using the configured key path.
9. Fetch the data from Core Data.
10. Tell the table to reload from the updated fetched data.
Run the app. If there are no cars with an unknown value for make, add one. Now tap the Sort by Make segment. You get an error something like this:
2013-08-30 19:40:15.396 CarValet[20992:a0b] CoreData: error:
(NSFetchedResultsController) A section returned nil value for section name key path
'make'. Objects will be placed in unnamed section
The error says some Core Data object is returning nil for the value of the property used to determine the section title, or the sectionNameKeyPath:, of the fetched results controller. In this case, the property key is make, and the object is the newly created car.
To solve this, give make and model default string values of Unknown. In addition to modifying the model, the only other change is to remove code that displays Unknown by checking for nil.
While the app is still running, for any car with an unknown make and/or model, either set them both to something valid or delete the car. Make sure the app saves data changes by exiting the app in the simulator using the Home button before using the inspector to stop the app. Use these steps to set the default values in the model and to update the app to use those values:
1. Open CarValet.xcdatamodeld in the Core Data editor.
2. Select the make attribute and show the Data Model inspector.
3. Change the default value to Unknown.
4. Do the same for the model attribute.
5. Search for all occurrences of Unknown in the project by selecting the Find icon in the Navigator and typing “Unknown”, including the quotes, in the search box.
You get a list of all occurrences of that string in the project, looking something like Figure 10-9.
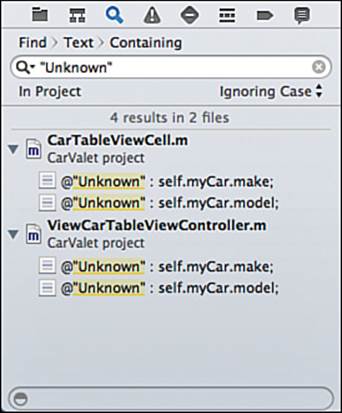
Figure 10-9 Results of a find in Xcode
6. In CarTableViewCell.m, remove the four lines assigning the make and model temporary strings and then modify the line that sets the text of the makeModelLabel (the new code is bold):
self.makeModelLabel.text = [NSString stringWithFormat:@"%@ %@ %@",
[self.myCar.year stringValue],
self.myCar.make,
self.myCar.model];
7. In ViewCarTableViewController.m, replace the two conditional assignments in viewDidLoad with the following statements:
self.makeLabel.text = self.myCar.make;
self.modelLabel.text = self.myCar.model;
Run the app and insert a new car. If the car data was saved earlier, you might have a car with a make and model of “(null).” That is a string representing a value of nil. You should either delete the car or change the make and model.
The app still shows Unknown for the new car’s make and model. When you edit the car, the app also shows Unknown. Changing the sort order to make or model adds a section header and title for Unknown.
Adding an Index
A nice feature of the Contacts app is the quick A–Z index shown on the right side. Because you are using a fetched results controller, adding an index like this is as simple as adding the following two methods in CarTableViewController.m aftertableView:titleForHeaderInSection::
- (NSArray *)sectionIndexTitlesForTableView:(UITableView *)tableView {
return [fetchedResultsController sectionIndexTitles];
}
- (NSInteger)tableView:(UITableView *)tableView
sectionForSectionIndexTitle:(NSString *)title
atIndex:(NSInteger)index {
return [fetchedResultsController sectionForSectionIndexTitle:title
atIndex:index];
}
Run the app, and you see A–Z indexes appear for the Make and Model sorts. Each index shows only the first letter of names that are in the table. If there are no cars with a make starting with Z, then Z is not in the list.
No matter what color scheme you picked, the index likely stands out, perhaps in a glaring fashion. Ideally, the index should be present but not overpowering. It should also be easier to see when a user is interacting with it. Three table view properties let you control those aspects:
![]() sectionIndexColor—The color of the text items in the index.
sectionIndexColor—The color of the text items in the index.
![]() sectionIndexBackgroundColor—The background color of the index view when not being touched.
sectionIndexBackgroundColor—The background color of the index view when not being touched.
![]() sectionIndexTrackingBackgroundColor—The background color when it is being touched.
sectionIndexTrackingBackgroundColor—The background color when it is being touched.
One way you could configure the index is using the same combination you used for the header and sort order segment control: magnesium for the text and magnesium for the background. To keep the index from being overpowering, you can use a translucent version of magnesium using the alpha property of UIColor.
Add these lines to the end of viewDidLoad. Each set of statements sets up a color and then assigns it to one of the three index color properties:
UIColor *magnesium = [UIColor colorWithRed:204.0/255.0
green:204.0/255.0
blue:204.0/255.0
alpha:1.0];
self.tableView.sectionIndexColor = magnesium;
UIColor *mercuryWithAlpha = [UIColor colorWithRed:230.0/255.0
green:230.0/255.0
blue:230.0/255.0
alpha:0.1];
self.tableView.sectionIndexBackgroundColor = mercuryWithAlpha;
UIColor *mercury = [UIColor colorWithRed:230.0/255.0
green:230.0/255.0
blue:230.0/255.0
alpha:1.0];
self.tableView.sectionIndexTrackingBackgroundColor = mercury;
Showing the Year in an Index
When you sort by year, you see only one or perhaps two index items. This is because the default title for an index is based on the first letter of whatever string is returned by the key. For the year property, the number is converted to a string, such as @"2012". Then the first character is added to the set of unique indexes. All the years in the current millennium are indexed by 2, and all from the previous millennium are indexed by 1. What you really want is to have the entire year used as the index title.
One way to do this is to create your own subclass of NSFetchedResultsController and specialize the implementation of sectionIndexTitleForSectionName: to return a custom string if the current sectionNameKeyPath is year.
Alternatively, you can modify the two methods you just added to return a different result for a table sorted by year. Which approach to take is a design decision and depends on both the reusability and maintainability of the code. Either way, the amount of code to add is small. For a subclass, you only need to define the one method. Changing the cars table also requires a small amount of code. In this case, you change the two methods you just entered.
When the table is sorted by year, the fetched results controller sections property contains the information for each section of grouped cars with the same year. Part of the property is the title of the section. You can use that title to construct the index list, as shown in the first method inListing 10-4.
The second method is used to find which section is associated with a particular index. It is used to move the table to the correct section when the index is tapped. Implementing this method is easy to do because the passed-in index is the index of the section. See the second method in Listing 10-4.
Listing 10-4 Creating an Index for Sorting by Year
- (NSArray *)sectionIndexTitlesForTableView:(UITableView *)tableView {
if (self.carSortControl.selectedSegmentIndex == kCarsTableSortYear) { // 1
NSMutableArray *indexes = [NSMutableArray new]; // 2
for (id <NSFetchedResultsSectionInfo> sectionInfo in // 3
fetchedResultsController.sections) {
[indexes insertObject:[sectionInfo name] // 4
atIndex:[indexes count]];
}
return indexes; // 5
}
return [fetchedResultsController sectionIndexTitles]; // 6
}
- (NSInteger)tableView:(UITableView *)tableView
sectionForSectionIndexTitle:(NSString *)title
atIndex:(NSInteger)index {
if (self.carSortControl.selectedSegmentIndex == kCarsTableSortYear) { // 7
return index;
}
return [fetchedResultsController sectionForSectionIndexTitle:title // 8
atIndex:index];
}
Here’s what happens in the numbered lines in Listing 10-4:
1. Check whether the table is sorted by year.
2. Set up a mutable array to hold the index titles.
3. The fetched results controller is sorted by year, so iterate through each section.
4. Insert the header string for the current section at the end of the titles array.
5. Return the array of year titles.
6. Getting to this line means the if condition at comment 1 failed. That means the table is sorted some other alphabetically based way, so return the default value.
7. If the table is sorted by year, the correct section number is just the index.
8. The table is not sorted by year, so return the default value.
Replace the current methods in CarTableViewController.m with the ones from Listing 10-4; then run the app and try each of the sorts. You see no index for the Parked sort, A–Z indexes for Make and Model, and the years for Year. Tapping on items in the index puts the section as close to the top of the table view as possible.
Searching Tables
The final functionality that could help the valet is to be able to search for a specific car. If the customer knows she has a BMW, filtering the content so that only BMWs show is a quick way to find her car.
Before you look at how to add searching to your table, it is useful to understand how searching works. In Figure 10-10, you can see the two stages of a search. On the left-hand side, the user has tapped in the search field to bring up the keyboard and cover the main table with a translucent view. On the right-hand side, the current search results are displayed in a table below the search field.
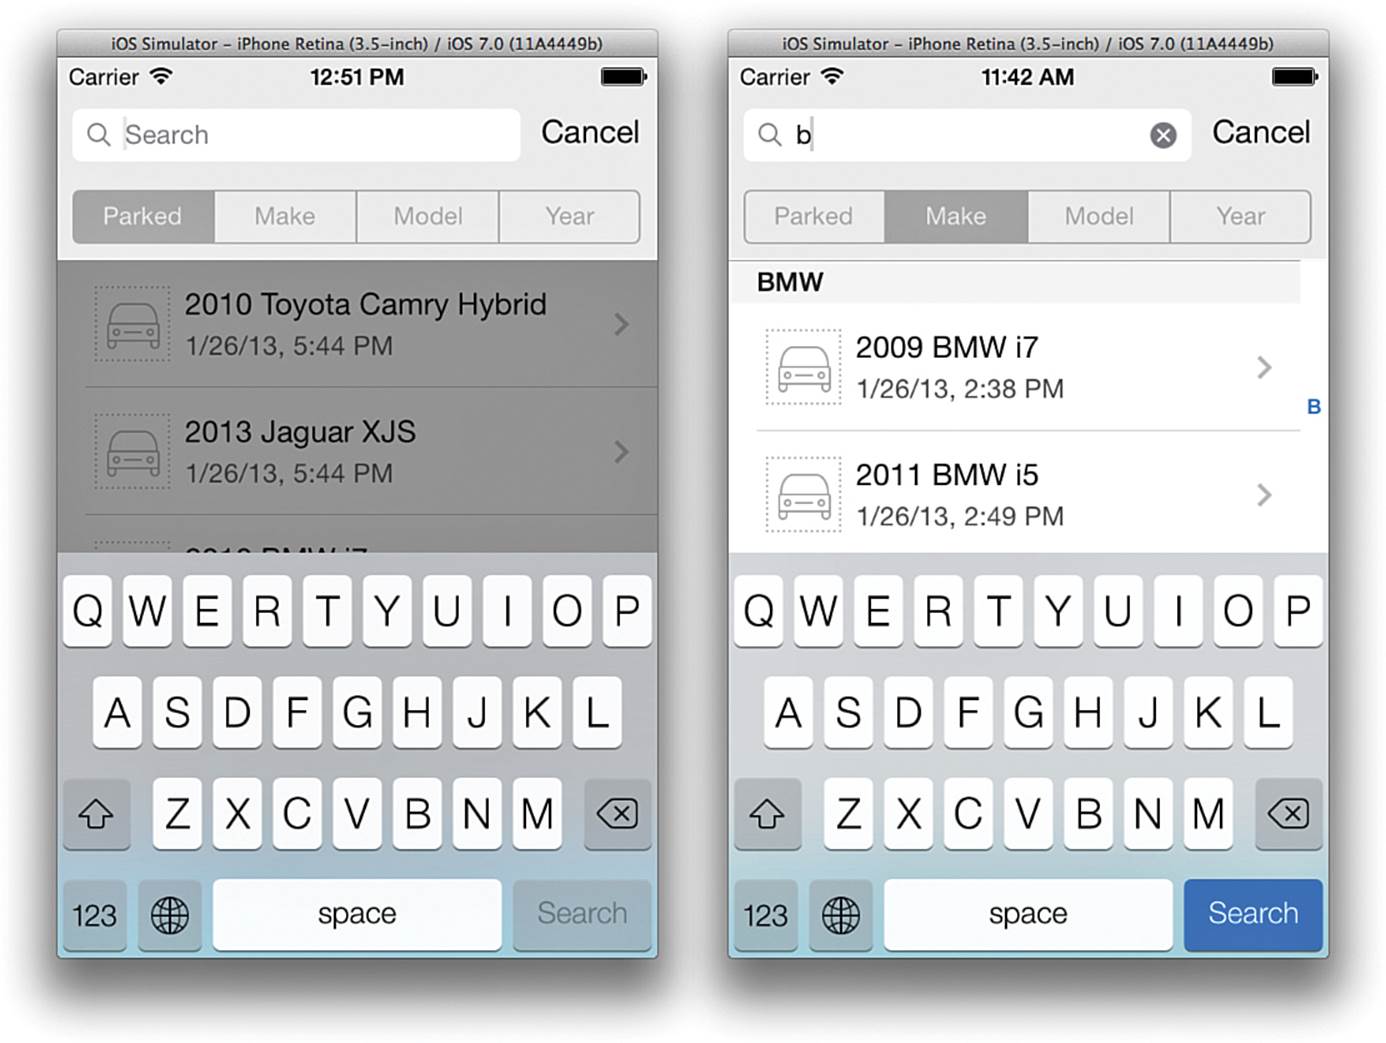
Figure 10-10 Search table view
Although the process of implementing a search seems like it might be complicated, most of the hard work is done by UISearchDisplayController, an object associated with your own view controller. When the user taps in the search field, the search display controller brings up the keyboard and displays the black translucent view. It also creates a new table for any search results, but it defaults to using your view controller’s table data source and delegate methods. This last part is very important to understand and is a source of confusion for many people when they implement searching.
The first time a user types something into the search field, the following things happen:
1. Your controller gets a callback to update the search results.
2. The search results controller creates a search results table.
3. The new table view calls your view controller’s table data source methods to build the search results table.
4. The search results table is displayed.
As the user updates the search text, callbacks are used to update the set of found items. When the number of items changes, the search results table updates.
Because the search results table uses the same data source and delegate, methods such as numberOfSectionsInTableView:, tableView:numberOfRowsInSection:, and tableView:cellForRowAtIndexPath: can be called for different tables. And even when these methods are called for the search results table, the main table view, self.tableView, is still valid. Figure 10-11 shows how this happens. The search results table (highlighted in red) is above the original table (highlighted in green) in the view hierarchy, so it covers the main table, though the main table is still there.
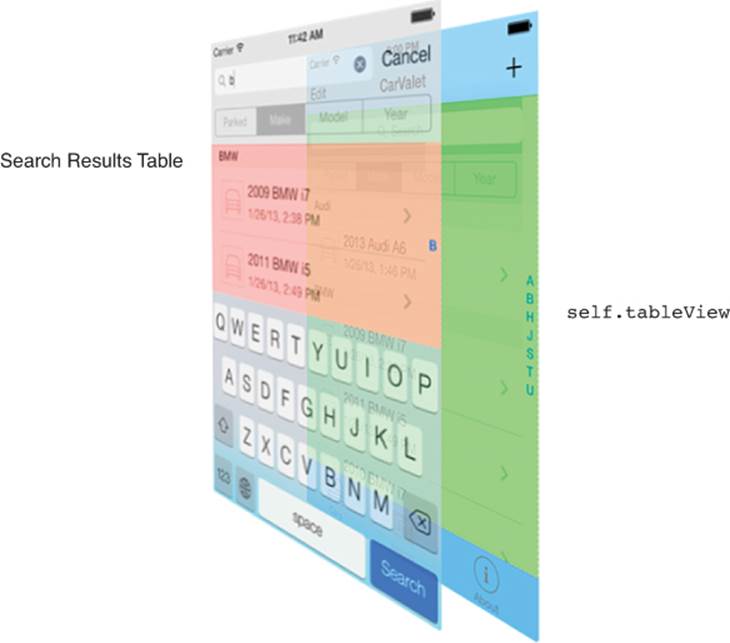
Figure 10-11 Two table views for a search
Important: The Search Code Might Not Behave as Expected...
The beta builds of iOS 7 and Xcode 5 available when this book was written have at least one table view-related search bug that prevented the following code solution from working properly. There is another way to implement search combined with filtering using UISearchBar’s scope bar. However, that also was not working correctly in those builds.
If you find this code does not work, look at the errata for the book (available, if there is any, at www.informit.com/title/9780321862969). In addition, if a change in code is required, the sample code on GitHub will be updated with the correct way to implement the functionality, assuming the functionality is possible.
Adding Searching
When you add search capability to a table, you are really adding a few things:
![]() A UISearchBar for the user to enter search terms
A UISearchBar for the user to enter search terms
![]() A UISearchDisplayController for managing the display of search results
A UISearchDisplayController for managing the display of search results
![]() Methods from the UISearchDisplayDelegate protocol for updating the found items, as well as other state information
Methods from the UISearchDisplayDelegate protocol for updating the found items, as well as other state information
![]() Any required updates to the table view data source and/or delegate methods
Any required updates to the table view data source and/or delegate methods
![]() Any other required methods and/or variables for updating and maintaining state
Any other required methods and/or variables for updating and maintaining state
You need to add the search bar and search display controller:
1. Open CarTableViewController in the storyboard.
2. Select the existing header view and change the height to 84 points. Make sure you have the header view selected. The best way to do this is using the left-hand list of scenes, controllers, views, and constraints.
3. Delete the top constraint from the filter segment control and move it down to the bottom of the new header. Ignore the constraint errors for now.
4. Look for a search bar with a search display controller, shown in Figure 10-12, in the objects shown in the utilities area. Drag it into the top of the header view, the one containing the filter bar.

Figure 10-12 Search bar and display controller
5. With the search bar still selected, check the option to show the Cancel button in the Attributes inspector.
6. Set the constraints for the search bar to be zero from the leading, trailing, and top edges of the container and its frame when the constraints are applied.
7. Select the filter segment controller and set a new vertical constraint of 6 points from the top of the segment control to the bottom of the search bar. Update the frame and the filter bar is now the correct size below the search bar.
Adding the Search Predicate
You are already using a fetched results controller for displaying data. You need to limit it to cars matching the search criteria. In addition to sorting cars, the fetch request can also filter the data. It does this using a predicate.
Predicates, or NSPredicate, provide a very flexible way to filter data on multiple criteria. You need a simple search, based on the current table grouping. For example, if cars are grouped by model, you look for any cars with a model attribute that contains the search string.
Whenever the search term changes, the search display delegate is sent a searchDisplayController:shouldReloadTableForSearchString: message. The method returns a BOOL that controls whether the search results table is updated. Update the predicate of your fetched results controller by following these steps:
1. Open CarTableViewController.h and add UISearchDisplayDelegate to the list of supported protocols.
2. In CarTableViewController.m, add the following just above carToView:
#pragma mark – UISearchDisplayDelegate
#pragma mark - ViewCarProtocol
3. Put the code in Listing 10-5 between the two #pragma marks you just added in step 2.
Listing 10-5 Updating a Car Search Predicate
- (BOOL)searchDisplayController:(UISearchDisplayController *)controller
shouldReloadTableForSearchString:(NSString *)searchString {
if (searchString && ([searchString length] > 0)) { // 1
fetchRequest.predicate = [NSPredicate predicateWithFormat: // 2
@"%K contains[cd] %@", // 3
[[fetchRequest.sortDescriptors // 4
objectAtIndex:0] key],
searchString]; // 5
} else {
fetchRequest.predicate = nil; // 6
}
NSError *error = nil;
[fetchedResultsController performFetch:&error]; // 7
if (error != nil) {
NSLog(@"Unresolved error %@, %@", error, [error userInfo]);
abort();
}
return YES; // 8
}
Here’s what happens in the numbered lines in Listing 10-5:
1. Check whether there is a search string with at least one character.
2. Set up a predicate based on the search string. Build the predicate using a predicate format string. Note that these are not the same as format strings. See the “Predicate Programming Guide” in the Apple documentation.
3. The string builds a predicate that checks whether the value of key, %K, contains the specified string %@. A key is the name of an object property. [cd] means use a case- and diacritical-insensitive comparison.
4. The name of the property, or key, is the same as the one used for sorting the data. For a table sorted by car model, the property is model.
5. Specify the search string to use for %@ in the predicate format string.
6. There is no search string, so clear any existing predicate.
7. Fetch any car objects that match the filter.
8. Tell the search results table to update.
Run the app, tap to sort the table by make, and then try to enter b into the search field. You get a crash report similar to the following (bold added for emphasis):
2013-08-30 20:48:01.641 CarValet[22058:a0b] *** Assertion failure in -
[UISearchResultsTableView dequeueReusableCellWithIdentifier:forIndexPath:],
/SourceCache/UIKit_Sim/UIKit-2891.1/UITableView.m:5184
2013-08-30 20:48:01.653 CarValet[22058:a0b] *** Terminating app due to uncaught
exception 'NSInternalInconsistencyException', reason: 'unable to dequeue a cell with
identifier CarCell - must register a nib or a class for the identifier or connect a
prototype cell in a storyboard'
The second error tells you where to look for the problem. The table view is unable to dequeue a cell with an identifier of CarCell because no such cell has been registered. You might wonder why this crash occurs because it worked fine until now.
Look at the line that allocates the cell in tableView:cellForRowAtIndexPath:
CarTableViewCell *cell = [tableView
dequeueReusableCellWithIdentifier:CellIdentifier
forIndexPath:indexPath];
The dequeue message is sent to tableView, whatever view is passed in to the method. In this case, tableView is the search results view, not the main table. CarCell is registered with the main table, not the search table.
Although there is a method to register a cell class with a cell identifier, that does not work for the search table. CarCell is based on the storyboard prototype custom cell you set up earlier in this chapter. Xcode associated the cell identifier with the prototype. You have no way to use that same mechanism for the search table. Instead, you can change the following line in tableView:cellForRowAtIndexPath: (the change is shown in bold):
CarTableViewCell *cell = [self.tableView dequeueReusableCellWithIdentifier:
CellIdentifier];
Make sure you remove the index path part of the dequeue call. When you have done that, run the app again, tap to sort by make, and type b into the search field. The search results table looks something like the left side of Figure 10-10, depending on your data.
All the correct data is displayed, but the custom cells do not fit. Once again, it is because the search results table is different. You need to set the rowHeight to 68 so it is high enough for the custom cell. Add the following method after the code from Listing 10-5:
- (void)searchDisplayController:(UISearchDisplayController *)controller
didLoadSearchResultsTableView:(UITableView *)tableView {
tableView.rowHeight = self.tableView.rowHeight;
}
The method is called the first time the search display controller creates and loads the search results table. The one line sets the row height for the new table to the row height of the main table.
Run the app, change the group and search, and now the search results table looks correct. Cancel the search, and you see another error:
2013-06-03 15:06:01.668 CarValet[14554:c07] *** Terminating app due to uncaught
exception 'NSRangeException', reason: '*** -[__NSArrayM objectAtIndex:]: index 2 beyond bounds [0 .. 0]'
Finding the source of this error requires setting a breakpoint for all exceptions, which is covered in Chapter 14, “Instruments and Debugging.” When the breakpoint is set, run the app. You see that the app crashes in tableView:titleForHeaderInSection: and, more specifically, it crashes because the fetched results controller has only one section but is being asked for information on a second section.
This error occurs because the fetched results controller is used for both the main and search results tables. Searching can change the data, including the number of sections and the number of cars in each section. When the search is cancelled, no code is run to reset the fetched results controller back to the presearch state. The easiest way to do that is to set the fetch request predicate to nil, and that is already done in searchDisplayController:shouldReloadTableForSearchString: when the string is empty.
Add the following to the search display delegate methods:
- (void)searchDisplayControllerWillEndSearch:(UISearchDisplayController *)
controller {
[self searchDisplayController:controller
shouldReloadTableForSearchString:@""];
}
searchDisplayControllerWillEndSearch: is called after the user ends the search but before the main table is updated. Using an empty string results in clearing the fetch request predicate and updating the fetch request controller.
Run the app again, change the sort, search, and then cancel. Everything now works. Search again and tap one of the found cars. There are no car details—or if there are, they are wrong.
Showing Details for a Found Car
The car detail view finds what car to display by calling carToView, a method from the ViewCarProtocol. The cars table uses the index path of the selected cell to look up the car in the fetched results controller. And that is the problem.
This is the current call:
currentViewCarPath = [self.tableView indexPathForSelectedRow];
Once again, the message is to the main table view when it needs to be to the search table.
The simplest solution is to track what table view is displayed to the user. You know that it is the main table view when the controller first appears. The only times the current table view switches are when the search display controller loads and unloads the search table. Both of those events have associated methods. Add the following code to track the currently active table:
1. Open CarTableViewController.m in an editor and add the following variable declaration to the ones in curly braces just after the @implementation statement:
UITableView *currentTableView;
2. In viewDidLoad, set the current table to the main table by adding this line just before setting tableHeaderView:
currentTableView = self.tableView;
3. Set the current table to the search results table by adding the following line to the end of searchDisplayController:didLoadSearchResultsTableView:
currentTableView = tableView;
4. Set the current table back to the main table with this line at the end of searchDisplayControllerWillEndSearch:
currentTableView = self.tableView;
5. Fix the two ViewCarProtocol methods, carToView and carViewDone:, by changing self.tableView to currentTableView.
Run the app, sort by make, search for a car, and then look at the details. The details show correctly. Now change the model information and tap Done. You get a crash with errors that look like this:
2013-06-03 17:07:12.874 CarValet[16312:c07] *** Assertion failure in -[UITableView
_endCellAnimationsWithContext:], /SourceCache/UIKit_Sim/UIKit-2380.17/UITableView.m:1054
2013-06-03 17:07:21.106 CarValet[16312:c07] CoreData: error: Serious application error.
An exception was caught from the delegate of NSFetchedResultsController during a call
to -controllerDidChangeContent:. Invalid update: invalid number of sections. The
number of sections contained in the table view after the update (1) must be equal to
the number of sections contained in the table view before the update (7), plus or minus the number of sections inserted or deleted (0 inserted, 0 deleted). with userInfo
(null)
You have seen similar problems where the sections are not in sync. In this case, the difference in the number of sections is quite large: 1 after the update and 7 before. There is also the name of the method where the failure occurred, controllerDidChangeContent:. A quick look at that method shows that it sends a message to the main table view. This particular update is occurring in the search table.
Searching the file shows that there are still 12 other occurrences of self.tableView. Not all of them need to change. Some are used to update the state of currentTableView, another occurs when the Edit button is touched, and yet another occurs when the table sort is changed.
Of the others, five are in NSFetchedResultsControllerDelegate methods, and all of them need to change. You therefore need to use the find and replace mechanism, as follows:
1. Choose Edit > Find > Find and Replace.
2. Type self.tableView into the top bar and currentTableView into the bottom bar. The search area looks like Figure 10-13.
3. Click the right arrow next to the top bar until self.tableView in controllerWillChangeContent: is highlighted, as shown in Figure 10-13.
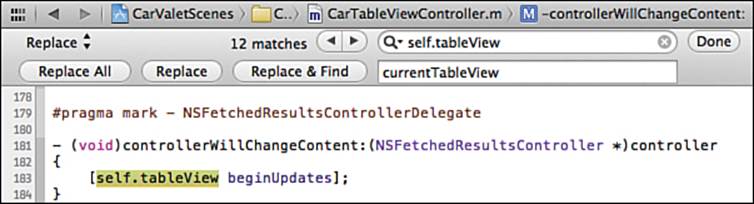
Figure 10-13 Finding and replacing in the Xcode editor
4. Click Replace & Find four times.
5. Click Replace to change the occurrence in controllerDidChangeContent:.
You need to make one more change to get the full detail flow working. Run the CarValet app, sort the table by make, and use Find to select a car that was visible in the main table before the Find interface opened. Make a change to the model of that car, go back to Find, and cancel the find. The model is changed in the search results table but not in the main table. Although the data model is correct, nothing updated the main table when searching was done.
Add the following line at the end of searchDisplayControllerWillEndSearch:
[self.tableView reloadData];
Now the whole flow works correctly.
An Index for Searching
Earlier in the chapter you added an index for quickly navigating to different sections. Some apps show a magnifying glass at the top of the index that you can use to quickly go to the search area.
The magnifying glass is a special item defined by the system. Adding it to an index requires modifying the methods that return the section titles and finding a section for a given title and index.
Replace sectionIndexTitlesForTableView: with the code in Listing 10-6. Then replace tableView:sectionForSectionIndexTitle:atIndex: with Listing 10-7.
Listing 10-6 Building the Array of Index Titles
- (NSArray *)sectionIndexTitlesForTableView:(UITableView *)tableView {
NSMutableArray *indexes; // 1
if (self.carSortControl.selectedSegmentIndex == kCarsTableSortYear) { // 2
indexes = [NSMutableArray new];
for (id <NSFetchedResultsSectionInfo> sectionInfo in
fetchedResultsController.sections) {
[indexes insertObject:[sectionInfo name]
atIndex:[indexes count]];
}
} else {
indexes = [fetchedResultsController sectionIndexTitles].mutableCopy; // 3
}
if (!self.searchDisplayController.active)
[indexes insertObject:UITableViewIndexSearch atIndex:0]; // 4
return indexes; // 5
}
Here’s what happens in the numbered lines in Listing 10-6:
1. Use a mutable array of indexes for inserting the search item.
2. If sorting by year, build the titles from full year strings.
3. Otherwise it is an alphabetical sort, so let the fetched results controller build the index of titles.
4. Insert the search item as the first index item.
5. Return the modified indexes.
Listing 10-7 Finding the Section Index for a Title or Title Index
- (NSInteger)tableView:(UITableView *)tableView
sectionForSectionIndexTitle:(NSString *)title
atIndex:(NSInteger)index {
if (!self.searchDisplayController.active) {
if (index == 0) { // 1
[tableView setContentOffset:CGPointZero animated:YES]; // 2
return NSNotFound; // 3
} else {
index = index - 1; // 4
}
}
return [fetchedResultsController sectionForSectionIndexTitle:title // 5
atIndex:index];
}
Here’s what happens in the numbered lines in Listing 10-7:
1. An index of 0 means the user picked the search item (the magnifying glass icon).
2. Move the table to the top so the search bar is visible.
3. Let the caller know there is no corresponding section.
4. Otherwise, it is a valid section. To find the right section, subtract 1 from the index to remove the search item added in sectionIndexTitlesForTableView:.
5. If sorting by year, the modified index is the correct section.
6. The sort is alphabetical so let the fetched results controller return the result.
Run the app, and the magnifying glass appears. Tapping the item scrolls the table to the search bar. All the other index items work correctly as well.
Summary
Your journey through the main power of table views is complete. In this chapter, you subclassed the built-in cell class to build a custom cell and added sorting, grouping, searching, and even an index to your app.
You began by building a better car cell, using the storyboard. You used a larger height for better data presentation. You added a custom class to initialize the cell data and figured out how to show cells of different heights in a table.
You used the app data saved with Core Data along with a fetched results controller to sort the cars and add grouping to the table. Then you made navigating all the data easier by adding an index. Finally, you went deeper with Core Data and added searching. As you did that, you discovered that searching a table actually results in two tables, with both using the same delegate and data source. To deal with that, you modified the methods to work well with both your cars table and the search table.
Along the way, you worked with UISegmentedControl, a visual element for switching between choices. You also learned a bit more about debugging and the usefulness of #define.
Now you can create apps for iPhone and iPod touch, using three of the main controllers for a device that size. Your apps can include the full power of table views, especially when backed by Core Data. And your designs can incorporate a segmented control where you need to switch between a few states.
Of course, the handheld form factor is only about 50% of all possible iOS devices. Chapter 11, “Navigation Controllers II: Split View and the iPad,” opens the world of tablets as you adapt CarValet to work on that form factor in addition to the iPhone/iPod touch form factor. You do that with one of the most-used iPad controllers.
Challenges
1. Add sections to the Parked grouping. Base the sections on the hour of the day the car was parked. For example, have all cars parked at 10 a.m. grouped into one section, sorted by time parked, with the latest at the top.
2. Update the index title for the modified parked grouping in Challenge 1 to show the hour, from 11 p.m. down to midnight. You can use 12- or 24-hour format.
3. For a greater challenge, add the owner’s first name and last name to the CDCar, add them to the car cell, and add them to the detail. Then add an item to group by last name, ensuring that you can search on that key.