Learning iOS Development: A Hands-on Guide to the Fundamentals of iOS Programming (2014)
Preface
“Mobile is the future” is a phrase you hear more and more these days. And when it comes to mobile, nobody has more user-friendly devices than Apple.
You want to add iOS development to your set of skills, but where do you begin? Which resources do you need and choose? It depends on how you learn. This book is hands-on. The goal is to get you doing things as soon as possible. You start with small things at first and then build on what you already know.
The result is a book that gives you the skills you need to write an app in an easily digestible format. You can go as fast or slow as you wish. And once you are creating apps, you can turn back to specific parts of the book for a refresher.
So find a comfortable place, have your Mac and your iOS handheld nearby, and dig in!
What You’ll Need
You will need a few things before you go any further in learning iOS development:
![]() A modern Mac running the current or previous generation of Mac OS—As of the writing of this book, Mac OS X Mountain Lion (v. 10.8) is the latest version with Mavericks just around the corner (not used for this book). Before Mountain Lion was Mac OS X Lion (v. 10.7). Ideally you want to use the latest OS, have at least 8GB of RAM, and lots of disk space.
A modern Mac running the current or previous generation of Mac OS—As of the writing of this book, Mac OS X Mountain Lion (v. 10.8) is the latest version with Mavericks just around the corner (not used for this book). Before Mountain Lion was Mac OS X Lion (v. 10.7). Ideally you want to use the latest OS, have at least 8GB of RAM, and lots of disk space.
![]() An iOS device—Although Xcode includes a desktop simulator for developing apps, you will need to run your app on an actual device to make sure it works correctly. It is helpful to have the same kinds of units your target customers are likely to use to make sure your app works well on all of them.
An iOS device—Although Xcode includes a desktop simulator for developing apps, you will need to run your app on an actual device to make sure it works correctly. It is helpful to have the same kinds of units your target customers are likely to use to make sure your app works well on all of them.
![]() An Internet connection—You will need to be able to download development resources. At some point, you might also want to test wireless app functionality. And of course, you will want to ship your app.
An Internet connection—You will need to be able to download development resources. At some point, you might also want to test wireless app functionality. And of course, you will want to ship your app.
![]() Familiarity with Objective-C—You create native applications for iOS by using Objective-C. The language is based on ANSI C, with object-oriented extensions, which means you also need to know a bit of C. If you have programmed with Java or C++ and are familiar with C, you’ll find that moving to Objective-C is easy. There is a short intro to Objective-C in Chapter 2, “Objective-C Boot Camp,” but a broader understanding will help you learn more quickly.
Familiarity with Objective-C—You create native applications for iOS by using Objective-C. The language is based on ANSI C, with object-oriented extensions, which means you also need to know a bit of C. If you have programmed with Java or C++ and are familiar with C, you’ll find that moving to Objective-C is easy. There is a short intro to Objective-C in Chapter 2, “Objective-C Boot Camp,” but a broader understanding will help you learn more quickly.
You also need Xcode, the development tool, and some sort of Apple developer account, as discussed in Chapter 1, “Hello, iOS SDK.”
Your Roadmap to iOS Development
One book can’t be everything to everyone. Try as we might, if we were to pack everything you need to know into this book, you wouldn’t be able to pick it up. There is, indeed, a lot you need to know to develop for the Mac and iOS platforms. If you are just starting out and don’t have any programming experience, your first course of action should be to take a college-level course in the C programming language.
When you know C and how to work with a compiler (something you’ll learn in that basic C course), the rest should be easy. From there, you can hop right on to Objective-C and explore how to program with it alongside the Cocoa frameworks. The flowchart shown in Figure P-1 shows you key titles offered by Pearson Education that provide the training you need to become a skilled iOS developer.
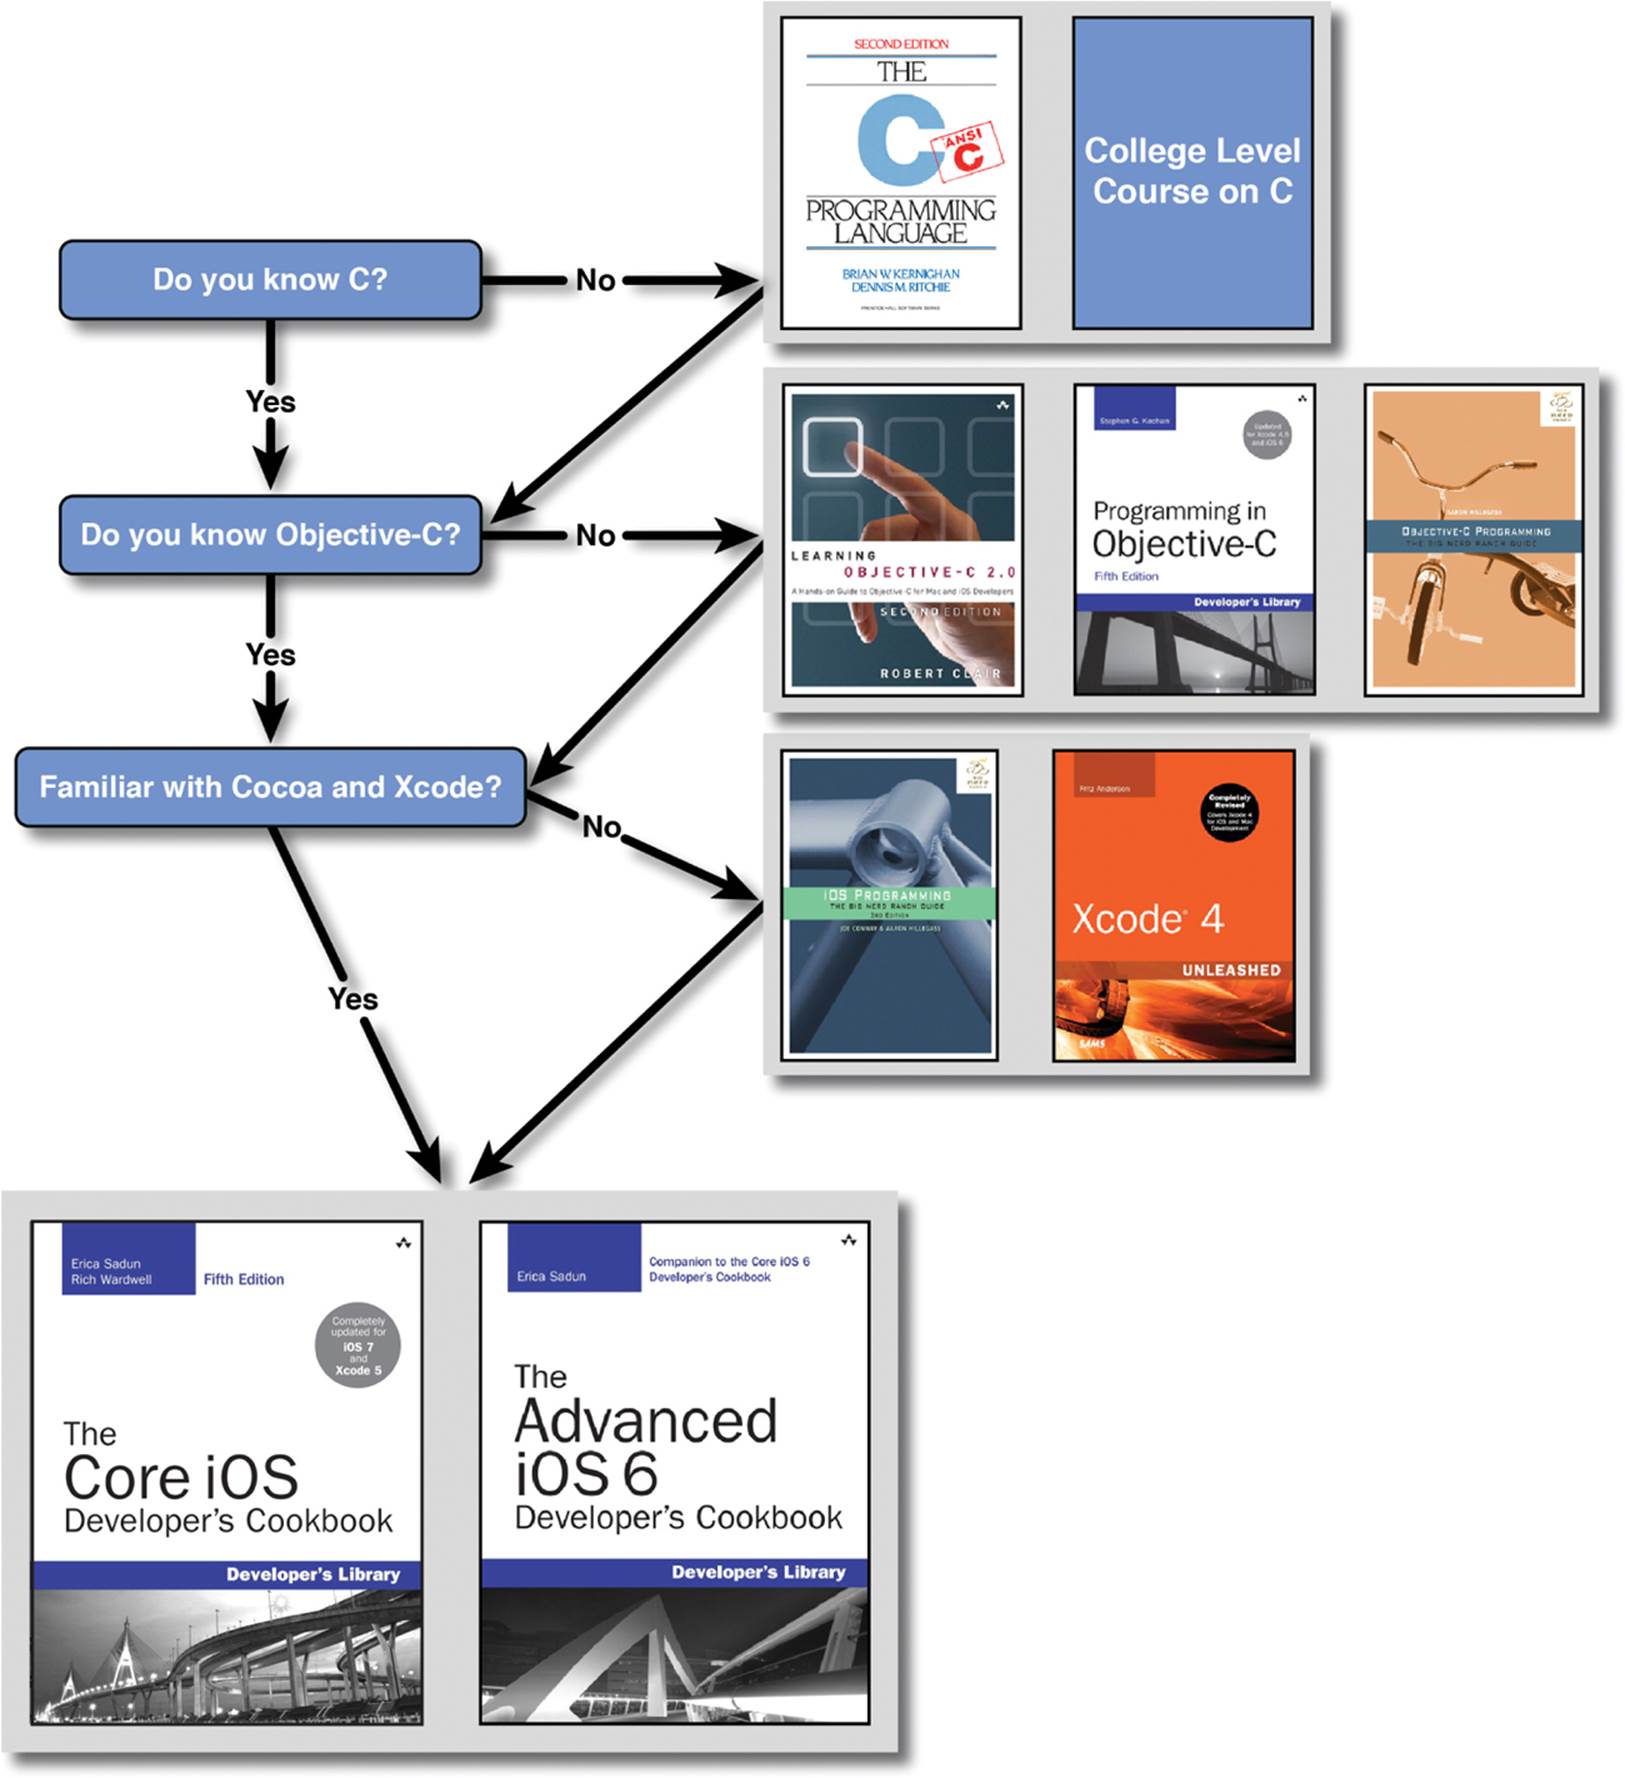
Figure P-1 A roadmap to becoming an iOS developer
When you know C, you have a few options for learning how to program with Objective-C. If you want an in-depth view of the language, you can either read Apple’s documentation or pick up one of these books on Objective-C:
![]() Objective-C Programming: The Big Nerd Ranch Guide by Aaron Hillegass (Big Nerd Ranch, 2012)
Objective-C Programming: The Big Nerd Ranch Guide by Aaron Hillegass (Big Nerd Ranch, 2012)
![]() Learning Objective-C: A Hands-on Guide to Objective-C for Mac and iOS Developers by Robert Clair (Addison-Wesley, 2011)
Learning Objective-C: A Hands-on Guide to Objective-C for Mac and iOS Developers by Robert Clair (Addison-Wesley, 2011)
![]() Programming in Objective-C 2.0, fourth edition, by Stephen Kochan (Addison-Wesley, 2012)
Programming in Objective-C 2.0, fourth edition, by Stephen Kochan (Addison-Wesley, 2012)
With the language behind you, next up is tackling Cocoa and the developer tools, otherwise known as Xcode. For that, you have a few different options. Again, you can refer to Apple’s documentation on Cocoa and Xcode. See the Cocoa Fundamentals Guide(http://developer.apple.com/mac/library/documentation/Cocoa/Conceptual/CocoaFundamentals/CocoaFundamentals.pdf) for a head start on Cocoa, and for Xcode, see A Tour of Xcode(http://developer.apple.com/mac/library/documentation/DeveloperTools/Conceptual/A_Tour_of_Xcode/A_Tour_of_Xcode.pdf). Or if you prefer books, you can learn from the best. Aaron Hillegass, founder of the Big Nerd Ranch in Atlanta (www.bignerdranch.com), is the coauthor of iOS Programming: The Big Nerd Ranch Guide, second edition, and author of Cocoa Programming for Mac OS X, soon to be in its fourth edition. Aaron’s book is highly regarded in Mac developer circles and is the most recommended book you’ll see on the cocoa-dev mailing list. And to learn more about Xcode, look no further than Fritz Anderson’s Xcode 4 Unleashed from Sams Publishing.
Note
There are plenty of other books from other publishers on the market, including the bestselling Beginning iPhone 4 Development by Dave Mark, Jack Nutting, and Jeff LaMarche (Apress, 2011). Another book that’s worth picking up if you’re a total newbie to programming isBeginning Mac Programming by Tim Isted (Pragmatic Programmers, 2011). Don’t just limit yourself to one book or publisher. Just as you can learn a lot by talking with different developers, you can learn lots of tricks and tips from other books on the market.
To truly master Apple development, you need to look at a variety of sources: books, blogs, mailing lists, Apple’s documentation, and, best of all, conferences. If you get the chance to attend WWDC (Apple’s Worldwide Developer Conference), you’ll know what we’re talking about. The time you spend at conferences talking with other developers, and in the case of WWDC, talking with Apple’s engineers, is well worth the expense if you are a serious developer.
How This Book Is Organized
The goal of this book is to enable you to build iOS apps for iOS handheld and tablet devices. It assumes that you know nothing about iOS development but are familiar with Objective-C. (Although there is a boot camp in Chapter 2, you will find it easier to learn from this book if you are more familiar with the language.) Each chapter introduces new concepts and, where appropriate, builds on knowledge from previous chapters.
Most chapters cover extra material in addition to their core content. The additional material doesn’t necessarily fit with the heart of a particular chapter, but it is important in creating apps. Extra material shows you how to use specific UI elements, provides tips and tricks, explains coding practices, and provides other helpful information.
Here is a summary of each chapter:
![]() Chapter 1, “Hello, iOS SDK”—Find out about the tools, programs, and devices used for creating iOS apps. You start by installing Xcode and also learn about the Apple developer programs and how to sign up. The last two sections help when you design your app. The first covers how limitations of handheld devices inform various iOS technologies. And the last gives a tour of model differences.
Chapter 1, “Hello, iOS SDK”—Find out about the tools, programs, and devices used for creating iOS apps. You start by installing Xcode and also learn about the Apple developer programs and how to sign up. The last two sections help when you design your app. The first covers how limitations of handheld devices inform various iOS technologies. And the last gives a tour of model differences.
![]() Chapter 2, “Objective-C Boot Camp”—An Xcode project is a container for an app’s code, resources, and meta-information. In this chapter, you create your first project. You also get a quick refresher on Objective-C, the language of app development.
Chapter 2, “Objective-C Boot Camp”—An Xcode project is a container for an app’s code, resources, and meta-information. In this chapter, you create your first project. You also get a quick refresher on Objective-C, the language of app development.
![]() Chapter 3, “Introducing Storyboards”—A user of your app sees only the interface. You might implement app behaviors by using incredible code, but the user sees only the effects. In this chapter, you start creating the interface by using a storyboard, a way to see all your app screens at once. You add screens and hook them together and to underlying code. The skills you get from this chapter are a core part of creating iOS apps.
Chapter 3, “Introducing Storyboards”—A user of your app sees only the interface. You might implement app behaviors by using incredible code, but the user sees only the effects. In this chapter, you start creating the interface by using a storyboard, a way to see all your app screens at once. You add screens and hook them together and to underlying code. The skills you get from this chapter are a core part of creating iOS apps.
![]() Chapter 4, “Auto Layout”—So far, iOS handheld devices have two different screen sizes and two different orientations for each screen size. Supporting four screen variations can be challenging. In this chapter, you learn and use auto layout, Apple’s constraint-based layout engine, to more easily support multiple screen sizes. You even use it to change layouts when the screen rotates.
Chapter 4, “Auto Layout”—So far, iOS handheld devices have two different screen sizes and two different orientations for each screen size. Supporting four screen variations can be challenging. In this chapter, you learn and use auto layout, Apple’s constraint-based layout engine, to more easily support multiple screen sizes. You even use it to change layouts when the screen rotates.
![]() Chapter 5, “Localization”—iOS devices are available in at least 155 countries and many different languages. As you go through the chapter, you create one app that supports three languages and many countries. You build on Chapter 4, using auto layout to adjust interface elements for different localized string lengths. You also implement language-and country-specific formatting of dates and times as well as left-to-right and right-to-left writing.
Chapter 5, “Localization”—iOS devices are available in at least 155 countries and many different languages. As you go through the chapter, you create one app that supports three languages and many countries. You build on Chapter 4, using auto layout to adjust interface elements for different localized string lengths. You also implement language-and country-specific formatting of dates and times as well as left-to-right and right-to-left writing.
![]() Chapter 6, “Scrolling”—You typically want to present more information than fits on a handheld screen. Sometimes the best way to navigate is to scroll through content. Starting with the simplest use case, you use the built-in scroll view UI element to go from simply bouncing a screen to scrolling through elements. You add pan and zoom as well as display item numbers based on scroll position.
Chapter 6, “Scrolling”—You typically want to present more information than fits on a handheld screen. Sometimes the best way to navigate is to scroll through content. Starting with the simplest use case, you use the built-in scroll view UI element to go from simply bouncing a screen to scrolling through elements. You add pan and zoom as well as display item numbers based on scroll position.
![]() Chapter 7, “Navigation Controllers I: Hierarchies and Tabs”—Navigating complex information can be challenging, especially on a phone’s relatively small screen size. iOS provides navigation controllers to make the job easier. You start by using UINavigationControllerfor moving through a hierarchy of information. Then you use more advanced features providing further customization. Next, you use a tab bar for moving between different kinds of information, and you learn how to work with view controllers that are not on the storyboard.
Chapter 7, “Navigation Controllers I: Hierarchies and Tabs”—Navigating complex information can be challenging, especially on a phone’s relatively small screen size. iOS provides navigation controllers to make the job easier. You start by using UINavigationControllerfor moving through a hierarchy of information. Then you use more advanced features providing further customization. Next, you use a tab bar for moving between different kinds of information, and you learn how to work with view controllers that are not on the storyboard.
![]() Chapter 8, “Table Views I: The Basics”—Table views are an important part of apps on both the iPhone and iPad. After learning how they work, you create a table of cars and then implement addition and deletion of items. You go deeper, using a variation of a table for car details. While doing this, you use a picker view for dates and protocols for communicating data and state between scenes.
Chapter 8, “Table Views I: The Basics”—Table views are an important part of apps on both the iPhone and iPad. After learning how they work, you create a table of cars and then implement addition and deletion of items. You go deeper, using a variation of a table for car details. While doing this, you use a picker view for dates and protocols for communicating data and state between scenes.
![]() Chapter 9, “Introducing Core Data”—Core Data provides full data management for a relatively small amount of work. In this chapter, you create a Core Data model for the app and use that data for the list of cars and car detail. Next, you use built-in objects to make managing the table view of cars even easier. You also learn ways to convert a project to use Core Data, and you become familiar with common errors.
Chapter 9, “Introducing Core Data”—Core Data provides full data management for a relatively small amount of work. In this chapter, you create a Core Data model for the app and use that data for the list of cars and car detail. Next, you use built-in objects to make managing the table view of cars even easier. You also learn ways to convert a project to use Core Data, and you become familiar with common errors.
![]() Chapter 10, “Table Views II: Advanced Topics”—There are several advanced features of table views for adding polish to apps. As the chapter progresses, you implement different features, including custom cells, sections, sorting, a content index, and searching. You also learn aboutUISegmentedControl, a bit more on debugging, and a good way to use #define.
Chapter 10, “Table Views II: Advanced Topics”—There are several advanced features of table views for adding polish to apps. As the chapter progresses, you implement different features, including custom cells, sections, sorting, a content index, and searching. You also learn aboutUISegmentedControl, a bit more on debugging, and a good way to use #define.
![]() Chapter 11, “Navigation Controllers II: Split View and the iPad”—Apps for the iPad usually require a different design than ones for the iPhone. In this chapter, you create a universal app, one that works on both the iPhone and iPad. You build a separate interface using the iPad-only UISplitViewController. You learn how to adapt iPhone views to iPad and how to choose when to use them and when to create something new. In addition, you implement a singleton, a special object that can have only one instance, learn the usefulness of accessor methods, and implement custom transition animations.
Chapter 11, “Navigation Controllers II: Split View and the iPad”—Apps for the iPad usually require a different design than ones for the iPhone. In this chapter, you create a universal app, one that works on both the iPhone and iPad. You build a separate interface using the iPad-only UISplitViewController. You learn how to adapt iPhone views to iPad and how to choose when to use them and when to create something new. In addition, you implement a singleton, a special object that can have only one instance, learn the usefulness of accessor methods, and implement custom transition animations.
![]() Chapter 12, “Touch Basics”—Almost everything a user does on iOS devices involves gestures with one or more fingers. Some features, like buttons, are easy to add. Others take more work. In this chapter, you learn the basics of gesture recognizers and add swiping through car detail views. Then you go deeper, creating a custom gesture recognizer. Finally, you add a draggable view.
Chapter 12, “Touch Basics”—Almost everything a user does on iOS devices involves gestures with one or more fingers. Some features, like buttons, are easy to add. Others take more work. In this chapter, you learn the basics of gesture recognizers and add swiping through car detail views. Then you go deeper, creating a custom gesture recognizer. Finally, you add a draggable view.
![]() Chapter 13, “Introducing Blocks”—From animating views to error responders, blocks are an important tool for using system calls. You learn how to create and use blocks, and use them to add pulsing to a view. You also learn about variable scope and read-only versus modifiable variables. Finally, you replace a protocol using blocks.
Chapter 13, “Introducing Blocks”—From animating views to error responders, blocks are an important tool for using system calls. You learn how to create and use blocks, and use them to add pulsing to a view. You also learn about variable scope and read-only versus modifiable variables. Finally, you replace a protocol using blocks.
![]() Chapter 14, “Instruments and Debugging”—There are two constants in app development: Initial implementations rarely perform as you expect, and there are always bugs. In this chapter, you start by fixing a performance problem using Instruments, a tool for checking performance, memory use, and other important parts of your app. Next, you learn some advanced features of breakpoints in the debugger. Then, you use both tools to solve one of the hardest types of bugs. In this chapter, you also learn about a process for finding and fixing problems, as well as a way to use background tasks.
Chapter 14, “Instruments and Debugging”—There are two constants in app development: Initial implementations rarely perform as you expect, and there are always bugs. In this chapter, you start by fixing a performance problem using Instruments, a tool for checking performance, memory use, and other important parts of your app. Next, you learn some advanced features of breakpoints in the debugger. Then, you use both tools to solve one of the hardest types of bugs. In this chapter, you also learn about a process for finding and fixing problems, as well as a way to use background tasks.
![]() Chapter 15, “Deploying Applications”—In the final chapter, you take your app from your machine to the App Store. First, you create any required developer credentials and app security certificates. You add icons and launch images, and then you learn about useful extra functionality for your app, such as metrics and bug reporting, as well as some of the main providers. After a brief look at marketing, you get the App Store ready to receive your application, build it, and upload it. The chapter ends with a summary of resources you can use as you continue your journey of creating great iOS apps.
Chapter 15, “Deploying Applications”—In the final chapter, you take your app from your machine to the App Store. First, you create any required developer credentials and app security certificates. You add icons and launch images, and then you learn about useful extra functionality for your app, such as metrics and bug reporting, as well as some of the main providers. After a brief look at marketing, you get the App Store ready to receive your application, build it, and upload it. The chapter ends with a summary of resources you can use as you continue your journey of creating great iOS apps.
About the Sample Code
As you progress through this book, you develop and refine an application for valet car parking. The CarValet app is used as a practical implementation for concepts you learn. It is not meant to be an app shipped to the masses, although it could serve as a base for one.
Any chapter that involves creating code usually comes with at least two projects: a starter that incorporates code from any previous chapters in the book and a finished project, including all changes made in the chapter. For most of the book, you can use your own completed project from one chapter as the starter for the next. There are a couple places where this is not the case, and the chapter makes that plain.
Except for the very end, the sample code projects use the same unique bundled identifier: com.mauricesharp.CarValet. As a result, you cannot have multiple versions installed in the simulator or on your device at the same time. If you want to have multiple versions, you can simply add a unique string to the end of the identifier, such as com.mauricesharp.CarValet.CH05.portrait. You’ll learn the significance of the bundle identifier in Chapter 15.
All the code you write and concepts you learn work with iOS 7 or later. By the end of the first day of availability, more than 35% of existing devices were using the iOS 7, the fastest adoption rate ever. That share will only increase. Adoption rates for iOS are usually very fast, typically hitting 80% or higher within a few months.
Getting the Sample Code
All the sample code is on GitHub, at https://github.com/mauricesharp/Learning-iOS-Development. The code is organized by chapter, with most folders containing starter and finished projects. Some also contain projects for interim steps, as well as folders containing new assets such as images. For example, these are the folders for Chapter 6:
![]() CH06 CarValet Starter—The finished project from Chapter 5, with no changes from Chapter 6. Use either this project or your own project from the end of Chapter 5 as a starting place for Chapter 6 additions.
CH06 CarValet Starter—The finished project from Chapter 5, with no changes from Chapter 6. Use either this project or your own project from the end of Chapter 5 as a starting place for Chapter 6 additions.
![]() CH06 CarValet Finished—A project with all the changes from Chapter 6. You can use this as a reference for what changes should have been made or as a starter for the next chapter.
CH06 CarValet Finished—A project with all the changes from Chapter 6. You can use this as a reference for what changes should have been made or as a starter for the next chapter.
![]() CH06 Assets CarImages—An extra folder with image resources used in changes made during the chapter.
CH06 Assets CarImages—An extra folder with image resources used in changes made during the chapter.
The code will be refreshed as needed. If you see something that needs changing, is missing, or even a way to implement something in a better way, feel free to...
Contribute!
Sample code is never a fixed target. It continues to evolve as Apple updates its SDK and the Cocoa Touch libraries. Get involved. You can pitch in by suggesting bug fixes and corrections, as well as by expanding the code that’s on offer. GitHub allows you to fork repositories and grow them with your own tweaks and features, and you can share those back to the main repository using a Pull Request on GitHub. If you come up with a new idea or approach, let us know. We are happy to include great suggestions both at the repository and in the next edition of this book.
Accessing git
You can download this book’s source code by using the git version control system. An OS X implementation of git is available at http://code.google.com/p/git-osx-installer. OS X git implementations include both command-line and GUI solutions, so hunt around for the version that best suits your development needs.
There are third-party git tools, as well—some free and some not. These are two of the most popular:
![]() SourceTree—A free git hub client tool available at www.sourcetreeapp.com
SourceTree—A free git hub client tool available at www.sourcetreeapp.com
![]() Tower—A paid client with a polished UI at www.git-tower.com
Tower—A paid client with a polished UI at www.git-tower.com
Accessing GitHub
GitHub (http://github.com) is the largest git-hosting site, with more than 150,000 public repositories. It provides both free hosting for public projects and paid options for private projects. With a custom web interface that includes wiki hosting, issue tracking, and an emphasis on social networking of project developers, it’s a great place to find new code and collaborate on existing libraries. You can sign up for a free account at http://github.com. When you do that, you can copy and modify the book repository or create your own open-source iOS projects to share with others.