Learning iOS Development: A Hands-on Guide to the Fundamentals of iOS Programming (2014)
Chapter 1. Hello, iOS SDK
Developing for iOS is a joyful and fun adventure in learning Objective-C and the Apple frameworks. Nowhere else is it so easy and quick to go from an idea to an app you can hold in your hand on an iPhone, iPad, or iPod touch. With your code behind the glass touchscreen, you can turn these devices into anything you can think of. An iOS device can become a flight simulator, an interactive book, or just about anything else you can imagine. In this chapter, you take the first steps in developing for iOS by learning about the iOS Software Development Kit (SDK) and how to get the Xcode toolset installed on your Mac. (It is easy.) In the next chapter, you dive in, create your first iOS app, and get it running on the iOS Simulator.
The iOS family includes the iPhone, the iPad, and the iPod touch. Despite their relatively diminutive proportions compared to desktop systems, they use increasingly powerful multicore CPUs to run iOS, a first-class version of OS X. iOS comes with a rich and varied SDK that enables you to design, implement, and realize a wide range of applications. For your projects, you can take advantage of the multitouch interface and powerful onboard features using Xcode, Apple’s integrated development environment (IDE). In this chapter, you learn about Apple’s various iOS Developer Programs and how you can join. Ready? Onward to the next step: getting the Xcode application installed on your Mac.
Installing Xcode
The first step in developing for the iOS platform is to get Xcode: the IDE from Apple. Xcode is the tool you use for writing Objective-C applications and compiling them for iOS devices. Apple has recently made installing Xcode as easy as possible by providing Xcode as a free download from the Mac App Store, as shown in Figure 1-1.
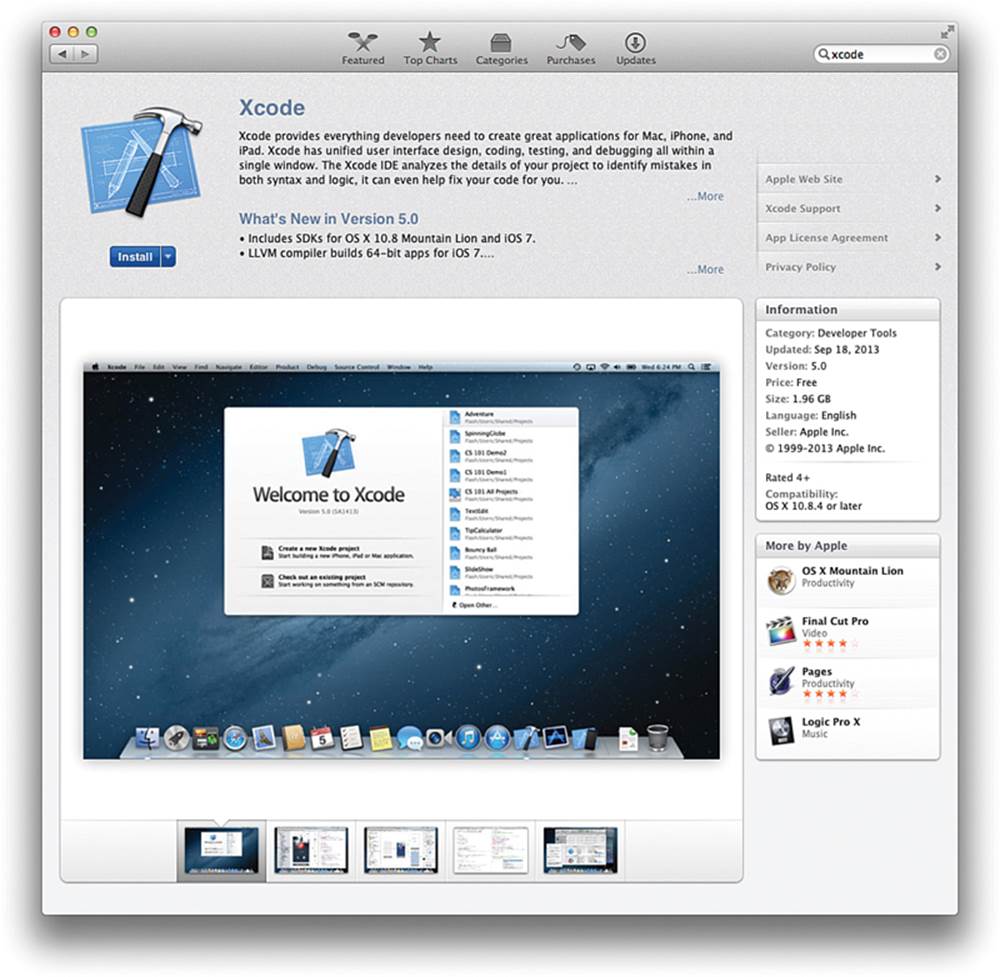
Figure 1-1 Xcode in the Mac App Store
To install Xcode, follow these steps:
1. Launch the Mac App Store application on your Mac.
2. Search for Xcode.
3. Click the Free button to install Xcode.
While Xcode is downloading and being installed, you can read the rest of this chapter and learn about the iOS SDK. That is all it takes to install Xcode and get on your way. The rest of this chapter covers the iOS SDK, the devices, and the development programs Apple offers. In Chapter 2, “Objective-C Boot Camp,” you start your journey into the Objective-C language and application development in iOS.
About the iOS SDK
The iOS SDK comprises all the libraries you need to write iOS apps, as well as the iOS Simulator for you to try out your apps on your Mac. The SDK is included with the Xcode tool, which is used for creating iOS and Mac applications.
You can register for free for the Apple Online Developer Program and download and explore the full iOS SDK programing environment. However, as discussed in the next section, this program doesn’t let you deploy your applications to an actual iOS device, such as the iPhone or iPad. If you want to do that, you need to register and become a member of Apple’s iOS Developer Program. There are four program choices, described in Table 1-1.
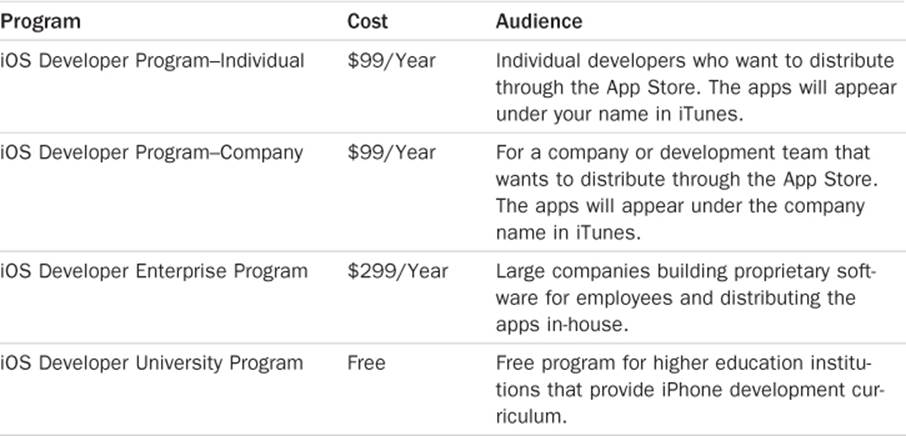
Table 1-1 iOS Developer Programs
Each program offers access to the same iOS SDK, which provides ways to build and deploy your applications. The audience for each program is specific. Keep in mind that if your company wants to deploy apps in the normal App Store, all you need is the iOS Developer Program–Company. The Enterprise option is available to you only if your company wants to deploy apps in a private in-house App Store.
The following sections discuss the various iOS Developer Programs in more detail.
What You Get for Free
The free program is for anyone who wants to explore the full iOS SDK programming environment but isn’t ready to pay for further privileges. The free program limits your deployment options to the iOS Simulator. Although you can run your applications in the simulator, you cannot install those applications to a device or sell them in the App Store.
Although each version of the simulator moves closer to representing iOS, you should not rely on it for evaluating your application. An app that runs rock solid on the simulator might be unresponsive or even cause crashes on an actual device. The simulator does not, for example, support vibration or accelerometer readings. These and other features present on devices are not always available in the simulator. A more detailed discussion about the simulator and its differences from a real device follows later in this chapter, in the section “Simulator Limitations.”
While you can download Xcode for free and without registering, joining a full program gives you access to much more, including the ability to run your code on devices, access to early releases, and even the ability to ask questions of Apple developer support engineers.
iOS Developer Program (Individual and Company)
To receive device and distribution privileges, you pay a program fee, currently $99/year, for the standard iOS Developer Program. You can join as an individual or as a company. When you have paid, you gain access to App Store distribution and can test your software on actual iOS hardware. This program adds ad hoc distribution as well, allowing you to distribute prerelease versions of your application to a set number of registered devices. The standard program provides the most general solution for the majority of iOS programmers who want to be in the App Store. If you intend to conduct business by selling applications, this is the program to sign up for.
The standard iOS Developer Program also offers early access to beta versions of the SDK. This is a huge advantage for developers who need to prepare products for market in a timely manner and to match Apple’s OS and device upgrade dates. As an example, program members gained access to early versions iOS 7 and Xcode 5 in June 2013.
Caution: Going from Individual to Company Is Hard to Do
Joining the company program currently requires paperwork to prove the company is a valid corporate entity. Changing from individual to company is even harder than starting with a company membership. If you are an individual and expect to become a company, even if only for liability protection, you are better off creating the company first and then joining the Developer Program, or even joining as an individual and then creating a separate company membership later. Joining as a company does take longer, especially with the current requirement for a DUNS (Data Universal Numbering System) number.
Note
In early 2010, Apple restructured its Macintosh Developer Program to match the success of the iOS Developer Program. Currently costing $99/year, the restructured Mac program offers the same kind of resources as the iOS program: code-level technical support incidents, developer forum membership, and access to prerelease software. Neither program offers hardware discounts. The Mac Developer Program does not give access to iOS software and vice versa.
Developer Enterprise Program
The Enterprise Program, currently $299/year, is meant for in-house application distribution. It’s targeted at companies with 500 employees or more. Enterprise memberships do not offer access to the Apple public App Store. Instead, you can build your own proprietary applications and distribute them to your employees’ hardware through a private storefront. The Enterprise Program is aimed at large companies that want to deploy custom applications such as ordering systems to their employees.
Developer University Program
Available only to higher education institutions, the Developer University Program is a free program aimed at encouraging universities and colleges to form an iOS development curriculum. The program enables professors and instructors to create teams with up to 200 students, offering them access to the full iOS SDK. Students can share their applications with each other and their teachers, and the institution can submit applications to the App Store.
Registering
Register for a free or paid program at the main Apple developer site: http://developer.apple.com/programs/register.
Regardless of which program you sign up for, you must have access to a Mac running a current version of Mac OS X. It also helps to have at least one—and preferably several—iPhone, iPad, and/or iPod touch units. These are for testing to ensure that your applications work properly on each platform, including legacy units. What better excuse for buying that iPhone, iPad, or iPod touch you’ve been wanting...err, needing for business purposes?
Often, signing up for paid programs involves delays. After registering, it can take time for account approval and invoicing. When you actually hand over your money, it may take another 24 to 72 hours for your access to advanced portal features to go live. There is a very short delay for individual registration, and the delay is longer for companies.
Registering for iTunes Connect, so you can sell your application through the App Store, is a separate step. Fortunately, this is a process you can delay until after you’ve finished signing up for a paid program. With iTunes Connect, you must collect banking information and incorporation paperwork prior to setting up your App Store account. You must also review and agree to Apple’s distribution contracts. Apple offers full details at http://itunesconnect.apple.com. Bear in mind that it can take several days until you are able to upload apps, so do not delay signing up for too long.
iTunes U and Online Courses
When you have registered for any level of iOS development with Apple, you will have access to the World Wide Development Conference (WWDC) videos that Apple releases each year. These high-quality presentations, given by Apple’s own engineers, provide great insight into many of the features in iOS and examples of how to use them. In addition, there are many iPhone programming courses available for free on iTunes University (iTunes U inside iTunes) that you can use as a companion to this book.
The iOS SDK Tools
Xcode typically runs a few gigabytes in size and installs an integrated suite of interactive design tools onto your Macintosh. This suite consists of components that form the basis of the iOS development environment and includes the following parts:
![]() Project Editor—This is the heart of Xcode and provides a home for most of the features, including project file and component management, syntax-aware source editing for both the Objective-C language and iOS SDK, as well as a visual editor and a full debugger. A separate window gives access to the full range of documentation for iOS, Xcode, and other supporting documentation.
Project Editor—This is the heart of Xcode and provides a home for most of the features, including project file and component management, syntax-aware source editing for both the Objective-C language and iOS SDK, as well as a visual editor and a full debugger. A separate window gives access to the full range of documentation for iOS, Xcode, and other supporting documentation.
![]() Interface Builder (IB)—IB is accessed through the project editor and provides a rapid prototyping tool for laying out user interfaces (UIs) graphically, and linking those prebuilt interfaces to your Xcode source code. With IB, you use powerful visual design tools to add the visual elements of your app and then connect those onscreen elements to objects and method calls in your application. In addition to individual screens, you can lay out all your application screens in one document and define the ways each screen moves to the next. You learn about this inChapter 3, “Introducing Storyboards.”
Interface Builder (IB)—IB is accessed through the project editor and provides a rapid prototyping tool for laying out user interfaces (UIs) graphically, and linking those prebuilt interfaces to your Xcode source code. With IB, you use powerful visual design tools to add the visual elements of your app and then connect those onscreen elements to objects and method calls in your application. In addition to individual screens, you can lay out all your application screens in one document and define the ways each screen moves to the next. You learn about this inChapter 3, “Introducing Storyboards.”
In Chapter 4, “Auto Layout,” you learn how to use IB with another powerful feature of iOS. Auto layout is an advanced rule-based system that enables you to specify the visual relationships between views instead of worrying about pixel-perfect placement. With it, you can create one interface that adapts to different screen orientations and sizes.
![]() Simulator—The iOS Simulator runs on a Macintosh and enables you to create and test iOS apps on your desktop. You can test programs without connecting to an actual iPhone, iPad, or iPod touch. The simulator offers the same API (Application Programming Interface) used on iOS devices and provides a preview of how your concept designs will look and behave. When working with the simulator, Xcode compiles Intel x86 code that runs natively on the Macintosh rather than ARM-based code used on the iPhone. Keep in mind that performance in the simulator is likely very different than on a physical device as it is running with a very different CPU, GPU (graphics processor), and storage/disk format. Your app is likely to be much faster in the simulator and have no memory or communications problems.
Simulator—The iOS Simulator runs on a Macintosh and enables you to create and test iOS apps on your desktop. You can test programs without connecting to an actual iPhone, iPad, or iPod touch. The simulator offers the same API (Application Programming Interface) used on iOS devices and provides a preview of how your concept designs will look and behave. When working with the simulator, Xcode compiles Intel x86 code that runs natively on the Macintosh rather than ARM-based code used on the iPhone. Keep in mind that performance in the simulator is likely very different than on a physical device as it is running with a very different CPU, GPU (graphics processor), and storage/disk format. Your app is likely to be much faster in the simulator and have no memory or communications problems.
![]() Performance Tools—As you run your app in the simulator or on a device, runtime debug gauges give an overview of performance including memory and CPU use. Instruments provides even more detail, profiling how iPhone applications work under the hood. It samples memory usage and monitors performance, enabling you to identify and target problem areas in your applications and work on their efficiency. As you see in Chapter 14, “Instruments and Debugging,” if you tune your app as you develop, you will catch issues early and end up with the best performance. Instruments offers graphical time-based performance plots that show where your applications are using the most resources. It is built around the open-source DTrace package developed by Sun Microsystems and plays a critical role in making sure your applications run efficiently on the iOS platform.
Performance Tools—As you run your app in the simulator or on a device, runtime debug gauges give an overview of performance including memory and CPU use. Instruments provides even more detail, profiling how iPhone applications work under the hood. It samples memory usage and monitors performance, enabling you to identify and target problem areas in your applications and work on their efficiency. As you see in Chapter 14, “Instruments and Debugging,” if you tune your app as you develop, you will catch issues early and end up with the best performance. Instruments offers graphical time-based performance plots that show where your applications are using the most resources. It is built around the open-source DTrace package developed by Sun Microsystems and plays a critical role in making sure your applications run efficiently on the iOS platform.
In addition, a static analyzer shows you places where your code might have problems. Simply run the analyzer on a single file or on your whole project to find unused variables, possible logic problems, potential memory leaks, and more.
![]() Debugger—Chapter 14 also covers the debugger. It helps you quickly find and fix problems in your code. With it, you can step through code and inspect values of variables, either in a separate display area or by just hovering the mouse pointer over the source code. You can set rich breakpoints, including conditional triggers and associated actions such as logging messages, playing source, or even running scripts. There is even a console for fine control.
Debugger—Chapter 14 also covers the debugger. It helps you quickly find and fix problems in your code. With it, you can step through code and inspect values of variables, either in a separate display area or by just hovering the mouse pointer over the source code. You can set rich breakpoints, including conditional triggers and associated actions such as logging messages, playing source, or even running scripts. There is even a console for fine control.
![]() Other Features—Xcode provides a wide array of other features supporting the app development and deployment cycle including built-in support for branching source code control using Git, management of developer certificates and app entitlements, testing device management, and uploading apps to the store.
Other Features—Xcode provides a wide array of other features supporting the app development and deployment cycle including built-in support for branching source code control using Git, management of developer certificates and app entitlements, testing device management, and uploading apps to the store.
Together, the components of the iOS SDK enable you to develop your applications. From a native application developer’s point of view: You will spend most of your time editing and debugging source, creating the interface, and running your app in the simulator. You will also spend time tuning your code in instruments. In addition to these tools, there’s an important piece not on this list. This piece ships with the SDK, but is easy to overlook: Cocoa Touch.
Cocoa Touch is a library of classes provided by Apple for rapid iOS application development. Cocoa Touch, which takes the form of a number of API frameworks, enables you to build graphical event-driven applications with UI elements such as windows, text, and tables. Cocoa Touch and UIKit on iOS is analogous to Cocoa and AppKit on Mac OS X and supports creating rich, reusable interfaces on iOS.
Many developers are surprised by the code base size of iOS applications; they’re tiny. Cocoa Touch’s library support is the big reason for this. By letting Cocoa Touch handle all the heavy UI lifting, your applications can focus on getting their individual tasks done. The result is compact code, focused on the value provided by your app.
Cocoa Touch lets you build applications with a polished look and feel, consistent with those developed by Apple. Remember that Apple must approve your software. Apple judges applications on the basis of appearance, operation, and even content. Using Cocoa Touch helps you better approximate the high design standards set by Apple’s native applications.
Before you start creating apps, make sure you look at the Apple “iOS Human Interface Guidelines” available in the Xcode documentation in the “User Interface” group, or on the web at https://developer.apple.com/appstore/guidelines.html. Also read through the legal agreement you signed for iTunes Connect. Breaking rules is highly likely to result in your app being rejected from the App Store.
Testing Apps: The Simulator and Devices
A physical iPhone, iPad, or iPod touch is a key component of the SDK. Testing on a device is vital. As simple and convenient as the iOS Simulator is, it is not the same as a real device. You want your apps to run on some or all of the iOS device family, so it’s important that they run best in the native environment. An iOS device itself offers the fully caffeinated, un-watered-down testing platform you need.
Apple regularly suggests that a development unit needs to be devoted exclusively to development. Reality has proven rather hit and miss on that point. Other than early betas, releases of iOS have proven stable enough that you can use your devices for both development and day-to-day tasks, including making calls on iPhones. It’s still best to have extra units on hand devoted solely to development, but if you’re short on available units, you can probably use your main iPhone for development; just be aware of the risks, however small. Note that as a developer program member, you have agreed to a non-disclosure agreement (NDA) with Apple. Beware of accidentally showing Apple confidential prereleases to others.
Devices must be proactively set up for development use with Xcode’s Organizer. The Organizer also lets you register your device with Apple, without having to enter its information by hand at the provisioning portal. Chapter 15, “Deploying Applications,” gives detailed information on how to do this.
When developing, it’s important to test on as many iOS platforms as possible. Be aware that real platform differences exist between each model of iPhone, iPad, and iPod touch. For example, two models of the fifth-generation iPod touch offer front- and back-facing cameras; one only offers a front-facing camera. The second-generation iPad and earlier as well as the original iPad-mini do not have retina screens. iPhones all have cameras, which none of the iPod touches offered until the fourth generation. Certain models of the iPad and the iPhone offer GPS technology; other models do not. A discussion of major platform device features along with some device differences follows later in this chapter.
Note
iOS developers do not receive hardware discounts for development devices. You pay full price for new devices, and you pay nonsubsidized prices for extra iPhones and iPads with carrier access. You can get significant savings by buying used and refurbished units. Depending on your country and other circumstances, you might be able to deduct the cost of units from your taxes.
Simulator Limitations
Each release of the Macintosh-based iOS Simulator continues to improve on previous technology. That said, there are real limitations you must take into account. From software compatibility to hardware, the simulator approximates but does not equal actual device performance.
The simulator uses many Macintosh frameworks and libraries, offering features that are not actually present on the iPhone or other iOS devices. Applications that appear to be completely operational and fully debugged on the simulator might flake out or crash on a device itself due to memory or performance limitations on iOS hardware. Even the smallest Mac nowadays comes with 4GB of RAM, whereas the third-generation iPad has only 1GB of RAM. Instruction set differences might cause apps to crash on older devices when they are built to support only newer versions of the ARM architecture. You simply cannot fully debug any program solely by using the simulator and be assured that the software will run bug-free on iOS devices.
The simulator is also missing many hardware features. You cannot use the simulator to test the onboard camera or to get accelerometer and gyro feedback. Although the simulator can read acceleration data from your Macintosh using its sudden motion sensor (if there’s one onboard, which is usually the case for laptops), the readings will differ from iOS device readings and are not practical for development or testing. The simulator does not vibrate or offer multitouch input (at least not beyond a standard “pinch” gesture).
Note
The open-source accelerometer-simulator project at Google Code (http://code.google.com/p/accelerometer-simulator/) offers an iPhone application for sending accelerometer data to your simulator-based applications, enabling you to develop and debug applications that would otherwise require accelerometer input. A similar commercial product called iSimulate is available in the App Store for purchase.
From a software point of view, the basic keychain security system is not available on the simulator. You cannot register an application to receive push notification either. These missing elements mean that certain kinds of programs can be properly tested only when deployed to an iPhone or other iOS device.
Another difference between the simulator and the device is the audio system. The audio session structure is not implemented on the simulator, hiding the complexity of making things work properly on the device. Even in areas where the simulator does emulate the iOS APIs, you might find behavioral differences because the simulator is based on the Mac OS X Cocoa frameworks. Sometimes you have the opposite problem: Some calls do not appear to work on the simulator but work correctly on the device. For example, if you store or access files, the simulator is usually case-insensitive (depending on how the Mac is set up), but iOS is case-sensitive.
That’s not to say that the simulator is unimportant in testing and development. Trying out a program on the simulator is quick and easy, typically much faster than transferring a compiled application to an iOS unit. The simulator lets you rotate your virtual device to test reorientation, produce simulated memory warnings, and try out your UI as if your user were receiving a phone call. It’s much easier to test out text processing on the simulator because you can use your desktop keyboard rather than hook up an external Bluetooth keyboard to your system and you can copy and paste text from local files; this simplifies repeated text entry tasks such as entering account names and passwords for applications that connect to the Internet.
Another area the simulator shines is localization. As you see in Chapter 5, “Localization,” switching languages for your app is as easy as launching the simulator with the right special flag.
In the end, the simulator offers compromise: You gain a lot of testing convenience but not so much that you can bypass actual device testing.
Note
The simulator supports Video Out emulation. There’s no actual Video Out produced, but the simulated device responds as if you’ve added a compliant cable to its (nonexistent) connector. You can view the “external” video in a floating simulator window.
Apple encourages new applications to use AirPlay to send the content to the user’s TV via AppleTV instead of relying on cables.
Tethering
Apple is moving away from tethered requirements in iOS but has not yet introduced a way to develop untethered at the time this book is being written. At this time, all interactive testing is done using a USB cable. Apple provides no way to wirelessly transfer, debug, or monitor applications as you develop. This means you perform nearly all your work tethered over a standard iPhone USB cable.
When you are debugging a tethered unit, try to set things up to reduce accidentally disconnecting the cable. If that happens, you lose the debug session including any interactive debugging, the console, and screenshot features.
You want to invest in a good third-party dock for iPhones or iPod touches and possibly one for iPads. Look for stands that allow the cable to be connected and hold the unit at a comfortable angle for touching the screen. Even better are docks that work in both portrait and landscape. The iPad will work in the Apple doc, though only in portrait. Alternatively, the Apple folding cases that also act as stands work in both orientations.
When tethered, always try to connect your unit to a port directly on your Mac. If you must use a hub, connect to a powered system that supports USB 2.0 or higher. Most modern screens, including Apple’s large display, come with built-in powered USB ports, but it pays to double check.
When it comes to the iPad, if the USB connection does not have sufficient power to charge the device, untether your device between testing periods and plug it directly into the wall using its 10W power adapter. Some USB ports provide sufficient power to charge the iPad while you’re using it, but this is not a universal situation.
Note
When testing applications that employ Video Out, you can use the Apple-branded component and composite cables or the HDMI digital adapter. These provide both Video Out and USB connections to allow you to tether while running your applications. The Apple-branded VGA cable does not offer this option. You need to redirect any testing output to the screen or to a file because you cannot tether while using VGA output. Another common way to show apps on another device is to use AirPlay screen mirroring. It is a good idea to pick up an AppleTV and test whether your app works well with AirPlay. It can also save money compared to buying adapter cables for both the original 30-pin and newer lightning connectors.
iOS Device Considerations
Designing apps for mobile platforms such as the iPhone or iPad is not the same as designing for the desktop (or laptop). There are several extra considerations such as storage, interaction methods, and battery life. Storage limits, smaller screens, different interaction techniques, and energy consumption are important design considerations when creating your app.
With the iPhone, you are designing for a small touch-based screen with a good, but limited battery life. It is not a desktop with a large screen, a mouse or trackpad, and a physical always-on A/C power supply. Platform realities must shape and guide your development. Fortunately, Apple has done an incredible job designing a platform that leverages flexibility from its set of storage, interaction controls, and constrained battery life.
Storage Considerations
The iPhone hosts a powerful yet compact OS X–based installation. Although the entire iOS fills no more than a few hundred megabytes of space—almost nothing in today’s culture of large operating system installations—it provides an extensive framework library. These frameworks of precompiled routines enable iPhone users to run a diverse range of compact applications, from telephony to audio playback, from e-mail to web browsing. The iPhone provides just enough programming support to create flexible interfaces while keeping system files trimmed down to fit neatly within tight storage limits.
Most modern devices come with at least 16GB of onboard Flash-based storage, and some have considerably more. Some older devices running iOS 7 and later have as little as 4GB. Although application size is limited (see the “Note: App Size”), the space for data is much larger. Having said that, be aware that users can check how much space an app is using and might delete hungrier apps.
Note: App Size
Each application is limited to a maximum size of 2GB. To the best of my knowledge, no application has ever actually approached this size, although there are some navigation apps that are pushing new records of deployment size, such as Navigon (1.5GB) and Tom Tom (1.4GB). Apple currently restricts apps larger than 50MB to Wi-Fi downloading. This bandwidth was set at the time that Apple announced its new iPad device and the possibility of delivering universal applications that could run on both platforms. Apple’s over-the-air restrictions help reduce cell data load when media-intense applications exceed 50MB and ease the pain of long download times. The 50MB limit is also an important design consideration. Keeping your size below the 50MB cutoff allows mobile users to make impulse application purchases, increasing the potential user base. Check the iTunesConnect guide for the latest maximum size.
Data Access Considerations
Every iOS application is sandboxed. That is, it lives in a strictly regulated portion of the file system. Your program cannot directly access other applications, certain data, and certain folders. Among other things, these limitations require accessing built-in application data using system APIs including the iTunes library, calendar, photos, location services, notifications, reminders, and built-in social services such as Facebook and Twitter.
Your program can, however, access any data that is freely available over the air when the iOS device is connected to a network—including any iCloud documents it owns. Your app can also access data stored in the shared system pasteboard and data shared using a document interaction controller, which offers a limited way to share document data between applications. Apps that create or download data can send those files to applications that can then view and edit that data. In that situation, the data is fully copied from the originating application into the sandbox of the destination application.
Memory Considerations
On iOS, memory management is critical. Apple has not enabled disk swap–based virtual memory for iOS. When you run out of memory, iOS shuts down your application; random crashes are probably not the user experience you were hoping for. With no swap file, you must carefully manage your memory demands and be prepared for iOS to terminate your application if it starts swallowing too much memory at once. You must also take care concerning what resources your applications use. Too many high-resolution images or audio files can bring your application into the auto-terminate zone.
Many parts of the iOS framework cache your image data in order to speed up rendering and application performance. This caching can come at the cost of a larger memory footprint and, on retina devices, if used improperly, can generate more memory pressure on your app. Chapter 14 covers using the Instruments tool to figure out what parts of your application consume too much memory and techniques to address and resolve those issues. It also covers the debug memory gauge, a handy way to see if and when your app is approaching the memory danger zone.
Interaction Considerations
For the iPhone and iPod touch, losing physical input devices such as mice and working with a small screen doesn’t mean you lose interaction flexibility. With multitouch and the onboard accelerometer, you can build UIs that defy expectations and introduce innovative interaction styles. The iPhone’s touch technology means you can design applications complete with text input and pointer control, using a virtual screen that’s much larger than the actual physical reality held in your palm.
Note
Almost all iOS devices support external keyboards. You can connect Bluetooth and USB keyboards to iOS devices for typing. Only a tiny fraction of devices running versions of iOS older than 3.2 have no external keyboard support.
In addition to the touchscreen, users can interact with your app using a smart autocorrecting onscreen keyboard, built-in microphone (for all units except on the obsolete first-generation iPod touch), and an accelerometer that detects current orientation as well as changes. When designing text input, look for ways you can make it easier for the user such as splitting up longer inputs into smaller fields or using auto completion. For longer text areas, make sure you use scrolling text views. Most importantly, try your interface without an external keyboard, as most users will not have one.
Focus your design efforts on easy-to-tap interfaces rather than on desktop-like mimicry. Remember to use just one conceptual window at a time—unlike in desktop applications, which are free to use a more flexible multiwindow display system.
Note
The iPhone screen supports up to five touches at a time. The iPad screen supports up to about 11 touches at a time. With its larger screen, the iPad invites multihand interaction and gaming in ways that the iPhone cannot, particularly allowing two people to share the same screen during game play. Virtual instruments are another type of app that benefits from lots of fingers. Apple has not specified the maximum number of touches for an iPad at the time of writing this book, but empirical evidence still points to 11. See http://mattgemmell.com/2010/05/09/ipad-multi-touch/.
Energy Considerations
For mobile platforms, wise use of the battery is part of any design. Apple’s SDK features help to design your applications to limit CPU use and avoid running down the battery. A smart use of technology (for example, properly suspending themselves between uses) lets your applications play nicely on the iPhone and keeps your software from burning holes in users’ pockets (sometimes almost literally, speaking historically). Some programs, when left running, produce such high levels of waste heat that the phone becomes hot to the touch, and the battery quickly runs down. The Camera application was one notable example.
Heavy users of the battery include the Camera app; communications, especially over phone networks; and high-precision location services that use the GPS hardware instead of Wi-Fi triangulation.
Each new generation of iOS device brings some improvement to battery life. Even so, you should continue to keep energy consumption in mind when developing your applications.
Application Considerations
With iOS multitasking, applications can allow themselves to
![]() Be suspended completely between uses (the default behavior)
Be suspended completely between uses (the default behavior)
![]() Be suspended with occasional slices of background processing time
Be suspended with occasional slices of background processing time
![]() Quit entirely between uses
Quit entirely between uses
![]() Run for a short period of time to finish ongoing tasks
Run for a short period of time to finish ongoing tasks
![]() Create background tasks that continue to run as other applications take control
Create background tasks that continue to run as other applications take control
There is built-in support for background tasks including playing music and other audio, collecting location data, and using Voice over IP (VoIP) telephony. Rather than running a simple background daemon, these tasks are event-driven. Your application is periodically called by iOS with new events, allowing the application to respond to audio, location, and VoIP updates.
Since only the current app can update the UI, Apple supports pushing data from web services. Using Push Notifications sends processing off-device to dedicated web-based services, leveraging their always-on nature to limit on-device processing requirements. Registered services can push badge numbers and messages to users, letting them know that new data is waiting on those servers. Push notifications can allow the user to launch your app or bring it to the foreground, passing a small amount of optional data while doing so.
A special kind of notification gives your app some background execution time for updating changes. And even if you do not use notifications, you can ask the system for regular background processing callbacks. These two mechanisms keep your app up to date before the user brings it into the foreground.
In addition, applications can pass control from one to the other by passing data (using the document interaction controller) and by opening custom URL schemes.
Apple strongly encourages developers to limit the amount of cell-based data traffic used by each application. The tendency of carriers to meter data usage and the overall movement away from unlimited data plans help reinforce this requirement. Applications that are perceived to use too much cell bandwidth might be rejected or pulled from the store. If your application is heavily bandwidth-dependent, you may want to limit that use to Wi-Fi connections.
Almost all device families come with Wi-Fi, mostly 802.11n. For those with cellular connections, many are at least 4G (5.8Mbps HSUPA), and LTE is usually the minimum speed for new devices.
Note
According to the iPhone Terms of Service, you may not use Cocoa Touch’s plug-in architecture for applications submitted to the App Store. You can build static libraries that are included at compile time, but you may not use any programming solution that links to arbitrary code at runtime. That means your app cannot download new or replacement code from a server.
That means bug fix releases need to be just that, full app releases. It also means extra code-level features available by in-app purchase need to ship with the app.
User Behavior Considerations
Although this is not a physical device-based consideration, iPhone users approach phone-based applications sporadically. They enter a program, use it for its intended purpose, and then leave just as quickly. The handheld nature of the device means you must design your applications around short interaction periods and prepare for your application to be interrupted as a user receives a phone call or sticks the phone back into a pocket, purse, or backpack. Keep your application state current between sessions and relaunch quickly to approximately the same task your user was performing the last time the program was run. This can demand diligence on the part of the programmer, but payoff in user satisfaction is worth the time invested. Apple does provide APIs for state restoration, though they are beyond the scope of this book. For more information, start with the chapter on state preservation and restoration in the iOS App Programming Guide available with the documentation that comes with Xcode.
Understanding Model Differences
When it comes to application development, many iOS apps never have to consider the platform on which they’re being run. Most programs rely only on the display and touch input. They can be safely deployed to all the current family of iOS devices; they require no special programming or concern about which platform they are running on.
There are, however, real platform differences. The most obvious difference is in screen size between iPhones/iPod touches and iPads. Other differences are usually feature-based such as the types of sensors, the presence or absence of cellular-based networking, and a few other items.
These differences can play a role in deciding how you tell the App Store to sell your software and how you design the software in the first place. Should you deploy your software only to the iPhone family or only to the iPad? To the iPhone, the iPad, and the second-generation and later iPod touch? Or can your application be targeted to every platform? You can use APIs and other techniques to find out what particular features are on a given device and even enable or disable parts of your app. The next section covers some issues to consider.
Screen Size
The most obvious difference is the amount of screen space available on the iPad family versus iPhone or iPod touch. iPads have a large 1024x768 point resolution enabling the display of much more content. iPhones and iPod touches have two display geometries: The 3.5-inch screen used by earlier devices is 480x320 points while the newer 4-inch screen is 568x320.
Notice that the above resolutions are in points, not pixels. Most Apple devices now use a higher resolution retina display, doubling the number of available pixels and better matching human vision. Luckily, instead of worrying about whether the device is 480x320 (non-retina) pixels or 960x640 (retina) pixels, you can work in the world of points. For artwork, Xcode makes it easy to provide any appropriate resolutions and, at runtime, the system automatically chooses the right one.
The Apple human interface guidelines for iPad differ from those for iPhone/iPod touch. Developing for the iPad involves creating unified interfaces rather than the staged screen-by-screen design used by the earlier iPhone and iPod touch units, with their reduced window size. Applications that rely on the greater screen scope that the iPad provides may not translate well to the smaller members of the device family.
Although the retina screens on the newer iPhones and iPod touches look great, their screen dimensions are either 3.5- or 4-inches diagonal. That geometry, combined with the physical realities of the human hand and fingers, prevents these units from providing the same kind of user interaction experience that is possible on the iPad. The interaction guidelines for the newest units remain in lock step with the earlier members of the iPhone and iPod touch family.
Camera
Most applications can assume there will be at least one camera. In most cases, there will be front- and back-facing cameras, though it is still wise to check at runtime. Although some very early devices had no camera (earlier iPod touches or the first-generation iPad), those devices make up a very small percentage of the market, and none of them run iOS 7. There are also devices with just a back-facing or a front-facing camera. The 16GB fifth-generation iPod touch is an example of the latter.
The cameras are useful. You can have the camera take shots and then send them to Flickr or Twitter. You can use the camera to grab images for direct manipulation, augmented reality, and so forth. The iOS SDK provides a built-in image picker controller that offers camera access to your users. There are also ways to capture still images, capture video, play movies, and stream content.
Audio
All iOS devices have headphone jacks and all but the very oldest have speakers as well. The same is true of microphones. The SDK provides ways to capture and play back audio.
The microphones and speakers are also used for accessibility features such as the VoiceOver screen reader. You can build descriptions into your graphical user interface (GUI) elements to enable your applications to take advantage of VoiceOver, so your interfaces can describe themselves to visually impaired end users.
Telephony
It may seem an overly obvious point to make, but the iPhone’s telephony system, which handles both phone calls and SMS messaging, can and will interrupt applications when the unit receives an incoming telephone call. Sure, users can suspend out of apps whenever they want on the iPhone, iPad, and iPod touch platforms, but only the iPhone has to deal with the kind of transition that’s forced by the system and not a choice by the user.
In addition to phone calls suspending your app, the user is able to open your app while on a call. When that happens, iOS adds a special top bar indicating the status of the call. Make sure to test your interface with the bar open as well as the bar being open then closing. The simulator lets you toggle the in-call status bar on and off.
Consider how the different kinds of interruptions might affect your application. It’s important to keep all kinds of possible exits in mind when designing software. Be aware that the choice to leave your app might not always come from the user, especially on the iPhone. Applications that use audio need to take special care to restore the correct state after phone call interruptions.
Another fallout of telephony operations is that more processes end up running in the background on iPhones than on iPod touches and iPads, even those iPads that provide cellular data support. These processes do reduce the amount of free memory, though for modern devices, the effect is minimal. Having said that, it still pays to test your app on cellular-enabled devices.
Core Location and Core Motion Differences
Core Location depends on three different approaches, each of which might or might not be available on a given platform. These approaches are limited by each device’s onboard capabilities. Wi-Fi location, which scans for local routers and uses their MAC addresses to search a central position database, is freely available on all iPhone, iPad, and iPod touch platforms.
Cell location, however, depends on an antenna that is available on the iPhone and on suitably equipped iPad models. This technology triangulates from local cell towers, whose positions are well defined from their installations by telephone companies.
The final and most accurate strategy, GPS location, depends on appropriate hardware. Most modern iPhones and iPads come with the hardware, though as of the writing of this book, no iPod touches do. You can use built-in calls to check for the presence of the hardware.
The third-generation iPhone 3GS introduced a built-in compass (via a magnetometer) along with the Core Location APIs to support it. The iPhone 4 and iPad 2 added a three-axis gyro, which provides pitch, roll, and yaw feedback, all of which can be solicited via the Core Motion framework. Most modern iPhone and iPad devices have both the compass and gyro. Modern iPod touches have only the gyro as of the writing of this book.
Vibration Support and Proximity
Vibration, which adds tactile feedback to many games, is limited to iPhones. The iPad and iPod touch do not offer vibration support. Nor do they include the proximity sensor that blanks the screen when holding an iPhone against your ear during calls. The UIDevice class offers direct access to the current state of the proximity sensor.
Processor Speeds
All modern devices come with fast Apple-designed ARM processors. The CPU includes a good amount of fast access RAM for code execution. To save power, some devices run the CPU at slower speeds (underclocked), and all have the ability to suspend parts of the hardware. Some earlier devices had relatively slow processors and much less execution space though they make up an ever-decreasing part of the market. Targeting iOS 6 or later will avoid those early devices.
The important thing is to run your app on a representative sample of the kinds of devices you are targeting. Make sure it performs well on the devices your customers will use. This is especially important if you plan to support iPhones prior to the 4 as well as first-generation iPads.
If your application isn’t responsive enough on the older platforms, consider working up your code efficiency. There is no option in the App Store at this time that lets you omit earlier generation iPhone devices from your distribution base, although setting your minimal required iOS version to 6.0 or higher will automatically exclude most older devices.
There are a few places you can look for an idea of the market share for each version of iOS. When a new version is released, check the Apple-oriented press, such as the following sites:
![]() MacOSRumors: www.macrumors.com
MacOSRumors: www.macrumors.com
![]() MacWorld: www.macworld.com
MacWorld: www.macworld.com
![]() TUAW: www.tuaw.com
TUAW: www.tuaw.com
You can also check with data analysis and mobile information companies, though you might have to dig to find the information:
![]() Canalys: www.canalys.com
Canalys: www.canalys.com
![]() Chitika: chitika.com
Chitika: chitika.com
![]() Flurry: www.flurry.com/index.html
Flurry: www.flurry.com/index.html
![]() Gartner: www.gartner.com/technology/home.jsp
Gartner: www.gartner.com/technology/home.jsp
![]() IDC: www.idc.com
IDC: www.idc.com
Finally, app developer David Smith regularly updates what OS versions are used in his app:
![]() http://david-smith.org/iosversionstats/
http://david-smith.org/iosversionstats/
OpenGL ES
OpenGL ES offers a royalty-free cross-platform API for 2D- and 3D-graphics development. It is provided as part of the iOS SDK. Most devices support OpenGL ES 2.0 with the newest support version 3.0. Some very early units supported only OpenGL ES 1.1, but you are unlikely to encounter them.
Note
Devices and features remain a moving target. Apple continues to introduce new units and make changes to iOS. As new devices are introduced, check Apple’s information pages, especially the technical specs. For iOS, make sure you read the release notes. In addition, you can look for summary pages on the Internet. One good source is Wikipedia: http://en.wikipedia.org/wiki/List_of_iOS_devices.
iOS
One obvious difference is the version of iOS running on any given device. iOS device users are quick to upgrade to new releases. It took comparatively little time for most devices to upgrade from iOS 3 to 4, then 4 to 5, and 5 to 6. Although there are some models that cannot upgrade to iOS 7, they make up a rapidly shrinking percentage of the total number of units.
There are definitely differences in functionality between various versions of the OS. For example, in addition to the new look, iOS 7 introduces UI Motion, UI Dynamics, and Text Kit. All three offer ways to increase engagement with your user. Usually it is a decision of supporting the current version plus the one before—in this case, iOS 6 and 7. It is fairly easy to test for the availability of features and enable or disable access in your app. The largest difference is the user experience, though it is fairly easy to create interfaces that work on both 6 and 7 if you use the built-in UI elements.
Ultimately, what you support should depend on what your potential customers are using. If they are all using devices with iOS 7, there is no need to support 6. This book focuses on iOS 7, though with the exception of some specific features, everything will work in iOS 6. In addition, using auto layout, covered in Chapter 4, makes adapting your interfaces to each iOS much easier.
Note
Apple expanded the iOS version of Objective-C 2.0 starting with the 4.0 SDK to introduce blocks. Blocks are a technology that have been around for decades in languages such as Scheme, Lisp, Ruby, and Python. Blocks allow you to encapsulate behavior as objects, so you can pass that behavior along to methods as an alternative to using callbacks. This new feature is introduced in Chapter 13, “Introducing Blocks.”
Other features, such as literals, better property declarations, and fast enumeration, make Objective-C even more powerful. You work with all these features as you progress through the book.
Summary
In this chapter, you have taken the first steps in learning to create applications for iOS. You have downloaded and set up Xcode and covered some of the basics of the devices and Apple’s developer program. Through the rest of the book, you continue your journey into the world of creating iOS apps. Each chapter focuses on important skills for some area of development. Though the territory might be unfamiliar, the book provides a focused map to guide you through.
In the next few chapters, you learn the Objective-C language and create your first application in Xcode. From there, you continue to expand your knowledge of iOS development, including user interface elements, adapting to screen size and language, performance tuning, debugging, and how to ship your app. When you are ready, turn the page to start writing your first iOS app.
All materials on the site are licensed Creative Commons Attribution-Sharealike 3.0 Unported CC BY-SA 3.0 & GNU Free Documentation License (GFDL)
If you are the copyright holder of any material contained on our site and intend to remove it, please contact our site administrator for approval.
© 2016-2026 All site design rights belong to S.Y.A.