Learning iOS Development: A Hands-on Guide to the Fundamentals of iOS Programming (2014)
Chapter 2. Objective-C Boot Camp
The first step in learning any programming language is to write a Hello World program. In this chapter, you start by creating an iOS Hello World program and get a quick tour of Xcode, the main tool for developing iOS apps.
Next you learn the fundamentals of Objective-C. With that base, you explore classes and objects, the main building block of apps. While doing that, you create the CarValet project, practice building classes, and learn about properties.
You end the chapter exploring subclassing by working through a guided challenge. By the time you have finished the chapter, you will have the beginnings of the CarValet project and enough Objective-C knowledge to work through this book.
Building Hello World the Template Way
Xcode’s preconfigured templates offer the easiest path to creating a Hello World–style sample application. In the following steps, you create a new project, edit it to say “Hello World,” and run it on the iOS Simulator. As you build your first Xcode project, you get a general introduction to this key tool, as well as discovering how to create and navigate a project.
Creating the Hello World Project
Launch Xcode and you will see the Xcode welcome page shown in Figure 2-1. (If you have dismissed this page, you can bring it back up by choosing Window > Welcome to Xcode or pressing Cmd-Shift-1.) Click Create a New Xcode Project. You can also create a new project in Xcode by choosing File > New > Project (or pressing Cmd-Shift-N). The template selection window shown in Figure 2-2 appears. By default, the template selection window is embedded in a large new window, called a workspace. Workspaces include all of Xcode’s editing and inspector features in a single window.
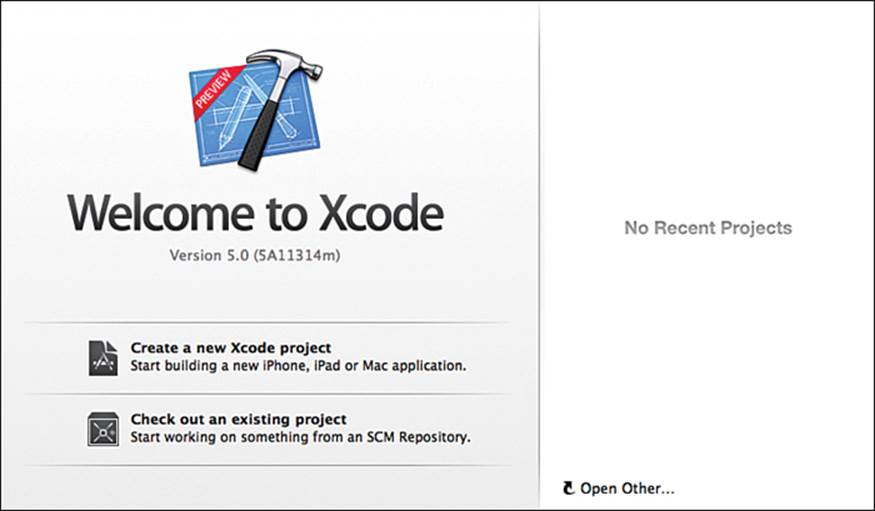
Figure 2-1 Xcode welcome window
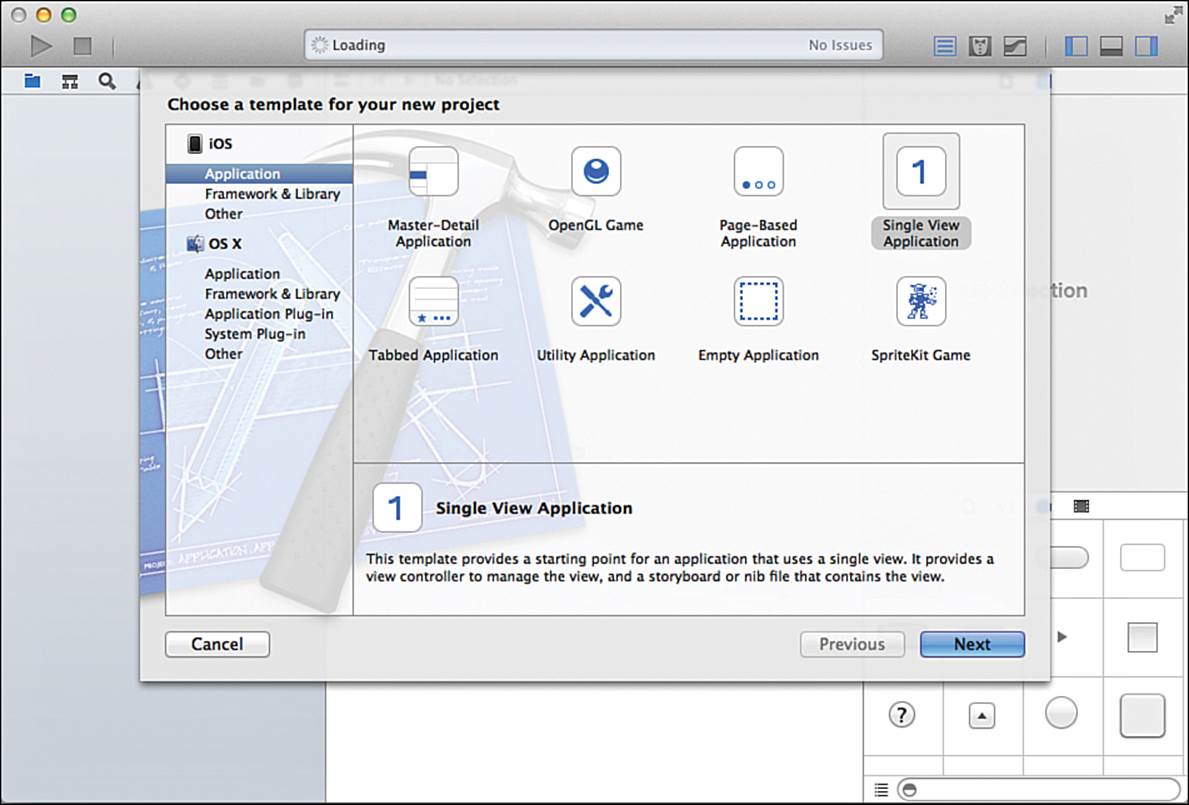
Figure 2-2 Xcode template selection window
In the template selection window shown in Figure 2-2, select Application under the iOS menu on the left side, select Single View Application, and click Next.
Caution: Screenshots and Functionality May Vary
Xcode is updated on a regular basis. This means the instructions might vary slightly from the actual items in Xcode or on Apple websites. When you encounter this situation, there is usually some obvious way to accomplish the same action. Check for controls or items that have the same name in a different position. Also look for similar names in similar areas. If this does not work, check the book website (www.informit.com/title/9780321862969) for updates and, failing that, please send feedback.
The Xcode project options panel is up next, as shown in Figure 2-3. Follow these steps in this window:
1. For Product Name, enter HelloWorld.
2. Set Company Identifier to your company, using reverse domain-naming notation. For example, Maurice’s is com.mauricesharp or com.klmapps, Rod’s is com.strougo, while Erica’s is com.sadun. If you have no identifier, Apple suggests using edu.self.
3. Click Next.
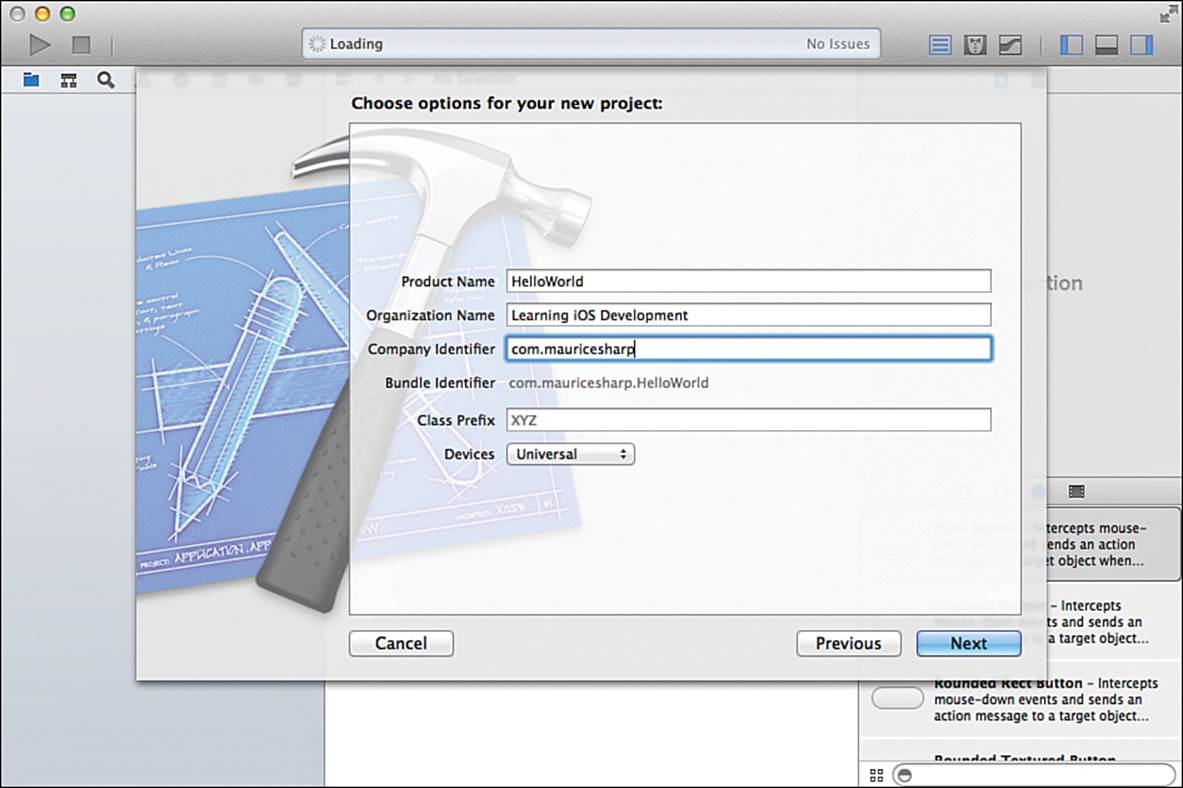
Figure 2-3 Xcode project options panel
Class Prefix lets you specify a prefix to include with your classes that Xcode will automatically add to your class definitions. Using prefixes is a good way to avoid conflicting with current or future iOS system classes. For example, if you created the class SlideMenuViewController, and a system update adds a class with the same name, at best your application would fail to build. Worse, your app could end up creating instances of the system class instead of your own, and that could lead to very nasty bugs. If you specified a prefix of “MS,” Xcode would create a file and class called MSSlideMenuViewController, avoiding the potential conflict. This book does not use prefixes to keep names shorter. You should add one based on your developer or company name.
Pro Tip: Prefix Formats
The most typical class prefixes are a short string of capitalized letters (Apple recommends three characters), usually the initials of you or your company. This is the style you usually find inside companies or for open source software. However, it is not the most readable. The following are some variations of a symbol for an imaginary slide menu class I did not write. Try just glancing at the items in the list, much like you would when scanning through code. See which ones are easier to recognize quickly:
SlideMenuViewController
MSSlideMenuViewController
MS_SlideMenuViewController
msSlideMenuViewController
ms_slideMenuViewController
The chances are the all caps prefix with no separator is the hardest to identify quickly. Lowercase is likely the next easiest, then those using a separator. When you use class prefixes, choose one that makes it easy to work with symbol names. In the long run, you will save lots of development and debugging time.
Other items in the project options panel include the following:
![]() Product Name—The name of the app, as it will appear on the device. As you will see in Chapter 15, “Deploying Applications,” you can change this later.
Product Name—The name of the app, as it will appear on the device. As you will see in Chapter 15, “Deploying Applications,” you can change this later.
![]() Organization Name—Used as part of the automatically generated source file header comments for copyright attribution.
Organization Name—Used as part of the automatically generated source file header comments for copyright attribution.
![]() Devices—The target platform for this app, which can be iPhone, iPad, or Universal for an app running on both platforms.
Devices—The target platform for this app, which can be iPhone, iPad, or Universal for an app running on both platforms.
The last Xcode panel asks you for the location to save your Hello World project. If you want, Xcode can also set up a local git repository for your project. For this Hello World example, leave the Source Control box unchecked. Choose a folder and click Create, as shown in Figure 2-4.
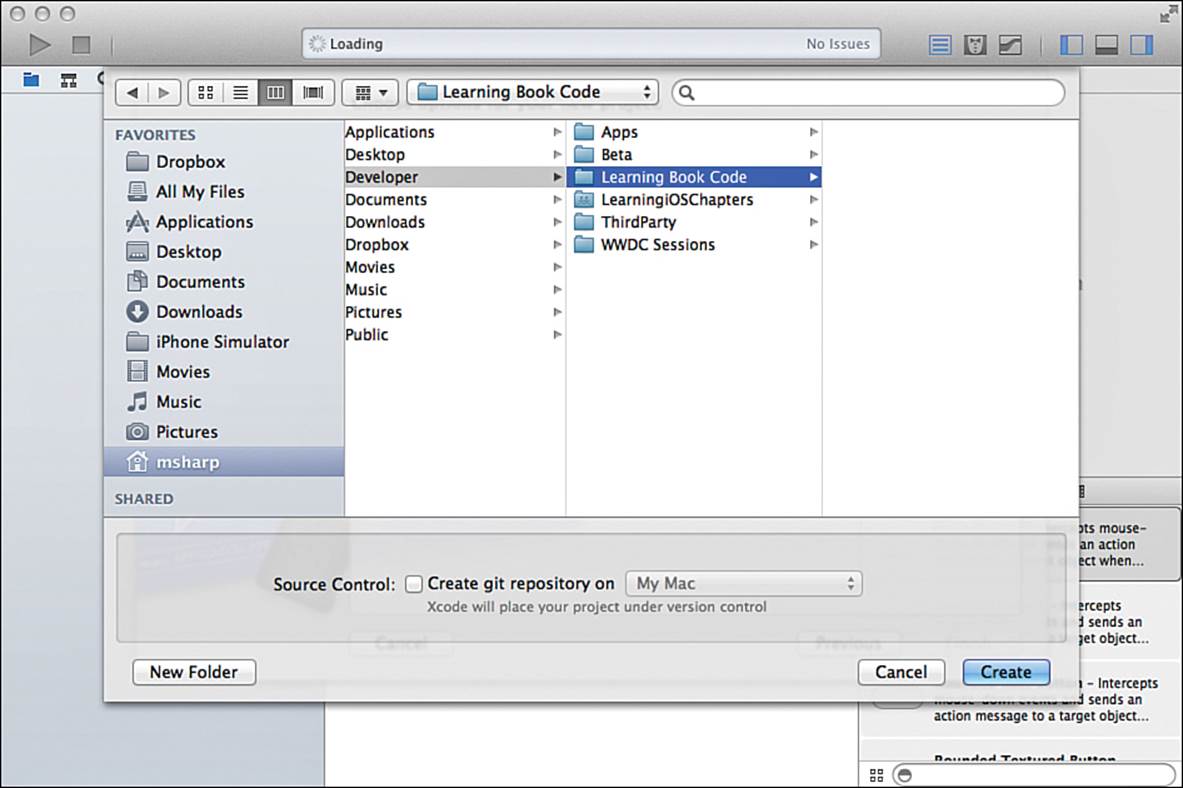
Figure 2-4 Xcode project folder location panel
After you click Create, you should see your new Hello World project opened in Xcode, along with several files Xcode generates for you. As of this point, you have a fully functional, if not particularly interesting, app. If you click the Run button right now, your app will show a blank white screen with a status bar at the top.
A Quick Tour of the Xcode Project Interface
You will spend a lot of time developing apps in Xcode. Figure 2-5 shows Xcode after expanding the project files and selecting the ViewController.m file.
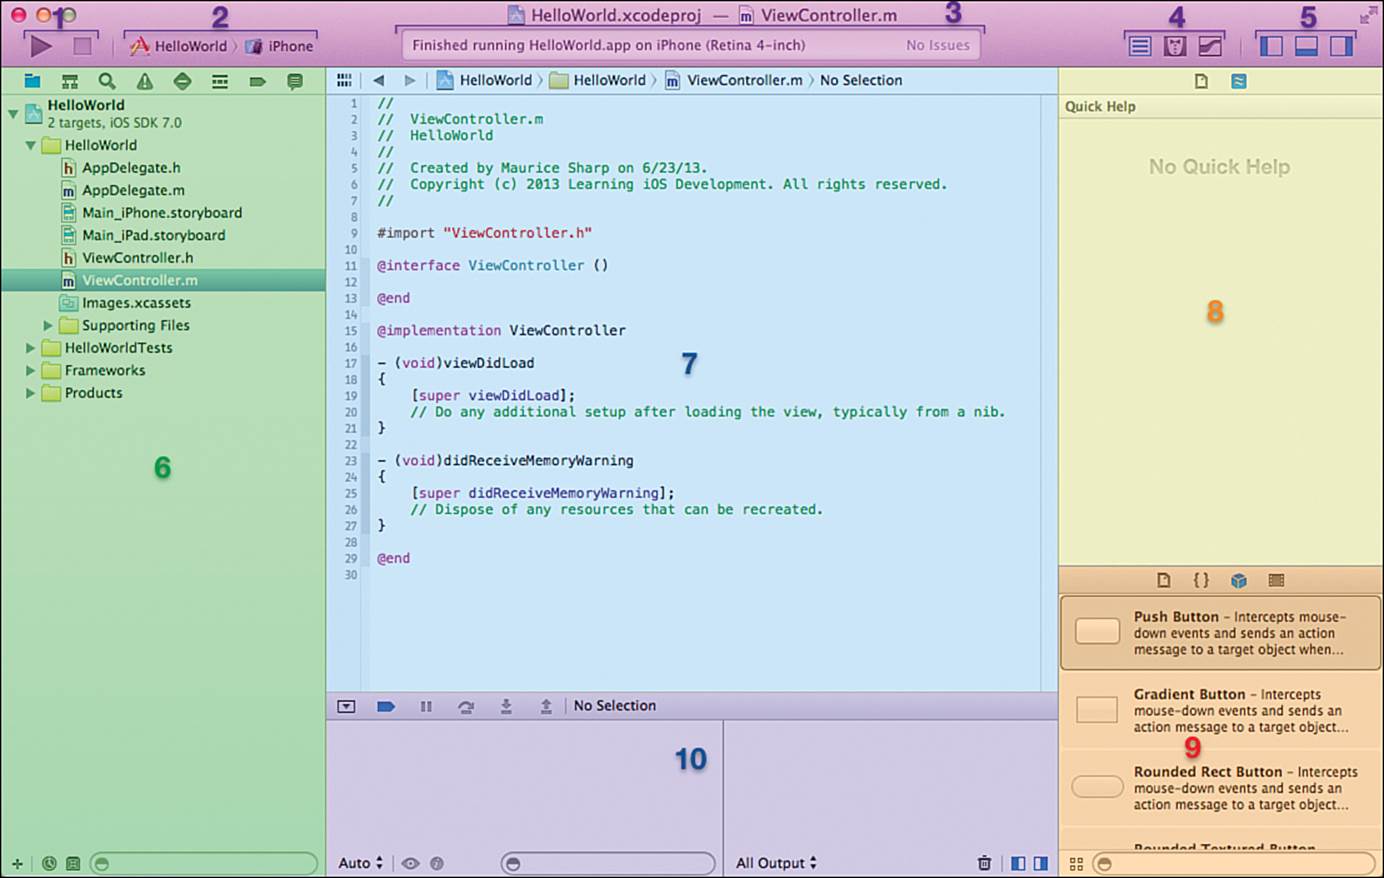
Figure 2-5 Parts of the Xcode project interface
The following is a quick tour of the Xcode interface. Later chapters go into more detail on different parts. The following numerals correspond to the numerals shown in Figure 2-5:
1. Pressing the Run (left-hand) button compiles and launches your app in the simulator or on a device. Pressing and holding Run gives you other options, such as testing or analyzing your project. The right-hand button stops a running app, a build, or whatever action you have kicked off.
2. In this two-sided popup, the left side is for selecting and editing schemes, or what you want to run and how to run it. On the right side, you select where you want to run your app: in one of the simulators or on an attached device.
3. The status area shows the result of the previous action or the progress of the current one. Actions include building the app, running the app, or even downloading the app to a device.
4. The Editor buttons let you configure what shows up in the editor (the area labeled 7 in Figure 2-5). The left-hand button, selected in the figure, shows just one item, the main editor area. The Assistant button in the middle divides the editor area into two and shows any related file, typically the header file, on the right. The final button shows source code differences, including the ability to look at different versions, on the right. This is useful if you are using a source code repository to track your changes. Note that you cannot show both the Assistant and Source code views at the same time.
5. This area controls the general layout of the workspace views in Xcode. The first button shows or hides the Navigator (area 6 in Figure 2-5). The second button controls the Debugger (area 10). The final one shows Utilities (areas 8 and 9).
6. The Navigator shows you different views of the project. The icons at the top control the type of view. In Figure 2-5, the folder icon is selected, so the area is showing the file and group-based project navigator. The others are a project symbol navigator, the magnifying glass for project-wide search, the alert triangle for build issues, and then a unit test navigator, a debug navigator, breakpoints list, and finally a log view.
One point of confusion can be the difference between what is shown in the file and group navigator versus what is in the Finder. The two can be different. In the Navigator, groups are represented by folder icons, but these are not the same as the folders in the Finder. If you want the groups and Finder folders to be the same, you need to add those folders in the Finder and save source files in the right place.
7. The Editor is where you will spend most of your time. Currently, it is showing the source editor. It can also display Interface Builder, the data model editor, or runtime debug gauges.
8. The utilities area shows different types of utilities including: file information; quick help (currently selected); inspectors for data model details; view attributes such as color, button title, or image; and size, including screen size and constraints.
9. At the bottom of the utilities area is the libraries area. Here you can find drag-and-drop components for building an app in Interface Builder, code snippets, and even pictures and other media. Note that you might see only the row of library selector icons at the bottom of the utilities area. To expand the library, click and drag the library selector bar up.
10. The debugger area has three main pieces. The top bar has controls for pausing and stepping through a running app on the left, and the current selection or file on the right side. The bottom is divided into two main areas, one for inspecting variables and the other for the console. You will see more of this throughout the book, especially in Chapter 14, “Instruments and Debugging.”
Now that you have an understanding of Xcode, it is time to start creating your first app.
Adding the Hello World Label
By default, Xcode creates a project that is set to run on the iPhone or iPad; when you create a project, the next one uses your previous settings. New projects start with all the classes and supporting files you need to create your application. This includes a basic home screen with no content. When you run a new project, it shows a blank white screen.
The quickest way to see Hello World on the screen is to add a label to your project. With your project open, follow these steps (see Figure 2-6):
1. Check that the project is set to run in the simulator by looking at the right side of the scheme popup menu (area 2 in Figure 2-5.) If the right-hand side does not say “iPhone Retina (4-inch),” click on that side of the scheme menu and choose that item. Note that the dropdown menu has two parts: The left side is the scheme popup, and the right allows you to choose where the app will run. You will be adding the Hello World label only to the iPhone storyboard; therefore, it is important that you run your app on the iPhone simulator instead of the iPad.
2. Click and select the Main_iPhone.storyboard file in the Xcode Project Navigator. Interface Builder opens in the editor area.
In the rare circumstance that the Interface Builder view does not open, check to make sure you do not have the third button, for showing source code control file differences, selected (refer to area 4 of Figure 2-5). If the source code control button is not selected, try selecting an .m or.h file and then choosing the storyboard file again. If that still does not work, quit Xcode and relaunch it.
3. In the bottom-right search panel, type label and drag the label object onto the storyboard canvas.
4. Type Hello World into the Text field in the attributes inspector shown in the Utility area on the left of the Xcode workspace. Adjust the label so it looks nice. Figure 2-6 shows the label horizontally centered in the top part of the view controller.
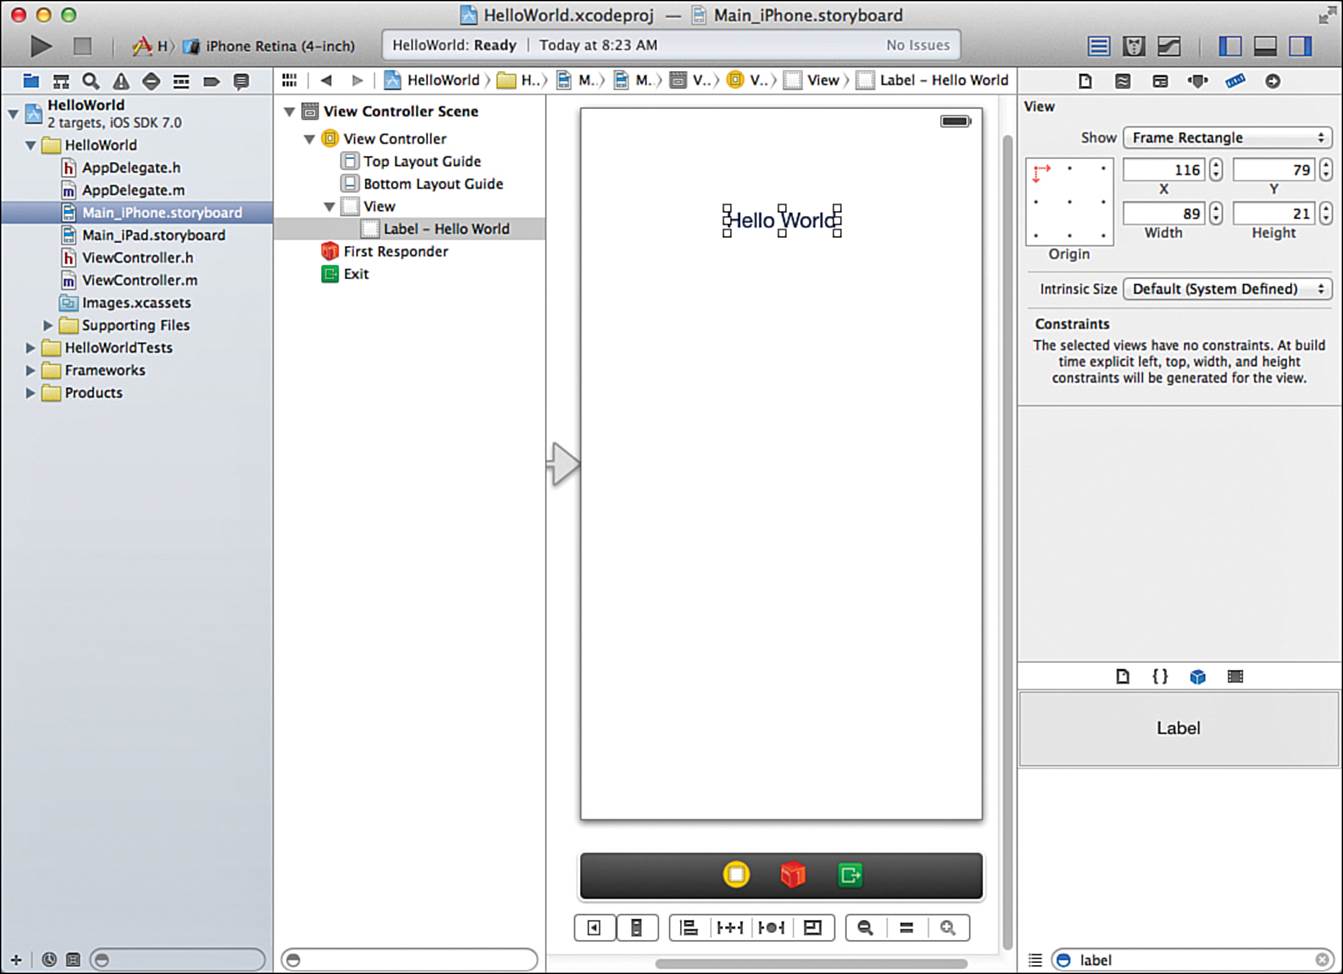
Figure 2-6 Adding the Hello World label via Interface Builder in Xcode
5. Click the Run button to compile and run your Hello World app.
When you run your Hello World app, you should see the iPhone Simulator (see Figure 2-7). If you see the iPad Simulator, remember to switch the run destination to the iPhone Simulator by using the Scheme popup menu.
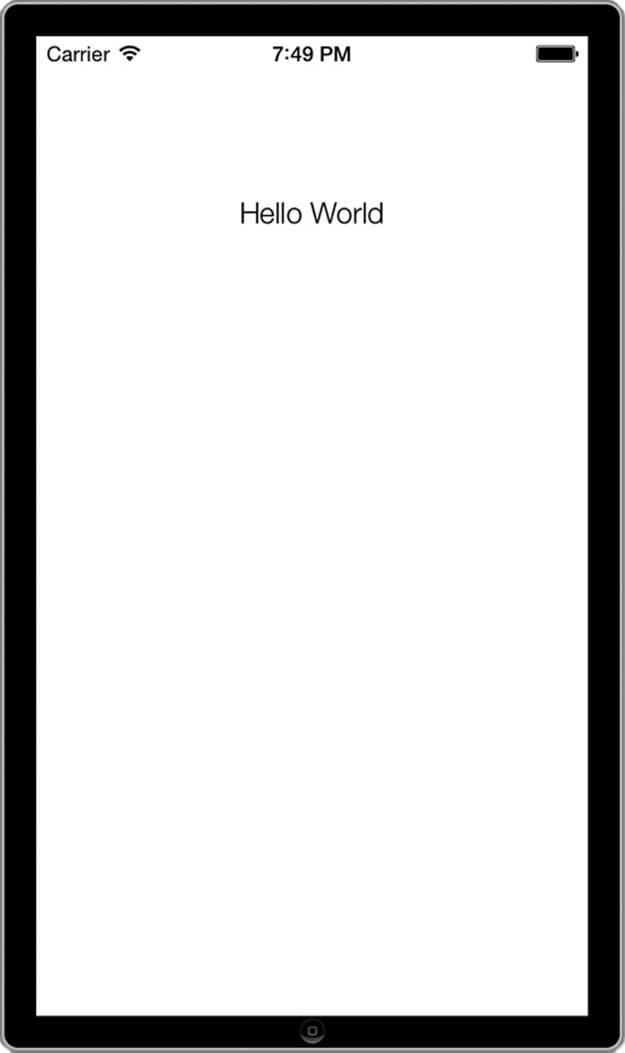
Figure 2-7 Hello World app running in the iPhone Simulator
This is all it takes to create a simple Hello World program. You didn’t even have to write any code. In the next section, you learn some Objective-C basics, and you come back to this Hello World app and add some code to learn and practice Objective-C.
Fitting the Simulator to Your Screen
The simulator shown in Figure 2-7 is a full-size, 4-inch retina display and can be quite large, especially if you are working on a laptop screen. You can change the size of the displayed screen using the Simulator Window > Scale menu.
Objective-C Boot Camp
To become a proficient iOS developer, you need to learn Objective-C, the main programming language of iOS and the Mac. Objective-C is a powerful object-oriented language that lets you build applications leveraging Apple’s Cocoa and Cocoa Touch frameworks. In this chapter, you learn basic Objective-C skills that help you get started with iOS programming. You learn about interfaces, methods, and more. To round things out, you get to practice what you have learned by adding some custom classes to your Hello World application.
Note
This section covers enough Objective-C for you to understand the code shown in this book and to implement the challenges at the ends of most chapters. However, there is a lot more to Objective-C than we can cover in such a small section, and a lot of it is important in writing production-quality apps. A good source for learning Objective-C is Learning Objective-C 2.0: A Hands-on Guide to Objective-C for Mac and iOS Developers, 2nd edition, by Robert Clair. You can also use Objective-C Programming: The Big Nerd Ranch Guide by Aaron Hillegass, which has more advanced coverage.
The Objective-C Programming Language
Objective-C is a strict superset of ANSI C. C is a compiled, procedural programming language developed in the early 1970s at AT&T. Objective-C, which was developed by Brad J. Cox in the early 1980s, adds object-oriented features to C. It blends C language constructs with concepts that originated in Smalltalk-80.
Smalltalk is one of the earliest and best-known object-oriented languages. It was developed at Xerox PARC as a dynamically typed interactive language. Cox layered Smalltalk’s object and message-passing system on top of standard C to create his new language. This approach allowed programmers to continue using familiar C-language development while accessing object-based features from within that language. In the late 1980s, Objective-C was adopted as the primary development language for the NeXTStep operating system by Steve Jobs’ startup computer company, NeXT. NeXTStep became both the spiritual and literal ancestor of OS X, and through that, of iOS.
Objective-C 2.0 was released in October 2007 along with OS X Leopard, introducing many new features, such as properties and fast enumeration. In 2010, Apple updated Objective-C to add blocks, a C-language extension that provides anonymous functions and lets developers treat code like objects. (You see more in Chapter 13, “Introducing Blocks.”) In the summer of 2011, Apple introduced Automatic Reference Counting (ARC). This extension greatly simplified development, allowing programmers to focus on creating application semantics rather than worry about memory management. (To be precise, ARC is a compile time extension, not a language extension.) More recently, Objective-C has expanded to include literals (how you define static objects) and subscripting (how to access elements in arrays and dictionaries). Apple continues to improve the Objective-C language, so keep your eye on the release notes of new iOS and Xcode updates.
Object-oriented programming brings to the table features that are missing in ANSI C. An object is a data structure that is associated with a publicly declared list of function calls. Every object in Objective-C has instance variables, which are the fields of the data structure, and methods, which are the function calls the object can execute. Object-oriented code uses these objects, variables, and methods to introduce programming abstractions that increase code readability and reliability. You might sometimes see instance variables referred to using the contraction iVars, and the termmessages instead of methods.
Objects are defined using a class. You can think of a class as a template for what the final object should be like: how to check state (instance variables) and what behaviors (methods) it supports.
Classes usually do not do much by themselves. Their main use is creating fully functional objects. Each of these objects is called an instance, that is, a functional entity based on the template provided by the class. “Instance variables” are called that because they only exist in an instance of the class, not in the class itself. When you typed the text “Hello World” into the field in step 4, you set the value of the text instance variable for a UILabel object. The UILabel class does not have any text variable to set. All the work and code of creating the label instance was done for you.
Object-oriented programming lets you build reusable code units that can be decoupled from the normal flow of procedural development. Instead of relying on process flow, object-oriented programs are developed around the custom data structures provided by objects and their methods. Cocoa Touch on iOS and Cocoa on Mac OS X offer a massive library of these custom objects. Objective-C unlocks that library and lets you build on Apple’s toolbox to create effective, powerful applications with a minimum of effort and code.
Note
iOS Cocoa Touch class names that start with NS, such as NSString and NSArray, harken back to NeXT. NS stands for NeXTStep, the operating system that ran on NeXT computers. Apple acquired NeXT in 1996.
Calling Functions: a.k.a. Message Sending
Objective-C is a superset of the C programming language, and as such, it follows mostly the same syntax. The one item that confuses most people learning Objective-C is the message-passing syntax used to invoke, or run, a method implemented by an instance of a class. Unlike function calls that use the function_name(arguments) syntax, messages are sent to objects using square brackets.
A message tells an object to perform a method. It is the object’s responsibility to implement that method and produce a result. The first item in the brackets is the receiver of the message—that is, the object implementing the method; the second item is the method name and possibly some arguments to that method that together define the message you want sent. In C, you might write this:
printCarInfo(); // This function prints out the info on the default car
but in Objective-C, you use this:
[self printCarInfo]; // This method prints out the info on the default car
In C, the object on which you want to run the function is assumed to be the current object. In some languages, you would see this.printCarInfo(). In Objective-C, self identifies the current object, much as this does.
In other languages, you can call a function on another object by using something like someOtherObject.printCarInfo(), assuming that someOtherObject has the printCarInfo() function. In Objective-C, you would use this:
[someOtherObject printCarInfo]; // This method prints out the info on the default car
Despite the difference in syntax, methods are basically functions that operate on objects. They are typed using the same types available in standard C, in addition to Objective-C types. Unlike with function calls, Objective-C places limits on who can implement and call methods. Methods belong to classes. And the class interface defines which of the methods are public, or declared to the outside world.
It starts to look different when a function has one or more arguments. Suppose you had to pass the car object myCar to the printCarInfo method. In C, you would write this:
printCarInfo(myCar); // Print the info from the myCar object
In Objective-C, you would write this:
[self printCarInfo:myCar]; // Objective-C equivalent, but with poor method name
In Objective-C, you are encouraged to interleave the method names with the parameters, so you would likely rename the printCarInfo method to this:
[self printCarInfoWithCar:myCar]; // More clear as to which car it will print out
Taking our example a step further, suppose you have to pass along the font size to use in displaying the information. In C, you would type this:
printCarInfo(myCar,10); // Print the info using a font size of 10
In Objective-C, you would use this:
[self printCarInfoWithCar:myCar withFontSize:10]; // Print using a font size of 10
You can see right away how much clearer the Objective-C method call is when you read through your code. Let’s take it one step further. Now assume that you have three parameters: the car object, the font size of the info, and a Boolean denoting whether the text should be bold or not. In C, you would use this:
printCarInfo(myCar, 10, 1); // Using 1 to represent the value of true in C
In Objective-C, you would use this:
[self printCarInfoWithCar:myCar withFontSize:10 shouldBoldText:YES];
Note
In Objective-C/Cocoa, the Boolean type is provided by BOOL. Unlike C, the standard values for a BOOL are YES/NO rather than true/false. Though you could import the standard C library and use that Boolean type, it is not recommended.
The interleaving of the method name with the parameters works to make the Objective-C message passing (or function calling in C) easy to read and understand. In C and other languages, you have to always reference the function definition to determine what each parameter is supposed to be and their order. In Objective-C, it is clear and right in front of you. You get to really appreciate this when you use some of the UIKit method calls, which take five or more parameters.
In Objective-C, the parameters of a method are separated by the colon (:) character, with a part of the method name included between the parameter values. Your method can return a value or an object, the same way a C function can return a value. In C, you would use this:
float mySpeed = calculateSpeed(100,10); // returns the speed based on distance / time
In Objective-C, your method call would look like this:
float mySpeed = [self calculateSpeedWithDistance:100 time:10];
Note
If the Objective-C method declaration and message-passing syntax are not clear to you, do not worry. In the next section of this chapter, you get ample opportunity to practice.
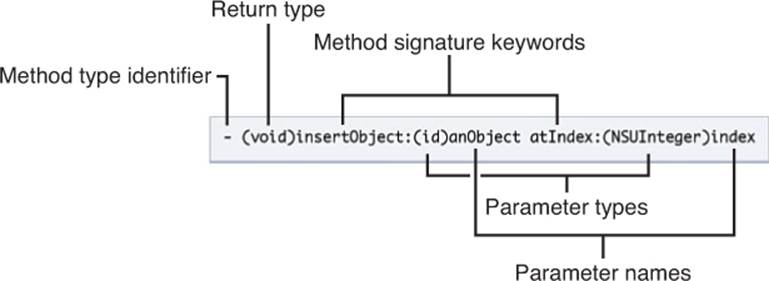
Apple provides the following diagram and text to illustrate the parts of Objective-C method calls. For more information, see https://developer.apple.com/library/ios/#referencelibrary/GettingStarted/RoadMapiOS/Languages/WriteObjective-CCode/WriteObjective-CCode/WriteObjective-CCode.html.
Methods bring one more powerful feature in addition to making the arguments clear. A method has access to everything defined in the class. In other words, it can access any instance variables or methods implemented by the instance of its class. In this sense, how a method works is transparent to the calling object. The implementation of a particular method or even the whole class can completely change without requiring a change anywhere else. This can be very useful as you upgrade or replace features of your app: perhaps making them more efficient, updating for new hardware features, or even completely replacing how you handle communications.
Classes and Objects
Objects are the heart of object-oriented programming. You define objects by building classes, which act as object creation templates. In Objective-C, a class definition specifies how to build new objects that belong to the class. To create a car object, for example, you define the Car class and then use that class to create new objects on demand. As in C, implementing a class in Objective-C is done in two places: a header file and implementation file. The header file specifies how the outside world can interact with the class: the instance variables and their types, and the methods with their arguments and any return types. It is like a contract promising how instances of your class will interface with other objects. The implementation file is how your class will provide values for instance variables or respond when a method is called. The implementation file can, and usually does, have private variables and methods in addition to the public ones declared in the header file.
Each class lists its public instance variables and methods in a header file using the standard C .h convention. For example, you might define a SimpleCar object like the one shown in Listing 2-1. The Car.h header file shown here contains the interface that declares how a SimpleCarobject is structured.
Listing 2-1 Declaring the SimpleCar Interface (SimpleCar.h)
#import <Foundation/Foundation.h>
@interface SimpleCar : NSObject {
NSString *_make;
NSString *_model;
int _year;
}
@property float fuelAmount;
- (void)configureCarWithMake:(NSString*)make
model:(NSString*)model
year:(int)year;
- (void)printCarInfo;
- (int)year;
- (NSString*)make;
- (NSString*)model;
@end
Class, variable, and method names use camel case in Objective-C. Instead of creating identifiers_like_this, in Objective-C, you would use identifiersLikeThis. Classes start with an initial capital letter, while other names start with lowercase. You can see this in Listing 2-1. The class name, SimpleCar, starts with an initial capital. The instance variable fuelAmount, is camel case, but starts with a lowercase letter. The methods, declarations starting with a minus sign toward the bottom of the listing, also use camel case. One example is the following:
- (void) printCarInfo
In Objective-C, the @ symbol is used with certain keywords. Two of the items shown here (@interface and @end) delineate the start and end of the class interface definition. This class definition describes an object with five methods and four instance variables.
Of the four variables, only fuelAmount is public, meaning it is available outside of an instance of the SimpleCar class. The three inside the curly braces can only be used by an instance of SimpleCar or any subclasses. The three variables could be defined inside the .m implementation file, but then they would only be available to the SimpleCar class. This is a problem if you want subclasses such as ElectricCar to share these variables.
Two of the private variables, _make and _model, are strings. Objective-C usually uses the NSString object-based class instead of the byte-based C strings defined with char *. As you see throughout this book, NSString offers far more power than C strings. With this class, you can find out a string’s length, search for and replace substrings, reverse strings, retrieve file extensions, and more. These features are all built into the object libraries for iOS (and Mac OS).
Both the private _year variable and the public fuelAmount are simple types. One is an int, and the other a float.
Using a leading underscore character (_) is a common practice in Objective-C to differentiate between an instance variable and its getter method. You know that using x = _year; is getting the value directly from the instance variable, whereas x = [self year]; is calling the getter method –(int)year;, which might do some needed computation or calculation before returning the value. A setter method is like a getter, except it is used for setting the value of an instance variable. Again, you use setters to perform any extra work such as updating an onscreen count. You learn more about creating and using getters and setters below as well as throughout the book.
The first public method is the following:
configureCarWithMake:model:year:
This entire three-part declaration, including the colons, is the name, or selector (sometimes also called signature), of that single method. That’s because Objective-C interleaves parameters inside the method name, using a colon to indicate each parameter. In C, you’d use a function such assetProperties(char *c1, char *c2, int i). Objective-C’s approach, although heftier than the C approach, provides much more clarity and self-documentation. You don’t have to guess what c1 and c2 mean because their use is declared directly within the name:
[myCar configureWithMake:c1 model:c2 year:i];
Every method has a return parameter. printCarInfo returns void, year returns int, while both make and model return NSString*. As in C, these refer to the type of data returned by the method. void means the method returns nothing. In C, the equivalent function declaration to the printCarInfo and year methods would be void printCarInfo() and int year().
Using Objective-C’s “method name interspersed with arguments” approach can seem odd to new programmers but quickly becomes a much-loved feature. There’s no need to guess which argument to pass when the method name itself tells you what items go where. You see this a lot in iOS programming, especially when you use calls to respondsToSelector:, which lets you check at runtime if an object responds to a particular message.
Notice that the header file in Listing 2-1 uses #import to load headers rather than #include. When you import headers, Objective-C automatically skips files that have already been added. You can therefore add duplicate #import directives to your various source files without penalties.
Defining the Implementation
The .h file tells the outside world how to interact with a class of an object. The .m, or implementation file, contains the code that powers an object. Listing 2-2 shows some of the implementation for the SimpleCar class.
Listing 2-2 Implementation of SimpleCar (SimpleCar.m)
#import "SimpleCar.h"
@implementation SimpleCar
- (void)configureCarWithMake:(NSString*)make
model:(NSString*)model
year:(int)year {
_make = [make copy];
_model = [model copy];
_year = year;
}
- (void)printCarInfo {
NSLog(@"--SimpleCar-- Make: %@ - Model: %@ - Year: %d - Fuel: %0.2f",
_make, _model, _year, [self fuelAmount]);
}
- (int)year {
return _year;
}
- (NSString*)make {
return [_make copy];
}
- (NSString*)model {
return [_model copy];
}
@end
Implementation files are usually paired with a header, so the first thing is importing that header, in this case SimpleCar.h. Most classes import other headers and possibly declare constants or other things. The main part of the class implementation is between @implementation and@end.
configureCarWithMake:model:year: sets values for each of the private instance variables. Except for fuelAmount, it is not possible to individually set a value for the current car. It is possible to read values for any individual element using the accessor methods such as –(int) year defined toward the bottom of Listing 2-2. Because the header used @property for fuelAmount, the setter and getter methods, as well as the underscore version of the variable are created for you. You will see more about that in the “Properties” section later in the chapter.
The first method sets the value of the three non-public instance variables. printCarInfo prints the current values of all instance variables to the log. The final three methods are getters for the private instance variables.
One thing you might notice is that both the configuration method and getters work with copies of the string. This is a common defensive practice to avoid other code accidentally changing the value of the string. This makes sense when you realize each variable is a pointer to an NSStringobject. If you assign it to the string argument, it is pointing to the same memory location as the original owner of the string. If that original owner changes the value of the string, the car object gets that new value because it is pointing to the same address.
Assigning and returning copies of strings results in new objects at different memory locations. Those copies can be changed without changing the car’s make or model. Note that the only time you need to worry about this is for long-lived instance variables. Temporary strings and objects do not need to be copied.
Creating Objects
You have learned that a class defines one or more objects. How does a class become an object at runtime? To create an object, you tell the class to allocate enough memory for a new object and return a pointer to that memory location. You then tell the new object in that newly allocated memory to initialize itself. You handle the memory allocation by calling the alloc method, and the initialization occurs when you call the init. If you were creating an instance of the SimpleCar object, you could use the following two lines of code:
SimpleCar *myCar = [SimpleCar alloc];
[myCar init];
Although it might not seem like a lot of code, it is something you will type often. Luckily, Objective-C supports nesting of message sends. This means you can use the result of one method as the receiver of another one. The return value of the set of nested messages comes from the last message.
In the previous code, the first line allocates the memory for the car object and returns a pointer to that object. The second line takes the allocated car and initializes it. The init method returns the initialized object, though the second line of code does not need to use the return value asmyCar is already pointing to the right object. With nesting, you can shorten the two lines into one:
SimpleCar *myCar = [[SimpleCar alloc] init];
Here, the source code sends the message alloc to the SimpleCar class resulting in a new car object, and then sends the message init to the newly allocated SimpleCar object and returns the initialized car. This nesting is typical in Objective-C.
The “allocate followed by init” pattern you see here is the most common way to instantiate a new object. The class SimpleCar performs the alloc method. It allocates a new block of memory sufficient to store all the instance variables listed in the class definition, zeros or nils out any instance variables, and returns a pointer to the start of the memory block. The newly allocated block is an instance and represents a single object in memory.
Some classes, like views, use custom initializers such as initWithFrame:. As you will see later in this chapter, you can write custom initializers such as initWithMake:model:year:fuelAmount:. The pattern of allocation followed by initialization to create new objects holds universally. You create the object in memory and then you preset any critical instance variables.
Inheriting Methods
Objects inherit method implementations as well as instance variables. A SimpleCar is a kind of NSObject, so it can respond to all the messages that an NSObject responds to. That’s why myCar can be allocated and initialized with alloc and init. These two methods are defined byNSObject and can be used to create and initialize any instance of SimpleCar, because it is derived from the NSObject class. All objects in Objective-C eventually inherit from NSObject, at the top of their inheritance tree.
Tip: Inherited Methods
If you look in the .h file for your Hello World AppDelegate or ViewController class, you will find that AppDelegate inherits from UIResponder and ViewController from UIViewController, which in turn inherits from UIResponder. If you select and right-click UIResponder and select Jump to Definition, Xcode shows you the declaration for UIResponder, and there you can see that it, too, inherits from NSObject.
As another example, when you have arrays in your app, you will likely use NSArray or NSMutableArray, a kind of NSArray that allows you to add or delete items. All array methods can be used by mutable arrays, their child class. You can count the items in the array, pull an object out by its index number, and so forth.
Caution
Some classes are not “subclassing” friendly. They are implemented as a class cluster; that is, the class itself creates objects of some other type of class, depending on some criteria. NSArray and NSString are both examples of clusters. They use different classes to create objects in the most memory-efficient way. All such classes are clearly marked in the documentation. Check before subclassing a system class.
A subclass can implement a method with the same selector as its superclass. Invoking the method on the subclass object calls the new method. Depending on how the method is implemented, it either specializes or overrides the behavior of the superclass. Specializing means you also let the superclass method run. You do this by sending the message to the super object, a special identifier that stands for the superclass. Overriding means you do not send the message to your superclass; that behavior never occurs.
A good example is initialization. You need to make sure every class in the inheritance chain gets a chance to initialize itself, though your method needs to worry only about calling its own superclass. Initialization methods always contain a line in this form:
self = [super init];
This sets the current object instance to whatever the superclass creates. Initializing the rest of your object follows.
Warning: Initialize the Superclass First
It is very important to call the superclass initialization method before doing anything specific to your class. If you try to manipulate your object first, nothing provided by any superclass, including NSObject, is set up. Although instance variables might return a value and method calls might work, the object is in an undefined state. At best, you will get a crash during initialization. More likely, you will get some random crash or strange behavior at a later date. You learn how to write a correct init method later.
Pointing to Objects
You have learned that creating objects is easy to do with classes. When you have a newly created (allocated) and initialized object, the next step is to reference and use your new object. In Objective-C, you use the * character to denote that a variable is a pointer to an object. You saw this inListing 2-2, where the _make, and _model variables were declared. The _make and _model variables both point to objects (NSString) and require a * before the variable name.
Other variables are primitive types, not objects. The variable itself, or more precisely, the memory location, holds the value instead of the address of the object. The _year variable is an example of a primitive type (int), so it does not require a * character.
To send a message to an object, you leave out the * character. In the following code snippet, the myCar object is created as an instance of the SimpleCar class, and its printCarInfo method is called.
SimpleCar *myCar = [[SimpleCar alloc] init];
[myCar printCarInfo];
If you wanted to create another pointer to the same SimpleCar instance, you could use this:
SimpleCar *sameCar = myCar;
or this:
id sameCar = myCar;
id is a special type that translates to NSObject *, which already includes the * character, denoting a pointer to an object.
It is important to realize that myCar and sameCar point to the same object. If you change the make, model, and year using the sameCar pointer, then [myCar printCarInfo] shows the new values.
The CarValet App: Implementing Car Class
Now it is time to practice creating methods, variables, and classes in Objective-C. To start, create a project for the CarValet app. As you continue through this book, you will take this app from these simple beginnings to a full iOS app, one that runs on iPhone and iPad using native user interface elements and other parts of iOS.
The first step is creating the CarValet project. You do this in the same way you created HelloWorld:
1. In Xcode, choose File > New > Project (or press Cmd-Shift-N).
2. Select an iOS Single View Application template, the same one you selected in Figure 2-2 when you created the HelloWorld project. Choose Next.
3. In the next panel, enter CarValet for the name of the app. Make sure Devices is set to Universal. The Organization and Company Identifier fields should be prepopulated with whatever you entered for HelloWorld. Change those fields if needed and select Next.
4. Save the project and Xcode opens the project in a new window. If you already have a project open, there may be an Add To option at the bottom of the Save panel. If so, make sure the selected option is something like Don’t Add to Any Project or Workspace.
Note
The code for this example—and all the other examples in this chapter—is found in the sample code for this book. See the Preface for details about downloading the book’s sample code from GitHub.
Just like HelloWorld, your CarValet project already comes with two classes provided by the Xcode template: the AppDelegate and ViewController classes. Now you add a Car class representing a simple automobile:
1. To start, right-click the CarValet folder in the Navigation window and select New File. You could also choose File > New > File from the menu or press Cmd-N.
2. In the new file dialog, select Cocoa Touch under iOS and then select Objective-C Class, as shown in Figure 2-8; then click Next.

Figure 2-8 Selecting Objective-C as the file type for the Car class in Xcode
3. In the following panel, enter Car for the Class field and NSObject in the Subclass Of field, as shown in Figure 2-9. You are creating a Car class, which inherits from NSObject. Click Next to show the save panel.
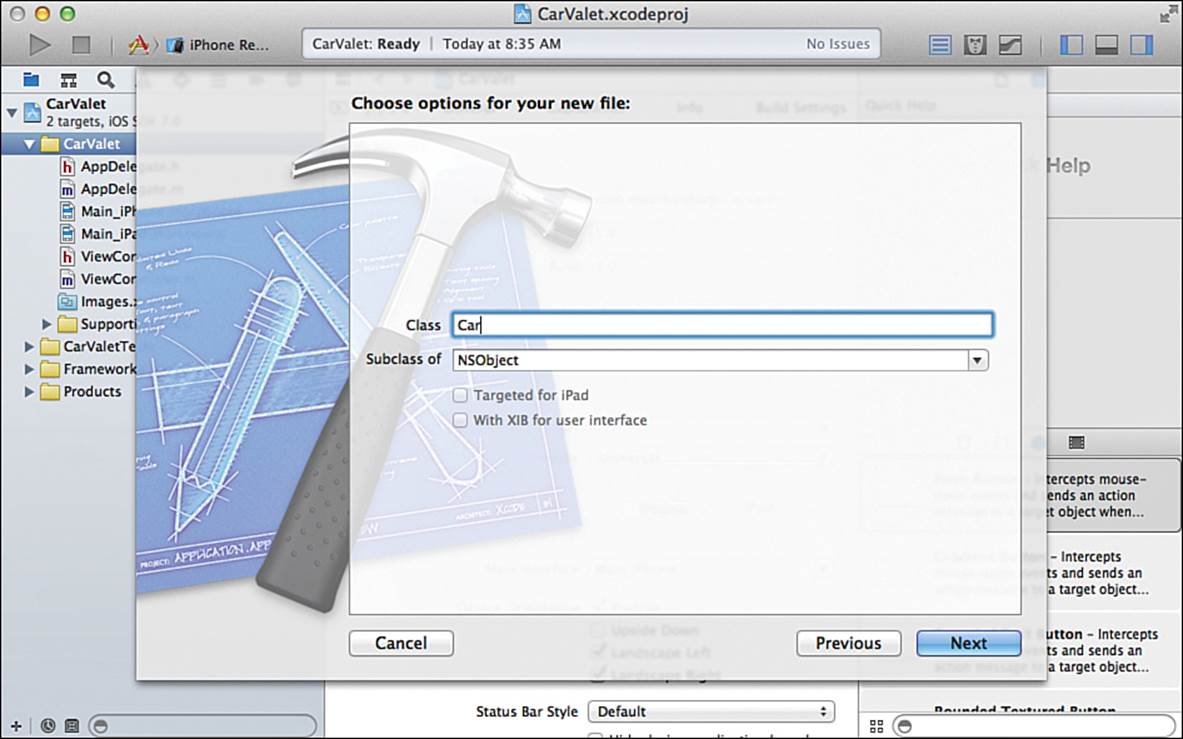
Figure 2-9 Setting the class name as Car and inheriting from NSObject
4. There is one more area at the bottom of the save panel allowing you to specify Target membership. For now, the important thing is to make sure the CarValet target is checked, as shown in Figure 2-10. When you are sure the box is checked, click Create to have Xcode create the Carclass and place it inside your project.
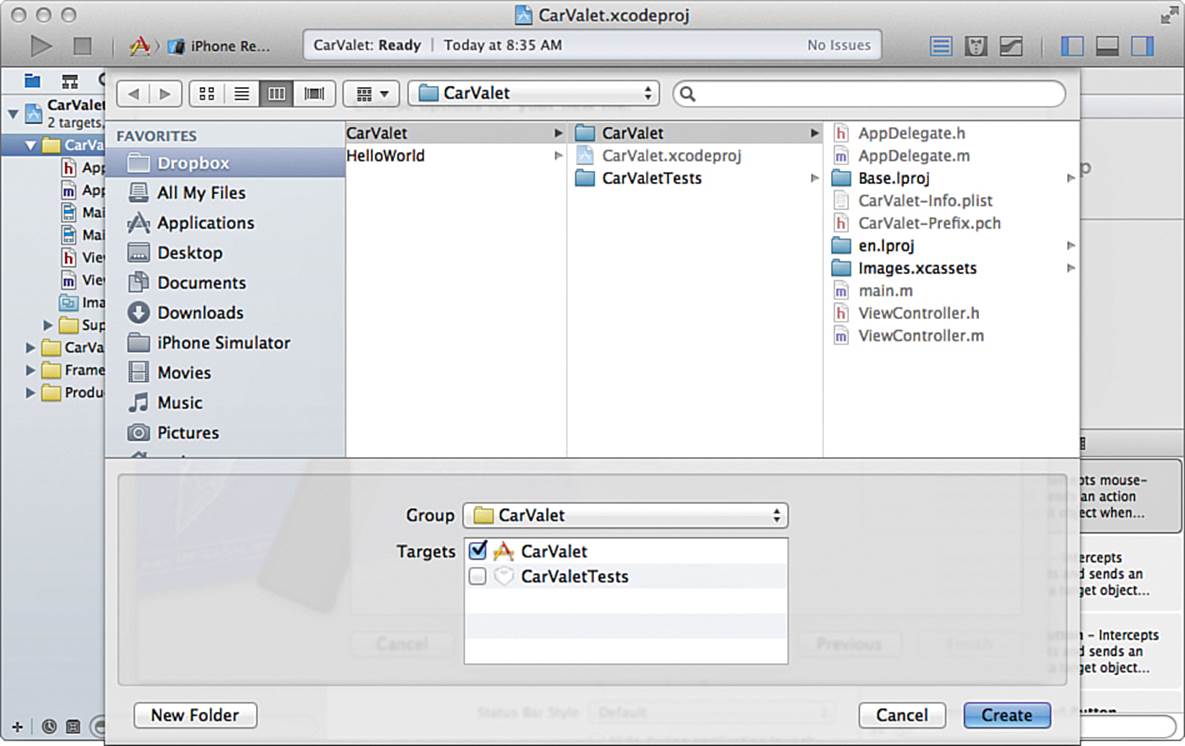
Figure 2-10 Setting the target for the Car class in Xcode
With the Car class created, Xcode automatically opens to the Car.m implementation file. You need to switch to the header file in order to add the instance variables for the Car class. Edit the Car.h header file so that it matches Listing 2-3.
Listing 2-3 Car.h Header File
// Car.h
// CarValet
#import <Foundation/Foundation.h> // 1
@interface Car : NSObject { // 2
int _year; // 3
NSString *_make; // 4
NSString *_model; // 5
float _fuelAmount; // 6
}
- (id)initWithMake:(NSString *)make // 7
model:(NSString *)model
year:(int)year
fuelAmount:(float)fuelAmount;
- (void)printCarInfo; // 8
- (float)fuelAmount; // 9
- (void)setFuelAmount:(float)fuelAmount;
- (int)year; // 10
- (NSString*)make;
- (NSString*)model;
@end
The first two lines are comments. In Objective-C, two forward-slashes (//) tell the compiler to ignore the text that follows. They can be used for single line or inline comments. You can use a combination of forward-slash and asterisk to enclose a comment block—that is, multiple lines of comments:
// this is a one line comment
// and so is this, even though it follows the last one
[MyObject doSomething]; // and this is an end of line comment
/*
And finally a lot of comments started by a forward-slash and asterisk
that can include lots of lines and ends with an asterisk then forward-slash.
*/
The first non-comment line imports the Foundation framework, the workhorse of iOS and Mac OS. Here you find everything from arrays and dictionaries to dates and predicates, from URL connections and JSON parsing to the most important object of all, NSObject. Next is the@interface declaration for the Car class. You can see that Car inherits from NSObject via the :NSObject tag.
The statements between @interface and @end define the class. Inside the brackets of the @interface declaration, you can see the four instance variables that will hold the information needed by the Car object. The methods define how to send messages to a car.
Here’s what happens in the numbered lines in Listing 2-3:
1. Import the Foundation Framework.
2. Define the interface for the Car object, a subclass of NSObject.
3. _year is the year the car was manufactured. This is stored as an integer, a primitive non-object type.
4. _make is the make of the car, stored as an NSString object.
5. _model is the model of the car, stored as another NSString object.
6. _fuel is the amount of fuel in the Car’s tank, stored as a floating-point value.
7. The initWithMake:model:year:fuelAmount: method initializes a newly allocated object and sets the car’s make, model, and year, as well as the fuel in the tank. It is a custom init method as described earlier.
8. The printCarInfo method prints out the Car’s information to the debugging console.
9. This pair of methods, fuelAmount and setFuelAmount:, are the getter and setter for the _fuelAmount instance variable.
10. The remaining three methods are getters for the other private instance variables.
The initWithMake:model:year:fuelAmount: method is a clear example of how method names and parameters are interleaved in Objective-C. These four parameters take in values of type NSString*, NSString*, int, and float. Notice the hyphen that starts both method declarations. It indicates that the methods are implemented by object instances. For example, you call [myCar printCarInfo] and not [Car printCarInfo]. The latter sends a message to the Car class rather than an actual car object instance. You see uses of class versus object methods (indicated by + rather than -) later in the book, though a full discussion is beyond the scope of this book.
Method calls can be long. For example, the following call initializes an iOS UIAlert object:
initWithTitle:message:delegate:cancelButtonTitle:otherButtonTitles:
Each parameter specifies different items that show, or optionally show, in the alert box, including a title, a message, a title for the cancel button, and other button titles. Another parameter specifies a delegate.
The use of a delegate is another common pattern in iOS and provides a way for two objects to communicate using a defined set of messages (called a protocol). These messages form a contract between the provider of the protocol and the delegate. Basically, the delegate promises to implement the messages, and the provider promises to use them appropriately. A protocol is defined separately from a class; they are two different kinds of things. Any class can choose to use the protocol as either the delegate or the implementer.
UIAlert uses this pattern to inform the delegate what button the user presses. As you go through the book, you see more complex uses of the delegate pattern by system objects. You also implement that pattern for some of the objects you build—that is, you create protocols and add the delegate code to objects.
Tip: Switching Between Header and Implementation Files
In Xcode, the keyboard shortcut Ctrl-Cmd-Up arrow allows you to move to the next counterpart, and the Ctrl-Cmd-Down arrow allows you to move to the previous counterpart. This shortcut makes it very easy to quickly switch between your header and implementation files.
Implementing Car Methods
Together, a header file and an implementation file store all the information needed to implement a class and use it with the rest of an application. The implementation source code is usually contained in an .m (either for implementation or method) file. As the name suggests, the methods file of a class provides the implementation of the methods and how the class will carry out its functionality.
In a larger class, in addition to the methods defined in the .h file, you would likely implement other supporting non-public methods. Unlike public methods, you do not need to declare the private methods before you define them. The compiler is smart enough to figure out where private methods are, even if you implement them after code that uses them. You will see more on this as you work through this book.
In addition, you can declare local instance variables that are visible only to the object. You do this inside curly braces below the @implementation statement. For example, you could add a local lemon flag:
@implementation Car {
BOOL isALemon;
}
For most objects with instance variables, one of the first methods you typically implement is init. Create a first version of this method by copying the bold code in Listing 2-4 to the Car.m implementation file.
Listing 2-4 Car.m Implementation File init Method
// Car.m
// CarValet
#import "Car.h"
@implementation Car
- (id)init {
self = [super init]; // 1
if (self != nil) { // 2
_year = 1900; // 3
_fuelAmount = 0.0f; // 4
}
return self; // 5
}
Here’s what happens in the numbered lines in Listing 2-4:
1. The first task is calling init on the superclass (NSObject). This ensures that any initialization required by NSObject is complete before the Car class–specific initializations are carried out.
2. A check is made to ensure that self was in fact initialized. If so, the rest of the object is set up.
3. The _year instance variable is set to 1900 as a default.
4. The _fuelAmount is set to 0.0f as a default. Although not strictly necessary, including f at the end of the number tells the compiler this is a float rather than some other type of floating point value.
5. The value of self returned. Note what is returned depends on the check in step 2. If the superclass returned nil, nil is returned. Otherwise the now-initialized Car object is returned.
At this point, the Car object is initialized, but it still does not respond to the custom initializer starting with initWithMake:, the printCarInfo, or any of the other method calls. If you tried to call those methods, you experience a runtime crash, with a message in the Console half of the Debug Area saying “unrecognized selector sent to instance.”
Sending a Message to nil and Sending an Unrecognized Message (Selector)
In Objective-C, the terms sending a message and performing a selector mean basically the same thing: calling a method on an object. While it is perfectly safe to send any message to nil, trying to send a message to an object that does not implement the message results in a runtime crash. This is a common mistake newcomers to Objective-C make, and as you see later in the book, there are ways to check that an object or a class will respond to a message (selector) before you send it. Also note that the message can be implemented anywhere in the inheritance tree. That is, the message can be defined either in the specific class or any class that object inherits from.
Add the next two methods, the custom initializer and printCarInfo, by adding the contents of Listing 2-5, the init method in the Car.m implementation file.
Listing 2-5 Car.m Implementation initWithMake:... and printCarInfo Methods
- (id)initWithMake:(NSString *)make // 1
model:(NSString *)model
year:(int)year
fuelAmount:(float)fuelAmount {
self = [super init]; // 2
if (self != nil) { // 3
_make = [make copy]; // 4
_model = [model copy];
_year = year;
_fuelAmount = fuelAmount;
}
return self; // 5
}
- (void)printCarInfo {
if (!_make) return; // 6
if (!_model) return;
NSLog(@"Car Make: %@", _make); // 7
NSLog(@"Car Model: %@", _model);
NSLog(@"Car Year: %d", _year);
NSLog(@"Number of Gallons in Tank: %0.2f", _fuelAmount);
}
Here’s what happens in the numbered lines in Listing 2-5:
1. initWithMake:... allocates a new object and then assigns each value passed into the Car object’s properties.
2. Call the superclass initializer method first.
3. Check if the superclass was able to initialize the object and, if so, initialize the rest of the object. If not, self will be nil.
4. Now set all the instance variables for this Car object.
5. At this point, self will either be nil if the superclass failed to initialize or an initialized car object. Note that returning nil is the correct thing to do if initialization failed.
6. Only print if Car has a make and model defined.
7. Use NSLog to print the values to the console.
NSLog is a wrapper around the C printf function. As a wrapper, it uses some of the same formatting cues as printf. %d is used for integers, %f for float values, and %@ for objects. You can see the full list of printf flags in the Xcode documentation.
The Real Open Curly Brace Convention
The listings in this book put the open curly brace ({) for methods right after the method name. This is done for space and is not the typical coding convention. Instead, the curly brace is on a line by itself. You can see this in any Xcode autogenerated code such as that inViewController.m.
Base Initializer
Everything done by the custom init method in Listing 2-4 can be done by the custom initializer in Listing 2-5. Instead of duplicating effort, simplify the first method by replacing it with the following code:
- (id)init {
return [self initWithMake:nil model:nil year:1900 fuelAmount:0.0f];
}
initWithMake:model:year:fuelAmount: allows the caller to specify values for all the public instance variables—that is, to completely specify the initial state of a new car object. Any other initialization method can call the complete one. This is another common pattern in Objective-C. initWithMake:... is called a base initializer, as it is the basic one that any other customized initializer can call. You will see this pattern used throughout the book.
Accessors
The last five methods declared in the .h file are used for accessing information about the car, in this case, instance variables. Add the code in Listing 2-6 to the bottom of Car.m.
Listing 2-6 Car.m Implementation of Accessor Methods
- (float)fuelAmount {
return _fuelAmount; // 1
}
- (void)setFuelAmount:(float)fuelAmount{
_fuelAmount = fuelAmount; // 2
}
- (int)year { // 3
return _year;
}
- (NSString*)make {
return [_make copy];
}
- (NSString*)model {
return [_model copy];
}
Here’s what happens in the numbered lines in Listing 2-6:
1. Return the current value of the _fuelAmount instance variable.
2. Set the value of the _fuelAmount instance variable to the fuelAmount argument.
3. Define the remaining instance variable getters. Each one returns the value of the related instance variable.
Usually, each of the public instance variables would be hidden by getters and setters. The variables themselves would be declared in the .m file, so only their car object could directly access them. Even in this simple class, that means eight extra methods to declare and define, a lot of repetitive code. Luckily, there is a better way.
Properties
Properties let you define instance variables and let the compiler take care of creating the accessor methods—that is, methods that access (get or set) variables or information. The compiler also generates the underscore version of the variable. Declaring a property is simple:
@property float fuelAmount;
This tells the compiler to create one instance variable and two methods:
float _fuelAmount;
- (float)fuelAmount;
- (void)setFuelAmount:(float)fuelAmount;
You might have noticed that the variable and method declarations are identical to the ones in Listing 2-3.
The compiler generates the underscore version of the variable for you. Any non-car objects have to use the getter and setter. The variables and method implementations are added at compile time. And if you need to do something special, just implement the particular accessor method in the.m file and the complier uses that instead.
Update the Car object to use properties by following these steps:
1. Open Car.m file in the editor and remove the implementations of the fuelAmount, setFuelAmount:, year, make, and model methods.
2. Open Car.h and remove the declarations for the methods you removed in step 1.
3. Change the part of the header file defining the instance variables to look like the following (the new code is in bold; make sure you remove the underscores):
@interface Car : NSObject
@property int year;
@property NSString *make;
@property NSString *model;
@property float fuelAmount;
- (id)initWithMake:(NSString *)make
Using properties might sound redundant. After all, the class definition shown in Listing 2-3 defines the accessors and the underscore instance variables are private. So why use properties? It turns out that there are more advantages to using properties over using publicly declared methods than saving space, especially encapsulation and dot notation.
Encapsulation
Encapsulation allows you to hide implementation details away from the rest of your application, including any clients that use your objects. The object’s internal representation (instance variables) and its behaviors (methods, and so on) are kept separate from the way the object declares itself to the outside. You are free to completely change the internal implementation as long as the publicly declared details stay the same. Properties provide ways to expose object state and other information in a well-structured and circumscribed manner.
Properties are not, however, limited to use as public variables. They play an important role in class definitions as well. Properties allow you to add smart proactive development techniques, including lazy loading and caching, to the rest of a class implementation. That’s why classes can be property clients as well as providers.
In addition to hiding details, encapsulation enables reusing the same code in other projects. A well designed Car class is not limited to CarValet. You could use it for a car collector app, dealership inventory tracker, or even a game. As you develop more apps, careful use of encapsulation results in a collection of plug and play classes that shorten your development cycles. And classes are not limited to data representation; they can also implement interface behaviors, custom views, and even server communications.
Dot Notation
Dot notation allows you to access object information without using square brackets. Instead of calling [myCar year] to read the value of the year instance variable, you use myCar.year. Although this might look as if you’re directly accessing the year instance variable, you’re not. Properties always invoke methods. These, in turn, can access an object’s data. So you’re not breaking an object’s encapsulation because properties rely on these methods to bring data outside the object.
Using my.year results in a call to [myCar year]. By using properties, the compiler will automatically generate the required accessor methods. If you need to do something special, such as check a remote web server, define the year accessor method in the .m file and the compiler will use your method instead of generating one.
Due to method hiding, properties simplify the look and layout of your code. For example, you can access properties to set a table’s cell text via the following:
myTableViewCell.textLabel.text = @"Hello World";
rather than this more cumbersome code:
[[myTableViewCell textLabel] setText:@"Hello World"];
The property version of the code is more readable and ultimately easier to maintain. For those used to using dots for indicating structure, it is important to remember that dots are invoking methods, not just traversing an object hierarchy.
To practice using dot notation, replace the implementation of printCarInfo with the code in Listing 2-7.
Listing 2-7 Car.m Updated Implementation printCarInfo
- (void)printCarInfo {
if (self.make && self.model) { // 1
NSLog(@"Car Make: %@", self.make); // 2
NSLog(@"Car Model: %@", self.model);
NSLog(@"Car Year: %d", self.year);
NSLog(@"Number of Gallons in Tank: %0.2f", self.fuelAmount);
} else { // 3
NSLog(@"Car undefined: no make or model specified.");
}
}
The key changes in Listing 2-7 are the following:
1. Change the two checks and return to checking that both the make and model are nonnil.
2. Use dot notation for printing each of the variable values to the log.
3. If there is no make or model, update the log.
The code in Listing 2-7 is easier to read even after adding extra functionality for printing something when the car is not fully specified. It is also clear that the variables are object-level items instead of just a local variable. Although that is less relevant in such a short method, imagine looking through code that is much longer.
You could make the same type of change to the initializer, though there are risks, especially if you use custom accessors. And using dot notation in custom accessors can be the most dangerous of all—see the following sidebar, “Why Use Underscore: No Dot, No Accessor.”
Why Use Underscore: No Dot, No Accessor
One common source of errors is using dot notation either in a properties custom accessor or in a method that could call the custom accessor. A simple example:
- (void) setMake:(NSString*)newMake {
if (![newMake isEqualToString:self.make) {
self.make = newMake;
}
}
This code is a custom setter for the make attribute. It checks to see if the new make is the same as the old make, and if not, sets the car’s make to the new one. But there is a lurking problem.
The call to self.make = newMake translates into:
[self setMake:newMake];
The result is a recursive call to the same setter, which in turn calls the same setter, and so on. An infinite recursion—well, at least until your app crashes.
The correct thing to do is use the underscore version of the variable in the setter. The assignment becomes:
_make = newMake;
The safe thing is for setters and getters to use the underscore version of the iVar they set or return. Any init method as well as custom initializers should also use the underscore version.
Creating and Printing Cars
You now have a Car class in your CarValet project, but it is not called or used anywhere in your app. Open up the ViewController.m implementation file and follow these steps:
1. Add the #import "Car.h" statement below the last import at the top of the ViewController.m file.
2. Add the viewWillAppear: method in Listing 2-8 below the viewDidLoad method.
Listing 2-8 ViewController.m viewWillAppear: Method
- (void)viewWillAppear:(BOOL)animated {
[super viewWillAppear:animated];
Car *myCar = [[Car alloc] init]; // 1
[myCar printCarInfo]; // 2
myCar.make = @"Ford"; // 3
myCar.model = @"Escape";
myCar.year = 2014;
myCar.fuelAmount = 10.0f;
[myCar printCarInfo]; // 4
Car *otherCar = [[Car alloc] initWithMake:@"Honda" // 5
model:@"Accord"
year:2010
fuelAmount:12.5f];
[otherCar printCarInfo]; // 6
}
The method viewWillAppear: is called each time this ViewController’s view is about to be displayed on the screen. It is a convenient location to create and call your Car object. Here’s what happens in the numbered lines in Listing 2-8:
1. The myCar object is allocated and initialized as an instance of the Car class.
2. The printCarInfo method is called, but because make and model are nil (uninitialized), it will print the car undefined message. If you look back at Listing 2-7, inside the printCarInfo method, you can see the if statement which checks that make and model are not niland the resulting message when they are.
3. The make, model, year, and fuelAmount are set. The NSString values are prefixed with the @ character before the double quote, and the float value has a trailing f.
4. The printCarInfo method is called a second time, and this time make and model are set so the information for the Ford will print.
5. A new car is created using the custom initializer to set values.
6. Unlike the call to printCarInfo after the plain init in step 2, this call prints out the Honda’s details as both make and model are defined.
When you run the code you will see something like the following in the console:
2013-07-02 08:35:44.267 CarValet[3820:a0b] Car undefined: no make or model specified.
2013-07-02 08:35:44.269 CarValet[3820:a0b] Car Make: Ford
2013-07-02 08:35:44.269 CarValet[3820:a0b] Car Model: Escape
2013-07-02 08:35:44.270 CarValet[3820:a0b] Car Year: 2014
2013-07-02 08:35:44.270 CarValet[3820:a0b] Number of Gallons in Tank: 10.00
2013-07-02 08:35:44.270 CarValet[3820:a0b] Car Make: Honda
2013-07-02 08:35:44.271 CarValet[3820:a0b] Car Model: Accord
2013-07-02 08:35:44.271 CarValet[3820:a0b] Car Year: 2010
2013-07-02 08:35:44.272 CarValet[3820:a0b] Number of Gallons in Tank: 12.50
Properties: Two More Features
The current version of CarValet is all you need for the next chapter. This section covers two different variations of the project. Each variation comes with the sample code for this chapter.
Some of you might be wondering if it is a good idea to change the make, model, and year of a car after it has been created. So far, you have been using properties in their default read and write configuration. However, it is easy to set a property to read only. All you have to do is add a little extra when declaring a property. The general form of the property declaration is the following:
@property <(qualifier1, qualifier2, ...)> <type> <property_name>;
You have already used the type and property_name. The make of a car has a type of NSString* and a property_name of make. Qualifiers let you change a number of things including setting a property as read only, specifying different levels of object ownership for memory management, and even changing the name of the default setters and getters. Another qualifier is covered later in this chapter.
If you do not specify qualifiers, the property is created with defaults: read and write, owned by the object declaring the property, and default setter and getter names. If you want a different behavior, all you need to do is change the defaults.
Creating read-only properties is as simple as including the readonly qualifier. Setting make, model, and year to read only is done by changing their declarations in the .h file:
@property (readonly) int year;
@property (readonly) NSString *make;
@property (readonly) NSString *model;
Do this and try to build the project. You get three errors in the ViewController.m file that you are trying to set the value of read-only properties. Fix the errors by removing or commenting out the code in ViewController.m and setting read-only values.
But say you wanted the properties to be read only outside the class, but read/write inside. That is also easy as you can re-declare property inside the .m file. You add or override class interface declarations by adding the following code to the Car.m file just before the @implementationstatement:
@interface Car ()
@property (readwrite) int year;
@property NSString *make;
@property NSString *model;
@end
A car object uses the new definitions of the instance variables. Note that you do not need to specify readwrite as that is the default.
To see this working, add a method to update the make attribute by following these steps:
1. Open Car.h and add the following method declaration below printCarInfo:
- (void)shoutMake;
2. Open Car.m and add this method just below printCarInfo:
- (void)shoutMake {
self.make = [self.make uppercaseString];
}
3. Open ViewController.m and remove the calls to create and print the first myCar object.
4. Add a call to shoutMake and another to printCarInfo to the end of viewWillAppear:. The end will now look like (new code in bold):
...
fuelAmount:12.5f];
[otherCar printCarInfo];
[otherCar shoutMake];
[otherCar printCarInfo];
}
When you run the code, the last call to printCarInfo shows the car make in all caps. You can convince yourself everything works as expected by trying to set the make of a myCar in viewWillAppear:. You get an error that you are trying to set the value of a read-only value.
Custom Getters and Setters
In another variation, sometimes you do not want the default getters and setters generated by the compiler. As an example, suppose you want self.fuelAmount to return liters instead of gallons, but only if a new property, showLiters, is YES. You also want to access this new property using isShowingLiters.
It only takes one line in Car.h to add the property. Add the following code below the existing properties:
@property (getter = isShowingLiters) BOOL showLiters;
The qualifier sets a different name for the getter. Instead of using aCar.showLiters to check the value of the variable, you use aCar.isShowingLiters, a more descriptive name. Setting the value still uses aCar.showLiters:
if (aCar.isShowingLiters) {
aCar.showLiters = NO;
}
Similarly, you can change the name of the setter like this:
@property (setter = setTheFuelAmountTo:) float fuelAmount;
However, a custom setter behaves a bit differently than a custom getter. You need to send a message to use the custom setter. This works:
[aCar setTheFuelAmountTo:20.0f];
but this does not:
aCar.setTheFuelAmountTo = 20.f;
Atomic and Nonatomic
With the new property defined, it is time to override the getter for fuelAmount. Add this code to the end of Car.m, just below printCarInfo:
- (float)fuelAmount {
if (self.isShowingLiters) {
return (_fuelAmount * 3.7854) ;
}
return _fuelAmount;
}
This custom getter returns liters instead of gallons if isShowingLiters is YES. (Of course, the formula only works for U.S. gallons, not U.K. ones, but world harmony of measurement standards is beyond the scope of this book.) Note this is another case where you must use the underscore version of the instance variable to avoid an infinite loop. See the sidebar, “Why Use Underscore: No Dot, No Accessor.”
After you add that method, you will notice a yellow warning triangle noting something about a “writable atomic property....” A what? In this case, the warning is quite correct. Another property qualifier is the atomicity of the variable. That is, can there be only one object accessing the variable at any one time (atomic or synchronous access), or can multiple objects on different threads access the object at the same time (nonatomic or asynchronous access)?
When you develop in a multithreaded environment, you can use the atomic property to make sure assignment works as expected. When you set an object as atomic, the compiler adds code to automatically lock objects before they are accessed or modified and unlock them after. This ensures that setting or retrieving an object’s value is performed fully, regardless of concurrent threads. However, it is also incredibly expensive and runs the danger of an infinite wait for unlock.
All properties are atomic by default; however, you can use the nonatomic property qualifier, a generally far safer and more performant alternative:
@property (nonatomic) NSString *make;
Marking your properties nonatomic does speed up access, but you might run into problems if two competing threads attempt to modify the same property at once. Atomic properties, with their lock/unlock behavior, ensure that an object update completes from start to finish before that property is released to a subsequent read or change, but they should be used only where required.
Some argue that accessors are not usually the best place for locks and cannot ensure thread safety. An object might be set to an invalid state, even with all atomic properties.
In practice, most properties are marked as nonatomic and other mechanisms are used to deal with possible issues of thread-safe access. For a deeper discussion, see the chapter on properties in Learning Objective C 2.0, second edition, by Robert Clair.
Get rid of the error by changing the declaration of the fuelAmount property in Car.h (and while you are there, you can add the nonatomic qualifier to all your properties, including showLiters):
@property (nonatomic) float fuelAmount;
Now you need to test that the change works. Once again, you only need to add a couple of lines to the end of viewWillAppear: in ViewController.m:
otherCar.showLiters = YES;
[otherCar printCarInfo];
When you run the code, you will see a Honda with 12.50 gallons in the tank and then printed again with 47.32 gallons. Gallons!? But that is the subject of Challenge 3 at the end of the chapter.
Subclassing and Inheritance: A Challenge
While gas and diesel cars continue to improve their use of fuel, your customers are demanding that you model a hybrid car. Your job is to create a HybridCar class that inherits from Car and adds a method to return the number of miles until the car’s battery and fuel are empty. You can name this method –(float)milesUntilEmpty.
Hint
Don’t forget to track the miles per gallon (MPG) so you can calculate the distance until the car is empty. For example, the 2013 Toyota Prius hybrid gets 42MPG. If there were 10 gallons left in the tank, the car would have a theoretical range of 402 miles until the tank was empty.
Think about it for a few minutes.
Do you have a solution worked out?
Go to the following section to see how you did.
Inheritance and Subclassing
In Objective-C, each new class is derived from a class that already exists. The Car class described in Listings 2-3 through 2-7 inherits from NSObject, the root class of the Objective-C class tree. Each subclass adds or modifies state and behavior that it inherits from its parent, also called its “superclass.” The Car class adds several instance variables and methods to the vanilla NSObject it inherits from.
The HybridCar class inherits from Car and adds functionality to calculate the distance the car can travel until empty, based on the MPG that the hybrid car is capable of. Listings 2-9 and 2-10 show one possible way to implement the HybridCar class. The sample code for this chapter contains a project with the code from Listings 2-9 to 2-11 in the folder “CarValet HybridCar.”
Listing 2-9 HybridCar.h Header File
// HybridCar.h
// CarValet
#import "Car.h"
@interface HybridCar : Car
@property (nonatomic) float milesPerGallon;
- (float)milesUntilEmpty;
- (id)initWithMake:(NSString *)make
model:(NSString *)model
year:(int)year
fuelAmount:(float)fuelAmount
MPG:(float)MPG;
@end
First, notice how small the .h file is. All the file needs to do is specify the differences between a Car and a HybridCar—in this case, one property and two methods. The property stores how many miles per gallon the hybrid car gets. milesUntilEmpty returns how many miles the car should be able to travel on the current contents of the fuel tank (fuelAmount), and the custom initializer adds an MPG argument, to set milesPerGallon.
Listing 2-10 shows a possible implementation file for the HybridCar class.
Listing 2-10 HybridCar.m Implementation File
// HybridCar.m
// CarValet
#import "HybridCar.h"
@implementation HybridCar
- (id)init
{
self = [super init] ;
if (self != nil) {
_milesPerGallon = 0.0f;
}
return self;
}
- (id)initWithMake:(NSString *)make
model:(NSString *)model
year:(int)year
fuelAmount:(float)fuelAmount
MPG:(float)MPG {
self = [super initWithMake:make model:model year:year fuelAmount:fuelAmount];
if (self != nil) {
_milesPerGallon = MPG;
}
return self;
}
- (void)printCarInfo {
[super printCarInfo];
NSLog(@"Miles Per Gallon: %0.2f", self.milesPerGallon);
if (self.milesPerGallon > 0.0f) {
NSLog(@"Miles until empty: %0.2f",
[self milesUntilEmpty]);
}
}
- (float)milesUntilEmpty {
return (self.fuelAmount * self.milesPerGallon);
}
@end
There are at least two major ways to implement the init method of a subclass when both the class and superclass have a base initializer. One is to call the base initializer of the subclass with some default values. The main body would look something like the following:
return [self initWithMake:nil model:nil year:1900 fuelAmount:0.0f MPG:0.0f];
However, there is a hidden bug and/or maintenance cost for doing this. Imagine there are several subclasses of Car, perhaps for hybrids, electrics, and diesels. And perhaps even subclasses of the subclasses such as GasElectricHybrid, DieselElectricHybrid, and so on.
You decide to change the default year of manufacture to 0 in order to easily detect missing values. If the init method of each subclass uses that class’s custom initializer, you have to change the value in every subclass. Miss one and you have introduced a bug. If, instead, the init methods use [super init] and then set default values specific for the subclass, you only need to make the change in one place.
The initWithMake:...MPG: used here is a great example of a subclass custom initializer extending the superclass method with additional functionality—in this case, setting milesPerGallon. First, it calls the superclass’s initWithMake:... method to initialize the Carattributes, then initializes the specific HybridCar value.
Because there are new attributes for the car, HybridCar specializes the printCarInfo method. The first thing is calling the Car version of this method—that is, the superclass. After that, the information specific to the hybrid is printed. Specialization is a powerful part of inheritance, allowing each class to do only the work it needs to. When combined with encapsulation, it lets the developer of a class focus on just that class, utilizing any public methods and properties up the inheritance chain to speed development.
The milesUntilEmpty method calculates how many more miles the car can go until the tank is empty. It uses a simple formula multiplying the MPG times the gallons of fuel in the tank. In a real hybrid vehicle, the algorithm would likely be much more complex.
The last step is to add an instance of the HybridCar class to the CarValet ViewController. You need to add the #import "HybridCar.h" at the top of the ViewController.m file and then the contents of Listing 2-11 inside the viewWillAppear: method.
Listing 2-11 Adding a Hybrid Car to the ViewController.m
HybridCar *myHybrid = [[HybridCar alloc] initWithMake:@"Toyota"
model:@"Prius"
year:2012
fuelAmount:8.3f
MPG:42.0f];
[myHybrid printCarInfo];
The myHybrid instance is created and set with make, model, year, and MPG. The hybrid’s info is printed, and then NSLog is called to display how many miles the car can travel until empty. If you run your Hello World app, you should see the following in your Debug console:
2013-07-03 08:39:45.458 CarValet[9186:a0b] Car Make: Toyota
2013-07-03 08:39:45.458 CarValet[9186:a0b] Car Model: Prius
2013-07-03 08:39:45.459 CarValet[9186:a0b] Car Year: 2012
2013-07-03 08:39:45.459 CarValet[9186:a0b] Number of Gallons in Tank: 8.30
2013-07-03 08:44:39.419 CarValet[9346:a0b] Miles Per Gallon: 42.00
2013-07-03 08:44:39.419 CarValet[9346:a0b] Miles until empty: 348.60
There are many different ways that the HybridCar class could be defined and implemented. Take some time to create a few variants. The key is to start becoming comfortable with Objective-C syntax. You can get more practice working on the challenges at the end of this chapter. As you continue through this book and move on to writing apps of your own, the Objective-C syntax and patterns will become second nature to you.
Summary
This chapter provided an abridged, high-octane introduction to Xcode, Objective-C syntax, objects, classes, properties, and inheritance. It also gave you practice with creating projects, using Xcode, as well as Objective-C concepts.
This is also a chapter you can refer back to as you go through this book. To get the most value, try testing all the material discussed in this chapter directly in Xcode. Mess around with the examples. Hands-on experience is the best way to gain critical skills you need for iOS development.
Learning Objective-C takes more than just a chapter. If you’re serious about learning iOS programming, and these concepts are new to you, consider seeking out single-topic books that are dedicated to introducing these technologies to developers new to the platform. Consider Learning Objective-C 2.0: A Hands-on Guide to Objective-C for Mac and iOS Developers, 2nd edition, by Robert Clair, or Programming in Objective-C, 5th edition, by Stephen G. Kochan. For Xcode, look for versions of Xcode 4 Unleashed, 2nd edition, by Fritz F. Anderson or Xcode 4 Developer Reference by Richard Wentk updated for Xcode 5 (though even the Xcode 4 versions are valuable). Apple has an excellent Objective-C 2.0 overview at http://developer.apple.com/Mac/library/documentation/Cocoa/Conceptual/ObjectiveC/Introduction/introObjectiveC.html.
During this chapter, you created the CarValet project. In the next chapter, you build on this project and learn about storyboards, a way to graphically create all the screens for your app, and hooking them together. You also learn more about Objective-C as well as several important techniques when coding for iOS.
Challenges
1. Update the printCarInfo method to print the string “Car undefined: no make specified.” if just make is nil; “Car undefined: no model specified.” if just model is nil; and keep printing “Car undefined: no make or model specified.” if both are nil. You can create test car objects using variations of the call to initWithMake:model:year:fuelAmount: from Listing 2-5 for checking your code.
2. Create a subclass of Car called ElectricCar. Take some time to design what that class might look like: the instance variables, modifications to existing methods, and any unique methods. When you have done that, either implement or read on for some possible approaches.
There are a few ways you could design the class for an electric car. Part of the choice depends on how much you want to inherit from the Car class. Of the instance variables describing a car, only fuel could be an issue. An electric car has a charge. You could reuse fuel and pretend it is the charge. If you reuse the variable, then all you have to do is change printCarInfo and add a method for the amount of charge left. You could also add an instance variable for distance per kilowatt hour and use that in calculating the remaining distance the car can travel.
3. In the “Custom Getters and Setters” section, you saw how to return U.S. gallons or liters from fuelAmount. But printCarInfo always prints “gallons.” Modify printCarInfo so that it prints “gallons” when isShowingLiters is NO and “liters” when it is YES.
When printCarInfo is working for liters, change Car so that it can print results in U.S. gallons, U.K. gallons, or liters. You will need a way to set which type of fuel is being shown. If you use BOOLs, remember that more than one can be set to YES.