Learning iOS Development: A Hands-on Guide to the Fundamentals of iOS Programming (2014)
Chapter 6. Scrolling
Sometimes you need to present more content than fits on the screen. You have already seen this on the car edit screen. When the keyboard is open, especially in landscape, you cannot show all the text edit fields. What you want is a virtual window onto larger content—a window the user can manipulate to show what he or she wants to see.
UIScrollView lets you do all that and more. In this chapter, you learn about and practice using the power of this versatile view. First, you learn the simple math behind scrolling and zooming and how easy it is to access. Then, you integrate a scroll view and change a single setting to add some bounce to your app. You delve deeper into scroll views by enabling scrolling to edit fields the user cannot see. Finally, you finish your scroll view exploration by creating a whole new controller for car images in the CarValet app—one that lets the user scroll and zoom.
By the end of the chapter, you will know how to add virtual space to your apps by using a scroll view. You will also know a standard way to shift views around as the keyboard comes and goes.
Scrolling Basics
Small screens make smartphones portable. They also limit the amount of information you can show. Sometimes information is bigger than the screen—for example a picture, a form with text fields, or a map.
On iOS, the solution is to scroll around. UIScrollView is a virtual window onto larger content. It provides all the support a user needs: dragging content around, zooming in and out, and all the other functionality an app might need.
The user drags or flicks a finger in a scroll view to slide the content around under a fixed “window.” Figure 6-1 shows changing what part of the content is viewed. The blue rectangle is what the user sees on an iOS device screen. The larger image is contained by the scroll view. The left side shows the scroll view over the upper-left corner of the image. Then the user drags a finger diagonally from the top left toward the bottom right. The right side of Figure 6-1 shows the scroll view over a new part of the image. Note that the scroll view does not move. It is the content—in this case an image—that “moves” under a fixed visible area.

Figure 6-1 Scrolling content
Figure 6-1 also shows two important UIScrollView properties. contentSize is the width and height of all the content inside the scroll view. contentOffset is the x and y location inside the larger content from the upper left of the visible scrolling window. On the left side of Figure 6-1, the x and y values of contentOffset are 0—that is, there is no offset. On the right side of the figure, both x and y are nonzero. The values of x and y are added to the top left of the content view to get the top left of the scroll view “window” on the content.
Scroll views also zoom in and out by scaling the content view. Figure 6-2 shows zooming in. The left side shows the content just before the user performs a zoom-in gesture by putting two fingertips close together on the screen and then moving them apart.
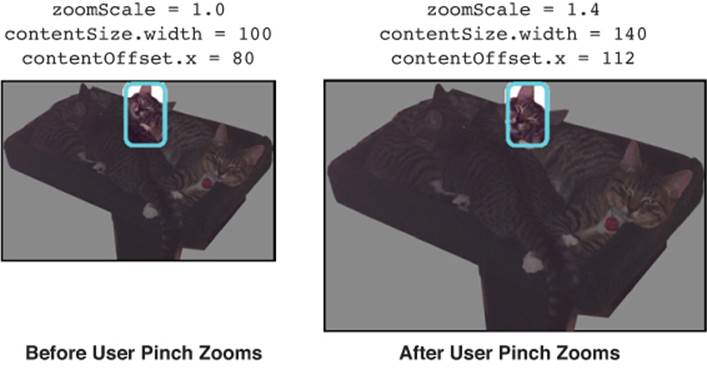
Figure 6-2 Zooming content
The right side of Figure 6-2 shows the result of zooming in. The most important property is zoomScale or the multiplier for the height and width of the content. The scale is 1.0 for a normal picture, larger for zooming in, and smaller for zooming out.
Once again, the visible area stays where it is, and the content is scaled. You can see by the numbers in the figure that contentSize and contentOffset are multiplied by the zoomScale. However, you should never scale content by directly manipulating the size or offset. Always usesetZoomScale:animated: or zoomToRect:animated:. Later, you see that scroll view uses zoom scale for other purposes.
As you work your way through this chapter, you find out how to use scroll views to move, zoom, and even page through logical units of content.
Bounce Scrolling
As users get familiar with iOS, they get used to scrolling. When experienced users get a new app, one of the first things they do is try to scroll the screen up and down. A screen with more content scrolls. But what about for screens that show everything? How does a user know that everything is shown?
One nice user experience feature is “bounce” scrolling of the screen—that is, moving down or up a little and then gently scrolling right back. The bounce feedback tells users they are seeing everything. In this section, you add bounce scrolling to the add/view car scene in the CarValet app.
Adding a Scroll View to the View/Edit Scene
The easiest way to set up a scroll view is to put all the content you want to scroll in one view. This new view becomes the scroll views content view. For the add/view scene, you need a UIView that contains the add car area, separator view, and view car area. Effectively this means the viewof the UIViewController is the content view. But you cannot just drag in a scroll view and make it the root view of the view/add scene controller.
That leaves two choices. First, you can add a scroll view as a child of the root view and then add a UIView as a child of the scroll view and move all the content areas (add car, separator, and view car) into that new child. Unfortunately, you also have to redo all the layout, constraints, and property connections. That is a lot of work, and it’s also a good way to introduce bugs.
A second way uses the same basic technique you used to embed the add car view controller in the navigation controller. But this time, you use Editor > Embed In > Scroll View. Unfortunately, it is not quite as easy as selecting the current top view and selecting the command.
This is because that view is the visual part of the add car view controller. Before using the embed command, you have to make a new top-level view. Doing that requires breaking the connection between the controller and its view.
Make sure you use the CH06 CarValet Starter project. As you see in the next section, the structure and constraints of the edit scene have been changed. Follow these steps to break the connection and embed everything in a scroll view:
1. Open the project and select Main_iPhone.storyboard. Make sure to uncheck the Arabic language Launch Flag in the scheme for this project. Also set the simulator back the United States region (or whatever region you have been using for your project).
2. Select the CarValet view controller from the left-hand list of view elements in IB and expand it to show the children of the root view.
3. In the project browser, change the name of the current root view to Content View.
4. Drag the root view from its current position to the list just below First Responder, as shown in Figure 6-3. The gray square and arrow show what is dragged and where.
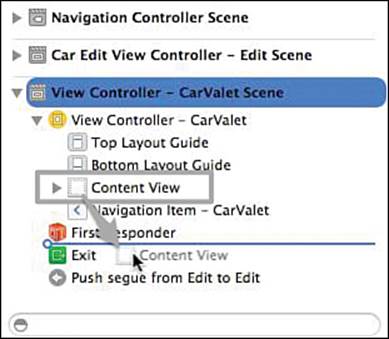
Figure 6-3 Adding a UIView after First Responder
5. Drag a UIView into the view controller where the old content view used to be.
6. Move Content View from the view controller into the newly added root view. Make sure the content view is inside the new root view and does not replace it. The easiest way to do this is to drag the content view onto the controller in the IB canvas.
Ignore any problems with constraints for now. You will fix those later.
7. Select the new content view, and choose Editor > Embed In > Scroll View. A new scroll view appears in the hierarchy. The hierarchy now looks like Figure 6-4.
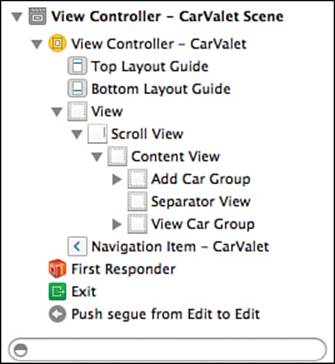
Figure 6-4 New hierarchy with scroll view
8. Fix the constraints. This takes a few steps:
![]() First, choose the new scroll view and use the pin constraint popup to set a distance of 0 for all four edges (top, bottom, leading, and trailing) to its nearest neighbor...the root view of the controller. Make sure you choose the update frames of the new constraints option before adding the constraints.
First, choose the new scroll view and use the pin constraint popup to set a distance of 0 for all four edges (top, bottom, leading, and trailing) to its nearest neighbor...the root view of the controller. Make sure you choose the update frames of the new constraints option before adding the constraints.
![]() Next, choose the content view and set the same 0 distance to the edges of the scroll view with the pin constraint popup. Do not choose the update frame option.
Next, choose the content view and set the same 0 distance to the edges of the scroll view with the pin constraint popup. Do not choose the update frame option.
![]() With the content view still selected, use the alignment popup to center it horizontally and vertically (the bottom two checkboxes), choosing update frames before setting the constraints.
With the content view still selected, use the alignment popup to center it horizontally and vertically (the bottom two checkboxes), choosing update frames before setting the constraints.
![]() There is one remaining issue. Select the add car group and pin the top edge based on whatever number shows in the popup.
There is one remaining issue. Select the add car group and pin the top edge based on whatever number shows in the popup.
![]() Pin the bottom of the view car group the standard distance from the bottom of its container and update frames.
Pin the bottom of the view car group the standard distance from the bottom of its container and update frames.
![]() Select all the children of the view car group and update frames.
Select all the children of the view car group and update frames.
After you drag in the new top level view, the hierarchy on the left-hand list looks something like Figure 6-4.
Run the app on both 3.5-inch and 4-inch displays. You should notice something is not quite right. The Total Cars label is too far from the navigation bar. Although this might seem like the wrong behavior, it is actually behaving correctly.
View controllers have an automaticallyAdjustsScrollViewInsets property that determines if scroll views will inset, or shrink, their content areas for navigation bars, toolbars, and other such items. The default value is YES, which means the scroll view is adjusting the height of the content view so the top is just below the navigation bar.
On the IB canvas, the constraint from the top of the content view to the top of the add car group extends under the toolbar. When the top of the content view is moved under the toolbar, the add car group is still 72 points below the content view. That means it is 72 points below the navigation bar, and not what you want.
There are two ways to fix this. The first is to change the 72 points to the standard distance. The only issue with this is, on the IB canvas, the top of the add car group moves under the navigation bar. It works if you run it on the simulator, but it is harder to maintain.
The second way is easier. Add the following line of code to viewDidLoad in ViewController.m, just below the call to the superclass:
self.automaticallyAdjustsScrollViewInsets = NO;
You now have an add/view scene with a scroll view but no bounce. You add bounce by selecting the scroll view, opening the Attributes inspector, and checking the Bounce Vertically check box.
Run the app in the simulator and bounce the main view. When the content view bounces, the areas underneath are white because the scroll view uses the default color. If you want to show the difference between the content view and empty space, change the background color of the scroll view to a different color.
Try changing it to light gray, run the simulator, and scroll. You see light gray above or below the edges of the content view when bouncing. If you were writing production code, this would be a good time to make sure the changes work in different screen sizes and orientations.
The bounce effect is there to provide feedback that the user has reached the edge of a scrollable area. So far, the content view and the scroll view are the same size, so any attempt to scroll bounces. Now, it is time to move on to the edit screen and add support for scrolling content. In this case, scrolling text fields into view when the keyboard is up.
Handling the Keyboard
You have not yet finished making the edit scene work in all screen sizes and orientations. The problem is that the keyboard sometimes covers at least one of the input lines, and there is no layout that works in all orientations and screen sizes with the keyboard open.
The solution is to put the view with the fields inside a UIScrollView. When the screen is big enough to show everything—that is, when the scroll view is large enough to show all the content—it only bounce scrolls (or not, if the Bounce Vertically check box is unchecked). The user cannot accidentally move the content off the screen. But when the keyboard opens, you resize the scroll view to be above the keyboard. The content view stays the same size, so the user can scroll through the input lines.
In this section, you do the following:
![]() Add the scroll view.
Add the scroll view.
![]() Resize the scroll view, based on the height of the keyboard.
Resize the scroll view, based on the height of the keyboard.
![]() Handle rotation.
Handle rotation.
While doing this, you learn how to set up the content area of a scroll view, resize scroll views, and listen for the keyboard opening and closing.
Adding the Scroll View
The starter project for this chapter has an updated edit view, as shown in the highlighted portions of Figure 6-5. Your first thought might be to simply embed the form view inside a scroll in the same way you added bounce scrolling to the add car scene. In this case, embedding is not what you want to do, and the reason is auto layout.
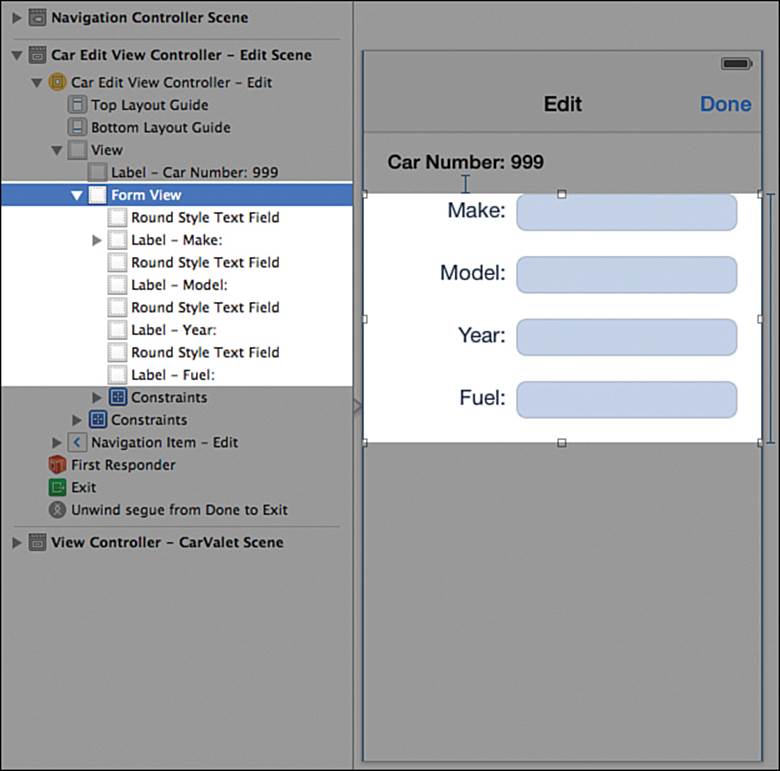
Figure 6-5 New edit view form and hierarchy
When the content view is the same size as the scroll view, it is possible to create a complete set of constraints for that content view in relation to its scroll view. This does not work when the size of the content inside the scroll view can be different from the size of the scroll view.
Remember that a scroll view works by offsetting the origin of the scroll view relative to its content... It is a window onto some larger view. Constraining the content to the scroll view means it has a fixed relationship with the scroll view—there is no scrolling.
Instead, you need the content view constraints to be independent of the scroll view, so the content view hierarchy lives in its own world. This can be done in two main ways. IB’s pixel-perfect layout works if the size of the content view does not change. One example of this is an image, as you will see later in “Scrolling Through Content.”
If the size of the content can change, you need some way to update both the content view and the contentSize property of the scroll view container. For the form view, even though the height is static, the width can change when the device rotates.
The easiest way to make this work is using code to add and manage the content view and the contentSize scroll view property. When you are done adding the scroll view, you no longer see the form view on the canvas, though it is available to the view controller. Follow these steps to add the scroll view:
1. Open Main_iPhone.storyboard and select the edit scene.
2. Move the Form View out of the hierarchy and under the First Responder. You do this the same way you moved the content view in Figure 6-3.
3. Drag a scroll view on the scene so that the top of the view is below the car number label.
4. Use the pin constraint popup to set the scroll view constraints. It should be 15 points from the car number label, 0 points from the edge of its container, and 200 points high. Figure 6-6 shows the popup for these constraints.
When you add the constraints, the scroll view resizes and moves to the correct position in the view.
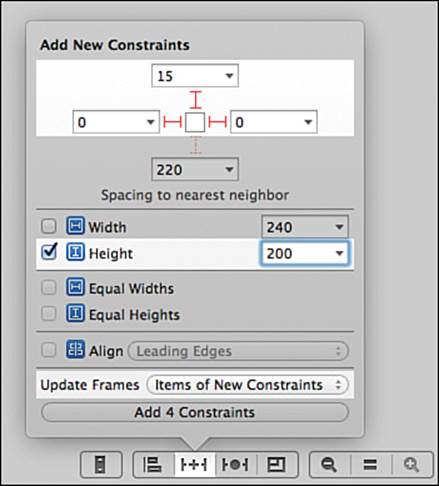
Figure 6-6 Pin constraints for scroll view
5. Open an Assistant editor with the .h file and create two properties: scrollView is a reference to the scroll view, and formView is a reference to the form view. You need to drag from the form view in the left-hand list to create the property.
Tip: Easy and Maintainable Content Views
The sample code starter for this chapter came with the form view already created, but why was it created before adding a scroll view? In fact, why create it at all?
The answer lies in creating self-configuring content views. Ideally, the form view resizes based on the width of its container: The labels and text fields grow or shrink based on the available space. You could do this in code, calculating the position and size of each label and text field, changing their frames, and telling the view to update. But that is a fair amount of code (about 25 or so lines), and any change in content means changing the code.
A better idea is using auto layout to set things up for you, using the top-level form view as a grouping view. As long as none of the constraints of the children inside form view refer to something outside of form view, it acts as a self-contained view hierarchy. The constraints are complete.
Using the IB canvas is the easiest way to create the constraints. Adding form view to the existing hierarchy allows you to set up all the internal constraints and get it working correctly. While you are doing this, the form view is constrained relative to its parent. That is, the form view has its own constraints enabling it to adjust position and size. And that lets you test that the children behave correctly.
After you remove the form view from the view controller hierarchy, any constraints attached to that hierarchy are removed. Form view no longer has any external constraints. But all the constraints for the children remain. And if you need to change things at a later date, you can drag form view back onto the main view, constrain it, make your adjustments to the subviews, then remove it again.
This is a powerful technique for creating dynamically added grouping views that use auto layout for their children.
Adding, Configuring, and Updating the Form View
Now that you have a scroll view, you need to add the content (form) view and manage its size. When you change the size of form view, you also need to update the scroll view’s contentSize.
Unlike auto layout and constraints, you set the frame of the form view and let the system do the rest. You still need to know the “constraints,” that is, the rules governing how to set the bounds, and those rules need to be complete:
![]() The origin of the frame view starts from x and y coordinates of 0.
The origin of the frame view starts from x and y coordinates of 0.
![]() The height of the frame view is fixed at 200 points, enough to enclose all the label/input field pairs.
The height of the frame view is fixed at 200 points, enough to enclose all the label/input field pairs.
![]() The form view is as wide as its parent, the scroll view.
The form view is as wide as its parent, the scroll view.
The question is where to put the code to add the frame view to the scroll view, set the frame views size, and the scroll view contentSize property. The answer lies in how the edit car scene is shown.
The only way to open the scene is by tapping the Edit button. That means the car scene is recreated each time. Unlike the add/view scene, there is no way to leave and return to the same edit screen. Unlike the returning to the add/view scene after rotation problem you solved in Chapter 4, “Auto Layout,” you can do everything in viewDidLoad.
Add the code from Listing 6-1 to viewDidLoad in CarEditViewController.m. New code is in bold.
Listing 6-1 Adding and Sizing formView to scrollView
- (void)viewDidLoad {
[super viewDidLoad];
self.formView.translatesAutoresizingMaskIntoConstraints = YES; // 1
[self.scrollView addSubview:self.formView]; // 2
self.formView.frame = CGRectMake(0.0, 0.0, // 3
self.scrollView.frame.size.width,
self.formView.frame.size.height);
self.scrollView.contentSize = self.formView.bounds.size; // 4
...
Here’s what happens in the numbered lines in Listing 6-1:
1. The frame view does not have any constraints relative to the superview. Tell the system to create constraints using its current frame.
2. Add the form view to the scroll view.
3. Make sure the form view is as wide as the scroll view.
4. Set the scroll view contentSize so it can scroll if needed. (Refer back to Figure 6-1 for the relationship between the scroll view size and the contentSize.)
Resizing for the Keyboard
When the keyboard comes up, it might cover one or more of the input fields. A scroll view lets you move the fields into view so the user can see where he or she can input text. All you have to do is resize the scroll view so it is above the keyboard. The scroll view becomes smaller, but the content size does not change and the user can scroll the form view, and therefore, the fields.
When the keyboard opens and closes, iOS uses the built-in NSNotificationCenter to send events. You add code to listen for the correct events and change the size of the scroll view as needed. Doing this takes three steps:
1. Add methods responding to keyboard open-and-close events.
2. Register for keyboard open-and-close notifications when the view opens.
3. Deregister for keyboard open-and-close notifications when the view goes away.
The last step is important. If you fail to unregister, it is possible to get notifications when the view controller is off the screen but still allocated. At best, this results in setting the view to an undefined state. More likely it will crash the app.
Resizing the Scroll View
Resizing the scroll view means changing one or more of its constraints, as you saw when you added landscape in Chapter 4. The question is, what to change?
There are four constraints for the scroll view: align to the leading and trailing edges, a fixed distance from the Car Number label, and a fixed height. To change the height of the scroll view, all you need to do is change the numerical constant for the fixed height constraint.
You only need to change the constant in two circumstances. The first is when the keyboard shows and covers part of the scroll view. In that case, you need to reduce the height by the amount of overlap. That is, you need to figure out the amount of overlap and subtract that from the default constant for the height constraint.
The second time you need to change the height constraint is when the keyboard goes away. In that case, you change the constraint back to its original value. This means you need a reference to the height constraint and an instance variable for the original height constraint.
Add a property called scrollViewHeightConstraint referencing the height constraint. Put this just below the scrollView property you added earlier.
Change the @implementation statement in CarEditViewController.m so it looks like the following:
@implementation CarEditViewController {
CGFloat defaultScrollViewHeightConstraint;
}
Initialize the default value in viewDidLoad, just after the call to the superclass:
defaultScrollViewHeightConstraint = self.scrollViewHeightConstraint.constant;
Now you need the amount of overlap, if any.
Finding Overlap: View Frames
The events sent when the keyboard opens and closes contain information about both the starting and ending frames of the keyboard. There is also a set of helper functions for coordinate math, including the intersection of rectangles.
An important thing to remember is that the frame of a view—that is, <view>.frame—is always given in the coordinate space of the parent of that view. The parent of the keyboard is the main window, so the frame of the keyboard is relative to the coordinate system of the main window. The frame of the scroll view is relative to the car edit view controller. And that might not be the same as the window.
Before you calculate any intersection, you have to convert the frames to use the same coordinate space. Generally, that means converting one of the frames into the other’s space. To understand why this is important, look at Figure 6-7.
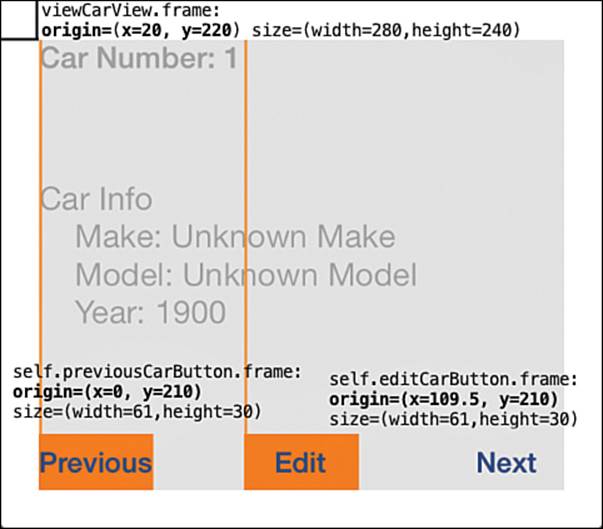
Figure 6-7 View frames
The frame of the view car group view is based on the coordinate system of its parent. The origin is (20, 220) relative to the parent. The frame for the Previous button (0, 210) is also in the coordinate system of the parent, but this time it is the view car group. It is clear from the xcoordinate that the two frames are in different spaces, since the Previous button cannot be both at 0 and 20 points from the edge.
A bit of math would show you that the coordinates for the Previous and Edit buttons are offset by the origin of their parent, the view car group. But again, this is the frame of each button expressed in the coordinate space of the view controllers’ root view.
The solution to converting between coordinate spaces is using the convertRect:forView: UIView message. Note that there are several variations of this message, including ones to convert points.
With a combination of the routines to intersect rectangles, the ability to convert view rectangles to the same space, and a variable for the default scroll view height constant, you have all you need to create the resizing code.
Add the keyboard open-and-close action methods shown in Listing 6-2 just below didReceiveMemoryWarning.
Listing 6-2 Keyboard Open-and-Close Methods
- (void)keyboardDidShow:(NSNotification *)notification {
NSDictionary *userInfo = [notification userInfo]; // 1
NSValue* aValue = userInfo[UIKeyboardFrameEndUserInfoKey]; // 2
CGRect keyboardRect = [aValue CGRectValue]; // 3
keyboardRect = [self.view convertRect:keyboardRect fromView:nil];
CGRect intersect = CGRectIntersection(self.scrollView.frame, keyboardRect);// 4
self.scrollViewHeightConstraint.constant -= intersect.size.height; // 5
[self.view updateConstraints]; // 6
}
- (void)keyboardWillHide:(NSNotification *)notification { // 7
self.scrollViewHeightConstraint.constant = defaultScrollViewHeightConstraint;
[self.view updateConstraints];
}
Here’s what happens in the numbered lines in Listing 6-2:
1. Get the dictionary of information associated with the notification.
2. Look up the final view frame for the displayed keyboard.
3. Convert the value for the final view frame into a CGRect and convert the coordinate space from the device main window to the coordinate system used by the view car group—that is, to the root view of the edit scene view controller.
4. Find the rectangle defined by the intersection of the scroll view and the keyboard. If scroll view and keyboard do not overlap, the rectangle is all zeros.
5. Reduce the height of the scroll view by the amount of vertical overlap—that is, the height of the intersection rectangle. If there is no intersection, this subtracts zero.
6. Tell the view to update constraints as the scroll view height constant might have been changed. Note that you can wrap these last three lines of code in CGRectIntersectsRect. This function returns true if the rectangles intersect.
7. When the keyboard closes, set the height constraint constant back to the default and update constraints. Again, you could check if the height has actually changed before executing these two lines of code.
Next, register for keyboard open-and-close notifications by adding viewDidAppear: below viewDidLoad:
- (void)viewDidAppear:(BOOL)animated {
[super viewDidAppear:animated];
[[NSNotificationCenter defaultCenter]
addObserver:self
selector:@selector(keyboardDidShow:)
name:UIKeyboardDidShowNotification
object:nil];
[[NSNotificationCenter defaultCenter]
addObserver:self
selector:@selector(keyboardWillHide:)
name:UIKeyboardWillHideNotification
object:nil];
}
Each of the calls registers for a particular notification with the default notification center. The call takes four arguments:
![]() An observer, or the object that is sent the registered notification method
An observer, or the object that is sent the registered notification method
![]() A selector—that is, the signature of a method called when the event triggers
A selector—that is, the signature of a method called when the event triggers
![]() The name of the notification
The name of the notification
![]() An optional object passed with the notification, which is useful when you are using a centralized object to handle notifications and need to differentiate the target
An optional object passed with the notification, which is useful when you are using a centralized object to handle notifications and need to differentiate the target
UIKeyboardDidShowNotification triggers after the keyboard finishes opening and results in a call to the registered keyboardDidShow: method. If you needed to animate views moving as the keyboard opens, you can register for UIKeyboardWillShowNotification, called just before the keyboard animates open. UIKeyboardWillHideNotification is triggered just before the keyboard animates closed and calls keyboardWillHide:.
The names of the methods are arbitrary; you can call them whatever you want. UIViewController has no standard keyboard notification methods. However, it is good practice to use a standardized naming scheme because doing so makes subclassing easier.
Tip: Using a Superclass for Common Behavior
Responding to keyboards is a common task for apps. To make things easier, you could create a subclass of UIViewController to encapsulate the behaviors associated with handling the keyboard:
![]() Registering for keyboard notifications using an object to make the registration unique
Registering for keyboard notifications using an object to make the registration unique
![]() Methods for handling open, close, and other keyboard messages that complete with any needed default behavior
Methods for handling open, close, and other keyboard messages that complete with any needed default behavior
![]() Unregistering for keyboard notifications
Unregistering for keyboard notifications
You can add an IBOutletCollection to the class of any views that need to be resized when the keyboard opens or closes. The default methods can go through the array and update views. This allows you to use IB to drag connections to views that need resizing.
Any view controller that needs to work with the keyboard can inherit from the subclass.
A more advanced technique is to create a category on UIViewController and then #import the category if you need to handle the keyboard. This works as long as you do not need any properties.
For more information on these techniques, see the iOS developer documentation or Chapters 6 and 11 in Learning Objective-C by Robert Clair.
Finally, you remove the view controller as an observer of keyboard events. To do so, add the bold code to viewWillDisappear:
- (void)viewWillDisappear:(BOOL)animated {
[super viewWillDisappear:animated];
[[NSNotificationCenter defaultCenter]
removeObserver:self
name:UIKeyboardDidShowNotification
object:nil];
[[NSNotificationCenter defaultCenter]
removeObserver:self
name:UIKeyboardWillHideNotification
object:nil];
...
The arguments to remove an observer are similar to those for adding an observer. The only difference is that you do not specify a selector. Other than that, the arguments must match those used in the call to add an observer. If you specified an object in the observe call, you must specify the same object in the remove call. If you don’t, the call might silently fail, and your object will still be observing.
Run the app again and open the keyboard. Scroll the form view up and down. You can scroll through all the fields and have margins at the top and bottom. Change the orientation to landscape, and now it is possible to scroll the form view beyond the last field. Getting rotation to work requires one more change.
Adding Resizing
When the screen is rotated, both the scroll view and form view need to be resized. Then the contentSize property needs to be updated.
You already have code to resize the scroll view. Put breakpoints in keyboardDidShow: and keyboardwillHide: and run the app again. Rotate the screen and you see that each method is called. The system hides and shows the keyboard to set it to the correct size. Those methods also correctly set the size of the scroll area.
The form view is also resized when the screen rotates. This happens when the scroll view changes size and updates the layout for its children. All you need to do is update contentSize from the new form view frame. Add the following line of code at the end of both thekeyboardDidShow: and keyboardWillHide: methods:
self.scrollView.contentSize = self.formView.frame.size;
Run the app in portrait, open the edit screen, and tap in one of the fields. Now change the orientation to landscape. The form view scrolls correctly. Rotate back to portrait, and everything still works.
Scrolling Through Content
This section shows you some of the most advanced features of UIScrollView. You add a new scene for paging through a set of zoomable car images. Paging means you scroll by units of content instead of smoothly through the content. In this case, each scroll gesture to the left or right moves by one car. To make this work, you do the following:
![]() Create a new view controller class for viewing car images.
Create a new view controller class for viewing car images.
![]() Add a new scene with a scroll view using the new class.
Add a new scene with a scroll view using the new class.
![]() Populate the scroll view with car images.
Populate the scroll view with car images.
![]() Set up the scroll view to page through images.
Set up the scroll view to page through images.
![]() Add the ability to zoom a car image in and out.
Add the ability to zoom a car image in and out.
You start by adding the car images (thanks to Sunipix.com for the free images!) to the project:
1. In the downloadable content for this chapter is a folder called CH06 Assets CarImages. Copy the folder into the Base.lproj folder of the current project.
2. In the left-side project browser, open the supporting files folder and make sure the folder is selected.
3. Choose File > Add Files to CarValet and add the folder you just copied. Make sure the option to create groups for added folders is selected.
4. Add a new view controller class called CarImageViewController and move the files for that class just above the Supporting Files group in the project browser.
5. In IB, drag a new view controller below the edit scene. You may need to zoom out to have enough space. Use the magnifying glass icons in the lower-right taskbar for zooming.
6. With the new view controller selected, go to the Identity inspector and set the class to CarImageViewController.
7. Select the add/view scene and drag a bar button item into the status bar (just as you did in Chapter 3, “Introducing Storyboards”; see Figure 3-23). Set the title of the button to Car Images.
8. Drag a push segue connection from the new bar button item to CarImageViewController. When the status bar appears in the new controller, give it the title “Car Images.”
9. Copy the Car Number label edit scene to the car image scene. Put it in the same place by setting the constraints to 15 from the top and 0 from the leading edge. Make sure to update frames when setting the constraints.
10. Add a scroll view and set the constraints to place the top edge 15 points from the bottom of the car number label, and adjacent (that is, 0 points) to the leading, trailing, and bottom edges of the parent. Again, update frames when you add the constraints.
11. Ctrl-drag to add two properties to CarImageViewController: carNumberLabel for the label and scrollView for the scroll view.
Run the app and make sure you can go to the new car images scene and get back to the main scene. Of course the scene is almost empty, so now you need to add some images.
Populating the Scroll View
So far, you have created content views using IB. Now you create the content view in code. In this case, the content view is a UIView with a number of UIImageView children. In a real app, the images would probably be pictures taken with the camera. In this app, the images are the car pictures you added to the project.
Set the content of CarImageViewController.m to the code in Listing 6-3.
Listing 6-3 Initial Code for CarImageViewController
//
// CarImageViewController.m
// CarValet
#import "CarImageViewController.h"
@implementation CarImageViewController {
NSArray *carImageNames; // 1
}
- (void)setupScrollContent {
NSMutableArray *imageViews = [NSMutableArray new]; // 2
CGFloat atX = 0.0;
CGFloat maxHeight = 0.0;
UIImage *carImage;
UIImageView *atImageView;
for (NSString *atCarImageName in carImageNames) { // 3
carImage = [UIImage imageNamed:atCarImageName];
atImageView = [[UIImageView alloc] initWithImage:carImage];
atImageView.frame = CGRectMake(atX, 0.0, // 4
atImageView.bounds.size.width,
atImageView.bounds.size.height);
[imageViews addObject:atImageView];
atX += atImageView.bounds.size.width; // 5
if (atImageView.bounds.size.height > maxHeight) { // 6
maxHeight = atImageView.bounds.size.height;
}
}
UIView *carImageContainerView = [[UIView alloc] initWithFrame: // 7
CGRectMake(0.0, 0.0,
atX, maxHeight)];
for (UIImageView *atImageView in imageViews) { // 8
[carImageContainerView addSubview:atImageView];
}
[self.scrollView addSubview:carImageContainerView]; // 9
self.scrollView.contentSize = carImageContainerView.bounds.size;
}
- (void)viewDidLoad {
[super viewDidLoad];
// 10
carImageNames = @[ @"Acura-16.jpg", @"BMW-11.jpg", @"BMW-13.jpg",
@"Cadillac-13.jpg", @"Car-39.jpg",
@"Lexus-15.jpg", @"Mercedes Benz-106.jpg",
@"Mini-11.jpg", @"Nissan Leaf-4.jpg",
@"Nissan Maxima-2.jpg" ];
[self setupScrollContent];
}
@end
Here’s what happens in the numbered lines in Listing 6-3:
1. Set up a private instance variable for the array of car names. If the contents of the array can change, you can use NSMutableArray.
2. Set up a mutable array for adding the image views.
3. Go through each image file name, create a UIImage, and put it in an image view.
4. Change the starting x position of the image view frame so it is next to the previous image. You do this by setting the x origin of the first image to 0 and then adding the width of the previous images to the origin in step 5.
5. Add the width of the current image to the starting position for the next image (or to get the final width of the view if this is the last image).
6. Set the maximum height for the content view to the height of the tallest image.
7. Allocate a container view with a width of all the images and the height of the tallest image.
8. Add each image to the new container view.
9. Add the container view as the child of the scroll view and set the content size.
10. Initialize a static array of car image file names.
Run the app and tap on the Car Images button in the navigation bar. You can scroll through all the pictures, but you see that they vary in both width and height. A better experience is having all the images be the same width. After you resize the images, you can use paging to move from image to image.
Adding Paging
Paging works by moving the content in units of the width and/or height of the scroll view. The user experience is flipping horizontally through the car images. To accomplish this, each car image must be the width of the scroll view. And because each image is the same width, the size of the content view is the width of the scroll view times the number of images.
Replace setupScrollContents with the code in Listing 6-4.
Listing 6-4 Paging Version of CarImageViewController
- (void)setupScrollContent {
CGFloat scrollWidth = self.view.bounds.size.width; // 1
CGFloat totalWidth = scrollWidth * [carImageNames count]; // 2
UIView *carImageContainerView = [[UIView alloc] initWithFrame:
CGRectMake(0.0, 0.0,
totalWidth,
self.scrollView.frame.size.height)];
CGFloat atX = 0.0;
CGFloat maxHeight = 0.0;
UIImage *carImage;
for (NSString *atCarImageName in carImageNames) {
carImage = [UIImage imageNamed:atCarImageName];
CGFloat scale = scrollWidth / carImage.size.width; // 3
UIImageView *atImageView = [[UIImageView alloc]
initWithImage:carImage];
CGFloat newHeight = atImageView.bounds.size.height * scale; // 4
atImageView.frame = CGRectMake(atX, 0.0, scrollWidth, newHeight);
if (newHeight > maxHeight) {
maxHeight = newHeight;
}
atX += scrollWidth;
[carImageContainerView addSubview:atImageView];
}
CGRect newFrame = carImageContainerView.frame;
newFrame.size.height = maxHeight;
carImageContainerView.frame = newFrame;
[self.scrollView addSubview:carImageContainerView];
self.scrollView.contentSize = carImageContainerView.bounds.size;
}
Here’s what happens in the numbered lines in Listing 6-4:
1. Get the width of the scroll view for setting the width of each image.
2. Calculate the total width for the container view.
3. Calculate a scale factor for making the current image the width of the scroll view.
4. Scale the image view based on the new height. Also check for a maximum height for setting the content view height.
Run the app and view the car image screen. Now each car image is small enough to fit on the screen. To add paging, open IB, select the scroll view, and check Paging in the Attributes inspector. This time, when you run the app and scroll left or right, you see a different car image.
Adding Zoom
Zooming is useful for helping the car valet see a license plate number or confirm that a particular scratch was already on a car. To enable a UIScrollView to zoom requires four main changes:
![]() Adopting the UIScrollViewDelegate protocol in the car image view controller
Adopting the UIScrollViewDelegate protocol in the car image view controller
![]() Implementing the viewForZoomingInScrollView: protocol method
Implementing the viewForZoomingInScrollView: protocol method
![]() Connecting the scroll view delegate to the view controller
Connecting the scroll view delegate to the view controller
![]() Specifying a maximum zoom level greater than 1.0 and/or a minimum level less than 1.0
Specifying a maximum zoom level greater than 1.0 and/or a minimum level less than 1.0
The following steps take you through the first two parts of adding zoom to the car images scroll view:
1. To adopt the UIScrollViewDelegate protocol in the car image view controller, make the changes shown in bold to CarImageViewController.h:
@interface CarImageViewController : UIViewController
<UIScrollViewDelegate>
@property (weak, nonatomic) IBOutlet UILabel *carNumberLabel;
...
2. Create a private instance variable for the view that zooms, in this case the car image container view, by adding the line in bold to the private variables declared near the top of CarImageViewController.m:
@implementation CarImageViewController {
NSArray *carImageNames;
UIView *carImageContainerView;
}
3. Set up the new instance variable for the container view in setupScrollContent. The top of the method changes as shown in bold:
- (void)setupScrollContent {
CGFloat scrollWidth = self.view.bounds.size.width;
CGFloat totalWidth = scrollWidth * [carImageNames count];
carImageContainerView = [[UIView alloc] initWithFrame:
CGRectMake(0.0, 0.0,
totalWidth,
self.scrollView.frame.size.height)];
...
4. Add the following method below viewDidLoad:
- (UIView *)viewForZoomingInScrollView:(UIScrollView *)scrollView
{
return carImageContainerView;
}
This is the scroll view delegate protocol method for returning the view to zoom. In this case, there is only one zoomable view—the view containing all the images.
That takes care of the first two parts of adding zooming. Now you need to connect the scroll view delegate. To do that, open Main_iPhone.storyboard and Ctrl-click on the scroll view. Figure 6-8 shows using the resulting connections popup to drag a connection from the delegate outlet of the scroll view to the view controller shown in the bar below the main view controller canvas window.
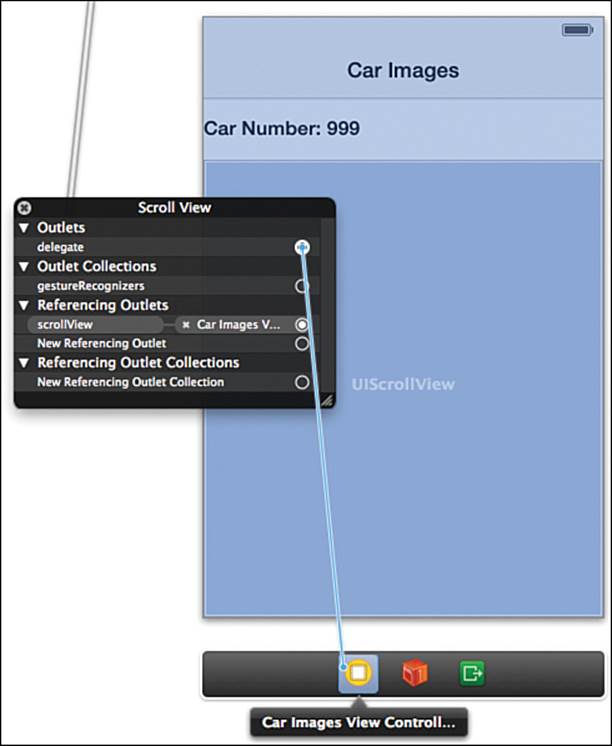
Figure 6-8 Connecting the scroll view delegate outlet
The final step to activate zoom is to change the maximum zoom level. Still in IB, select the scroll view and look at the Attributes inspector. Change the maximum zoom to 3.
Run the app, open the car image viewer, and zoom in. Hold down the Option key, and you see two dots appear on the simulator screen, as shown in Figure 6-9. Those represent where your fingertips will be if you press down on the mouse.
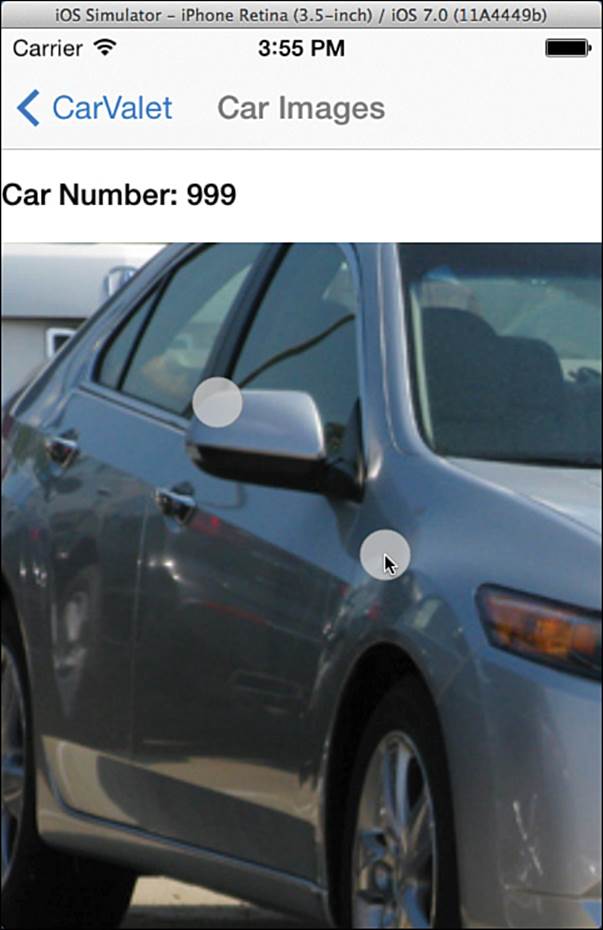
Figure 6-9 Pinch gesture in the simulator
Press the mouse and move the circles (your fingertips) apart. The image zooms. You are able to scroll around the image, and if you scroll too far left or right, you page to the next image. Notice that paging works correctly even though the view is zoomed in. As you come to the right or left edge of one car image, the scroll view snaps to an edge of the new car. This is because paging uses the scale factor to determine the new page size.
Zooming out uses the opposite gesture from zooming in: You pinch. However, it is easy to see that most of the time, the car valet is zooming in. Zooming out is an extra effort, especially when most of the time the user will try to get the image back to the original size. This would be a good behavior to provide through an interface element.
To do this, add a Reset Zoom button to the navigation bar. Tapping that button resets the scale to 1. The button is disabled unless the image is zoomed. Follow these steps:
1. Drag a bar button item into the status bar of the car image screen and change the title to Reset Zoom. Use the Attributes inspector to make sure it is initially disabled.
2. Create a property in CarImageViewController.h for the Zoom button called resetZoomButton.
3. Create an IBAction for the Zoom button called resetZoom: by Ctrl-dragging into the .h file and selecting the type Action instead of Outlet.
4. In CarImageViewController.h, add the code below to resetZoom:
[self.scrollView setZoomScale:1.0 animated:YES];
Run the app. The button is in there, but when you zoom, it is not enabled. You need to detect when the content is zoomed and enable or disable the button depending on the scale factor. You can use scrollViewDidEndZooming:withView:atScale:, another scroll view protocol method called anytime the scroll view finishes zooming content. The zoom can be a user pinch or a message. Add this method just below viewForZoomingInScrollView:
- (void)scrollViewDidEndZooming:(UIScrollView *)scrollView
withView:(UIView *)view
atScale:(float)scale {
self.resetZoomButton.enabled = scale != 1.0;
}
The single line of code sets the enabled state of the button based on the current scale. If the scale is not 1, the button is enabled; otherwise, it is not.
Run the app, scale an image, and reset the scale. Everything should now work. If it does not, make sure the button is sending the resetZoom: message.
One small thing to notice is the Reset Zoom button is enabled when you first open the car images screen. Fix that by adding the following line to viewDidLoad, just below the call to the superclass:
self.resetZoomButton.enabled = NO;
Rotation
The only thing not working correctly is changing orientations. If you change to landscape, the images are not resized, and the scroll view pages based on its wider size. That means the paging is off.
You need to regenerate the content view when the screen rotates. Make two changes to make rotation work. First, add the following method below viewDidLoad:
- (void)willAnimateRotationToInterfaceOrientation:
(UIInterfaceOrientation)toInterfaceOrientation
duration:(NSTimeInterval)duration {
[super willAnimateRotationToInterfaceOrientation:toInterfaceOrientation
duration:duration];
[self setupScrollContent];
}
Then change setupScrollContent to remove a container view if one already exists. Add the code in bold to the top of setupScrollContent:
- (void)setupScrollContent {
if (carImageContainerView != nil) {
[carImageContainerView removeFromSuperview];
}
CGFloat scrollWidth = self.view.bounds.size.width;
...
Run the app again on a 3.5-inch screen, and you see that rotation works, though it is not ideal. The car images are too high for the available space to make paging work in the horizontal direction. It is possible to scroll them down, but paging causes it to be a jerky vertical scroll. Since zooming already works, a simple fix is to allow making the image smaller as well as larger. Use IB to change the minimum zoom to 0.75. Run the app again, and everything should work correctly in both orientations. (You create a better fix in Challenge 3 at the end of the chapter.)
What Car Is This?
The final thing you need to do with the car image scene is to correctly set the car number. With paging enabled, you know how much width each car takes. You also know the location of the scroll view in the content. To find the number (not the index) of the car, find the number of page widths.
You need to add the methods in Listing 6-5 above viewDidLoad:. The methods update the label and find the current car index. The car index is 0-based, so add 1 before displaying.
Listing 6-5 Updating the Label Using the Index of the Current Car Image
- (void) updateCarNumberLabel {
NSInteger carIndex = [self carIndexForPoint:self.scrollView.contentOffset];
NSString *newText = [NSString stringWithFormat:@"Car Number: %d",
carIndex + 1];
self.carNumberLabel.text = newText;
}
- (NSInteger)carIndexForPoint:(CGPoint)thePoint {
CGFloat pageWidth = self.scrollView.frame.size.width;
pageWidth *= self.scrollView.zoomScale; // 1
return (NSInteger)(thePoint.x / pageWidth); // 2
}
- (void)scrollViewDidScroll:(UIScrollView *)scrollView {
[self updateCarNumberLabel]; // 3
}
Here’s what happens in the numbered lines in Listing 6-5:
1. Multiply the scroll view width by the zoom scale to get the actual page width.
2. Convert the result of a floating-point division to an integer. By casting the result—that is, telling the system to turn the result into an NSInteger—the system effectively uses the floor function, rounding it down to the nearest integer.
3. Update the Car Number label whenever the scroll view scrolls. scrollViewDidScroll: is another protocol method sent whenever the scroll view finishes scrolling content.
You also need to set the car number when the view first appears. Add a viewDidAppear: below viewDidLoad for the initial car update:
- (void)viewDidAppear:(BOOL)animated {
[super viewDidAppear:animated];
[self updateCarNumberLabel];
}
Summary
In this chapter, you have explored many parts of UIScrollView, from a simple bounce to scrolling and zooming.
You started by retrofitting the view/add screen and enabling a bounce to show the user that what shows on the screen is all there is (is the complete content view.) After retrofitting the edit view, you used the scroll view to give access to all the edit fields, even when the available screen area is too small for all of them. Finally, you used a new view controller to explore paging and zooming content.
Along the way, you found out how to enable and disable buttons, resize scroll views and their content area when the screen rotates, and figure out which item is shown as a user scrolls.
Now you can add a scroll view to your design toolkit. Your own apps can add some feedback with a bounce or let the user work with more information than can fit on a screen. You can also handle keyboards as they show and hide, and you can provide feedback on what buttons can and cannot be touched. And in case you forget to add the scroll view when you build the view, you have a reliable process for retrofitting later.
Even with three screens, controlling the navigation in your app is becoming more complex. In Chapter 7, “Navigation Controllers I: Hierarchies and Tabs,” you use two key view controllers to tidy up navigation. One controller is perfect for presenting hierarchical content, just like looking at all the cars and then seeing the detail. The other makes moving between different groups of content, like the cars, car images, and a new about screen, a breeze.
Challenges
1. When the screen rotates from portrait to landscape, stay on the same car by aligning the left edge of the car image with the left edge of the screen. Doing this requires knowing how big an individual car is, what part of the content view is being shown, and how much width defines a car. Remember that zooming changes the paging width.
2. In the add/view scene, it is possible to view the data for a particular car. When the user opens the car image scene, start on the image that corresponds to the car currently being viewed. Because there might be more cars than images, use modulo divide to set the car number. % is the modulo operator for ints in Objective-C. Implementing this requires communication between the add/car scene controller and the car image scene controller. You have already done this for the edit scene. Use that code as a starting point. You might even be able to reuse something.
3. Add code to disable paging when the car image is zoomed. You need to detect when the content is zoomed in or out, and you need to set pagingEnabled for the scroll view.
4. Internationalize the screen. If you do not have access to native speakers, use an automated web translation site. A word of warning: It is very risky to ship code that uses automatic translations. The safest way is for native speakers to verify that the correct word or words are used, given the context. As of this writing, automatic translation sites are unable to correct for context. At best, the interface appears clunky, and it will more likely confuse, or even insult, your user.