Learning iOS Development: A Hands-on Guide to the Fundamentals of iOS Programming (2014)
Chapter 5. Localization
At this writing, the Apple App Store is available in 155 countries. In most of those countries, English is not the native language. Even if there are people who speak English in a country, it is still best to show your app in a customer’s native language. That person can always choose to show it in English. And even English is not just English. There’s British English, American English, Australian English, Canadian English...and they all have differences.
iOS provides ways to localize entire screens, some or all of your strings, or even just an individual image. Thanks to auto layout, most apps can focus on strings and perhaps on updating some layout constraints.
In this chapter, you add two more languages to the CarValet app and look for places where constraints might need to change. You start by exploring localization and prepare your app and scenes for localization. As part of this, you find strings that could cause problems.
German is the first language you add. As you localize, you update some interface elements and constraints. Then you reverse your perspective on writing by adding Arabic, including delving into locales by localizing numbers and dates. While doing that, you find out that there are really four ways to set the locale of a device.
When you are done, you will be able to create apps that are ready for localization from the start, which is much easier than retrofitting existing apps.
Localization Basics
When you want an app to support many languages, you need to write only one app. iOS makes it easy to dynamically update your interface based on the user’s language preferences.
To find those preferences, in the simulator or on a device, open the Settings app, tap General, and then tap International. You should see a screen like the first one in Figure 5-1. Tap Language and then scroll through the list. When you choose an item from the list, the system updates the interface with the new language. The same choice enables apps to update. The third screen, which appears after you tap Region Format on the International screen, allows you to change how numbers and dates are presented.
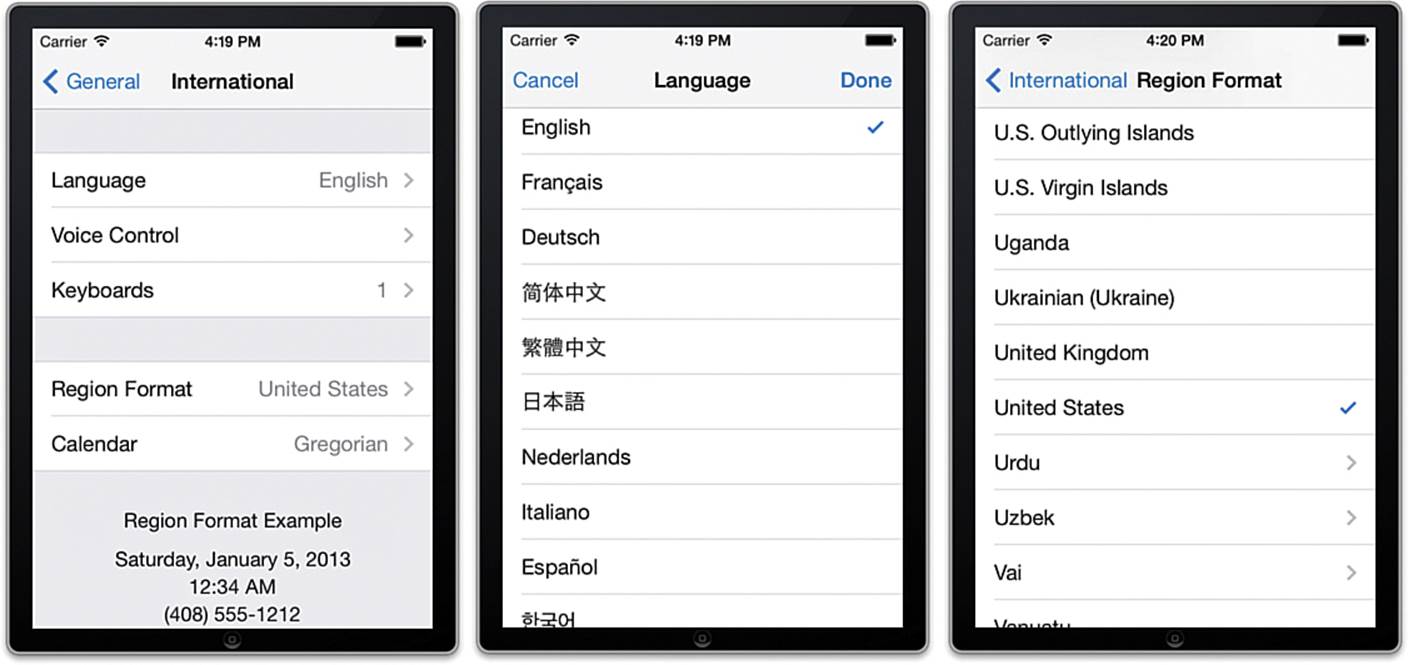
Figure 5-1 International settings
You localize an app by using two basic iOS mechanisms: redirection and formats. Each mechanism is used to present different types of localized content. Redirection is for user interface (UI) elements, resources, and strings. Formats are for showing and reading numbers and dates. Occasionally, there is also code to write outside of these mechanisms as you see when localizing for Arabic.
Redirection
Whenever you load a resource, the system uses an indirection step to check for a local version. Resources can include storyboards, XIB (IB interface definition) files, sounds, images, and tables of strings. If a localized version is found, the system uses it; if not, the system uses a default value. You add new languages by adding files and data for that language.
A project starts with English localization. Figure 5-2 shows the project view from the Chapter 5 starting version of CarValet. In the Info panel is a category called Localizations with two items. One is a language—in this case, English.
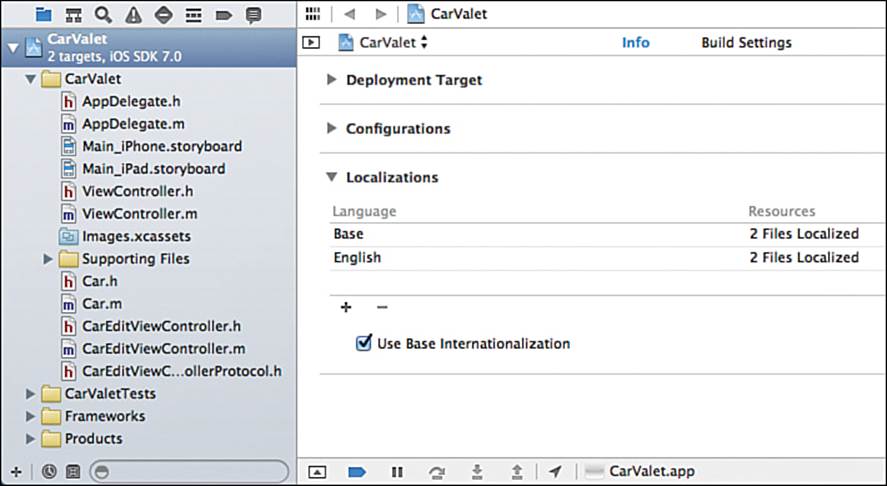
Figure 5-2 Project-level localization
For CarValet, there is also a “language” called Base. This is considered the default localization. If the device is running in Swahili, and the system cannot find the localized version of a string, picture, or other item, it uses whatever is in Base. That happens because the checkbox to use a base localization is checked. If it were not checked, the system would still use redirection by looking at the top level of the app bundle. (App bundles and how they are organized is beyond the scope of this book because Xcode manages them in all but the most complex cases, and using Base localization is strongly recommended.)
The localizations area also has buttons to add (+) and delete (–) localizations. As you can see, both English and Base already have two localized files. So far you have done no work to localize, so what and where are these files?
To find those files, look in your project folder in the Finder for a folder called Base.lproj. The two files inside that folder are both storyboard files, one for iPhone and one for iPad. So far, you have only edited the iPhone version.
When you add another language, another folder is created. Any content specific to the new language goes inside the new language folder. Every folder has a similar name, <LanguageCode>.lproj:
![]() <LanguageCode> is the internationally recognized two-letter code for the language.
<LanguageCode> is the internationally recognized two-letter code for the language.
![]() lproj means “language-specific project directory.”
lproj means “language-specific project directory.”
When you add German later in this chapter, a folder called de.lproj is added. de is the internationally agreed-on, two-letter code for German, or “Deutsch.” You can find some of the two-letter codes in the iOS documentation. The letters are part of the larger ISO 639.2 standard, available at www.loc.gov/standards/iso639-2/php/code_list.php.
Any time the system needs to load a resource, the first place it looks is the language-specific project directory folder (lproj) for the current device language. If the system doesn’t find anything, it looks in the base localization. This redirection step makes localization much easier for you.
String Tables
If you want to present an entirely different set of scenes on the iPad after adding Chinese to your product, add an iPad storyboard file with the same name to the Chinese folder, zh.lproj. In your project, the iPad storyboard is called Main_iPad.storyboard. A Chinese-specific storyboard would have the same file name and be in the Chinese folder. On an iPad set to China, iOS looks in that folder first and finds the specific Chinese storyboard. For any other language, it checks in the language folder and does not find a storyboard file, so it uses the default, or English, storyboard.
For most apps, different screens are rarely needed. Usually most of the work is localizing the strings displayed to the customer. Again, this is done by redirection, using a different type of file, called a string table.
Each string table consists of pairs of lines in a string table, which are at the heart of string localization. Each pair looks like this:
/* Documentation about SomeStringKey */
"SomeStringKey" = "ALocalizedSomeString";
The first line in each pair is documentation to help translators figure out what the localized string should be. The second line is like a dictionary with a key and a value. "SomeStringKey" is a key to identify the particular localized string. Some people use the native language equivalent of the string, such as “Previous” or “Edit.” The recommended key name, such as "PreviousButtonTitle" or "EditButtonTitle", helps identify what the string is for.
"ALocalizedSomeString" is the localized version of the string. Unlike with localized storyboard files that the system finds, you write the code to get a localized string using NSLocalizedString. The two arguments correspond to the line pairs in a string table file:
NSLocalizedString(SomeStringKey, SomeStringDocumentation);
![]() SomeStringKey is the key side shown on the second line of the preceding code example.
SomeStringKey is the key side shown on the second line of the preceding code example.
![]() SomeStringDocumentation is the documentation string shown on the first comment line.
SomeStringDocumentation is the documentation string shown on the first comment line.
When you ask for a string this way, the system goes through a few steps:
1. It looks for a file called Localizable.strings in the lproj folder for the current device language.
2. If it finds the file, it looks for SomeStringKey, and if it finds it, the system returns the associated string.
3. If the system does not find either the file or string key, the system looks for the key in the Localizable.strings file in the Base localization folder and returns the associated string.
You might wonder why there needs to be documentation for every localized string. Languages can have many features and may require different words and/or modifiers, depending on the use of a particular concept. Languages can have any, some, or all of the following features:
![]() Gender specificity—Nouns can be feminine, masculine, or neutral, and modifiers (verbs, adverbs, and so on) have to match gender.
Gender specificity—Nouns can be feminine, masculine, or neutral, and modifiers (verbs, adverbs, and so on) have to match gender.
![]() Number matching—Different words, conjugations, or other elements are required if the noun is singular or plural.
Number matching—Different words, conjugations, or other elements are required if the noun is singular or plural.
![]() Tense matching—Different words, conjugations, or other elements are required if the noun is past, present, and/or future tense. In addition, languages may have only two tenses or even no tense.
Tense matching—Different words, conjugations, or other elements are required if the noun is past, present, and/or future tense. In addition, languages may have only two tenses or even no tense.
![]() Modifications for statement versus question—Different words, conjugations, or other elements are required if the sentence is a question rather than a statement.
Modifications for statement versus question—Different words, conjugations, or other elements are required if the sentence is a question rather than a statement.
![]() Modifications for yes or no—Different words, conjugations, or other elements are required if an answer is a yes or a no.
Modifications for yes or no—Different words, conjugations, or other elements are required if an answer is a yes or a no.
For example, German has both gender and number matching. The word car is gender neutral, so a car is das auto, while more than one are die autos. If you are talking about a make, those are usually masculine, such as der Porsche, with multiple makes still using die. Japanese includes statement versus question, yes versus no, and tense modifications. Arigato gozaimasu is “Thank you for what are you are doing”; Gozaimashita makes it “for what you have done”; Wakarimasuka is “Do you understand?”; Wakarimasu is “I understand”; and Wakarimashita is “I do not understand.”
You call NSLocalizedString (or, as you see later in this chapter, one of its variants) any time you need to display something to the user. This includes setting the text of buttons, labels, and other static elements. It does add some extra code to initializing views, but the one line works for displaying strings from any of your app’s localized languages.
The final part is creating the string tables. Apple provides a way to build the table from the command line by using genstrings, which looks for calls to NSLocalizedString or variants. The string table is built using the key and documentation arguments. Adding a new localization makes a copy of the existing default string table.
Formats
When you localize an app, you are really localizing four things:
![]() The language displayed in your interface—In the United States, the title for a button to show the next car is Next; in German, it is Nächstes.
The language displayed in your interface—In the United States, the title for a button to show the next car is Next; in German, it is Nächstes.
![]() The order in which you display text items and some controls—This comes up in two main ways: sort orders and order of words or visual elements. The last part comes from languages that are read right-to-left. You learn more about this later in the chapter.
The order in which you display text items and some controls—This comes up in two main ways: sort orders and order of words or visual elements. The last part comes from languages that are read right-to-left. You learn more about this later in the chapter.
![]() Specific graphical elements or even whole scenes that may need to change—All but whole scenes is made much easier using the language project folder mechanism discussed earlier.
Specific graphical elements or even whole scenes that may need to change—All but whole scenes is made much easier using the language project folder mechanism discussed earlier.
Changing whole scenes is very rare and is usually due to one of two things: String length and/or localized iconography make it impossible to adjust the layout using constraints or due to cultural differences.
![]() The formats for dates, numbers, and other items—In the United States, dates are month/day/year; in Canada or the UK, it is day/month/year. German reverses the use of the comma and period in decimal numbers: 1.000,1 is one-thousand point 1. The system provides classes and convenience methods for converting numbers and dates to and from localized strings.
The formats for dates, numbers, and other items—In the United States, dates are month/day/year; in Canada or the UK, it is day/month/year. German reverses the use of the comma and period in decimal numbers: 1.000,1 is one-thousand point 1. The system provides classes and convenience methods for converting numbers and dates to and from localized strings.
Only some of these things are controlled by the selected language. In addition to setting a language for a device, a user can set a regional format or locale. This is done through the right-hand screen in Figure 5-1.
The locale is set independently of the language. It is perfectly fine for a user to set the language to (U.S.) English and locale to the United Kingdom or even to German. A locale specifies conventions for displaying numbers, date and time formats, and other things.
Most apps show generated numbers and dates as part of their interface. Apps may also parse entered number or date strings. Unlike static strings, you cannot translate numbers and dates in advance. In the physical world, how to display or read information varies from country to country and even from region to region in a country. On iOS, it varies by locale.
There are many rules for how to display numbers, ranging from where separators go and what character to use for the separator and decimal points, to the characters used for the numbers themselves. Dates are far more complex and can vary in the order of elements displayed, separators used, and even the number of months.
An example of order of display is showing the day, month, and year. In the United States, the standard is to display “month, day, year” or “mm/dd/yyyy.” In Canada, just next door, the order of days and months is reversed, though the separators are the same—that is, “day, month, year” or “dd/mm/yyyy.” In China, it is “year, month, and day” with a special character after each element, then a space, and no other separator.
Calendars also differ. Most of the West uses the Gregorian calendar. Japan uses the Imperial calendar, based on the reign of the current emperor. The Gregorian year 2013 represents a year almost 2,000 years in the future in the Imperial calendar. On the Hebrew calendar, 2013 is more than 3,000 years in the past. The English language setting offers a choice of three calendars: Gregorian (the one you are probably used to), Japanese, or Buddhist.
iOS providers two key classes that let you simplify displaying the correct format and parsing input in your apps:
![]() NSNumberFormatter is used to display and read numbers formatted for a locale.
NSNumberFormatter is used to display and read numbers formatted for a locale.
![]() NSDateFormatter is used to display and read dates and times formatted for a locale.
NSDateFormatter is used to display and read dates and times formatted for a locale.
Other classes are used for calculating dates and time units:
![]() NSDate represents a date in the current calendaring system. It is really just a point in time wrapped in methods.
NSDate represents a date in the current calendaring system. It is really just a point in time wrapped in methods.
![]() NSCalendar represents a calendaring system that includes information on the number of days in a week, months in a year, or days in a particular month.
NSCalendar represents a calendaring system that includes information on the number of days in a week, months in a year, or days in a particular month.
![]() NSDateComponents is used for initializing dates from pieces and for time and date math. You can read or write the individual components of a date by using the current calendar as well as add or subtract different units of time.
NSDateComponents is used for initializing dates from pieces and for time and date math. You can read or write the individual components of a date by using the current calendar as well as add or subtract different units of time.
You should never do math assuming that there are 60 seconds in a minute, 60 minutes in an hour, and 24 hours in a day. Doing so is fraught with problems such as leap years and variations in daylight savings, not to mention different calendars.
![]() NSTimeZone represents a time zone and is important in the correct display of dates and times.
NSTimeZone represents a time zone and is important in the correct display of dates and times.
You will look at formats in more detail as you internationalize your app. Notice the word internationalize in the last sentence. There are two processes involved in adding a new language to your app:
![]() Localization is the process of preparing an application for other languages. This is when you set up the default language lproj folder, localize strings and generate string tables, and prepare for other types of content that can change as the language changes.
Localization is the process of preparing an application for other languages. This is when you set up the default language lproj folder, localize strings and generate string tables, and prepare for other types of content that can change as the language changes.
![]() Internationalization is configuring the content and files for a specific country. It is adding a language’s lproj folder and setting up, for example, strings for German or the special graphics for Japan.
Internationalization is configuring the content and files for a specific country. It is adding a language’s lproj folder and setting up, for example, strings for German or the special graphics for Japan.
The next section guides you through localizing the CarValet app.
Preparing the App for Localization
To prepare the CarValet app for other languages, you need to know the following:
![]() All the static strings that are displayed and where they are defined
All the static strings that are displayed and where they are defined
![]() All the dynamic strings that are displayed and where they are created
All the dynamic strings that are displayed and where they are created
![]() All places that display dates and where they are defined or created
All places that display dates and where they are defined or created
![]() All places that display numbers and where they are defined or created
All places that display numbers and where they are defined or created
![]() All places that parse dates or numbers entered by the user and that are read from the interface
All places that parse dates or numbers entered by the user and that are read from the interface
![]() Any culturally specific graphics and where they are defined (for example, an upside-down triangle is used to represent a stop sign in Japan)
Any culturally specific graphics and where they are defined (for example, an upside-down triangle is used to represent a stop sign in Japan)
For CarValet, there are very few strings shown and only two places where numbers are read. Figure 5-3 shows both of the related screens. All the strings to localize are highlighted in green, display only numbers in red, and numbers that are both displayed and read in blue. The Done button is not highlighted as it is a system button so iOS does the localization for you.
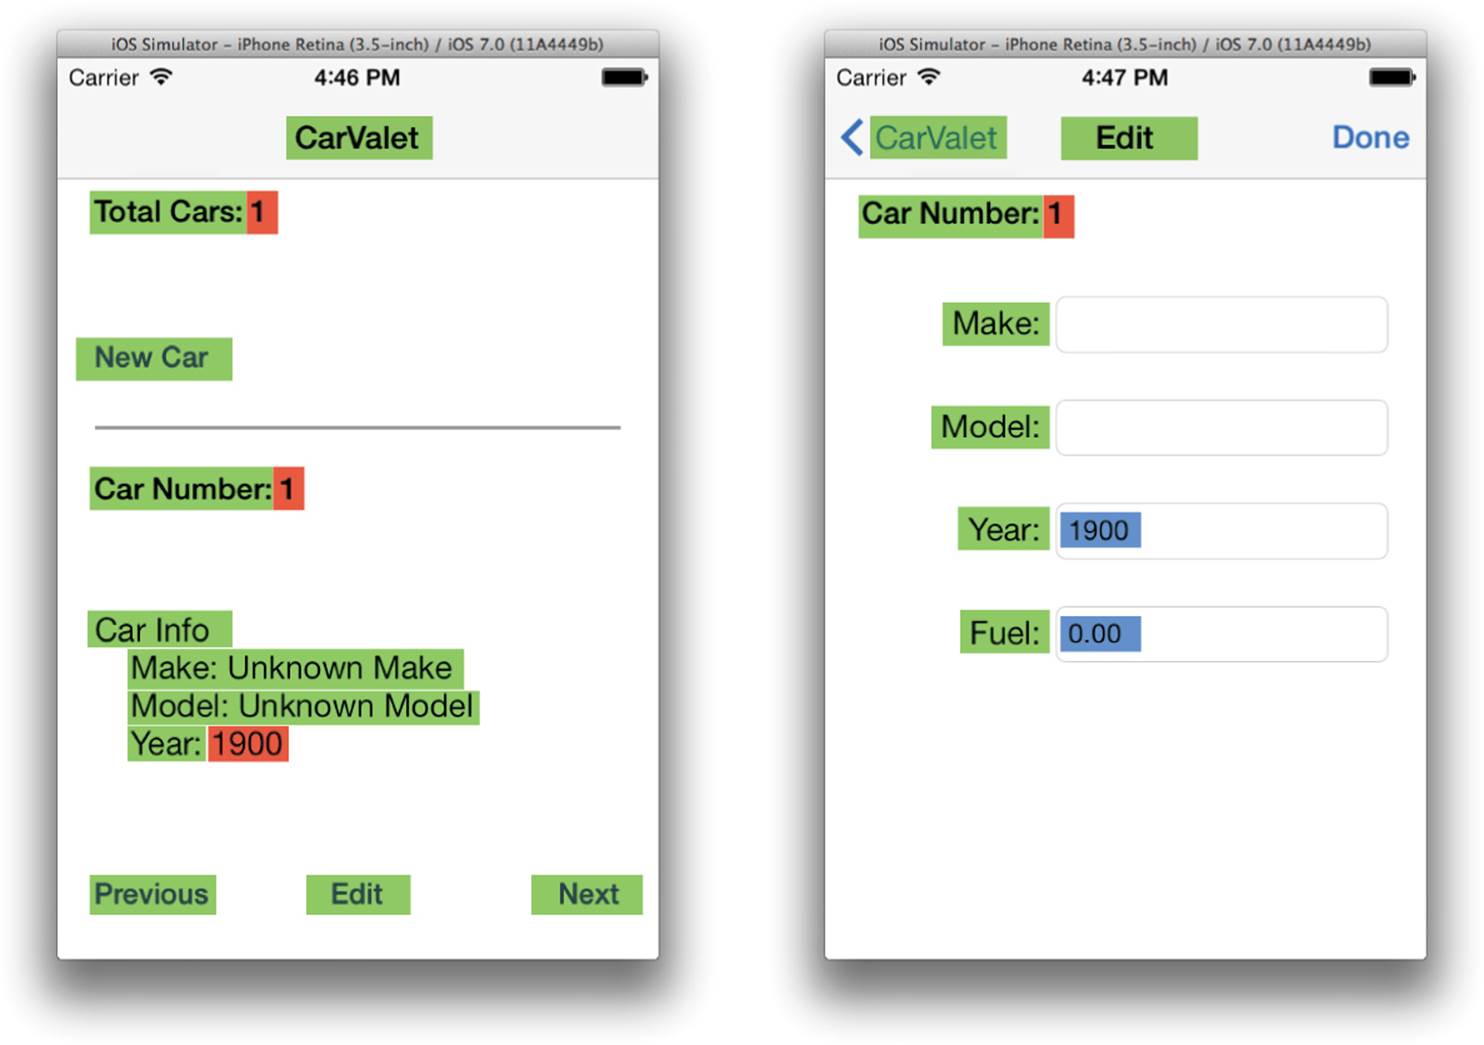
Figure 5-3 Strings and numbers to localize
For other apps, you need to know some other information:
![]() All places where lists of ordered strings are presented
All places where lists of ordered strings are presented
![]() All places attempting to autocomplete entered text
All places attempting to autocomplete entered text
![]() All places searching strings, especially for user display
All places searching strings, especially for user display
![]() All places requiring access to strings on a character-by-character basis, such as finding the position of a character or iterating through characters
All places requiring access to strings on a character-by-character basis, such as finding the position of a character or iterating through characters
The first item is because sort orders can vary widely between different countries and locales. Most of the rest are because a character might not be a character. The key to understanding this is, well, a key: ![]()
The key emoticon is not just one character. Although it may only take one “key” press from a special keyboard, it is really a number of elements that combine to make one user-visible character, or glyph. The same is true of many languages. Not just an obvious one such as Korean, but even French, where multiple key-presses combine to make an accented character.
Although most of this is beyond the scope of this book, the basic approach is to use methods for NSString that are locale-specific as well as checking text input for completed user-visible glyphs versus marked, or in-progress, glyphs.
For CarValet, the next step is to add code to read language-specific strings. The code you add is then used to generate the first string table. You can use the CH05 CarValet Starter project provided with the sample code or continue with your project from the previous chapter.
Setting Up Localization for the Add/View Car Scene
The existing InfoPlist.strings string table is for localizing items from CarValet-Info.plist, such as the application name. You need a different string table to localize the interface.
The first step is to add the calls to read localized strings. You call NSLocalizedString with a key to the string table and an argument documenting the meaning of the UI element. Make the following changes in ViewController.m:
1. In displayCurrentCarInfo, change the withBaseString: argument in the call to the updateLabel:withBaseString:andCount: method:
withBaseString:NSLocalizedString(
@"Car Number",
@"Label for the index number of the current car")
2. Similarly, change the withBaseString: argument in the newCar: method:
withBaseString:NSLocalizedString(
@"Total Cars",
@"Label for the total number of cars")
The calls to NSLocalizedString contain enough information to create a string table. Instead of manually creating one, you use genstrings to generate the table from your .m file(s):
1. Open the Terminal application on your Mac.
2. Navigate to your code directory. The easiest way to do this is to type cd and a space at the command line in the Terminal window and then drag the CarValet folder from the Finder (the one at the same level as the CarValet.xcodeproj file) into the Terminal window. A long path name appears. Press Return in the Terminal window, and you are in the project folder. You can easily confirm this by typing ls and pressing Return to list the contents of the directory. You should see all the .m, .h, and other files, as well as the en.lproj folder.
3. Use genstrings to generate the English strings localization file. In the Terminal window, type the following command and then press Return:
genstrings -o Base.lproj *.m
-o indicates the output folder, and *.m tells genstrings to look in each .m file for possible localized strings—that is, code that uses any of the NSLocalizedString macros.
After you complete these steps, the Base.lproj folder has a new file called Localizable.strings that contains the UI string table. Notice that you are setting up the base localization, the default for any localization item not defined in a specific language. Add that file to your project, in the Supporting Files group. Take a quick look at the project localization screen you saw in Figure 5-2. The base localization now has three files instead of two.
Tip: Version Control Is Your Friend
It is something that happens to all of us: The main string file has many lines, all with great symbols and comments for the localization team. Then you update the file for some new strings using genstrings and use the wrong arguments. Your work is gone.
Version control is the friend that saves you hours of work. Minimally, make sure you check the box to use GIT when you create your project. Commit often. Small commits are much easier to work with than large ones. It is not a matter of if, but when.
The contents of the strings file look something like Listing 5-1.
Listing 5-1 Localizable.strings File
/* Label for the index number of the current car */
"Car Number" = "Car Number";
/* Label for the total number of cars */
"Total Cars" = "Total Cars";
Each of the entries in the Localizable.strings file corresponds to a unique string defined by NSLocalizedString. The key is the same as the first argument, and the comment is the same as the second argument. It might look strange that the file has the resulting string equal to the key, but that is because this is the English localization. For German, the first translation line would look like this:
"Car Number" = "Nummer des Autos";
As mentioned earlier, it is best to use a descriptive key. Change the two calls to NSLocalizedString to use NSLocalizedStringWithDefaultValue, a related macro for specifying a default value, among other things. Change the call in displayCurrentCarInfo to this:
withBaseString:NSLocalizedStringWithDefaultValue(
@"CarNumberLabel",
nil,
[NSBundle mainBundle],
@"Car Number",
@"Label for the index number of the current car")
And change the one in newCar: to this:
withBaseString:NSLocalizedStringWithDefaultValue(
@"TotalCarsLabel",
nil,
[NSBundle mainBundle],
@"Total Cars",
@"Label for the total number of cars")
Run genstrings again and then look at Localizable.strings. This time you see the following:
/* Label for the index number of the current car */
"CarNumberLabel" = "Car Number";
/* Label for the total number of cars */
"TotalCarsLabel" = "Total Cars";
Run the project in the simulator, and you do not see any differences. Now open the Localizable.strings file and change the right-hand side of the "CarNumberLabel" label to "Car NumberCar Number":
"CarNumberLabel" = "Car NumberCar Number";
When you run the app again, you see the new string in the lower view car area.
Faking Localization with Double Strings
You might be surprised how long button titles or labels are in other languages. Unlike English, some languages use compound words or require an adjective and/or a definite article to modify a noun.
An example is the Edit button. In German, the text is Bearbeiten, which is more than twice as long as the English equivalent. Other buttons and labels might have similar issues. A good approach is to test your interface by doubling your default strings.
You could do this by manually changing your strings, although this is both tedious and prone to errors. (Imagine forgetting to change a string back before shipping.) Luckily, Xcode provides an easier way.
When you click the Run button, Xcode looks at the current scheme to figure out what to build and where to run. You can configure the arguments passed to the app before it launches. This might seem like a strange thing to do, but for debugging it can be a great help, including doubling all localized strings.
You add command-line arguments by editing the scheme (area 2 in Figure 2-5). Follow these steps to the option to double localized strings:
1. Choose Edit Scheme... from the scheme dropdown. You access the dropdown by clicking the right side of the scheme for the area. You should see the scheme editing pane.
2. Make sure the Debug is selected in the left list and then choose the Arguments tab in the left area.
3. Click the + button under the Arguments Passed on Launch list in the top part of the tab. It should be above the Environment Variables area.
4. Enter the following text in the editing field that appears. (Make sure to include the initial dash character.) When you are done, the pane should look like Figure 5-4:
-NSDoubleLocalizedStrings YES
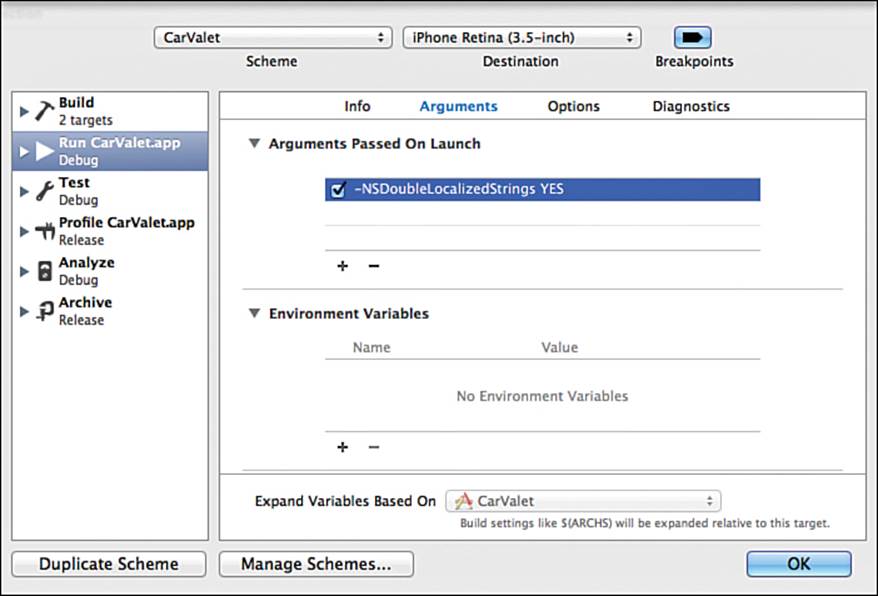
Figure 5-4 The scheme-editing pane
5. Make sure the box is checked and click OK to dismiss the pane.
Now run the project. On the main screen, any localized strings such as the Car Total and Number labels are localized, as are button strings. Xcode doubles the button titles for you.
Doubling the strings shows you that most of the main screen is likely to be fine with longer strings. You can also see that some buttons might be too big. Remember that you set the bottom row of buttons to be equal in width. They are all as wide as the largest button. That works well in this app for English but might not work for other languages. For now, you can take the string-doubling effect as a warning that you might need to make changes. You look at this in more detail when you add German. This is a good chance to think about how you might solve the problem of providing the same functionality where there is not enough room for all three text-based buttons.
To stop doubling strings, go back to the scheme-editing pane and uncheck the box next to the NSDoubleLocalizedStrings argument. Run your app again and your strings are back to normal.
With the labels localized, there are four other types of content on the page: button titles, the current car info, the screen title, and numbers. First, you need to localize button titles.
Localizing Buttons
To change a button title, you need a reference to the button object. The easiest way to get this is to use IB to add an IBOutlet-based property for each button. You localize the text in the view controller’s viewDidLoad: method. (Note that there is another way to localize any storyboard elements. See the “ibtool: Another Way to Localize Storyboard Strings” sidebar.)
Here’s how you add a property for the New Car button:
1. Open the Main_iPhone.storyboard file in the editor.
2. Open the Assistant editor to show ViewController.h next to IB.
3. Ctrl-drag the New Car button to the ViewController.h file and add an IBOutlet property, as shown in Figure 5-5.
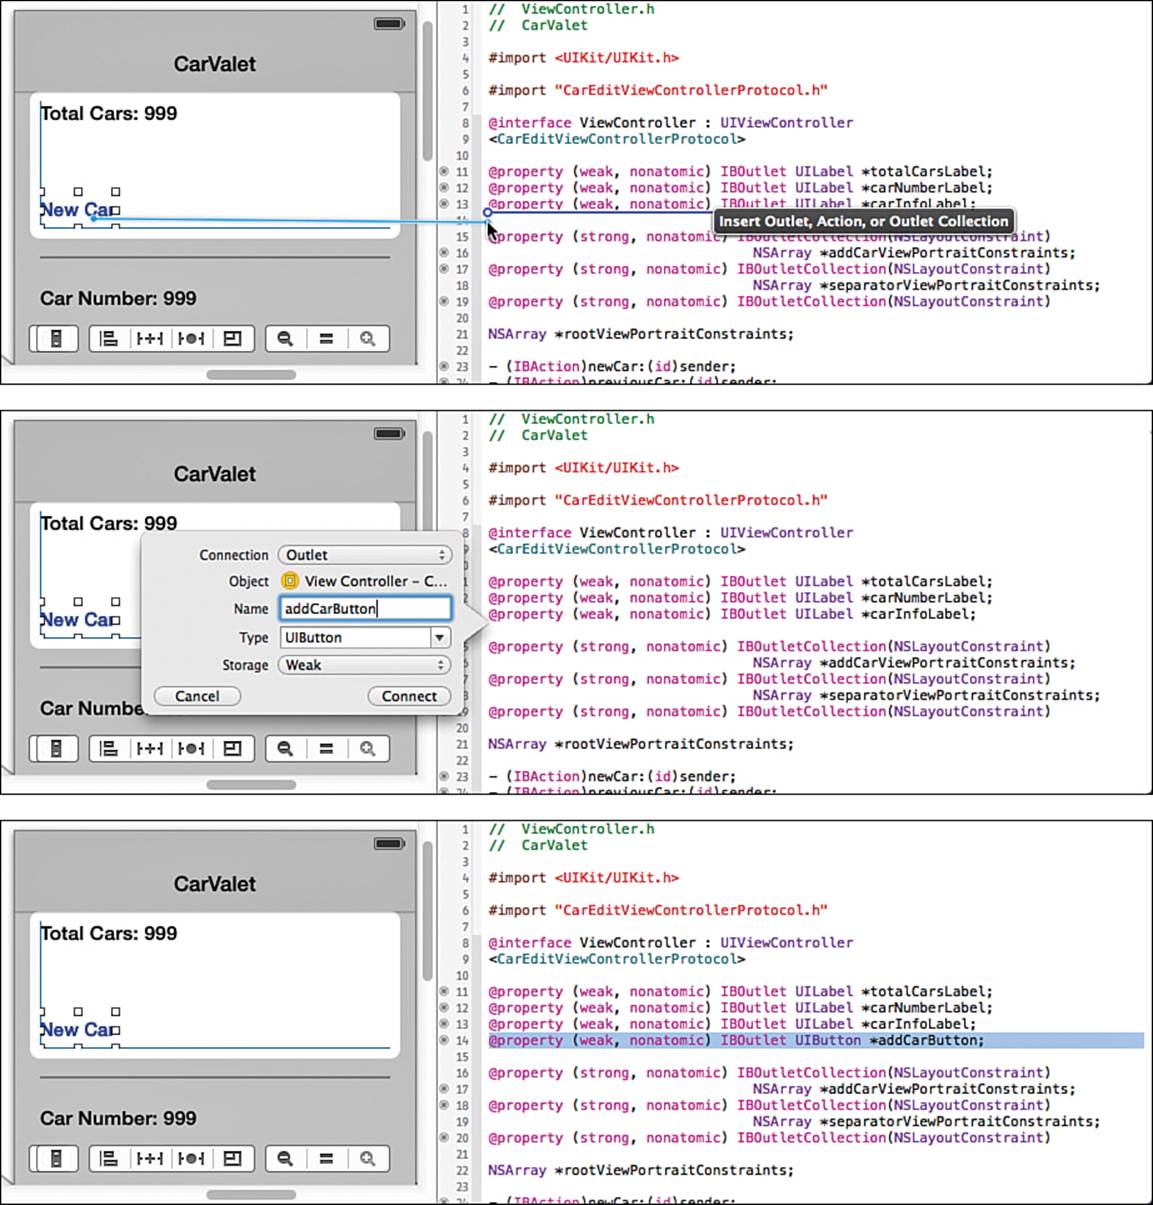
Figure 5-5 Adding a property for a button
The top part of Figure 5-5 shows Ctrl-dragging a connection from the button to the header file. The middle shows naming the outlet addCarButton. The bottom shows the newly added property. Note that the created property line is not normally selected. This was done afterward to make the new property easier to see.
Caution: Why addCarButton and Not newCarButton?
You might wonder why the property for the button titled New Car is not called newCarButton. new, like alloc or init, is the standard beginning for the name of a method that returns an object owned by the caller. Since you are creating a property, the compiler creates the accessor methods, including one called newCarButton. But that method returns a button owned by the view, not by the object using the accessor. The compiler detects the problem and gives an error.
Use the same technique to set up properties for previousCarButton, nextCarButton, and editCarButton. When you are done with that, add the code in Listing 5-2 to the viewDidLoad method. The new code is shown in bold.
Listing 5-2 Changes in ViewController.m viewDidLoad
- (void)viewDidLoad {
[super viewDidLoad];
NSString *local; // 1
local = NSLocalizedStringWithDefaultValue ( // 2
@"NewCarButton",
nil,
[NSBundle mainBundle],
@"New Car",
@"Button to create and add a new car");
[self.addCarButton setTitle:local forState:UIControlStateNormal]; // 3
local = NSLocalizedStringWithDefaultValue(
@"PreviousCarButton",
nil,
[NSBundle mainBundle],
@"Previous",
@"Title for button to go to the previous car");
[self.previousCarButton setTitle:local forState:UIControlStateNormal];
local = NSLocalizedStringWithDefaultValue(
@"NextCarButton",
nil,
[NSBundle mainBundle],
@"Next",
@"Title for button to go to the next car");
[self.nextCarButton setTitle:local forState:UIControlStateNormal];
local = NSLocalizedStringWithDefaultValue(
@"EditCarButton",
nil,
[NSBundle mainBundle],
@"Edit",
@"Title for button to go to edit the current car");
[self.editCarButton setTitle:local forState:UIControlStateNormal];
...
Here’s what happens in the numbered lines in Listing 5-2:
1. Set up a temporary string reference for the current localized title.
2. Set the temporary string to the localized title for the Add Car button.
3. Set the title of the default state for the Add Car button to the localized string.
Next, you add entries for the new strings to Localizable.strings. Use the terminal to run genstrings. Although you could update the strings file manually, this takes longer. Use the same command as you did before:
genstrings *.m -o Base.lproj
ibtool: Another Way to Localize Storyboard Strings
ibtool is another command-line tool like genstrings that works with storyboard and XIB files. It finds all strings from any standard UI element including button titles, labels, navigation items, and others. It is an advanced tool with lots of flexibility. Using the tool as part of the full project life cycle is beyond the scope of this book. What follows provides a basis for further exploration.
You can use it to generate a strings file. It uses the values in the storyboard or XIB as the default value, though you cannot specify the key or translation documentation. That means you have to go into the strings files and add the documentation yourself.
An example of the first few items from the current Main_iPhone.storyboard is as follows:
/* Class = "IBUIButton"; normalTitle = "Edit"; ObjectID = "9bN-ld-QVT"; */
"9bN-ld-QVT.normalTitle" = "Edit";
/* Class = "IBUILabel"; text = "Car Info Goes Here"; ObjectID = "Ebi-7G-Bnk"; */
"Ebi-7G-Bnk.text" = "Car Info Goes Here";
/* Class = "IBUINavigationItem"; title = "CarValet"; ObjectID = "Eva-kX-rHD"; */
"Eva-kX-rHD.title" = "CarValet";
As you can see, the comment is great to locate the particular element but not so good if you are the person trying to localize the string into some other language. The keys are strange-looking, but that is okay because they are part of the mechanism for matching strings to elements.
Localization is done the same way as elsewhere in this chapter: putting the localized string on the right-hand side in a file for that language.
Running the tool is done from the command line. If you wanted to generate the strings file for the Main_iPhone.storyboard file in the Base.lproj folder, you would change into that directory, and then use the following command:
ibtool Main_iPhone.storyboard --generate-strings-file Main_iPhone.strings
The first part is the file to localize. –-generate-strings-file tells ibtool what to do and what the name of the strings file should be. Because you are already in the Base.lproj folder, the strings file is generated in that folder. You could add it to your project as part of the localization.
This book uses genstrings and the NSLocalizedStrings macros for localizing all strings, including those in storyboards or XIB files. If you want to experiment with ibtool, you can get full documentation by opening a terminal window and typing the following command:
man ibtool
By reading the manual page and exploring the options, you can turn ibtool into a handy addition to your project life cycle.
Now it is time to localize the car info area. All that content is generated from the car model.
Localizing Strings in the Car Model
Car objects return display strings from carInfo. The method is currently based on a simple format string with hard-coded values for the title, separator, categories, placeholder values, and year. For now, you can add elements to the format string for localized values.
The rule of thumb is that the sentence is the most appropriate unit of localization. It gives a translator the best chance of matching gender, number, and tense. In this case, the information is singular: There is just one car. Gender for words can vary but sentences will make it clear if a word should be female, male, or neutral. Tense should not be an issue as the information is all in the present tense.
Change the carInfo method in car.m to the code in Listing 5-3 and then run genstrings to regenerate the Localizable.strings table.
Listing 5-3 New carInfo: Method in Car.m
- (NSString*)carInfo {
NSString *infoLabel = NSLocalizedStringWithDefaultValue(
@"CarInfoLabel",
nil,
[NSBundle mainBundle],
@"Car Info",
@"Label for the information of one car");
NSString *makeLabel = NSLocalizedStringWithDefaultValue(
@"CarInfoMakeLabel",
nil,
[NSBundle mainBundle],
@"Make",
@"Make Label for the make of one car");
NSString *modelLabel = NSLocalizedStringWithDefaultValue(
@"CarInfoModelLabel",
nil,
[NSBundle mainBundle],
@"Model",
@"Model label for the model of one car");
NSString *yearLabel = NSLocalizedStringWithDefaultValue(
@"CarInfoYearLabel",
nil,
[NSBundle mainBundle],
@"Year",
@"Year label for one car");
NSString *unknownMake = NSLocalizedStringWithDefaultValue(
@"UnknownMakePlaceholder",
nil,
[NSBundle mainBundle],
@"Unknown Make",
@"Placeholder string for an unknown car make");
NSString *unknownModel = NSLocalizedStringWithDefaultValue(
@"UnknownModelPlaceholder",
nil,
[NSBundle mainBundle],
@"Unknown Model",
@"Placeholder string for an unknown car model");
return [NSString stringWithFormat:
@"%@\n %@: %@\n %@: %@\n %@: %d",
infoLabel, makeLabel,
self.make ? self.make : unknownMake,
modelLabel,
self.model ? self.model : unknownModel,
yearLabel, self.year];
}
You do the work to localize the year near the end of the chapter.
Setting Up Localization for the Edit Car Scene
Now is your chance to experiment with setting up localization. Change the CarEditViewController class by doing the following:
![]() Change how the main label showing the car number is generated.
Change how the main label showing the car number is generated.
![]() Add properties to access each of the labels next to the edit fields. Use Table 5-1 for the name of the properties for each field. These names will be used in Listing 5-4.
Add properties to access each of the labels next to the edit fields. Use Table 5-1 for the name of the properties for each field. These names will be used in Listing 5-4.
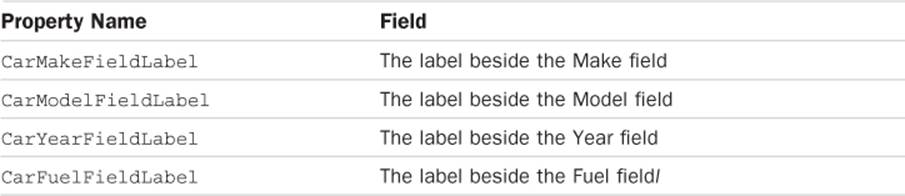
Table 5-1 Property Names for Elements of the Edit Car Scene
![]() Localize the field labels. (Remember that you are just localizing the word, not the separator.)
Localize the field labels. (Remember that you are just localizing the word, not the separator.)
The Done button in the navigation bar at the top of the screen is localized by the system so there is no work for you to do.
Add the new properties and the code to set localized values for all the labels on the screen. After you do that, regenerate the string table. If you used any duplicate keys such as CarNumberLabel, genstrings gives you a warning including any action taken:
Key "CarNumberLabel" used with multiple values. Value "Car Number" kept. Value
"CarNumberLabel" ignored.
Generally, this is what you want as it enables using the same key wherever a particular string is used. To give you an idea of how things could look, this is the strings file from the sample code after adding localization to the car edit scene:
/* Label for the line to enter or edit the Fuel in a car */
"CarFuelFieldLabel" = "Fuel";
/* Label for the information of one car */
"CarInfoLabel" = "Car Info";
/* Make Label for the make of one car */
"CarInfoMakeLabel" = "Make";
/* Model label for the model of one car */
"CarInfoModelLabel" = "Model";
/* Year label for one car */
"CarInfoYearLabel" = "Year";
/* Label for the line to enter or edit the Make of a car */
"CarMakeFieldLabel" = "Make";
/* Label for the line to enter or edit the Model of a car */
"CarModelFieldLabel" = "Model";
/* Label for the index number of the current car */
"CarNumberLabel" = "Car Number";
/* Label for the line to enter or edit the Year of a car */
"CarYearFieldLabel" = "Year";
/* Title for button to go to edit the current car */
"EditCarButton" = "Edit";
/* Button to create and add a new car */
"NewCarButton" = "New Car";
/* Title for button to go to the next car */
"NextCarButton" = "Next";
/* Title for button to go to the previous car */
"PreviousCarButton" = "Previous";
/* Label for the total number of cars */
"TotalCarsLabel" = "Total Cars";
/* Placeholder string for an unknown car make */
"UnknownMakePlaceholder" = "Unknown Make";
/* Placeholder string for an unknown car model */
"UnknownModelPlaceholder" = "Unknown Model";
The sample code from this chapter implements localizing labels with the code in Listing 5-4. The changes are in bold.
Listing 5-4 Changes in CarEditViewController.m viewDidLoad:
- (void)viewDidLoad {
[super viewDidLoad];
NSString *labelFormat = @"%@:"; // 1
NSString *local; // 2
local = NSLocalizedStringWithDefaultValue( // 3
@"CarMakeFieldLabel",
nil,
[NSBundle mainBundle],
@"Make",
@"Label for the line to enter or edit the Make of a car");
self.carMakeFieldLabel.text = [NSString
stringWithFormat:labelFormat, local];
local = NSLocalizedStringWithDefaultValue(
@"CarModelFieldLabel",
nil,
[NSBundle mainBundle],
@"Model",
@"Label for the line to enter or edit the Model of a car");
self.carModelFieldLabel.text = [NSString
stringWithFormat:labelFormat, local];
local = NSLocalizedStringWithDefaultValue(
@"CarYearFieldLabel",
nil,
[NSBundle mainBundle],
@"Year",
@"Label for the line to enter or edit the Year of a car");
self.carYearFieldLabel.text = [NSString
stringWithFormat:labelFormat, local];
local = NSLocalizedStringWithDefaultValue(
@"CarFuelFieldLabel",
nil,
[NSBundle mainBundle],
@"Fuel",
@"Label for the line to enter or edit the Fuel in a car");
self.carFuelFieldLabel.text = [NSString
stringWithFormat:labelFormat, local];
NSString *carNumberText;
carNumberText = [NSString stringWithFormat:@"%@: %d",
NSLocalizedString( // 4
@"CarNumberLabel",
@"Label for the index number of the current car"),
[self.delegate carNumber]];
self.carNumberLabel.text = carNumberText;
...
Here’s what happens in the numbered lines in Listing 5-4:
1. Set up a default format string for labels that includes the separator character. This allows for later localization of the format string using the NSLocalizedString macros.
2. Set up a temporary variable used to store a pointer to each localized string object and then set the displayed string of a UI element. You could skip using a variable and set the interface string to the result of calling NSLocalizedStringWithDefaultValue.
3. Format all the labels.
4. Format the Car Number label. Use the same key as for the add/view scene.
Run the code again and confirm that all the strings are correct.
Multiple String Tables
Using one string table works for the CarValet app because it is relatively small. When you have larger projects with many localized classes, one monolithic file does not work as well. It is hard to maintain, hard to read, and provides little flexibility. In such situations, a better approach is to use multiple string tables. You can use one table per source file or per logical grouping, or you can choose other organizational units such as a scene.
You specify a table from one of three specialized localized string macros. Each one takes a tableName parameter, a string that specifies the name of the table. The table name @"Car" would add the localization to Car.strings. Tables are created if they do not exist. These are the three routines:
![]() NSLocalizedStringFromTable adds a table argument to NSLocalizedString.
NSLocalizedStringFromTable adds a table argument to NSLocalizedString.
![]() NSLocalizedStringFromTableInBundle lets you specify both a table and a bundle.
NSLocalizedStringFromTableInBundle lets you specify both a table and a bundle.
![]() NSLocalizedStringWithDefaultValue is the most flexible, letting you specify a table as well as a default value and bundle. So far, all calls in CarValet use nil for the table.
NSLocalizedStringWithDefaultValue is the most flexible, letting you specify a table as well as a default value and bundle. So far, all calls in CarValet use nil for the table.
You can experiment with custom tables by adding them to a project. The files are created by genstrings. You need to add them to the project the first time they are generated. A call of the form genstrings –skipTable <table> tells genstrings to skip any strings for that table.
German Internationalization
German is a good target for internationalization for three reasons. First, there are many potential customers. Second, German has a different set of grammatical rules and includes gender and other modifications. And third, the language has compound words resulting in generally longer than English strings. Working with German is a good test to how well your UI adapts to long strings as well as a good source of possible downloads.
Before you start adding German words, make sure doubling of strings is off by unchecking the box next to the command-line argument in the scheme-editing pane.
Adding the German Locale
Now that you have set up localization, adding new languages is much easier. As you saw in the earlier section, “Redirection,” and Figure 5-2, you add new languages using the localization area of the project info pane.
Follow these steps to add German:
1. In Xcode, select the CarValet project in the left-hand Navigator and make sure the CarValet Project is selected, not the CarValet Target. With the project selected, choose the Info tab of the CarValet project in the main view.
2. Find the Localizations area and click the + button.
3. Select German (de) from the resulting popup shown in Figure 5-6.
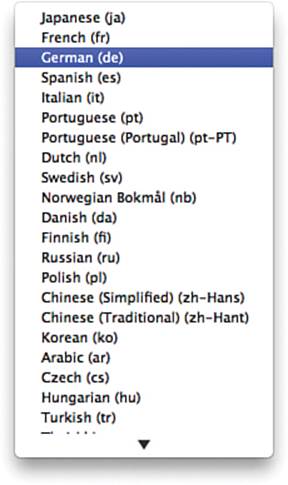
Figure 5-6 Language selection popup
4. In the localization items pane that appears, uncheck everything except the Base reference language Localizable.strings file. When the selection checkboxes look like those in Figure 5-7, click Finish.
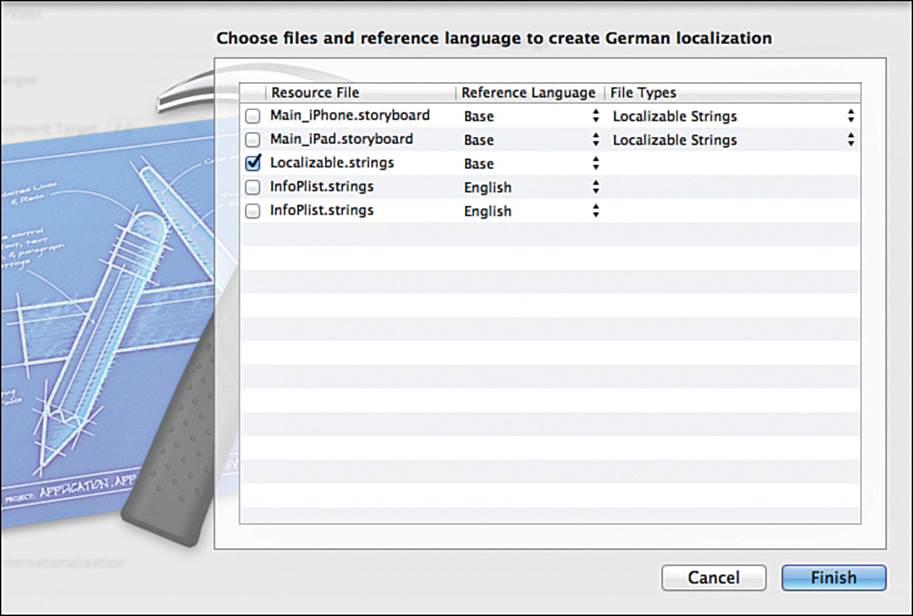
Figure 5-7 Localization items selection pane
In the Supporting Files group, Localizable.strings now has a disclosure triangle, with both Base and German versions. In the Finder, there is a de.proj folder with the strings file. If you left other files checked, the de.proj folder would also have a copy of those files. This is part of the redirection mechanism mentioned previously. Anything in the German project folder overrides something in Base. Note that accidentally leaving the storyboard checked can cause problems later on as changing the Base storyboard would not update the German one.
Localizing the App Name
There is one important string that is not in any of the code files you have worked with so far: the app name. In Figure 5-7, there is another strings file called InfoPlist.strings used for localizing application-level strings.
Localizing the app name requires two main steps. First, you have to add InfoPlist.strings to the German localization. Then, you update the file with the German app name. In general, it is a good idea to add this file when you create a localization. It was left out to show you how to add or remove files to a localization after a language has been added:
1. Select the InfoPlist.strings file in the project navigator.
2. Select the File inspector in the left-hand accessory pane. It should look something like Figure 5-8.
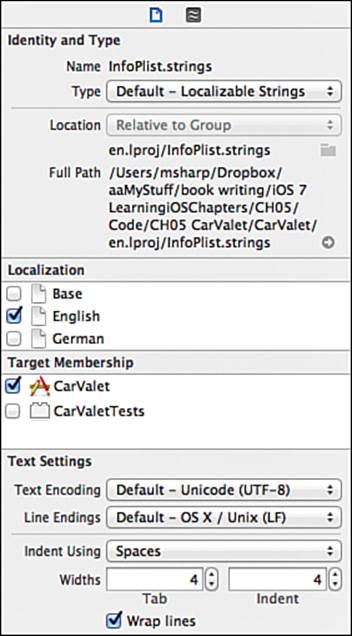
Figure 5-8 File inspector for a localizable file
3. Check the box for German. Note that you could remove a file from a localization by unchecking a box for a language.
When you check the box, the InfoPlist.strings item in the supporting files folder also has a disclosure triangle. Opening the items shows one strings file for English and another for German.
Adding the German App Name
To localize a project-based string, you need to know the real key used by the system for that item. Follow these steps to localize the string:
1. Select the CarValet-Info.plist file in the supporting files folder.
2. Find the key titled Bundle Display Name, the name that shows in the iOS app launcher, or home screen, of a device.
3. Press Ctrl or click the second mouse button anywhere in the Key, Type, or Value columns and choose Show Raw Keys/Values from the popup menu.
4. The name of the item you found in step 3 has changed to the actual key: CFBundleDisplayName. Make a note of the key or, better still, copy it to the Clipboard.
Create the localized launcher display name:
1. If you have not yet expanded the InfoPlist.strings to show the localization versions, click the disclosure triangle.
2. Open the German version of the file and update it so it looks like this (new content in bold):
/* Localized versions of Info.plist keys */
/* Name of the CarValet App in the App Launcher */
CFBundleDisplayName = "AutoParker";
Changing the Device Language
Shortly, you run the app in German, but first you need to know how to change the language of the simulator or device, even if it is running in a language you cannot read. This way, you do not get stuck in German or Arabic and end up resetting or even re-installing your device to get back to normal. These instructions are for the simulator, but they are easily adaptable to devices:
1. If you are running an application, go back home by choosing Hardware > Home or by pressing Ctrl-Shift-H.
2. Open the Settings app.
3. Choose General from the main Settings page on the iPhone/iPod touch or the left column on the iPad. It has a smaller version of the geared Settings icon. Note which item this is, as you may need to navigate with the unit in a different language. The name differs but the position stays the same.
4. Choose International, and again, note the position of the choice in the menu.
5. In the International screen that appears, choose Language, once again noting the position.
6. Choose any language from the list. Every language is shown in its localized format so your native one should be easy to spot. After you tap a language, you get a confirmation dialog in the current language. Tap the top-right confirmation button (no matter what it says). The screen goes black and tells you it is updating the language. The left button cancels changing the language.
Run the app in the simulator. When it is running, stop it in Xcode. Use the preceding steps to change the language to German. Find the screen containing the app, usually the second one, and you see that the name has changed to AutoParker. When you launch the app, no other strings are in German. Updating strings in the app is the next step.
Updating the German Localizable.strings
Open the German version of Localizable.strings, and you see that it looks identical to the English one. Change the right-hand strings to those in Table 5-2, make sure the simulator language is German, and run the app. The German version of the app should look as shown in Figure 5-9.
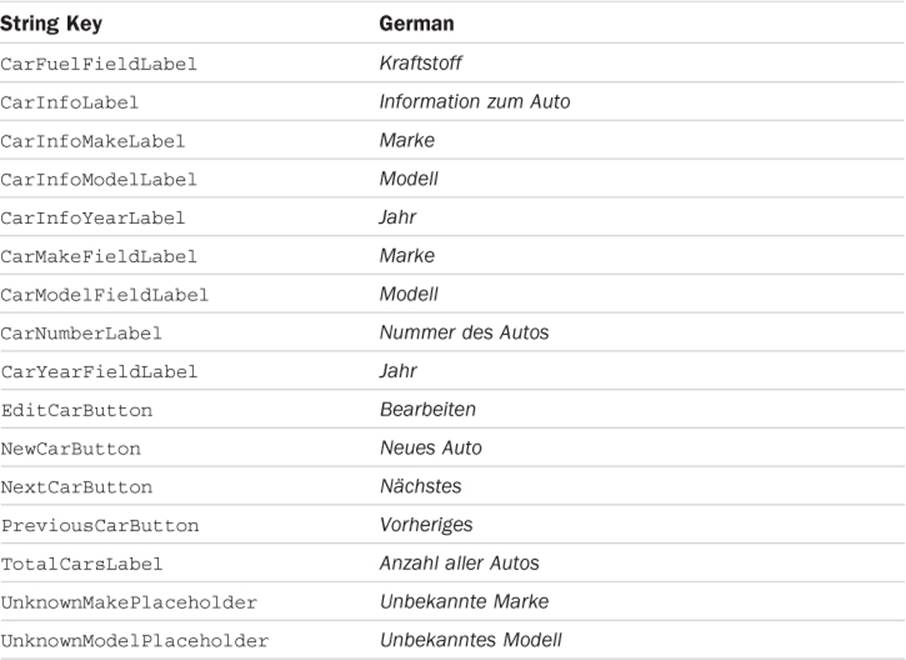
Table 5-2 German Localization Strings
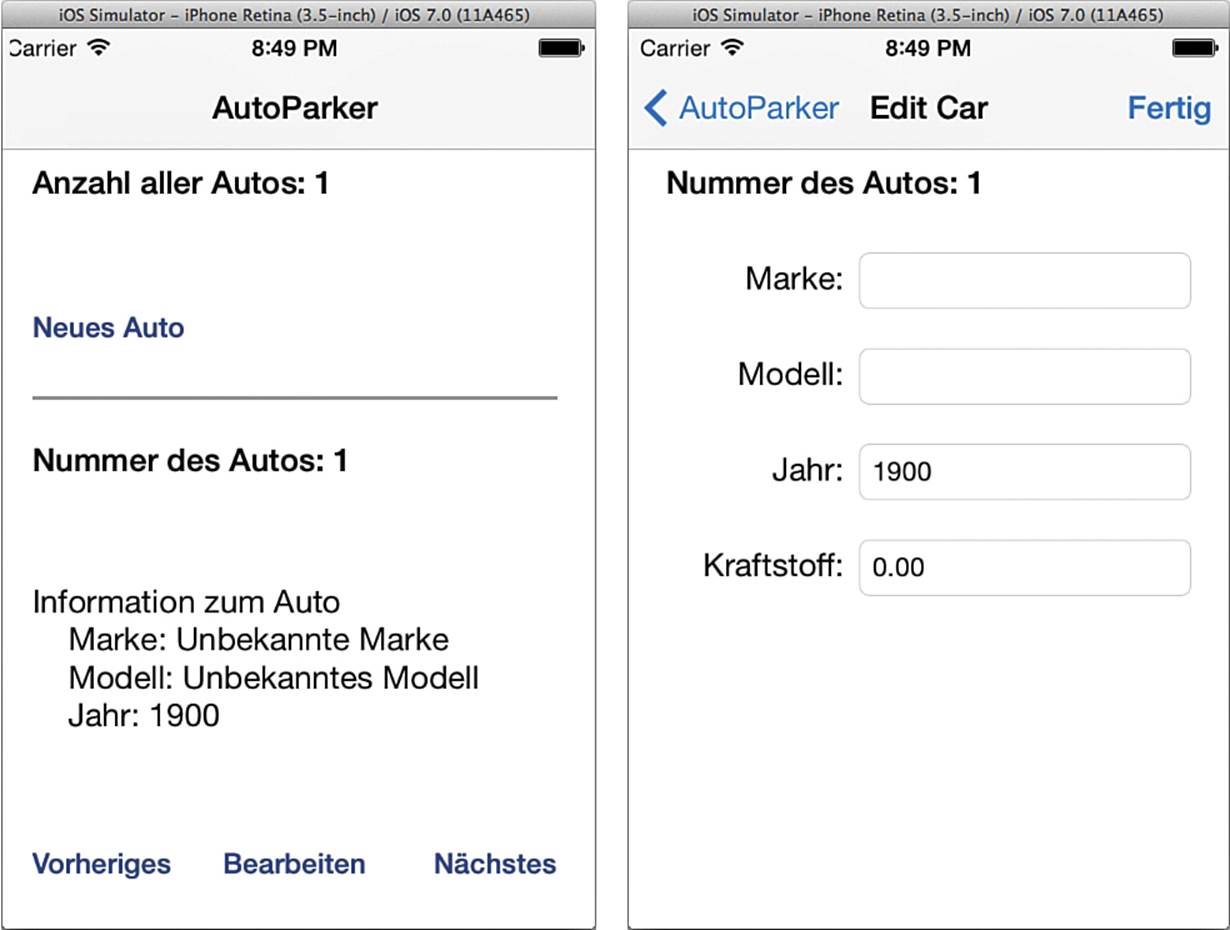
Figure 5-9 The CarValet app in German
There is a chance your app will still show English strings. If that happens, the problem is that the Localizable.strings file is not a member of the CarValet target. To check and fix this, follow these steps:
1. Select the Localizable.strings file in the project navigator.
2. Show the File inspector on the left side of the Xcode window and look at the Target Membership area.
3. If the CarValet (top) target is not checked, check it.
If the CarValet target is checked, then your project is missing something from this chapter. You can go back over the chapter or look at the chapter sample code.
There is one problem here: The title of the main screen is okay, but the edit screen is still English. The main screen worked because the default title is the name of the app, and that string is localized. Having said that, it is safer to control the strings.
Add the following code in viewDidLoad: for ViewController.m:
- (void)viewDidLoad {
[super viewDidLoad];
self.title = NSLocalizedStringWithDefaultValue(
@"AddViewScreenTitle",
nil,
[NSBundle mainBundle],
@"CarValet",
@"Title for the main app screen");
NSString *local;
...
Do the same for CarEditViewController.m but use the key EditViewScreenTitle, a default value of “Edit Car,” and change the translator documentation to the “Title for the edit car screen.” You have two choices for how to add new keys to the string table. First, you could manually create entries in the English and German tables. Second, and better, as it does not change work already done, is to replace the Base string table using genstrings and then copy the two new keys and comments to the German file. Then you can change the values to German. When you add another language, the new entries are copied from the Base table.
These are the additional German strings:
![]() CarValet is AutoParker
CarValet is AutoParker
![]() Edit Car is Auto Bearbeiten
Edit Car is Auto Bearbeiten
Changing Label Constraints
The app is now shown in German, but there is still one issue. To see this, run the app on the simulator and rotate to landscape. As you can see in Figure 5-10, the translated Total Cars label is too long.
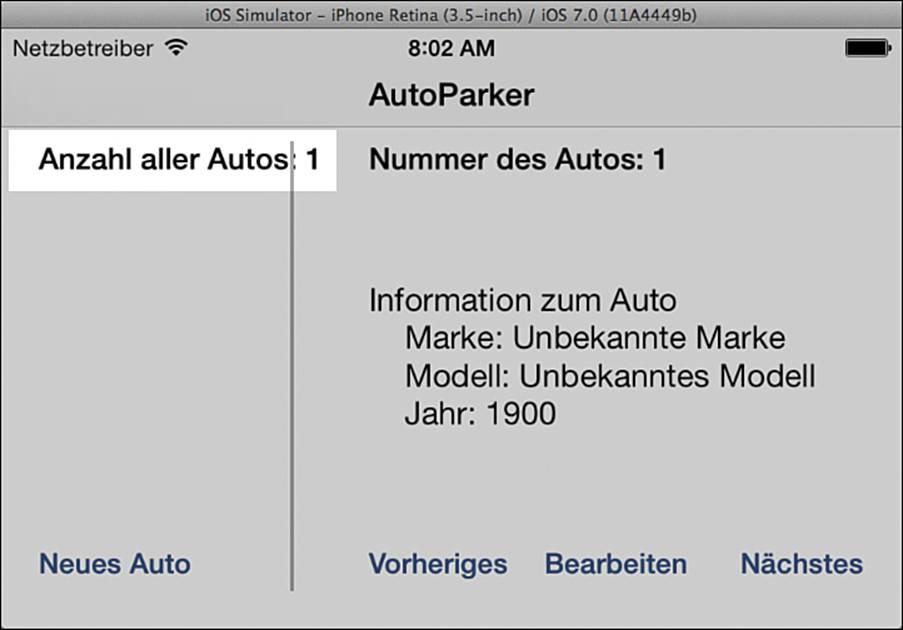
Figure 5-10 Translated label drawn outside of the container view
The core problem is the translated string is too large to fit on one line in the space provided by the add car group. Normally, you would expect to see a truncated string with a continuation character, something like “Anzahl aller Au...”.
The reason is the width of the label is not constrained to the width of its container. The resulting frame extends beyond the trailing edge of that container. You might expect the labels container view to clip the string...that is, to cut off any part of the label drawn outside of the frame of the add car grouping view. Views can clip their contents, but doing that requires setting a flag in IB or in code. Some types of view elements have that flag set by default, but not UIView.
Try setting the Clip Subviews flag for the add car group shown in Figure 5-11. When it is checked, run the app in landscape. The label is clipped but does not look good because part of a letter is missing. This is why the preferred way of showing strings that are too long is to truncate them using ellipses, the default behavior of labels, buttons, and other elements.
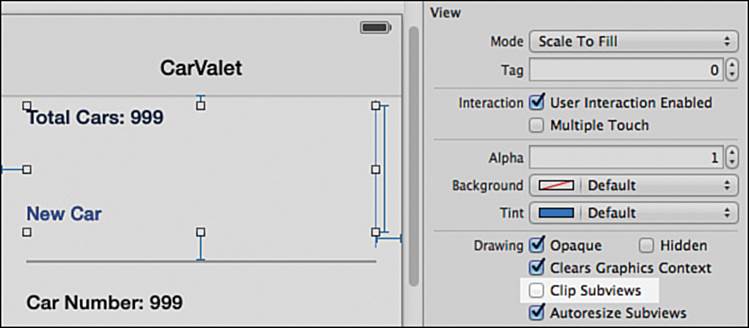
Figure 5-11 Clip Subviews flag in IB
In this case, there is a lot of vertical space between the label and button. You can change the label to allow multiple lines and modify the constraints as needed. Before you start doing this, make sure the Clip Subviews flag of add car grouping view is unchecked again.
As shown in Figure 5-12, running the app in landscape on a 3.5-inch screen shows one other issue: There is not enough room to show the total number of cars.
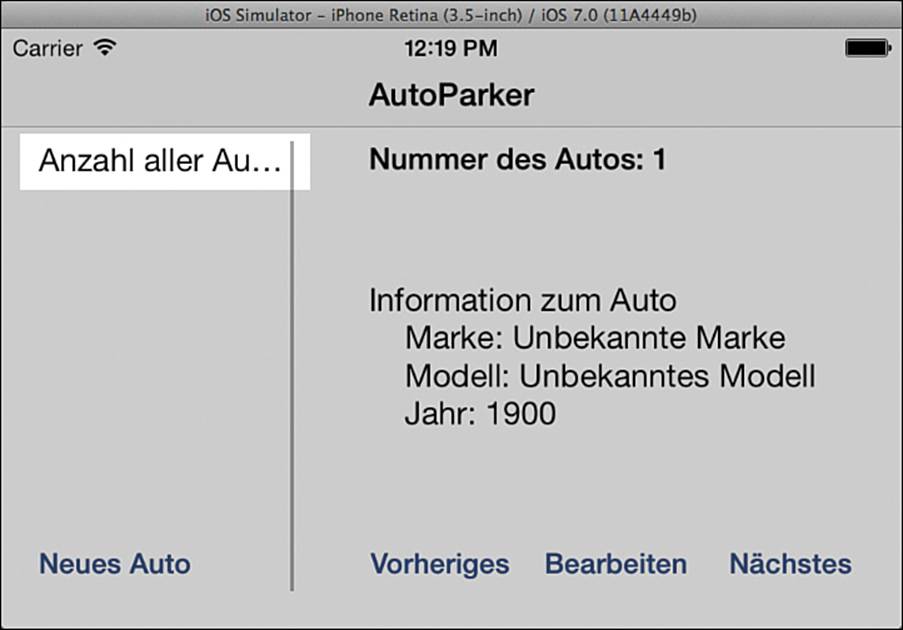
Figure 5-12 German Total Cars label clipped in portrait
The best solution is to find a set of constraints that resizes the Car Total label for any localized string in any orientation. You can do this by making it a multiline label by setting the number of label lines to 0.
Next, set new constraints for the label using these steps:
1. Select the total cars label, and choose Editor > Resolve Auto Layout Issues > Clear Constraints. You can also use the constraint resolution pane from the toolbar to do the same thing.
2. Set the leading, trailing, and top constraints to be adjacent to (0 points from) the leading, trailing, and top edges of the container.
3. Drag a connection between the label and button and set a vertical height constraint.
4. Double-click on the constraint and set the relationship to greater-than-or-equal-to and the constant to 0. Editing the constraint is shown in Figure 5-13.
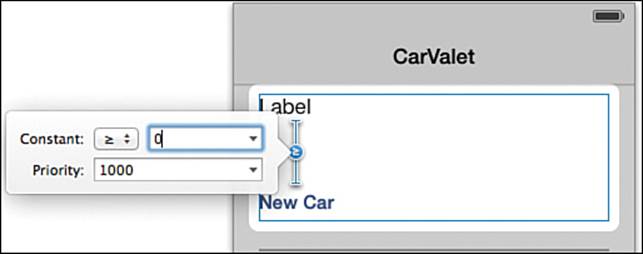
Figure 5-13 Setting a greater-than-or-equal-to constraint
5. Use the Size inspector to confirm that all the content-hugging priorities are set to 250 (the standard value) and all content compression resistance priorities to 750. If they are not, set them to those values.
6. Use the Attributes inspector to set the number of lines for the label to 0. That allows it to display multiple lines.
You might wonder why you set the constraint between the label and the button in step 3. This prevents the label covering the button. It says that the distance between the bottom of the label and the top of the label can never be less than zero. And since the button is fixed, the label does not grow any larger. If the text is too large, it gets truncated.
Note that these settings are based on a recommendation from Apple, though they were not working with the beta version of iOS 7 used for this book. If they do not work with the version of iOS you are using, use the workaround described in “Caution: Multiline Labels and Auto Layout.”
Caution: Multiline Labels and Auto Layout
As of the iOS 7 beta used for this book, the recommended constraints do not correctly resize the label. The root cause seems to be auto layout relying on the preferredMaxlayoutWidth property to find the horizontal size of a label. Preferred maximum width needs to be set before auto layout can successfully lay out the landscape view. Unfortunately, the system does not try to resize the label until after auto layout is done. The label never grows to show the text.
The solution is to wait until the view has completed laying out subviews and then set the preferred maximum width. Effectively, you have to wait until viewDidLayoutSubviews is done for all views and then set the preferred maximum based on the new width. The workaround code shown next uses a routine called dispatch_async, part of Grand Central Dispatch. That technology is beyond the scope of this book. For more information, see the Apple documentation or Chapter 18 of iOS Components and Frameworks: Understanding the Advanced Features of the iOS SDK by Kyle Richter and Joe Keeley.
The workaround fixes the problem for the Total Cars label by adding two methods to your view controller. Add the following methods below viewDidLoad:
// BEGIN WORKAROUND for labels not correctly updating during rotation
- (void)viewWillLayoutSubviews {
self.totalCarsLabel.preferredMaxLayoutWidth = 0.0;
}
- (void)viewDidLayoutSubviews {
dispatch_async(dispatch_get_main_queue(), ^{
self.totalCarsLabel.preferredMaxLayoutWidth =
self.totalCarsLabel.frame.size.width;
});
}
// END WORKAROUND for labels not correctly updating during rotation
The solution works for one specific label. If there are other possible problem labels, add them to the methods, performing the same steps on each string. If there are a number of strings, you could create an IBOutletCollection, populate it with problem labels, and iterate through them.
Run the app again in German, and the landscape scene looks like Figure 5-14. Try rotating between portrait and landscape to make sure all the views are laid out correctly.

Figure 5-14 New landscape layout
Formatting and Reading Numbers
So far you have only localized strings in the CarValet app. Numbers and dates also vary in formatting from locale to locale. In iOS, the language and locale are set separately, as you saw in Figure 5-1. One simple example is a device using English for the language and Canada for formats.
As mentioned previously, German numbers reverse the period and comma separators. The number 1,234.56 in English is 1.234,56 in German. At the moment, you are showing the fuel amount using stringWithFormat: and reading it with floatValue. Neither of these methods works with localized numbers. For that, you need NSNumberFormatter, a class for both creating and parsing localized numbers as well as other formatting tasks. Creating a string uses either the class method localizedNumberFromString:numberStyle: or the instance methodstringFromNumber:. Reading strings requires numberFromString: which, like stringFromNumber:, requires a bit more effort in setting up the formatter.
Adding localized number display and parsing requires only a few lines of code in CarEditViewController.m:
1. Display a localized fuel amount by replacing the line setting self.fuelField.text in viewDidLoad with this:
self.fuelField.text = [NSString localizedStringWithFormat:@"%0.2f",
self.currentCar.fuelAmount];
2. In prepareForSegue:sender:, replace the line that updates self.currentCar.fuelAmount with this:
NSNumberFormatter *readFuel = [NSNumberFormatter new];
readFuel.locale = [NSLocale currentLocale];
[readFuel setNumberStyle:NSNumberFormatterDecimalStyle];
NSNumber *fuelNum = [readFuel numberFromString:self.fuelField.text];
self.currentCar.fuelAmount = [fuelNum floatValue];
3. Make the same code change from step 2 in viewWillDisappear:.
The code in step 1 uses the localized version of the string with format call. localizedStringWithFormat: also uses indirection, though this time the system does the work for you. You specify a format string as normal, and the system will do whatever is required to show the localized versions of those formats.
The code from steps 2 and 3 allocates a number formatter, sets it to the current locale, and to work with decimal numbers. Next, it uses the formatter to get an NSNumber object from the localized entry in the text field, and finally, it converts that number to a float and assigns it to the fuel amount.
In final code, you would create a utility method for reading the field data. You might have a private instance variable for the number formatter and create it only once. Creating formatters for either numbers or dates is a relatively time-consuming operation.
To see the code working, run the app again with the device set to English language, with United States (or Canada, or United Kingdom, and so on) as your region format. Then do the following:
![]() Edit a car and enter a fuel amount of 1234.56. Note that the keyboard might block the field, so you should return to the main view and then return to the edit view to confirm that you entered the correct number.
Edit a car and enter a fuel amount of 1234.56. Note that the keyboard might block the field, so you should return to the main view and then return to the edit view to confirm that you entered the correct number.
![]() Go to the main screen and use Settings to set the region format, not the language, to Germany.
Go to the main screen and use Settings to set the region format, not the language, to Germany.
![]() Go back to the app and edit the same car.
Go back to the app and edit the same car.
You should see the fuel displayed as 1.234,56. Try making changes and confirm that the fuel is read and displayed correctly. You can also try switching to different region formats to make sure the fuel is displayed and edited correctly. Before moving to the next section, make sure you set your region back to your default. (This book uses United States.)
As you see later, you can localize dates by using NSDateFormatter.
Caution: Balancing Display and Parsing
When you use edit fields, it is very important to balance the use of localization. If you are localizing the display of a number or date, you must use a formatter to parse any changed value. Forgetting to do this can lead to unexpected values, sometimes resulting in errors.
Next, you learn how to localize the CarValet app for Arabic. If needed, you can start with the CH05 CarValet Arabic Starter project, which contains the final German internationalization.
Right-to-Left: Arabic Internationalization
Several of the constraints you have created use leading and trailing edges instead of left and right. This section shows you why.
Both English and German are left-to-right languages. This applies both to the flow of a sentence and the flow of each word. Changing “Mary had a little lamb.” to right-to-left means flipping the complete sentence: “.bmal elttil a dah yraM” And even that does not catch the true difference, as there may be non-native words inside the sentence. If “Mary,” a proper name, were foreign, the right-to-left version would be something like this: “.bmal elttil a dah Mary”
Note that everything from this section applies to any right-to-left language including Hebrew, N’Ko (African), Thaana (Maldives), and a few others.
The best way to understand all the issues with internationalizing to a right-to-left language is to do it.
Adding Arabic Strings
The first step in adding Arabic strings is creating the new localization with string tables for the interface and for the application name. You do this in much the same way you did German except you select both the Localizable.strings and InfoPlist.strings files in the localization pane.
When you have created the new localization, you need to run the app in Arabic. There are two ways to do this. First, you can use the settings app in the simulator as you did when you changed to German. Switching between languages in this way is useful when you want the whole device to behave as if it were in that language. If you want to switch languages in this way, the Arabic language choice looks like “![]() .”
.”
A second option lets you run just your app in a different language but has no effect on the rest of the device. Generally, this is a faster way to check incremental changes. This option uses the AppleLanguages launch argument:
1. Open the scheme-editing pane to the Arguments tab.
2. Add two runtime arguments, one for setting the language to Arabic, and one for German. The two strings are:
-AppleLanguages "(German)"
-AppleLanguages "(Arabic)"
3. When you are done, the pane should look like Figure 5-15. Close the pane.
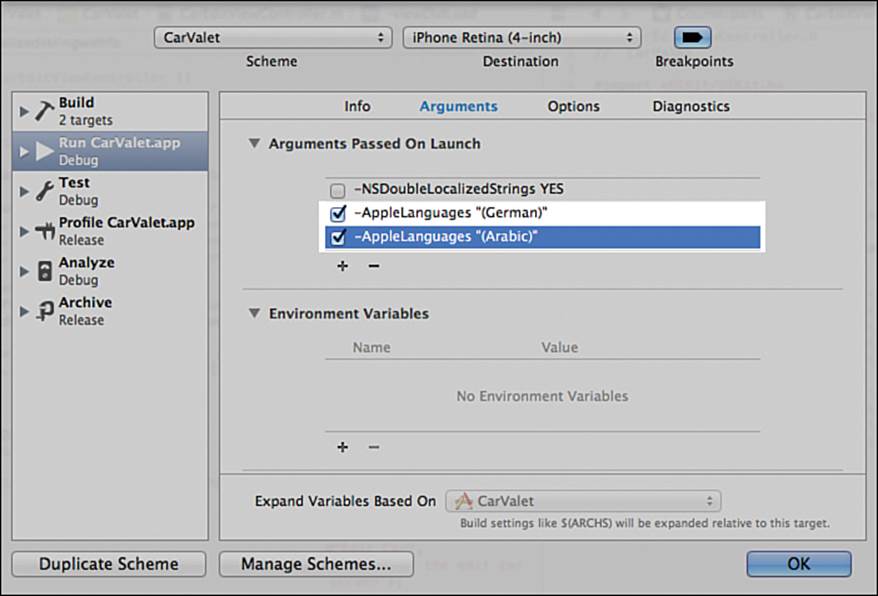
Figure 5-15 Scheme pane with Apple language arguments
When you closed the editing pane, both languages were checked, but what you want is Arabic. You can use a shortcut to show the scheme-editing pane as part of running the app. Option-click the run button and you will see the pane, though with Done and Run buttons in the lower right instead of OK. Uncheck German and press the Run button, and the app looks like the screen shown in Figure 5-16.
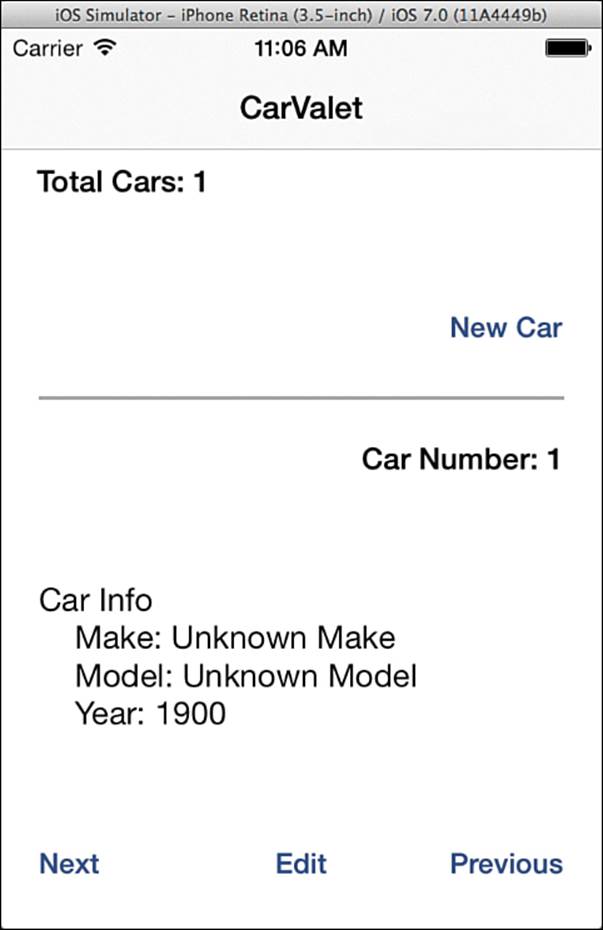
Figure 5-16 Arabic language, English strings
From now on, when you run the app, it will be in Arabic until you change the settings of the launch flags.
Leading, Trailing, and Language Direction
Because you used leading and trailing, the Total Cars and Car Number labels are aligned with the right-hand side of the screen. The same is true for buttons. New Car is on the right, and Previous and Next have been switched.
This is a significant savings in time compared to older ways of localizing. Without auto layout, you would need to add code to detect right-to-left languages and either manually change all the appropriate interface elements or use different storyboards. With auto layout, there is almost no work for you to do, and most of the work is done in the string table.
The only element not right-aligned in Figure 5-16 is the car info string. This is because the label has leading and trailing constraints that are up against the edges of its container. To make things work, remove the trailing constraint and resize the frame.
You can remove the constraint in at least two ways. Whichever way you choose, the first step is to select the view. After that, you use the Size inspector to select and delete the constraint using the gear icon. The other way is to move your mouse to the trailing area. Click to select the trailing constraint when the i-bar highlights and then press the Delete key.
Run the app again and you will see Car Info is aligned to the left side. There is a slight issue with indentation that you fix shortly.
Now use Table 5-3 to update the Localizable.strings and InfoPlist.strings files. To make this easy, you can copy and paste each string into the Arabic string table. If that does not work, check out the sample code for the book, which includes a completed Arabic string table you can use.
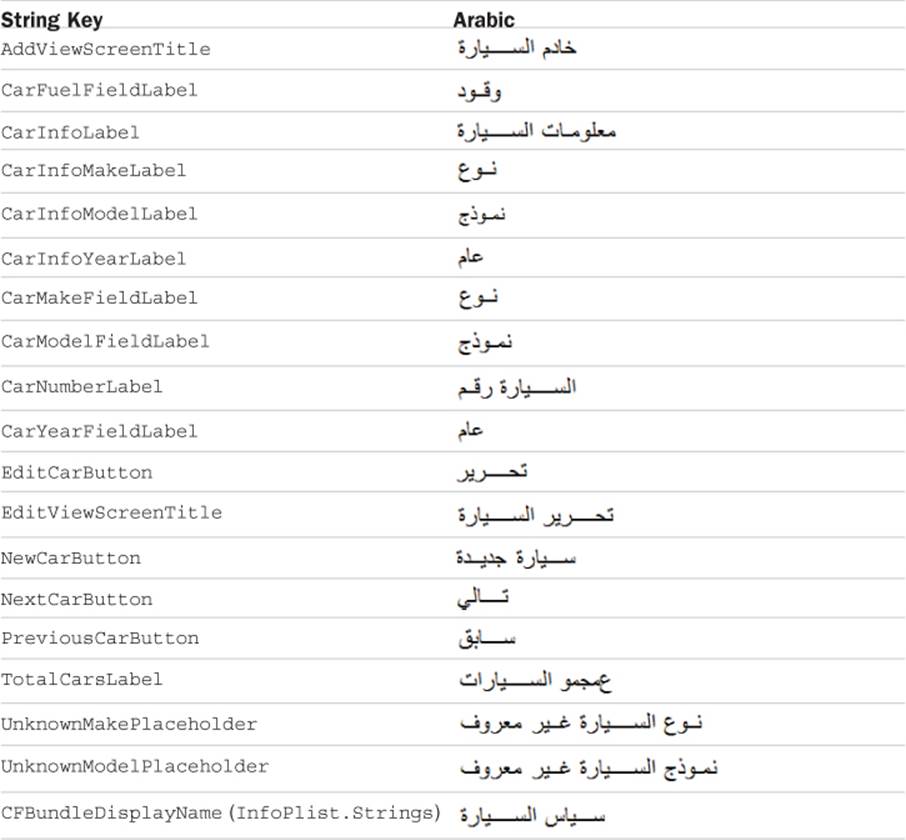
Table 5-3 Arabic Localization Strings
Run the app, and you should see something like the screen in Figure 5-17.
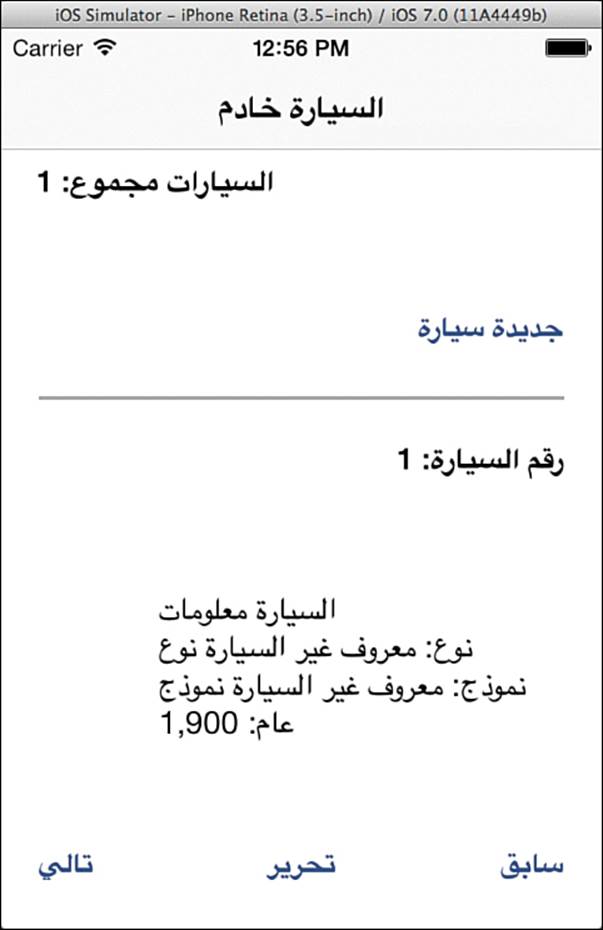
Figure 5-17 App with Arabic strings
The next step is localizing the numbers and the year.
Making Dates and Numbers Work
Figure 5-17 looks almost right. At first glance, it appears that the car counts and years are not correctly localized. However, it turns out they are. Look in the iPhone status bar at the top of the simulator, and you see that the time is still in English. This is because there are really four settings controlling full localization.
So far, you have only been changing the display language. Go to the Settings app and the International screen. In addition to selecting a language, you can also select a keyboard. For English, you can choose between some different software and hardware layouts. Other languages have more layouts, while some—such as Simplified Chinese handwriting—have just one. There might be several possible keyboards shown. Each time you switch to a new language, the keyboard settings for that language are added to the list.
The international settings screen has two more settings for controlling the region. The first is Region Format. This controls formats for various numbers, such as integers, floats, currency, and phones. It also controls how times and dates are displayed.
The other region setting is Calendar, and it controls how NSDate objects are converted to dates as well as date and time math. Some calendars, such as the Buddhist one, have 13 months.
The first step to seeing Arabic numbers and dates is to set the correct region. Keep the unit in English and use the Region Format to select Arabic > World. When you select World, you see the time in the status bar change. When you return to the International screen, the number of keyboards is in Arabic, as are the date, time, and phone number shown at the bottom of the screen. Now select Arabic as the main language and run the app.
None of the numbers on the main screen are in Arabic. Now go to the edit screen, and most of the numbers are in English. The exception is fuel. That is because earlier you changed stringWithFormat: to localizedStringWithFormat:.
The rule of thumb is to use the localized version, if you are displaying something in the interface and it contains something that could be localized such as numbers or formatting. Based on that, update the following two places to use localizedStringWithFormat:. Both update the numbers in labels:
![]() CarEditViewController.m—Look for carNumberText and update the assignment statement.
CarEditViewController.m—Look for carNumberText and update the assignment statement.
![]() ViewController.m—Modify the call in updateLabel:withBaseString:count:.
ViewController.m—Modify the call in updateLabel:withBaseString:count:.
When you run the app, you see that the numbers in the labels for both screens are correct, but the date is not. Showing the localized year requires using a date formatter. You could argue that the year is user-entered data and should not be touched, but for now it is useful to see how to localize dates.
Creating a localized date from component parts is a multistep process. In this case, all you have is an integer for the year. These are the steps:
1. Create an NSDate object from any component(s) by using NSDateComponents.
2. Generate a format string for how you want to display the date (optional).
3. Create an NSDateFormatter that uses the format string or a standard format.
4. Generate the string for the displayed date from that date formatter.
Though this process might seem complex, you could easily encapsulate it in a utility method. For now, add the code from Listing 5-5 directly to carInfo in Car.m. (The new code is in bold.)
Listing 5-5 Creating a Localized Date from the Year
NSString *unknownModel = MyLocalizedStringWithDefaultValue(
@"UnknownModelPlaceholder",
nil,
[NSBundle mainBundle],
@"Unknown Model",
@"Placeholder string for an unknown car model");
NSDateComponents *dateComponents = [[NSDateComponents alloc] init]; // 1
[dateComponents setYear:self.year]; // 2
NSDate *yearDate = [[NSCalendar currentCalendar] // 3
dateFromComponents:dateComponents];
NSString *yearFormat = [NSDateFormatter // 4
dateFormatFromTemplate:@"YYYY"
options: 0
locale:[NSLocale currentLocale]];
NSDateFormatter *yearFormatter = [[NSDateFormatter alloc] init];
[yearFormatter setDateFormat:yearFormat]; // 5
NSString *localYear = [yearFormatter stringFromDate:yearDate]; // 6
return [NSString stringWithFormat:
@"%@\n %@: %@\n %@: %@\n %@: %@", // 7
infoLabel, makeLabel,
self.make ? self.make : unknownMake,
modelLabel,
self.model ? self.model : unknownModel,
yearLabel, localYear]; // 8
}
Here’s what happens in the numbered lines in Listing 5-5:
1. Allocate a date component object.
2. Set the year of the date component to the year of the car.
3. Use the current calendar to create a date from the date component object.
4. Set up a localized format to show the year.
5. Create a date formatter and set its format to the one created in step 4.
6. Generate the localized string for the date from the formatter.
7. Change the format string argument from a number to a string.
8. Replace the year attribute to the newly localized date string.
Run the new code, and you see the year displayed in Arabic on the main page.
Most of the time, you display full dates and/or times. This is much easier than converting to and from date components because NSDateFormatter provides a convenience class method localizedStringFromDate:dateStyle:timeStyle: that can generate various formats based on the current locale.
Like NSNumberFormatter, the date formatter class parses input using either dateFromString: or getObjectValue:forString:range:error:. This last method is supported in both the date and number formatters and is a safer way to parse input. Unlike the other methods, it returns a BOOL to indicate success or failure and sets an error object if problems occur.
Note: Using Custom Arabic Fonts
This chapter only uses built-in iOS fonts. It is possible to add custom fonts, and one of the reviewers for the book kindly pointed out that custom Arabic fonts might not work as expected. He recommended a library that worked well for his own app. You can find it athttps://github.com/Accorpa/Arabic-Converter-From-and-To-Arabic-Presentation-Forms-B.
Text Alignment
The last issue is the Car Info label’s text alignment. Although the text is shown right-to-left, the label itself uses left alignment. Things such as the Car Number label work because the label is just as big as it needs to be to show the text.
The car info area is larger than it needs to be and is left aligned, the default for all labels. Although the text direction is reversed, it still is aligned to the left, and the label is larger than just the size of the text.
There is no automatic way to correct for this. Auto layout has already updated the leading and trailing alignment of the label. You need to detect a right-to-left language and change the alignment of the car info view.
Add the code from Listing 5-6 to the viewWillAppear: in ViewController.m. The bold code detects the language direction and sets the text alignment for the label appropriately.
Listing 5-6 Setting Text Alignment for Car Info in viewWillAppear:
super viewWillAppear:animated];
NSLocaleLanguageDirection langDirection;
langDirection = [NSLocale characterDirectionForLanguage: // 1
[NSLocale preferredLanguages][0]];
if (langDirection == NSLocaleLanguageDirectionRightToLeft) { // 2
self.carInfoLabel.textAlignment = NSTextAlignmentRight; // 3
self.totalCarsLabel.textAlignment = NSTextAlignmentRight;
} else {
self.carInfoLabel.textAlignment = NSTextAlignmentLeft;
self.totalCarsLabel.textAlignment = NSTextAlignmentLeft;
}
...
Here’s what happens in the numbered lines in Listing 5-6:
1. Find the direction of the current language—that is, the language at the top of the preferred languages list. You might be tempted to use currentLocale, but that does not return the selected language.
2. Check whether the language is right-to-left.
3. If the language is right-to-left, change the text alignment of the car info label to right. Otherwise use left.
Run the code again, and this time the screen displays correctly, as shown in Figure 5-18.
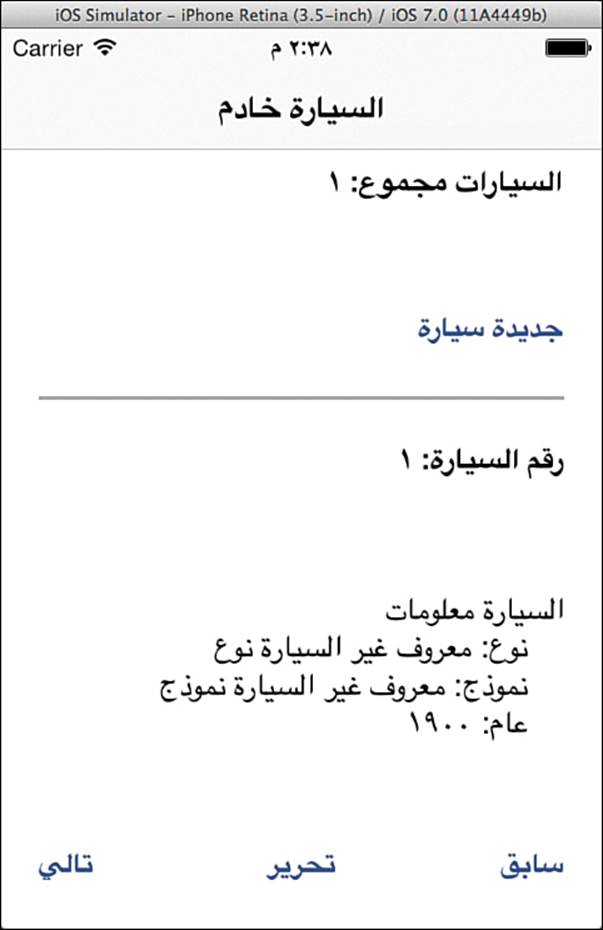
Figure 5-18 Arabic dates and car info correctly aligned
Summary
In this chapter, you created a truly international app, one that supports three languages: English, German, and Arabic. First, you explored the mechanisms iOS uses to make localization easy. You localized your app strings and used genstrings to make a string table. While doing that, you learned a handy way to double native strings and find places where you might need to change your layouts.
The first language you added was German, a language that typically has longer words than English. You learned the power of icons for both localization and looks and got some more practice with auto layout as you changed some buttons. You also found out the importance of continuing to test your app in all four combinations of screen size and orientation (or eight if you support iPad).
In this chapter, you also worked with Arabic localization to discover the true value of leading and trailing edges in auto layout. You discovered that there are four places to set the languages and display formats for the device, and you used that knowledge to correctly show numbers and dates in the user’s locale and language. Finally, you found some cases where auto layout is not enough, and you need code. You added code to detect the direction of writing and used it to update button graphics and text alignment.
Along the way, you learned how to parse localized numbers and apply that knowledge to reading user-entered dates and times.
Before you leave this chapter, make sure to set your device back to your preferred language, region, and keyboard. This book uses English for the language, United States for the region, and the default English keyboard.
Your app can add, view, and edit cars in three languages, though editing can be a bit difficult, especially on small or rotated screens. In Chapter 6, “Scrolling,” you add scrolling, which enables the user to show any field, and you also add some iOS user experience polish.
Challenges
1. Create a Pig Latin internationalization of the CarValet app. You can use another country or practice with regions using either the English–Canada or English–United Kingdom regional setting. Remember to set Region Format to the correct place in the Settings app, either United Kingdom or Canada.
If you need to refresh your memory about the rules of Pig Latin, see http://en.wikipedia.org/wiki/Pig_Latin. And avehay unfay ithway isthay allengechay.
2. Change carInfo to add fuel on the main screen and use NSNumberFormatter to localize how fuel is displayed. Remember to localize the label.
3. Change the app to use a separate strings table for each screen. Update all the string localization calls to use the correct table—either AddViewScreen.strings or EditScreen.strings.