iOS Auto Layout Demystified, Second Edition (2014)
Chapter 2. Constraints
Auto Layout is a constraint satisfaction system. The word constraint means “limitation” or “restriction.” Each rule you build creates a requirement about how one part of the interface relates with another. You rank these rules using a numeric priority, and Auto Layout builds your interface’s visual presentation based on your rules and ranking. In this chapter, you will read about constraints in depth—what they are and how to specify them. You will learn about the kinds of constraints used in Auto Layout, how to install constraints in the system, and how priorities affect your results.
Constraint Types
Auto Layout centers on several core constraint classes:
![]() Layout constraints (NSLayoutConstraint class, public)—These rules specify view geometry. They restrict a view’s position and size by relating a view to other views and/or to constant values.
Layout constraints (NSLayoutConstraint class, public)—These rules specify view geometry. They restrict a view’s position and size by relating a view to other views and/or to constant values.
![]() Content size constraints (NSContentSizeLayoutConstraint class, private)—Content size rules specify how a view’s size should relate to its content. For example, content hugging rules avoid adding padding, and content compression rules prevent clipping.
Content size constraints (NSContentSizeLayoutConstraint class, private)—Content size rules specify how a view’s size should relate to its content. For example, content hugging rules avoid adding padding, and content compression rules prevent clipping.
![]() Autosizing constraints (NSAutoresizingMaskLayoutConstraint class, private)—Autosizing constraints translate the older autoresizing masks into the Auto Layout system.
Autosizing constraints (NSAutoresizingMaskLayoutConstraint class, private)—Autosizing constraints translate the older autoresizing masks into the Auto Layout system.
![]() Layout support constraints (_UILayoutSupportConstraint class, private)—Introduced in iOS 7, layout support constraints establish practical boundaries for the tops and bottoms of your view controller instances. These constraints restrict content from overlapping with obstacles such as status bars.
Layout support constraints (_UILayoutSupportConstraint class, private)—Introduced in iOS 7, layout support constraints establish practical boundaries for the tops and bottoms of your view controller instances. These constraints restrict content from overlapping with obstacles such as status bars.
![]() Prototyping constraints (NSIBPrototypingLayoutConstraint class, private)—Also new to iOS 7, prototyping constraints are constraints that Interface Builder (IB) adds for you. They enable you to build interfaces incrementally yet still have a working interface to test. When you ship apps, your code should not use, reference, or otherwise include prototyping constraints.
Prototyping constraints (NSIBPrototypingLayoutConstraint class, private)—Also new to iOS 7, prototyping constraints are constraints that Interface Builder (IB) adds for you. They enable you to build interfaces incrementally yet still have a working interface to test. When you ship apps, your code should not use, reference, or otherwise include prototyping constraints.
Although all but one of these classes are private, you can and do create all of them through public application programming interfaces (APIs) and IB. You may see instances of each class mentioned in Xcode output logs, like this, during normal application development and debugging sessions:
2013-07-17 09:56:26.788 HelloWorld[14733:c07]
<NSAutoresizingMaskLayoutConstraint:0x767ae50
h=&-& v=&-& H:[UIView:0x7668030(30)]>
2013-07-17 09:56:26.789 HelloWorld[14733:c07]
<NSLayoutConstraint:0x766bfc0
H:[UIImageView:0x766aac0(>=0)]>
2013-07-17 09:56:26.790 HelloWorld[14733:c07]
<NSContentSizeLayoutConstraint:0x7674b00
H:[UIImageView:0x766aac0(512)] Hug:250 CompressionResistance:1>
2013-07-17 09:56:26.792 HelloWorld[14733:c07]
<_UILayoutSupportConstraint:0x8e14e80
V:[_UILayoutGuide:0x8e1f260(0)]>
2013-07-17 09:56:26.793 HelloWorld[14733:c07]
<NSIBPrototypingLayoutConstraint:0x895e390
'IB auto generated at build time for view with ambiguity'
H:|-(137@251)-[UIButton:0x895b750](LTR) priority:251
(Names: '|':UIView:0x895b570 )>
Although developer-created NSLayoutConstraint instances are by far the most common items you work with, you’ll encounter these other classes as well. The circumstances under which Auto Layout generates these items are specific to the roles the constraints play:
![]() Autosizing constraints (NSAutoresizingMaskLayoutConstraint) pop up when you work with hybrid systems that mix and match old-style layout with Auto Layout views. The Auto Layout system translates masks into equivalent constraints, allowing struts-and-springs-style layout to coexist with Auto Layout rules.
Autosizing constraints (NSAutoresizingMaskLayoutConstraint) pop up when you work with hybrid systems that mix and match old-style layout with Auto Layout views. The Auto Layout system translates masks into equivalent constraints, allowing struts-and-springs-style layout to coexist with Auto Layout rules.
![]() Content size constraints (NSContentSizeLayoutConstraint) appear most commonly when you work with labels, image views, and controls, many of which are built with embedded image views. These constraints are tied to the intrinsic content size feature that text and images naturally express. You may see them as well with any other custom view class that can express a natural size.
Content size constraints (NSContentSizeLayoutConstraint) appear most commonly when you work with labels, image views, and controls, many of which are built with embedded image views. These constraints are tied to the intrinsic content size feature that text and images naturally express. You may see them as well with any other custom view class that can express a natural size.
![]() In IB, you create layout support constraints (_UILayoutSupportConstraint) by constraining views to top or bottom layout guide proxies. In code, your constraints may refer to a view controller’s topLayoutGuide or bottomLayoutGuide properties. These store references to _UILayoutGuide objects, which are (invisible) placement views used during layout.
In IB, you create layout support constraints (_UILayoutSupportConstraint) by constraining views to top or bottom layout guide proxies. In code, your constraints may refer to a view controller’s topLayoutGuide or bottomLayoutGuide properties. These store references to _UILayoutGuide objects, which are (invisible) placement views used during layout.
Here’s an example of how these guides work in iOS 7:
UIView *topLayoutGuide = (UIView *) self.topLayoutGuide;
CONSTRAIN(@"V:[topLayoutGuide][textView]|", topLayoutGuide, textView);
In this example, a text view stretches between the top guide, which defines the top of the application content space, and the bottom of the parent.
![]() IB adds prototyping constraints (NSIBPrototypingLayoutConstraint) on your behalf when working with underconstrained storyboard and xib files. These constraints, which are meant to allow incremental development, offer a way for IB to project view frames into temporary constraints.
IB adds prototyping constraints (NSIBPrototypingLayoutConstraint) on your behalf when working with underconstrained storyboard and xib files. These constraints, which are meant to allow incremental development, offer a way for IB to project view frames into temporary constraints.
What all constraint types, regardless of class, have in common is that (1) they express the way items should be laid out onscreen and (2) they have an intrinsic priority that ranks the strength of each request in the Auto Layout system.
Note
There are, in fact, other internal constraint classes, particularly on the UIKit side of things. You won’t normally encounter instances of window-anchoring constraints, window-autoresizing constraints, or scroll view automatic content-size constraints in your day-to-day work, and they don’t affect the way you build with Auto Layout.
Priorities
Constraint priorities are numbers that express how strongly Auto Layout considers each layout request. Auto Layout uses priorities to resolve constraint conflicts and decide which rule takes precedence.
A constraint’s priority is exposed as a readable and sometimes settable property on the instance. The priority ranges from 1 (lowest priority) to 1,000 (required priority). Strictly speaking, priorities are floats:
typedef float UILayoutPriority;
typedef float NSLayoutPriority;
It’s easier to think of them and treat them as unsigned integers, which is how they’re presented in IB. Follow Apple’s IB example. I cannot conceive of any reason you’d ever need—or want—to use fractional priorities.
Conflicting Priorities
Any rule with a priority of 501 always wins out over a rule with a priority of 500. If you tell a view to be both 30 points and 40 points high at the same time, but assign the latter rule a higher priority, the 40-point height prevails. The following example implements these two rules using these priorities:
NSLayoutConstraint *heightConstraint = [NSLayoutConstraint
constraintWithItem:view
attribute:NSLayoutAttributeHeight
relatedBy:NSLayoutRelationEqual
toItem:nil
attribute:NSLayoutAttributeHeight
multiplier:1.0 constant:30];
heightConstraint.priority = 500;
[view addConstraint:heightConstraint];
heightConstraint = [NSLayoutConstraint
constraintWithItem:view
attribute:NSLayoutAttributeHeight
relatedBy:NSLayoutRelationEqual
toItem:nil
attribute:NSLayoutAttributeHeight
multiplier:1.0 constant:40];
heightConstraint.priority = 501;
[view addConstraint:heightConstraint];
As you’d expect, when you run this code, the result is a 40-point-high view. The rule that is prioritized at a level of 501 overrules the request prioritized at 500. The constraints are not in conflict due to the different priorities even though they attempt to control the same value. They do notgenerate any warnings in the console:
2013-01-16 10:05:53.638 HelloWorld[97799:c07]
<TestView: 0xfe38a80; frame = (254 464; 66 40);
layer = <CALayer: 0xfe38af0>>
Enumerated Priorities
Apple offers platform-specific priority enumerations, which you see in Table 2-1. The items are roughly the same across both UIKit and AppKit, although AppKit includes window-specific priorities, which appear around the 500 mark.
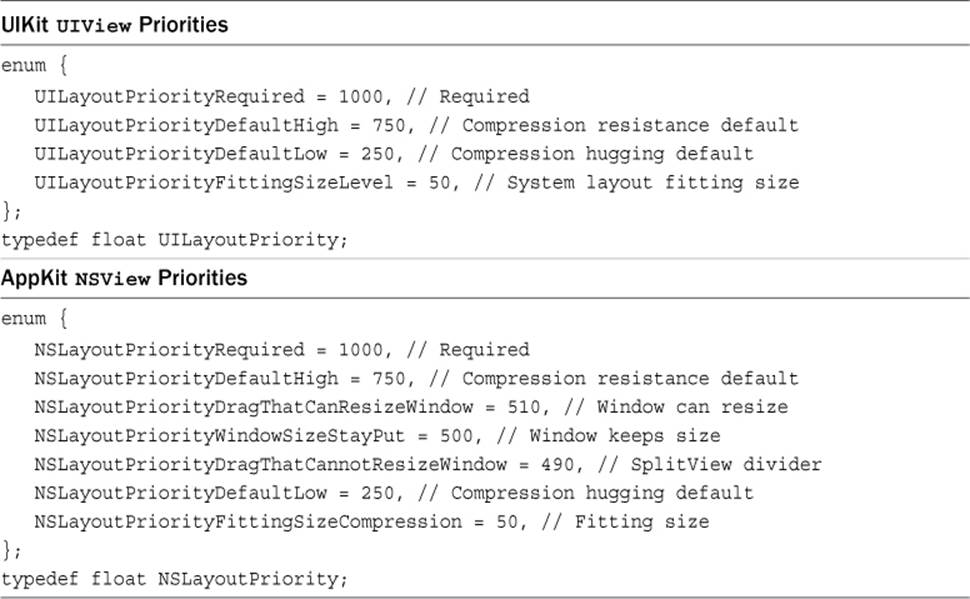
Table 2-1 Priority Enumerations for UIKit and AppKit
The AppKit-only priorities enable you to rank constraints related to the way users resize a window. Your constraints, when ranked higher than window-resizing defaults, can prevent users from shrinking or expanding windows beyond certain points.
While priority numbers basically mean the same thing across OS X and iOS, the separate enumerations affect any cross-platform code. For that reason, I ended up building custom enumerations for my cross-platform development, adding a few tweaks along the way.
For example, my personal enumeration includes a “mild suggestion” priority with a rank of 1. It allows me to assign fallback layouts that rank far below my common presentation rules. The most common use-case ensures that a view is both onscreen and visible when I need it to be. This enables me to iteratively develop view content without running into the zero-sized missing views problem.
Apple recommends that you work around but not at fixed priority levels such as window sizing and fitting sizes. As a good citizen of the view layout system, you should tweak your priorities slightly higher or lower. These adjustments express the priority’s relative rank compared to the fixed system values.
That isn’t to say that you cannot set a button’s compression resistance priority to the default value of 750. Instead, when you create constraints that involve that button, a priority of 751 says “more important than default compression resistance” and a priority of 749 says “less important.”
Note
Be very careful when updating constraint priorities at runtime, especially if the priority value changes from required to not required or vice versa. When an updated priority’s role changes the effect of an installed constraint, it can raise an exception at runtime, as shown here:
2013-01-17 10:31:50.820 HelloWorld[16232:c07] *** Assertion
failure in -[NSLayoutConstraint setPriority:],
/SourceCache/Foundation_Sim/Foundation-992/
Layout.subproj/NSLayoutConstraint.m:155
2013-01-17 10:31:50.821 HelloWorld[16232:c07] *** Terminating app due
to uncaught exception 'NSInternalInconsistencyException',
reason: 'Mutating a priority from required to not on an
installed constraint (or vice-versa) is not supported.
You passed priority 1000 and the existing priority was 502.'
Content Size Constraints
Every view’s frame consists of an origin (the location at which the view sits) and a size (the width and height of that view within its parent). Although you can express exact rules for both position and size, sometimes you want Auto Layout to infer sizing from a view’s content. You work with two kinds of constraints related to content size: content hugging and compression resistance. These rules specify how easily Auto Layout can stretch, squash, or pad a view in relation to that intrinsic size.
Intrinsic Content Size
As you read in Chapter 1, “Introducing Auto Layout,” the sizes of labels, image views, and controls often depend on the content they present. For example, a button labeled Go! can be narrower than a Share Link or Send Feedback button. An image is sized both by its underlying art and a natural screen scale. Whenever a view’s bounds vary in this way, content size enables Auto Layout to automatically fit that material into its rules.
Views without natural content report an intrinsic content size of (–1, –1). UIKit declares this “no content” size as UIViewNoIntrinsicMetric. AppKit on OS X offers no equivalent. Apple writes:
Note that not all views have an intrinsicContentSize. UIView’s default implementation is to return (UIViewNoIntrinsicMetric, UIViewNoIntrinsicMetric). The _intrinsic_content size is concerned only with data that is in the view itself, not in other views. Remember that you can also set constant width or height constraints on any view, and you don’t need to override instrinsicContentSize if these dimensions won’t be changing with changing view content.
Content Hugging
Content hugging constraints restrict the amount of stretching and padding a view allows itself to experience. A high-content hugging priority matches a view’s frame to its intrinsic content size. If that content size is small, you will want the frame to be small as well. The lines of force pull inward to the view’s natural edges to resist padding (see Figure 2-1).
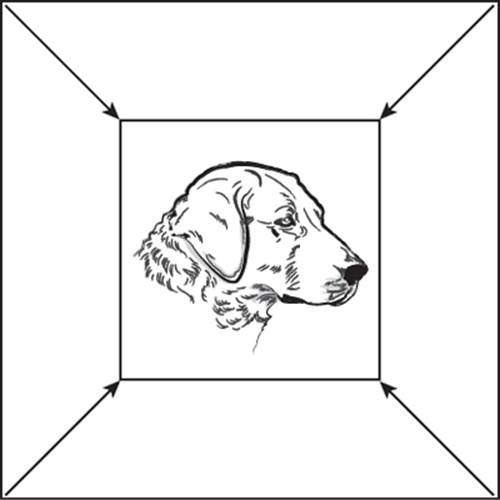
Figure 2-1 Content hugging squeezes a view inward, toward its content, to match that content’s natural size and avoid padding or stretching.
Consider Figure 2-2. It shows an image view displaying an application icon. Layout constraints tell this view to center itself and to stretch out to fill as much screen as possible.
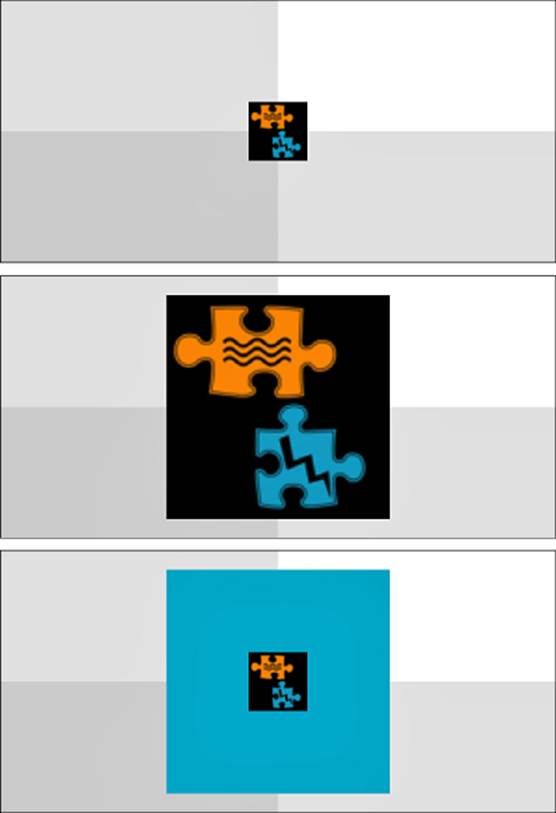
Figure 2-2 Views with low content hugging priorities may stretch to large sizes.
The top part of Figure 2-2 shows this view using a very high (required) content hugging priority. The view’s bounds constrict to the base size, producing a small centered result. The middle and bottom parts of the figure use a low content hugging priority. As a result, the view fills up a much larger portion of the screen.
Content modes account for the other difference between the middle and bottom screenshots. In iOS, content mode defines how content reshapes with respect to the view frame.
The view in the middle image in Figure 2-2 uses UIViewContentModeScaleAspectFill. The art zooms to fill up the view. The bottom image uses UIViewContentModeCenter, so its art is centered and unscaled. The colored background behind the image shows the view’s full extent, which is the same size as in the middle image.
Compression Resistance
Compression resistance constraints prevent a view from clipping its content. A high resistance priority ensures that a view’s intrinsic content is fully displayed. With compression resistance, the lines of force originate from within the content, pushing outward to ensure that the entire intrinsic content is seen (see Figure 2-3).

Figure 2-3 Compression resistance keeps views from clipping their content by matching their size to their intrinsic content.
This is demonstrated in Figure 2-4, where the widths in both images have been constrained to half their natural size (256 points instead of 512 points), using a medium (500) priority.
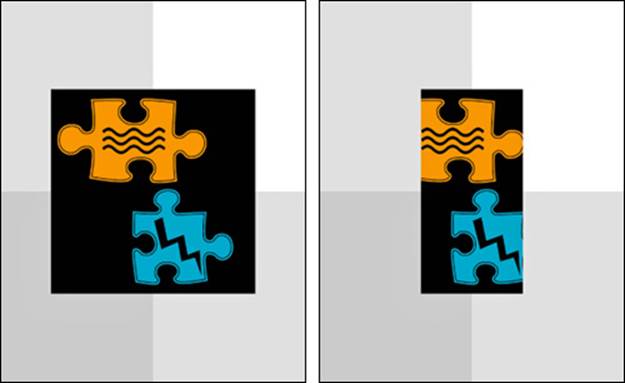
Figure 2-4 When a view’s compression resistance priority is lowered, the view may end up clipping its content. These views use a center content mode.
The left image uses a required (1,000) resistance priority; the right one uses a very low (1) priority. In the first case, the resistance wins out over the width constraint. In the second case, it loses to it. The view resizes below its natural content extent, and the image clips accordingly.
To create these images, I used a center content mode so that the image would display at its natural size, and I enabled clipsToBounds to ensure that the view’s image would not extend beyond its bounds.
Setting Content Size Constraints in Code
For each view, you can assign content hugging and compression resistance priorities in code. The default hugging priority is 250, and the default resistance priority is 750. Table 2-2 shows the UIKit and AppKit APIs. As you see, these differ slightly by platform. The main difference is nomenclature. UIKit refers to axes, and AppKit talks about orientations. They are, otherwise, functionally equivalent. Both axes and orientations are enumerated values. Each enumeration defines horizontal as 0 and vertical as 1.
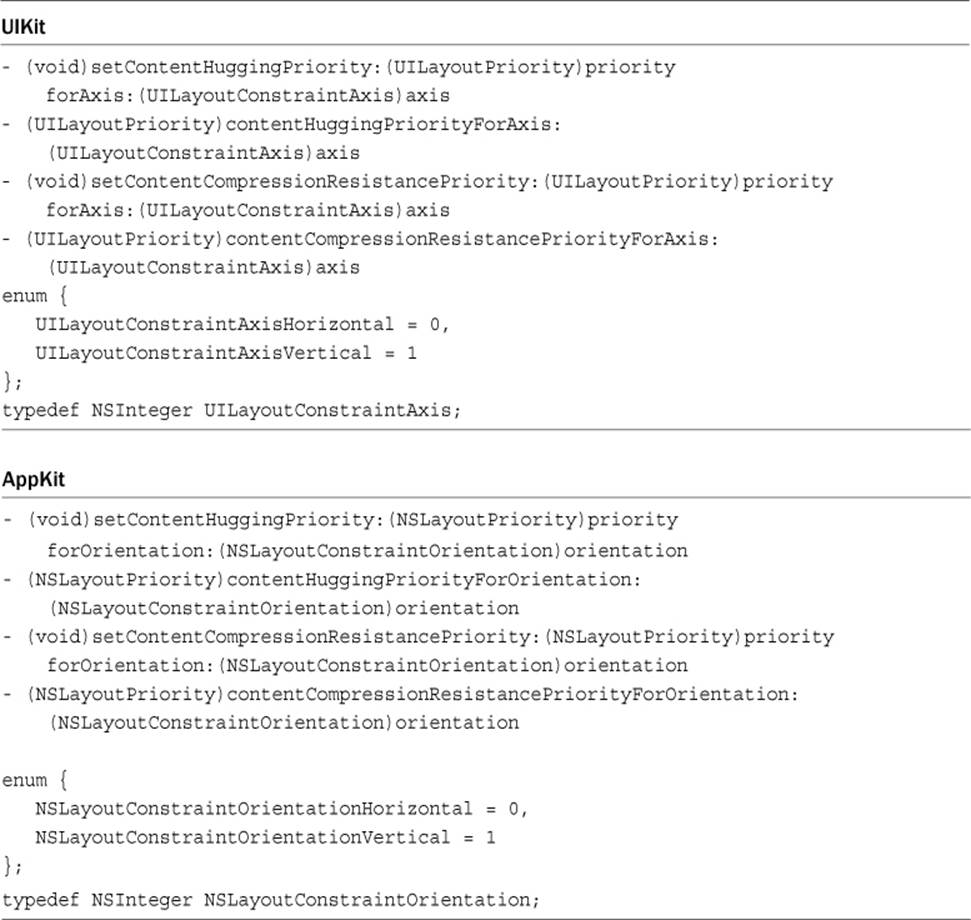
Table 2-2 Content Size APIs for UIKit and AppKit
The priorities you assign to these methods are also equivalent. You assign a value from 1 (lowest priority) to 1,000 (required priority). In turn, these values produce the behaviors shown in Figures 2-1 through 2-4.
Setting Content Size Constraints in IB
The interactive setting pane shown in Figure 2-5 appears for some (but not all) views in Xcode 5. In IB, select a view and open the Size Inspector (by selecting View > Utilities > Show Size Inspector). If the priority sliders appear, adjust values in the View > Content Hugging Priority or View > Content Compression Resistance Priority. The sliders and stepper text fields limit those values between 1 and 1,000.

Figure 2-5 IB provides pop-up tips that describe what each priority means.
As Figure 2-5 shows, IB offers interactive tips as you adjust priorities. These tips describe the level you’re setting. For the most part, I find it easiest to skip the explanation and enter a value in the text field to the right, especially since the manual control over values while dragging is coarse.
Building Layout Constraints
Layout constraints (instances of NSLayoutConstraint) define rules about a view’s physical geometry. They specify how a view should be laid out and how a view relates to other views in the same hierarchy.
To express these rules, you use the simple mathematical vocabulary shown in Table 2-3. This vocabulary consists of view attributes, relations, and the basic operations of addition and multiplication.
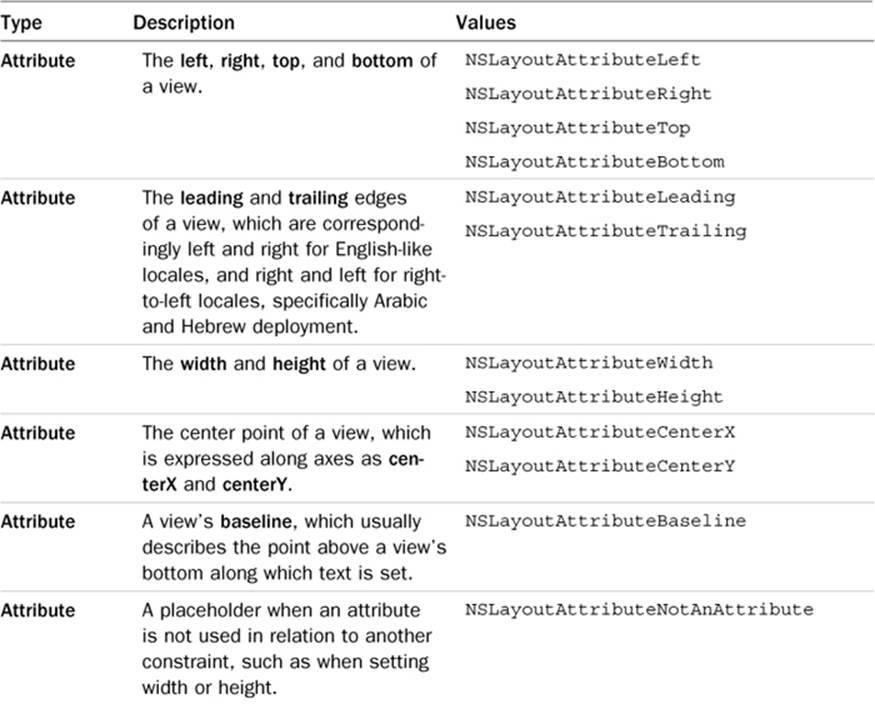
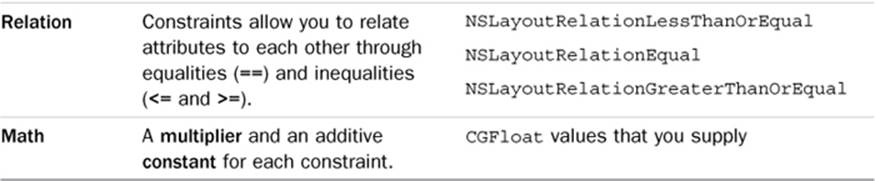
Table 2-3 Elements of Constraints
The Layout Constraint Class
You create mathematical rules by building instances of the NSLayoutConstraint class and adding them to your views. Instances offer the following base properties:
![]() priority—This attribute stores a constraint’s priority value. Priorities allow the Auto Layout system to rank constraints to choose which requests to honor. You read about priorities and their values earlier in this chapter.
priority—This attribute stores a constraint’s priority value. Priorities allow the Auto Layout system to rank constraints to choose which requests to honor. You read about priorities and their values earlier in this chapter.
![]() firstItem and secondItem—These properties point to views. A constraint may talk about the properties of one view or the relation between two views. A valid constraint always has a non-nil first item. The second item may or may not be nil.
firstItem and secondItem—These properties point to views. A constraint may talk about the properties of one view or the relation between two views. A valid constraint always has a non-nil first item. The second item may or may not be nil.
![]() firstAttribute and secondAttribute—Attributes are the “nouns” of the constraint system, describing features of a view’s alignment rectangle, such as left, right, center, and height. These properties are set to any of the 12 enumerated attributes in Table 2-3. If you don’t have a second item, you set the second attribute to NSLayoutAttributeNotAnAttribute.
firstAttribute and secondAttribute—Attributes are the “nouns” of the constraint system, describing features of a view’s alignment rectangle, such as left, right, center, and height. These properties are set to any of the 12 enumerated attributes in Table 2-3. If you don’t have a second item, you set the second attribute to NSLayoutAttributeNotAnAttribute.
![]() relation—Relations are the “verbs” of the constraint system, specifying how attributes compare to each other: the same (==), greater than or equal to (>=), or less than or equal to (<=). A constraint’s relation constant must be set to one of the three enumerated values listed in Table 2-3.
relation—Relations are the “verbs” of the constraint system, specifying how attributes compare to each other: the same (==), greater than or equal to (>=), or less than or equal to (<=). A constraint’s relation constant must be set to one of the three enumerated values listed in Table 2-3.
![]() multiplier and constant—These properties provide the algebra that gives the constraint system its power and flexibility. They allow you to say one view is half the size of another or that a view is offset from its superview by a set distance. These properties are both floating-point values. They correspond to the m (multiplier) and b (constant) elements used to form the constraint equation. You can ignore any multiplier of 1 or constant of 0; they are identity operations.
multiplier and constant—These properties provide the algebra that gives the constraint system its power and flexibility. They allow you to say one view is half the size of another or that a view is offset from its superview by a set distance. These properties are both floating-point values. They correspond to the m (multiplier) and b (constant) elements used to form the constraint equation. You can ignore any multiplier of 1 or constant of 0; they are identity operations.
Constraint Math
All constraints, regardless of how they are created, are essentially equations or inequalities with the following form:
y (relation) m * x + b
If you have a math background, you may have seen a form more like this, with R referring to the relation between y and the computed value on the right side:
y R m * x + b
y and x are view attributes of the kind listed in Table 2-3, such as width or centerY or top. Here, m is a constant scaling factor, and b is a constant offset. For example, you might say, “View B’s left side should be placed 15 points to the right of View A’s right side.” The relation equation that results is something like this:
View B’s left = View A’s right + 15
Here, the relation is equality, the constant offset (b) is 15, and the scaling factor or multiplier (m) is 1. I’ve taken care here to keep the preceding equation from looking like code because, as you’ll see, you do not use code to declare your constraints in Objective-C.
Constraints do not have to use strict equalities. They can use inequality relations as well. For example, you might say, “View B’s left side should be placed at least 15 points to the right of View A’s right side,” or
View B’s left >= View A’s right + 15
Offsets let you place fixed gaps between items, and the multipliers let you scale. Scaling proves especially useful when you’re laying out grid patterns, letting you multiply by the height of a view, not just add a fixed distance to the next view.
First and Second Items
Every relation equation you build looks like this, with the multiplier (m) and constant (b) always applying to the second item:
firstItem.firstAttribute (R) secondItem.secondAttribute * m + b
There are no hard-and-fast rules about which view must be the first item and which must be second. You assign them however you like. For example, you can do this:
View B’s left = View A’s right + 10
Or you can do this:
View A’s right = View B’s left – 10
These are essentially identical statements.
In the first example, View B is firstItem; in the second, it’s secondItem. They both describe a layout where View B appears 10 points to the right of View A. Here’s another, more visual, way of showing the relationship described by both of these two identical constraints:
[viewA]-10-[viewB]
This visual format is discussed in detail in Chapter 4, “Visual Formats.” There’s a trick to keeping math positive, as in the first example (the one with + 10 rather than – 10.) To accomplish this, you make the leading, left, or top item the firstItem, and the trailing, right, or bottom item thesecondItem. This is somewhat counterintuitive, as many people think of the request as “viewA.trailing followed by 10 points followed by viewB.leading.” But, since you can’t legally say this using NSLayoutConstraint:
View A’s trailing + 10 = View B’s leading
you have to settle either for keeping the views in order (and using a negative value that describes how much to move to get back from the secondItem to the firstItem) or flipping the view order you’re trying to produce and keeping the number positive.
As you’ll discover in Chapter 4, working with visual format strings does allow you to build this rule using a more intuitive “[viewA]-10-[viewB]”-style layout.
Creating Layout Constraints
You build layout constraints in any of three ways:
![]() You can use IB to design your interfaces. IB can generate constraints that support your layout. You can further customize the set of constraints from within the visual editor.
You can use IB to design your interfaces. IB can generate constraints that support your layout. You can further customize the set of constraints from within the visual editor.
![]() You can use a visual formatting language to describe your constraints and allow the NSLayoutConstraint class to generate individual instances from your request (constraintsWithVisualFormat:options:metrics:views:).
You can use a visual formatting language to describe your constraints and allow the NSLayoutConstraint class to generate individual instances from your request (constraintsWithVisualFormat:options:metrics:views:).
![]() You can build instances of the NSLayoutConstraint class by supplying each component of a base relation (constraintWithItem:attribute: relatedBy:toItem:attribute:multiplier:constant:).
You can build instances of the NSLayoutConstraint class by supplying each component of a base relation (constraintWithItem:attribute: relatedBy:toItem:attribute:multiplier:constant:).
Officially, the order of these three approaches matches the way Apple expects you to build your constraints, from most preferred to least preferred. The overall “safety” of the technology and guarantees of valid layout decrease as you go down the list.
Unofficially, my experiences go the opposite direction. I find that building constraints from the ground up offers the greatest level of developer control and the best expression of the Principle of Least Astonishment. If you want your interfaces to match your expectations and design, you’re generally best off building your constraints manually in code, using either of the latter two methods.
Unfortunately, while vastly improved in Xcode 5, IB may fail at several levels. It scatters constraint references around the interface. It offers no way to group and document functionally related constraints. It provides no editor that enables you to express edge conditions, which is a primary concern in working with Auto Layout design. (You explore these conditions in Chapter 6, “Building with Auto Layout.”)
At the same time, there are things that IB does really well. It provides a design tool that works in the same visual space as the result you’re creating. That’s important when you’re working on teams with nonprogrammers. It enables you to lay out items and test applications without having to write your own constraints. (It generates some of them for you.) It helps you test constraints and suggests fixes for problems in your layouts. For simple layouts, it provides fast and workable solutions.
I find that coupling IB-based storyboards and nib files with code-based constraint management provides a smooth solution for these issues. Another solution that has worked well for me involves building self-contained interface sections using Autosizing and then importing them into apps as modular Auto Layout components.
I’m not saying you can’t set up expressive constraints in IB. You can. However, inspecting the constraints you build is hard to do, and it’s impossible to do it rigorously. Plus your layout vocabulary is limited.
All three design approaches eventually end up as NSLayoutConstraint instances. No matter how you specify your Auto Layout rules, they all factor down to a set of layout constraints that are added to views in your interface.
Building NSLayoutConstraint Instances
The NSLayoutConstraint’s class method constraintWithItem:attribute: relatedBy: toItem:attribute:multiplier:constant: (gesundheit!) creates a single constraint at a time. Each layout constraint defines a rule about either one or two views.
With two views, the creation method produces a strict view.attribute R view.attribute * multiplier + constant relation, where R is one of equal-to (==), greater-than-or-equal-to (>=), or less-than-or-equal-to (<=) relations.
Consider the following example:
[self.view addConstraint:
[NSLayoutConstraint
constraintWithItem:self.view
attribute:NSLayoutAttributeCenterX
relatedBy:NSLayoutRelationEqual
toItem:textfield
attribute:NSLayoutAttributeCenterX
multiplier:1
constant:0]];
This call adds a new constraint to a view controller’s view (self.view) that horizontally center-aligns a text field. It does this by setting an equality relation (NSLayoutRelationEqual) between the two views’ horizontal centers (NSLayoutAttributeCenterX attributes). The multiplier here is 1, and the offset constant is 0. This represents the following equation:
[self.view]’s centerX = ([textfield]’s centerX * 1) + 0
It basically says, “Please ensure that my view’s center and the text field’s center are co-aligned at their X positions.”
The addConstraint: method adds that constraint to the view, where it is stored with any other constraints in the view’s constraints property.
Unary Constraints
Not all constraints reference two views. Some constraints, particularly those dealing with view sizing, operate on only a single view. For example, a constraint stating that a view’s width is 50 points doesn’t reference any other item.
These kinds of constraints are unary and do not involve a second item. In this case, the secondItem property will be nil, which you can easily test by examining the constraint:
if (constraint.secondItem == nil)
NSLog(@"Constraint is unary");
For example, you might establish a unary constraint that sets a view’s minimum width to 100 points:
NSLayoutConstraint *constraint = [NSLayoutConstraint
constraintWithItem:view
attribute:NSLayoutAttributeWidth
relatedBy:NSLayoutRelationGreaterThanOrEqual
toItem:nil
attribute:NSLayoutAttributeNotAnAttribute
multiplier:1
constant:100];
[view addConstraint:constraint];
This constraint corresponds to the following rule:
[view]’s width >= 100
The second item in this constraint is nil, and the attribute is set to “not an attribute.” You can actually set the second attribute to any attribute you like if you don’t particularly care about readability. The constraint will still work as described here because there’s no second item to refer to.
Zero-Item Constraints Are Illegal
Each constraint references either one or, more commonly, two views. You cannot create a valid constraint with no items. Consider the following code, which attempts to add a constraint with no items:
[self.view addConstraint:
[NSLayoutConstraint
constraintWithItem:nil
attribute:NSLayoutAttributeNotAnAttribute
relatedBy:NSLayoutRelationEqual
toItem:nil
attribute:NSLayoutAttributeNotAnAttribute
multiplier:1 constant:0]]
It compiles properly, without warnings. When run, however, it raises an exception:
2013-01-17 12:14:37.653 HelloWorld[17700:c07] *** Terminating app
due to uncaught exception 'NSInvalidArgumentException', reason:
'*** +[NSLayoutConstraint constraintWithItem:attribute:relatedBy:
toItem:attribute:multiplier:constant:]:
Constraint must contain a first layout item'
View Items
A constraint points to the views it affects by using the firstItem and secondItem properties. These properties are read-only and can be set only during constraint creation.
These two properties are typed as id, a fact that, frankly, irritates me. There is no circumstance I have encountered where the first and second items legally point to any other class other than views. (I suspect this is done to allow the same class to be used in both iOS and OS X.)
To address this issue, I created a trivial class category (see Listing 2-1) that provides the typed firstView and secondView properties I prefer to deal with. As with all other class categories, you want to add namespace prefixes in your own code that ensure that category methods and properties will not conflict with any future development done on Apple’s end. You have been warned.
To allow this category to work across platforms, I established a VIEW_CLASS constant that refers to the proper base class on the software development kit (SDK) I’m working with. Here’s how that’s defined across all my constraint work:
#pragma mark - Cross Platform
#if TARGET_OS_IPHONE
#define VIEW_CLASS UIView
#elif TARGET_OS_MAC
#define VIEW_CLASS NSView
#endif
This definition is used throughout the book wherever code may be applicable to both iOS and OS X. Alternatively, you can define it with this:
#if TARGET_OS_IPHONE
@compatibility_alias VIEW_CLASS UIView;
#elif TARGET_OS_MAC
@compatibility_alias VIEW_CLASS NSView;
#endif
Note
Always add namespace prefixes to class extensions so they don’t conflict with Apple’s potential expansions. I do not follow this practice in this book, in the interest of keeping my code samples readable. Not using namespace prefixes in your production code can cause future compatibility problems.
Listing 2-1 Extending NSLayoutConstraint to Return View-Specific Properties
@interface NSLayoutConstraint (ViewHierarchy)
@property (nonatomic, readonly) VIEW_CLASS *firstView;
@property (nonatomic, readonly) VIEW_CLASS *secondView;
@end
@implementation NSLayoutConstraint (ViewHierarchy)
// Cast the first item to a view
- (VIEW_CLASS *) firstView
{
return self.firstItem;
}
// Cast the second item to a view
- (VIEW_CLASS *) secondView
{
return self.secondItem;
}
@end
Constraints, Hierarchies, and Bounds Systems
When constraints reference two views, these views must always belong to the same view hierarchy. You encounter only two legal scenarios for two-view constraints. Either one view has a superview relationship to the other (that is, firstItem is an ancestor of secondItem or vice versa) or the two views must be siblings of some sort (that is, they must have a non-nil common view ancestor [belong to the same window]). If you attempt to do otherwise, you will encounter a nasty crash.
Consider Figure 2-6, where View 3 and its children exist in one window and View 4 in another:
![]() You can establish a constraint between View 1 and View 3 because View 1 is a subview of View 3.
You can establish a constraint between View 1 and View 3 because View 1 is a subview of View 3.
![]() You can also build a constraint between View 2 and View 3 even though View 2 is an indirect subview. It’s still legal.
You can also build a constraint between View 2 and View 3 even though View 2 is an indirect subview. It’s still legal.
![]() You cannot establish a constraint between any of Views 1 through 3 and View 4. View 4 does not belong to the same hierarchy as the other three.
You cannot establish a constraint between any of Views 1 through 3 and View 4. View 4 does not belong to the same hierarchy as the other three.
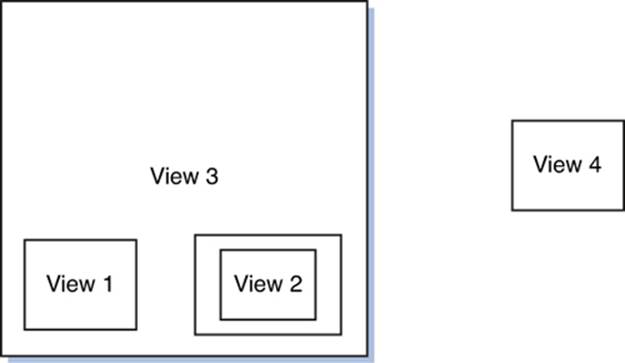
Figure 2-6 You cannot establish a constraint between View 4 in its own window and any of the other views.
These checks crop up a lot when you’re using constraints. While NSView offers the ancestorSharedWithView: method, UIView does not. To address this, I created the cross-platform view class extension shown in Listing 2-2. This class implements two common tests. It checks whether one view is an ancestor of another view, and it returns two views’ nearest common ancestor.
Be aware of bounds systems. You should not relate a button on some view, for example, with a text field inside a separate collection view. If there’s some sort of content view with its own bounds system (such as collection views, scroll views, and table views), don’t hop out of that to an entirely different bounds system. Listing 2-2 does not check for this, although if you’d like to add that in, you certainly can.
Listing 2-2 Supporting the View Hierarchy
@implementation VIEW_CLASS (HierarchySupport)
// Return an array of all superviews
- (NSArray *) superviews
{
NSMutableArray *array = [NSMutableArray array];
VIEW_CLASS *view = self.superview;
while (view)
{
[array addObject:view];
view = view.superview;
}
return array;
}
// Test if the current view has a superview relationship to a view
- (BOOL) isAncestorOfView: (VIEW_CLASS *) aView
{
return [[aView superviews] containsObject:self];
}
// Return the nearest common ancestor between self and another view
- (VIEW_CLASS *) nearestCommonAncestorToView: (VIEW_CLASS *) aView
{
// Check for same view
if ([self isEqual:aView])
return self;
// Check for direct superview relationship
if ([self isAncestorOfView:aView])
return self;
if ([aView isAncestorOfView:self])
return aView;
// Search for indirect common ancestor
NSArray *ancestors = self.superviews;
for (VIEW_CLASS *view in aView.superviews)
if ([ancestors containsObject:view])
return view;
// No common ancestor
return nil;
}
@end
Installing Constraints
To get constraints to enter the Auto Layout system, you add them to views. Here’s an example:
[myView addConstraint: aConstraintInstance];
Because the visual format system returns arrays of constraints rather than single constraints, the NSLayoutConstraint class also offers a way to add a collection of constraints simultaneously:
[myView addConstraints: myArrayOfConstraints];
Constraints always have a natural home, in the nearest common ancestor of their firstItem and the secondItem properties. For example, consider the views you saw in Figure 2-6:
![]() A constraint between View 1 and View 3 should be added to View 3, the superview.
A constraint between View 1 and View 3 should be added to View 3, the superview.
![]() Similarly, a constraint between View 2 and View 3 belongs with View 3. Although View 3 is not View 2’s superview, it is its ancestor.
Similarly, a constraint between View 2 and View 3 belongs with View 3. Although View 3 is not View 2’s superview, it is its ancestor.
![]() When working with View 1 and View 2, View 3 is the nearest common ancestor. You add the constraint there even though it’s not mentioned as either the first or second item.
When working with View 1 and View 2, View 3 is the nearest common ancestor. You add the constraint there even though it’s not mentioned as either the first or second item.
IB follows this rule, and you should, too. If you’re trying to track down where each constraint lives in the IB hierarchy, you’ll find them in the storyboard outline, added to the nearest common ancestor of the first and second items.
Here’s what Apple says on the matter in the UIView.h (iOS) and NSLayoutConstraint.h (OS X) header files:
A constraint is typically installed on the closest common ancestor of the views involved in the constraint. It is required that a constraint be installed on a common ancestor of every view involved. The numbers in a constraint are interpreted in the coordinate system of the view it is installed on. A view is considered to be an ancestor of itself.
Every constraint, in fact, can and should self-install itself to a natural and correct view destination. Listing 2-3 shows an NSLayoutConstraint class category that does this. It looks for the nearest common ancestor between its two items and adds itself to that view. If the constraint is unary, it installs onto the first item.
With this category, you call install (and remove) on the constraint itself. The information you need in order to know where to install already exists within every (legally defined) constraint. And, if your constraints are consistently installed to consistent destinations, removing constraints becomes a trivial problem as well.
Auto Layout also offers a blunt-trauma approach to removing constraints. It automatically disposes of constraints when a view is removed from its hierarchy:
[view removeFromSuperview]
Then, any constraint referencing that view is automatically removed from Auto Layout. Suppose, for instance, that you have a constraint that describes the relationship between Figure 2-6’s View 1 and View 2. View 3 owns the constraint because it is View 1 and View 2’s nearest common ancestor. When you remove View 2 from its superview, Auto Layout automatically removes the constraint from View 3. This removal happens on your behalf, without explicit requests.
Listing 2-3 Self-Installing Constraints
@implementation NSLayoutConstraint (SelfInstall)
- (BOOL) install
{
// Handle Unary constraint
if (self.isUnary)
{
[self.firstView addConstraint:self];
return YES;
}
// Find nearest common ancestor
VIEW_CLASS *view =
[self.firstView nearestCommonAncestor:self.secondView];
if (!view)
{
NSLog(@"Error: No common ancestor between items.");
return NO;
}
// Install to nearest common ancestor
[view addConstraint:self];
return YES;
}
// You may want to rename this to installWithPriority:, which in
// retrospect would have been a far better method name.
- (BOOL) install: (float) priority
{
// Set priority and install
self.priority = priority;
return [self install];
}
// Discussed further in the section that follows
- (void) remove
{
if (self.isUnary)
{
VIEW_CLASS *view = self.firstView;
[view removeConstraint:self];
return;
}
// Remove from preferred recipient
VIEW_CLASS *view =
[self.firstView nearestCommonAncestor:self.secondView];
if (!view) return;
// This is safe. If the constraint isn't on the view, this is a no-op
[view removeConstraint:self];
}
@end
Removing Constraints
You can add and remove constraints from views at any time. The two built-in methods removeConstraint: and removeConstraints: enable you to remove one or an array of constraints from a given view. Because these methods work on object pointers, they might not do what you expect when you attempt to remove constraints.
Suppose, for instance, that you build a center-matching constraint and add it to your view. You cannot then build a second version of the constraint with the same rules and expect to remove it using the removeConstraint: call. They are equivalent constraints, but they are not the sameconstraint. Here’s an example of this conundrum:
// Build and add the constraint
[self.view addConstraint:
[NSLayoutConstraint constraintWithItem:textField
attribute:NSLayoutAttributeCenterX
relatedBy:NSLayoutRelationEqual
toItem:self.view
attribute:NSLayoutAttributeCenterX
multiplier:1.0f constant:0.0f]];
// Attempt to remove the constraint
[self.view removeConstraint:
[NSLayoutConstraint constraintWithItem:textField
attribute:NSLayoutAttributeCenterX
relatedBy:NSLayoutRelationEqual
toItem:self.view
attribute:NSLayoutAttributeCenterX
multiplier:1.0f constant:0.0f]];
Executing these two method calls ends up as follows: The self.view instance contains the original constraint, and the attempt to remove the second constraint is ignored. Removing a constraint not held by the view has no effect.
You have two choices for resolving this. First, you can hold on to the constraint when it’s first added by storing it in a local variable. Here’s what this looks like:
NSLayoutConstraint *myConstraint =
NSLayoutConstraint constraintWithItem:textField
attribute:NSLayoutAttributeCenterX
relatedBy:NSLayoutRelationEqual
toItem:self.view
attribute:NSLayoutAttributeCenterX
multiplier:1.0f constant:0.0f]];
[self.view addConstraint:myConstraint];
// later
[self.view removeConstraint:myConstraint];
To remove an equivalent constraint, you can use a method that compares constraints and removes one that mathematically matches the one you pass. Alternatively, you can tag constraints (using a class category) so you can find them and remove them at a future time. Removing constraints plays a major role in Auto Layout. Whenever you refresh a layout—most commonly when a device rotates—you need to remove invalid constraints and replace them with fresh rules.
Knowing whether your constraints will be static (used for the lifetime of your view) or dynamic (updated as needed) helps you decide which approach you need. If you think you might need to remove a constraint in the future, either hold on to it via a local variable so that you can later remove it from your view or implement workarounds that let you search for the constraint at a later time.
Comparing Constraints
All constraints use a fixed structure of the following form, along with an associated priority:
view1.attribute (relation) view2.attribute * multiplier + constant
Each element in this equation is exposed through a constraint’s object properties, namely priority, firstItem, firstAttribute, relation, secondItem, secondAttribute, multiplier, and constant. These properties make it easy to compare two constraints.
Views store and remove constraints as objects. If two constraints are stored in separate memory locations, they’re considered unequal, even if they describe the same conditions. To allow your code to add and remove constraints on-the-fly without storing those items locally, you use comparisons.
Listing 2-4 creates an NSLayoutConstraint category that compares the properties between two constraints and determines whether they match. The isEqualToLayoutConstraint: method considers the equation but not the priority. Two constraints describing the same conditions are essentially equivalent, regardless of the priority a developer has currently assigned.
Listing 2-4 Constraint-to-Constraint Attribute Comparison
@implementation NSLayoutConstraint (ConstraintMatching)
// This ignores any priority, looking only at y (R) mx + b
- (BOOL) isEqualToLayoutConstraint: (NSLayoutConstraint *) constraint
{
if (self.firstItem != constraint.firstItem) return NO;
if (self.secondItem != constraint.secondItem) return NO;
if (self.firstAttribute != constraint.firstAttribute) return NO;
if (self.secondAttribute != constraint.secondAttribute) return NO;
if (self.relation != constraint.relation) return NO;
if (self.multiplier != constraint.multiplier) return NO;
if (self.constant != constraint.constant) return NO;
return YES;
}
@end
Matching Constraints
Once a constraint is installed, you can do two important things with it. You can either remove it (and likely replace it with a new rule) or modify its constant (usually to animate a view). These tasks are both often used in Auto Layout work to create lively interfaces that respond to user interaction.
Although you can create instance variables and outlets that point to specific constraints, a highly interactive GUI can create numerous constraints that are added, modified, and removed on-the-fly. Lightweight and short-lived constraints may not hang around long enough to make it worth your while to point to them directly.
I ended up building a view category dedicated to retrieving installed constraints. Listing 2-5 presents a number of constraint-matching methods that search through views to find constraints that match a single constraint, that match an array of constraints (useful for constraint arrays built via visual formats), and that reference a specific view (handy for animation). It also provides a pair of methods that remove the constraints thus matched.
Listing 2-5 Finding Matching Constraints and Removing Them
@implementation VIEW_CLASS (ConstraintMatching)
// Find the first matching constraint
- (NSLayoutConstraint *) constraintMatchingConstraint:
(NSLayoutConstraint *) aConstraint
{
// Try to find a matching constraint in the view's
// installed constraints
for (NSLayoutConstraint *constraint in self.constraints)
{
if ([constraint isEqualToLayoutConstraint:aConstraint])
return constraint;
}
// Search superviews as well
for (VIEW_CLASS *view in self.superviews)
for (NSLayoutConstraint *constraint in view.constraints)
{
if ([constraint isEqualToLayoutConstraint:aConstraint])
return constraint;
}
return nil;
}
// Find all matching constraints. Use this to pull out
// installed constraints matching a set generated from
// a visual pattern.
- (NSArray *) constraintsMatchingConstraints: (NSArray *) constraints
{
NSMutableArray *array = [NSMutableArray array];
for (NSLayoutConstraint *constraint in constraints)
{
NSLayoutConstraint *match =
[self constraintMatchingConstraint:constraint];
if (match)
[array addObject:match];
}
return array;
}
// All constraints matching that view
// This method is *insanely* useful.
- (NSArray *) constraintsReferencingView: (VIEW_CLASS *) view
{
NSMutableArray *array = [NSMutableArray array];
for (NSLayoutConstraint *constraint in self.constraints)
if (([constraint.firstItem isEqual:view]) ||
([constraint.secondItem isEqual:view]))
[array addObject:constraint];
return array;
}
// Remove matching constraint
- (void) removeMatchingConstraint:
(NSLayoutConstraint *) aConstraint
{
NSLayoutConstraint *match =
[self constraintMatchingConstraint:aConstraint];
if (match)
{
[self removeConstraint:match];
[self.superview removeConstraint:match];
}
}
// Remove matching constraints
- (void) removeMatchingConstraints: (NSArray *) anArray
{
for (NSLayoutConstraint *constraint in anArray)
[self removeMatchingConstraint:constraint];
}
@end
Laws of Layout Constraints
Here are a few basic facts about layout constraints that you should keep in mind:
![]() Layout constraints have priorities. Priorities range numerically from 1 to 1,000. Higher priorities are always satisfied before lower priorities. The highest priority you can assign is “required” (value: 1,000), which is also the default. During layout, the system iterates through any constraints you have added, attempting to satisfy them all. Priorities come into play when deciding which constraint has less sway. A 99 priority constraint is broken in favor of a 100 priority constraint when the two come into conflict.
Layout constraints have priorities. Priorities range numerically from 1 to 1,000. Higher priorities are always satisfied before lower priorities. The highest priority you can assign is “required” (value: 1,000), which is also the default. During layout, the system iterates through any constraints you have added, attempting to satisfy them all. Priorities come into play when deciding which constraint has less sway. A 99 priority constraint is broken in favor of a 100 priority constraint when the two come into conflict.
![]() Layout constraints don’t have any natural “order” outside of priorities. All constraints of the same priority are considered at the same time. If you need some constraint to take precedence, assign it a higher priority.
Layout constraints don’t have any natural “order” outside of priorities. All constraints of the same priority are considered at the same time. If you need some constraint to take precedence, assign it a higher priority.
![]() Layout constraints are relationships and are not directional. You don’t have to solve the right side to calculate the left side.
Layout constraints are relationships and are not directional. You don’t have to solve the right side to calculate the left side.
![]() Layout constraints can be approximated. Optional constraints try to optimize their results. Consider the constraint “View 2’s top edge should be at the same position as View 1’s bottom edge.” The constraint system attempts to squeeze these two together by minimizing their distance. If other constraints prevent them from touching, the system places them as close as it can, minimizing the absolute distance between the two attributes.
Layout constraints can be approximated. Optional constraints try to optimize their results. Consider the constraint “View 2’s top edge should be at the same position as View 1’s bottom edge.” The constraint system attempts to squeeze these two together by minimizing their distance. If other constraints prevent them from touching, the system places them as close as it can, minimizing the absolute distance between the two attributes.
![]() Layout constraints can have cycles. As long as all items are satisfied, it doesn’t matter which elements refer to which. Don’t sweat the cross-references. In this declarative system, circular references are okay, and you will not encounter infinite looping issues.
Layout constraints can have cycles. As long as all items are satisfied, it doesn’t matter which elements refer to which. Don’t sweat the cross-references. In this declarative system, circular references are okay, and you will not encounter infinite looping issues.
![]() Layout constraints can be redundant. If constraints do not contradict each other, you may safely install multiple items that implement the same layout logic.
Layout constraints can be redundant. If constraints do not contradict each other, you may safely install multiple items that implement the same layout logic.
![]() Layout constraints can refer to view siblings. You can align the center point of one view’s subview with the center point of an entirely different view as long as both views have a common view ancestor. For example, you might create a complex text entry view and align its rightmost button’s right attribute with the right attribute of an embedded image view below it. Or you might attach a “handle” to a “drawer,” as in Chapter 6, where both items move together, but neither is the parent of the other.
Layout constraints can refer to view siblings. You can align the center point of one view’s subview with the center point of an entirely different view as long as both views have a common view ancestor. For example, you might create a complex text entry view and align its rightmost button’s right attribute with the right attribute of an embedded image view below it. Or you might attach a “handle” to a “drawer,” as in Chapter 6, where both items move together, but neither is the parent of the other.
![]() Auto Layout may not play nicely with transforms. Exercise care when mixing transforms with Auto Layout, especially those that include rotation:
Auto Layout may not play nicely with transforms. Exercise care when mixing transforms with Auto Layout, especially those that include rotation:
![]() Auto Layout doesn’t support transforms that don’t preserve rectangles.
Auto Layout doesn’t support transforms that don’t preserve rectangles.
![]() Auto Layout doesn’t support nonzero alignment insets on views with bounds transforms that don’t preserve rectangles.
Auto Layout doesn’t support nonzero alignment insets on views with bounds transforms that don’t preserve rectangles.
![]() Auto Layout does not work with the new iOS 7 view dynamics. You can use Auto Layout inside any view that’s affected by dynamic behaviors, but you cannot combine Auto Layout view placement with dynamic animator management.
Auto Layout does not work with the new iOS 7 view dynamics. You can use Auto Layout inside any view that’s affected by dynamic behaviors, but you cannot combine Auto Layout view placement with dynamic animator management.
![]() Auto Layout does work with motion effects. The visual changes applied by UIMotionEffect instances won’t disturb your underlying layout as they only affect the view’s layer.
Auto Layout does work with motion effects. The visual changes applied by UIMotionEffect instances won’t disturb your underlying layout as they only affect the view’s layer.
![]() Layout constraints should not cross bounds systems. Don’t cross into and out of scroll views, collection views, and table views for alignment. If there’s some sort of content view with its own bounds system, avoid hopping out of that to an entirely different bounds system in another view. Doing so may not crash your app, but it’s not a good idea, and it’s not well supported by Auto Layout. Here are a few further points about bounds:
Layout constraints should not cross bounds systems. Don’t cross into and out of scroll views, collection views, and table views for alignment. If there’s some sort of content view with its own bounds system, avoid hopping out of that to an entirely different bounds system in another view. Doing so may not crash your app, but it’s not a good idea, and it’s not well supported by Auto Layout. Here are a few further points about bounds:
![]() Auto Layout doesn’t support crossing bounds transforms that don’t preserve rectangles.
Auto Layout doesn’t support crossing bounds transforms that don’t preserve rectangles.
![]() Auto Layout doesn’t support crossing rotational bounds transforms with edge layout constraints, such as right, left, top, and bottom.
Auto Layout doesn’t support crossing rotational bounds transforms with edge layout constraints, such as right, left, top, and bottom.
![]() Auto Layout doesn’t support crossing rotational bounds transforms with dimensional layout constraints, such as width and height.
Auto Layout doesn’t support crossing rotational bounds transforms with dimensional layout constraints, such as width and height.
![]() Layout constraints can fail at runtime. If your constraints cannot be resolved and come into conflict, the runtime system chooses which constraints to disregard so it can present whatever view layout it can. This is usually ugly and nearly always not the visual presentation you intended. Auto Layout sends exhaustive descriptions of what went wrong to your Xcode console. Use these reports to fix your constraints and bring them into harmony with each other.
Layout constraints can fail at runtime. If your constraints cannot be resolved and come into conflict, the runtime system chooses which constraints to disregard so it can present whatever view layout it can. This is usually ugly and nearly always not the visual presentation you intended. Auto Layout sends exhaustive descriptions of what went wrong to your Xcode console. Use these reports to fix your constraints and bring them into harmony with each other.
Custom views that directly set view frames (for example, in layoutSubviews) are especially vulnerable to runtime failure. Frame updates that contradict existing constraint rules can cause crashes.
![]() Badly formed layout constraints will interrupt application execution. Although you have not read about visual formats in detail (see Chapter 4), it’s important to note that some constraint calls may crash your application through unhandled exceptions. For example, if you pass a constraint format string such as @"V[view1]-|" (which is missing a colon after the letter V) to a constraint creation method, you’ll encounter a runtime exception:
Badly formed layout constraints will interrupt application execution. Although you have not read about visual formats in detail (see Chapter 4), it’s important to note that some constraint calls may crash your application through unhandled exceptions. For example, if you pass a constraint format string such as @"V[view1]-|" (which is missing a colon after the letter V) to a constraint creation method, you’ll encounter a runtime exception:
Terminating app due to uncaught exception 'NSInvalidArgumentException',
reason: 'Unable to parse constraint format'
This error cannot be detected during compilation; you must carefully check your format strings by hand. Designing constraints in IB helps avoid bad-typo scenarios.
![]() A constraint must refer to at least one view. You can create a constraint without any items and compile that code without warnings, as you saw earlier in this chapter, but it will raise an exception at runtime. Consider this to be “not a good thing.”
A constraint must refer to at least one view. You can create a constraint without any items and compile that code without warnings, as you saw earlier in this chapter, but it will raise an exception at runtime. Consider this to be “not a good thing.”
![]() Beware of invalid attribute pairings. You cannot legally match a view’s left edge to another view’s height. Invalid pairings raise runtime exceptions. Specifically, you shouldn’t mix size attributes with edge attributes. You can generally guess which pairs are problematic because they make no sense.
Beware of invalid attribute pairings. You cannot legally match a view’s left edge to another view’s height. Invalid pairings raise runtime exceptions. Specifically, you shouldn’t mix size attributes with edge attributes. You can generally guess which pairs are problematic because they make no sense.
![]() Take care of Auto Layout. Don’t get constraints wet. Don’t expose constraints to bright light. And, no matter how much constraints cry, no matter how much constraints beg, don’t feed constraints after midnight.1
Take care of Auto Layout. Don’t get constraints wet. Don’t expose constraints to bright light. And, no matter how much constraints cry, no matter how much constraints beg, don’t feed constraints after midnight.1
1. Gremlins, Joe Dante, 1984.
Exercises
After reading this chapter, test your knowledge with these exercises:
1. Can you build an NSContentSizeLayoutConstraint by hand? How and why do these constraints appear in Auto Layout?
2. What happens at runtime when two conflicting rules have exactly the same priority?
3. Why use layout priorities like 251 and 249 in preference to ones like 257 and 243?
4. Why might you use views without intrinsic content size?
5. What happens if you install a constraint between a view and its superview on the child view?
6. What is the difference between constraining View A’s width to twice the size of View B’s width and constraining View B’s width to half of View A’s width? What happens if you install both constraints?
7. In Figure 2-6, where would you install a constraint between View 1 and View 3? Between View 1 and View 2? Between View 2 and View 3? Between View 2 and View 4? If you add a button as a subview to View 2, where do you install a constraint between that button and View 1? Between that button and View 4?
8. You create View A and add a subview, View B. You add constraints that center View B in its superview and size View B to 100 points by 100 points. (a) Is View B’s layout ambiguous? (b) How many items are stored in View A’s constraints array? (c) How many items are stored in View B’s constraints array?
You remove View B from its superview. (d) After this, how many constraints are stored in View A’s constraints array? (e) How many constraints are stored in View B’s array?
Conclusions
This chapter rather exhaustively introduces constraints, discussing what they are, where they come from, and how they are represented in the Auto Layout system. You have read about the kinds of constraints you might deal with and how you add and remove them from views. Before you move on to the next chapter, here are a few thoughts to take with you:
![]() Priorities play an important role in adding nuance to your interfaces. They help you manage edge conditions, allowing Auto Layout to decide which rules should win out in an otherwise conflicting design. If you find yourself creating only required constraints, you’re missing out on a powerful part of Auto Layout.
Priorities play an important role in adding nuance to your interfaces. They help you manage edge conditions, allowing Auto Layout to decide which rules should win out in an otherwise conflicting design. If you find yourself creating only required constraints, you’re missing out on a powerful part of Auto Layout.
![]() Although Apple recommends using IB as the primary avenue for creating constraints, you may find that code-level constraints offer tighter control and better solutions for achieving reliable interface design. Most importantly, code helps you document your design choices and inspect your implementation—which IB rather fails at.
Although Apple recommends using IB as the primary avenue for creating constraints, you may find that code-level constraints offer tighter control and better solutions for achieving reliable interface design. Most importantly, code helps you document your design choices and inspect your implementation—which IB rather fails at.
![]() Compression resistance and content hugging become especially important when internationalizing text in your interface. As labels and buttons resize, these constraints allow you to adjust interface layout so your apps will look as good in German and Japanese as they do in English.
Compression resistance and content hugging become especially important when internationalizing text in your interface. As labels and buttons resize, these constraints allow you to adjust interface layout so your apps will look as good in German and Japanese as they do in English.
![]() Although y R m * x + b looks like an absolutely minimal way to lay out an interface, it provides a surprising robustness in its expressive reach. (The tl;dr of this was explained to me as follows: “If you describe a linear inequality as a shaded region on the number line, you can describe a system of linear inequalities as an N dimensional polytope with optimal solutions at the vertices.”—Anonymous Engineer) You’ll discover in the following chapters that simple constraints can be flexible and powerful.
Although y R m * x + b looks like an absolutely minimal way to lay out an interface, it provides a surprising robustness in its expressive reach. (The tl;dr of this was explained to me as follows: “If you describe a linear inequality as a shaded region on the number line, you can describe a system of linear inequalities as an N dimensional polytope with optimal solutions at the vertices.”—Anonymous Engineer) You’ll discover in the following chapters that simple constraints can be flexible and powerful.