iPad All-in-One For Dummies, 7th Edition (2015)
Book I. Getting Started with iPad
Chapter 9. Maintaining and Troubleshooting
In This Chapter
![]() Taking care of your iPad
Taking care of your iPad
![]() Solving common iPad problems
Solving common iPad problems
![]() Finding technical support
Finding technical support
![]() Finding a missing iPad
Finding a missing iPad
![]() Backing up to iCloud
Backing up to iCloud
iPads don’t grow on trees — they cost a pretty penny. That’s why you should know how to take care of your iPad and troubleshoot any problems that it might have so that you get the most out of it.
In this chapter, I provide some advice about the care and maintenance of your iPad, as well as tips about how to solve common problems, update iPad system software, and even reset your iPad should something go seriously wrong. In case you lose your iPad, I even tell you about a feature that helps you find it, activate it remotely, or even disable it if it’s fallen into the wrong hands. Finally, you get information about backing up your iPad settings and content using iCloud.
Maintaining Your iPad
You have a great gadget and an investment to protect in your iPad. A few simple precautions can keep it damage-free — at least until you rush out and buy the next version.
It’s wise to keep the screen clean and safe from damage, as well as maximize your battery use. The following sections tell you how.
Keeping the iPad screen clean
If you’ve been playing with your iPad, you know — despite Apple’s claim that iPads have fingerprint-resistant screens — that iPads are fingerprint magnets. They’re covered with an oil-resistant coating, but that definitely doesn’t mean they’re smudge-proof. One way to avoid those finger smudges is by obtaining an inexpensive stylus — just be sure it’s got a soft or pliable tip and is designed for use with an iPad.
 Avoid a few smudges in the first place by using a stand or dock to hold your iPad. With a stand or dock, you spend less time picking up your tablet, which cuts down on fingerprints.
Here are some tips about cleaning your iPad screen:
· Use a dry, soft cloth. You can get most fingerprints off with a dry, soft cloth such as the one you use to clean your eyeglasses or a cleaning tissue that’s lint- and chemical-free. Or try products used to clean lenses in labs, such as Kimwipes or Kaydry, which you can get from several major retailers such as Amazon.
· Use a slightly moistened soft cloth. To get the surface even cleaner, very slightly moisten the cloth before you use it to clean the screen. Again, make sure that whatever cloth material you use is lint free.
· Remove the cables. This may go without saying, but I’ll say it anyway: If you don’t want a fried iPad, turn it off and unplug any cables from it before cleaning the screen with a moistened cloth.
· Avoid moisture. Avoid getting moisture around the edges of the screen where it can seep into the unit.
· Never use any household cleaners on your iPad screen. They can degrade the coating that keeps the screen from absorbing oil from your fingers.
 Do not use premoistened lens-cleaning tissues to clean your screen. Most of these products contain alcohol, which can damage the screen’s coating.
Protecting your gadget with a case
Your screen isn’t the only element on the iPad that can be damaged, so consider getting a case for it so that you can carry it around the house or around town safely. Besides providing a bit of padding if you drop the device, a case makes the iPad less slippery in your hands, offering a better grip when working with it.
Several types of cases are available for iPad Air 2 and iPad mini 3, and more are showing up all the time. You can choose the Smart Cover from Apple that covers the screen, for example ($39); the Smart Case from Apple, which wraps around the iPad completely ($79 for Air 2 and $69 for iPad mini 3); or covers from other manufacturers. I’ve found the covers from other manufacturers to be somewhat sturdier than Apple cases. For instance, Tuff-Luv (www.tuff-luv.com) and Griffin Technology (www.griffintechnology.com) come in materials ranging from leather (see Figure 9-1) to silicone (see Figure 9-2).
Cases range in price from a few dollars to $125 or more for leather; some will cost you hundreds of dollars. Some provide a cover (see Figure 9-1), and others protect only the back and sides or, in the case of Smart Cover, only the screen. If you carry around your iPad much at all, consider a case with a screen cover to provide better protection for the screen or use a screen overlay, such as the InvisibleShield from ZAGG (www.zagg.com).

Figure 9-1: Casemaker Tuff-Luv’s website, where you can find a variety of iPad cases.
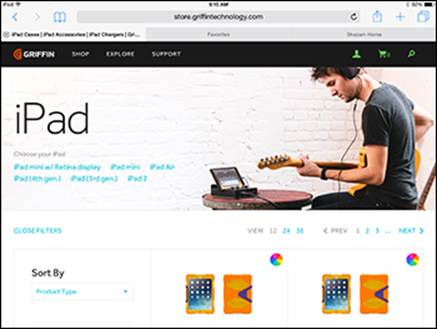
Figure 9-2: A less-expensive option is a silicone skin.
Extending your iPad’s battery life
The much-touted ten-hour battery life of the iPad is a wonderful feature, but you can take some steps to extend that battery life even further. You can estimate how much battery life you have left by looking at the battery icon in the far-right end of the status bar at the top of your screen. Here are a few tips to help that little icon stay full up:
· Use a wall outlet to charge. Though it can vary depending on your computer model, generally when connected to a recent model Mac computer, iPad will slowly charge; however, some PC connections don’t provide enough power to prevent battery drain. Even so, the most effective way to charge your iPad is to plug it into the wall outlet using the Lightning to USB Cable (or Dock Connector to USB Cable for pre–fourth-generation iPads) and the 10W USB Power Adapter that came with your iPad. (See Figure 9-3.)

Figure 9-3: The provided cord and power adapter.
· Turn off the iPad. The fastest way to charge the iPad is to turn it off while charging it.
· Consider letting your iPad totally run out of battery charge once a month and then recharging it to prevent a memory effect that can have an effect on your lithium-ion battery life.
· Avoid USB ports on keyboards. Your battery may lose some power if you leave it connected to the USB port on a keyboard or other device.
 The best way to charge your iPad is with the included cord plugged into an electrical outlet. Using your computer to charge it can take a great deal longer. There are also power strips and adapters now available that have USB ports so that you can charge several USB devices at one time.
· Limit the screen’s impact on the battery. Turn off the screen when not in use because the display eats up power. Also, reduce the screen brightness in Settings to save power.
· Turn off Wi-Fi. If you’re not using Wi-Fi, turn it off in Settings or in the Control Center. Constantly maintaining a Wi-Fi connection or searching for a signal can use up a bit of power.
Your iPad battery is sealed in the unit, so you can’t replace it as you can with many laptops or your cellphone battery. If the battery is out of warranty, you have to fork over the money, possibly more than $100, to get a new one. If you use your iPad a great deal, consider getting the AppleCare service contract for free replacement. See the “Getting Support” section, later in this chapter, to find out where to get a replacement battery.
Apple has introduced AppleCare+. For $99, you get two years of coverage, which even covers you if you drop or spill liquids on your iPad. If your iPad has to be replaced, it costs only $50, rather than the $250 it used to cost with garden-variety AppleCare (but only for two instances). That means $149 ($99 for AppleCare+ plus $50 replacement fee) versus the $299 price Apple offered me to replace my fourth-generation iPad when it died 14 months into its life (after I was advised that Apple couldn’t service it). You can also purchase it when you buy your iPad or within a month of the date of purchase. See www.apple.com/support/products/ipad.html.
Troubleshooting Your iPad
Although everyone wants to think that his or her iPad is a perfect magical machine, unburdened with the vagaries of crashing and system software bugs, that’s not always the case.
Here are some common issues that can come up with your iPad, along with ways to deal with them.
Dealing with a nonresponsive iPad
If your iPad goes dead on you, it’s most likely a power issue, so the first thing to do is to plug the Lightning to USB Cable (or Dock Connector to USB Cable for pre–fourth-generation iPads) into the 10W USB Power Adapter, plug the 10W USB Power Adapter into a wall outlet, plug the other end of the Lightning to USB Cable (or Dock Connector to USB Cable) into your iPad, and charge the battery.
Another thing to try — especially if you think that an app might be hanging up the iPad — is to press the Sleep/Wake button for a few seconds. Then press and hold the Home button. The app you were using should close.
You can always try the old reboot procedure, which in the case of an iPad means pressing the Sleep/Wake button on the top until the Slide to Power Off control displays. Drag the slider to the right to turn off your iPad. After a few moments, press the Sleep/Wake button to boot up the little guy again. Be sure that your battery has a decent charge because this procedure can eat up battery power.
If the situation seems drastic and none of these ideas works, try to reset your iPad. To do this, press the Sleep/Wake button and the Home button at the same time until the Apple logo appears onscreen.
Troubleshooting keyboard woes
When you’re using a Bluetooth keyboard, your onscreen keyboard won’t appear. The physical keyboard has, in essence, co-opted keyboard control of your device. To use your onscreen keyboard with a Bluetooth keyboard connected, you have a few options: You can turn off your connection to the Bluetooth keyboard, turn off Bluetooth in iPad’s Settings or the Control Center, switch off the keyboard, or move the keyboard out of range. Your onscreen keyboard should reappear.
Are you accidentally tapping extra keys on the onscreen keyboard as you type? Wearing a wrist support can keep you from hitting extra characters with your wrists. Also, it’s much easier to use the onscreen keyboard in landscape mode where it’s just plain wider.
Updating software
Just as software manufacturers provide updates for your main computer, Apple occasionally updates the iPad system software to fix problems or offer enhanced features. Occasionally check for an updated version (say, every month). You can do this by opening Settings, tapping General, and then tapping Software Update.
Note that if you’ve chosen to back up and restore iPad via iCloud when you first set up the device or later using Settings, restoring and updating your device happens automatically. (See Chapter 5 in this minibook for more about iCloud.)
If you choose not to use iCloud, follow these steps to update the iPad system software using a connection to your computer and iTunes 11:
1. Connect your iPad to your computer.
2. On your computer, open iTunes.
3. Click your iPad’s name near the top-right corner of the screen.
4. Click the Summary tab, as shown in Figure 9-4.
5. Click the Check for Update button.
iTunes displays a message telling you whether a new update is available.
6. Click the Update button to install the newest version if yours isn’t up-to-date.
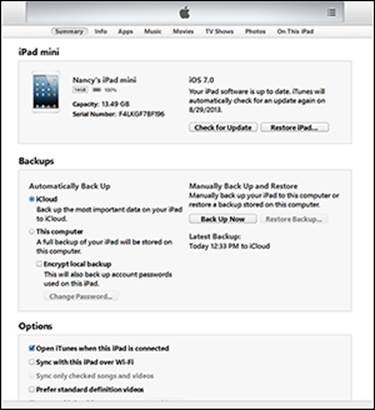
Figure 9-4: Get system updates for iPad through your iTunes account.
If you’re having problems with your iPad, you can use the Update feature to try to restore the current version of the software. Follow the preceding set of steps and then click the Restore button instead of the Update button in Step 6. Typically, restoring an OS to another version does run the risk of going back to original settings, so be aware of that going in.
Restoring sound
Coincidentally, the very morning I wrote this chapter, my husband was puttering with his iPad when the sound suddenly stopped. We gave ourselves a quick course in recovering sound, so now I can share these tips with you. Make sure that
· You haven’t touched the volume control keys on a physical keyboard connected to your iPad via Bluetooth. They’re on the right side of the top-right side of your iPad when holding it in portrait orientation. Be sure not to touch one and inadvertently lower the sound ’til it’s essentially muted.
· You haven’t flipped the Side switch. If you have the Side switch set to control sound, moving the switch mutes sound on your iPad.
· The speaker isn’t covered up. Make sure that you haven’t covered up the speaker in a way that muffles the sound.
· A headset isn’t plugged in. Sound won’t play through the speaker and the headset at the same time.
· The Volume Limit is set to Off. You can set up the Volume Limit in Settings for Music to control how loudly the Music app can play (which is useful if your partner’s into loud rap music). Tap Settings on the Home screen and then tap Music. In the settings that appear, tap the Volume Limit controls (see Figure 9-5) and move the slider to adjust the Volume Limit.
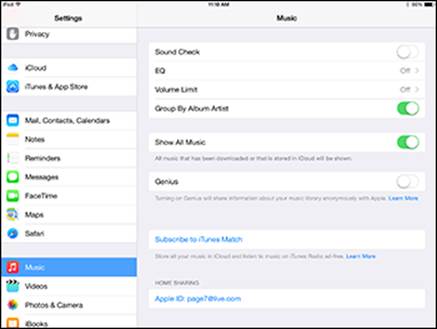
Figure 9-5: Volume Limit lets your iPad get only so loud.
If all else fails, reboot. That’s what worked for us — just press the Sleep/Wake button until the Slide to Power Off control appears. Drag the slider to the right. After iPad turns off, press the Sleep/Wake button again until the Apple logo appears, and you may find yourself back in business, sound-wise. If you’re also an iPhone user, and Siri or Voice Control stops understanding you, you’ll be glad to know that this reboot trick works for them, as well!
Getting Support
As you may already know if you own another Apple device, Apple is known for its great customer support, so if you’re stuck, I definitely recommend that you try them. Also, be aware that every new iPad comes with a year’s coverage for repair of the hardware and 90 days of free technical support. Here are a few options that you can explore for getting help:
· The Apple Store: Make an appointment online or by phone and then go to your local Apple Store if one is handy to find out what the folks there might know about your problem.
· The Apple iPad Support website: Visit this site at www.apple.com/support/ipad (see Figure 9-6) or check out the iBooks Store. Here you find online manuals, discussion forums, downloads, and the Apple Expert feature, which enables you to contact a live support person by phone.
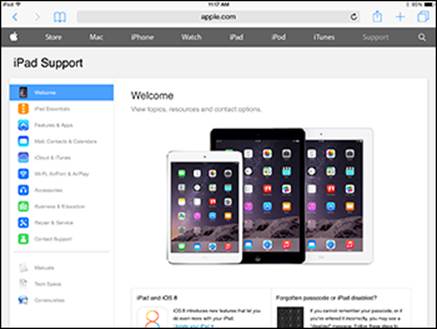
Figure 9-6: Don’t forget to check out the manuals and discussions for help.
· The iPad User Guide: You can visit http://manuals.info.apple.com/en_us/ipad_user_guide.pdf to view your iPad user guide. You can also download the manual and read it in most popular e-reader programs.
· The Apple battery replacement service: If you need repair or service for your battery, visit www.apple.com/batteries/replacements.html.
Note that your warranty provides free battery replacement if the battery level dips below 50 percent and won’t go any higher during the first year you own it. If you purchase the AppleCare service agreement, this is extended to two years. Also note that Apple recommends that the iPad battery should be replaced only by an Apple Authorized Service Provider.
Finally, here are a few useful non-Apple discussion forums that may help provide some answers:
· MacRumors at http://forums.macrumors.com/forumdisplay.php?f=137
· The iPad Guide discussions at www.theipadguide.com/forum
· iPad.org, with several useful threads at http://ipad.org/forum
Finding a Missing iPad
You can take advantage of the Find My iPad feature to pinpoint the location of your iPad. This is a very handy feature if you forget where you left your iPad or somebody walks away with it. Find My iPad lets you not only track down the critter but also wipe off the data contained in it if you have no way to get the iPad back.
If you’re using Family Sharing, your family can help each other out if someone in your family loses an iOS device. Anybody in the family can find the device and play a sound without having to sign into the missing device with its password. This works even if the ringer on the iPhone is turned off. See Book II, Chapter 1 for more about Family Sharing.
Follow these steps to set up this feature:
1. Tap Settings on the Home screen.
2. Tap iCloud.
3. In the iCloud settings that appear, tap Find My iPad.
4. Tap the On switch for the Find My iPad setting (see Figure 9-7) that appears to turn the feature on if it isn’t already.
5. Tap the Send Last Location On switch so that iPad sends your iPad’s location to Apple if your battery is almost out of juice, if you’d like.
If your iPad is ever lost or stolen, go to www.icloud.com on your computer and enter your ID and password. Click the Find My iPad button to display a map of its location, as shown in Figure 9-8. Click the circle representing your iPad; then click the Information button (the small i) in the toolbar that appears. In the dialog that appears, to erase all information from the iPad in a process called wiping, click the Erase iPad button. Remember that this action erases all content, including contacts, music, notes, and so on, for good. To lock the iPad from access by others, click the Lost Mode button.
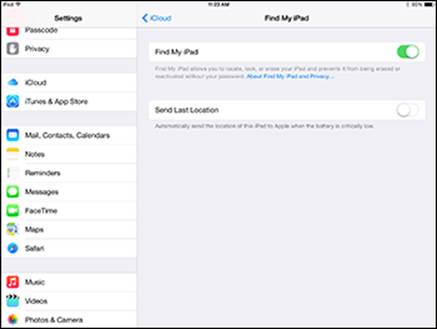
Figure 9-7: Turn the feature on or off to locate your iPad from your computer.
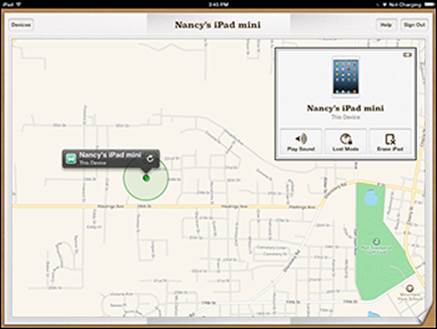
Figure 9-8: Find My iPad can pinpoint your iPad’s location.
You can also tap Play a Sound to send whomever has your iPad a note saying how to return it to you — or a note that the police are on their way if it has been stolen! If you choose to play a sound, it plays for two minutes, helping you track down your iPad or anybody holding it within earshot.
Backing Up to iCloud
You used to be able to back up your iPad content only using iTunes, but with iCloud, you can back up via a Wi-Fi network to your iCloud storage. Note that whereas iTunes backs up everything, iCloud backs up only what Apple considers your most important content — Apple never backs up videos you get from sources other than iTunes, for example. Note that you can back up to iTunes or iCloud, but not both at the same time. However you can always sync to iTunes which copies apps and documents.
You get 5GB of storage (not including iTunes-bought music, videos, apps, and electronic books or content pushed automatically among your Apple devices by iTunes Match) for free, or you can pay for increased levels of storage (10GB for $20 per year, 20GB for $40 per year, or 50GB for $100 per year).
To perform a backup to iCloud, follow these steps:
1. Tap Settings on the Home screen.
See Chapter 5 in this minibook for details on creating an iCloud account.
2. Tap iCloud and then tap Backup (see Figure 9-9).
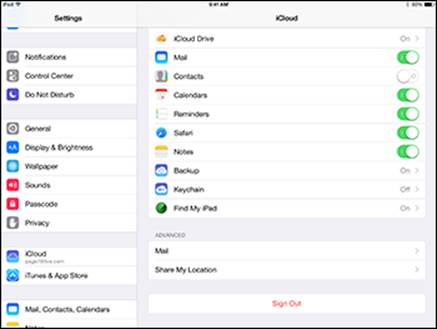
Figure 9-9: Backing up to the cloud.
3. In the pane that appears (see Figure 9-10), tap the iCloud Backup On/Off switch to enable automatic backups, or to perform a manual backup, tap Back Up Now.
A progress bar shows how your backup is moving along.
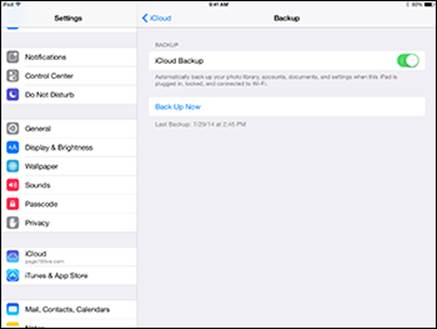
Figure 9-10: Automatic backups ensure that your data is saved.
All materials on the site are licensed Creative Commons Attribution-Sharealike 3.0 Unported CC BY-SA 3.0 & GNU Free Documentation License (GFDL)
If you are the copyright holder of any material contained on our site and intend to remove it, please contact our site administrator for approval.
© 2016-2025 All site design rights belong to S.Y.A.