iPad All-in-One For Dummies, 7th Edition (2015)
Book I. Getting Started with iPad
Chapter 8. Managing iPad Settings
In This Chapter
![]() Setting brightness and changing the wallpaper
Setting brightness and changing the wallpaper
![]() Controlling General settings
Controlling General settings
![]() Getting the sounds right
Getting the sounds right
![]() Changing Network and Bluetooth settings
Changing Network and Bluetooth settings
![]() Managing iCloud
Managing iCloud
![]() Getting an overview of apps settings
Getting an overview of apps settings
The Settings app is a command center for your iPad, allowing you to adjust the functionality of features such as the screen brightness and wallpaper, sound volume, and security features. You can also set up email accounts (which I tell you about in Chapter 7 of this minibook) and control how the Calendar and Contacts apps manage their respective details. Finally, you find settings for each of the individual preinstalled apps, as well as for many apps designed for the iPad that you may have downloaded to your device.
 Check out settings for the Siri personal assistant feature of iPad in Book V, Chapter 6.
In this chapter, you get some highlights of the settings you’re likely to need most often and advice for how to use them.
Making Brightness and Wallpaper Settings
You might as well set up the visual side of iPad first so your interaction with the device is easy on the eyes and battery power. Two such categories in Settings help out with your display: Display & Brightness and Wallpaper.
Setting brightness
When using iPad day in and day out, you may find that a dimmer screen reduces strain on your eyes. Also, by reducing the brightness when using any app, you can save a little on your iPad’s battery life.
To modify the brightness setting, follow these steps:
1. Tap Settings on the Home screen.
2. In Settings, shown in Figure 8-1, tap Display & Brightness.
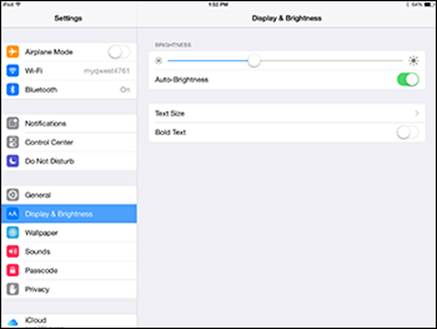
Figure 8-1: Display & Brightness settings are combined in one pane.
3. To control brightness manually, tap the Auto-Brightness On/Off switch (refer to Figure 8-1) to turn it off.
4. Tap and drag the Brightness slider to the right to make the screen brighter or to the left to make it dimmer.
5. You can also tap the Text Size setting to choose a size of text for any apps that support the Dynamic text feature, and tap the Bold Text switch to turn on this feature that may make text easier to see.
6. Tap the Home button to close Settings.
If glare from the screen is a problem for you, consider getting a screen protector. This thin film not only protects your screen from damage but also can reduce glare. These are available from a wide variety of sources (just do a web search for iPad screen protector) and cost about $2 each.
In the iBooks app, you can set a sepia tone for book pages, which might be easier on your eyes. See Book II, Chapter 7 for more about using iBooks.
Changing the wallpaper
Just as your desktop computer or laptop can display a pretty picture or pattern as a desktop background called a wallpaper, so your iPad can display an image on the Home screen and the same or another picture that displays when your iPad is locked.
The default picture may be pretty, but it may not be the background that’s most appealing to you. Choosing different wallpaper may help you to see all the apps and status bar information on your Home screen, or just provide an image that appeals to your artistic sensibilities.
To change the wallpaper, do this:
1. Tap Settings on the Home screen, and then tap Wallpaper.
2. In the Wallpaper settings that appear, tap Choose a New Wallpaper row.
3. In the pane that appears, tap either Dynamic or Stills under Apple Wallpaper to display wallpaper images.
Dynamic images use animation, and stills are static images.
You can also use your own picture for your wallpaper. Instead of choosing Apple Wallpaper, tap a Photos collection such as Recently Added to browse your saved photos, select the picture you want to assign, and then resume with Step 5.
4. In the Wallpaper pane (see Figure 8-2), tap a wallpaper image.
A preview of that wallpaper appears onscreen.
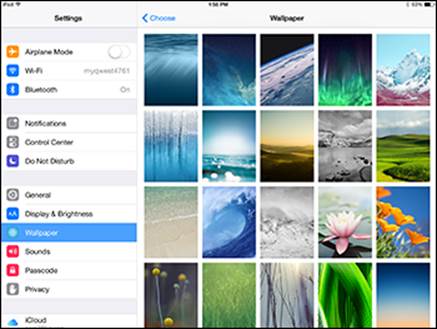
Figure 8-2: Choose from various built-in wallpapers.
5. Tap Set Lock Screen (the screen that appears when you lock the iPad by tapping the power button), Set Home Screen (to use as the wallpaper), or Set Both.
6. Press the Home button.
You return to your Home screen where you can view the new wallpaper set as the background.
Managing General Settings
A great many of the iPad settings are tucked into the General category. These include Software Update to update the iOS, Spotlight Search, Siri, security settings such as Auto-Lock and Restrictions, and settings for things like date and time, the keyboard, and accessibility.
Here’s a rundown of some of the settings you’ll find tucked under General settings.
Handling security
Because you’re likely to take your iPad on the road on a regular basis, it’s a good idea to consider a few security features. Some save battery life and protect your data or access to certain apps.
Security settings involve three features, which you access through the General settings:
· Lock/Unlock: Turns off your display to save battery power when you close the cover for your iPad.
· Auto-Lock: Locks your iPad at a set interval. You can set the amount of time you want before your iPad goes to the Lock screen by tapping this setting.
· Restrictions: Allows you to restrict access to certain apps and content using a passcode (see Figure 8-3). This is useful if you don’t want your kids to access a particularly adult app or simply don’t want them browsing with Safari or buying things with iTunes, for example.
In addition, there are two items in the main Settings (not within General settings) that relate to security: Passcode and Privacy.
· Passcode allows you to assign a passcode to the Lock screen. You can set a passcode, turn it on or off, change the passcode, and set the time interval at which your passcode is required. This is useful if you don’t want to bother with a passcode for only brief periods of locking your iPad. Finally, you can use the Erase Data setting so that multiple failed attempts to access your device results in your iPad erasing all data on it. This could protect from prying eyes your contacts’ information, for example, or map data that shows your location. Note that if Simple Passcode is turned on (the default setting), you’re limited to a four-digit passcode. If you turn off the Simple Passcode setting, you can use a longer, stronger, passcode using a combination of letters and numbers.
· Privacy shows you which apps have requested access to your data or social accounts, and lets you enable or disable the access of an app to the various iPad features listed, such as its microphone or contacts.
 If you forget a passcode, the only thing to do is restore iPad software, which can be a headache. The obvious advice here: Don’t forget your passcode!
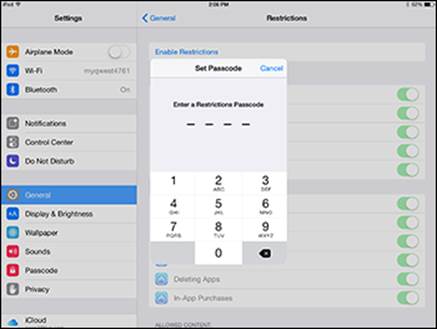
Figure 8-3: Set a password and choose the apps or content you want to restrict in this pane.
Setting the date and time
By default, your iPad is set to Cupertino time — Cupertino, California, that is, home to Apple. If you have occasion to reset the time zone or date and time, either because you live somewhere other than near Apple headquarters or you travel around with your iPad, here’s how you control the time setting on your iPad:
1. Tap Settings on the Home screen.
2. Tap General.
3. Tap Date & Time.
The settings shown in Figure 8-4 appear.
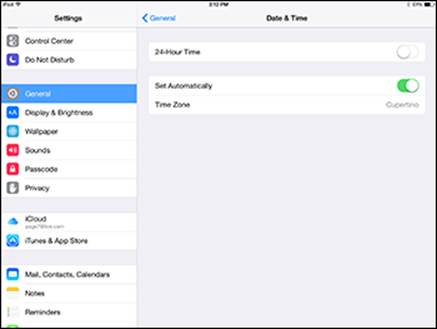
Figure 8-4: Choose the time format or time zone, or let your iPad set things up for you.
4. Do any of the following:
· Tap the Off switch to turn 24-hour time on. This is military time, so 2 p.m. is 1400, and so on.
· Tap the On/Off switch for Set Automatically. This feature sets your time and date based on your current location.
· Turn off the Set Automatically setting and then tap Time Zone, and a text-entry field displays along with your onscreen keyboard. Press the Delete key to delete Cupertino, and type your location. (If you type a major city near you and in the same time zone, it comes up on a list as you type, and you can just tap to select it.)
Controlling keyboard settings
Your keyboard is one of the most important ways in which you interact with iPad, so it’s helpful if you have all the onscreen keyboard settings just the way you want them. You can access these in Settings, under the Keyboard option in the General settings (see Figure 8-5), and they include the following:
· Auto-Capitalization and Auto-Correction: Allow iPad to help you avoid mistakes by automatically suggesting corrections to what it perceives as spelling errors, based on a built-in dictionary, or correcting capitalization mistakes you make after you finish entering a sentence.
· Check Spelling: If you want iPad to automatically check spelling, turning on this feature causes two things to happen: A jagged red line appears under problematic text in apps such as Notes and Mail; and as you type a word with a misspelling, a suggested correct spelling appears in a little bubble. If you also have Auto-Correction turned on, the word is corrected automatically when you finish typing it and add a space or punctuation mark (such as a period) after the word. Note that you can use the Undo key on the onscreen keyboard with numbers displayed to undo automatic changes.
· Enable Caps Lock: Activates a feature that lets you double-tap the Shift key to activate Caps Lock. Note that when Caps Lock is activated, the Shift key on the onscreen keyboard is blue, and you tap the Shift key to turn Caps Lock off. This setting is turned off by default.
· “.” Shortcut: Turning this on activates a shortcut that allows you to enter a period and a space by double-tapping the spacebar.
· Keyboards: Gives you access to a choice of built-in keyboard styles such as QWERTY and AZERTY. You can also choose from dozens of language keyboard layout options, including German, Italian, Russian, Spanish, and my personal favorite, Estonian.
· Split Keyboard: Turns on a feature that allows you to break the onscreen keyboard into two pieces, one on each side of your screen, to make a more texting-like experience for those who like to type mainly with their thumbs.
· Shortcuts: Use these two settings to have iPad automatically convert common texting phrases into shortcuts — for example, you can replace omw (the shortcut) with “on my way” — or add new shortcuts to its repertoire.
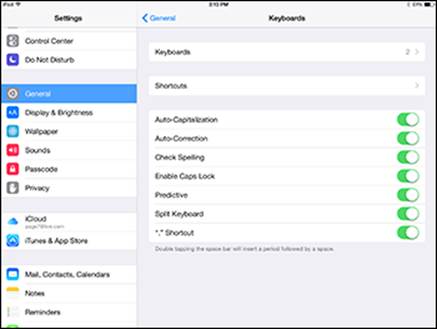
Figure 8-5: Set up your keyboard to work the way you want it to.
In addition to modifying Keyboard settings in the General category, you can tap Language & Region to access more settings. You can change the language you use for interacting with the iPad; add new keyboards; set the region format (for example, for date, time, and phone numbers); and pick which calendar to use (Gregorian, Japanese, or Buddhist).
Working with the Reset feature
If only life had a Reset button to put some things back the way they were. Well, life doesn’t, but iPad does. The last item in the General settings is Reset. When you tap it, you get options for resetting the following:
· Reset All Settings: All the preferences and settings are reset, although information that you’ve added to apps such as Calendar and Contacts doesn’t change at all.
· Erase All Content and Settings: This one both resets your settings and erases information that you’ve added to apps such as Calendar and Contacts. This is useful if you plan to sell your iPad (you also should turn off Find My iPad in the iCloud settings in this scenario, as otherwise the device will be locked to your Apple ID).
· Reset Network Settings: By choosing this, any networks you’ve set up are removed. iPad also turns off Wi-Fi and then turns it on again, which disconnects you from any network you’re connected to. Note that the Ask to Join Networks setting stays on.
· Reset Keyboard Dictionary: When you turn down the iPad’s suggestions of words as you type, you can add custom words to the keyboard dictionary. You do this by tapping an unrecognized word that an app has underlined; tapping the word rejects the suggestion and adds the current spelling of the word to the dictionary. If you don’t want to keep all those added words, use this Reset Keyboard Dictionary option.
· Reset Home Screen Layout: If you want to get back to the original Home screen that you saw when you took your iPad out of its box, choose this Reset Home Screen Layout option.
· Reset Location & Privacy: When you use an app like Maps that checks your location, it asks you whether it’s okay to do that. When you tap OK two times to let it proceed, it stops asking. If you want it to start asking again, tap this option.
Managing Sounds
The Sounds category has two main settings. One adjusts the volume level for all apps on your iPad; the other modifies whether system sounds play for events such as new email, calendar alerts, and keyboard clicks.
Adjusting the volume
Although individual applications such as Music and Videos have their own volume settings, you can set your iPad system volume as well to control the level of system sounds and sounds in apps that don’t have their own volume control. This system setting is the max against which Music volume settings work; if you set volume to 80% here, for example, Music’s 100% volume setting will actually be the maximum system volume, or 80%.
You can simply press the volume rocker controls on the top-right side of your iPad (when it’s in portrait orientation) to increase or decrease volume. However, this doesn’t change the volume of ringers and alerts unless you change one additional setting. To adjust the system volume from the Settings pane, tap Sounds. In the Sounds pane that appears (see Figure 8-6), tap and drag the slider to the right to increase the volume or to the left to lower it. Note that you can also adjust system volume in the Control Center, which you display by swiping up from the bottom of the iPad screen.
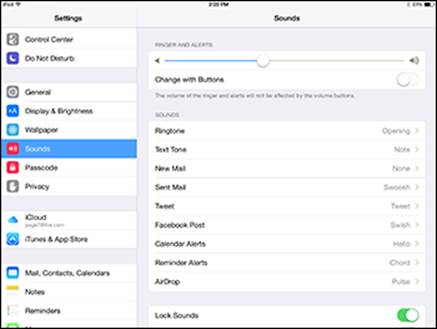
Figure 8-6: Use this familiar volume slider to adjust your system’s volume.
Under General settings, make a choice from the Use Side Switch To settings to set the side switch on your iPad to mute all sounds. If you prefer to use that switch to lock screen rotation, another way to mute your iPad is to hold down the volume switch (below the Side switch on the top-right corner of the device) until the sound is effectively off. This method assumes that you have set this switch to control volume.
Turning system sounds on and off
In my experience, people are either big fans or big haters of system sounds on computers. You know, sounds like that annoying chime you hear when a new email arrives? iPad also makes sounds when certain events occur, if you want it to. You can turn on and off the following system sounds:
· Ringtone
· Text Tone
· New Mail
· Sent Mail
· Tweet
· Facebook Post
· Calendar Alerts
· Reminder Alerts
· AirDrop
· Lock Sounds
· Keyboard Clicks
To turn these off or on, or to choose different system sounds, from the Settings pane, tap Sounds and use the On/Off switch for the last two settings, or choose None or a different sound for any of the others.
You can control the Apple Push Notification Service, used to push alerts to your Apple device, via the Notifications category in Settings. This lets you control the alerts sent to you. You can turn alerts on and off, for example, which can save a bit of your battery life. You can also control alerts in a specific app’s settings.
Making Network and Bluetooth Settings
You can make a few settings for your networks and Bluetooth: ones for virtual private networks (VPNs) under General settings, ones for Wi-Fi networks, and finally, settings for 3G/4G network cellular data.
You may have read in the news that your iPad and iPhone save a record of your every move. If you don’t like that idea, plug your iPad or iPhone into your computer and, when iTunes opens, click your device. Then, with the Summary tab selected, click the Encrypt iPhone/iPad Backup option. Apple can find your phone if you enable Find My iPhone, but Apple can’t view your backed up information in iCloud!
A virtual private network (VPN) allows you to set up an encrypted connection with a private network, such as one at your office, over the Internet. A VPN lets you make such a connection securely, and your iPad allows you to make settings for activating your connection through General settings.
For more about connecting to your company network remotely and configuring a VPN, see Book III, Chapter 1.
The Wi-Fi settings include simply turning Wi-Fi on or off, choosing which network to connect to, and activating a feature that joins recognized networks automatically.
I can’t forget 3G and 4G. If you have a 3G or 3G/4G iPad, you can make some settings for your 3G/4G connections by tapping Settings and then tapping Cellular Data. See Book III, Chapter 1 for more about these settings.
Note that you can also use the Airplane Mode setting to turn your Wi-Fi and Bluetooth signals off when in flight and quickly turn them back on again when you’re safely on terra firma. This setting is also available through Control Center.
Another setting that you can make in Privacy Settings to protect you when you’re online is to turn Location Services on or off. Turning this on lets apps like Maps find your current physical location. If you turn this feature off and an app needs Location Services to function, it prompts you to turn it on.
Managing iCloud Settings
iCloud is Apple’s online storage and sharing service. Chapter 5 of this minibook takes you through the steps involved in setting up an iCloud account, one of the things you can do using the iCloud pane in the Settings app. (See Figure 8-7.) Here are the other three main things you can control for iCloud from within Settings:
· Turn various apps on or off for inclusion in iCloud syncs. For example, you can set Contacts to sync contacts stored in your iCloud account. Your iCloud account can sync Mail, Contacts, Calendars, Reminders, and Notes in your iCloud account.
· Control Storage & Backup. This includes checking your available storage, buying additional storage, or turning iCloud Backup on or off.
· Set Up Family Sharing. Use this to set up an account that up to six people can use to make and share purchases using a single credit card.
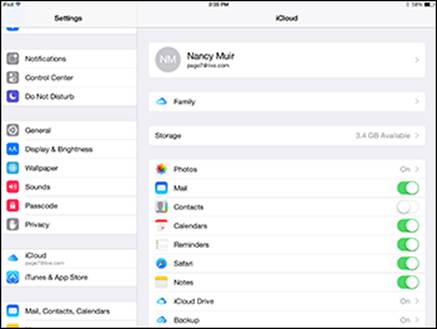
Figure 8-7: Choose which type of content to sync via iCloud here.
Settings for Individual Apps
Most bundled apps have a corresponding group of settings in the iPad. Rather than bore you by taking you through each and every one, I provide Table 8-1, which gives you an overview of most of the types of settings you can control. (Note that settings for the first three apps, Mail, Contacts, and Calendar are all included in the Mail, Contacts, and Calendars settings.) If you like to work with a particular app often, it’s worth your while to explore the settings for it to see whether one might make your life with that app a bit easier.
Table 8-1 Built-In Apps Settings Overview
|
App |
Types of Settings |
|
|
Add Accounts, Fetch New Data Frequency, and Display Settings (how many messages to show, font size, and so on) |
|
Contacts |
Display Settings (sort order and display order) |
|
Calendars |
Turn on Alerts, Time Zone, and Default Calendar |
|
Notes |
Set Default Account for storing notes |
|
Reminders |
Sync Reminders and choose the Default List of Reminders to use when a list isn’t specified |
|
Messages |
Turn On/Off, Make Send & Receive Settings, and Show/Hide Subject Field |
|
Music |
Toggle Sounds, Volume Limit, and the Display Lyrics and Podcast Info setting; toggle iTunes Match On/Off; set up Home Sharing |
|
Videos |
Start Playing (where you left off or from the beginning), Show All Videos that have been downloaded, and Home Sharing |
|
Photos & Camera |
Photo Stream and Photo Sharing, Slideshow Settings, and Camera Grid |
Also note that apps that you download, which have been designed for iPad, often appear in Settings under the Apps heading. Non-iPad apps (for example, iPhone apps) don’t seem to appear. The settings vary based on the app, so go exploring and see what you find!