iPad All-in-One For Dummies, 7th Edition (2015)
Book V. Using iPad to Get Organized
 Visit www.dummies.com/extras/ipadaio for a listing of great information-resource apps for iPad, from news sources to dictionaries.
In this book…
· Jot down quick messages with the Notes app
· Sync files to your computer
· Store and print documents online
· Keep your schedule with Calendar and Reminders
· Manage people through the Contacts app
· Talk to Siri
Chapter 1. Managing Files and Printing
In This Chapter
![]() Understanding how iPad stores files
Understanding how iPad stores files
![]() Sharing files by emailing, AirDrop, or through the cloud
Sharing files by emailing, AirDrop, or through the cloud
![]() Setting up Home Sharing
Setting up Home Sharing
![]() Printing wirelessly from iPad
Printing wirelessly from iPad
Okay, I’m going to be very upfront about this: Apple has not used a traditional paradigm for moving files to and from your iPad or managing files on the device. In essence, this is partially a chapter about the following:
· What iPad does differently from how traditional file management is handled by OS interfaces such as OS X’s Finder or Windows Explorer (Windows 7 and earlier) or File Explorer (Windows 8 and later). (For brevity, I just refer to this feature using the Windows 8 nomenclature, File Explorer, in the rest of this chapter.)
· How you can get things in and out of the device without a USB port or DVD drive.
One exciting way to back up content is iCloud, which allows you to store content online, and I discuss that in this chapter as well as in Book I, Chapter 5. In addition, you can share content with somebody in close proximity by using the AirDrop technology.
The other topic in this chapter is printing, and there are two options here: Use iPad’s native printing capability with a compatible wireless printer or use a third-party printing app.
Finding Your Files
iPad stores files locally by app, or if you use iCloud, iPad automatically stores and shares files among iOS devices and with your Mac or PC. Here’s how this works.
How iPad stores files
Though there’s no Mac Finder or Windows File Explorer on iPad where you can view all your stored files in one place, apps on iPad do store files. Open the Photos app, for example, and you see lots of photos, each one contained in a separate file. The Music app contains audio files, Videos contains movie files, iBooks contains e-book files, and if you own Pages, it contains word-processing documents (as shown in Figure 1-1), and so on.
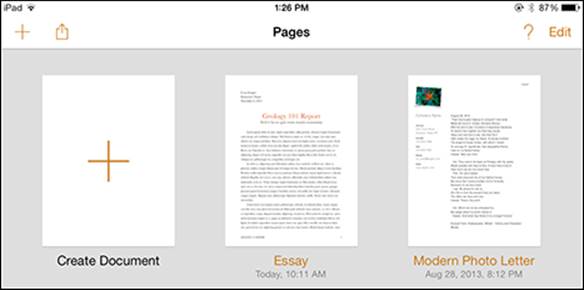
Figure 1-1: Documents stored by Pages.
 Though there’s no Windows File Explorer feature on iPad, when you connect iPad to a PC, you can use the Windows File Explorer feature on your computer to view the files stored on your iPad.
How did those files get there? You may have created them in an app on your iPad; you may have downloaded them from the Internet, as with music or video purchases from iTunes; or you may have synced them from your computer or had them pushed to all your iOS devices from iCloud, as with music files or photos. Perhaps you grabbed a document from a website or from an online storage service such as Dropbox.
Depending on the app you open, you may see a Documents button to display thumbnails of documents (refer to Figure 1-1); libraries of photos, as in Photos; albums of music or individual song files, as in Music (see Figure 1-2); or bookshelves or lists of e-books, as in iBooks. Each app offers a slightly different way to find whatever you’ve created on, downloaded to, or synced to your iPad.
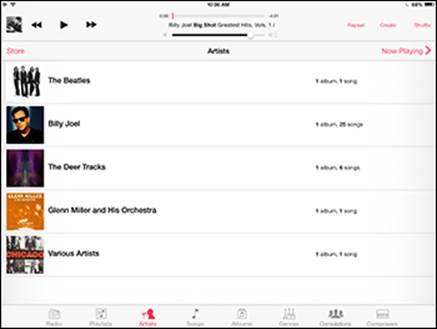
Figure 1-2: Music shows you files by album, song, composer, artist, and more.
See Book II, Chapter 1, for information about buying and downloading content, and see Book I, Chapter 5, for information about syncing to your computer and buying apps. Book IV, Chapter 1, gives some details about moving files around for use with iWork products.
Going with iCloud
iCloud isn’t so much a place as it is a storage service. If you choose to back up or share files by using iCloud, you can’t go to a website and organize those files. Rather, they’re automatically backed up from your devices, and new files created or downloaded to one device are automatically pushed to your other devices. In essence, this process is invisible to you. You still access these files by opening the associated app.
Note that iCloud Drive, which released just as this book was going to press, will eventually replace simple iCloud storage. iCloud Drive includes storage, calendar and contact syncing capabilities, email, location services, and app sharing.
Sharing Files
As mentioned in the previous section, iPad doesn’t let you get at files the way your computer does with a series of folders and files. You open files in individual apps, such as Photos and Videos. You can’t save files to a storage medium, such as a flash drive that you can remove and place in another computing device. Therefore, managing and sharing your files with other devices or other people works a bit differently on your iPad.
You have a few options for getting files out of your iPad:
· Sync them via iCloud, which automatically pushes them to other iOS devices.
· Email them.
· Sync via iTunes with a computer to share things like calendar events, contact records, music, or photos, which is covered in Book I, Chapter 5.
· Share them over a network.
· Share them with somebody in close proximity using AirDrop.
Also consider using wireless devices from manufacturers such as Kingston or Maxell for external storage.
Relying on good old email
You can use tools in individual applications to email files to yourself or others. Emailing files to yourself can be useful if you’ve worked on a document on your iPad and then want to get a copy of it on your computer. You can’t exactly save a copy because (remember) no removable storage medium exists on your iPad, so you email the file and open and save the email attachment to your computer hard drive or other storage.
Here’s an example of emailing from an app; in this case, Photos:
1. Open Photos and locate a picture you want to email.
2. Tap the picture to open it and then tap the Share button to display the Sharing popover shown in Figure 1-3.
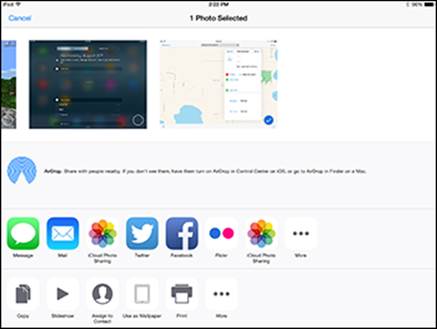
Figure 1-3: View the several options for sharing.
3. Tap Mail.
The email form shown in Figure 1-4 appears.
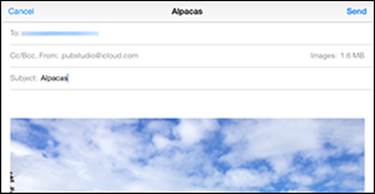
Figure 1-4: The email form and onscreen keyboard appear together.
4. Fill out the email form and tap Send to get the email on its way to yourself or somebody else.
Getting up close with AirDrop
To use the AirDrop feature, you need to be near another AirDrop–enabled device (I’m talking within a few feet). Then, as in the previous email example, you can use the Share popover from within an app. (Refer to Figure 1-3.) Tap AirDrop in that popover, and any eligible devices in your vicinity appear. Tap the device you want to share with, and the content appears on the other device when the recipient accepts it.
That’s it!
Going through the cloud
In addition to iCloud, there are other cloud-based options for sharing files. Apps such as Dropbox and FileFly, and Easy Wi-Fi Sharing and Viewing (a wireless file-sharing app) allow you to upload files to an online site and, using an app you download to your iPad, access and view those files. Some of these options provide more flexibility for managing your files than iCloud does.
Take a look at how this works with Dropbox, which is a good, free, file-sharing app that provides one of the easiest ways to get any and all files to and from your iPad to any and all other computers and devices.
Dropbox is a cloud-based service that allows you to store your files on its servers and access them on any device that’s connected to the Internet. (Figure 1-5 shows you what the Dropbox interface looks like if you surf there using Safari.) It directly supports (in the form of dedicated software) OS X, Windows, Linux, Android, BlackBerry, and of course, iOS.

Figure 1-5: Accessing Dropbox through Safari.
When you’re on a computer, Dropbox works like any other folder on your hard drive. When you open it with your browser, you have instant access to all your files. When you drop something into your folder, it’s copied to the company’s servers, and then pushed out to anywhere you’ve set up with your Dropbox account, including your iPad or others you’re sharing folders with.
After you download the Dropbox app, you can open a file on iPad and print or view it, but not edit it, unless you choose the option of opening the document with an app you have on your iPad that would be a logical fit. Figure 1-6 shows the iCloud app for iPad with shared photos from iPad’s Photos app available; this feature is offered to you the first time you log in to Dropbox from the Dropbox app on your iPad.
Dropbox folders can be selectively shared with other Dropbox users, making it a great tool for any sort of collaborative project.
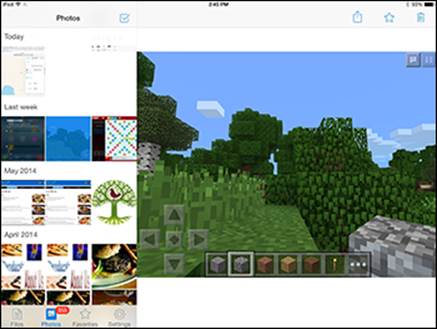
Figure 1-6: Share your photos via Dropbox.
Setting Up Home Sharing
With Home Sharing, you can stream content from any Mac or PC to your iPad directly. You simply set up Home Sharing on your iPad, turn on the feature in iTunes on your computer, and you’re good to go.
Here are the steps for setting up Home Sharing when you’re connected to a Wi-Fi network:
1. On your computer, open iTunes.
2. Click the File menu and choose Turn On Home Sharing.
The Home Sharing dialog appears.
3. Enter your Apple ID and password and then click Create Home Share.
A message appears, telling you to use the same account you just signed in to on devices you want to share with.
4. Click Done.
5. On your iPad, tap Settings and then tap Music.
6. In the Home Sharing section, shown in Figure 1-7, enter your Apple ID for the same account you used in iTunes on your computer and, beneath the ID, enter a password.
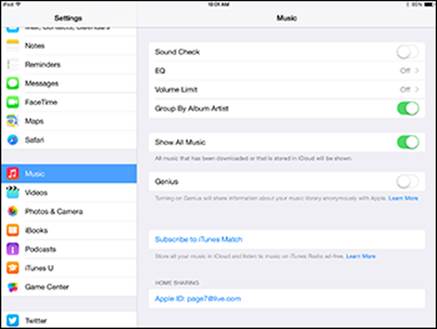
Figure 1-7: The Home Sharing settings for Music.
7. Tap the Home button and then tap Music.
Music opens.
8. Tap Songs and then tap a shared song to download it from the cloud.
To view shared videos, follow the same procedure for Videos settings and the Videos app.
Printing from iPad
If you need to print from your iPad, you can use its built-in wireless printing capability or a third-party app, which is likely to give you a few more printing controls.
Native printing capability is part of iPad’s bag of tricks. This capability requires a wireless-enabled printer that supports the AirPrint protocol. All the major printer manufacturers offer AirPrint–compatible printers, including HP, Epson, Canon, Brother, and Lexmark, so check to see whether your model has such support.
The only control you have over your printing is to set the number of copies to be printed; with some printers, you can also specify a page range and double-sided printing. You can also use an app such as Printopia or AirPrint Activator 2 on your computer to print through that computer from iPad to shared and networked printers, whether wireless or wired.
You can print photos, notes, email messages, web pages, and documents from iWork apps such as Pages. Tap the Share button (available in most apps) to display a popover including the Print command. When you tap that command, you see the Printer Options dialog. Follow these steps to print:
1. In the Printer Options dialog, shown in Figure 1-8 (the screen you see if you haven’t yet used this feature with your printer), tap Select Printer.
iPad searches for any available wireless printers.
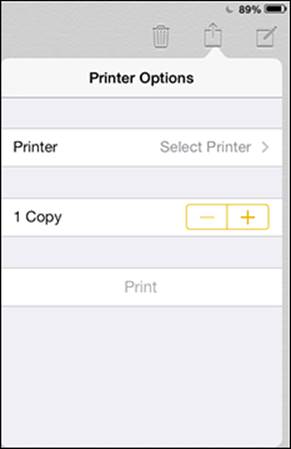
Figure 1-8: Choose your printer and the number of copies and print away!
2. Tap your printer to select it.
3. Tap Printer Options to return to the Printer Options dialog and tap the + or – button in the Copies field to adjust the number of copies.
4. Tap Print.
Your document or photo prints.
When you have print jobs going to your printer, you can access a Print Summary popover that shows the name of the document that’s printing, the printer it’s printing to, the number of copies, when the print job started, and its status (for example, Printing 1 of 3). You access this summary by double-tapping the Home button to open the App Switcher. There, scroll to the left in the list of apps to locate the Print Center app. Tap it, and the summary displays.