iPad All-in-One For Dummies, 7th Edition (2015)
Book V. Using iPad to Get Organized
Chapter 3. Keeping On Schedule with the Calendar and Clock Apps
In This Chapter
![]() Viewing your calendar
Viewing your calendar
![]() Adding and repeating calendar events
Adding and repeating calendar events
![]() Working with, searching, and sharing calendars
Working with, searching, and sharing calendars
![]() Deleting events
Deleting events
![]() Using the Clock app
Using the Clock app
Most people have busy lives full of activities that aren’t always easy to keep straight. You may need a way to keep on top of all those work-related and personal activities and appointments. The Calendar app on the iPad is a simple, elegant, electronic daybook that helps you do just that.
In addition to being able to enter events and view them by the day, week, month, or year, you can set up Calendar to provide alerts to remind you of your obligations, and you can search for events by keyword. You can also set up repeating events, such as the weekly staff meeting, a regular social get-together, or monthly flea treatments for your cat. By taking advantage of the new Family Sharing feature in iOS 8, you can create a family calendar that everybody in your family can add events to.
Another useful preinstalled app is Clock. Though simple to use, Clock helps you view the time in multiple locations, set alarms, and use a timer and stopwatch.
In this chapter, I show you how to master simple procedures for getting around in your calendar, creating a family calendar, entering and editing events, setting up alerts, and searching. You also discover the simple ins and outs of using Clock.
Taking a Look at Your Calendar
You’ve probably used calendar apps in a slew of settings — in your email client, on your cellphone, and even in robust contact-management programs. The Calendar app on iPad is more robust than some and less robust than others, but it’s quite a nicely designed and simple-to-use program that saves you the cost of buying one more app, plus it syncs with your computer and iCloud, Google, Exchange, or Office 365 calendar. Calendar offers several ways to view your schedule, so the first step in mastering Calendar is to understand how to navigate those various views.
You get started by tapping the Calendar app icon on the Home screen to open it. Depending on what you last had open, you may see today’s calendar or the weekly, monthly, or yearly calendar or an open event.
Next, tap one of the top buttons described here to change the view:
· Today: This view, shown in landscape orientation with Search open in Figure 3-1, displays your daily appointments and a small monthly calendar on the left page, along with an hourly breakdown of the day on the right page. In portrait orientation, the two pages are narrower. Tap an event on this list to view more details.
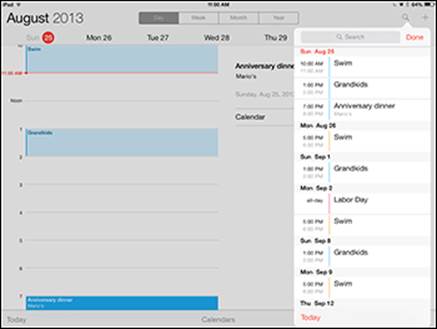
Figure 3-1: Calendar in landscape orientation.
· Week: Use Week view to see all your events for the current week, as shown in Figure 3-2. In this view, appointments appear in their scheduled time slots on the grid.
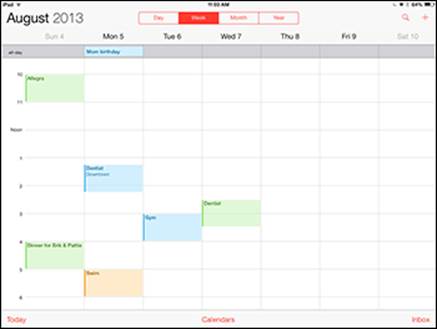
Figure 3-2: Tap another week in the row beneath the weekly calendar to jump there.
· Month: See one month at a time and switch among months in Month view (see Figure 3-3). You see the name and timing of each event. In this view, days that have scheduled events display the color of the calendar associated with the event.
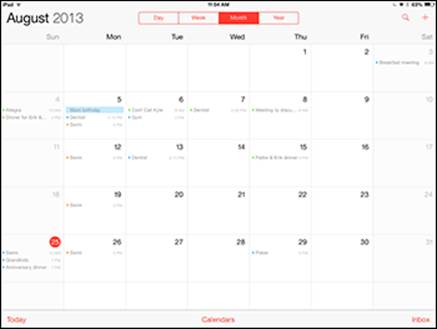
Figure 3-3: Tap a month name along the bottom of the screen to jump to another month.
· Year: Tap the Year button to see all months in the year so that you can quickly move to one, as shown in Figure 3-4.
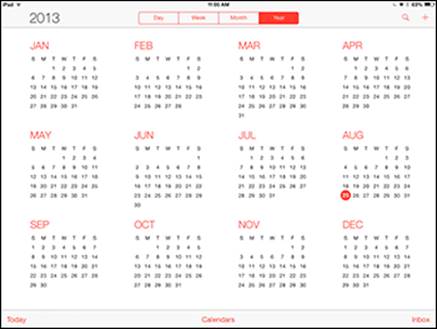
Figure 3-4: If you want an overview of your year, this is the view for you.
· List: Tap the Search button to see the List view, which displays your daily calendar with a list of all commitments for the month in a list to the right side of the page, as shown in Figure 3-5.
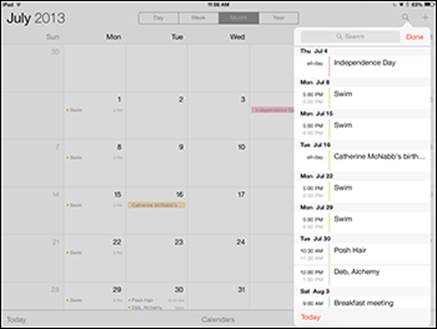
Figure 3-5: List view shows today and all the days containing events in the month ahead.
To move from one day, week, month, or year to another, use your finger to scroll up or down the list.
To jump back to today, tap the Today button in the bottom-left corner of Calendar. And now you know the basics about views in Calendar!
The portrait and landscape orientations of your iPad with the Calendar app give you a slightly different display. Play around with turning your iPad in different directions to see which one you prefer to work in.
 Note that you can tap text that mentions a reservation or phone number in an email to add an event to Calendar.
If you’re looking for a more robust scheduling app, consider buying Pocket Informant HD for $12.99. This app is easy to use and has helpful scheduling tools for your tasks. You can also sync information that you save in the app by using Google Calendar. Also, if you want to use a calendar program for business, check out Shifty ($13.99), a work-shift management app that has tools that can be quite useful to managers and supervisors.
Adding Calendar Events
Events in your life might range from business meetings to karaoke dates, but whatever the nature of your appointments, Calendar can help you keep them all straight. You can enter single events or repeating events and include alerts to remind you that they’re coming up.
Adding one event at a time
If you’ve used other calendar programs, you know that adding events is usually a simple procedure. You can easily add events to iPad’s Calendar app, but if you haven’t used a touchscreen computer or smartphone, it’s worth a walk-through.
Follow these steps to add an event to your calendar:
1. With Calendar open in any view, tap the Add button to add an event.
The New Event dialog, shown in Figure 3-6, appears.
2. Enter a title for the event and, if you want, a location.
3. Tap the All-day button for an all-day event, or tap the Starts or Ends field.
The tools for setting a date and time, as shown in Figure 3-7, displays.
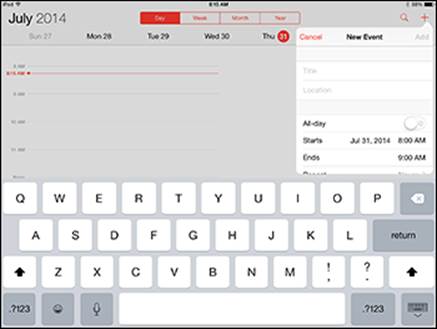
Figure 3-6: Add your event details in this dialog.
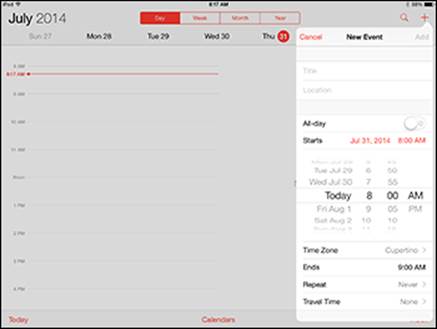
Figure 3-7: Use this cool slot machine–like interface to set up event timing details.
4. Place your finger on the date, hour, minute, or AM/PM column, and swipe your finger to scroll up or down.
5. (Optional) To add notes, use your finger to scroll down in the New Event dialog; then tap in the Notes field.
6. After all items are set correctly, tap Add.
Note that you can edit any event at any time by simply tapping it in any view of your calendar. The Edit dialog appears, offering the same settings as the Add Event dialog. (Refer to Figure 3-6.) Just tap the Done button in this dialog to save your changes or Cancel to return to your calendar without saving any changes.
Adding events with Siri
Siri, the personal assistant feature, offers a hands-free way to schedule events. There are several ways to schedule an event with Siri because the feature is pretty flexible. For example, you can say, “Create event,” and then Siri asks you first for a date and then for a time. Or you can say, “I have a meeting with John on April 1st,” and Siri might respond by saying, “I don’t find a meeting with John on April 1st; shall I create it?” Then you can say, “Yes” to have Siri create it, asking you for more details like the time and place.
Follow these steps to have Siri schedule an event for you:
1. Press and hold the Home button.
2. Say a command such as “Create meeting October 3rd at 2:30 p.m.”
3. When Siri asks you whether you are ready to schedule the event, say “Yes.”
 You can also use Siri to delete events, change details about an event, or remind you about an event. Siri recognizes holidays so that you can say, “Schedule a family dinner on Christmas,” and Siri will know what you mean. Play around with Siri; it’s a lot of fun!
Creating repeating events
Many events in your life probably happen regularly: that Tuesday evening book club, the monthly sales meeting, or your company’s yearly audit, for example. You can use the Repeating Events feature of the Calendar app to set repeating events.
Follow these steps to create a repeating event:
1. With any view displayed in the Calendar app, tap the Add button to add an event.
The Add Event dialog (refer to Figure 3-6) appears.
2. Enter a title and location for the event and set the start and end dates and times (see the preceding section).
3. Scroll down the page if necessary and tap the Repeat field.
The Repeat dialog, shown in Figure 3-8, appears.
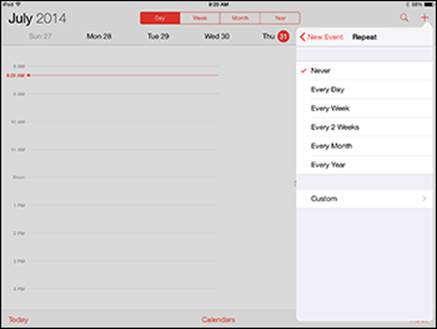
Figure 3-8: You have to use preset intervals, but you can choose from among several.
4. Tap a preset time interval: Every Day, Week, 2 Weeks, Month, or Year.
If you want, you can tap Custom and enter a Frequency and Day. For example, you can create an event to happen monthly, but only every three months, or daily every three days.
5. Tap New Event to close the Repeat dialog, and then tap Add.
You return to the Calendar.
If you have an iCloud, Exchange, or Gmail account, your iPad recognizes and supports all calendars you’ve compiled there as well as those you’ve synced and the iPad calendar. Be sure to set the Calendar switch to on in the Settings app’s Mail, Contacts, Calendars pane for any accounts that you want Calendar to access.
Adding alerts
Once upon a time, helpful assistants placed printed paper schedules of the day’s activities in front of their bosses to remind them of scheduled commitments. Today, I’m not sure anybody but the highest-paid CEOs get this type of service. Instead, most people set up alerts in calendar programs to remind them where to be, and when.
Luckily, in the iPad Calendar app, you can easily set up alerts by following these steps:
1. Tap the Settings icon on the Home screen and then tap Sounds.
2. Scroll down and tap Calendar Alerts and then tap any alert tone, which causes iPad to play the tone for you.
3. After you choose a tone, tap Sounds to return to the Sounds settings.
4. Press the Home button and then tap Calendar.
5. Create an event in your calendar or open an existing one for editing (see the preceding sections).
6. In the Add Event dialog or Edit dialog for an existing event (refer to Figure 3-6), tap the Alert field.
The New Alert dialog appears, as shown in Figure 3-9. Note that if you want two alerts — say, one per day before and one an hour before — you can repeat this procedure using Second Alert instead. The Second Alert field appears directly below the Alert field in the Add Event dialog after you set an alert.
7. Tap any preset interval, from 5 Minutes Before to 2 Days Before or at the time of an event.
8. Tap New Event or Edit Event to return to the New Event or Edit Event dialog.
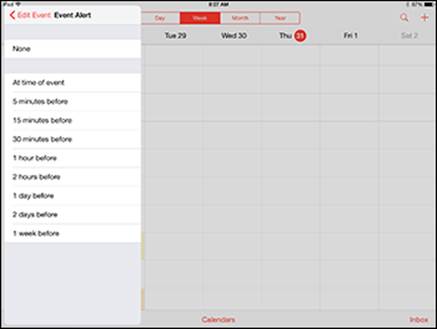
Figure 3-9: Use these preset intervals to set up alerts.
9. Tap Add (for a new event) or Done (if you’re done editing an existing event) to save the alert.
10. Tap the Day button to display the date of your event in Day view and then tap the event.
Note that the alert and time frame are listed under the event in that view, as shown in Figure 3-10.

Figure 3-10: An alert is noted along with the appointment in your calendar.
 If you’re on the road and change time zones, iPad may not recognize the local time, which can cause your alerts to become useless. To avoid this problem, you can adjust the time of your iPad manually by using the Date & Time feature in the General category in Settings.
To view any invitation or event that you accepted, which placed an event on your calendar, tap Inbox, and a list of invitations is displayed. Tap Done to return to the calendar.
Working with Your Events
After you have entered some events in Calendar, you can use features to search for events, sync your events with other calendars on other devices, or delete events that have been canceled.
In this section, you work with the various events on your calendar to keep things up-to-date and organized.
Searching calendars
Displaying events by day or week and scrolling the pages is one way to look for appointments, but if you need to view a particular event and can’t remember its time frame, you can use the Calendar Search feature to find it.
Don’t forget that you can also search for events in your calendar by speaking a command to Siri or searching with the Spotlight Search feature.
Follow these steps to search for events in Calendar:
1. With Calendar open in any view, tap the Search field (refer to Figure 3-5) in the top-right corner.
The onscreen keyboard appears.
2. Tap in the Search field and type a word or words to search by and then tap the Search key on the onscreen keyboard.
As you type, the Results dialog appears, as shown in Figure 3-11.
Tap any result to display it in the view you were in when you started the search.
The event details are displayed.
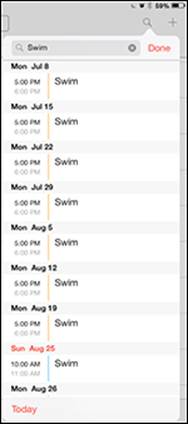
Figure 3-11: Every instance of an event that includes your search term displays.
Working with multiple calendars
You can choose a calendar — for example, Business, Personal, Parties, Classes, and Volunteering — for every event. If you’re synchronizing your calendars with your Mac or PC or by using iCloud, Google Calendar, Microsoft Exchange, or AOL, each source can have its own calendar. You can also sync a local calendar on your Mac or Windows PC via iTunes. On your iPad, tap Calendars at the bottom of the screen in the Calendar app. Every calendar is listed with a dot of a different color.
You can choose calendars on this list to display the events from several calendars at one time, including calendars you sync with from your PC or Mac, only your PC calendar, only your Mac calendar, cloud-based calendars, or only your iPad calendar. With the Calendar app open, tap the Calendars button, and in the Calendars dialog, tap to select or deselect the calendars you want to display: All from My <Account>, Birthday Calendar, My Calendar, or US Holidays. If you have synced to calendars from other sources, you can choose them by tapping them to select or deselect them; for example, tap All iCloud to show all your iCloud-synced calendars. Tap Done, and your chosen calendar displays. When you add a new event, use the Calendar field to choose the calendar you want to add the event to.
If you’ve created lots of events, you might want to tap Hide All Calendars in the Calendar app, and then tap the one or two calendars you need to see now so that you can quickly find their events.
Syncing Calendars
If you use a calendar available from an online service, such as Yahoo! or Google, you can sync to that calendar to read events that are saved in it on your iPad. To sync a calendar, follow these steps:
1. Tap the Settings icon on the Home screen.
2. Tap the Mail, Contacts, Calendars option on the left.
3. Tap Add Account.
The Add Account options, shown in Figure 3-12, appear.
4. Tap an email choice, such as Outlook, Gmail, or Yahoo!
5. In the settings that appear (see Figure 3-13), enter your name, email address, and email account password.
6. Tap Next.
iPad verifies your address.
7. On the following screen, tap the On/Off switch for the Calendars field.
8. Your iPad retrieves data from your calendar at the interval you have specified, so to review these settings, tap the Back button in the top-left corner of the pane, and then tap the Fetch New Data option in the Mail, Contacts, Calendars pane.
9. In the Fetch New Data pane that appears (see Figure 3-14), be sure that the Push option’s On/Off switch is set to on (green) and then choose the frequency option you prefer your iPad to use for querying the server for new data: every 15 or 30 minutes, hourly, or manually.
More frequent pushing of data can use battery power and incur data charges on a 3G/4G connection.
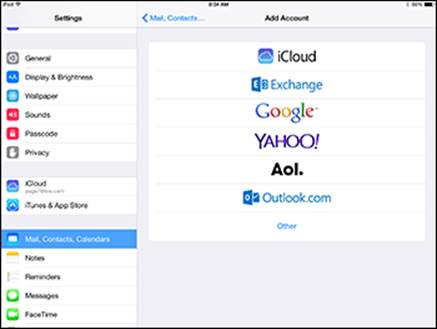
Figure 3-12: Choose accounts with calendars to copy to iPad.
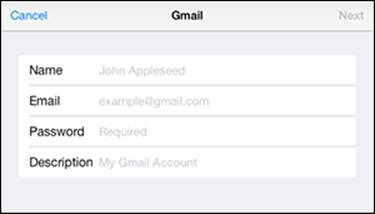
Figure 3-13: Enter your calendar account information.
If you store your contacts’ birthdays in the Contacts app, the Calendar app displays each one when the day arrives so that you don’t forget to pass on your congratulations!
You can also have calendar events automatically shared with your iPad if you use a service such as iCloud. The service can sync calendars from multiple email accounts with your iPad calendar. Keep in mind that if you choose to have data automatically shared with your iPad, your battery may drain faster.
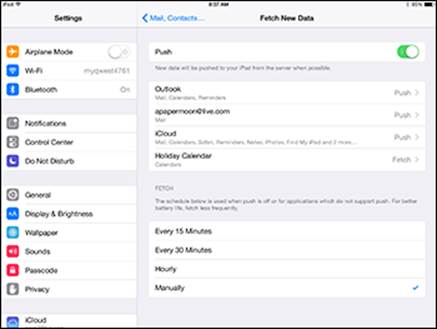
Figure 3-14: Choose how often you want data pushed to your iPad.
If you set up the new Family Sharing feature (see Book I, Chapter 5 for how to do this), you create a family calendar that you can use to share family events with up to five other people. After you set up Family Sharing, you have to make sure that the Calendar sharing feature is on.
After setting up Family Sharing, to set up a family calendar, follow these steps:
1. Tap Settings.
2. Tap iCloud and check that Family Sharing is set up on the second line of the settings on this pane (see Figure 3-15) (it will say Family rather than Set Up Family Sharing if it has been set up). If it’s not set up, go to Book I, Chapter 5 for step-by-step instructions for setting it up.
3. Tap the On/Off switch for Calendars to turn it on if it’s not already on.
4. Tap the Home button and then tap Calendars; next, tap the Calendars button at the bottom of the screen, and in the popover that opens, scroll down and make sure that Family is selected. Tap Done.
5. Now when you create a new event in the New Event dialog, tap Calendar and choose Family or Show All Calendars.
In the details of events is a notation that an event is from the family calendar.
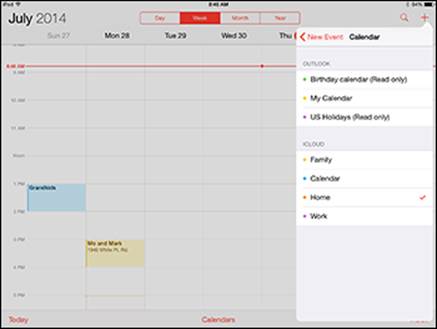
Figure 3-15: Start by turning Family Sharing on in the Settings app.
Deleting Events
Face it: Things change. When that scheduled luncheon or meeting is canceled, you may want to delete the appointment in Calendar. Here’s how:
1. With Calendar open, tap an event.
The event details are displayed.
2. Tap the Edit button.
3. In the Edit Event dialog, scroll to the bottom and then tap the Delete Event button, shown in Figure 3-16.
Confirming options appear, including a Delete Event button.
If this is a repeating event, you can delete either this instance of the event or this and all future instances of the event. (See Figure 3-17.)
4. Tap the button of the option you prefer.
The event is deleted, and you return to Calendar view.
If an event is moved but not canceled, you don’t have to delete the existing one and create a new one; simply edit the existing event to change the date and time in the Edit Event dialog.
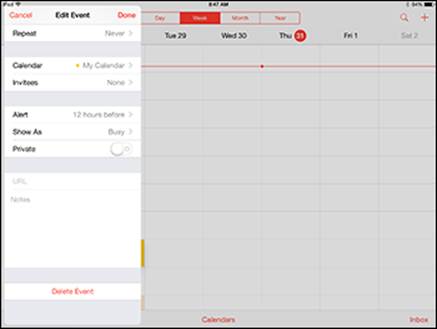
Figure 3-16: Get rid of an event you no longer need by tapping Delete Event.
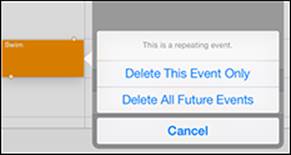
Figure 3-17: Choose whether to delete one instance or all instances of a repeating event.
Using Clock
The Clock app comes preinstalled on your iPad. Using Clock, you can view the time anywhere in the world, set up alarms for certain times, and even use the timer and stopwatch features of Clock to keep track of the timing of events.
Displaying Clock
Tap the Clock app to open it. In World Clock view, preset location clocks are displayed along the top, and the location of these clocks on the world map are displayed below along with the current temperature in that location. To see more views in Clock, follow these steps:
1. Tap a clock along the top of the screen to display it full screen. (See Figure 3-18.)
The temperature for the location is displayed to the right of the clock and the date and location are displayed on the left.
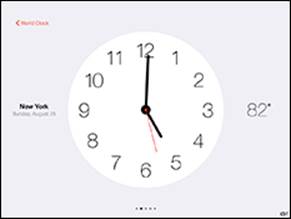
Figure 3-18: Clock lets you enlarge the display.
2. Tap World Clock to return to the World Clock screen.
If the World Clock button isn’t visible, tap the screen once and it appears.
Cities that are in time zones currently in nighttime are displayed in black. Clocks for cities that are currently in daytime are displayed in white.
Adding or deleting a clock
You can add a clock for many locations around the world (but not everywhere). You can also get rid of a clock when you no longer need it (especially useful for those who travel to different time zones frequently).
To add a clock, follow these steps:
1. With Clock displayed, tap Add on the clock on the far right.
2. Tap a city on the list, or tap a letter on the right side to display locations that begin with that letter.
The clock appears in the last slot on the right, and the location is displayed on the world map.
To delete a clock, follow these steps:
1. To remove a location, tap the Edit button in the upper-left corner of the World Clock screen.
2. Tap the minus symbol next to a location (see Figure 3-19) and then tap Delete.

Figure 3-19: Delete a city when you no longer need to know its time.
Setting an alarm
Want to make sure that you’re on time for that big meeting or date? Use the Alarm feature in the Clock app and make sure that you have your iPad near at hand.
Follow these steps to set an alarm:
1. With the Clock app displayed, tap the Alarm tab.
2. Tap the Add button.
3. In the Add Alarm dialog, shown in Figure 3-20, take any of the following actions, tapping Back after you make each setting to return to the Add Alarm dialog:
· Tap Repeat if you want the alarm to repeat at a regular interval such as every Monday or every Sunday.
· Tap Sound to choose the tone the alarm will play.
· Tap the On/Off switch for Snooze if you want to use the Snooze feature.
· Tap Label if you want to give the alarm a name such as “Take Pill” or “Call Mom.”
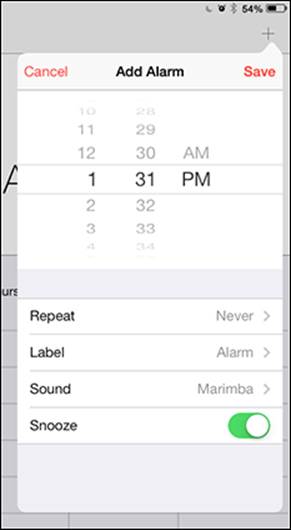
Figure 3-20: Alarms keep you from missing important events.
4. Place your finger on the three sliders at the top of the dialog, scroll to set the time you want the alarm to occur, and tap Save.
The alarm appears on the calendar on the Alarm tab.
To delete an alarm, tap the Alarm tab and tap Edit. All alarms appear. Tap the red circle with a minus in it, and then tap the Delete button.
Using Stopwatch and Timer
Sometimes life seems like a countdown or a ticking clock counting up the minutes you’ve spent on a certain activity. You can use the Stopwatch tab of the Clock app to time the length of an activity such as a walk. Use the Timer feature to do a countdown to a specific time such as the moment when your chocolate chip cookies are done baking.
These two work very similarly: Tap the Stopwatch or Timer tab and tap the Start button. When you set the Timer, iPad uses a sound to notify you when time’s up. When you start the Stopwatch, you have to tap the Stop button when the activity is done (see Figure 3-21).
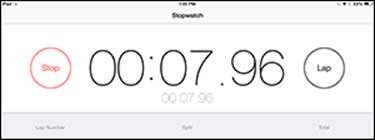
Figure 3-21: Time your next walk to work using the Stopwatch feature.
Note that you can use the Lap feature with Stopwatch to time a quick series of events within a larger event, such as timing each of ten laps in a swimming race and getting a total time at the end of the race. Just tap the lap button while recording time to tally one lap and move on to the next. Tap Stop when all laps are complete.
All materials on the site are licensed Creative Commons Attribution-Sharealike 3.0 Unported CC BY-SA 3.0 & GNU Free Documentation License (GFDL)
If you are the copyright holder of any material contained on our site and intend to remove it, please contact our site administrator for approval.
© 2016-2026 All site design rights belong to S.Y.A.