iPad All-in-One For Dummies, 7th Edition (2015)
Book I. Getting Started with iPad
Chapter 7. Working with Email in Mail
In This Chapter
![]() Adding an iCloud, Gmail, Yahoo!, Outlook, or AOL account
Adding an iCloud, Gmail, Yahoo!, Outlook, or AOL account
![]() Setting up a POP3 email account
Setting up a POP3 email account
![]() Opening Mail and reading messages
Opening Mail and reading messages
![]() Formatting, searching, printing, deleting, and organizing your email
Formatting, searching, printing, deleting, and organizing your email
![]() Setting up a VIP list
Setting up a VIP list
What use would an iPad be if you couldn’t stay in touch with your friends online? You can access an existing email account using the handy Mail app supplied with your iPad, or you can sign into your email account using the Safari browser. Using Mail involves adding one or more existing email accounts using iPad Settings. Then you can use Mail to write, format, retrieve, and forward messages from any email accounts you added to iPad.
Mail offers the capability to mark the messages you’ve read, delete messages, and organize your messages in folders, as well as use a handy Search feature. You can create a VIP list so that you are notified when that special person sends you an email.
A few new features for Mail arrived with iOS 8, including a feature that makes jumping between a draft email and other messages in your Inbox possible, as well as the ability to quickly swipe to mark an email as read or flag it for future action.
In this chapter, you find out about Mail and its various features.
 If you’re wondering about IM (instant messaging) and iPad, check out Book II, Chapter 5 to discover the IM app, Messages.
Adding an Account
To use the Mail app to access email on iPad, you first have to make settings for an existing email account on your iPad. You can add one or more email accounts using iPad Settings, including any email account that you’ve associated with an iCloud account. If you set up multiple accounts, you can then switch between accounts by tapping an account name in the upper-left corner of the displayed inbox and then tapping Accounts and choosing which account to display. Or you can use the consolidated inbox and check your mail from all active accounts on one page.
If you have an iCloud, Microsoft Exchange (mostly used for business accounts), Gmail, Yahoo!, Outlook (this includes Microsoft accounts from Live, Hotmail, and so on), or AOL account, iPad pretty much automates the setup. Here are the steps to get you going with any of these email providers:
1. Tap Settings on the Home screen.
2. In Settings, tap Mail, Contacts, Calendars.
The settings shown in Figure 7-1 appear.
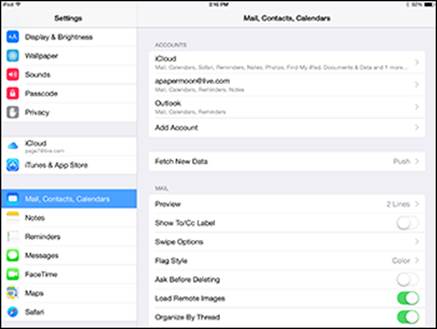
Figure 7-1: Mail settings allow you to set up multiple email accounts.
3. Tap Add Account.
The options shown in Figure 7-2 appear.
4. Tap iCloud, Exchange, Gmail, Yahoo!, AOL, or Outlook.com and then enter your account information in the form that appears (a description is optional). (See Figure 7-3.)
5. Tap Next.
6. After iPad takes a moment to verify your account information, tap any On/Off switch to have Mail, Contacts, Calendars, Notes, and/or Reminders services for that account synced with iPad.
iCloud and Exchange support syncing all five services. Google supports all but Reminders. Other email account support is usually limited to Mail or to Mail and Notes.
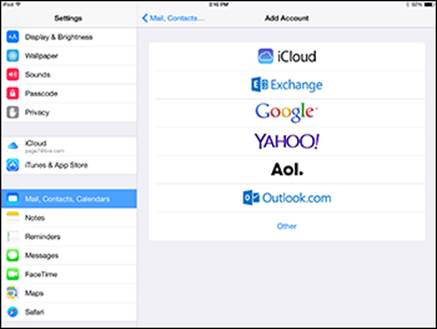
Figure 7-2: : Choosing built-in email providers is a quick way to get set up, if you have an account with one.
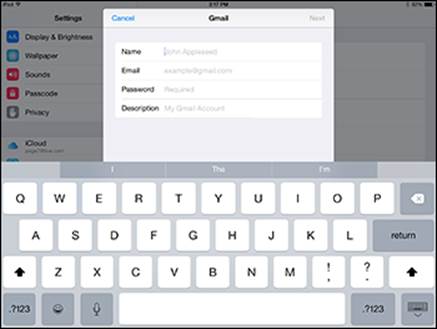
Figure 7-3: Enter your name, email address, and password, and the iPad finds your settings for you.
7. When you’re done, tap Save.
The account is saved, and you can now open it using Mail.
Setting Up a POP3 Email Account
You can also set up most email accounts, such as those available through EarthLink or a cable provider, by obtaining the host name from the provider. To set up an existing account with a provider other than Gmail, Yahoo!, Outlook.com, or AOL, you have to enter the account settings yourself.
Follow these steps to set up an IMAP or POP3 account:
1. Tap Settings on the Home screen.
2. In Settings, tap Mail, Contacts, Calendars and then tap Add Account.
3. In the settings that appear (refer to Figure 7-2), tap Other.
4. In the screen that appears (see Figure 7-4), tap Add Mail Account.
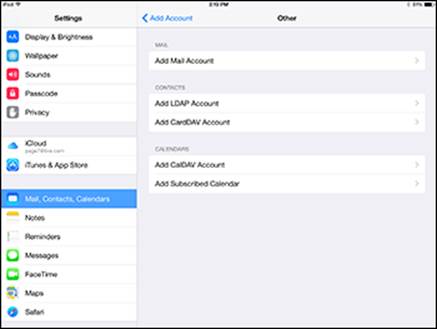
Figure 7-4: Proceed by choosing to add an email account in these settings.
5. In the next form, enter your name and the account address, password, and description, and tap Next.
The iPad takes a moment to verify your account and then returns you to the Mail, Contacts, Calendars pane with your new account displayed.
Your iPad will probably add the outgoing mail server information for you, but if it doesn’t, tap SMTP and enter this information.
6. Tap Done.
You can now access the account through the Mail app.
You can have more than one active account set to On for receiving email; tap the account name in Settings. When you do, you can then open different accounts to view their inboxes from within the Mail app. If you don’t want a particular account’s emails to be downloaded, you can turn off any active email account by opening it in Settings and tapping the On/Off switch.
If you turn on Calendars in the Mail account settings, any information you’ve put into your calendar in that email account is brought over into the Calendar app on your iPad and reflected in the Notification Center (discussed in more detail in Book V, Chapter 4).
Opening Mail and Reading Messages
The whole point of email is to send and receive messages. Mail offers a pretty simple interface for reading your email. It displays an open message and a pane that you can use to show inbox contents or change to a different folder. In landscape orientation, the Mailboxes/Inbox pane is always displayed, but in portrait orientation, you display it by tapping the Inbox button.
When you tap the Mail app to open it, it automatically heads out and checks for any new email. (If you use Microsoft Exchange or iCloud, you can turn on push settings to have your email host initiate a check for new messages to download them to your iPad.)
Here are some common actions in Mail:
· To follow a link in a message, simply tap it. Note that tapping web links opens them in Safari, and tapping address links opens the Maps app with a map to that address displayed. You can also tap phone number links to call that person, or tap flight code links to check on a flight’s status in Safari.
· To open an attachment, tap it, and Mail presents you with a menu to select the one you want to use to open it.
· To open a meeting invitation, tap the meeting icon (what it looks like depends on the originating application; for example, Outlook.com uses a little calendar symbol).
iPad supports many common file types — including those that run on multiple platforms, such as PDF and text; those available on Macs, including iWork Pages and Numbers; those familiar to Windows users (though also available in Mac versions), including Microsoft Word and Excel; as well as most common graphics and audio file formats.
When your iPad gets an email, it alerts you with a little sound. If those email–received alerts are driving you nuts, you can go to Settings and, under Sounds, use the slider to lower the volume or tap the On/Off switch to turn off the chimes.
The following steps take you through the simple process of using Mail to open and read emails if you have a single email account set up on iPad:
1. Tap the Mail app on the Home screen (see Figure 7-5), which displays the number of unread emails in your Inbox in a red circle.
If you have only one email account set up on your iPad, a list of messages displays (see Figure 7-6); skip to Step 3.
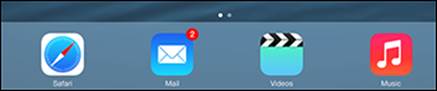
Figure 7-5: Without having to open Mail, you can see how many unread messages you have.
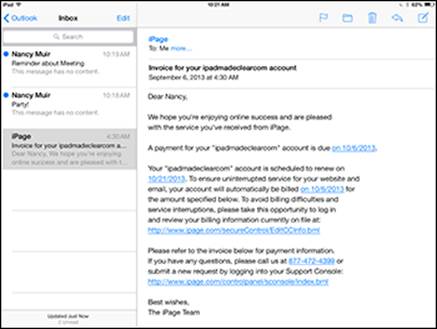
Figure 7-6: Open your inbox and view its contents.
2. If the list doesn’t display, tap the arrow with the name of the currently opened mailbox in the top-left corner (refer to Figure 7-6) to display a list of Inboxes. Tap the Inbox whose contents you want to display.
3. Tap a message to read it.
The message opens, as shown in Figure 7-7.
Use gestures such as double-tapping and pinching to reduce or enlarge email.
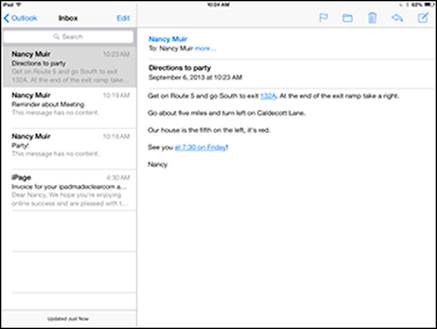
Figure 7-7: Open your email and read it.
4. If you need to scroll to see the entire message, place your finger on the screen and flick upward to scroll down.
You can swipe right while reading a message in portrait orientation to open the Inbox list of messages, and then swipe left to hide the list.
You can tap the Next or Previous button (top-left corner of the message in Portrait orientation) to move to the next or previous message.
 If you have multiple email accounts set up, you can choose which inbox to display. From the inbox that appears when you open Mail, tap the Back button to view the list of your mailboxes (see Figure 7-8).
With several accounts set up, in addition to each account listed on the Mailboxes screen, an All Inboxes item is listed. Tapping this takes you to a consolidated Inbox containing all messages from all accounts in one place.
Email messages that you haven’t read are marked with a blue circle in your inbox. After you read a message, the blue circle disappears. If you like, you can mark a read message as unread. This can help remind you to read it again later. With your messages displayed, swipe to the right on a message and then tap Mark as Unread.
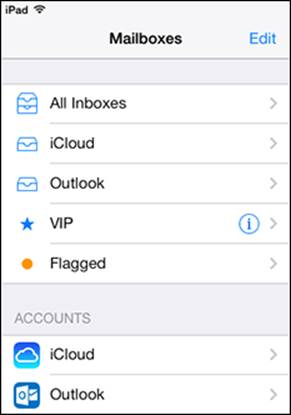
Figure 7-8: Mailboxes for various accounts and the consolidated Inbox are listed here.
To escape your email now and then if you have a 3G or 4G model iPad, you can stop retrieval of data including email by tapping Settings and then tapping Cellular and setting the Cellular Data switch to Off. Now you’ll get data on your device only if you’re logged into a Wi-Fi network.
Replying to or forwarding email
Replying to or forwarding emails is pretty darn easy with iPad as well. In fact, there’s a handy button for replying or forwarding. There’s also a Print command on this menu to make printing your emails to a compatible printer easy.
You can attach a photo or video to new email messages when you create them by pressing in the message body and then tapping Insert Photo or Video. You can also use features in apps such as Photos, Contacts, Notes, iWork Pages, and Maps to share individual documents via email.
Here’s how to use the simple Reply/Forward functions in iPad:
1. With an email open (see the preceding section), tap the Reply button, as shown in Figure 7-9.
If you are the only recipient, there will be no Reply All option; if available, this option allows you to reply to the sender and all other recipients.
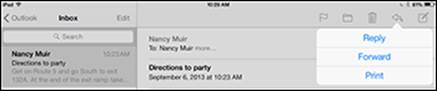
Figure 7-9: The Reply button sports a left-pointing arrow.
2. Do one of the following:
· Tap Reply to respond to the message sender. The reply message form shown in Figure 7-10 appears. Tap in the message body and jot down your inspired thoughts.
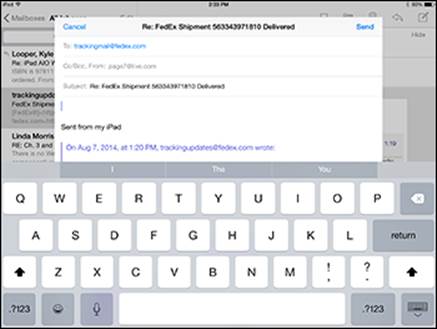
Figure 7-10: What you reply is up to you!
· Tap Reply All to respond to the sender and all other recipients. A message form appears with all those folks included in the To field. You can now add your response for all to see.
· Tap Forward to send the message to somebody else. If the email has an attachment, you can choose Include or Don’t Include in the dialog that appears. The form in Figure 7-11 then appears. Enter a recipient in the To field; then tap in the message body and enter a message.
To find out how to print an email, see “Printing Emails,” later in this chapter.
3. Tap Send.
The message is sent.
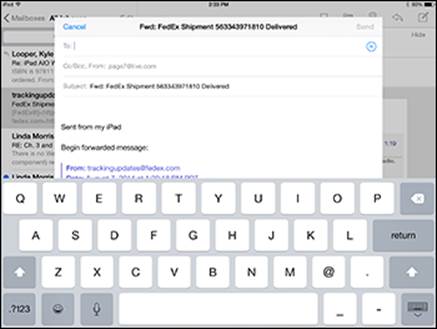
Figure 7-11: When you forward a message, all previous contents are included.
 If you want to move an address from the To field to the Cc/Bcc field or vice versa, tap and hold the address and drag it to the other field.
 Although you can choose whether to keep original attachments when forwarding an email, any attachments to the original email can’t be included in a reply.
Creating and sending a new message
You’re probably an old pro at creating and sending email messages, but it’s worth a quick trip through the iPad’s Mail feature and its approach to writing an email using the onscreen keyboard.
Note that, by default, your emails have a signature that says, “Sent from my iPad.” This will definitely impress your geekiest friends, but if you want to change it to something a little more useful, just go to Settings. In the Mail section of the Mail, Contacts, Calendars settings, choose Signature. You can then enter any signature text you want. If you have multiple email accounts, Signature displays options to use the message for All Accounts or Per Account. If you choose Per Account, settings for each account appear so that you can specify unique signatures for each.
Follow these steps to create and send email:
1. ![]() With Mail open, tap the New Message button.
With Mail open, tap the New Message button.
A blank message form (see Figure 7-12) appears.
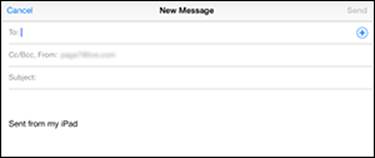
Figure 7-12: The very basic email message form.
2. Enter a recipient’s address in the To field either by typing it or by tapping the Dictation key on the iPad’s onscreen keyboard (fourth-generation iPad and later) and speaking the address.
![]() If you have saved addresses in Contacts, tap the plus sign (+) in an address field to choose an addressee from the Contacts list that appears.
If you have saved addresses in Contacts, tap the plus sign (+) in an address field to choose an addressee from the Contacts list that appears.
3. If you want to copy other people on the message, tap the Cc/Bcc field.
Both Cc and Bcc fields are displayed. Enter addresses in either or both. Use the Bcc field to specify recipients of blind carbon copies, which means that no other recipients are aware that that person received this reply.
4. Enter a subject for the message in the Subject field.
5. Tap in the message body and type your message.
6.  If you want to check a fact or copy and paste some part of another message into your draft message, swipe down near the top of the email to display your Inbox and other folders. Locate a message or messages and if you wish, copy text; when you’re ready to return to your draft, tap the Subject of the email, which is displayed near the bottom of the screen along with any other open emails, and paste any text you might have copied into the new message.
7. Tap (you guessed it) Send.
You can also use Siri to address an email to a person for whom you’ve created a record in your Contacts app that includes an email address. Just press and hold the Home button and say something like “Email Joe Smith,” confirm the contact, and then fill out the form that appears using either Dictation or the keyboard.
Want to shout at somebody in an email (not, of course, a practice I advocate)? You can activate Caps Lock when using the onscreen keyboard on your iPad by double-tapping either Shift key. To turn off Caps Lock, tap either Shift key once. To use this functionality, first be sure to tap Settings⇒General⇒Keyboard and enable Caps Lock.
Formatting Email
You can apply some basic formatting to email text. You can use bold, underline, and italic formats; also, you can indent text using the Quote Level feature. To use the Quote Level feature from within your emails, you need to first make sure that it’s on. In Settings, tap Mail, Contacts, Calendars; next, tap Increase Quote Level and then tap the Increase Quote Level On/Off switch. This setting allows you to increase and decrease how forwarded or reply text is indented. Then follow these steps to apply formatting:
1. Press and hold the text in a new or forwarded message and choose Select or Select All from the menu that appears to select a single word or all the words in the email.
Note that if you select a single word, handles appear that you can drag to add adjacent words to your selection.
2. To apply bold, italic, or underline formatting, tap the BIU button (see Figure 7-13).
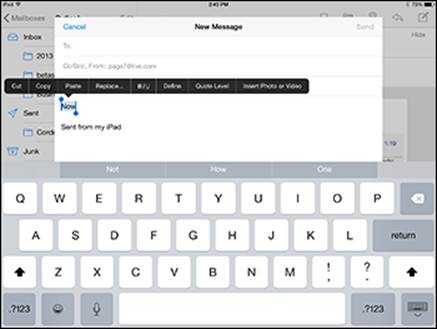
Figure 7-13: Use BIU to add standard styles or emphasis, such as italicized book titles.
3. In the pop-up that appears (see Figure 7-14), tap Bold, Italics, or Underline to apply the respective formatting.
4. To change the indent level, tap at the beginning of a line and then tap Quote Level (refer to Figure 7-13).
5. Tap Increase to indent the text or Decrease to move indented text farther toward the left margin.

Figure 7-14: Choose the style that works for your message.
Searching Email
I’m sure you’ve never mislaid an email, but some people do it all the time. What if you want to find all messages from a certain person or that contain a certain word in the Subject field? Of course, you can enter a name or term into Spotlight Search, and results will include any emails that match the search term as well as contacts, songs, and so on. Or you can use Mail’s handy Search feature to find that email. You can search To, From, and Subject fields.
Follow these steps to practice using Mail’s Search feature:
1. With Mail open, tap an account to display its Inbox.
2. In the Inbox, tap in the Search field.
The onscreen keyboard appears.
3. Enter a search term or name, as shown in Figure 7-15.
Matching emails are listed in the results.
If you have an email account set up to download messages to your device instead of accessing them from the mail server, you can use Mail to search the entire contents of the messages in that account.
To start a new search, tap the Delete key in the upper-right corner of the onscreen keyboard to delete the term, or tap the Cancel button next to the Search field.
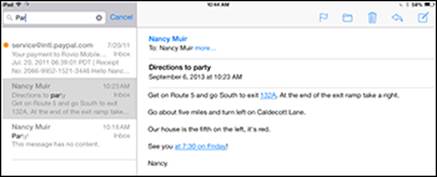
Figure 7-15: Tapping in the Search Inbox field opens the onscreen keyboard.
You can also use the Spotlight Search feature covered in Book I, Chapter 2 to search for terms in the To, From, or Subject lines of mail messages from this search feature that searches several apps.
Mark Email as Unread or Flag for Follow-Up
 With a new feature in iOS 8, you can use a simple swipe to access tools that either mark an email as unread after you’ve read it, which places a blue dot before the message, or flag an email, which places an orange circle before it. These methods help you to remember to reread an email that you’ve already read or to follow up on a message at a later time.
1. With Mail open and an Inbox displayed, swipe to the left to display three options: More, Flag, and Trash. Note that you should swipe only about halfway across the message; swiping all the way to the left deletes the message.
2. Tap More.
On the menu shown in Figure 7-16, you’re given several options, including Mark as Unread and Flag. Tapping either command applies it and returns you to your Inbox.
3. Tap Mark as Unread.
Note that you can also get to the Mark as Unread command by swiping to the right on a message displayed in your Inbox.
4. Swipe to the left on another email and then tap Flag.
An orange circle appears before the email.
You can either mark an email as unread or flag it; you can’t do both. Either action provides a unique visual clue indicating that you need to revisit this message before deleting it.

Figure 7-16: More options are offered for managing your email.
In the menu shown in Figure 7-16, you can also select Notify Me. This option causes Mail to notify you whenever somebody replies to this email thread.
Create an Event from Email Contents
Invitations sent to you in email that you accept have always been placed in the Calendar app automatically. In addition, Mail will create a Calendar event from certain information contained within an email such as a flight reservation.
To check this feature out, follow these steps:
1. Create an email to yourself mentioning a reservation on a specific airline on a specific date and time.
You can also mention another type of reservation, such as for dinner, or even just a phone number.
2. Send the message to yourself and then open Mail.
3. In your Inbox, open the email. Note that pertinent information is displayed in blue, underlined text.
4. Tap some underlined text; in the menu shown in Figure 7-17, choose Create Event.
A New Event form from Calendar appears.
5. Enter additional information about the event and then tap Done.
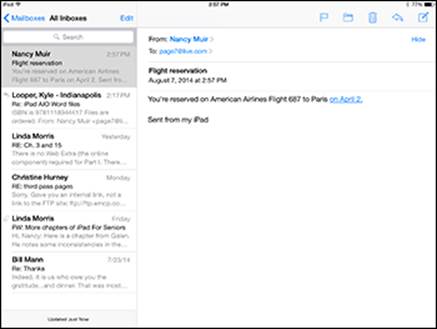
Figure 7-17: Create an event from information in your email using this menu.
Printing Emails
iPad has native printing capabilities that can be used by certain apps, including Mail. You need an AirPrint–compatible wireless printer set up to use this feature. For more about other options for printing from your iPad, see Book V, Chapter 1.
With an email message open, follow these steps to print:
1. Tap the Reply button and then tap Print.
2. In the Printer Options dialog that appears (if you haven’t used this feature with your printer before), tap Select Printer.
The iPad searches for any available printers.
3. Tap your printer to select it.
4. Tap Back to return to the Printer Options dialog and use the plus or minus buttons (as necessary) in the Copies field to adjust the number of copies. If you use printer that supports two-sided printing, you can tap the Double-Sided switch to choose that option.
5. Tap Print.
Your print job is on its way to your printer.
Deleting an Email
I have friends who never delete emails, but that, frankly, drives me nuts (plus, at some point, their mailbox fills up and new emails are rejected). When you no longer want an email cluttering up your Inbox, you can delete it. When you delete an email on your iPad, it’s gone from your Inbox, including the Inbox you access through your mobile phone or computer. However, for a time, you can retrieve it if your email provider offers a Trash folder for your email account and if your settings for your account with that provider don’t cause emails to be deleted from their server on download.
Here’s how to delete those emails you no longer want:
1. With the Inbox displayed, tap the Edit button.
Circular check boxes display to the left of each message (see Figure 7-18).
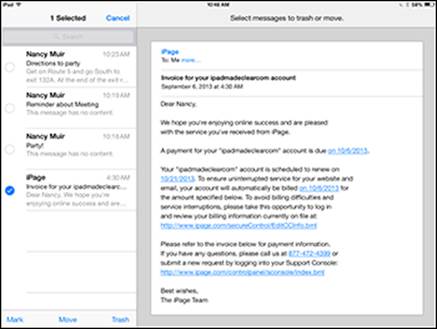
Figure 7-18: Delete several messages at one time using the Delete feature.
2. Tap the circle next to the message you want to delete.
You can tap multiple items if you have several emails to delete. Messages marked for deletion show a check mark in the circular check box. (Refer to Figure 7-18.)
3. Tap the Trash button.
The message(s) moves to the Trash folder.
Depending on your email provider, Mail may keep a copy of all deleted messages for a time in a Trash folder. To view deleted messages, go to the list of all mailboxes. Tap the account name in the Accounts list in the Mailboxes panel, and a list of folders appears. Tap the Trash folder, and all deleted messages display.
You can also delete an open email by tapping the Trash button in the toolbar that runs across the top of Mail or by swiping left or right on a message displayed in an Inbox and tapping the Trash button that appears.
Organizing Email
In most email accounts your ability to create folders is dependent on the email program’s abilities. Some providers don’t offer much support for managing messages in folders. Depending on your email provider, you may be able to move messages into any of a few predefined folders in Mail, or you may have access to all the folders you’ve already set up using your computer.
Assuming that you have access to folders in your email account, with the folder containing the message you want to move (for example, the Trash or Inbox if you have an Outlook.com account) displayed, tap the Edit button. Circular check boxes display to the left of each message.
Follow these steps to move any message into another folder:
1. Tap the circle next to the message you want to move.
2. Tap the Move button.
3. In the folder list that appears (see Figure 7-19), tap the folder where you want to store the message.
The message is moved.
If you get a junk email, you might want to move it to the Spam or Junk Email folder. After you do, any future mail from that same sender is placed automatically in that folder.
If you have an email open, you can move it to a folder by tapping the Folder icon on the toolbar that runs along the top. The Mailboxes list displays; tap a folder to move the message.
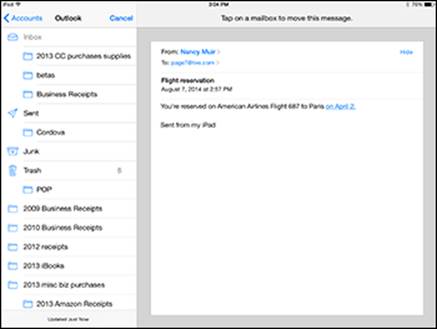
Figure 7-19: Pick a folder to move the selected message to.
Creating a VIP List
VIP List is a way to create a list of special senders. When any of these senders sends you an email, it’s flagged in your Inbox. You can view the VIP mailbox to just see messages from VIP contacts in one place. Also, you get a distinct notification sound when a VIP message arrives. Be sure that in Notifications settings, you have set up your Mail accounts to use Notification Center for VIP mail. Then, in the Mailboxes list of Mail, tap the Information button to the right of VIP (see Figure 7-20) and follow these steps to designate a contact as a VIP:
1. Tap Add VIP, and your Contacts list appears.
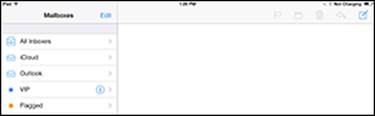
Figure 7-20: Tap here to access the VIP feature.
2. Tap a contact to add that person to the VIP list, shown in Figure 7-21.
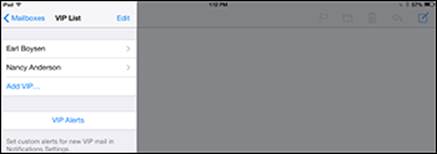
Figure 7-21: To add a VIP, that person must first be added to the Contacts app.
3. Tap the Home button and then tap Settings.
4. Tap Notifications and then tap Mail.
5. In the settings that appear, shown in Figure 7-22, tap VIP.
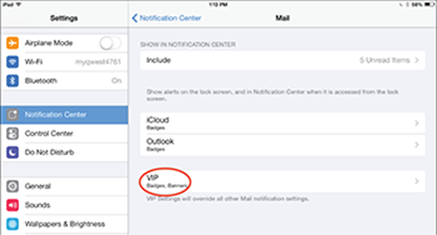
Figure 7-22: Because the VIP list displays information in Notification Center, that’s the setting category you work with.
6. Tap VIP.
7. Tap an alert style and choose whether a badge icon, sound, or preview should occur.
You can also choose to have the notification displayed on your Lock screen. (See Figure 7-23.)
8. Tap the Home button to close Settings.
New mail from your VIPs now appear in Notification Center when you swipe down from the top of the screen, and depending on the settings you chose, may cause a sound to play or a badge icon to appear on your lock screen, or a blue star icon to appear to the left of these messages in your Mail inbox.
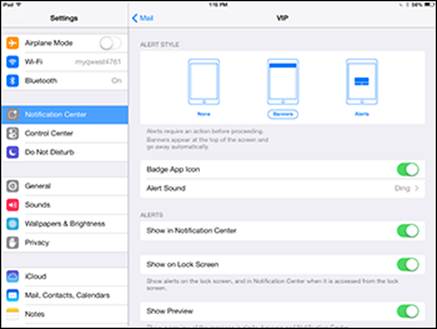
Figure 7-23: Choose from several options for how VIP List alerts happen.
All materials on the site are licensed Creative Commons Attribution-Sharealike 3.0 Unported CC BY-SA 3.0 & GNU Free Documentation License (GFDL)
If you are the copyright holder of any material contained on our site and intend to remove it, please contact our site administrator for approval.
© 2016-2026 All site design rights belong to S.Y.A.