iPad For Seniors For Dummies, 8th Edition (2016)
Part I. Making the iPad Yours
Chapter 4. Making Your iPad More Accessible
Get ready to …
· Set Brightness
· Change the Wallpaper
· Set Up VoiceOver
· Use VoiceOver
· Make Additional Vision Settings
· Adjust the Volume
· Set Up Subtitles and Captioning
· Manage Mono Audio
· Turn On and Work with AssistiveTouch
· Manage Home Click Speed
· Focus Learning with Guided Access
iPad users are all different; some face visual, motor, or hearing challenges. If you’re one of these folks, you’ll be glad to hear that the iPad offers some handy accessibility features.
To make your screen easier to read, you can adjust the brightness or change wallpaper. You can also set up the VoiceOver feature to read onscreen elements out loud. Then you can turn a slew of features on or off, including Zoom, Invert Colors, Speak Selection, Large Type, and more.
If hearing is your challenge, you can do the obvious thing and adjust the system volume. The iPad also has settings for mono audio (useful when you’re wearing headphones) and using an LED flash when an alert sounds. Features that help you deal with physical and motor challenges include AssistiveTouch for those who have difficulty using the iPad touchscreen, Switch Control for working with adaptive accessories, and the Home Button and Call Audio Routing settings that allow you to adjust how quickly you have to tap the iPad screen to work with features.
Finally, the Guided Access feature provides help for those who have difficulty focusing on one task. It also provides a handy mode for showing presentations of content in settings where you don’t want users to flit off to other apps, as in school or a public kiosk.
Set Brightness
1. Especially when you’re using the iPad as an e-reader, you may find that a slightly less-bright screen reduces strain on your eyes. To adjust screen brightness, tap the Settings icon on the Home screen.
2. Tap Display & Brightness.
3. To control brightness manually, tap the Auto-Brightness On/Off switch (see Figure 4-1) to turn off this feature.
4. Tap and drag the Brightness slider (refer to Figure 4-1) to the right to make the screen brighter or to the left to make it dimmer.
5. Press the Home button to close Settings.
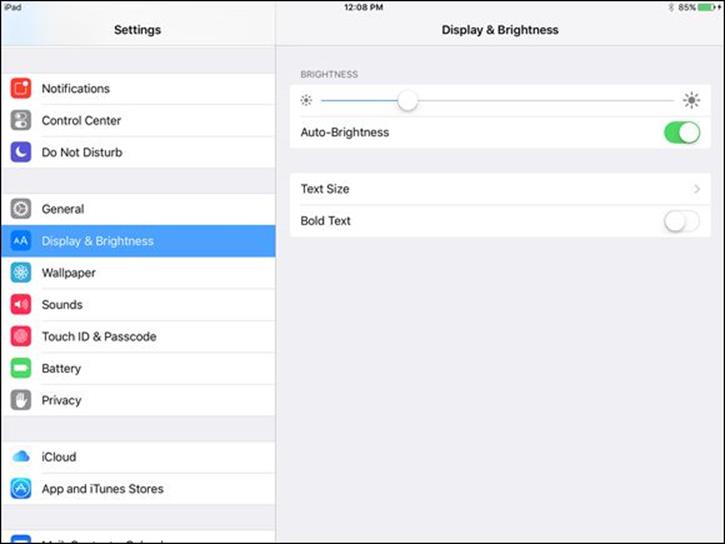
Figure 4-1
 If glare from the screen is a problem for you, consider getting a screen protector. This thin film not only protects your screen from damage, but also reduces glare.
In the iBooks e-reader app, you can set a sepia tone for the page, which might be easier on your eyes. See Chapter 10 for more about using iBooks.
Change the Wallpaper
1. The default iPad’s background image may be pretty, but it may not be the best for you. Choosing different wallpaper may help you see all the icons on your Home screen. Start by tapping the Settings icon on the Home screen.
2. In Settings, tap Wallpaper (refer to Figure 4-1).
3. In the Wallpaper settings that appear, tap Choose a New Wallpaper and then tap a wallpaper category. Tap either Dynamic or Stills, shown in Figure 4-2, to view your choices, and tap a sample to select it. Alternatively, on the initial wallpaper screen, tap an album in the Photos section, locate a picture to use as your wallpaper, and tap it.
4. In the preview that appears (see Figure 4-3), tap Set Lock Screen, Set Home Screen, or Set Both if you want to use the image for the Lock screen and Home screen. You can also tap Perspective Zoom to turn that feature on or off. When turned on, Perspective Zoom makes images move slightly as you move your iPad.
5. Press the Home button to return to your Home screen, where the new wallpaper is set as the background.
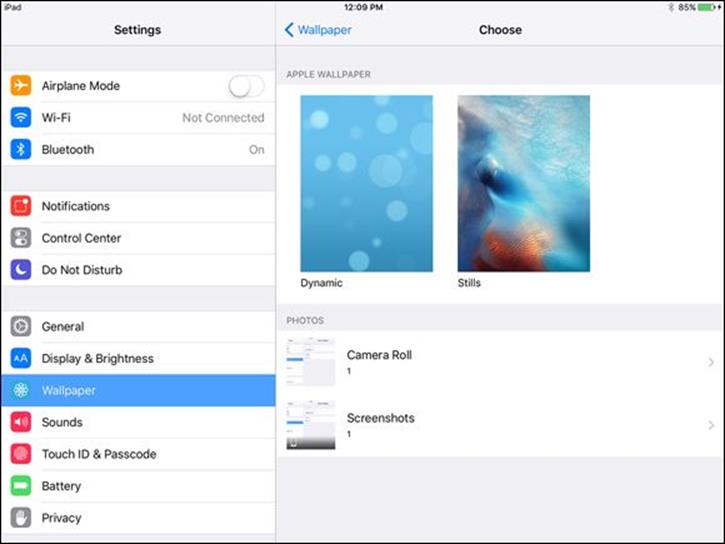
Figure 4-2
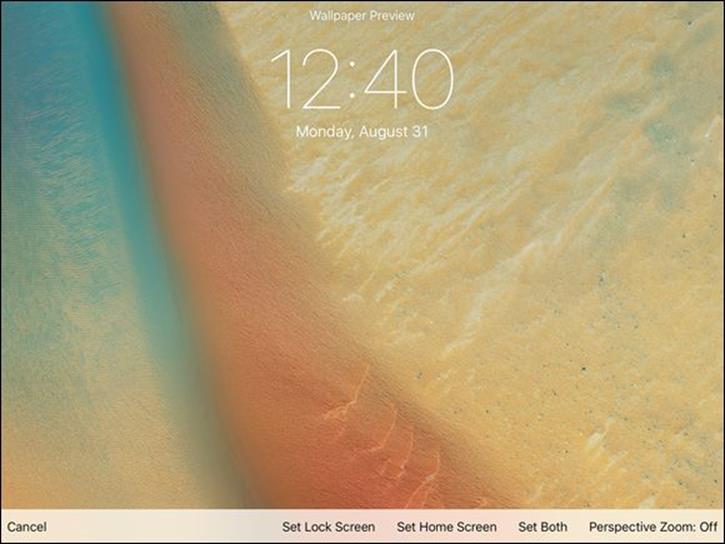
Figure 4-3
Set Up VoiceOver
1. VoiceOver reads the names of screen elements and settings to you, but it also changes the way you provide input to the iPad. In Notes, for example, you can have VoiceOver read the name of the Notes buttons to you, and when you enter notes, it reads words or characters you’ve entered. It can also tell you whether features such as Auto-Correction are on. To turn on this feature, tap the Settings icon on the Home screen. Tap General and then tap Accessibility.
2. In the Accessibility pane, shown in Figure 4-4, tap the VoiceOver On/Off switch to display the VoiceOver pane.
3. In the VoiceOver pane, shown in Figure 4-5, tap the VoiceOver On/Off switch to turn on this feature. The first time you use it, you will see a message that lets you know that enabling VoiceOver changes the gestures that you use with iPad. Double-tap OK to proceed.
When VoiceOver is on, you first tap to select an item such as a button, which causes VoiceOver to read the name of the item to you; then you double-tap the item to activate its function.
4. Tap the VoiceOver Practice button to select it and then double-tap the button to open VoiceOver Practice. (Double-tapping replaces the tapping action when VoiceOver is turned on.) Practice using gestures such as pinching or flicking left, and VoiceOver tells you what action each gesture initiates.
5. Tap the Done button and then double-tap the same button to return to the VoiceOver settings.
6. Tap the Speak Hints field On/Off switch, and then double-tap the same button. VoiceOver speaks the name of each tapped item.
7. If you want VoiceOver to read words or characters to you (in the Notes app, for example), scroll down and tap and then double-tap Typing Feedback.
8. In the Typing Feedback settings, tap and then double-tap to select the option you prefer. The Words option causes VoiceOver to read words to you but not characters, such as the dollar sign ($). The Characters and Words option causes VoiceOver to read both, and so on.
9. Press the Home button to return to the Home screen. Read the next task to find out how to navigate your iPad after you’ve turned on VoiceOver.
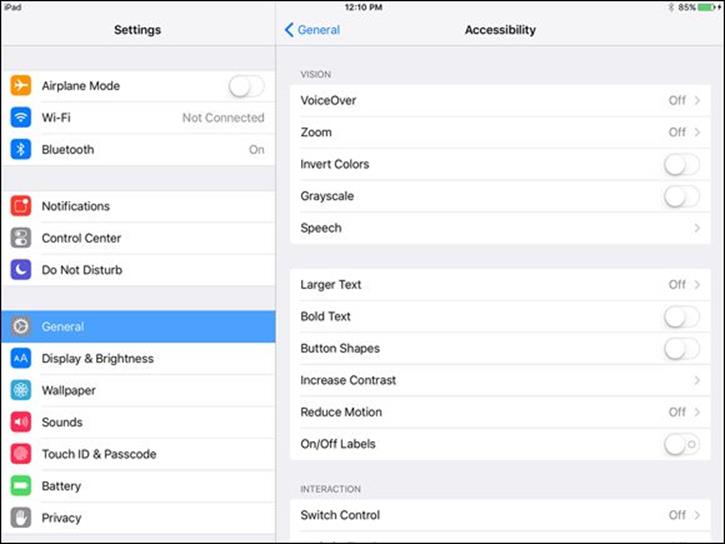
Figure 4-4
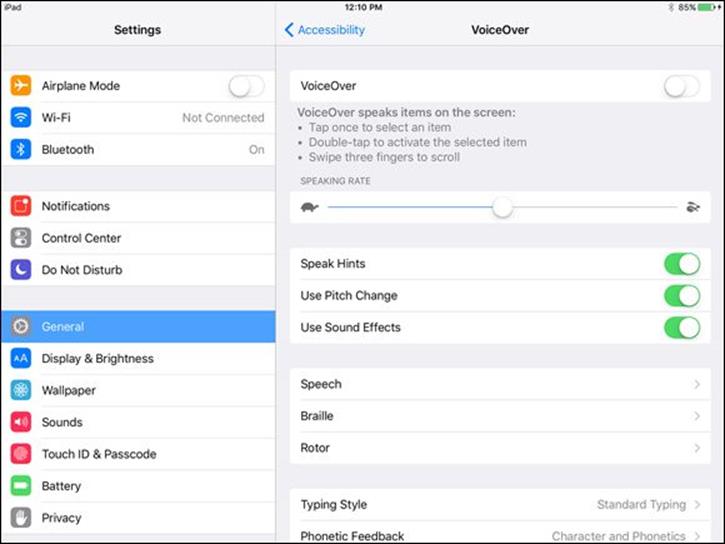
Figure 4-5
 You can change the language that VoiceOver speaks. In the General category of Settings, choose International and then Language, and select another language. This action, however, also changes the language used for labels on Home-screen icons and various settings and fields on the iPad.
You can use the Accessibility Shortcut setting to toggle the VoiceOver, Zoom, Switch Control, AssistiveTouch, Grayscale, and Invert Colors features rapidly. In the Accessibility category of Settings, tap Accessibility Shortcut. In the setting that appears in the right pane, choose what you want a triple-press of the Home button to activate. Now a triple-press of the Home button opens the option you selected in this dialog (such as Zoom or Invert Colors, for example) wherever you go in iPad.
Use VoiceOver
After VoiceOver is turned on, you need to figure out how to use it. I won’t kid you — using it is awkward at first, but you’ll get the hang of it! Here are the main onscreen gestures you should know how to use:
· Tap an item to select it. VoiceOver speaks the item’s name.
· Double-tap the selected item. This action activates the item.
· Flick three fingers. It takes three fingers to scroll around a page when VoiceOver is turned on.
Table 4-1 provides additional gestures that help you use VoiceOver. I suggest that if you want to use this feature often, you read the VoiceOver section of the iPad User Guide (see Chapter 3), which goes into a great deal of detail about the ins and outs of using VoiceOver. You’ll find theiPad User Guide by downloading it through the iBooks Store or going to https://help.apple.com/ipad/9/.
Table 4-1 VoiceOver Gestures
|
Gesture |
Effect |
|
Flick right or left. |
Select the next or preceding item. |
|
Tap with two fingers. |
Stop speaking the current item. |
|
Flick two fingers up. |
Read everything from the top of the screen. |
|
Flick two fingers down. |
Read everything from the current position. |
|
Flick three fingers up or down. |
Scroll one page at a time. |
|
Flick three fingers right or left. |
Go to the next or preceding page. |
|
Tap three fingers. |
Speak the scroll status (for example, line 20 of 100). |
|
Flick four fingers up or down. |
Go to the first or last element on a page. |
If tapping with two or three fingers is difficult for you, try tapping with one finger of one hand and one or two fingers of the other hand. When you’re double- or triple-tapping, you have to perform these gestures as quickly as you can to make them work.
Check out some of the settings for VoiceOver, including Braille, Language Rotor (for making language choices), a setting for navigating images, and a setting that directs the iPad to read notifications to you.
Make Additional Vision Settings
Several vision features are simple on/off settings, so rather than give you the steps to get to those settings repeatedly, I provide this useful bullet list of additional features you can turn on or off after you tap Settings ⇒ General ⇒ Accessibility:
· Zoom: The Zoom feature enlarges the contents displayed on the iPad’s screen when you double-tap the screen with three fingers. The Zoom feature works almost everywhere on the iPad: in Photos, on web pages, on your Home screens, in Mail, in Music, and in Videos. Give it a try!
· Invert Colors: The Invert Colors setting reverses colors on your screen so that white backgrounds are black and black text is white.
 The Invert Colors feature works well in some places and not so well in others. In the Photos app, for example, pictures appear almost like photo negatives. Your Home screen image will likewise look a bit strange. And don’t even think of playing a video with this feature turned on! However, if you need help reading text, White on Black can be useful in several apps.
· Larger Text: If having larger text in apps such as Contacts, Mail, and Notes would be helpful to you, you can turn on the Larger Type feature and choose the text size that works best for you.
· Bold Text: Turning on this setting first restarts your iPad (after asking you for permission to do so) and then causes text in various apps and in Settings to be bold. This setting is a handy one, as text in the iOS 7 and 8 redesign was simplified (meaning it got thinner!).
· Increase Contrast: Use these three settings to add greater contrast to backgrounds in some areas of the iPad and apps, which should improve visibility.
· Reduce Motion: If you turned on this setting but would rather have it off, tap this accessibility feature and then tap the On/Off switch to turn off the parallax effect, which causes the background of your Home screens to appear to float as you move the iPad around.
· On/Off Labels: If you have trouble making out colors, and so have trouble telling when an On/Off switch is On (green) or Off (white), use the On/Off Labels setting to add a circle to the right of a setting when it’s off and a white vertical line to a setting when it’s on (see Figure 4-6).
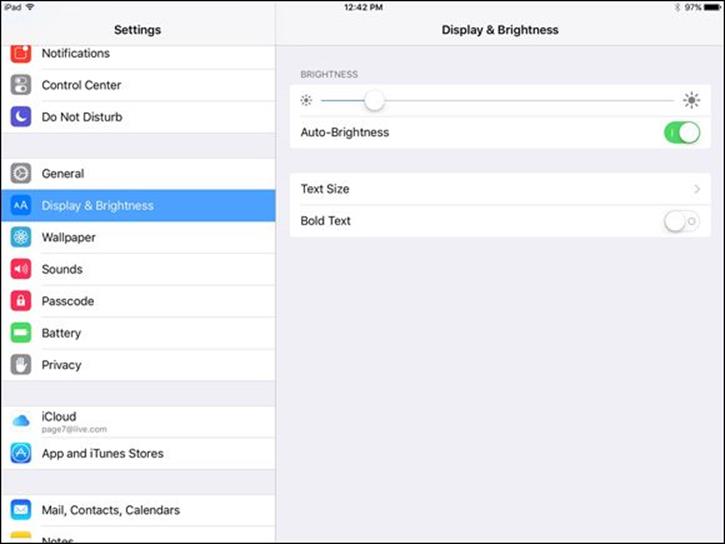
Figure 4-6
Adjust the Volume
1. Though individual apps such as Music and Video have their own volume settings, you can set your iPad system volume for your ringer and alerts as well to help you better hear what’s going on. To start, tap Settings ⇒ Sounds.
2. In the Sounds pane that appears (see Figure 4-7), tap and drag the Ringer and Alerts slider to the right to increase the volume of these audible attention-grabbers or to the left to lower the volume.
3. Press the Home button to display the Home screen.
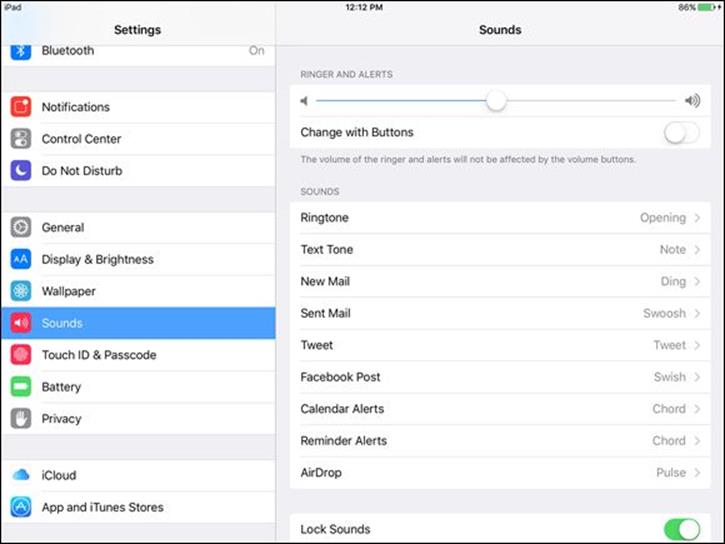
Figure 4-7
In the Sounds pane, you can turn on or off the sounds that the iPad makes when certain events occur (such as new mail or Calendar alerts). These sounds are turned on by default.
Set Up Subtitles and Captioning
1. Closed captioning and subtitles help folks with hearing challenges enjoy entertainment and educational content. Tap Settings on the Home screen, tap General, and then tap Accessibility. On the Accessibility Settings screen (refer to Figure 4-4), scroll down to the Media section and tap Subtitles & Captioning.
2. On the Subtitles & Captioning screen, shown in Figure 4-8, tap the On/Off switch to turn on Closed Captions + SDH (Subtitles for the Deaf and Hard of Hearing). If you’d like, you can also tap Style and choose a text style for the captions.
3. Tap the Style setting and choose the Default style, Large Text, Classic, which looks like a typewriter font, or Create a New Style to personalize the font, size, and color for your captions.
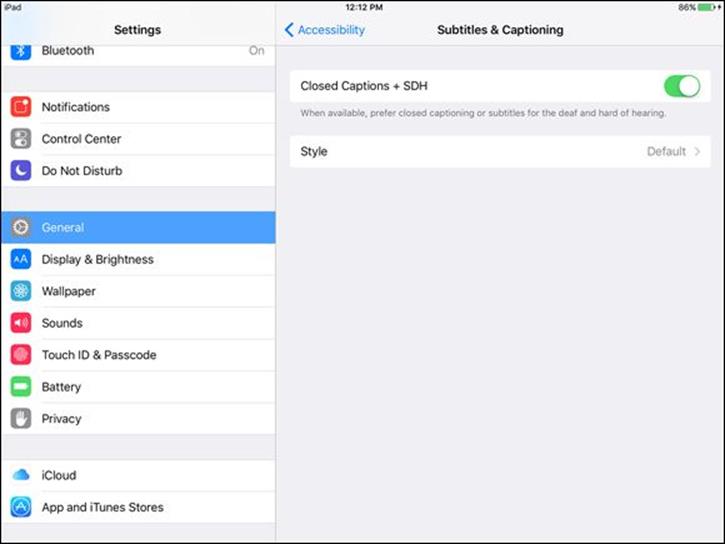
Figure 4-8
Manage Mono Audio
Using the stereo effect in headphones or a headset breaks up sounds so that you hear a portion in one ear and a portion in the other ear, simulating the way that your ears process sounds. If there’s only one channel of sound, that sound is sent to both ears.
If you’re hard of hearing or deaf in one ear, however, you’re picking up only a portion of the sound in your hearing ear, which can be frustrating. If you have such hearing challenges and want to use the iPad with a headset connected, you should turn on Mono Audio. When that accessibility setting is turned on, all sound is combined and distributed to both ears. You can get to Mono Audio settings in the Accessibility settings under Hearing.
Turn On and Work with AssistiveTouch
1. The AssistiveTouch Control Panel helps those who have challenges working with a touchscreen or who have to use some kind of assistive device for providing input. To turn on AssistiveTouch, tap Settings on the Home screen; then tap General ⇒ Accessibility.
2. In the Accessibility pane, scroll down to tap AssistiveTouch.
3. In the pane that appears, tap the On/Off switch for AssistiveTouch to turn it on (see Figure 4-9). A gray square, called the AssistiveTouch button, appears on the screen. This square button now appears in the same location in whatever Home screen or app you display on your iPad, although you can move it around the screen using your finger.
4. Tap the Home button to display the Home screen and then tap the AssistiveTouch button to display its options, shown in Figure 4-10. You can tap Device or Custom on the panel to see additional choices, tap Siri to activate the personal-assistant feature, tap Notification Center or Control Center to display those panels, or tap Home to go directly to the Home screen.
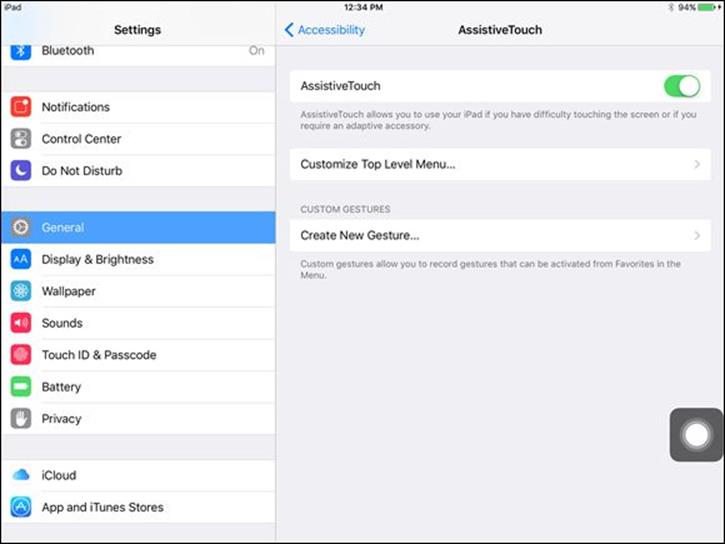
Figure 4-9
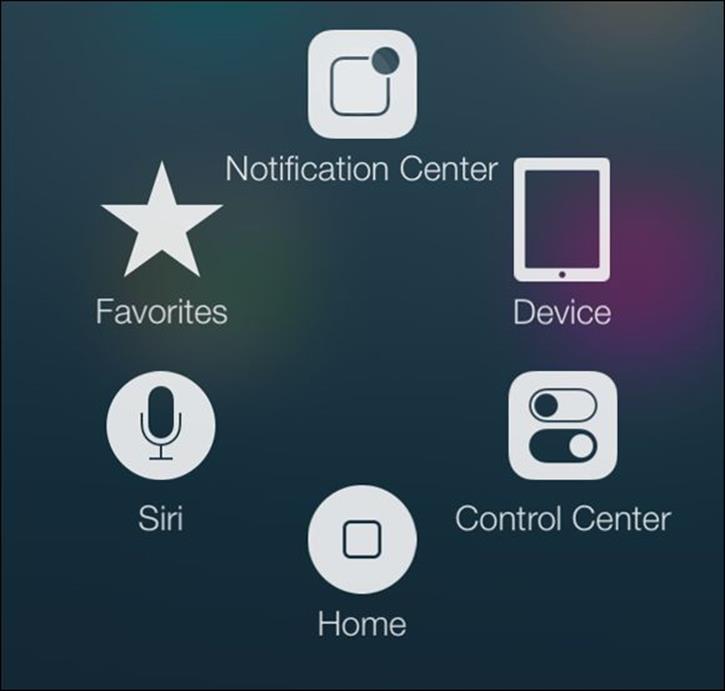
Figure 4-10
Table 4-2 shows the major options available in AssistiveTouch and their purposes.
Table 4-2 AssistiveTouch Controls
|
Control |
Purpose |
|
Siri |
Activates the Siri feature, which allows you to speak questions and make requests of your iPad. |
|
Custom |
Displays a set of gestures with only the Pinch gesture preset; you can tap any of the other blank squares to add your own favorite gestures. |
|
Device |
Allows you to rotate the screen, lock the screen, turn the volume up or down, mute or unmute sound, or shake the iPad to undo an action by using the presets in this option. |
|
Home |
Sends you to the Home screen. |
|
Notification Center |
Displays the Notification Center. |
|
Control Center |
Displays the Control Center. |
In addition to using Siri, don’t forget about using the Dictation key on the onscreen keyboard to speak text entries and basic keyboard commands.
Manage Home Click Speed
Sometimes, if you have dexterity challenges, it’s hard to double-press or triple-press the Home button fast enough to make an effect. Choose the Slow or Slowest setting when you tap this setting to allow you a bit more time to make that second or third tap. Follow these steps:
1. Tap Settings ⇒ General ⇒ Accessibility.
2. Scroll down and tap Home Button.
3. Tap the Slow or Slowest setting to change how rapidly you have to double-press or triple-press the Home button to initiate an action.
If you have certain adaptive accessories, you can use head gestures to control your iPad, highlighting features in sequence and then selecting one. Use the Switch Control feature in the Accessibility Settings screen to turn this mode on and configure settings.
Focus Learning with Guided Access
1. Guided Access is a feature you can use to limit a user’s access to the iPad to a single app and even limit access to that app to certain features. This feature is useful in several settings, ranging from a classroom to use by someone with attention deficit disorder and even to a public setting (such as a kiosk) where you don’t want users to be able to open other apps. To activate it, start by tapping Settings ⇒ General ⇒ Accessibility ⇒ Guided Access.
2. On the screen that appears (see Figure 4-11), tap the Guided Access On/Off button to turn the feature on.
3. Tap Passcode Settings and then tap Set Guided Access Passcode to activate a passcode so that those using an app can’t return to the Home screen to access other apps. In the Set Passcode dialog that appears (see Figure 4-12), enter a passcode, using the numeric pad. Enter the number again when you’re prompted.
4. Press the Home button to return to the Home screen.
5. Tap an app to open it.
6. Triple-press the Home button. Several buttons appear at the bottom of the screen including a Hardware Buttons Options button.
7. Tap the Hardware Buttons Options button to display these settings:
· Sleep/Wake Button: You can put your iPad to sleep or wake it up with a triple-press of the Home button.
· Volume Buttons: Tap Always On or Always Off. If you don’t want users to be able to adjust volume by using the volume toggle on the side of the iPad, for example, use the Volume Buttons setting.
· Motion: Turn this setting off if you don’t want users to disable the motion sensors — for example, so that users can’t play a race car driving game.
· Keyboards: Use this setting to prohibit people using this app from entering text using the keyboard.
8. Another setting that’s displayed to the right of Options is Touch. If you don’t want users to be able to use the touchscreen, turn this off. You can also set a Time Limit for users to be able to work with this app.
9. To begin Guided Access tap Start in the upper-right corner; triple-press the Home button and then enter your passcode (if you set one in Step 3) to return to the Home screen.
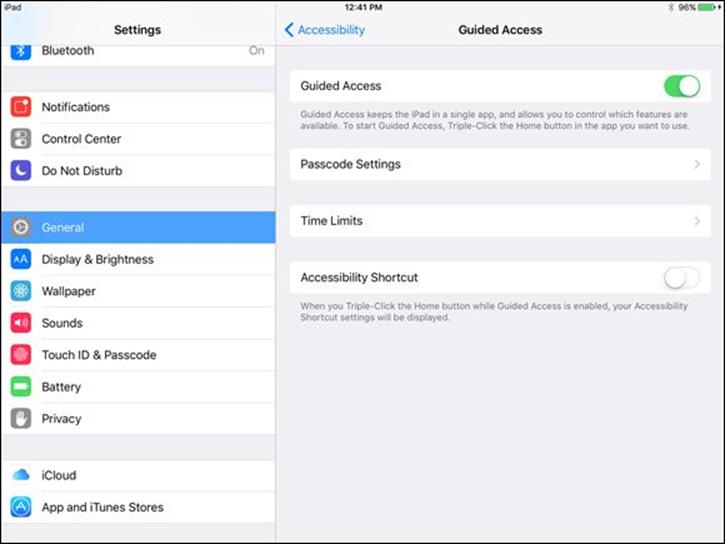
Figure 4-11
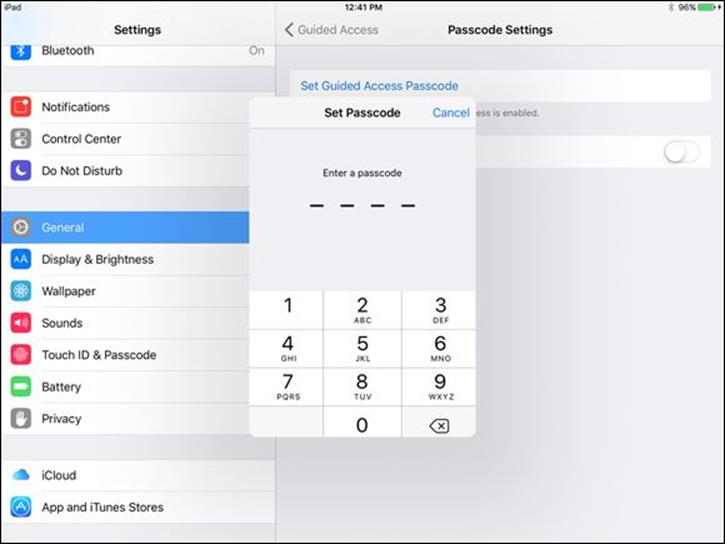
Figure 4-12
All materials on the site are licensed Creative Commons Attribution-Sharealike 3.0 Unported CC BY-SA 3.0 & GNU Free Documentation License (GFDL)
If you are the copyright holder of any material contained on our site and intend to remove it, please contact our site administrator for approval.
© 2016-2026 All site design rights belong to S.Y.A.