iPad For Seniors For Dummies, 8th Edition (2016)
Part II. Taking the Leap Online
 Visit www.dummies.com/extras/ipadforseniors for information about several recommended free (or almost free) apps.
Chapter 5. Browsing the Internet with Safari
Get ready to …
· Connect to the Internet
· Explore Safari
· Navigate among Web Pages
· Use Tabbed Browsing
· View Browsing History
· Search the Web
· Add and Use Bookmarks
· Save Links and Web Pages to the Safari Reading List
· Enjoy Reading with Safari Reader
· Add Web Clips to the Home Screen
· Save an Image to Your Photo Library
· Post Photos from Safari
· Send a Link
Getting on the Internet with your iPad is easy thanks to its Wi-Fi or, depending on your model, 3G or 4G capabilities. After you’re online, the preinstalled browser (software that helps you navigate the Internet’s contents), Safari, is your ticket to a wide world of information, entertainment, education, and more. Safari will look familiar to you if you’ve used it on a PC or Mac device before, though the way you move around it on the iPad touchscreen may be new to you. If you’ve never used Safari, in this chapter, I take you by the hand and show you all its ins and outs.
In this chapter, you discover how to connect your iPad to the Internet, navigate among web pages, and use iCloud tabs to share your browsing among devices. Along the way, you see how to place a bookmark for a favorite site or place a web clip on your Home screen. Tab view lets you view all your open web pages as thumbnails. You can also view your browsing history, save online images to your photo library, post photos to certain sites from within Safari, or email or tweet a hotlink to a friend. A Sidebar design lists your Bookmarks, Reading List, and Shared Links. You explore the Safari Reader and Safari Reading List features, and see how to keep yourself safer while you’re online by using Private Browsing. Finally, you review the simple steps involved in printing what you find online.
Connect to the Internet
How you connect to the Internet depends on which iPad model you own:
· The Wi-Fi–only iPad connects to the Internet only via a Wi-Fi network, logically enough. You can set up this type of network in your own home by using your computer and some equipment from your Internet service provider. You can also connect over public Wi-Fi networks, referred to as hotspots. You’ll probably be surprised to discover how many hotspots your town or city has: Look for Internet cafes, coffee shops, hotels, libraries, and transportation centers such as airports or bus stations, for example. Many of these businesses display signs alerting you to their free Wi-Fi.
· If you own a 3G– or 4G–enabled iPad, you can still use a Wi-Fi connection (in fact, when one is available, the iPad defaults to using Wi-Fi to save money), but you can also use the paid data network provided by AT&T, Verizon, T-Mobile, or Sprint to connect from just about anywhere you can get cellphone coverage via a cellular network.
If you have a 3G or 4G model, you don’t have to do anything; with a contract for coverage, the connection is made automatically wherever cellular service is available, just as it is on your cellphone. To connect to a Wi-Fi network, you have to complete a few steps once for each network.
1. Tap the Settings icon on the Home screen and then tap Wi-Fi.
2. Make sure that Wi-Fi is set to On (see Figure 5-1), and choose a network to connect to. Network names should appear automatically when you’re in range of networks. When you’re in range of a public hotspot, if access to several nearby networks is available, you may see a message asking you to tap a network name to select it.
3. After you select a network (or if only one network is available), you may see a message asking for your password. Ask the owner of the hotspot (such as a hotel desk clerk or business owner) for this password, or, if you’re connecting to your home network, enter your home network password.
4. Tap the Join button, and you’re connected. Your iPad will automatically reconnect to this Wi-Fi network in the future when you come in range of it.
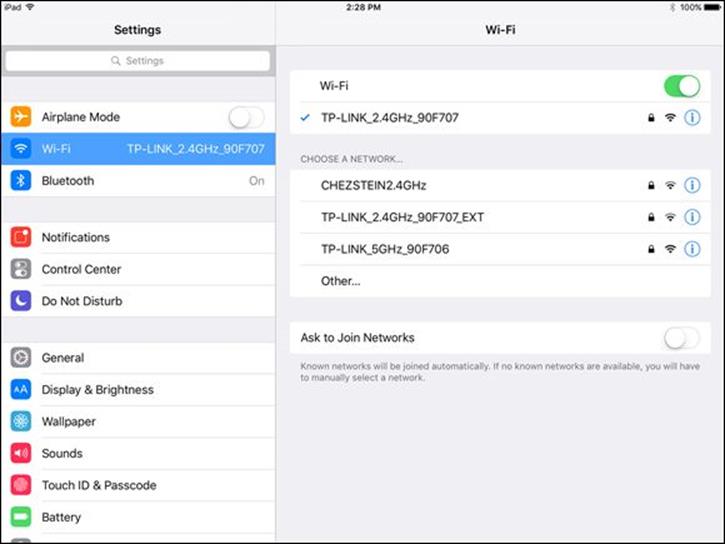
Figure 5-1
 See Chapter 1 for more about the capabilities of different iPad models and the costs associated with 3G and 4G.
Free public Wi-Fi networks typically don’t require a password, or the password is posted prominently for all to see. These networks are unsecured, however, so it’s possible for someone else to track your online activities over these networks. Avoid accessing financial accounts or sending emails that contain sensitive information when you’re connected to a public hotspot.
Explore Safari
1. After you’re connected to a network, tap the Safari icon on the dock at the bottom of the Home screen. Safari opens, possibly displaying the Apple home page the first time you go online (see Figure 5-2).
2. Put two fingers together on the screen and swipe them outward to enlarge the view, as shown in Figure 5-3. Double-tap the screen with a single finger to restore the default screen size.
3. Put your finger on the screen and flick upward to scroll the page contents and view additional contents lower on the page.
4. To return to the top of the web page, put your finger on the screen and drag downward, or tap the status bar at the top of the screen.
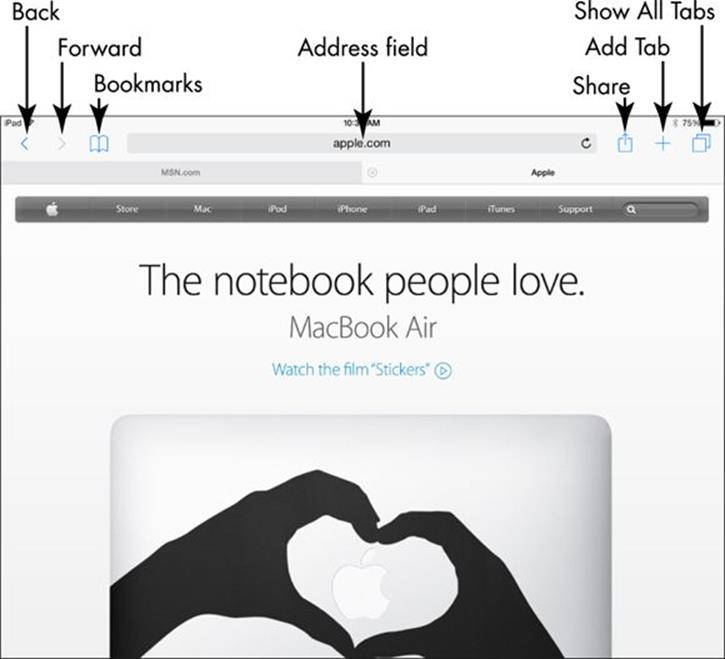
Figure 5-2
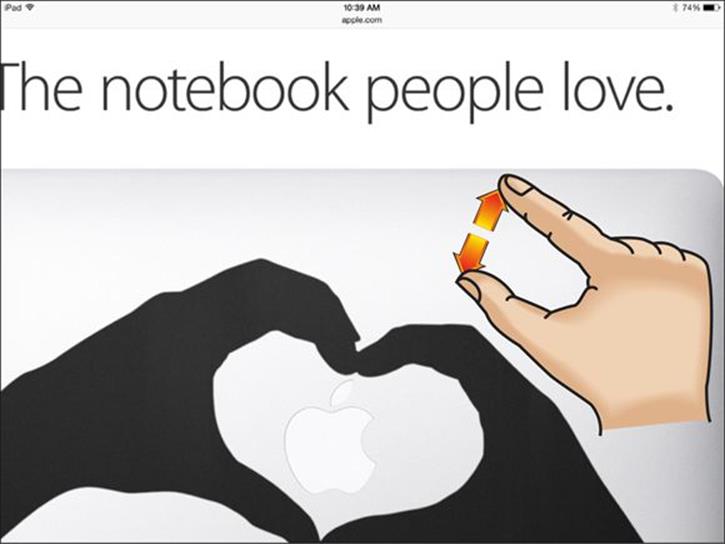
Figure 5-3
Using the expand or pinch method to enlarge or shrink, respectively, a web page on your screen allows you to view what’s displayed at various sizes, giving you more flexibility than the double-tap method.
When you enlarge the display, you gain more control using two fingers to drag the screen from left to right or from top to bottom. On a reduced display, one finger works fine for making these gestures.
Navigate among Web Pages
1. With Safari open, tap the Address field below the status bar. The onscreen keyboard appears (see Figure 5-4).
2. To clear the Address field, if necessary, tap the X button at its far right or tap the Delete key on the keyboard.
3. Enter a web address. You can enter this website: www.ipadmadeclear.com.
4. Tap the Go key on the keyboard (refer to Figure 5-4). The website that you entered appears.
· ![]() If for some reason the page doesn’t appear, tap the Reload icon at the right end of the Address field.
If for some reason the page doesn’t appear, tap the Reload icon at the right end of the Address field.
· ![]() If Safari is loading a web page, and you change your mind about viewing the page, you can tap the Stop button (the X icon), which appears at the right end of the Address field during this process, to stop loading the page.
If Safari is loading a web page, and you change your mind about viewing the page, you can tap the Stop button (the X icon), which appears at the right end of the Address field during this process, to stop loading the page.
5. ![]() Tap the Back button (<) to go to the last page you displayed.
Tap the Back button (<) to go to the last page you displayed.
6. ![]() Tap the Forward button (>) to go forward to the page you came from when you tapped Back.
Tap the Forward button (>) to go forward to the page you came from when you tapped Back.
7. To follow a link to another web page (links typically are colored text or graphics), tap the link with your finger. To view the destination web address of the link before you tap it, just touch and hold the link. A contextual menu appears, displaying the address at the top, as shown inFigure 5-5.
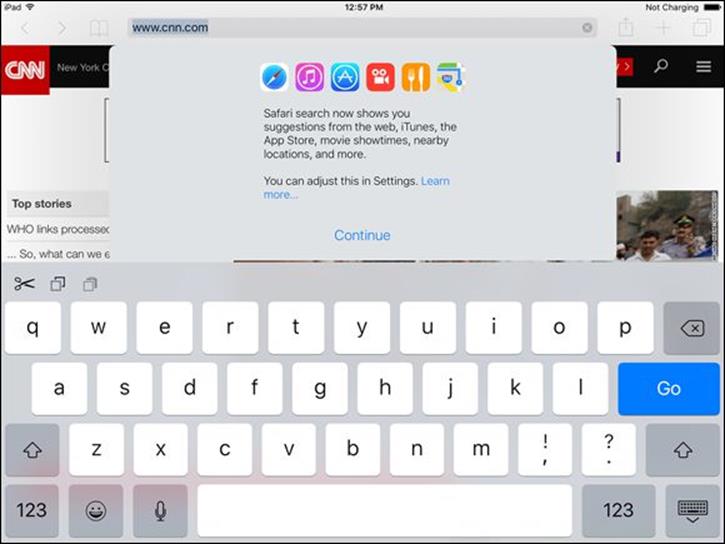
Figure 5-4
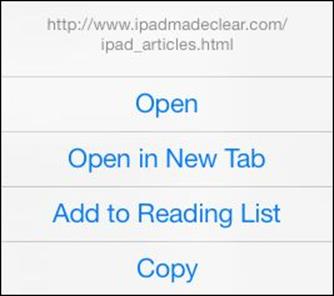
Figure 5-5
By default, AutoFill is turned on, causing entries that you make in fields such as Address to display possibly matching entries automatically. You can turn off AutoFill by tapping Settings ⇒ Safari ⇒ AutoFill and then turn the Use Contact Info switch to Off.
QuickType is a feature that supports predictive text in the onscreen keyboard. This means that iPad identifies what you probably intend to type from text you’ve already entered and makes a suggestion to save you time typing. Tap a suggestion and iPad enters it for you.
Use Tabbed Browsing
1. Safari includes a feature called tabbed browsing, which allows you to have several websites open at the same time on separate tabs so that you can move among those sites easily. To add a tab, tap the Add Tab button (shaped like a + symbol) near the top-right corner of the screen (refer to Figure 5-2). A new tab appears with your favorites and frequently visited sites.
2. To add a new page (meaning that you’re opening a new website), tap one of the favorites or frequently used sites displayed onscreen (see Figure 5-6), or tap the Address field that appears. (Note you can get to a new page simply by tapping the Address field on any site but you will leave that site when you do.) Enter a website address and then tap the Go key.
3. Switch among open sites by tapping another tab, or tap the Show All Tabs button to see all open web pages. Tap a page to go to it, or tap Done to close All Tabs view.
4. To close a tab, scroll to locate the tab and then tap the Close button on the left side of the tab.
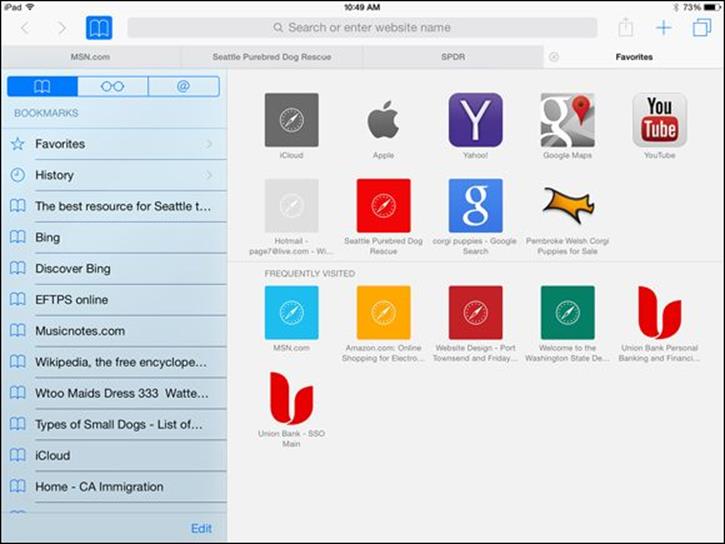
Figure 5-6
When you’re using tabbed browsing, you can place not only a site on a tab, but also a search results screen. If you recently searched for something, those search results are in your Recent Searches list. Also, if you’re displaying a search results page when you tap the plus (+) sign to add a tab, the first ten suggested sites in the results are listed for you to choose among.
View Browsing History
1. ![]() As you move around the web, your browser keeps a record of your browsing history. This record can be handy when you want to visit a site that you viewed previously but whose address you’ve forgotten. With Safari open, tap the Bookmarks icon. The Bookmarks Sidebar slides in, as shown in Figure 5-7.
As you move around the web, your browser keeps a record of your browsing history. This record can be handy when you want to visit a site that you viewed previously but whose address you’ve forgotten. With Safari open, tap the Bookmarks icon. The Bookmarks Sidebar slides in, as shown in Figure 5-7.
2. On the Bookmarks list, tap the History option.
3. In the History list that appears, tap a date, if one is available, and then tap a site to navigate to it (see Figure 5-8).
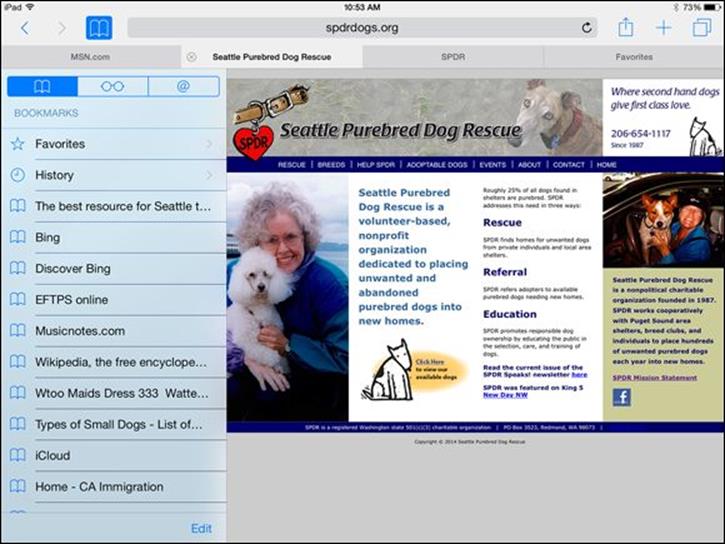
Figure 5-7
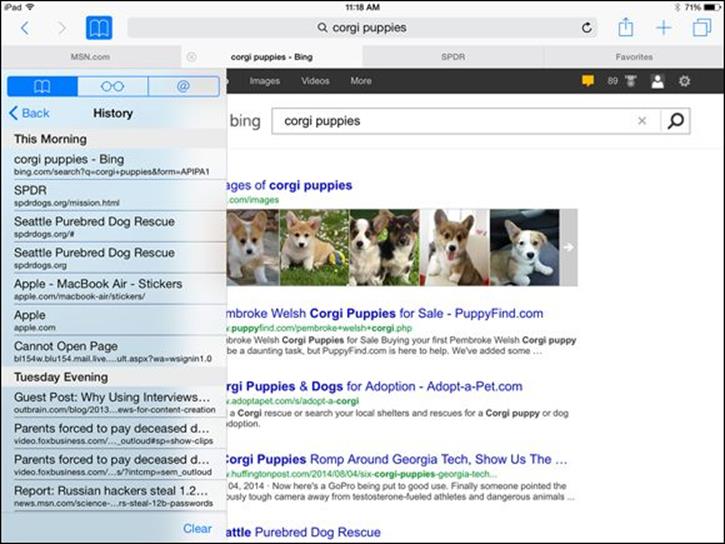
Figure 5-8
To clear the history, tap the Clear button in the bottom-right corner of the Sidebar (refer to Figure 5-8). This button is useful when you don’t want your spouse or grandchildren to see where you’ve been browsing for birthday or holiday presents!
You can tap and hold the Back button to quickly display your browsing history for the currently displayed tab during the current browsing session.
Search the Web
1. If you don’t know the address of the site that you want to visit (or if you want to research a topic and find other information online), get acquainted with Safari’s Search feature on the iPad. By default, Safari uses the Google search engine. With Safari open, tap the Address field. The onscreen keyboard appears.
2. Tap one of the suggested sites that appear, or enter a search word or phrase (which, with Safari’s unified smart search field, can be a topic or a web address).
3. Tap the Go key on your keyboard (see Figure 5-9).
4. In the search results, tap a link to visit that site.
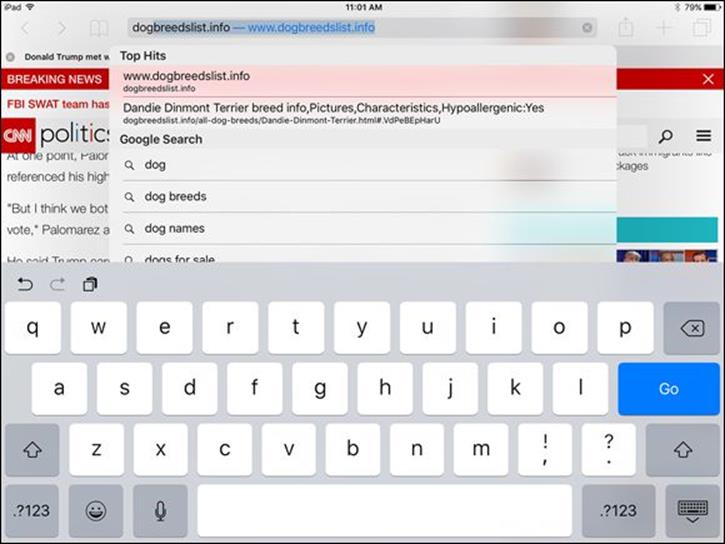
Figure 5-9
To change your default search engine from Google to Yahoo!, DuckDuckGo, or Bing, in Settings, tap Safari and then tap Search Engine. Tap Yahoo!, DuckDuckGo, or Bing, and your default search engine changes.
You can browse for specific items such as web images or videos by tapping the corresponding link at the top of the Google results screen. Also, tap the More button in this list to see additional options to narrow your results, such as searching for books or shopping sources related to the subject.
Add and Use Bookmarks
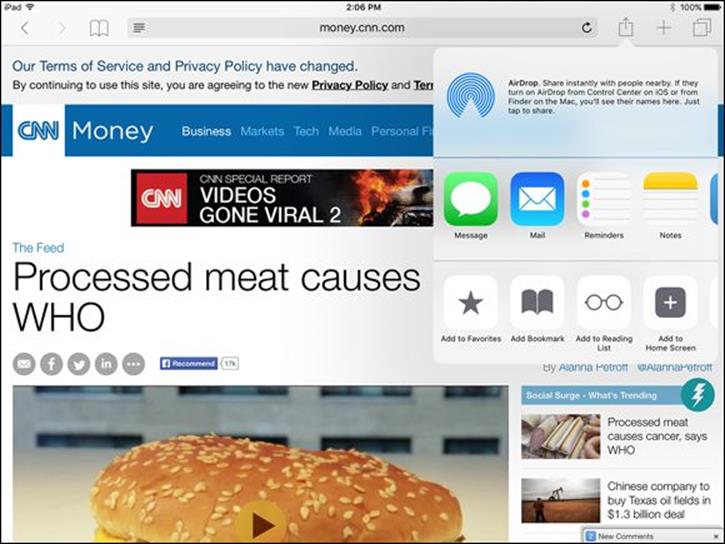
1. ![]() Bookmarks enable you to save favorite sites so you can easily visit them again. With a site that you want to bookmark displayed, tap the Share button in the top right of the screen.
Bookmarks enable you to save favorite sites so you can easily visit them again. With a site that you want to bookmark displayed, tap the Share button in the top right of the screen.
2. On the menu that appears (see Figure 5-10), tap Add Bookmark. The Add Bookmark dialog appears.
3. In the Add Bookmark dialog, shown in Figure 5-11, edit the name of the bookmark, if you want to. To do so, tap the name of the site and then use the onscreen keyboard to edit its name.
 To set your default location for saved bookmarks, tap Location and then tap Bookmarks. Tapping Favorites adds saved bookmarks to the Favorites list.
4. Specify which folder you want to save the bookmark to by tapping an item under Location. By default, new bookmarks are added to the Favorites folder, so that they appear in the Favorites section of the Bookmarks menu.
5. Tap the Save button.
6. ![]() To go to the bookmark, tap the Bookmarks button near the top left of the screen (shaped like a little book).
To go to the bookmark, tap the Bookmarks button near the top left of the screen (shaped like a little book).
7. On the Bookmarks list that appears (see Figure 5-12), tap the bookmarked site that you want to visit.
Figure 5-10
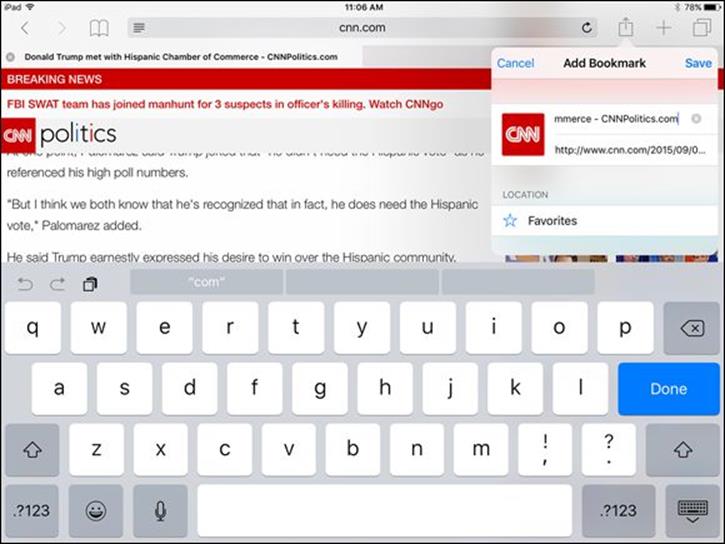
Figure 5-11
Figure 5-12
If you want to sync your bookmarks on your iPad browser with those on your computer, connect your iPad to your computer, tap iPad, and make sure that the Sync Safari Bookmarks setting on the Info tab of iTunes is activated.
When you tap the Bookmarks button, you can tap Edit and then use the New Folder option to create folders in addition to the existing Favorites folder to organize your bookmarks. When you next add a bookmark, you can choose the folder to which you want to add the new bookmark.
Save Links and Web Pages to the Safari Reading List
The Safari Reading List provides a way to save web pages with content you want to read later so that you can easily visit those saved pages again. You can save not only links to sites, but also the sites themselves, so you can read the content even when you’re offline. Where a bookmark takes you to a live, updated page, adding an item to the Reading List simply saves a static copy of the item when you added it to the Reading List. In Safari, you can scroll from one item to the next easily.
1. ![]() With a site that you want to add to your Reading List displayed, tap the Share button.
With a site that you want to add to your Reading List displayed, tap the Share button.
2. On the popover that appears, tap Add to Reading List.
3. To view your Reading List, tap the Bookmarks button and then tap the Reading List tab (the tab sports a pair of reading glasses).
4. On the Reading List that appears (see Figure 5-13), tap the content you want to revisit and resume reading.
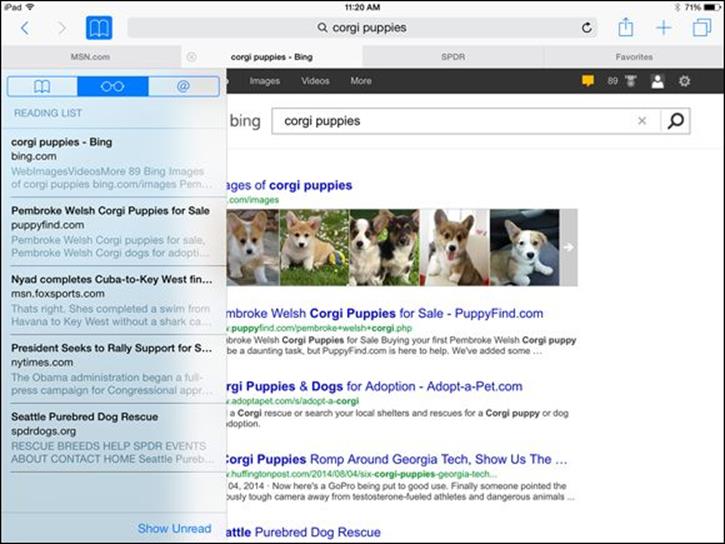
Figure 5-13
If you want to see both Reading List material that you’ve read and material that you haven’t read, tap Show All near the bottom of the Reading List. To see only the material that you haven’t read, tap Show Unread (refer to Figure 5-13).
To save an image to your Reading List, tap and hold the image until a menu appears; then tap Add to Reading List (this is available only for some images). To delete an item, with the Reading List displayed, swipe left over the item; a Delete button appears. Tap this button to delete the item from the Reading List.
Enjoy Reading with Safari Reader
The Safari Reader feature gives you an e-reader type of experience right within your browser, removing other stories and links as well as those distracting advertisements. When you’re on a website, reading content, such as an article, Safari displays the Reader button at the left side of the Address field.
1. Tap the Reader button (see Figure 5-14). The content appears in Reader format (see Figure 5-15).
2. Scroll down the page. The entire content is contained in one long page.
3. When you finish reading the material, just tap the Reader button in the Address field again to return to the material’s source.
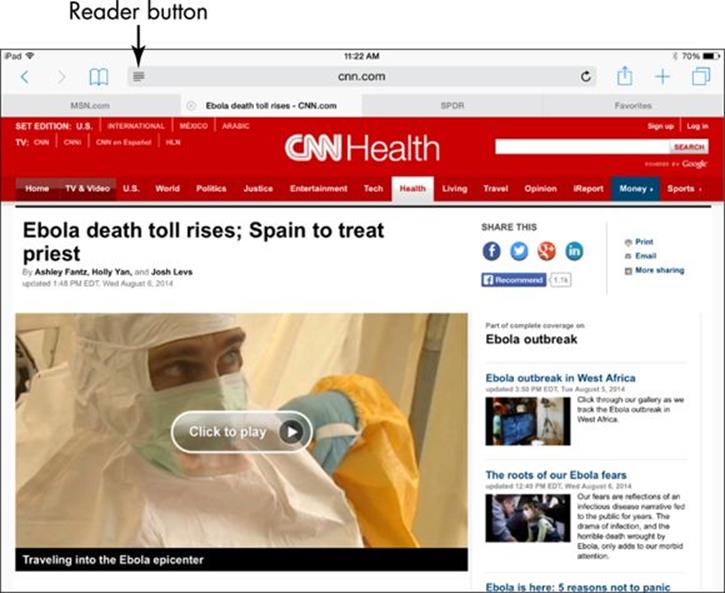
Figure 5-14

Figure 5-15
Add Web Clips to the Home Screen
1. ![]() The web clips feature allows you to save a website as an icon on your Home screen so that you can go to the site at any time with one tap. With Safari open and displaying the site that you want to add, tap the Share button.
The web clips feature allows you to save a website as an icon on your Home screen so that you can go to the site at any time with one tap. With Safari open and displaying the site that you want to add, tap the Share button.
2. On the menu that appears (refer to Figure 5-10), tap Add to Home Screen.
3. In the Add to Home dialog that appears (see Figure 5-16), you can edit the name of the site to be more descriptive, if you like. To do so, tap the name of the site and use the onscreen keyboard to edit its name.
4. Tap the Add button. The site is added to your Home screen.
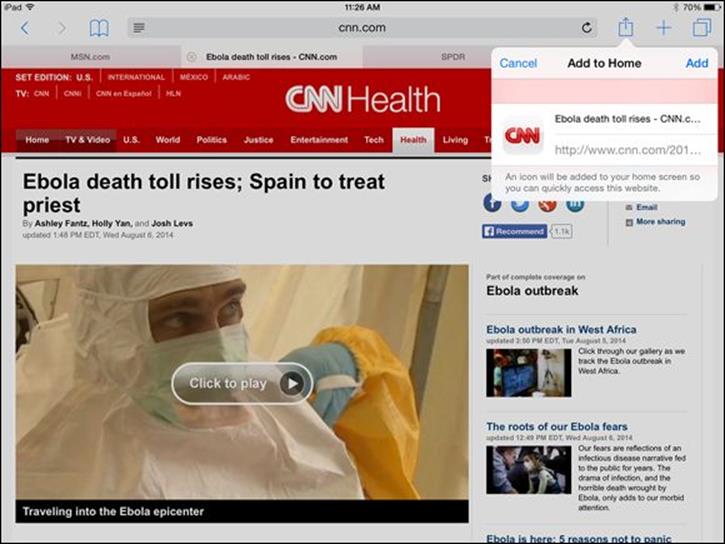
Figure 5-16
You can have as many as 11 Home screens on your iPad to accommodate all the web clips and apps you download (you can save an unlimited number of apps within folders). If you want to delete an item from your Home screen for any reason, press and hold the icon on the Home screen until all items on the screen start to jiggle and Delete icons appear in the top-left corner on all items except the preinstalled apps. Tap the Delete icon on each item you want to delete, and it’s gone. (To get rid of the jiggle, press the Home button.)
Save an Image to Your Photo Library
1. Display a web page that contains an image you want to copy.
2. Press and hold the image. The menu shown in Figure 5-17 appears. Note that options on this menu for an image that doesn’t contain a link to another location on the web are only Save Image and Copy.
3. Tap the Save Image option (refer to Figure 5-17). The image is saved to your Photos gallery.
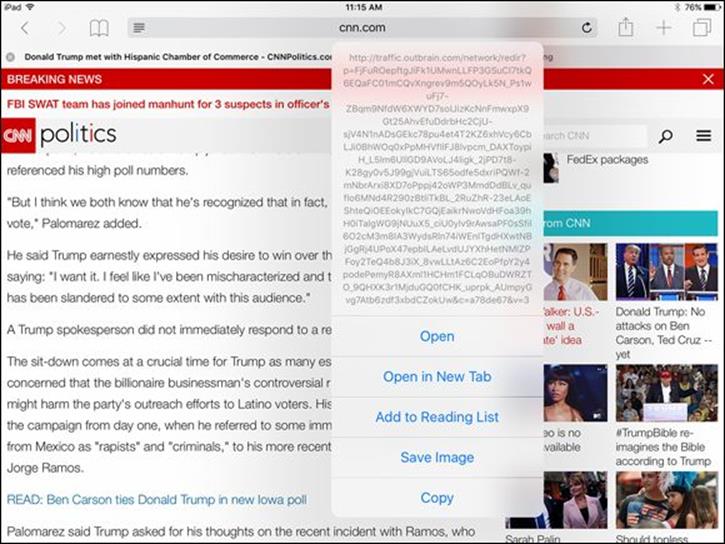
Figure 5-17
Be careful about copying images from the Internet and using them for business or promotional activities. Most images are copyrighted, and you may violate the copyright even if you simply use an image in, say, a brochure for your association or a flyer for your community group. Note that some search engines’ advanced search settings offer the option of browsing only for images that aren’t copyrighted.
Post Photos from Safari
1. You can post photos to sites such as eBay, Craigslist, and Facebook from within Safari. For this example, go to Facebook and sign in. (To follow this example, you have to have downloaded the Facebook for iPad app and created a Facebook account.)
2. Tap Add Photos/Video, Upload Image/Video, or a link. (On Facebook, you might have to verify that you wish to upload a photo or video rather than create a photo album.)
3. Tap the appropriate source for the image, such as an album in your Photos gallery or iCloud Drive.
4. Tap a photo on your iPad (see Figure 5-18).
5. Tap Done or Post, depending on the service, to post the photo or video.
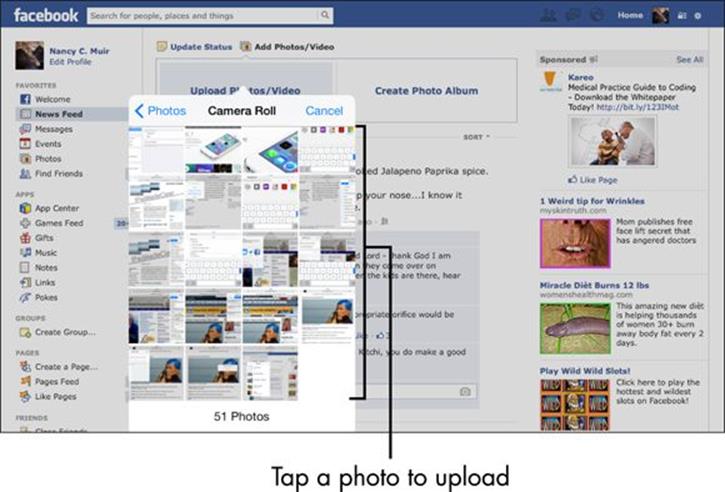
Figure 5-18
Send a Link
1. ![]() If you find a great site that you want to share, you can do so easily by sending a link in an email. (This also works for sending a site via Message, Twitter, or Facebook, or even saving a link to Reminders or Notes.) With Safari open and displaying the site that you want to share, tap the Share button.
If you find a great site that you want to share, you can do so easily by sending a link in an email. (This also works for sending a site via Message, Twitter, or Facebook, or even saving a link to Reminders or Notes.) With Safari open and displaying the site that you want to share, tap the Share button.
2. On the popover that appears (refer to Figure 5-10), tap Mail.
3. On the message form that appears, which contains the link (see Figure 5-19), enter a recipient’s email address, a subject, and your message.
4. Tap Send, and the email containing the link is sent.
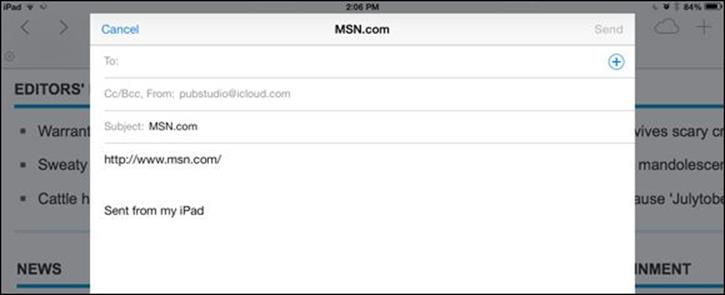
Figure 5-19
The email is sent from the default email account you set up on your iPad. For more about setting up an email account, see Chapter 6.
To tweet the link by using your Twitter account, in Step 2 of this task, tap Twitter, enter your tweet in the form that appears, and then tap Send. For more about using Twitter with the iPad, see Chapter 7. You can also choose AirDrop (fourth-generation iPad and later) from the same pop-up menu to share with someone in your immediate vicinity who has an AirDrop-enabled device.
Make Private Browsing and Cookie Settings
Apple has provided some privacy settings for Safari that you should consider using. Private Browsing automatically removes items from the download list, stops Safari from using AutoFill to save information used to complete your entries in the search or address fields as you type, and erases some browsing history information. You turn Private Browsing mode on or off by tapping the multiple tabs view (the button in the top right corner of Safari) and tapping Private.
The Block Cookies setting allows you to stop the downloading of cookies (small files that document your browsing history so that you can be recognized by a site the next time you go to or move within that site) to your iPad.
You can control both Block Cookies and Do Not Track settings by tapping Safari in the Settings app. In the Privacy & Security section, tap Do Not Track to turn that feature on or off (see Figure 5-20). Tap Block Cookies, and choose never to allow cookies to be saved, always save cookies, or allow or block only cookies from the current website or visited third-party and advertiser sites.
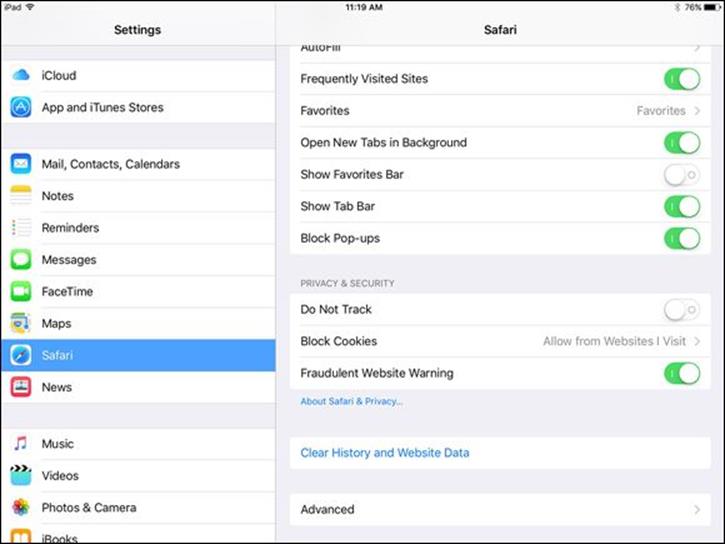
Figure 5-20
You can also tap the Clear History and Website Data setting (refer to Figure 5-20) to clear your browsing history, saved cookies, and other data manually.
Print a Web Page
1. ![]() If you have a wireless printer that supports Apple’s AirPrint technology (most manufacturers, including Brother, Canon, Epson, Hewlett-Packard, and Lexmark, include AirPrint printers in their product lines), you can print web content via a wireless connection. With Safari open and displaying the site that you want to print, tap the Share button.
If you have a wireless printer that supports Apple’s AirPrint technology (most manufacturers, including Brother, Canon, Epson, Hewlett-Packard, and Lexmark, include AirPrint printers in their product lines), you can print web content via a wireless connection. With Safari open and displaying the site that you want to print, tap the Share button.
The Mac applications Printopia and handyPrint make any shared or network printer on your home network visible to your iPad. Printopia has more features but costs you, whereas handyPrint is free.
2. On the pop-up menu that appears, scroll to the right on the bottom list of buttons and then tap Print.
3. In the Printer Options dialog that appears (see Figure 5-21), tap Select Printer. Then, in the list of printers that appears, tap the name of your wireless printer.
4. Tap the plus or minus button in the Copy field to adjust the number of copies to print.
5. If you only want to print certain pages, tap Range and select the pages to print.
6. Tap Print to print the displayed page.
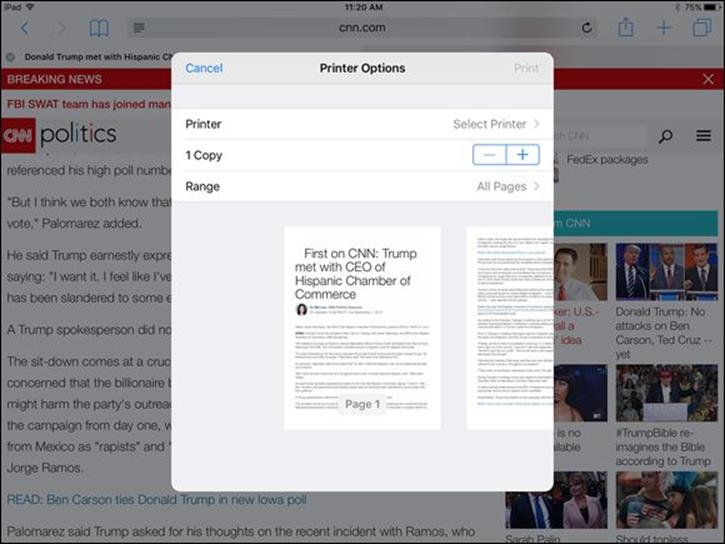
Figure 5-21
If you don’t have an AirPrint–compatible wireless printer or don’t want to use an app to print wirelessly, just email a link to the web page to yourself, open the link on your computer, and print the page from there.
Understand iCloud Tabs
The iCloud Tabs feature allows you to access all browsing history among your different Apple devices from any device. If you begin to research a project on your iPad before you leave home, you can then pick up where you left off as you sit in a waiting room with your iPhone.
1. Tap Settings and then tap iCloud; check to make sure that iPad is using the same iCloud account as your other devices. You may also have to go to iCloud settings and tap Safari to turn it on if it’s off and merge Safari and iCloud.
2. Open Safari on another device and tap the Show/Hide Tabs button. Scroll down to see a list of every device using your iCloud account in the bottom-left corner. All items in your iPad’s browsing history are displayed on the other devices.
All materials on the site are licensed Creative Commons Attribution-Sharealike 3.0 Unported CC BY-SA 3.0 & GNU Free Documentation License (GFDL)
If you are the copyright holder of any material contained on our site and intend to remove it, please contact our site administrator for approval.
© 2016-2026 All site design rights belong to S.Y.A.