iPad For Seniors For Dummies, 8th Edition (2016)
Part II. Taking the Leap Online
Chapter 6. Working with Email in Mail
Get ready to …
· Add an iCloud, Gmail, Yahoo!, AOL, or MicrosoftOutlook.com Account
· Set Up a POP3 or IMAP Email Account
· Open Mail and Read Messages
· Reply to or Forward Email
· Create and Send a New Message
· Format Email
· Search Email
· Mark Email as Unread or Flag for Follow-Up
· Create an Event from Email Contents
· Delete Email
· Organize Email
· Create a VIP List
Staying in touch with others by using email is a great way to use your iPad. You can access an existing account by using the handy Mail app supplied with your iPad or sign in to your email account by using the Safari browser (see Chapter 5). In this chapter, you take a look at using Mail, which involves adding one or more existing email accounts by way of iPad Settings. Then you can use Mail to write, format, retrieve, and forward messages from one or more accounts.
Mail offers the capability to mark the messages you’ve read, delete messages, organize your messages in folders, and use the handy search feature. You’re notified when that special person sends you an email.
iOS 9 includes a feature that makes jumping between a draft email and your Inbox possible; the capability to quickly swipe to mark an email as read or flag it for future action; and the capability to create an event from information about a reservation, flight number, or phone number within an email.
In this chapter, you read all about Mail and its various features.
Add an iCloud, Gmail, Yahoo!, AOL, or Microsoft Outlook.com Account
1. You can add one or more email accounts, including the email account associated with your iCloud account, by using iPad Settings. If you have an account with iCloud, Microsoft Exchange (mostly used for business accounts), Google, Yahoo!, AOL, or Outlook.com (this includes Microsoft accounts from Live, Hotmail, and so on), iPad pretty much automates setup. To set up the iPad to retrieve messages from your email account at one of these popular providers, tap Settings ⇒ Mail, Contacts, Calendars. The settings shown in Figure 6-1 appear.
2. Tap Add Account. The options shown in Figure 6-2 appear.
3. Tap iCloud, Exchange, Google, Yahoo!, AOL, Exchange, or Outlook.com.
4. Enter your account information in the form that appears (see Figure 6-3) and tap Sign In or, for AOL and Outlook accounts, tap Next.
5. After the iPad takes a moment to verify your account information, tap any On/Off switch to have Mail, Contacts, Calendars, Notes, or Reminders from that account synced with the iPad.
6. When you’re done, tap Save. The account is saved, and you can now open it by using Mail.
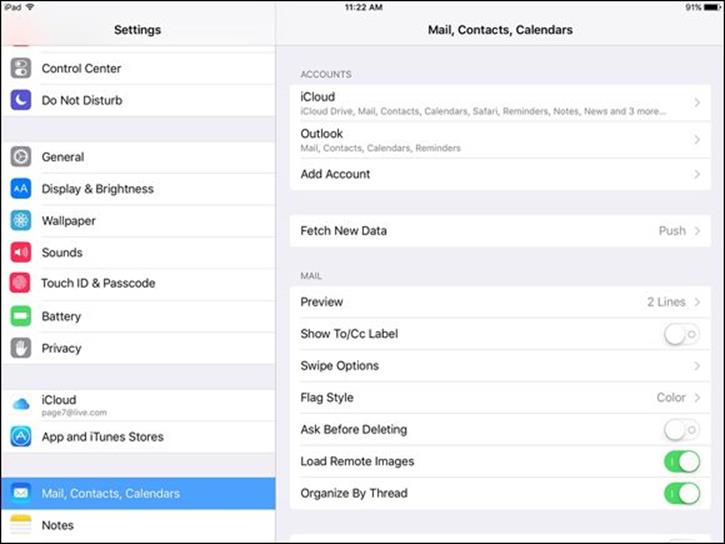
Figure 6-1
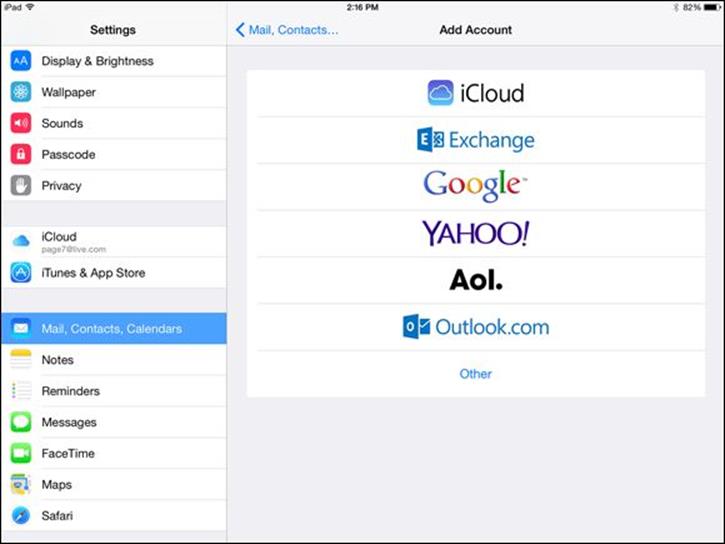
Figure 6-2
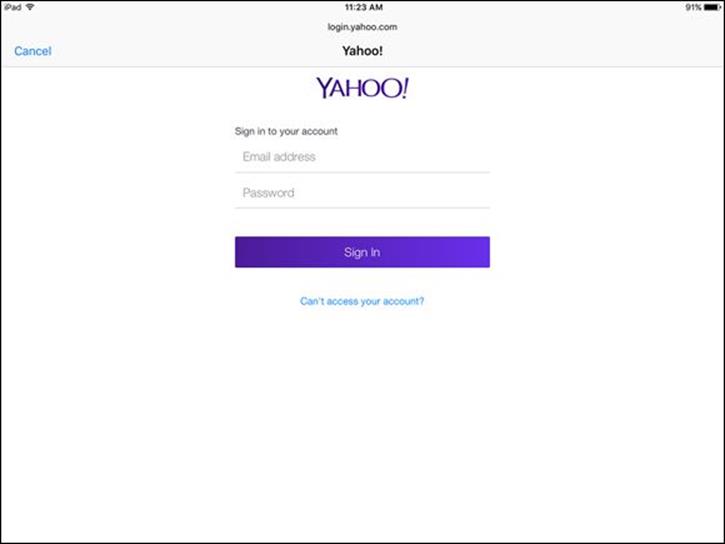
Figure 6-3
Set Up a POP3 or IMAP Email Account
1. You can also set up most popular email accounts, such as those available through EarthLink or a cable provider’s service, by obtaining the host name from the provider. To set up an existing account with a provider other than iCloud, Gmail, Outlook.com, Yahoo!, or AOL, you have to enter the account settings yourself. First, tap Settings ⇒ Mail, Contacts, Calendars.
2. Tap Add Account in the top-right corner of the screen that appears.
3. On the screen that appears (refer to Figure 6-2), tap Other.
4. On the screen shown in Figure 6-4, tap Add Mail Account.
5. In the next form, enter your name and an account address, password, and description; then tap Next. The iPad takes a moment to verify your account and then returns you to the Mail, Contacts, Calendars page, where your new account is displayed.
 If you have a less-mainstream email service, you may have to enter what’s called the mail server protocol (protocols are either POP3 or IMAP; ask your email provider for this information) and your password. The iPad probably will add the outgoing mail server (SMTP) information for you, but if it doesn’t, you may have to enter it yourself. Your Internet service provider (ISP) can provide this information as well.
6. To make sure that the Account field is set to On for receiving email, tap the account name on the Mail, Contacts, Calendars pane of Settings (refer to Figure 6-1). In the settings that appear, tap the On/Off switch for the Mail field and then tap Done to save the setting. Now you can access the account through the Mail app. Note that with some email services, after you set up the account, you have to go to Settings ⇒ Mail, Contacts, and Calendars and then tap the account name to access the Mail On/Off slider.
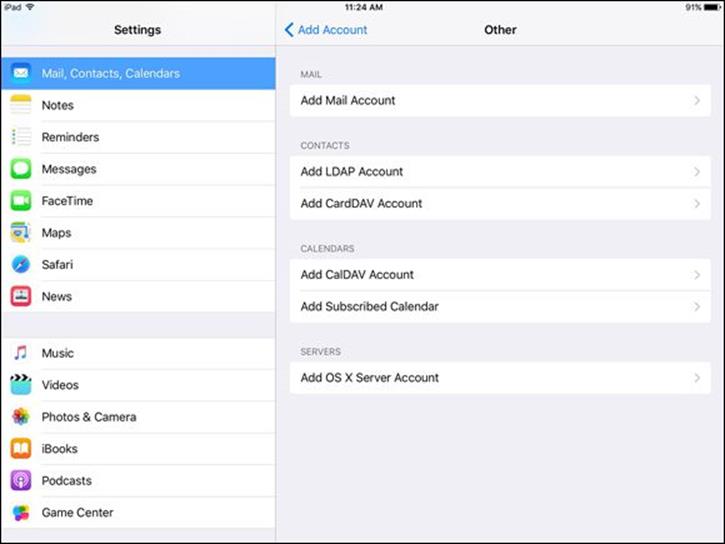
Figure 6-4
 If you turn on Calendars in the Mail account settings, any information you’ve put in your calendar in that email account will be brought over into the Calendar app on your iPad and reflected in Notification Center (discussed in more detail in Chapter 17). This option is only available for certain types of email accounts such as Exchange and Google.
Open Mail and Read Messages
1. Tap the Mail app icon, located on the Dock on the Home screen (see Figure 6-5). A circled red number on the icon indicates the number of unread emails in your Inbox.
2. In the Mail app, if the Inbox you want isn’t displayed, tap Mailboxes (or the specific name of the mailbox that’s displayed) in the top-left corner (see Figure 6-6) to display your list of Inboxes. Then tap the Inbox whose contents you want to display.
3. Tap a message to read it. It opens (see Figure 6-7).
4. If you need to scroll to see the entire message, just place your finger on the screen and flick upward to scroll down.
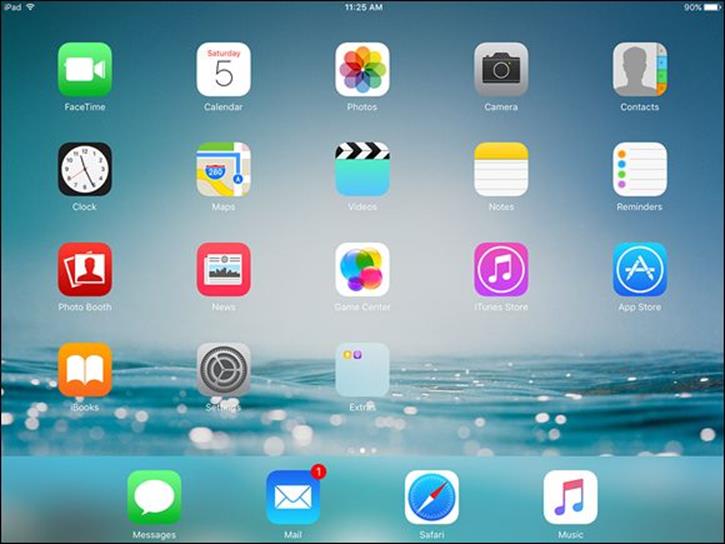
Figure 6-5
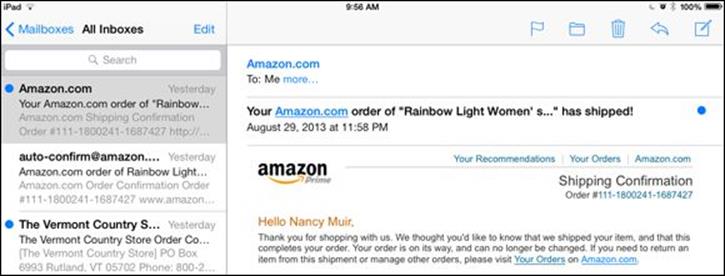
Figure 6-6
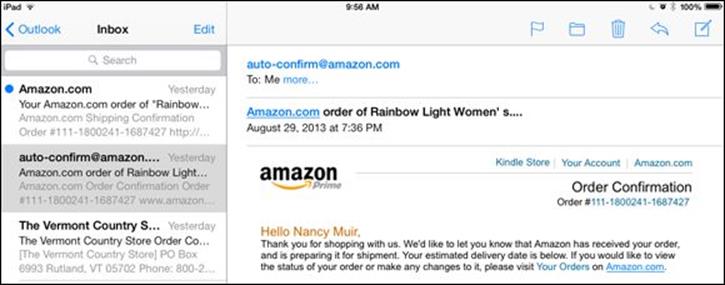
Figure 6-7
You can swipe right while reading a message in portrait orientation to open the Inbox list of messages and then swipe left to hide the list.
You can tap the Next (downward arrow) or Previous (upward arrow) button (top-left corner of the message in portrait orientation) to move to the next or previous message.
Email messages that you haven’t read are marked with a blue circle in your Inbox (refer to Figure 6-6). After you read a message, the blue circle disappears. You can mark a read message as unread to help remind you to read it again later. With your messages displayed, swipe to the right on a message and then tap Mark as Unread.
Reply to or Forward Email
1. With an email message open (see the preceding task), tap the Reply/Forward button, which looks like a left-facing arrow (refer to Figure 6-7).
2. Tap Reply, Reply All (if the email has multiple recipients), or Forward in the menu that appears (see Figure 6-8).
3. Take one of the following actions:
· Tap Reply to respond to the sender of the message, or if the message had other recipients, tap Reply All to respond to the sender and to all recipients. The Reply Message form, shown in Figure 6-9, appears. Enter a message.
· Tap Forward to send the message to somebody other than the sender. The form shown in Figure 6-10 appears. Enter a recipient in the To: field, tap in the message body, and enter a message.
4. Tap Send. The message is sent.
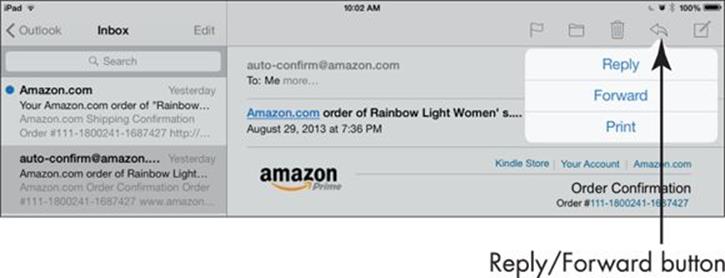
Figure 6-8
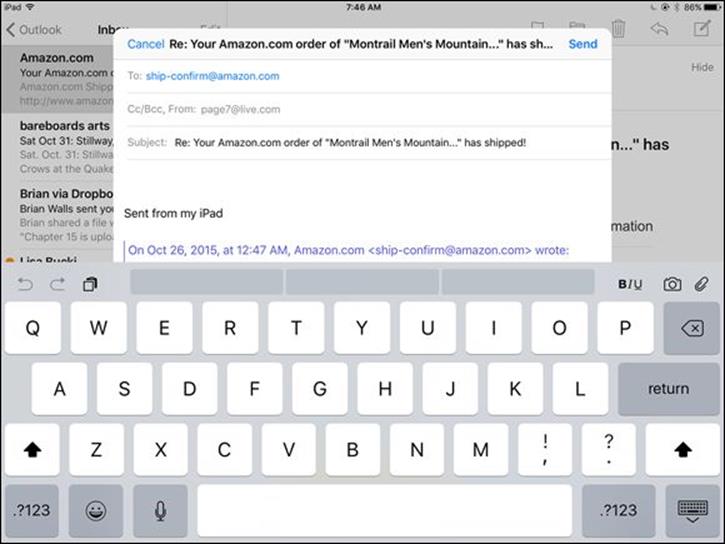
Figure 6-9
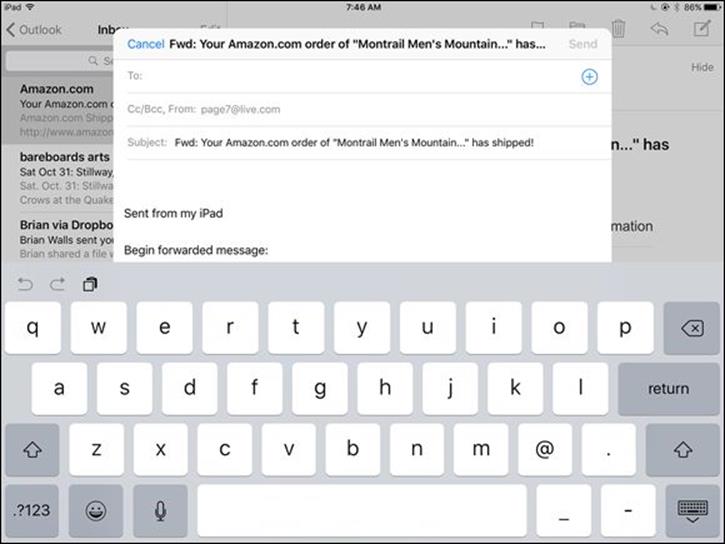
Figure 6-10
If you want to copy an address from the To: field to the Cc or Bcc field, tap and hold the address, and drag it to the other field.
If you tap Forward to send the message to somebody else, and the original message had an attachment, you’re offered the option of including or not including the attachment.
Create and Send a New Message
1. ![]() With Mail open, tap the New Message icon (it looks like a piece of paper with a pen on it). A blank message form appears (see Figure 6-11).
With Mail open, tap the New Message icon (it looks like a piece of paper with a pen on it). A blank message form appears (see Figure 6-11).
2. ![]() Enter a recipient’s address in the To: field either by typing or by tapping the Dictation key on the onscreen keyboard and speaking the address. If you have saved addresses in Contacts, tap the plus sign (+) in the Address field to choose an addressee from the Contacts list that appears.
Enter a recipient’s address in the To: field either by typing or by tapping the Dictation key on the onscreen keyboard and speaking the address. If you have saved addresses in Contacts, tap the plus sign (+) in the Address field to choose an addressee from the Contacts list that appears.
3. If you want to send a copy of the message to other people, tap the Cc/Bcc field; the Cc and Bcc fields open; enter addresses in either or both. Use the Bcc field to specify recipients of blind carbon copies, which means that no other recipients are aware that that person received this reply.
4. Enter the subject of the message in the Subject field.
5. Tap in the message body and type your message.
6. If you want to check a fact or copy and paste some part of another message into your draft message, swipe down the email’s title bar to display your Inbox and other folders. Locate the message; when you’re ready to return to your draft, tap the Subject of the draft email that is displayed near the bottom of the screen to open it.
7. When you’ve finished creating your message, tap Send.
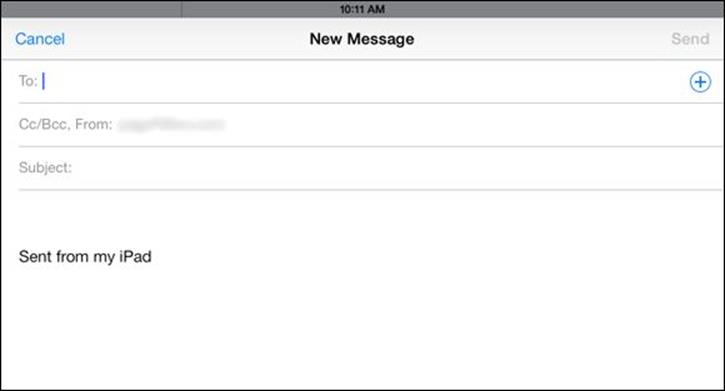
Figure 6-11
Mail keeps a copy of all deleted messages in the Trash folder for each email account for a time. To view deleted messages, tap Mailboxes (or the name of the mailbox that is displayed); then, in the settings that appear, tap the account name in the Accounts list of the Mailboxes pane. A list of folders opens. Tap the Trash folder and all deleted messages display.
Format Email
1. You can apply some basic formatting to email text. You can use character formats (bold, underline, and italic) and indent text by using the Quote Level feature, though available formatting features may vary by the type of email account. To use formatting, press and hold text in a new message that you’re creating and choose Select or Select All in the pop-up menu to select a single word or all the words in the email (see Figure 6-12). Note that if you select a single word, handles appear; you can drag the handles to add adjacent words to your selection.
2. To apply bold, italic, or underline formatting, tap the BIU button.
3. In the pop-up menu that appears (see Figure 6-13), tap Bold, Italic, or Underline to apply the respective formatting.
4. To change the indent level, tap and hold at the beginning of a line and then tap Quote Level.
5. Tap Increase to indent the text or Decrease to move indented text farther toward the left margin.
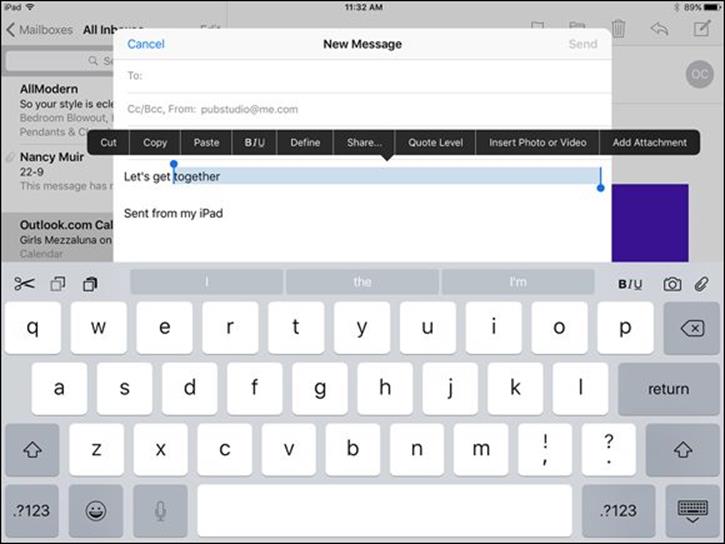
Figure 6-12
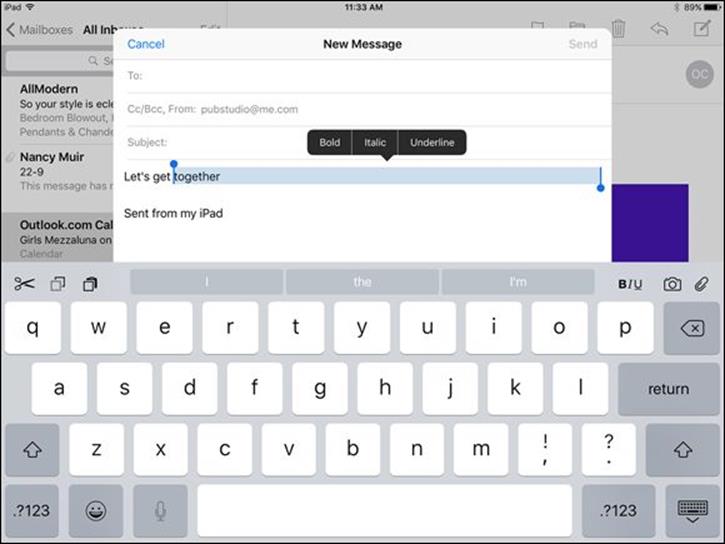
Figure 6-13
To use the Quote Level feature, make sure that it’s on. Tap Settings ⇒ Mail, Contacts, Calendars, and then tap Increase Quote Level and then tap the Increase Quote Level On/Off switch to turn it on.
Search Email
1. What if you want to find all messages that are from a certain person or that contain a certain word in the Subject field? You can use Mail’s handy Search feature to find these emails. With Mail open, tap an account to display its Inbox.
2. In the Inbox, tap and drag down near the top of your Inbox to display the Search field; tap in the Search field and the onscreen keyboard appears.
3. Enter a search term or name, as shown in Figure 6-14. Matching emails are listed in the results.
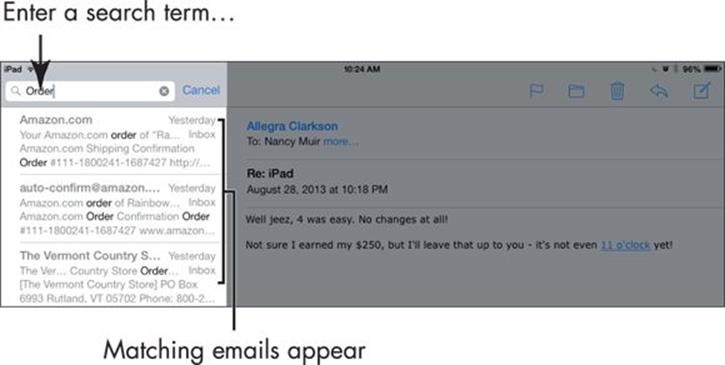
Figure 6-14
You can also use the Spotlight Search feature covered in Chapter 2 to search for terms in the To, From, or Subject lines of mail messages from this search feature that searches several apps.
To start a new search, tap the Delete key in the top-right corner of the onscreen keyboard to delete the term, or just tap the Cancel button next to the Search field.
Note that you can reply to an email directly from the lock screen or Notification Center.
Mark Email as Unread or Flag for Follow-Up
1. You can use a simple swipe to access tools that either mark an email as unread after you’ve read it (which places a blue dot before the message), or to flag an email that places an orange circle before it. These methods help you to remember to reread an email you’ve already read or to follow up on a message later. With Mail open and an Inbox displayed, swipe to the left a short distance to display three options: More, Flag, and Trash (see Figure 6-15).
2. Tap More. On the menu that appears, you’re given several options, including the Mark command; tap this and you see the Flag, Mark as Unread, and Move to Junk commands. Tapping any command applies it and returns you to your Inbox.
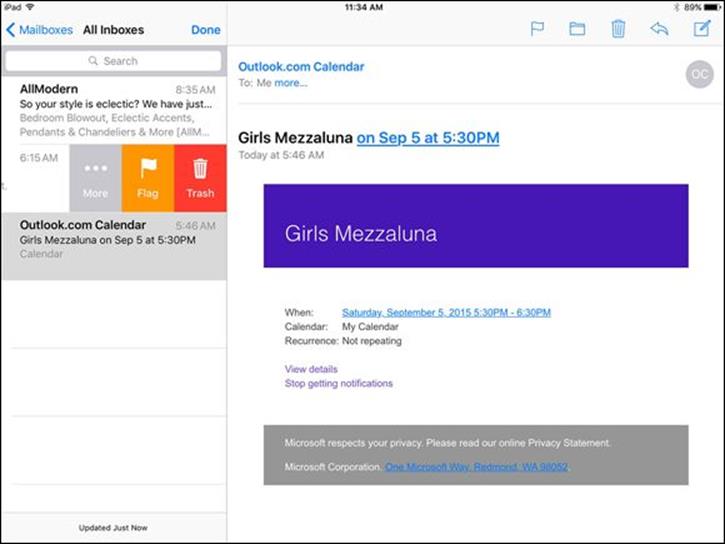
Figure 6-15
You can either mark an email as unread or flag it; you can’t do both. Either action provides a unique visual clue that you need to revisit this message before deleting it.
In the menu of commands that displays when you tap More, you can also select Notify Me. This option causes Mail to notify you whenever somebody replies to this email thread.
Create an Event from Email Contents
1. Invitations sent to you in email that you accept have always been placed in the Calendar app automatically. You can create a Calendar event from certain information contained within an email. To check this out, create an email to yourself mentioning a reservation on a specific airline on a specific date and time; you can also mention another type of reservation, such as for dinner, or even just a phone number.
2. Send the message to yourself.
3. In your Inbox, open the email. Note that pertinent information is displayed in blue, underlined text.
4. Tap on underlined text, as shown in Figure 6-16, and in the menu, choose Create Event. A New Event form from Calendar appears. Enter additional information about the event and then tap Done.
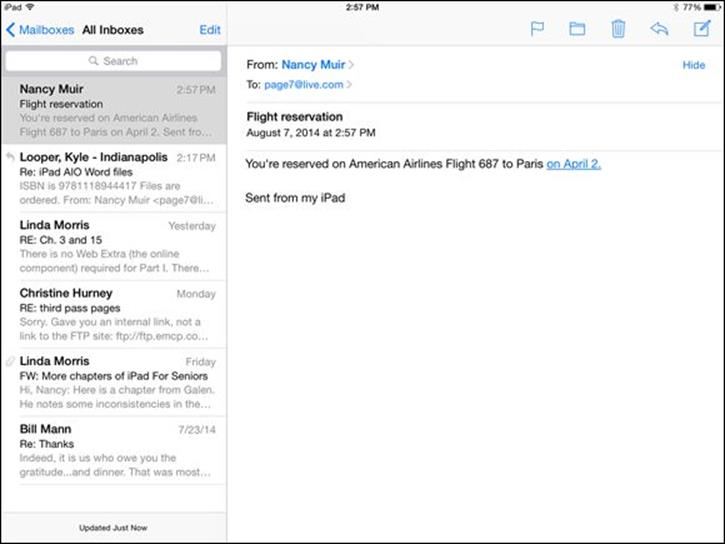
Figure 6-16
Delete Email
1. When you no longer want an email cluttering your Inbox, you can delete it. With the Inbox displayed, tap the Edit button. A circular check box displays to the left of each message (see Figure 6-17).
2. Tap the circle next to the message you want to delete. (You can tap multiple items if you have several emails to delete.) A message marked for deletion has a check mark in its circular check box (refer to Figure 6-17).
3. Tap Trash at the bottom of the Inbox. The message is moved to the Trash folder.
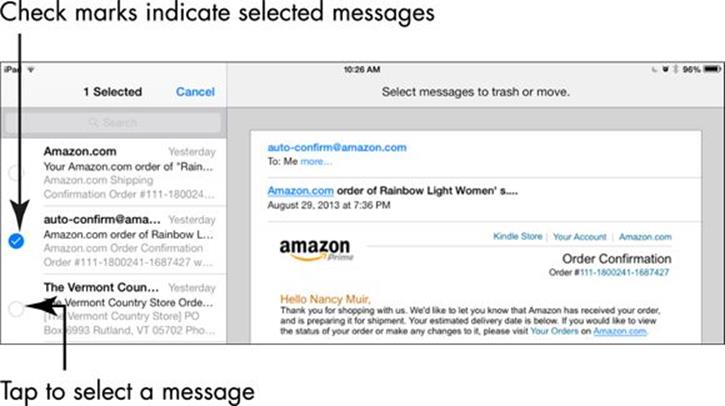
Figure 6-17
You can also delete an open email by tapping the Trash icon on the toolbar that runs across the top of Mail or by swiping left over a message displayed in the Inbox and then tapping Trash.
Organize Email
1. You can move messages into any of several predefined folders in Mail. (These folders will vary, depending on your email provider and the folders you’ve created on its server.) After displaying the folder containing the message you want to move (for example, Archive or Inbox), tap the Edit button. A circular check box is displayed to the left of each message (refer to Figure 6-17).
2. Tap the circle next to the message you want to move. A check mark appears in its circular check box.
3. Tap the Move button.
4. In the Mailboxes list that appears on the left side of the screen (see Figure 6-18), tap the folder where you want to store the message. The message is moved.

Figure 6-18
If you receive a junk email, you may want to move it to the Spam or Junk folder, if your email account provides one.
If you have an email open, you can move it to a folder by tapping the Folder icon on the toolbar at the top of the screen. The Mailboxes list appears (refer to Figure 6-18). Tap a folder to move the message.
Create a VIP List
1. VIP List is a way to create a list of special senders. When any of these senders sends you an email, you’re notified through the iPad’s Notifications feature. Any VIPs you set up in iPad sync to your Mac computer, if you have one. In the Mailboxes list in Mail (refer to Figure 6-16), tap VIP (see Figure 6-19).
2. Tap Add VIP (see Figure 6-20). Your Contacts list appears.
3. Tap a contact to add that person to your VIP list.
4. Press the Home button.
5. Tap Settings ⇒ Notifications ⇒ Mail.
6. In the screen that appears, tap VIP.
7. In the screen shown in Figure 6-21, tap the Show in Notification Center On/Off switch to turn on notifications for VIP mail.
8. Tap an alert style, and specify whether the iPad should use a badge icon or sound to alert you. You can also choose to display VIP alerts on your lock screen (refer to Figure 6-21).
9. Press the Home button to close Settings. New mail from your VIPs should now appear in Notification Center when you swipe down from the top of the screen. Depending on the settings that you chose in Step 8, the iPad may play a sound, display a badge icon on your lock screen, and add a blue star icon to the left of these messages in your Mail Inbox.
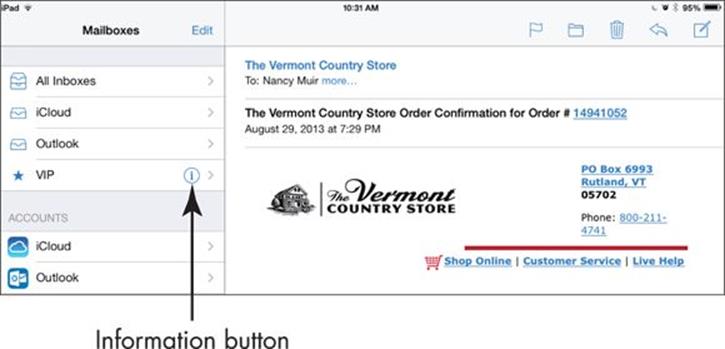
Figure 6-19
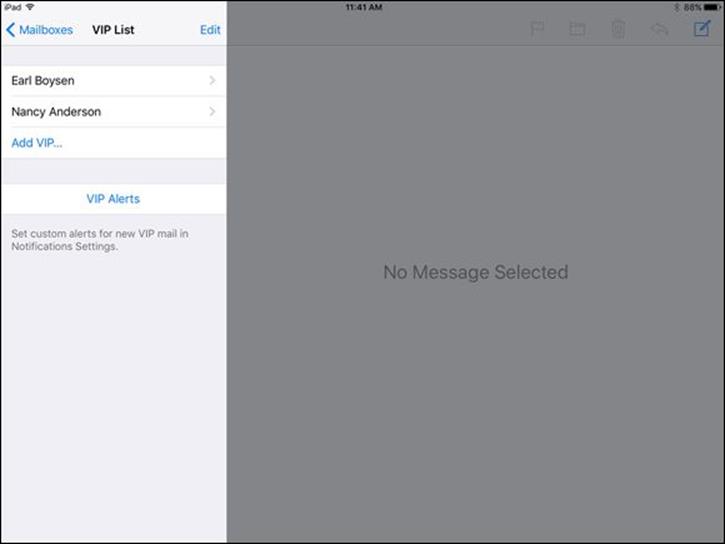
Figure 6-20
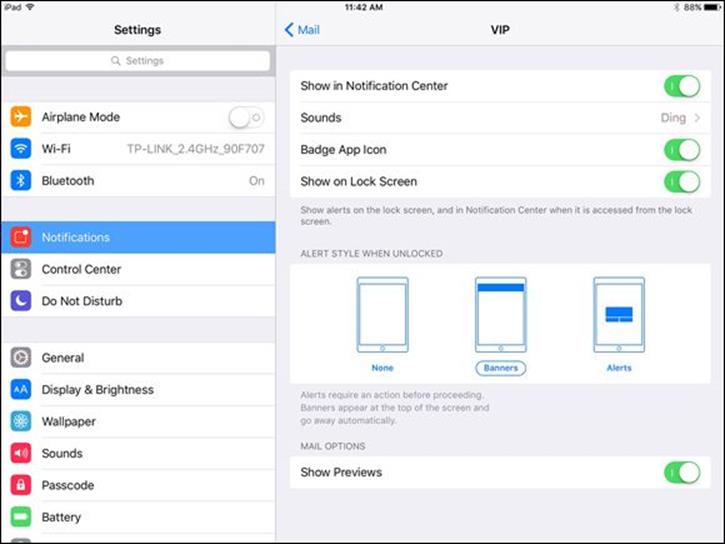
Figure 6-21
All materials on the site are licensed Creative Commons Attribution-Sharealike 3.0 Unported CC BY-SA 3.0 & GNU Free Documentation License (GFDL)
If you are the copyright holder of any material contained on our site and intend to remove it, please contact our site administrator for approval.
© 2016-2026 All site design rights belong to S.Y.A.