iPad For Seniors For Dummies, 8th Edition (2016)
Part II. Taking the Leap Online
Chapter 8. Shopping the iTunes Store
Get ready to …
· Explore the iTunes Store
· Find a Selection
· Preview Music or a Movie
· Buy a Selection
· Rent a Movie
· Shop Anywhere Else
· Enable Autodownloads of Purchases from Other Devices
· Set Up Family Sharing
The iTunes Store app that comes preinstalled on iPad lets you easily shop for music, movies, and TV shows.
In this chapter, you discover how to find content in the iTunes Store. The content can be downloaded directly to your iPad or to another device and then synced to your iPad. With the new Family Sharing feature, which I cover in this chapter, up to six people in a family can share purchases and make purchases using the same credit card. Finally, I cover a few options for buying content from other online stores.
Note that I cover opening an iTunes account and downloading iTunes software to your computer in Chapter 3. If you need to, refer to Chapter 3 to see how to handle these two tasks before digging into this chapter.
Explore the iTunes Store
1. Visiting the iTunes Store from your iPad is easy with the built-in iTunes Store app. Tap the iTunes Store icon on the Home screen.
2. If you’re not already signed in to iTunes, the dialog shown in Figure 8-1 appears, asking for your iTunes password. Enter your password and tap OK. You may also be prompted to set up Family Sharing, a feature that allows family members to use the same purchase method on their devices, covered later in this chapter.
3. Tap the Music button in the row of buttons at the bottom of the screen, if it’s not already selected, to view selections, as shown in Figure 8-2.
4. Tap the See All link (refer to Figure 8-2) in any category of music to display more music selections.
5. Tap the button in the top-left corner labeled Music to go back to the featured Music selections; tap the Genres button at the top left of the screen. This step displays a list of music categories you can choose among. Tap one genre. Items that are displayed are organized by criteria such as New Music and Greatest Hits.
6. Tap any listed item to see more details about it, as shown in Figure 8-3.

Figure 8-1
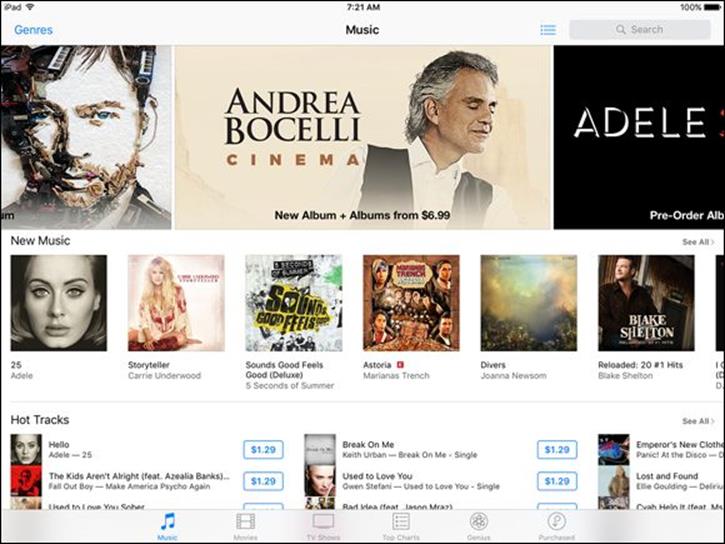
Figure 8-2
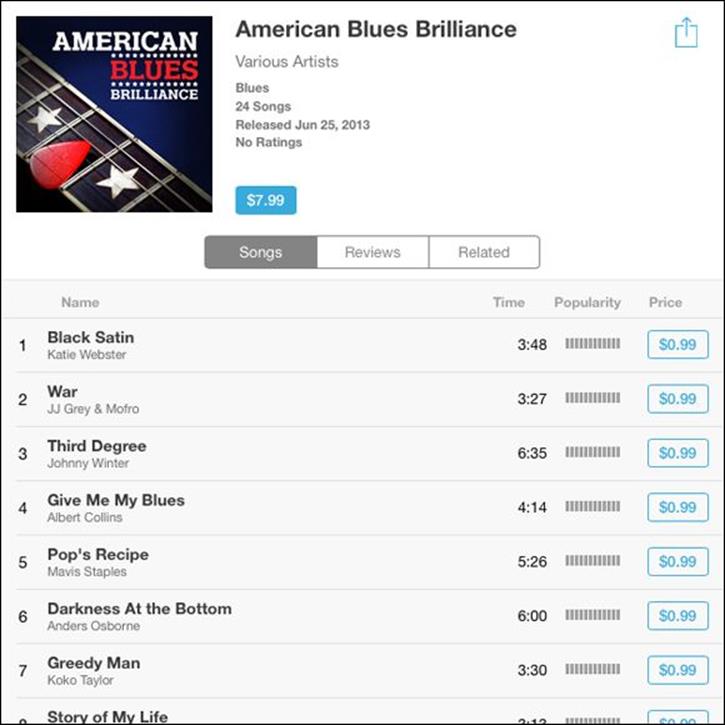
Figure 8-3
 The navigation techniques in these steps work essentially the same way in any of the content categories (the buttons at the bottom of the screen), which include Music, Movies, and TV Shows.
If you want to use the Genius playlist feature, which recommends additional purchases based on the contents of your library, in the iTunes app on your iPad, tap the Genius button at the bottom of the screen. If you’ve made enough purchases in iTunes, song and album recommendations appear based on those purchases as well as on the content in your iTunes Match library (a fee-based music service), if you have one.
If you’re in search of other kinds of content, the Podcast app and iTunes U app allow you to find and download podcasts and online courses to your phone.
Find a Selection
You can look for a selection in the iTunes Store in several ways. You can use the Search feature, search by genre or category, or view artists’ pages. Here’s how these methods work:
· Tap the Search field shown in Figure 8-4, and enter a search term with the onscreen keyboard, which could be a genre of music, the name of an album or song, or an artist’s name, for example. If a suggestion in the list of search results appeals to you, just tap it, or tap Search on the keyboard.
· Tap a result; on the description page that appears when you tap a selection, you can find more offerings by the people involved, such as a singer or actor, by tapping the Related tab, as shown in Figure 8-5.
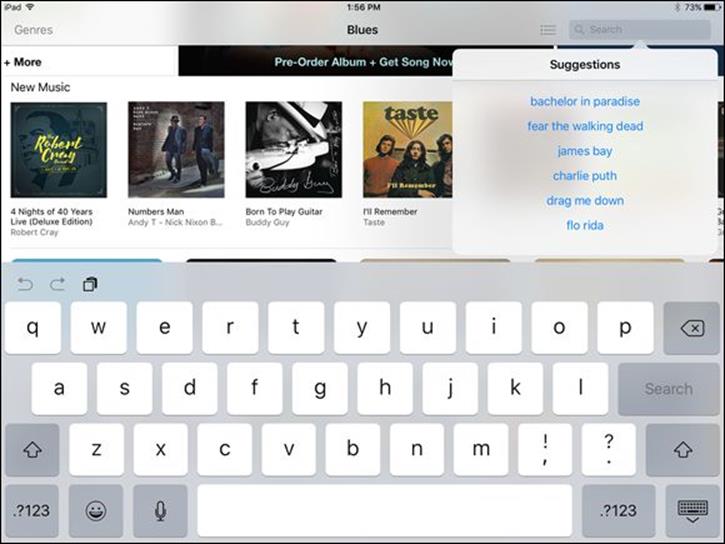
Figure 8-4
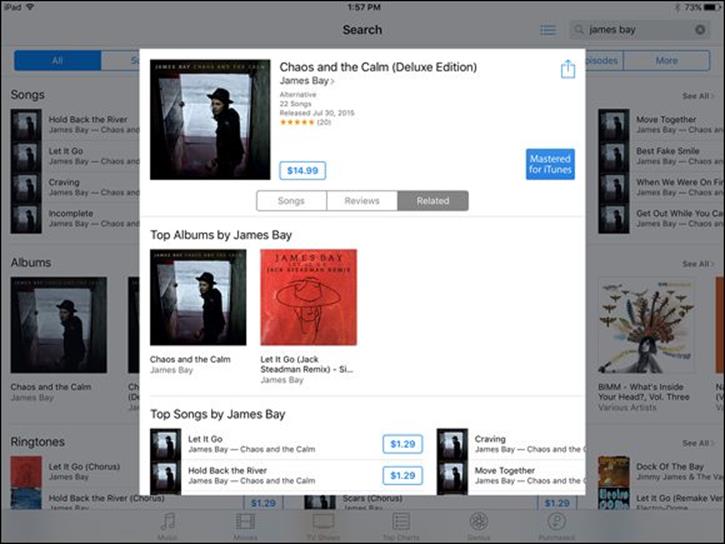
Figure 8-5
If you find a selection that you like, tap the Share button at the top of its description page to share your discovery with a friend via AirDrop (fourth-generation iPad and later), Mail, Twitter, or Facebook. For all but AirDrop, a message form appears with a link that your friend can click or tap to view the selection. Enter an address in the To: field, and tap Send or Post. Now your friend is in the know.
Preview Music or a Movie
1. If you’ve already set up an iTunes account (if you haven’t done so yet, see Chapter 3), when you choose to buy an item, it’s automatically charged to the credit card or PayPal account you have on record or against any allowance you have outstanding on an iTunes gift card. You may want to preview an item before you buy it. If you like it, buying and downloading are easy and quick. Open iTunes Store, and use any method outlined in earlier tasks to locate a selection you may want to buy.
2. Tap the item to see detailed information about it, as shown in Figure 8-6.
3. For a movie selection, tap the Play button on a Trailer (refer to Figure 8-6) to view the theatrical trailer if one’s available. For a TV show, tap an episode to get further information. If you want to listen to a sample of a music selection, tap the track number (see Figure 8-7); a small square appears and the track plays. Tap the square to stop the preview.
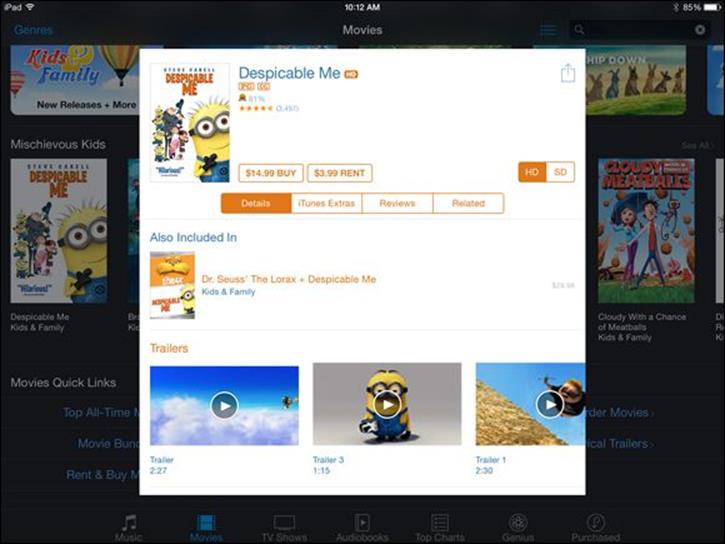
Figure 8-6
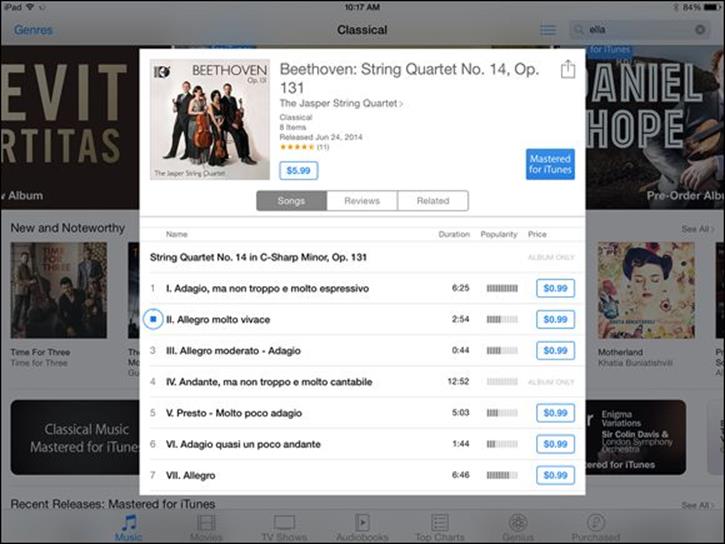
Figure 8-7
Buy a Selection
1. When you find an item that you want to buy, tap the button that shows the price (if the selection is available for purchase) or the button with the word Get on it (if the selection is available free). The button label changes to Buy X, where X is the type of content you’re buying, such as a song or album. If the item is free, the label changes to Get Song (or whatever type of item you’re purchasing).
2. Tap the Buy X button (see Figure 8-8). The iTunes Password dialog appears (refer to Figure 8-1). You may or may not be prompted to enter your Apple ID at this point, depending on what you’re purchasing.
3. Enter your password and tap OK. The item begins downloading and the cost is automatically charged against your account. When the download finishes, you can view the content in the Music or Videos app, depending on the type of content.
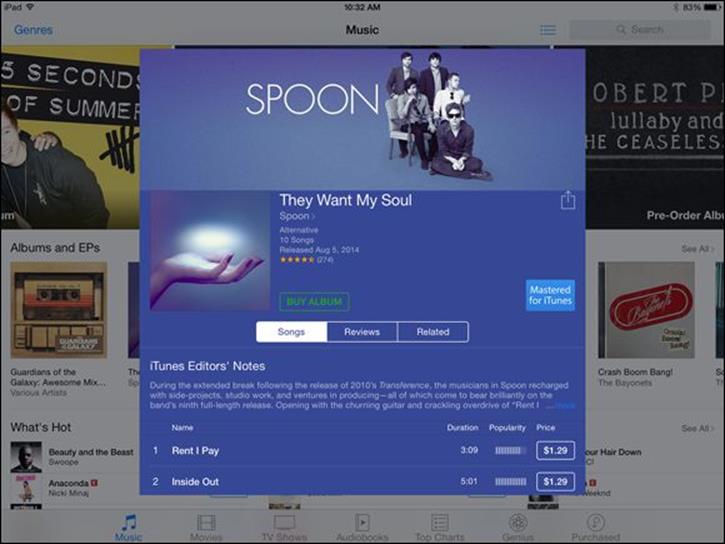
Figure 8-8
If you want to buy music, you can open the description page for an album and tap the album price, or buy individual songs rather than the entire album. Tap the price for a song and then proceed to purchase it.
Notice the Redeem button on many iTunes Store screens. Tap this button to redeem any iTunes gift certificates you may have received from your generous friends (or from yourself).
If you don’t want to allow purchases from within apps (such as Music or Videos) and want to allow purchases only through the iTunes Store, tap Settings ⇒ General ⇒ Restrictions ⇒ Enable Restrictions, and enter a passcode. After you’ve set a passcode, you can tap individual apps to turn on restrictions for them, as well as for actions such as installing apps, sharing via AirDrop, or using Siri.
Rent a Movie
1. In the case of some movies, you can either rent or buy content. If you rent, which is less expensive than buying but makes the content yours for only a short time, you have 30 days from the time you rent the item to begin watching it. After you’ve begun to watch it, you have 24 hours remaining to watch it on the same device as many times as you like. With the iTunes Store open, tap the Movies button.
2. Locate the movie you want to rent, and tap either the HD or SD choice, if available. Tap the Rent button, shown in Figure 8-9. The Rent button changes to a Rent Movie or Rent HD Movie button.
3. Tap Rent HD Movie (see Figure 8-10) to confirm the rental. The movie begins to download to your iPad immediately and the rental fee is charged to your account.
4. When the download is complete, use either the Music or Videos app to watch it. (See Chapters 11 and 13, respectively, to read about how these apps work.)
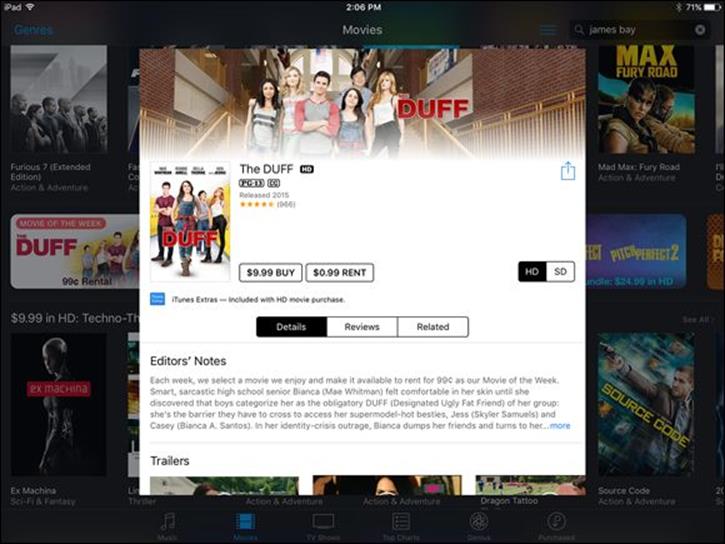
Figure 8-9
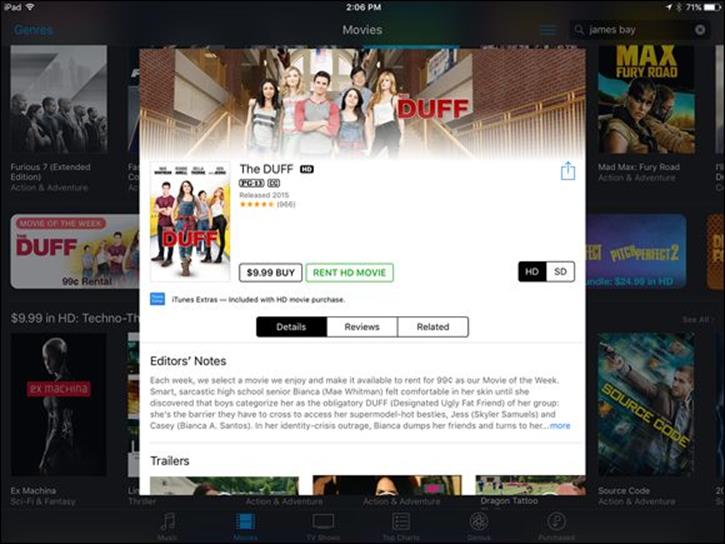
Figure 8-10
Some movies are offered in high-definition (HD) versions as well as standard definition (SD). These HD movies look great on that crisp, colorful iPad screen, especially if you have an iPad with Retina display.
Shop Anywhere Else
Though iPads don’t work with every video format, many online stores that sell content such as movies and music have added iPad-friendly videos to their collections, so you do have alternatives to iTunes for movies and TV shows. You can also shop for music from sources other than iTunes, such as Amazon.com.
You can open accounts at one of these stores by using your computer’s web browser or your iPad’s Safari browser and then following the store’s instructions to purchase and download content.
For non–iPad-friendly formats, you can download the content on your computer and stream it to your iPad by using Air Video ($2.99) on the iPad or Air Video Server (which is free) on your Mac or Windows computer. For more information, go to www.inmethod.com/air-video/index.html. Another free utility for Mac and Windows that converts most video to an iPad-friendly format is HandBrake. Go to http://handbrake.fr for more information.
Enable Autodownloads of Purchases from Other Devices
1. With iCloud, you can make a purchase or download free content on any of your Apple devices and have those purchases automatically copied to all your Apple devices. To enable this autodownload feature on iPad, start by tapping Settings on the Home screen.
 To use iCloud, first set up an iCloud account. See Chapter 3 for detailed coverage of iCloud, including setting up your account.
2. Tap iTunes & App Store.
3. In the options that appear, tap on or slide the On/Off switch to turn on any category of purchases you want to autodownload to your iPad from other Apple devices (see Figure 8-11).
At this point, Apple doesn’t offer an option to autodownload video content by using these settings because video is such a memory and bandwidth hog.
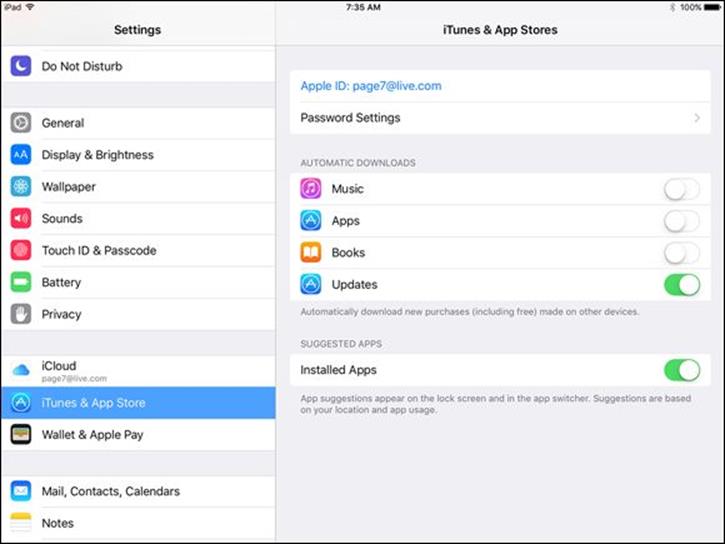
Figure 8-11
Set Up Family Sharing
1. Family Sharing is a feature in that allows up to six people in your family to share whatever anybody in the group has purchased from the iTunes, iBooks, and App Stores even if you don’t share Apple accounts. Your family must all use one credit card to purchase items, but you can approve purchases by younger children. You can also share calendars, photos, and a family calendar (see Chapter 16 for information about Family Sharing and Calendar and Chapter 12 for information on sharing Photos in a Family album). Start by turning on Family Sharing. Tap Settings.
2. Tap iCloud and then tap Set Up Family Sharing.
3. Tap Get Started and on the next screen, you can add a photo for your family. Tap Continue. Your current payment method associated with your Apple account displays. Tap Continue.
4. Tap Share Your Location and then tap Add Family Member to add people to your family group.
5. Enter the person’s name (assuming she is listed in your contacts) or email address (see Figure 8-12) and tap Next. An invitation is sent to that person’s email. When the invitation is accepted, the person is added to your family.
6. Check the payment method you want to use. If it’s not the payment method you want to use, you have to change it in iTunes.
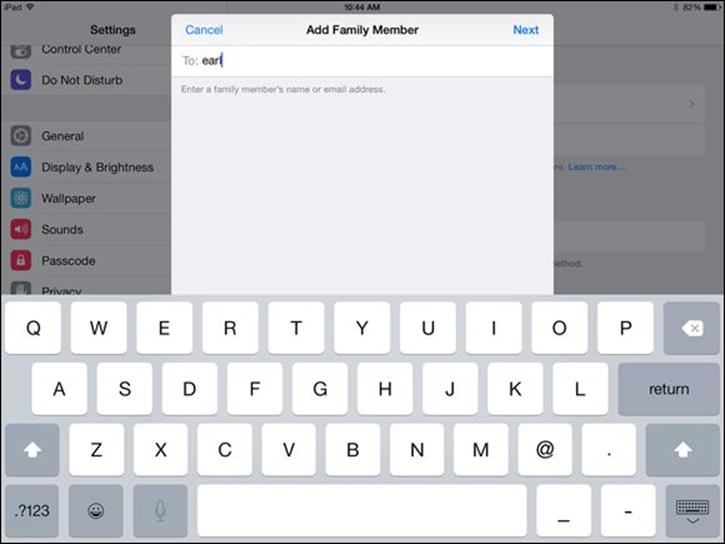
Figure 8-12
If you want to add a child aged under 13, note the separate link, Create an Apple ID for a Child, at the bottom of the pane shown in Figure 8-12. This method is provided here because kids younger than 13 can’t set up their own Apple IDs.
Note that the payment method for this family is displayed under Shared Payment Method in this screen. All those involved in a family have to use a single payment method for family purchases.
All materials on the site are licensed Creative Commons Attribution-Sharealike 3.0 Unported CC BY-SA 3.0 & GNU Free Documentation License (GFDL)
If you are the copyright holder of any material contained on our site and intend to remove it, please contact our site administrator for approval.
© 2016-2026 All site design rights belong to S.Y.A.