iPad mini For Dummies (2013)
Part III. The Multimedia iPad mini
Chapter 9. You Oughtta Be in Pictures
In This Chapter
![]() Shooting pictures
Shooting pictures
![]() Importing your pictures
Importing your pictures
![]() Viewing and admiring pictures
Viewing and admiring pictures
![]() Creating a slide show
Creating a slide show
![]() Working with pictures even more
Working with pictures even more
![]() Deleting your photos
Deleting your photos
![]() Hamming it up in Photo Booth
Hamming it up in Photo Booth
We often sing the praises of the grown-up iPads’ vibrant multitouch display. You’d be hard-pressed to find a more appealing portable screen for watching movies or playing games — and, yes, for appreciating photos. Though the screen on the iPad mini is smaller (and of lower resolution) than the iPads with Retina displays that preceded it, the mini tablet you have recently purchased (or are lusting after) is also a first-rate photo viewer. Images are crisp and vivid, at least those that you shot properly. (C’mon, we know Ansel Adams is a distant cousin.)
What’s more, you can shoot some of those pictures directly with your prized tablet. The reasons, of course, are the front and rear cameras that are built into the device. If you’ve already read Chapter 8, you already know you can put those cameras to work capturing video. In this chapter, you get to see the big picture on shooting still images.
Okay, we need to get a couple of things out of the way. The iPad mini will never substitute for a point-and-shoot digital camera, much less a pricey digital SLR. As critics, we can quibble about the lack of a flash or about the grainy images you may produce after shooting in low light. And shooting can be awkward.
But we’re here, friends, to focus on the positive. And having cameras on your iPad may prove to be a godsend when no better option is available, and they represent decent solutions for close-up “macro shots.” In Chapter 8, we tell you about the capability to capture full, high-definition video, up to the 1080p standard, as techies refer to it.
In this chapter, we point out other optical enhancements in the iPad mini. The 5-megapixel iSight camera has backside illumination and boasts what’s known as an ƒ/2.4 aperture and a five-element lens. It also has a hybrid infrared filter (like the one on an SLR) that helps lead to more uniform colors. Oh, and face detection ensures that the balance and focus are just right for as many as ten faces on the screen.
All these features are simply photographer-speak for “potentially snapping darn sweet pictures.”
And we can think of certain circumstances — selling real estate, say, or shopping for a new home — where tablet cameras are quite convenient.
Meanwhile, you’re in for a real treat if you’re new to Photo Booth, a yuk-it-up Mac program that’s on the iPad mini as well. It may be the best, or at least the most fun, use of the cameras yet.
We get to Photo Booth at the end of this chapter. But over the next few pages, you discover the best ways to make the digital photos on the iPad come alive, no matter how they managed to arrive on your machine.
Shooting Pictures
To start shooting pictures on iPads with cameras, tap the Camera icon on the Home screen. The screen resembles a closed camera shutter. When that shutter opens an instant later, you’re peering through, in effect, a 7.9-inch viewfinder. Here’s what to do next:
1. In this example, make sure that the Camera/Video switch at the lower-right corner of the screen (and shown in Figure 9-1) is turned to Camera mode. If it isn’t, slide the switch from right to left.
2. Use the viewfinder to frame the image.
3. Tap the portion of the screen in which you see the face or object you want as the image’s focal point.
A small rectangle surrounds your selection, and the iPad automatically adjusts the exposure and focus of that part of the image.
4. (Optional) To zoom in or out, tap the screen with two fingers and spread (unpinch) to zoom in or pinch to zoom out.
The iPad has a 5X digital zoom, which basically crops and resizes an image. Such zooms are nowhere near as effective, quality-wise, as optical zooms on many digital cameras. Be aware that zooming works only with the rear camera still in Camera mode; it doesn’t work with the front camera or when you shoot video.
5. (Optional) To see grid lines to help compose your picture, tap the Options button and then tap the Grid switch (so that it says On).
 To toggle between the front and rear cameras, tap the Front/Rear Camera button (refer to Figure 9-1) in the lower-right corner of the screen.

Figure 9-1: Using the iPad as a camera.
We should point out that the front camera is of lower quality than its rear cousin, but it’s perfectly adequate for the kinds of demands you put on it, including using FaceTime and Photo Booth.
6. When you’re satisfied and ready to snap an image, tap the shutter release button in the right-center of the screen.
We’ve also found, when we use the onscreen shutter button, that we often get better results when we hold a finger against the button while composing a shot and then release it only when the moment is right. This way, you’re less prone to shake the iPad — and blur your pictures — than when you’re tapping the screen.
As an alternative to the shutter release, use the Volume Up/Down control on the side of the iPad, which some people, under certain circumstances, will find more comfortable. Don’t cover the lens with your fingers!
You hear a shutter sound unless you’ve turned the Mute switch to Silent, as we explain in Chapter 1.
The image you shoot lands in the Camera Roll in the lower-left corner of the screen. We explain what you can do with the images on the iPad later in this chapter.
Importing Pictures
Of course, you don’t need to shoot pictures on the iPad mini to place images on your tablet. You can add them in several ways, in fact. Alas, at least one of the methods involves buying an accessory. We zoom in on this topic in the following sections.
Syncing pix via computer
We devote an entire chapter (see Chapter 3) to synchronizing data with the iPad, so we don’t dwell on it here. But because syncing pictures is still the most common way to import images to the iPad, we’d be remiss not to mention it in this chapter. (The assumption in this section is that you already know how to put pictures on your computer.)
When the iPad is connected to your computer, click the Photos tab on the iPad Device page in iTunes on the Mac or PC. Then select a source from the Sync Photos From pop-up menu.
 On a Mac, you can sync photos (and videos) via iPhoto software version 6.06 or later or Aperture 3.02 or later. On a PC, you can sync using Adobe Photoshop Elements 8.0 or later. Alternatively, with both computers, you can sync with any folder that contains pictures.
After you make a selection from the Sync Photos From menu, you may see one or more check boxes or radio buttons enabling you to sync different combinations of albums, events, faces, or folders. The boxes or buttons you see are based on your selection on the Sync Photos From menu.
So what are events and faces, anyway? Here’s a quick look at these staple features in iPhoto and Aperture on the Mac:
![]() Events: In their infinite wisdom, the folks at Apple figured that most pictures shot on a given day are tied to a specific occasion, such as Junior’s birthday party or a wedding. So the iPhoto program on a Mac automatically groups them accordingly, by placing all pictures taken on the same day into a single collection. Don’t worry: You can split a day’s worth of pictures into more than one event if, say, the birthday party was in the morning and the wedding was at night. Apple automatically names an event by its date; you can change it to something more descriptive (such as Timmy’s Softball Game or Geri’s Graduation).
Events: In their infinite wisdom, the folks at Apple figured that most pictures shot on a given day are tied to a specific occasion, such as Junior’s birthday party or a wedding. So the iPhoto program on a Mac automatically groups them accordingly, by placing all pictures taken on the same day into a single collection. Don’t worry: You can split a day’s worth of pictures into more than one event if, say, the birthday party was in the morning and the wedding was at night. Apple automatically names an event by its date; you can change it to something more descriptive (such as Timmy’s Softball Game or Geri’s Graduation).
![]() Faces: As its name implies, Faces is a collection of pictures on a single common thread: whose mug is in them. In our experience with Faces, the technology, although pretty darn impressive, isn’t perfect.
Faces: As its name implies, Faces is a collection of pictures on a single common thread: whose mug is in them. In our experience with Faces, the technology, although pretty darn impressive, isn’t perfect.
Photo Stream: Sync photos among your devices effortlessly
The Photo Stream feature, when enabled, uploads and stores up to 1,000 photos from the last 30 days on iCloud and automatically downloads them to all your devices that have Photo Stream enabled when connected to Wi-Fi.
You need to enable two settings if you want to use your Photo Stream. First, instruct your iPad’s camera to send photos to your Photo Stream by following these steps:
1. Tap Settings on your Home screen.
2. Tap iCloud on the left side of the screen.
3. Tap Photo Stream.
4. Tap the switch to turn on Photo Stream (it should say On).
Second, if you want to see your Photo Stream in the Photos app, do this:
1. Tap Settings on your Home screen.
2. Tap Photos & Camera on the left side of the screen.
3. Tap the switch to turn on Photo Stream (it should say On).
That’s it. Turn it on, and you’ll always have access to your last 30 days of pictures.
If you’re a Mac user, iPhoto ’11 (versions 9.2 and higher) supports Photo Stream. To enable it, launch iPhoto on your Mac and do this:
1. Choose iPhoto⇒Preferences.
2. Click the Photo Stream tab at the top of the Preferences window.
3. Select the Enable Photo Stream check box.
A bit later in this chapter, we tell you about a cool variation that lets you share Photo Streams with friends and family.
Connecting a digital camera or memory card
Almost all the digital cameras we’re aware of come with USB cables that you can use to transfer images to a computer. Of course, the iPad isn’t a regular computer, and it isn’t equipped with a USB port.
Instead, Apple sells optional $29 Lightning–to–SD–Card Camera Readers and Lightning–to–USB Camera Adapters, $29 apiece; here’s how the latter product works:
1. Connect the Lightning end of the connector to the iPad mini.
2. Connect the other end of the connector to the USB cable that is, in turn, connected to your digital camera.
Kindly use the USB cable that comes with your camera, or another that fits, because no such cable comes with the Apple adapter.
3. Make sure that the iPad is unlocked.
4. If you haven’t already done so, turn on the camera and ensure that it’s set to transfer pictures.
Consult the manual that came with the camera if you’re unsure of which setting to use.
The Photos app on the iPad opens and displays the pictures that you can import from the camera.
5. Tap Import All to select the entire bunch, or tap the individual pictures you want to include if you’d rather cherry-pick.
A check mark appears next to each image you select. And that’s pretty much it: The iPad organizes the pictures into albums and such, as we describe later in this chapter.
At this point, you’re free to erase the pictures from your camera.
The Lightning–to–SD–Card Reader connector accommodates the SD memory cards that are common to many digital camera models. The procedure works almost identically to the USB connector, except that you’re inserting the SD gizmo into the Lightning connector port rather than into the USB connector we mentioned. Insert the SD gently to prevent damage.
 The two connectors support many common photo formats, including JPEG and Raw. The latter format is favored by photo enthusiasts. They also support common standard and high-definition video formats.
You might be able to connect certain USB computer keyboards, MIDI keyboards, media readers, and microphones to your iPad mini with the Lightning–to–USB–Camera Adapter and then watch those peripherals come alive. We’re making no guarantees, of course, but, hey — it never hurts to try.
Saving images from e-mails and the web
You can easily save pictures that arrive in e-mails or pictures that you come across on the web: Just press and hold your finger against the image, and then tap Save Image when the button pops up a second later. Pictures are stored in the Camera Roll, as noted in the next section.
Where Have All My Pictures Gone?
So where exactly do your pictures hang out on the iPad? Well, we explain in the preceding section what happens to images saved from e-mails and the Internet: They reside in the Camera Roll. (We wanted to see whether you’re paying attention.)
Other imported images are grouped into the same albums as they were on the computer, or lumped together as Events or Faces or — when the embedded metadata inside an image identifies where a picture was shot — under the very cool Places feature. We have more to say about Places later in this chapter.
So now that you know where the pictures are, you’re ready to discover how best to display them and share them with others — and how to dispose of the duds that don’t measure up to your lofty photographic standards.
Get ready to literally get your fingers on the pics (without worrying about smudging them). The following steps walk you through the basics of navigating among your pictures with the Photos app:
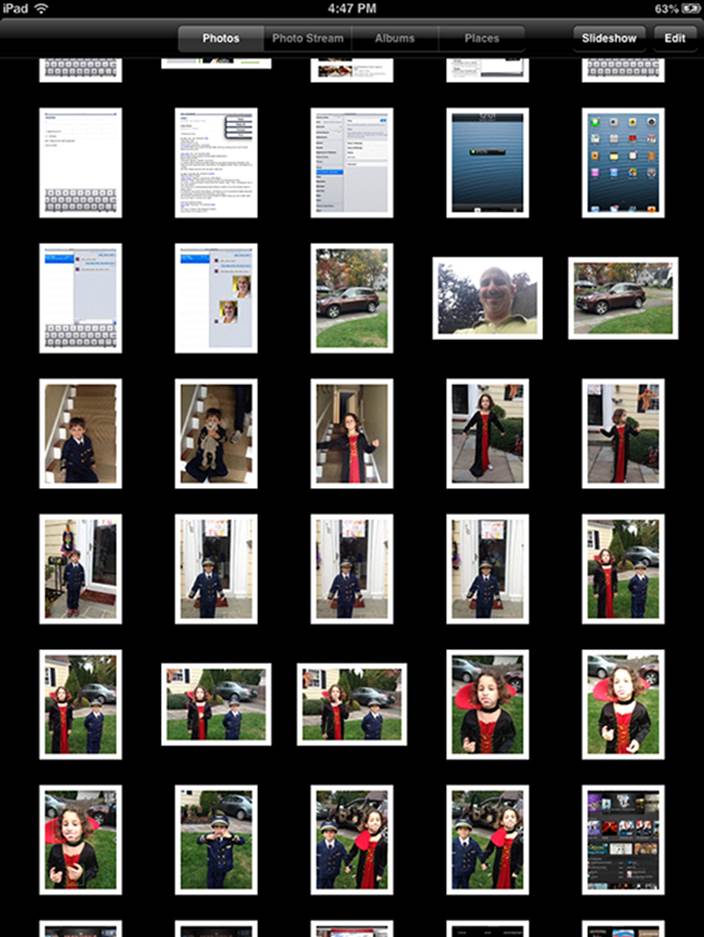
1. Tap the Photos app on the Home screen.
The app opens with a grid of thumbnail images on top of a black background, as shown in Figure 9-2. The Photos tab at the top of the screen is highlighted because you’re in Photos view. If the thumbnail you have in mind doesn’t appear on this screen, flick your finger up or down to scroll through the pictures rapidly, or use a slower dragging motion to pore through the images more deliberately. So, if you have more photos than can possibly show up on the screen at any one time, which is highly probable, your flicking and dragging skills will improve quickly.
Figure 9-2: The landing spot for photos.
2. Tap or pinch the photo you want to display.
These actions lead to slightly different outcomes. When you tap an image, the picture rapidly gets bigger, practically jumping off the screen. If you pinch or unpinch instead, by putting your thumb and forefinger together and then spreading them apart, you have more control over how the image shrinks or grows. You can also keep your finger pressed against the image to drag it around.
3. To navigate collections of images, tap Albums, Events, Faces, or Places at the top of your iPad screen. Or pinch them.
You see stacks or collections of pictures. Tap an Album, Event, or Faces pile, and all the underlying pictures scatter into a mass of individual images. It’s an orderly escape because the individual pictures once again appear in a grid. Most likely, you’ll have to scroll up or down again to see all the pictures in the collection. As before, tap any of the individual pictures you want to focus on.
But what if you unpinch a collection instead of tapping? The answer depends on how you pinch. If you pinch just a little bit, the pictures spread out slowly enough that you can preview some of the images in the pile. Let go, and the collection opens (unless, that is, you hadn’t pinched far enough and the images retreat into a stack). If you do a wider pinch by spreading your fingers even more, the entire collection opens. As before, tap a picture to see a large view of it.
4. With an individual photo on the screen, tap the picture to open the picture controls at the top and bottom of the screen.
The controls are shown in Figure 9-3. Later in this chapter, we discuss what they do, but we want you to know how to summon them, because we’re certain that you’ll be calling on them.
5. To make the controls disappear, tap the screen again. Or just wait a few seconds and they go away on their own.
6. Press the Home button when you’re finished with the Photos app.
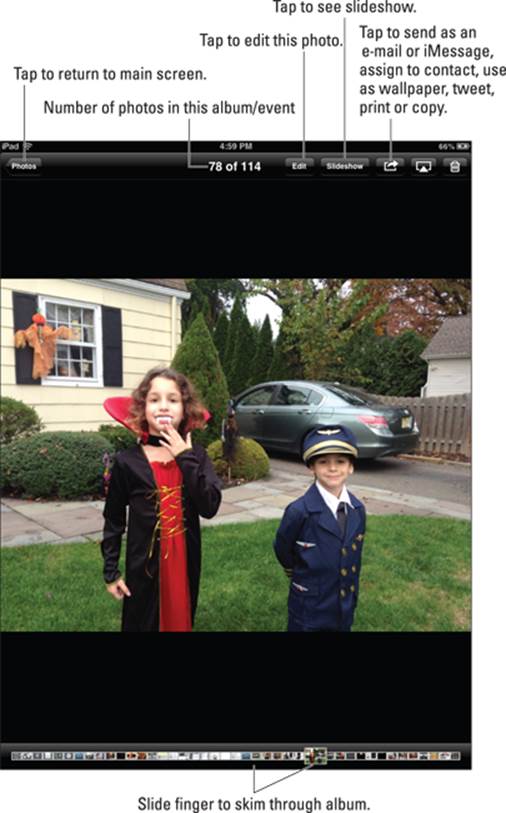
Figure 9-3: Picture controls.
Improving Pictures
iOS includes a welcome quartet of photo editing tools: Rotate, Enhance, Red-Eye, and Crop — to use any of them, tap the Edit button in the upper-right portion of the screen, and a toolbar with four buttons appears at the bottom of the screen:
![]() Rotate: Tap to turn the image a quarter-turn counterclockwise.
Rotate: Tap to turn the image a quarter-turn counterclockwise.
![]() Enhance: Tap to improve the lighting, contrast, and color balance of the image. Tap Enhance again to remove the effect.
Enhance: Tap to improve the lighting, contrast, and color balance of the image. Tap Enhance again to remove the effect.
![]() Red-Eye: Tap to enable, and then tap on the red eye in the image. Tap again to undo.
Red-Eye: Tap to enable, and then tap on the red eye in the image. Tap again to undo.
If the tool doesn’t recognize a red eye, it politely informs you that it didn’t find a red eye to correct.
![]() Crop: Tap to crop or straighten the image. Tap the corners of the overlay to set the cropping area; tap the Constrain button to make the cropped image conform to popular proportions, such as 5 x 7, 8 x 10, 4 x 6, and so on.
Crop: Tap to crop or straighten the image. Tap the corners of the overlay to set the cropping area; tap the Constrain button to make the cropped image conform to popular proportions, such as 5 x 7, 8 x 10, 4 x 6, and so on.
 If you’ve applied more than one of the tools to your image, you can use the Undo button in the upper-left corner to step backward through time, undoing one step for each tap. Or tap the Revert to Original button to remove all the improvements at one time.
Admiring Pictures
Photographs are meant to be seen, of course, not buried in the digital equivalent of a shoebox. And the iPad affords you some neat ways to manipulate, view, and share your best photos.
You’ve no doubt already figured out (from the preceding section) how to find a photo, view it full-screen, and display picture controls. But you can do a lot of maneuvering of your pictures without summoning those controls. Here are some options:
![]() Skip ahead or view the previous picture: Flick your finger left or right.
Skip ahead or view the previous picture: Flick your finger left or right.
![]() Landscape or portrait: The iPad’s wizardry (or, more specifically, the device’s accelerometer sensor) is at work. When you turn the iPad sideways, the picture automatically reorients itself from portrait to landscape mode, as the images in Figure 9-4 show. Pictures shot in landscape mode fill the screen when you rotate the iPad. Rotate the device back to portrait mode, and the picture readjusts accordingly.
Landscape or portrait: The iPad’s wizardry (or, more specifically, the device’s accelerometer sensor) is at work. When you turn the iPad sideways, the picture automatically reorients itself from portrait to landscape mode, as the images in Figure 9-4 show. Pictures shot in landscape mode fill the screen when you rotate the iPad. Rotate the device back to portrait mode, and the picture readjusts accordingly.
The Screen Orientation Lock to the left of the iPad controls on the multitasking bar must be switched off. See Chapter 2 for the gory details.
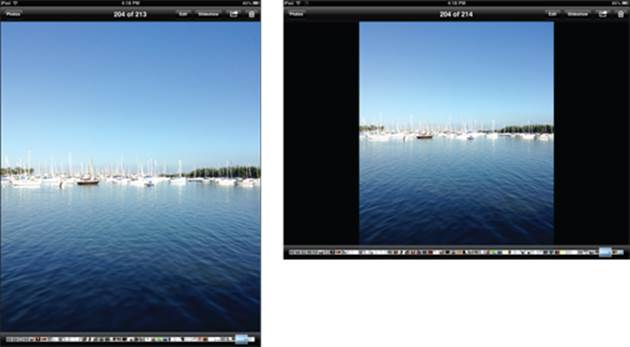
Figure 9-4: The same picture in portrait (left) and landscape (right) modes.
Show a picture to a friend by flipping the iPad over. The iPad always knows which side is up.
![]() Zoom: Double-tap to zoom in on part of an image. Double-tap again to zoom out. Alternatively, spread and pinch with your thumb and index finger to zoom in and zoom out. The downside to zooming is that you can’t see the entire image.
Zoom: Double-tap to zoom in on part of an image. Double-tap again to zoom out. Alternatively, spread and pinch with your thumb and index finger to zoom in and zoom out. The downside to zooming is that you can’t see the entire image.
![]() Pan and scroll: This cool little feature is practically guaranteed to make you the life of the party. After you zoom in on a picture, drag it around the screen with your finger. Besides impressing your friends, you can bring front and center the part of the image you care most about. That lets you zoom in on Fido’s adorable face, as opposed to, say, the unflattering picture of the person holding the dog in his lap.
Pan and scroll: This cool little feature is practically guaranteed to make you the life of the party. After you zoom in on a picture, drag it around the screen with your finger. Besides impressing your friends, you can bring front and center the part of the image you care most about. That lets you zoom in on Fido’s adorable face, as opposed to, say, the unflattering picture of the person holding the dog in his lap.
![]() Skim: A bar appears at the bottom of the screen when you summon picture controls. Drag your finger across the bar in either direction to quickly view all the pictures in an open album.
Skim: A bar appears at the bottom of the screen when you summon picture controls. Drag your finger across the bar in either direction to quickly view all the pictures in an open album.
![]() Map it: If you tap the Places tab instead of an album, or an Event or Faces collection, a map like the one shown in Figure 9-5 appears. Notice the red pins on the map. These indicate that pictures were taken in the location shown on the map. Now tap a pin, and a stack representing all the images on the iPad that were shot in that location appears, as shown in the middle of Figure 9-5. As before, you can tap or pinch the collection to open it.
Map it: If you tap the Places tab instead of an album, or an Event or Faces collection, a map like the one shown in Figure 9-5 appears. Notice the red pins on the map. These indicate that pictures were taken in the location shown on the map. Now tap a pin, and a stack representing all the images on the iPad that were shot in that location appears, as shown in the middle of Figure 9-5. As before, you can tap or pinch the collection to open it.
The iPad is pretty smart when it comes to geography. So as long as Location Services is turned on in Settings and the specific location settings (also under Location Services in Settings) for the camera are turned on, pictures you take with the iPad cameras are geotagged, or identified by where they were shot.
Be aware that Apple placed the various options for Location Services under a Privacy setting. For more on Settings, see Chapter 15.

Figure 9-5: Mapping out your pictures.
Spread your fingers on a map to enlarge it and narrow the pictures taken to a particular area, town, or even neighborhood. For more on Maps, flip to Chapter 6.
Launching Slide Shows
Those who store a lot of photographs on computers are familiar with running slide shows of those images. You can easily replicate the experience on the iPad, and through AirPlay, stream the slide show wirelessly to an Apple TV or, lacking that device, via an optional cable that connects to a TV, projector, or even (you still have one of these?) a VCR. Follow these steps:
1. Open an album by tapping it or display all your photos in Photos view.
2. Tap the Slideshow button in the upper-right corner of the screen.
The Slideshow Options window, as shown in Figure 9-6, appears. We explore these and other options in the next section. But if you just want to start the slide show from here, continue to Step 3.
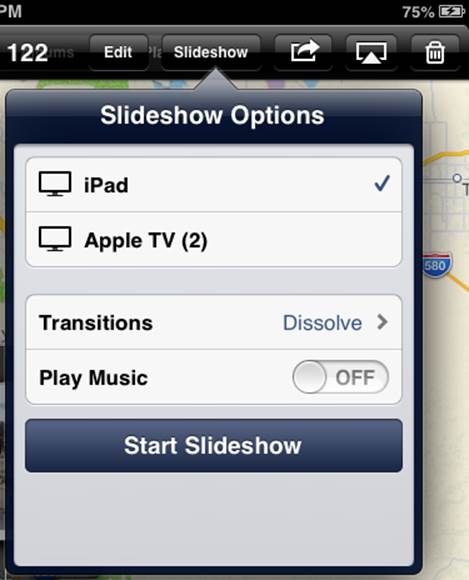
Figure 9-6: Tap the Slideshow button to see slide show options.
3. Tap Start Slideshow.
Your only obligation is to enjoy the show.
Adding special slide show effects
Both the Settings options and the Slideshow button enable you to add special effects to your slide shows. Under Settings, you can alter the length of time each slide is shown, change the transition effects between pictures, and display images in random order. With Slideshow Options, you can add transitions and music.
From the Home screen, tap Settings⇒Photos & Camera. Then tap any of the following options to make changes:
![]() Play Each Slide For: You have five choices: 2 seconds, 3 seconds, 5 seconds, 10 seconds, and 20 seconds. When you’re finished, tap the Photos button to return to the main Settings screen for Photos.
Play Each Slide For: You have five choices: 2 seconds, 3 seconds, 5 seconds, 10 seconds, and 20 seconds. When you’re finished, tap the Photos button to return to the main Settings screen for Photos.
![]() Repeat: If this option is turned on, the slide show continues to loop until you stop it. The Repeat control may be counterintuitive. If Off displays, tap it to turn on the Repeat function. If On displays, tap it to turn off the Repeat function.
Repeat: If this option is turned on, the slide show continues to loop until you stop it. The Repeat control may be counterintuitive. If Off displays, tap it to turn on the Repeat function. If On displays, tap it to turn off the Repeat function.
![]() Shuffle: Turning on this feature plays slides in random order. As with the Repeat feature, if it says Off, tap to switch it to On. Conversely, if it says On, tap to switch it to Off.
Shuffle: Turning on this feature plays slides in random order. As with the Repeat feature, if it says Off, tap to switch it to On. Conversely, if it says On, tap to switch it to Off.
Tap the Home button to leave Settings and return to the Home screen.
To select transitions and music for your slide shows, tap the Slideshow button within the Photos app to select options (refer to Figure 9-6):
![]() Transitions: You can change the effect you see when you move from one slide to the next. Again, you have five cool choices: Cube, Dissolve, Ripple, Wipe, or, a personal favorite of ours, Origami, in which the images fold out in ways similar to the Japanese folk art of paper folding. Why not try them all to see what you like?
Transitions: You can change the effect you see when you move from one slide to the next. Again, you have five cool choices: Cube, Dissolve, Ripple, Wipe, or, a personal favorite of ours, Origami, in which the images fold out in ways similar to the Japanese folk art of paper folding. Why not try them all to see what you like?
![]() Music: Adding music to a slide show couldn’t be easier. From the Slideshow Options window, tap the Play Music option so that it’s turned on. Then tap Music in the Slideshow Options overlay (refer to Figure 9-6) to choose your soundtrack from the songs stored on the device. Ed loves backing up slide shows with Sinatra, Sarah Vaughan, or Gershwin, among numerous other artists. Bob loves using songs by The Beatles or stately classical music.
Music: Adding music to a slide show couldn’t be easier. From the Slideshow Options window, tap the Play Music option so that it’s turned on. Then tap Music in the Slideshow Options overlay (refer to Figure 9-6) to choose your soundtrack from the songs stored on the device. Ed loves backing up slide shows with Sinatra, Sarah Vaughan, or Gershwin, among numerous other artists. Bob loves using songs by The Beatles or stately classical music.
Tap anywhere onscreen during a slide show to display additional information and controls; tap the Photos button in the upper-left corner to exit the slide show.
Admiring pictures on the TV
The AirPlay feature lets you stream music and videos wirelessly from the iPad to an Apple TV (see Chapter 8), and it works with photos, too. For wired connections to a TV, let us direct you to Chapter 17 on accessories.
To watch the slide show or view individual pictures on a big-screen TV via Apple TV, tap the AirPlay button shown in the upper-right corner of Figure 9-3, and then tap Apple TV from the list. If the AirPlay button isn’t visible, make sure that the iPad and Apple TV share the same Wi-Fi network. Tap the iPad button to view the slide show again on the iPad. We can tell you the experience is very cool.
Turning the iPad into a picture frame
Even when the iPad is locked, it can do something special — turn into a handsome, animated, digital picture frame — a variation on the slide show feature. To turn on this feature, tap the Picture Frame icon in the lower-right corner of the Lock screen. (It can also be used as a camera when locked, so you don’t have to fumble when the perfect shot unexpectedly presents itself.)
Inside Picture Frame Settings, and reachable like all other settings when you tap the Settings icon on the Home screen, you can choose one of two transitions (Dissolve or Origami), turn a “zoom in on faces” feature on or off, and arrange to play slides in random mode or shuffle mode. And, of course, you can pick the albums or photos to include in your slide show.
You can pause or stop a slide show by tapping the Picture Frame icon or sliding the slider to unlock the iPad. To disable the feature altogether, tap General under Settings, tap Passcode Lock so that it’s on (you have to enter your passcode at this point, if you have one), and tap Picture Frame so that the setting is off.
Sharing Photo Streams
 The Photo Streams feature we discuss earlier in the chapter is generally a terrific and hassle-free way for you to make sure the pictures you’ve shot end up on your devices without fretting about how they land there. But Apple, in its infinite wisdom, recognizes that you also might want to share your best images with friends and family and have those pictures automatically show up on those people’s devices. The impressive, aptly named solution Shared Photo Streams arrived on the iPad — and, of course, on the iPad mini and the iPhone and iPod touch — with iOS 6 (and a bit earlier on Macs running OS X Mountain Lion). The feature lets you share pictures with other folks and lets you subscribe in kind to the shared photo streams that they make available to you. Here’s how:
1. Tap Settings on your Home Screen.
2. Tap Photos & Camera on the left side of the screen.
3. Tap the Shared Photo Streams option so that On is showing.
4. Open the Photos app and choose the photos you want to share in a Shared Photo Stream.
5. Tap the Share button and tap the Photo Stream option in the Share dialog that appears.
Take note of some of your other options here: sharing via Mail, Twitter, and Facebook, as discussed in the next section.
6. Choose whether you want to create a new Photo Stream or add to an existing one.
If you’re adding your photos to an existing Photo Stream, tap the appropriate Photo Stream that appears on your list of Photo Streams. To create a new Photo Stream, tap New Photo Stream.
7. In the Share dialog that appears (see Figure 9-7), type the e-mail addresses for each person you want to receive your Photo Stream or tap the + button to add names from your contacts.
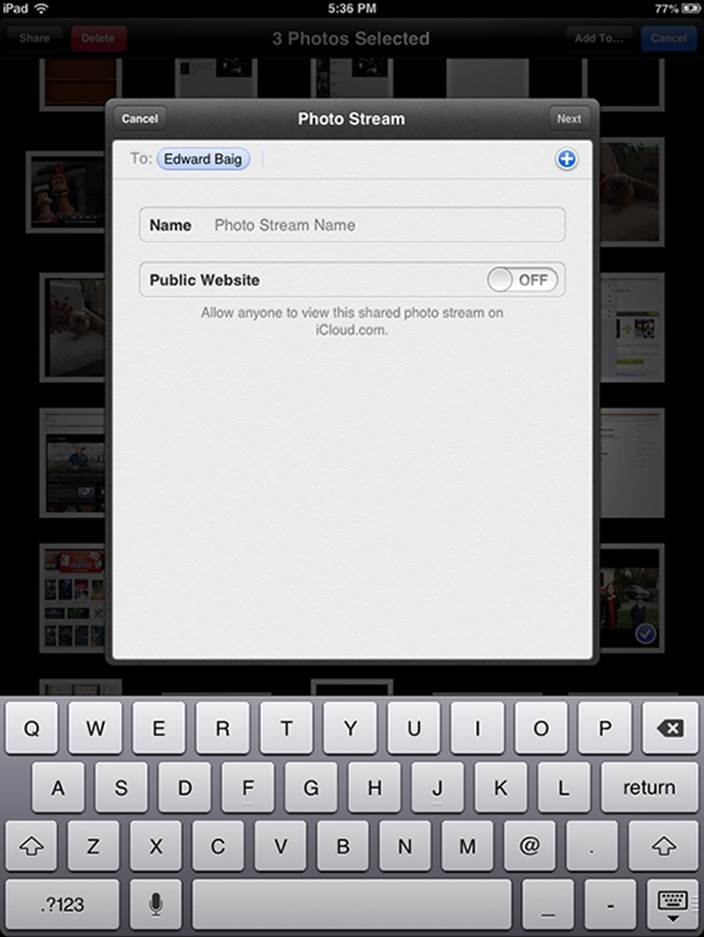
Figure 9-7: Preparing to stream your pictures to friends.
8. Enter a name for your Photo Stream and tap Next.
Share your Photo Stream with everyone through a public gallery on iCloud.com. To do that, flip the Public Website switch to On.
9. Enter a comment (optional) and then tap Post.
More (Not So) Stupid Picture Tricks
You can take advantage of the photos on the iPad in a few more ways. In most cases, you tap the picture and make sure that the picture controls are displayed. Then tap the Share (or Action) button in the upper-right corner. (It looks like an arrow trying to escape from a rectangle.)
Here’s what each choice does:
![]() Email Photo: Some photos are so precious that you just have to share them with family members and friends. When you tap Mail, the picture is automatically embedded in the body of an outgoing e-mail message. Use the virtual keyboard to enter the e-mail addresses and subject line and any comments you want to add — you know, something profound, like “Isn’t this a great-looking photo?” (Check out Chapter 5 for more info on using e-mail.)
Email Photo: Some photos are so precious that you just have to share them with family members and friends. When you tap Mail, the picture is automatically embedded in the body of an outgoing e-mail message. Use the virtual keyboard to enter the e-mail addresses and subject line and any comments you want to add — you know, something profound, like “Isn’t this a great-looking photo?” (Check out Chapter 5 for more info on using e-mail.)
![]() Message: When e-mail just won’t do, this option lets you send the photo in an iMessage. The caveat, of course, is that the recipient has to have an i-device with iOS 5 or higher or Mac with Mountain Lion. To send a picture this way, tap the Messages icon on the Home screen, and tap the Camera icon adjacent to the field where you type text to a recipient. That gives you the Take Photo or Video option (self-explanatory, don’t you think?) or Choose Existing option (still evident). Select a picture you already have on hand, and it’s embedded in the message.
Message: When e-mail just won’t do, this option lets you send the photo in an iMessage. The caveat, of course, is that the recipient has to have an i-device with iOS 5 or higher or Mac with Mountain Lion. To send a picture this way, tap the Messages icon on the Home screen, and tap the Camera icon adjacent to the field where you type text to a recipient. That gives you the Take Photo or Video option (self-explanatory, don’t you think?) or Choose Existing option (still evident). Select a picture you already have on hand, and it’s embedded in the message.
![]() Assign to Contact: You can assign a picture to someone in your contacts list. To make it happen, tap Assign to Contact from the Share options window. (Yep, we’re back to starting out in the Photos app.) Your list of contacts appears on the screen. Scroll up or down the list to find the person who matches the picture of the moment. You can drag and resize the picture to get it just right. Then tap Use.
Assign to Contact: You can assign a picture to someone in your contacts list. To make it happen, tap Assign to Contact from the Share options window. (Yep, we’re back to starting out in the Photos app.) Your list of contacts appears on the screen. Scroll up or down the list to find the person who matches the picture of the moment. You can drag and resize the picture to get it just right. Then tap Use.
You can also assign a photo to a contact by starting out in Contacts, as we explain in Chapter 12. Here’s a sneak peek at that chapter: From Contacts, choose the person, tap Edit, and then tap Add Photo. At that point, you can select an existing portrait from one of your on-board picture albums or take a new picture.
To change the picture you assigned to a person, tap her name in the contacts list, tap Edit, and then tap the person’s thumbnail picture, which also carries the Edit label. From there, you can select another photo from one of your albums, edit the photo you’re already using (by resizing and dragging it to a new position), or delete the photo you no longer want.
![]() Use As Wallpaper: When you unlock the iPad mini, the default background image shows what appears to be calm waves on a hazy day. You also see this same image (unless you change it) on the Lock screen.
Use As Wallpaper: When you unlock the iPad mini, the default background image shows what appears to be calm waves on a hazy day. You also see this same image (unless you change it) on the Lock screen.
But you probably have what you consider to be an even better photograph to use as the iPad’s wallpaper — perhaps a picture of your spouse, your kids, or your pet.
When you tap the Use As Wallpaper button, you see what the present image looks like as the iPad background picture. You can move and resize the picture through the now-familiar action of dragging or pinching across the screen with your fingers. When you’re satisfied with the wallpaper preview, tap the Set Home Screen button to make it your new Home background, or tap Set Lock Screen to have the image appear when the iPad is locked. Or you can tap Set Both to set that image as your Home and Locked wallpaper screens. Per usual, you also have the option to tap Cancel. (You can find out more about wallpaper in Chapter 15.)
![]() Twitter: Tap this button to tweet this picture to your Twitter followers. (Try saying that three times, fast.) For it to work, you have to add or create a Twitter account in Settings. Once it’s set up, you can add your location to the tweet by tapping Add Location in the Tweet dialog that appears.
Twitter: Tap this button to tweet this picture to your Twitter followers. (Try saying that three times, fast.) For it to work, you have to add or create a Twitter account in Settings. Once it’s set up, you can add your location to the tweet by tapping Add Location in the Tweet dialog that appears.
![]() Facebook: If you’ve configured a Facebook account in Settings, you can share the photo (and, if you wish, your location) on the world’s most popular social network.
Facebook: If you’ve configured a Facebook account in Settings, you can share the photo (and, if you wish, your location) on the world’s most popular social network.
![]() Print: In the 21st century, people are accustomed to viewing pictures on computer screens, digital frames, smartphones, and tablets. In the last century, most viewed prints. But something is still special about printing pictures to give away, carry around, or place in an old-fashioned photo frame or album. Through AirPrint, you can print photos from an iPad onto a compatible printer. Tap Print from the menu. The iPad tries to find the printer. You can select the number of copies. If your printer has a tray for photo paper in addition to plain paper, the printer may automatically switch to that tray when you try to print a picture.
Print: In the 21st century, people are accustomed to viewing pictures on computer screens, digital frames, smartphones, and tablets. In the last century, most viewed prints. But something is still special about printing pictures to give away, carry around, or place in an old-fashioned photo frame or album. Through AirPrint, you can print photos from an iPad onto a compatible printer. Tap Print from the menu. The iPad tries to find the printer. You can select the number of copies. If your printer has a tray for photo paper in addition to plain paper, the printer may automatically switch to that tray when you try to print a picture.
![]() Copy Photo: Tap this button when you want to copy a photo and paste it elsewhere.
Copy Photo: Tap this button when you want to copy a photo and paste it elsewhere.
Alternatively, you can also press and hold your finger against a photo until the Copy button appears. Tap that button, and you can paste the image into an e-mail, for example, by preparing a message, holding your finger against the screen until a Paste button appears, and then pressing the button to paste it into the body of the message.
In addition to describing the photo tricks that come ready to use on your iPad, we encourage you to check out the App Store, which we explore in greater depth in Chapter 11. As of this writing, hundreds of photography-related applications, some free, are available. These come from a variety of sources and range from Photobucket for iPad, which is free, to Adobe Photoshop Touch, a $9.99 app that brings layers, filters, and other photographic tools to the tablet. Apple even produces iPhoto for iPad, a custom $4.99 version of the popular photography program on Macs.
Deleting Pictures
We told a tiny fib by intimating that photographs are meant to be seen. We should have amended our statement by saying that some pictures are meant to be seen. Others, well . . . you can’t get rid of them fast enough. Fortunately, the iPad makes it a cinch to bury the evidence:
![]() Deleting photos in the Camera Roll albums or Photo Stream: Some pictures — namely, those you saved from an e-mail or web page and that now reside in the Camera Roll album or Photo Stream — are easy to dispose of. Just tap the soon-to-be-whacked picture to open it, and then tap the Trash icon that appears in the upper-right corner when you summon picture controls. To finish the job, tap the big red Delete Photo button. Or tap anywhere else on the screen if you have second thoughts and decide to keep the picture on your iPad.
Deleting photos in the Camera Roll albums or Photo Stream: Some pictures — namely, those you saved from an e-mail or web page and that now reside in the Camera Roll album or Photo Stream — are easy to dispose of. Just tap the soon-to-be-whacked picture to open it, and then tap the Trash icon that appears in the upper-right corner when you summon picture controls. To finish the job, tap the big red Delete Photo button. Or tap anywhere else on the screen if you have second thoughts and decide to keep the picture on your iPad.
 If you dispose of images in Photo Stream, the images are removed from the Photo Stream on all your devices.
![]() Deleting multiple photos in Camera Roll or Photo Stream: When the Saved Photos or Camera Roll or Photo Stream albums are open, tap the Edit button in the upper-right corner, and a red Delete button appears in the upper-left corner of the screen, though it’s somewhat dim. Now tap each photo that you want to get rid of; a check mark appears on each one and the red Delete button brightens. When you’ve identified the doomed bunch, tap Delete Selected Photos, or tap Cancel to save them.
Deleting multiple photos in Camera Roll or Photo Stream: When the Saved Photos or Camera Roll or Photo Stream albums are open, tap the Edit button in the upper-right corner, and a red Delete button appears in the upper-left corner of the screen, though it’s somewhat dim. Now tap each photo that you want to get rid of; a check mark appears on each one and the red Delete button brightens. When you’ve identified the doomed bunch, tap Delete Selected Photos, or tap Cancel to save them.
![]() Removing synced photos: The Trash icon appears only in the Saved Photos or Camera Roll album. That’s because the other pictures on your iPad — those you synced through your Mac or PC — must first be deleted from the photo album on your computer. Then when you resync those albums, the photos are no longer on your iPad.
Removing synced photos: The Trash icon appears only in the Saved Photos or Camera Roll album. That’s because the other pictures on your iPad — those you synced through your Mac or PC — must first be deleted from the photo album on your computer. Then when you resync those albums, the photos are no longer on your iPad.
Entering the Photo Booth
Remember the old-fashioned photo booths at the local 5 and Dime? Remember the 5 and Dime? Okay, if you don’t remember such variety stores, your parents probably do, and if they don’t, their parents no doubt do. The point is that photo booths (which still exist) are fun places to ham it up solo or with a friend as the machine captures and spits out wallet-size pictures.
In the Photo Booth app included on the iPad mini, Apple has cooked up a modern alternative to the real-life photo booth. The app is a close cousin to a similar application on the Mac. Here’s how Photo Booth works:
1. Tap the Photo Booth icon.
A red curtain opens, revealing the tic-tac-toe-style grid, as shown in Figure 9-8.

Figure 9-8: Photo booths of yesteryear weren’t like this.
2. Point the front-facing camera at your face.
You see your mug through a prism of eight rather wacky special effects: Thermal Camera, Mirror, X-Ray, Kaleidoscope, Light Tunnel, Squeeze, Twirl, and Stretch. The center square (what is this, Hollywood Squares?) is the only one in which you come off looking normal — or, as we like to kid, like you’re supposed to look.
You can also use the rear camera in Photo Booth to subject your friends to this form of, um, visual abuse.
3. Choose one of the special effects (or stick with Normal) by tapping one of the thumbnails.
Ed chose Mirror for the example shown in Figure 9-9, because, after all, two Eds are better than one. (Sorry — couldn’t resist.)
4. If you’re not satisfied with the effect you’ve chosen, tap the icon at the lower-left corner of the app to return to the Photo Booth grid and select another.
5. (Optional) After choosing an effect, doctor things up even further by pinching or unpinching with your fingers.

Figure 9-9: When one co-author just isn’t enough.
6. When you have your bizarre look just right, tap the shutter release on the screen to snap the picture.
Your pic lands (as do other pictures taken with the iPad cameras) in the Camera Roll album.
From the Camera Roll album, pictures can be shared or — you might want to seriously consider this, given the distortions you’ve just applied to your face — deleted.
Nah, we’re only kidding. Keep the image and take a lot more. Photo Booth may be a blast from the past. But it’s also a blast.
All materials on the site are licensed Creative Commons Attribution-Sharealike 3.0 Unported CC BY-SA 3.0 & GNU Free Documentation License (GFDL)
If you are the copyright holder of any material contained on our site and intend to remove it, please contact our site administrator for approval.
© 2016-2026 All site design rights belong to S.Y.A.