iPad mini For Dummies (2013)
Part III. The Multimedia iPad mini
Chapter 10. Curling Up with a Good iBook
In This Chapter
![]() Getting the skinny on e-books
Getting the skinny on e-books
![]() Opening up to iBooks
Opening up to iBooks
![]() Reading books
Reading books
![]() Shopping for iBooks
Shopping for iBooks
![]() Reading electronic periodicals
Reading electronic periodicals
Don’t be surprised if you have to answer this question from an inquisitive child someday: “Is it true, Grandpa, that people once read books on paper?”
That time may still be a ways off, but it somehow doesn’t seem as far-fetched any more, especially now that Apple has signed on as a major proponent of the burgeoning electronic books revolution.
Don’t get us wrong; we love physical books as much as anyone and are in no way urging their imminent demise. But we also recognize the real-world benefits behind Apple’s digital publishing efforts, and those by companies like Amazon, which manufactures what is, for now, the market-leading Kindle electronic reader. As you discover in this chapter, the Kindle plays a role on the iPad mini as well.
For its part, the iPad mini makes a terrific electronic reader, with color and dazzling special effects, including pages that like they’re in a paper book. You can even make the case that the iPad mini is a superior electronic reader than larger iPads because it’s closer in size to a paperback and is more easily carried in one hand or slipped into a jacket pocket.
We open the page on this chapter to see how to find and purchase books for your iPad, and how to read them after they land on your virtual bookshelf. But first we look at why you might want to read books and periodicals on your iPad.
Why E-Books?
We’ve run into plenty of skeptics who ask, “What’s so wrong with the paper books that folks have only been reading for centuries that we now have to go digital?” The short answer is that nothing is wrong with physical books — except maybe that paper, over the long term, is fragile, and they tend to be bulky, a potential impediment for travelers.
On the other hand, when asked why he prefers paper books, Bob likes to drop one from shoulder height and ask, “Can your iPad (or Kindle) do that?”
Having said that, though, now consider the electronic advantages:
![]() No more weight or bulk constraints: You can cart a whole bunch of e-books around when you travel, without breaking your back. The same goes for students on campus. To the avid bookworm, this potentially changes the whole dynamic in the way you read. Because you can carry so many books wherever you go, you can read whatever type of book strikes your fancy at the moment, kind of like listening to a song that fits your current mood. You have no obligation to read a book from start to finish before opening a new bestseller, just because that happens to be the one book, maybe two, that you have in your bag. In other words, weight constraints are out the window.
No more weight or bulk constraints: You can cart a whole bunch of e-books around when you travel, without breaking your back. The same goes for students on campus. To the avid bookworm, this potentially changes the whole dynamic in the way you read. Because you can carry so many books wherever you go, you can read whatever type of book strikes your fancy at the moment, kind of like listening to a song that fits your current mood. You have no obligation to read a book from start to finish before opening a new bestseller, just because that happens to be the one book, maybe two, that you have in your bag. In other words, weight constraints are out the window.
![]() Feel like reading a trashy novel? Go for it. Rather immerse yourself in classic literature? Go for that. You might read a textbook, cookbook, or biography. Or gaze in wonder at an illustrated beauty. What’s more, you can switch among the various titles and styles of books at will, before finishing any single title.
Feel like reading a trashy novel? Go for it. Rather immerse yourself in classic literature? Go for that. You might read a textbook, cookbook, or biography. Or gaze in wonder at an illustrated beauty. What’s more, you can switch among the various titles and styles of books at will, before finishing any single title.
![]() Flexible fonts and type sizes: With e-books, or what Apple prefers to call iBooks, you can change the text size and fonts on the fly — quite useful for people with less than 20/20 vision.
Flexible fonts and type sizes: With e-books, or what Apple prefers to call iBooks, you can change the text size and fonts on the fly — quite useful for people with less than 20/20 vision.
![]() Get the meaning of a word: No more searching for a physical dictionary. You can look up an unfamiliar word on the spot.
Get the meaning of a word: No more searching for a physical dictionary. You can look up an unfamiliar word on the spot.
![]() Search with ease: Need to do research on a particular subject? Enter a search term to find each and every mention of the subject in the book you’re reading.
Search with ease: Need to do research on a particular subject? Enter a search term to find each and every mention of the subject in the book you’re reading.
![]() Read in the dark: The iPad has a high-resolution backlit display so that you can read without a lamp nearby, which is useful in bed when your partner is trying to sleep.
Read in the dark: The iPad has a high-resolution backlit display so that you can read without a lamp nearby, which is useful in bed when your partner is trying to sleep.
![]() See all the artwork in color: Indeed, you’re making no real visual sacrifices anymore. For example, the latest iBooks software from Apple lets you experience (within certain limits) the kind of stunning art book once reserved for a coffee table. Or you can display a colorful children’s picture book.
See all the artwork in color: Indeed, you’re making no real visual sacrifices anymore. For example, the latest iBooks software from Apple lets you experience (within certain limits) the kind of stunning art book once reserved for a coffee table. Or you can display a colorful children’s picture book.
Truth is, there are two sides to this backlit story. The grayscale electronic ink displays found on Amazon’s Kindle and several other e-readers may be easier on the eyes and reduce fatigue, especially if you read for hours on end. And although you may indeed have to supply your own lighting source to read in low-light situations, those screens are easier to see than the iPad screen when you’re out and about in bright sunshine. And some newer E Ink-type readers from Amazon, Barnes & Noble, and others include displays that do light up.
 You can buy an iBook using iTunes on your Mac or PC, but as we write this, you can’t read that iBook using iTunes (or any other app we know of) on your Mac or PC. You can read iBooks from Apple’s iBookstore only on an iPhone, iPad, or iPod touch.
Beginning the iBook Story
To start reading iBooks on your iPad, you have to fetch the iBooks app in the App Store. (For more on the App Store, consult Chapter 11.)
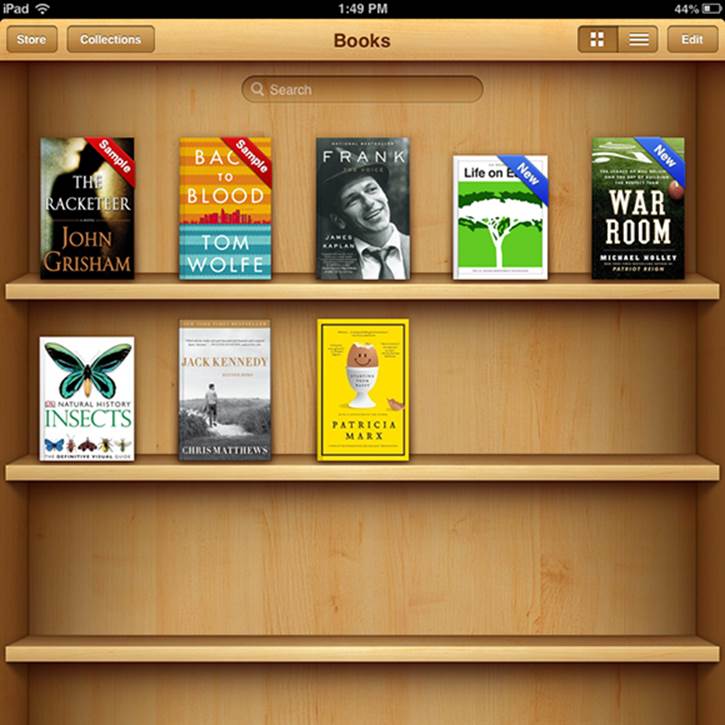
As you might imagine, the app is free, and it comes with access to Apple’s iBookstore, about which we have more to say later in this chapter. For now, just know that iBookstore is an inviting place to browse and shop for books 24 hours a day. All the other books you end up purchasing for your iPad library turn up on the handsome wooden bookshelf, as shown in Figure 10-1.
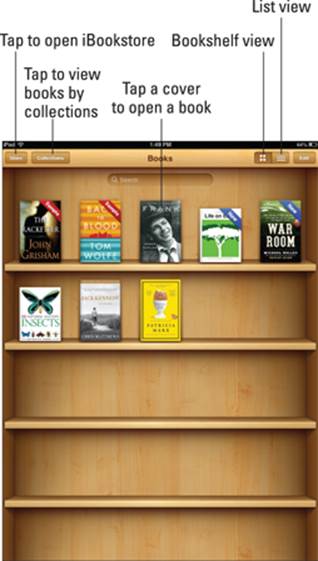
Figure 10-1: You can read a book by its cover.
Follow these guidelines to navigate the iBooks main screen:
![]() Change the view: If you prefer to view a list of your books rather than use this Bookshelf view, tap the button toward the upper-right corner of the screen (labeled in Figure 10-1). In this view, you can sort the list by title, author, or category (as shown in Figure 10-2), or you can rearrange where books appear on the bookshelf.
Change the view: If you prefer to view a list of your books rather than use this Bookshelf view, tap the button toward the upper-right corner of the screen (labeled in Figure 10-1). In this view, you can sort the list by title, author, or category (as shown in Figure 10-2), or you can rearrange where books appear on the bookshelf.
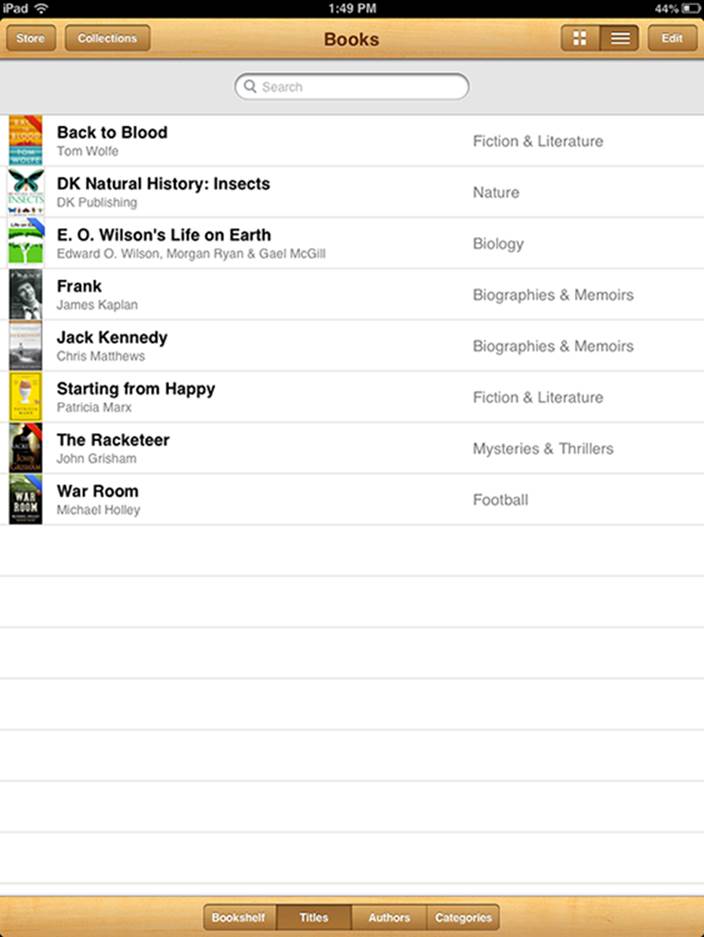
Figure 10-2: Sort a list of your books by title, author, category, or bookshelf.
![]() Rearrange books in Bookshelf view: Hold your finger on the book you want to move. Wait a second or two and it will increase in size slightly to let you know it’s now moveable. Without lifting your finger, drag the book to its new location and then release.
Rearrange books in Bookshelf view: Hold your finger on the book you want to move. Wait a second or two and it will increase in size slightly to let you know it’s now moveable. Without lifting your finger, drag the book to its new location and then release.
![]() Rearrange books in List view: Tap Edit (in the upper-right corner) and then press on the three horizontal lines to the right of the book you want to move. Now drag the book up or down the list.
Rearrange books in List view: Tap Edit (in the upper-right corner) and then press on the three horizontal lines to the right of the book you want to move. Now drag the book up or down the list.
![]() Remove a book from the bookshelf: In either view, tap Edit and then tap the book(s) you want to remove. Each book you tap displays a check mark; tap the book again to remove the check mark and thus deselect the book. When all the books you want to delete have check marks, tap the red Delete button at top left.
Remove a book from the bookshelf: In either view, tap Edit and then tap the book(s) you want to remove. Each book you tap displays a check mark; tap the book again to remove the check mark and thus deselect the book. When all the books you want to delete have check marks, tap the red Delete button at top left.
 As with other content you purchase from Apple, you can restore (download) any book you’ve purchased from the Purchased tab of the iBookstore.
![]() Organize books by collections: If you have a vast library of e-books, you might want to organize titles by genre or subject by creating collections of like-minded works. You might have collections of mysteries, classics, biographies, children’s books, how-to’s, textbooks — even all the For Dummies books you (hopefully) own. Apple has already created two collections on your behalf: books for all titles and PDFs for the Adobe PDF files you may have on your iPad. (Apple doesn’t let you edit or remove the premade Books or PDFs collections.) To create, rename, or remove a collection of your own, tap the Collections button (also labeled earlier, in Figure 10-1) to show off your current list of collections and choose from the following options:
Organize books by collections: If you have a vast library of e-books, you might want to organize titles by genre or subject by creating collections of like-minded works. You might have collections of mysteries, classics, biographies, children’s books, how-to’s, textbooks — even all the For Dummies books you (hopefully) own. Apple has already created two collections on your behalf: books for all titles and PDFs for the Adobe PDF files you may have on your iPad. (Apple doesn’t let you edit or remove the premade Books or PDFs collections.) To create, rename, or remove a collection of your own, tap the Collections button (also labeled earlier, in Figure 10-1) to show off your current list of collections and choose from the following options:
• Tap New to add a new collection.
• Tap Edit and the red circle with the white dash to delete a collection. Tap Delete to finish the job.
If the collection has books in it, you’re asked if you want to remove the contents of this collection from your iPad. If you choose not to remove them, they’re returned to their original collections (Books, PDFs, or any other collection).
• If you want to change the name of a collection, tap its name.
• If you want to move a book or PDF to a collection, go to the bookshelf, tap each work you want to move, and then tap Move. Select the new collection for these titles.
 A book can reside in only one collection at a time.
Of course, here we are telling you how to move or get rid of a book before you’ve even had a chance to read it. How gauche. The next section helps you start reading.
Reading a Book
To start reading a book, tap it. The book leaps off the shelf, and at the same time, it opens to either the beginning of the book or the place where you left off. (And you may have left off on an iPhone, iPod touch, or another iPad because, via your Apple ID, your virtual place in a book is transported from device to device as long as both devices have an Internet connection.)
Even from the title page, you can appreciate the color and beauty of Apple’s app as well as the navigation tools, as shown in Figure 10-3.
If you rotate the iPad to the side, the one-page book view becomes a two-page view, though all the navigational controls remain the same. On the newer multitouch books, you may have a scrolling view of a book (when you hold the iPad in portrait mode) rather than the typical one-page view. And you have the option of a scrolling display for any title by changing the Book theme to the Scroll theme. Tap the Fonts button, labeled in Figure 10-3, to do that.
 While you’re lounging around reading, and especially if you’re lying down, we recommend that you use the Screen Rotation Lock (shown in Chapter 1) to stop the iPad from inadvertently rotating the display.
You can take advantage of the iPad’s VoiceOver feature to have the iPad read aloud to you. It may not be quite like having Mom or Dad read you to sleep, but it can be a potential godsend for people with impaired vision. For more on the VoiceOver feature, consult Chapter 15.
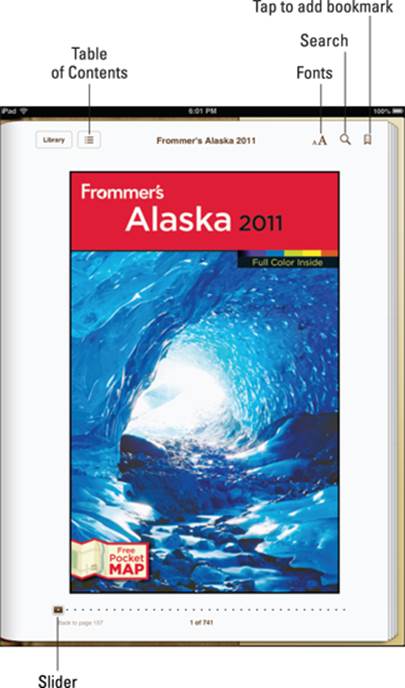
Figure 10-3: Books on the iPad offer handy reading and navigation tools.
The VoiceOver feature is useful under certain circumstances. But we’re not at the point where the iPad’s loquacious virtual assistant Siri can read a book aloud. Maybe someday. For now, Siri can open the iBooks app, though. Read Chapter 14 for more on Siri.
Turning pages
You’ve been turning pages in books your entire life, so you don’t want this simple feat to become a complicated ordeal just because you’re now reading electronically. Fear not, it’s not. You have no buttons to press.
Instead, to turn to the next page of a book, do any of the following:
![]() Tap or flick your finger near the right margin of the page. If you tap or flick, the page turns in a blink.
Tap or flick your finger near the right margin of the page. If you tap or flick, the page turns in a blink.
![]() Drag your finger near the margin, and the page folds down as it turns, as if you were turning pages in a real book.
Drag your finger near the margin, and the page folds down as it turns, as if you were turning pages in a real book.
![]() Drag down from the upper-right corner of the book, and the page curls from that spot. The effect is so authentic that you can make out the faint type bleeding from the previous page on the next folded-down page.
Drag down from the upper-right corner of the book, and the page curls from that spot. The effect is so authentic that you can make out the faint type bleeding from the previous page on the next folded-down page.
![]() Drag up from the lower-right corner, and the page curls up from that spot.
Drag up from the lower-right corner, and the page curls up from that spot.
![]() Drag from the middle-right margin, and the entire page curls.
Drag from the middle-right margin, and the entire page curls.
To turn to the previous page in a book, tap, flick, or drag your finger in a similar fashion, except now do so closer to the left margin. You’ll witness the same cool page-turning effects.
That’s what happens by default anyway. If you go into the main iPad Settings and tap iBooks under Apps on the left side of the screen, you have the option to go to the next page instead of to the previous page when you tap near the left margin.
The iPad is smart, remembering where you left off. So if you close a book by tapping the Library button in the upper-left corner or by pressing the main Home button, you automatically return to this page when you reopen the book. It isn’t necessary to bookmark the page (though you can, as we describe later in this chapter). The lone proviso: You need an Internet connection when you “close” the book, because, otherwise, the server at Apple doesn’t get the new bookmark info to pass on when you open the book on another device. And similarly, you need an Internet connection when you reopen it to retrieve the information that was passed on.
Jumping to a specific page
When you’re reading a book, you often want to go to a specific page. Here’s how:
1. Tap anywhere near the center of the page you’re reading to summon page navigator controls, if they’re not already visible.
The controls are labeled earlier, in Figure 10-3.
2. Drag your finger along the slider at the bottom of the screen until the chapter and page number you want appear.
3. Release your finger and — voilà — that’s where you are in the book.
Going to the table of contents
Most books you read on your iPad have tables of contents, just like many other books. Here’s how you use a table of contents on your iPad:
1. With a book open on your iPad, tap the Table of Contents button near the top of the screen.
The Table of Contents screen, as shown in Figure 10-4, appears.
2. Tap the chapter, title page, or another entry to jump to that page.
Alternatively, tap the Resume button that appears at the upper-left corner of the screen to return to the previous location in the book.
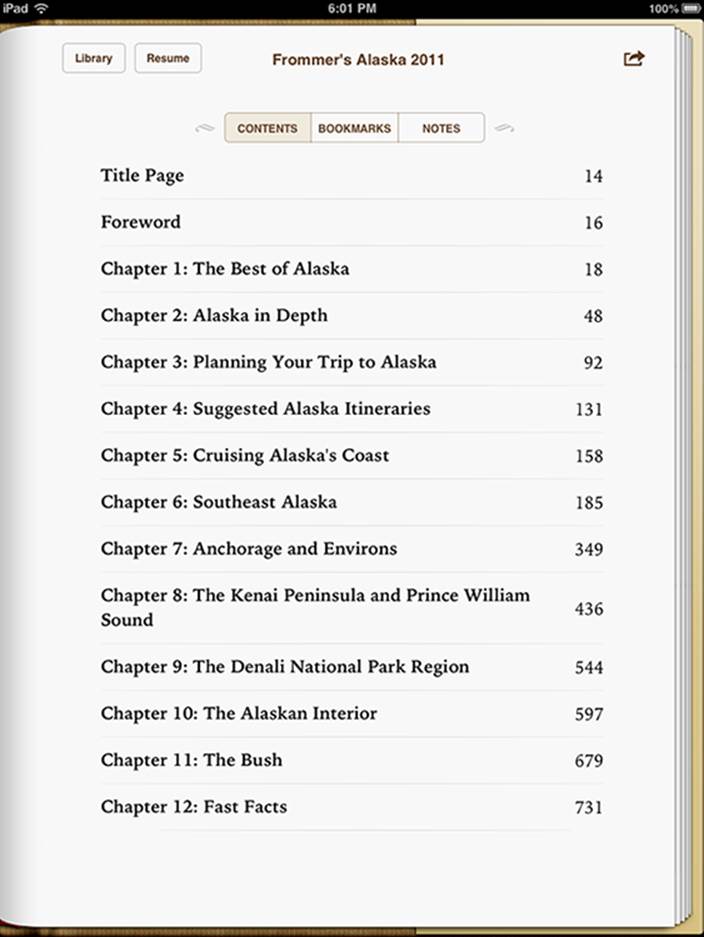
Figure 10-4: The table of contents for Frommer’s Alaska 2011.
Adding bookmarks
Moving around to a particular location on the iPad is almost as simple as moving in a real book, and as we explain in the earlier section “Turning pages,” Apple kindly returns you to the last page you were reading when you closed a book.
Still, occasionally, you want to bookmark a specific page so that you can easily return to it. To insert a bookmark somewhere, merely tap the Bookmark icon near the upper-right reaches of the screen. A red ribbon slides down over the top of the Bookmark icon, signifying that a bookmark is in place. Tap the ribbon if you want to remove the bookmark. Simple as that.
After you set a bookmark, here’s how to find it later:
1. Tap the Table of Contents/Bookmark button.
2. Tap Bookmarks (if it’s not already selected).
Your bookmark is listed along with the chapter and page citations, the date you bookmarked the page, and a phrase or two of surrounding text, as the example in Figure 10-5 shows.
3. Tap a bookmark to return to that page in the book.
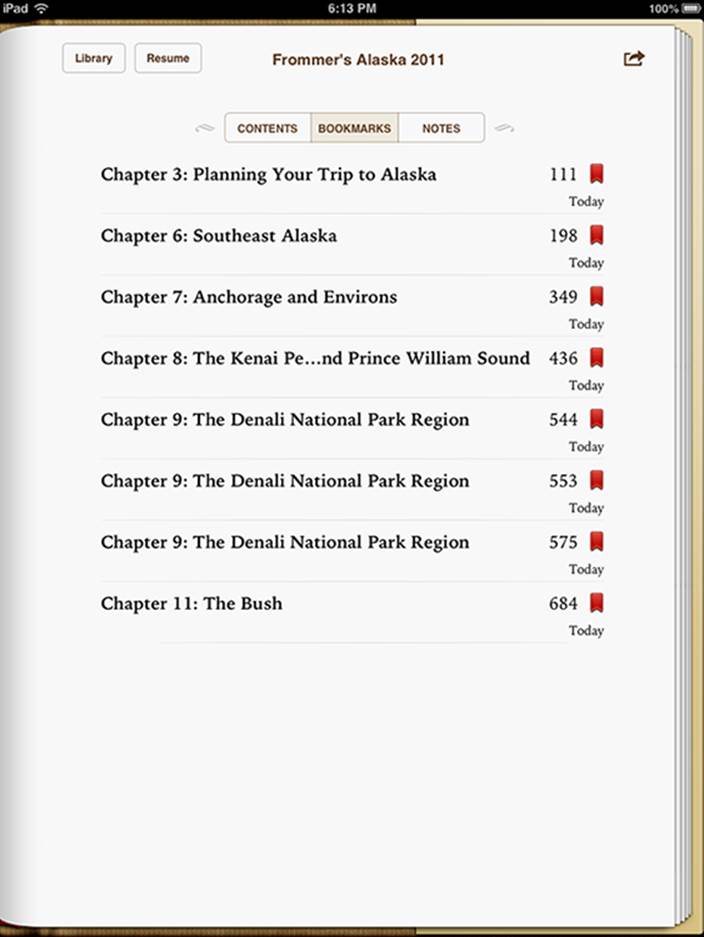
Figure 10-5: Finding the pages you bookmarked.
You can also remove a bookmark from the Bookmarks list by swiping your finger in either direction along a bookmark and then tapping the red Delete button that appears.
Adding highlights and notes
Bookmarks are great for jumping to pages you want to read again and again. Of course, you may instead want to highlight specific words or passages within a page. And sometimes you want to add your own annotations or comments, which is handy for school assignments. Pardon the pun, but Apple is on the same page. Here’s how to do both:
1. Press and hold your finger against any text on a page. Then lift your finger to summon the Highlight and Note buttons.
These two buttons appear side by side, sandwiched along with the Define and Search buttons that we address in a moment.
You see grab points along the highlighted word.
2. (Optional) Refine the highlighted section by expanding the grab points.
3. Choose a button to add a highlight or note:
• When you tap the Highlight button, the word or passage you selected is highlighted in yellow. You can later read the highlight by returning to the Table of Contents page in the same way that you find a bookmark. (See the preceding section, and refer to Figure 10-5.)
• Tap Note, and a Post-it–like note appears on the screen. Using the virtual keyboard, type your note.
After you add a highlight or note, the following tips are handy to know:
![]() To remove a highlight or note: Tap the highlighted text or note and, from the toolbar that appears, tap the circle icon with a red line running diagonally inside. Alternatively, from the Highlights & Notes section under the Bookmarks list, swipe your finger in either direction along an entry and tap the red Delete button that appears.
To remove a highlight or note: Tap the highlighted text or note and, from the toolbar that appears, tap the circle icon with a red line running diagonally inside. Alternatively, from the Highlights & Notes section under the Bookmarks list, swipe your finger in either direction along an entry and tap the red Delete button that appears.
![]() To change the highlighted color of a highlight or note: You can change the color from the default yellow to green, blue, pink, or purple. And you can underline. Touch the highlighted selection for a moment and lift your finger. From the toolbar, tap the icon with the color that you prefer.
To change the highlighted color of a highlight or note: You can change the color from the default yellow to green, blue, pink, or purple. And you can underline. Touch the highlighted selection for a moment and lift your finger. From the toolbar, tap the icon with the color that you prefer.
![]() To e-mail or print notes: From the Table of Contents page, in the upper-right corner of the screen, tap the Action button (it looks like an arrow trying to escape a rectangle). Tap Email to e-mail your notes, or tap Print to print them (provided you have a compatible printer). See Chapter 2 for details about printing. Meanwhile, to see other possibilities for notes and iBooks generally, read the nearby sidebar, “The iPad goes to school.”
To e-mail or print notes: From the Table of Contents page, in the upper-right corner of the screen, tap the Action button (it looks like an arrow trying to escape a rectangle). Tap Email to e-mail your notes, or tap Print to print them (provided you have a compatible printer). See Chapter 2 for details about printing. Meanwhile, to see other possibilities for notes and iBooks generally, read the nearby sidebar, “The iPad goes to school.”
The iPad goes to school
Apple has been pushing the use of the iPad in K–12 and higher education. As part of its vision for the iPad and with the iBooks 3 app, the company is throwing its considerable weight behind digital textbooks, works that include interactive captions, quizzes, 3D objects, and video. Apple even unveiled free software for the Mac, iBooks Author, to encourage teachers and others to produce their own interactive books for learning.
In the meantime, among the early high school textbooks produced for the iPad are titles that cover algebra, environmental sciences, physics, and other subjects.
E. O. Wilson’s Life on Earth is an especially rich, interactive, digital biology textbook like none you’ve seen, from 3D models of DNA to animated maps of global photosynthesis. The introduction to the book was made available for free, after which you can purchase additional chapters as they’re released — $1.99 as this book was being published. (In general, publishers will have to work out pricing on most of the emerging textbooks.)
Meanwhile, if a book supports it, you can turn your notes into study cards — a great way for students to learn vocabulary or prepare for exams. (If the option is available, you see an icon that looks like a notepad just to the right of the Table of Contents button.) You can swipe the cards to move from one to another, or tap a card to see one side with glossary terms or material you’ve highlighted, on the other any notes you’ve supplied. At the time we wrote this book, there weren’t a lot of new textbooks that supported Apple’s vision. But with the backing of such prominent textbook publishers as Houghton Mifflin Harcourt, McGraw-Hill, and Pearson, it would appear to be only a matter of time. What’s more, it’s worth noting that some third-party publishers such as Kno and Inkling are also producing some very interesting interactive textbooks.
According to Apple, hundreds of thousands of books in the iBookstore can be used in school curriculums, including novels for English or social studies. It’s also worth noting that some of the books are accessible via the iTunes U app.
As you consider these various efforts, we understand if you wish you had owned an iPad with digital textbooks back when you were in school.
We should also point out that although educational materials are the main impetus behind iBooks 2 and iBooks 3 for iPad, other books rich in audio, video, and other interactive materials take full advantage of Apple’s latest software. One example: George Harrison Living In the Material World, a handsome $14.99 book written by the ex-Beatle’s widow, Olivia Harrison. You can view it only on an iPad with iBooks 2 or later software.
Changing the type size, font, and page color
If you want to enlarge the typeface size (or make it smaller), here’s how:
1. Tap the Text Size and Fonts button, labeled earlier, in Figure 10-3, at the upper-right corner of the screen.
2. Tap the uppercase A.
The text swells right before your eyes so that you can pick a size that’s comfortable for you.
To make the font smaller, tap the lowercase a instead.
If you want to change the fonts, tap the Text Size, Themes, and Fonts button, and then tap Fonts and the font style you want to switch to. Your choices at this time are Original (the default), Athelas, Charter, Georgia, Iowan, Palatino, Seravek, and Times New Roman. We don’t necessarily expect you to know what these look like just by their font names — fortunately, you get to examine the change right before your eyes. A check mark indicates the selected font style.
To change the page color, tap Theme and pick Normal (the default), Sepia, or Night. While you’re there, you can slide the Full Screen button to On if you want more of the content to stretch out across the entire page. As we mention earlier in this chapter, you can also choose tap Themes and then Scroll to scroll while you’re reading on a page.
Searching inside and outside a book
If you want to find a passage in a book but just can’t remember where it is, try searching for it. Here’s how:
1. Tap the magnifying glass Search icon to enter a search word(s) or page number on the virtual keyboard that slides up from the bottom.
All the occurrences in the book turn up in a window under the Search icon, complete with a few lines of text and a page citation.
2. Tap one of the items to jump to that portion of the book.
The words you were searching for are highlighted on that page.
You can also search the web (via Google) or the Wikipedia online encyclopedia by using the corresponding buttons at the bottom of the search results. If you do so, the iBooks app closes, and the Safari browser fires up Google or Wikipedia, with your search term already entered.
If you search Google or Wikipedia in this fashion, you are, for the moment, closing the iBooks application and opening Safari. To return to the book you’re reading, you must reopen the app. Fortunately, you’re brought back to the page in the book where you left off.
Shopping for E-Books
We love browsing in a physical bookstore. But the experience of browsing Apple’s iBookstore, although certainly different, is equally pleasurable. Apple makes it a cinch to search for books you want to read, and even lets you peruse a sample prior to parting with your hard-earned dollars. To enter the store, tap the Store button in the upper-left corner of your virtual bookshelf or your library List view.
A few things to keep in mind: The iBooks app and iBookstore are available to the United States, Canada, Australia, and 29 European countries, including the U.K., Germany, and France. Apple’s iBookstore had more than 700,000 titles for U.S. customers at the time our book was being published, including some works — Jay-Z’s memoir Decoded, for example — that are enhanced with video. Outside American soil, hundreds of thousands are available, Apple says. Folks can read iBooks in more than 40 languages. Meanwhile, the store includes titles from all six major trade publishers: Hachette Book Group, HarperCollins, Macmillan, Penguin Group, Simon & Schuster, and Random House, as well as several independents. John Wiley & Sons is also represented, of course. Random House had been the only holdout among big-name publishers when Apple first launched the iBookstore, but the largest trade-book publisher in the United States finally came aboard.
Publishers, not Apple, set the prices. Many bestsellers in the joint cost $12.99, though some fetch $9.99 or less. In fact, Apple even has a $9.99-or-less section, the virtual equivalent of the bargain rack. And free selections are available. On the other hand, Walter Isaacson’s Steve Jobs bio commands $16.99.
Just browsing iBookstore
You have several ways to browse for books in the iBookstore. The top portion of the screen shows ever-changing ads for books that fit a chosen category, such as Children & Teens in the example shown in Figure 10-6, or All Categories. But you can also browse subsections. In the Children & Teens example, you see Recent Releases, New Teen Fiction, or, by scrolling down, Children’s Picture Books. You see different choices, of course, in other categories. Choose Mysteries & Thrillers as the underlying category and you’ll find the Hard-Boiled section. One subsection under Romance is Paranormal Romance (we won’t comment). Tap See All for many more selections in whatever subsections you choose.

Figure 10-6: The featured Children & Teens page.
Look at the bottom of the screen. You see the following icons:
![]() Books: This is where you’ve been hanging out so far in this chapter. Featured works are the books being promoted in the store. These may include popular titles or an author spotlight from the likes of Twilight writer Stephenie Meyer. Swipe the featured books at the top of the screen for more choices. You can narrow your choices to fiction or nonfiction or tap More to choose by category. Tap See All for more selections.
Books: This is where you’ve been hanging out so far in this chapter. Featured works are the books being promoted in the store. These may include popular titles or an author spotlight from the likes of Twilight writer Stephenie Meyer. Swipe the featured books at the top of the screen for more choices. You can narrow your choices to fiction or nonfiction or tap More to choose by category. Tap See All for more selections.
![]() NYTimes: Short for The New York Times, of course. These books make the newspaper’s famous bestsellers lists, which are divided into fiction and nonfiction works. The top books in each list are initially shown. Scroll down to see more titles.
NYTimes: Short for The New York Times, of course. These books make the newspaper’s famous bestsellers lists, which are divided into fiction and nonfiction works. The top books in each list are initially shown. Scroll down to see more titles.
![]() Top Charts: Apple shows you the most popular books in the iBookstore. You find a list for paid books and one for free books. Scroll down to see more of the top books in each category.
Top Charts: Apple shows you the most popular books in the iBookstore. You find a list for paid books and one for free books. Scroll down to see more of the top books in each category.
![]() Top Authors: Are you a fan of Stephen King? Or Barbara Kingsolver? Tapping the Top Authors icon lets you find books by poring through a list of popular authors, shown in a scrollable pane on the left half of the screen. Flick your finger up or down to scroll the list, or tap one of the letters in the margin to jump to authors whose name begins with that letter. When you tap an author’s name, a list of his or her available titles appears in a scrollable pane on the right.
Top Authors: Are you a fan of Stephen King? Or Barbara Kingsolver? Tapping the Top Authors icon lets you find books by poring through a list of popular authors, shown in a scrollable pane on the left half of the screen. Flick your finger up or down to scroll the list, or tap one of the letters in the margin to jump to authors whose name begins with that letter. When you tap an author’s name, a list of his or her available titles appears in a scrollable pane on the right.
![]() Purchased: Tapping here shows you the books you’ve already bought, which you can download onto your iPad. In this area, you can also check out your iTunes account information, tap a button that transports you to iTunes customer service, and redeem any iTunes gift cards or gift certificates.
Purchased: Tapping here shows you the books you’ve already bought, which you can download onto your iPad. In this area, you can also check out your iTunes account information, tap a button that transports you to iTunes customer service, and redeem any iTunes gift cards or gift certificates.
Searching iBookstore
In the upper-right corner of the iBookstore is the Search Store field, similar to the Search field you see in iTunes. Using the virtual keyboard, type an author name or title to find the book you seek.
If you like freebies, search for free in the iBookstore. You’ll find tons of (mostly classic) books that cost nothing, and you don’t even have to import them. See the section “Finding free books outside iBookstore,” later in this chapter, for more places to find free books. By Apple’s count, free content is distributed in 155 countries. Off the top of our heads, we can’t remember how many countries are on Planet Earth. But it’s fair to say that when it comes to digital books, Apple has most of them covered.
Deciding whether a book is worth it
To find out more about a book that you come across in the iBookstore, you can check out the detail page and other readers’ reviews or read a sample of the book:
![]() Find the book’s details. Tap its cover. An information screen appears with Details highlighted by default. You can see when the book was published, read a description, and more.
Find the book’s details. Tap its cover. An information screen appears with Details highlighted by default. You can see when the book was published, read a description, and more.
![]() Find ratings and reviews. Tap Ratings and Reviews to see the grades and comments bestowed on the book by other readers.
Find ratings and reviews. Tap Ratings and Reviews to see the grades and comments bestowed on the book by other readers.
You can throw in your own two cents, if you’ve already read it, by tapping Write a Review.
![]() Find other books by the same author. Tap Related to see the covers of other books written by the author.
Find other books by the same author. Tap Related to see the covers of other books written by the author.
![]() Share your interest in a book. Tap the Action button in the upper-right corner of the information screen. You can then sing the praises of a book by tapping icons for Email, Message, Twitter, and Facebook. You can also tap Copy Link.
Share your interest in a book. Tap the Action button in the upper-right corner of the information screen. You can then sing the praises of a book by tapping icons for Email, Message, Twitter, and Facebook. You can also tap Copy Link.
Of course, the best thing you can do to determine whether a book is worth buying is to read a sample. Tap Sample, and the book cover almost immediately lands on your bookshelf. You can read it like any book, until that juncture in the book where your free sample ends. Apple has placed a Buy button inside the pages of the book to make it easy to purchase it if you’re hooked. The word Sample is plastered on the cover on the bookshelf, to remind you that this book isn’t quite yours — yet.
Buying a book from iBookstore
Assuming that the book meets or exceeds your lofty standards, and you’re ready to purchase it, here’s how to do so:
1. Tap the price shown in the gray button on the book’s information page.
After you do so, the dollar amount disappears, and the button becomes green and carries the Buy Book label. If you tap a free book instead, the button is labeled Get Book.
2. Tap the Buy Book/Get Book button.
3. Enter your iTunes password to proceed with the transaction.
The book appears on your bookshelf in an instant, ready for you to tap it and start reading. You get an e-mail receipt acknowledging your purchase via the same mail account in which you receive other receipts from iTunes for music, movies, and apps.
If you buy another book within 15 minutes of your initial purchase, you aren’t prompted for your iTunes password again.
Buying books beyond Apple
The business world is full of examples where one company competes with another on some level only to work with it as a partner on another level. When the iPad first burst onto the scene in early April 2010, pundits immediately compared it to Amazon’s Kindle, the market-leading electronic reader. Sure, the iPad had the larger screen and color, but the Kindle had a few bragging points too, including a longer battery life (up to about a month on the latest Kindle versus about 10 hours for the iPad), a lighter weight, and a larger selection of books in its online bookstore.
But Amazon has long said that it wants Kindle books to be available for all sorts of electronic platforms, and the iPad, like the iPhone and iPod touch before it, is no exception. So, we recommend taking a look at the free Kindle app for the iPad, especially if you’ve already purchased a number of books in Amazon’s Kindle Store and want access to that wider selection of titles.
The Barnes & Noble NOOK app is also worth a look. In fact, both Barnes & Noble and Amazon are competing against the iPad mini with smaller-screen (and less expensive) tablets: Nook Tablet and Kindle Fire and Kindle Fire HD, respectively. Google is doing the same with the Nexus 7 tablet (with its Google Play app).
Meanwhile, we haven’t tried them all, and we know it’s hard enough competing against Apple (or Amazon). But we’d be selling our readers short if we didn’t at least mention that you can find several other e-book–type apps for the iPad in the App Store. As this book goes to press, you can have a look at the following apps, just to name a few:
![]() CloudReaders from Satoshi Nakajima (free)
CloudReaders from Satoshi Nakajima (free)
![]() Free e-books by Kobo
Free e-books by Kobo
![]() Stanza from Lexcycle (free), owned by Amazon
Stanza from Lexcycle (free), owned by Amazon
![]() Bluefire Reader from Bluefire Productions
Bluefire Reader from Bluefire Productions
See Chapter 11 for details about finding and downloading apps.
Finding free books outside iBookstore
 Apple supports a technical standard — ePub, the underlying technology behind thousands of free public-domain books. You can import these to the iPad without shopping in the iBookstore. Such titles must be DRM-free, which means that they’re free of digital rights restrictions.
To import an ePub title, you can download it to your Mac or PC (assuming that it isn’t already there) and then sync it to the iPad through iTunes. There are other methods. If you have Dropbox, for example, you can bring an ePub into your account, and from Dropbox you can share the title with iBooks. You can also e-mail it as an attachment.
You can find ePub titles at numerous cyberspace destinations, among them
![]() Feedbooks: www.feedbooks.com
Feedbooks: www.feedbooks.com
![]() Google Play: http://play.google.com/store/books (Not all the books here are free, and Google has a downloadable app.)
Google Play: http://play.google.com/store/books (Not all the books here are free, and Google has a downloadable app.)
![]() Project Gutenberg: www.gutenberg.us
Project Gutenberg: www.gutenberg.us
![]() Smashwords: www.smashwords.com
Smashwords: www.smashwords.com
![]() Baen: www.baen.com
Baen: www.baen.com
Also, check out the free titles that you can find through the apps mentioned in the previous section.
Reading Newspapers and Magazines
People in the newspaper business know that it’s been tough sledding in recent years. The Internet, as it has in so many areas, has proved to be a disruptive force in media.
It remains to be seen what role Apple generally, and the iPad specifically, will play in the future of electronic periodicals or in helping to turn around sagging media enterprises. It’s also uncertain which pricing models will make the most sense from a business perspective.
What we can tell you is that reading newspapers and magazines on the iPad is not like reading newspapers and magazines in any other electronic form. The experience is slick, but only you can decide whether it’s worth paying the tab (in the cases where you do have to pay).
There are two paths you might follow to subscribe to or read a single issue of a newspaper or magazine. The first path includes several fine publishing apps worth checking out, including USA TODAY (where Ed works), The Wall Street Journal, TIME magazine, The New York Times, The New Yorker, Reuters News Pro, BBC News, Vanity Fair, and Popular Science. We also highly recommend fetching the free Zinio app, which offers publications including Rolling Stone, The Economist, Macworld, Newsweek, PC Magazine Digital Edition, Car and Driver, National Geographic Interactive, Spin, Bloomberg Businessweek, and many more. You can buy single issues of a magazine or subscribe, and you can sample and share a certain number of articles without a subscription.
You have to pay handsomely or subscribe to some of these newspapers and magazines, which you find not in the iBookstore but in the regular App Store, which we cover in Chapter 11. You also see ads (somebody has to pay the freight).
The second path is Newsstand. This handy icon on your Home screen purports to gather all your newspaper and magazine subscriptions in a single place. Newsstand is a special type of folder rather than an app.
You purchase subscriptions in a section of the App Store, which you can also get to by tapping Newsstand on your Home screen and then tapping the Store button, which opens the App Store (see Chapter 11) to the new Subscriptions section.
Numerous publications have adopted the Newsstand paradigm, though some choose custom apps or Zinio, and many do both.
All materials on the site are licensed Creative Commons Attribution-Sharealike 3.0 Unported CC BY-SA 3.0 & GNU Free Documentation License (GFDL)
If you are the copyright holder of any material contained on our site and intend to remove it, please contact our site administrator for approval.
© 2016-2026 All site design rights belong to S.Y.A.