iPad mini For Dummies (2013)
Part III. The Multimedia iPad mini
Chapter 8. iPad mini Video: Seeing Is Believing
In This Chapter
![]() Finding and playing videos
Finding and playing videos
![]() Restricting movies
Restricting movies
![]() Capturing, editing, and deleting video on your iPad
Capturing, editing, and deleting video on your iPad
![]() Facing up to FaceTime
Facing up to FaceTime
Picture this scene: The smell of popcorn permeates the room as you and your family congregate to watch the latest Hollywood blockbuster. A motion picture soundtrack swells up. The images on the screen are stunning. And all eyes are fixed on the iPad.
Okay, here comes the reality check. The iPad mini won’t replace a wall-size, high-definition television as the centerpiece of your home theater (though, as you discover, you can watch material that originates on the iPad on the bigger screen). But the 7.9-inch screen on your mini is very good, if not quite up to high-definition standards or the beautiful Retina display on the most recent full-size iPads. (In technical terms, it has 1024-by-768-pixel resolution at 163 pixels per inch.)
The bottom line: Watching movies and other videos on Apple’s new mini tablet is a cinematic treat. What’s more, your mini is equipped with front and rear cameras that can help turn you, under certain circumstances, into a filmmaker — directly from the device.
And video on the iPad ventures into another area: video chat. You can keep in touch with friends and loved ones by gazing into each other’s pupils. It’s all done through a version of FaceTime, a clever video chat program that comes with your iPad mini. In the interest of equal time, we’d like to point out that you can also do video chats on your iPad by downloading a popular third-party app, such as Skype.
We get to FaceTime later in this chapter. For now, and with no further ado, we get on with the show!
Finding Stuff to Watch
You have a few main ways to find and watch videos on your iPad mini. You can fetch all sorts of fare from the iTunes Store, whose virtual doors you can open directly from the iPad.
Or you can sync content that already resides on your Mac or PC. (If you haven’t done so yet, now is as good a time as any to read Chapter 3 for all the details on syncing.)
The videos you can watch on the iPad generally fall into one of the following categories:
![]() Movies, TV shows, and music videos from the iTunes Store: You can watch these by tapping the Videos icon on the Home screen.
Movies, TV shows, and music videos from the iTunes Store: You can watch these by tapping the Videos icon on the Home screen.
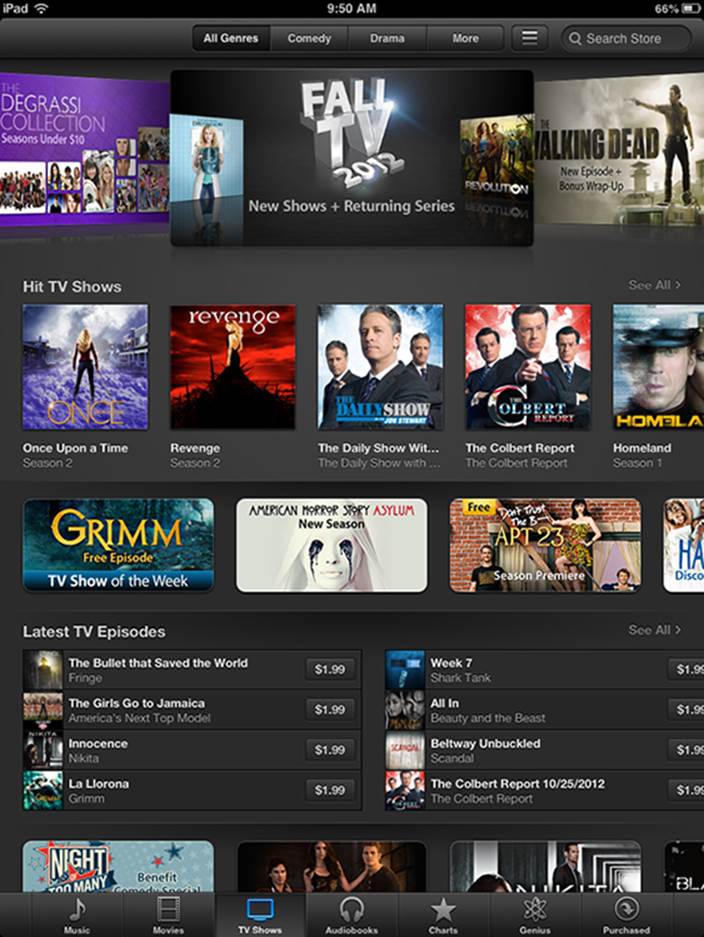
The iTunes Store features dedicated sections for purchasing or renting episodes of TV shows, as shown in Figure 8-1, and for buying or renting movies, as shown in Figure 8-2.
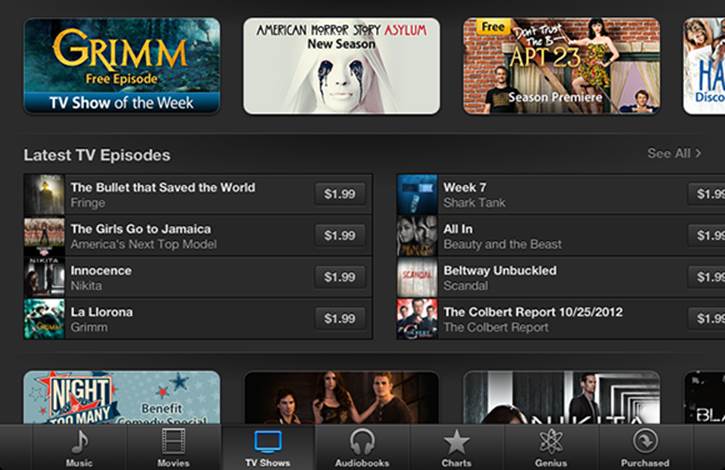
Figure 8-1: Buying and watching TV on the iPad is gleeful.
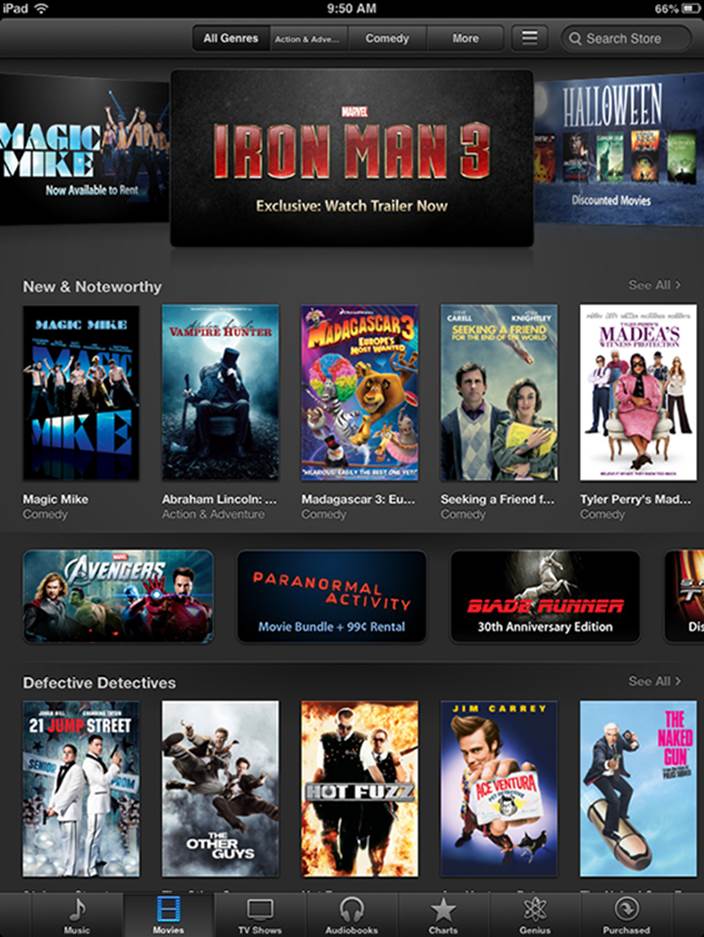
Figure 8-2: You can spend hours watching movies on the iPad.
Pricing varies, but it’s not atypical as of this writing to fork over $1.99 to pick up an episode of a popular TV show in standard definition or $2.99 for high-def versions. You can rent certain shows commercial-free for 99 cents. And a few shows are free. You can also purchase a complete season of a favorite show. The final season of a classic show, such as Lost, for example, costs $24.99 in standard-def and $34.99 in high-def.
A new release feature film typically costs $19.99 in high definition or $14.99 in standard def. But you can find HD movies for as little as $9.99 and sometimes even cheaper than that.
You can also rent many movies, typically for $2.99, $3.99, or $4.99. We’re not wild about current rental restrictions — you have 30 days to begin watching a rented flick and a day to finish watching after you’ve started, though you can watch as often as you want during the 24-hour period. But that’s showbiz for you. Such films appear in their own Rented Movies section in the video list, which you get to by tapping Videos. The number of days before your rental expires displays.
As shown in Figure 8-3, by tapping a movie listing in iTunes, you can generally preview a trailer before buying (or renting) and check out additional tidbits: the plot summary, credits, reviews, and customer ratings, as well as other movies that appealed to the buyer of this one. And you can search films by genre or top charts (the ones other people are buying or renting) or rely on the Apple Genius feature for recommendations based on stuff you’ve already watched. (Genius works for movies and TV much the way it works for music, as we explain in Chapter 7.)
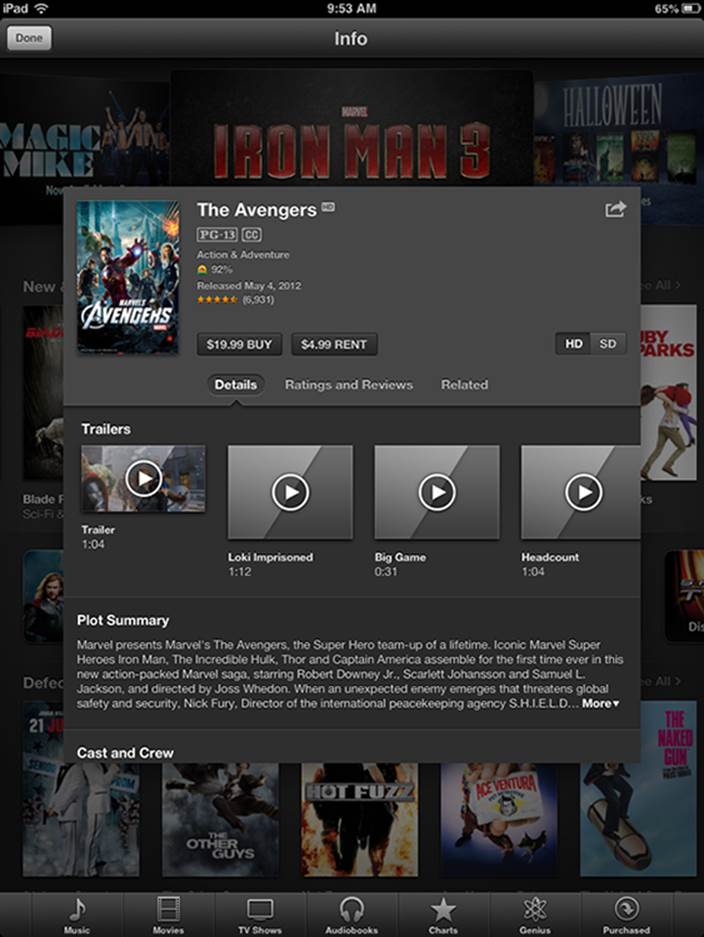
Figure 8-3: Bone up on a movie before buying or renting it.
![]() The boatload of video podcasts, just about all free, featured in the iTunes Store on your computer: Podcasts started out as another form of Internet radio, although, rather than listen to live streams, you download files onto your computer or iPod to take in at your leisure. You can still find lots of audio podcasts, but the focus here is on video. You can watch free episodes that cover Sesame Street videos, sports programming, investing strategies, political shows (across the ideological spectrum), and so much more. You can access these on your iPad via Apple’s free Podcasts app.
The boatload of video podcasts, just about all free, featured in the iTunes Store on your computer: Podcasts started out as another form of Internet radio, although, rather than listen to live streams, you download files onto your computer or iPod to take in at your leisure. You can still find lots of audio podcasts, but the focus here is on video. You can watch free episodes that cover Sesame Street videos, sports programming, investing strategies, political shows (across the ideological spectrum), and so much more. You can access these on your iPad via Apple’s free Podcasts app.
![]() Videos that play via entertainment apps: For example, Netflix offers an app that enables you to use your Netflix subscription, if you have one, to stream video on your iPad. We like it so much, it made our list of favorites in Chapter 18. In summer 2012, Amazon added its appealing Amazon Instant Video streaming app for members of its service. Similarly, the ABC television network offers an appealing app so that you can catch up on its shows on your iPad. The Hulu Plus subscription app also lets you catch up on favorite TV. And if you’re an HBO subscriber, go for the HBO Go app.
Videos that play via entertainment apps: For example, Netflix offers an app that enables you to use your Netflix subscription, if you have one, to stream video on your iPad. We like it so much, it made our list of favorites in Chapter 18. In summer 2012, Amazon added its appealing Amazon Instant Video streaming app for members of its service. Similarly, the ABC television network offers an appealing app so that you can catch up on its shows on your iPad. The Hulu Plus subscription app also lets you catch up on favorite TV. And if you’re an HBO subscriber, go for the HBO Go app.
![]() Seminars at Harvard, Stanford, or numerous other prestigious institutions: iTunes U boasts more than 500,000 free lectures from around the world, many of them videos, in what Apple calls the world’s largest catalog of educational content. In early 2012, Apple created a free iTunes U app, shown in Figure 8-4, so you no longer go directly through the iTunes Store to “enroll” in such lectures. Better yet, you get no grades, and you don’t have to apply for admission, write an essay, or do homework. But you can take notes while watching. Some interactive textbook e-books (see Chapter 10) can also be accessed via iTunes U. Bring on our sheepskins.
Seminars at Harvard, Stanford, or numerous other prestigious institutions: iTunes U boasts more than 500,000 free lectures from around the world, many of them videos, in what Apple calls the world’s largest catalog of educational content. In early 2012, Apple created a free iTunes U app, shown in Figure 8-4, so you no longer go directly through the iTunes Store to “enroll” in such lectures. Better yet, you get no grades, and you don’t have to apply for admission, write an essay, or do homework. But you can take notes while watching. Some interactive textbook e-books (see Chapter 10) can also be accessed via iTunes U. Bring on our sheepskins.
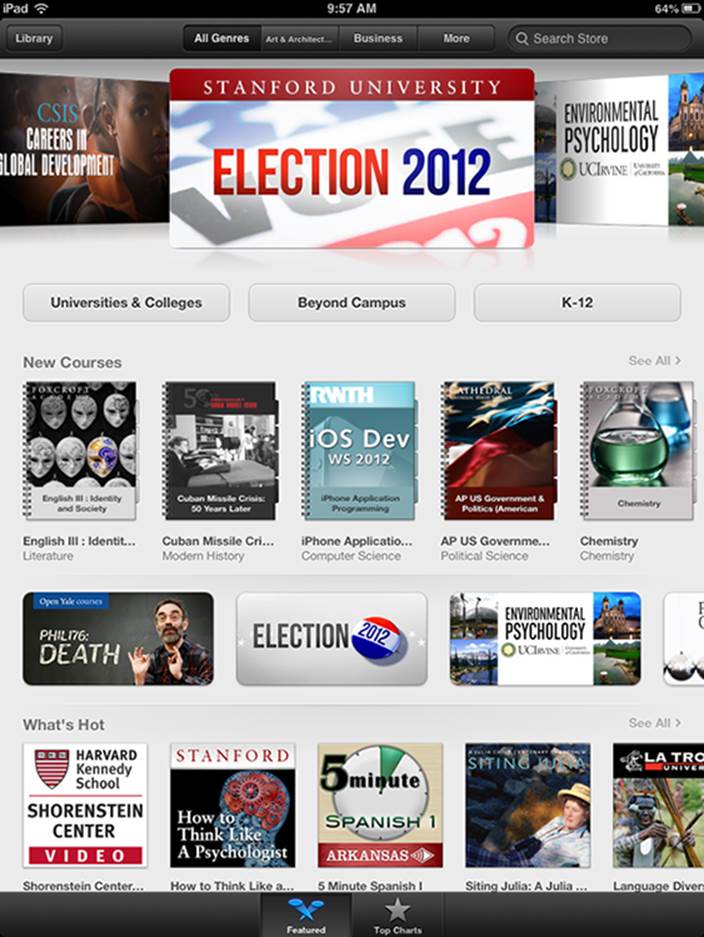
Figure 8-4: Get smart. iTunes U offers a slew of lectures on diverse topics.
![]() The movies you’ve created in iMovie software or other software on the Mac or, for that matter, other programs on the PC: Plus, you can view all the other videos you may have downloaded from the Internet, though sometimes you must convert these to a format the iPad recognizes.
The movies you’ve created in iMovie software or other software on the Mac or, for that matter, other programs on the PC: Plus, you can view all the other videos you may have downloaded from the Internet, though sometimes you must convert these to a format the iPad recognizes.
![]() Videos you’ve given birth to using the rear- or front-facing camera on the iPad mini: Oh, and now a version of iMovie is made especially for iPads with cameras. The optional app costs $4.99. Check out the “Shooting Your Own Videos” section, later in this chapter, for direction on creating movies with the iPad.
Videos you’ve given birth to using the rear- or front-facing camera on the iPad mini: Oh, and now a version of iMovie is made especially for iPads with cameras. The optional app costs $4.99. Check out the “Shooting Your Own Videos” section, later in this chapter, for direction on creating movies with the iPad.
You may have to prepare some videos so that they’ll play on your iPad. To do so, highlight the video in question after it resides in your iTunes library. In iTunes, choose Advanced⇒Create iPad or Apple TV Version. Alas, creating an iPad version of a video doesn’t work for all the video content you download off the Internet, including video files in the AVI, DivX, MKV, Flash, WMV, and Xvid formats.
 For a somewhat technical workaround without potential conversion hassles, try the $2.99 Air Video app from InMethod s.r.o. The utility app can deliver AVI, DivX, MKV, and other videos that wouldn’t ordinarily play on your iPad. You can also check out a limited free version. You have to download the free Air Video Server software to your Mac or PC to stream content to your iPad. Or try the excellent (and free) HandBrake application (from www.handbrake.fr) to convert most video formats to iPad-compatible versions.
For more on compatibility, check out the nearby “Are we compatible?” sidebar (but read it at your own risk).

Are we compatible?
The iPad works with a whole bunch of video, although not everything you’ll want to watch will make it through. Several Internet video standards — notably, Adobe Flash — are not supported.
The absence of Flash is a bugaboo because Flash has been the technology behind much of the video on the web, though the landscape is changing. Even Adobe is pulling support for mobile versions of Flash.
Fortunately, Apple backs other increasingly popular standards — HTML5, CSS 3, and JavaScript. But the company was apparently sensitive enough to the issue that in the early days of the iPad, Apple made mention of several sites where video would play on the iPad. The list included CNN, The New York Times, Vimeo, Time, ESPN, Major League Baseball, NPR, The White House, Sports Illustrated, TED, Nike, CBS, Spin, and National Geographic. What’s more, entertainment apps from Netflix and ABC help fill the TV/movie void, as do many others.
With the appropriate utility software, you might also be able to convert some nonworking video to an iPad-friendly format on your computer. But if something doesn’t play now, it may in the future because Apple has the capability to upgrade the iPad through software.
In the meantime, you can find a description of the video formats that iPad supports on Apple’s website; point your browser to
www.apple.com/ipad/specs
Playing Video
After you know what you want to watch, here’s how to watch it:
1. On the Home screen, tap the Videos icon.
Videos stored on your iPad are segregated by category — Movies, Rented Movies, TV Shows, Music Videos, and Shared. For each category, you see the program’s poster art, as shown in Figure 8-5. Categories such as Rented Movies and Shared appear only if you have that type of content loaded on the machine.

Figure 8-5: Choosing the movie, TV show, or music video to watch from Ed’s Shared library.
You can view podcasts and iTunes U content through their dedicated apps.
2. At the top of the screen, select the tab that corresponds to the type of video you want to watch.
3. Tap the poster that represents the movie, TV show, or other video you want to watch.
You sometimes see a full description of the movie you want to watch, along with a listing of cast and filmmakers, and sometimes only the cast, as shown in Figure 8-6. Tap the Chapters tab to browse the chapters. You see thumbnail images and the length of the chapter. Tap the Info tab to return to a description.

Figure 8-6: Who’s who in the movie you’re about to watch?
4. To start playing a movie (or resume playing from where you left off), tap the Play button.
Alternatively, from Chapters view (see Figure 8-7), tap any chapter to start playing from that point.

Figure 8-7: Start playing from any chapter.
If you go to Settings from the Home screen and tap Videos, you can change the setting to start playing from where you left off rather than to start playing from the beginning, or vice versa.
5. (Optional) Rotate your iPad to landscape mode to maximize a movie’s display.
If you hold the iPad in portrait mode, you can see black bars on top of and below the screen where the movie is playing. Those bars remain when you rotate the device to its side, but the iPad plays the film in a wider-screen mode (depending on the video).
For movies, this is a great thing. You can watch flicks as the filmmaker intended, in a cinematic aspect ratio. But we should point out that you might experience pillarboxing (see the following section) on flicks that aren’t optimized to the iPad’s aspect ratio proportions.
Finding and Working the Video Controls
While a video is playing, tap the screen to display the controls shown in Figure 8-8. Then you can tap a control to activate it. Here’s how to work the controls:
![]() To play or pause the video, tap the Play/Pause button.
To play or pause the video, tap the Play/Pause button.
![]() To adjust the volume, drag the volume slider to the right to raise the volume and to the left to lower it. The volume adjusts relative to how the physical Volume buttons are controlling audio levels.
To adjust the volume, drag the volume slider to the right to raise the volume and to the left to lower it. The volume adjusts relative to how the physical Volume buttons are controlling audio levels.
![]() To restart or go back, tap the Restart/Rewind button to restart the video, or tap and hold the same button to rewind.
To restart or go back, tap the Restart/Rewind button to restart the video, or tap and hold the same button to rewind.
![]() To skip forward, tap and hold Fast Forward to advance the video. Or skip ahead by dragging the Playhead along the Scrubber bar.
To skip forward, tap and hold Fast Forward to advance the video. Or skip ahead by dragging the Playhead along the Scrubber bar.
![]() To set how the video fills the screen, tap the Scale button, which toggles between filling the entire screen with video or fitting the video to the screen. Alternatively, you can double-tap the video to go back and forth between fitting and filling the screen.
To set how the video fills the screen, tap the Scale button, which toggles between filling the entire screen with video or fitting the video to the screen. Alternatively, you can double-tap the video to go back and forth between fitting and filling the screen.
Fitting the video to the screen displays the film in its theatrical aspect ratio. Again, you may see black bars above and below the video (or to its sides), which some people don’t like. The bars on the top and bottom are an example of letterboxing; on the sides, it’s pillarboxing.Filling the entire screen with the video may crop or trim the sides or top of the picture, so you don’t see the complete scene that the director shot.
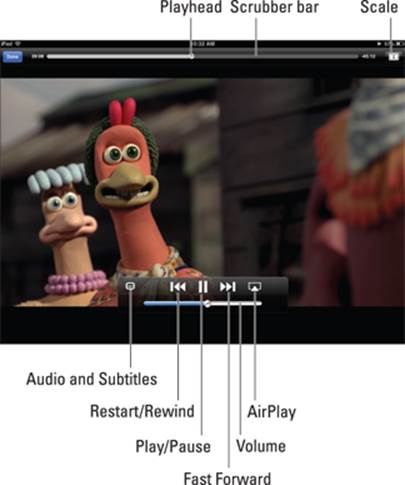
Figure 8-8: Controlling the video.
![]() To select language and subtitle settings, tap the Audios and Subtitles button. You see options to select a different language, turn on or hide subtitles, and turn on or hide closed captioning. The control appears only if the movie supports any of these features or if you’ve turned on closed captioning by choosing Settings⇒Video.
To select language and subtitle settings, tap the Audios and Subtitles button. You see options to select a different language, turn on or hide subtitles, and turn on or hide closed captioning. The control appears only if the movie supports any of these features or if you’ve turned on closed captioning by choosing Settings⇒Video.
![]() To make the controls go away, tap the screen again (or simply wait for them to go away on their own).
To make the controls go away, tap the screen again (or simply wait for them to go away on their own).
![]() To tell your iPad you’re done watching a video, tap Done. You return to the last Videos screen that was visible before you started watching the movie.
To tell your iPad you’re done watching a video, tap Done. You return to the last Videos screen that was visible before you started watching the movie.
Watching Video on a Big TV
We love watching movies on the iPad, but we also recognize the limitations of a smaller screen. Friends won’t crowd around to watch with you, so Apple offers two ways to display video from your iPad to a TV:
![]() AirPlay: Through the AirPlay feature, you can wirelessly stream movies — commercial flicks or videos you shot — as well as photos and music from the iPad to an Apple TV box that’s connected to an HDTV. Start watching the movie on the iPad and tap the AirPlay button that appears in the video controls. (Refer to Figure 8-8.) You can watch only one screen at a time. Tap Apple TV to stream to the TV through the Apple TV box. Tap iPad to watch on the iPad.
AirPlay: Through the AirPlay feature, you can wirelessly stream movies — commercial flicks or videos you shot — as well as photos and music from the iPad to an Apple TV box that’s connected to an HDTV. Start watching the movie on the iPad and tap the AirPlay button that appears in the video controls. (Refer to Figure 8-8.) You can watch only one screen at a time. Tap Apple TV to stream to the TV through the Apple TV box. Tap iPad to watch on the iPad.
You can multitask while streaming a video. Therefore, while the kids are watching a flick on the TV, you can surf the web or catch up on e-mail.
 Although you can stream from an iPad to an Apple TV and switch screens between the two, you can’t stream to the iPad a rented movie that you start watching on Apple TV.
![]() AV Adapter cables: Apple sells a pair of $49 cable adapters — one for the digital AV (HDMI)) and one for a VGA connection. These cables let you connect to large, widescreen televisions, projectors, or other devices that have either of these inputs.
AV Adapter cables: Apple sells a pair of $49 cable adapters — one for the digital AV (HDMI)) and one for a VGA connection. These cables let you connect to large, widescreen televisions, projectors, or other devices that have either of these inputs.
If you have a more recent iPad, however, the Digital AV (HDMI) adapter also lets you mirror the iPad screen on the connected TV or projector. So not only can you watch a movie or video, but you can also view anything else that’s on the iPad’s screen: your Home screens, web pages, games, other apps — you name it.
 The Digital AV adapter doesn’t include an HDMI cable, so you have to supply one yourself. For more on accessories, check out Chapter 17.
Restricting Video Usage
If you’ve given an iPad mini to your kid or to someone who works for you, you may not want that person spending time watching movies or television. You might want him to do something more productive, such as homework or the quarterly budget. That’s where parental restrictions come in. Please note that the use of this iron-fist tool can make you really unpopular.
Tap Settings⇒General⇒Restrictions⇒Enable Restrictions. You’re asked to establish or enter a previously established passcode. Twice. Having done so, you can set restrictions based on movie ratings (PG, R, and so on) and TV shows. You can also restrict FaceTime usage or use of the camera (which when turned off also turns off FaceTime). For more on restrictions, flip to Chapter 15, where we explain the settings for controlling (and loosening) access to iPad features.
Deleting Video from Your iPad
Video takes up space — lots of space. After the closing credits roll and you no longer want to keep a video on your iPad, here’s what you need to know about deleting video:
![]() To delete a video manually, tap and hold its movie poster until the small, circled x shows up on the poster. To confirm your intention, tap the larger Delete button that appears or tap Cancel if you change your mind.
To delete a video manually, tap and hold its movie poster until the small, circled x shows up on the poster. To confirm your intention, tap the larger Delete button that appears or tap Cancel if you change your mind.
![]() Deleting a movie from the iPad only removes it from the iPad. It remains in the iTunes library on your Mac or PC (assuming that you synced it to your computer) and iCloud. That means if you want to watch it on your iPad again in the future, you can do so, as long as you either sync it again or download the movie from iCloud. You can also download purchased videos again from the iTunes Store at no charge.
Deleting a movie from the iPad only removes it from the iPad. It remains in the iTunes library on your Mac or PC (assuming that you synced it to your computer) and iCloud. That means if you want to watch it on your iPad again in the future, you can do so, as long as you either sync it again or download the movie from iCloud. You can also download purchased videos again from the iTunes Store at no charge.

![]() If you delete a rented movie before watching it on your iPad, it’s gone. You have to spend (more) loot if you hope to watch it in the future on the iPad.
If you delete a rented movie before watching it on your iPad, it’s gone. You have to spend (more) loot if you hope to watch it in the future on the iPad.
Shooting Your Own Videos
Apple equipped the iPad mini with two splendid cameras. The 5-megapixel iSight camera takes terrific stills (see Chapter 9) and lets you capture 1080p video, or the highest of the high-definition specifications. Another bonus is that it has built-in video stabilization, which helps compensate for a slightly jittery videographer.
The front FaceTime camera on the mini does high-def too, but up to the 720p video standard. It lets you capture 1.2-megapixel stills as well. Given its name, of course, you also know that it serves a vital role in FaceTime video chats.
Now that we’ve dispensed with that little piece of business, here’s how to shoot video on the iPad:
1. Tap the Camera icon on the Home screen.
2. Drag the little onscreen button at the lower-right corner of the display from the camera position to the video camera position.
The button is labeled in Figure 8-9. The camera button is for stills, a subject we cover in Chapter 9.

Figure 8-9: Lights, camera, action.
You can’t switch from the front to the rear camera or vice versa while you’re capturing a scene. So before shooting anything, think about which camera you want to use and then tap the front/rear camera button at the bottom-right corner of the screen when you’ve made your choice.
3. To begin shooting a scene, tap the Record button (a large, silver button with a red dot in the center) on the center-right side of the screen.
4. Tap the Record button again to stop recording.
Your video is automatically saved to the Camera Roll, alongside any other saved videos and digital stills.
Editing what you shot
We assume that you’ve captured some great-looking footage, but you probably shot some stuff that belongs on the cutting-room floor as well. No big whoop because you can perform simple edits right on your mini. Remember to tap the Camera Roll at the lower-left corner of the Camera app to find your recordings. Then:
1. Tap a video recording to display the onscreen controls, as shown in Figure 8-10.

Figure 8-10: Getting a trim.
2. Drag the start and end points along the frame viewer at the top of the screen to select only the video you want to keep.
Hold your finger over the section to expand the frame viewer to make it easier to apply your edits. Tap the Play button to preview your surgery.
3. Choose what to do with your trimmed clip:
• Tap Trim Original to permanently remove scenes from the original clip.
• Tap Save as New Clip to create a newly trimmed video clip; the original video remains intact, and the new clip is stored in the Camera Roll.
• Tap Cancel to start over.
We should point out that this method lets you edit footage captured only on an iOS device, not video from a digital camcorder or camera, even if you sync it to the iPad mini.
For more ambitious editing on the iPad, consider iMovie for iPad, a $4.99 app that resembles a lighter version of iMovie for Mac computers. Through iMovie, you can export your finished video to YouTube, Vimeo, and Facebook. And iMovie for iPad lets you produce Hollywood-style movie trailers, just like on a Mac.
Any video edited with the iOS version of iMovie has to have originated on an iOS device. You can’t mix in footage shot with a digital camera or obtained elsewhere.
Sharing video
You can play back what you’ve just shot in portrait mode or landscape mode. And if the video is any good, you likely want to share it with a wider audience. To do so, display the playback controls by tapping the screen and then tap the Action button, the icon that resembles an arrow trying to escape a rectangle. From there, you can e-mail the video (if the video file isn’t too large), or send it as an iMessage (see Chapter 5). If you download the YouTube app, you can send it there too.
Seeing Is Believing with FaceTime
We’d bet you can come up with a lengthy list of people you’d love to be able to eyeball in real time from afar. Maybe it’s your old college roommate. Maybe it’s your old college sweetheart. And maybe it’s your grandparents, who’ve long since retired to warm climates somewhere.
That’s the beauty of FaceTime, the video chat app on the iPad mini. FaceTime exploits the two cameras built into the devices, each serving a different purpose. The front camera lets you talk face to face. The back camera shows the person you’re talking to what you’re seeing.
To take advantage of FaceTime, here’s what you need:
![]() Access to Wi-Fi or cellular: And the people you’re talking to need Internet access, too. On an iOS device, you used to need Wi-Fi. With iOS 6, Apple made FaceTime available to cellular connections. A third-generation or more recent iPad is required. On a Mac, you need an upstream or downstream Internet connection of at least 128 Kbps. You also need at least a 1 Mbps upstream and downstream connection for HD-quality video calls.
Access to Wi-Fi or cellular: And the people you’re talking to need Internet access, too. On an iOS device, you used to need Wi-Fi. With iOS 6, Apple made FaceTime available to cellular connections. A third-generation or more recent iPad is required. On a Mac, you need an upstream or downstream Internet connection of at least 128 Kbps. You also need at least a 1 Mbps upstream and downstream connection for HD-quality video calls.
 Using FaceTime over a cellular connection can quickly run through your monthly data allotment and prove hazardous to your budget.
![]() FaceTime: On your conversation partner’s own iPad or Intel-based Mac computer (OS X 10.6.6 or later), on a recent-model iPod touch, or on an iPhone 4, 4S or 5. (FaceTime first appeared on Apple’s prized smartphone.)
FaceTime: On your conversation partner’s own iPad or Intel-based Mac computer (OS X 10.6.6 or later), on a recent-model iPod touch, or on an iPhone 4, 4S or 5. (FaceTime first appeared on Apple’s prized smartphone.)
The iPad’s inviting screen would seem to be made for FaceTime, but it helps to have halfway decent lighting and a robust Internet connection.
Getting started with FaceTime
When you use FaceTime for the first time, after you tap the app’s icon from the Home screen, you’re required to sign in to FaceTime using your Apple ID, which can be your iTunes Store account, iCloud ID, or another Apple account. (You may have previously supplied this info during setup of your iPad.) If you don’t have an account, tap Create New Account to set one up within FaceTime. You also must supply an e-mail address or phone number that callers use to call you from their own FaceTime-capable iPads, Macs, iPhones, or iPod touches.
If this is the first time you’ve used a particular e-mail address for FaceTime, Apple sends an e-mail to that address to verify the account. Tap (or click) Verify Now and enter your Apple ID and password to complete the FaceTime setup. If the e-mail address resides in Mail on the iPad, you’re already good to go.
If you have multiple e-mail addresses, callers can use any of them for FaceTime. To add an e-mail address after the initial setup, tap Settings⇒FaceTime⇒Add Another Email. And phone numbers work too with iOS 6.
In fact, it’s often a good idea to allocate separate e-mail addresses for FaceTime, assuming you have more than one Apple product that can take advantage of it. That way, a call to you when you’re on your Mac, for example, won’t ring on the iPad instead.
You can turn FaceTime on or off within Settings, but if you don’t turn it off, you don’t have to sign back in when you launch the app.
Making a FaceTime call
Now the real fun begins — making a call.
Follow these steps:
1. Start the FaceTime app from the Home screen or by asking Siri to open the app on your behalf.
You can check out what you look like in a window before making a FaceTime call. So powder your nose and put on a happy face.
2. Choose someone to call. Pick among the following:
• Your contacts: Tap a name or number, and then tap the e-mail address or phone number that contact has associated with FaceTime. To add a contact, tap Contacts and tap +.
• Your recent calls: Tap Recents and then tap the appropriate number or name.
• Your favorites: You can add frequent callers to a favorites list. Once again, merely tap a name to call.
3. Check or change what you display on the screen, if needed.
When a call is under way, you can still see what you look like to the other person through a small picture-in-picture window that you can drag to any corner of the video call window. It’s a great way to know whether your mug has dropped out of sight.
4. (Optional) To toggle between the front and rear cameras, tap the Camera button that is also labeled in Figure 8-11.

Figure 8-11: Bob can see Ed, and Ed can see Bob in FaceTime.
5. Tap End when you’re ready to hang up.
While you’re on a FaceTime call, the following tips are handy to know:
![]() Rotate the iPad to its side to change the orientation.
Rotate the iPad to its side to change the orientation.
![]() Silence or mute a call by tapping the Microphone icon (labeled in Figure 8-11).
Silence or mute a call by tapping the Microphone icon (labeled in Figure 8-11).
Be aware that you can still be seen even if not heard (and you can still see and hear the other person).
![]() Momentarily check out another iPad app by pressing the Home button and then tapping the icon for the app you have in mind, or by double-tapping the Home button to select the app from the multitasking bar. At this juncture, you can still talk over FaceTime, but you can no longer see the person. Tap the green bar at the top of the iPad screen to bring the person and the FaceTime app back in front of you.
Momentarily check out another iPad app by pressing the Home button and then tapping the icon for the app you have in mind, or by double-tapping the Home button to select the app from the multitasking bar. At this juncture, you can still talk over FaceTime, but you can no longer see the person. Tap the green bar at the top of the iPad screen to bring the person and the FaceTime app back in front of you.
Receiving a FaceTime call
Of course, you can get FaceTime calls as well as make them. FaceTime doesn’t have to be open for you to receive a video call. Here’s how incoming calls work:
![]() You hear the call: When a call comes in, the caller’s name prominently displays on the iPad’s screen, as shown in Figure 8-12. You simultaneously hear the phone ring.
You hear the call: When a call comes in, the caller’s name prominently displays on the iPad’s screen, as shown in Figure 8-12. You simultaneously hear the phone ring.

Figure 8-12: Tap Accept to answer the call.
![]() You accept or decline the call: Tap Accept to answer the call or tap Decline if you’d rather not. If your iPad is locked when a FaceTime call comes in, slide the green arrow button to the right to answer. To decline it, do nothing and wait for the caller to give up.
You accept or decline the call: Tap Accept to answer the call or tap Decline if you’d rather not. If your iPad is locked when a FaceTime call comes in, slide the green arrow button to the right to answer. To decline it, do nothing and wait for the caller to give up.
![]() You silence the ring: You can press the Sleep/Wake button at the top of the iPad to silence the incoming ring. If you know you don’t want to be disturbed by FaceTime calls before the phone even rings, flip the side switch on the iPad to Mute. Make sure that you’re using the side switch as a mute control rather than as a rotation lock. Otherwise, head to Settings (see Chapter 15) to change the function of this switch back to mute.
You silence the ring: You can press the Sleep/Wake button at the top of the iPad to silence the incoming ring. If you know you don’t want to be disturbed by FaceTime calls before the phone even rings, flip the side switch on the iPad to Mute. Make sure that you’re using the side switch as a mute control rather than as a rotation lock. Otherwise, head to Settings (see Chapter 15) to change the function of this switch back to mute.
And with that, we hereby silence this chapter. But you can do more with the cameras on your iPad. And we do that in Chapter 9.
All materials on the site are licensed Creative Commons Attribution-Sharealike 3.0 Unported CC BY-SA 3.0 & GNU Free Documentation License (GFDL)
If you are the copyright holder of any material contained on our site and intend to remove it, please contact our site administrator for approval.
© 2016-2026 All site design rights belong to S.Y.A.