iPad mini For Dummies (2013)
Part I. Getting to Know Your iPad mini
Chapter 3. The Kitchen Sync: Getting Stuff to and from Your iPad mini
In This Chapter
![]() Setting up an iPad mini, computer-free
Setting up an iPad mini, computer-free
![]() Starting your first sync
Starting your first sync
![]() Disconnecting during a sync
Disconnecting during a sync
![]() Synchronizing contacts, calendars, e-mail accounts, and bookmarks
Synchronizing contacts, calendars, e-mail accounts, and bookmarks
![]() Synchronizing music, podcasts, videos, photos, books, and applications
Synchronizing music, podcasts, videos, photos, books, and applications
![]() Getting your head around iCloud
Getting your head around iCloud
We have good news and . . . more good news. The good news is that you can easily set up your iPad mini so that your contacts, appointments, events, mail settings, bookmarks, books, music, movies, TV shows, podcasts, photos, and applications are synchronized between your computer and your iPad (or other i-devices). And the more good news is that after you set it up, your contacts, appointments, and events can be kept up to date automatically in multiple places — on your computer(s), iPad(s), iPhone(s), and iPod touch(es).
Here’s more good news: Whenever you make a change in one place, it’s reflected almost immediately in all the other places it occurs. So, if you add or change an appointment, an event, or a contact on your iPad while you’re out and about, the information automatically updates on your computers and i-devices. If no Wi-Fi or cellular network is available at the time, the update syncs the next time your iPad encounters a wireless network, all with no further effort on your part.
This communication between your iPad and computer is called syncing (short for synchronizing). Don’t worry: It’s easy, and we walk you through the entire process in this chapter.
But wait. We have even more good news. Items that you choose to manage on your computer, such as movies, TV shows, podcasts, and e-mail account settings, are synchronized only one way — from your computer to your iPad, which is the way it should be.
In this chapter, you find out how to sync all the digital data your iPad can handle. And because iOS 6 lets you set up your iPad computer-free (so you’re not required to sync your iPad with a computer running iTunes), you also find out how to sync both with and without using iTunes and your computer. But some things are easier with a computer than without.
 The information in this chapter is based on iTunes version 10.7 and iOS 6.0, which were the latest and greatest when these words were written. If your screens don’t look exactly like ours, you probably need to do either of the following:
![]() Upgrade to iTunes 10.7 or higher: Launch iTunes (on your Mac or PC) and choose iTunes⇒Check for Updates.
Upgrade to iTunes 10.7 or higher: Launch iTunes (on your Mac or PC) and choose iTunes⇒Check for Updates.
![]() Upgrade your iPad to iOS 6 or higher: Click the Check for Update button on the Summary tab for your iPad, as you see later, in Figure 3-2, and follow the instructions for updating your iPad operating system (if necessary). Or tap Settings⇒General⇒Software Update.
Upgrade your iPad to iOS 6 or higher: Click the Check for Update button on the Summary tab for your iPad, as you see later, in Figure 3-2, and follow the instructions for updating your iPad operating system (if necessary). Or tap Settings⇒General⇒Software Update.
By the way, both upgrades are free, and both offer useful new features and have significant advantages over their predecessors.
 Because Apple updates iTunes and iOS often, having the latest and greatest version is a double-edged sword. So sometimes you’ll see something in this book that looks different on your iPad because you’re using a newer version of the iOS than we had when we wrote this. If you discover one of these and you’re certain you’re using the latest-and-greatest versions of both iTunes and iOS, drop us a note so we can fix it; our e-mail addresses appear at the end of this book’s introduction.
Setting Up an iPad Computer-Free
In this section, you find out how to set up and use an iPad without involving a computer.
Unless your iPad is brand-spanking-new and fresh out of the box, chances are good that you’ve performed the steps that follow. We cover them here because if you choose to use your iPad computer-free, these steps comprise the entire setup process.
Even so, we urge you to read this whole chapter, even if you’re firmly committed to running computer-free. As you see in the next few pages, some tasks that are easy using iTunes on your Mac or PC are difficult or impossible on a stand-alone, PC-free iPad.
That said, here are the steps you take to set up a new, fresh-out-of-the-box iPad without connecting it to a Mac or PC:
1. Turn on the iPad or wake it if it’s sleeping.
An arrow appears near the bottom of the screen, flashing messages in many languages. We’re pretty sure they all say Slide to Set Up, because that’s what the English rendition says.
2. Swipe the Slide to Set Up arrow to the right.
The first thing you see on your shiny new (or freshly restored) iPad is the Wi-Fi screen.
3. Tap to choose a Wi-Fi network, provide a password (if necessary), and then tap the blue Join button.
A check mark appears next to the network you select.
Note that you can skip this step by tapping the Next button without selecting a Wi-Fi network, but we suggest you select a network now, if you can. (If you do wait to set up your Wi-Fi network, turn to Chapter 15 to find out how to do so via Settings.)
4. Tap the Next button in the upper-right corner to advance to the Location Services screen.
5. Tap to enable or disable Location Services.
Location Services is your iPad’s way of knowing where, precisely, you are geographically. The Maps app, for example, which is covered in Chapter 6, relies on Location Services to determine where in the world you are.
You can turn Location Services on or off globally or for individual apps in Settings, as you discover in Chapter 15.
6. Tap the Next button in the upper-right corner to advance to the Set Up iPad screen.
Your choices are Set Up As a New iPad, Restore from iCloud Backup, and Restore from iTunes Backup.
 See Chapter 16 for the scoop on restoring from iCloud or iTunes backups.
7. Tap Set Up As a New iPad.
A check mark appears next to your selection.
8. Tap the Next button in the upper-right corner to advance to the Apple ID screen.
9. Tap Sign In with an Apple ID, or tap Create a Free Apple ID.
If you have an Apple ID, sign in with it here; if you don’t have one, tap the Create a Free Apple ID button. If you tap Skip This Step and proceed without supplying an Apple ID, you can’t take advantage of the myriad excellent and free features described in this and other chapters. Obtain an Apple ID if you don’t already have one, because you need it to take advantage of iCloud. See the end of this chapter for an introduction to this service.
Note that if you skip this step now, you can sign in later by tapping Settings⇒iCloud⇒Account.
10. When the Terms and Conditions screen appears, read it thoroughly and then tap the blue Agree button in the lower-right corner to acknowledge that you agree to the terms and conditions. Then tap Agree again when the Terms and Conditions alert appears.
What happens if you disagree? You don’t want to know. And, of course, you won’t be able to use your iPad.
11. Tap the Next button in the upper-right corner to advance to the Set Up iCloud screen.
12. Tap either Use iCloud or Don’t Use iCloud.
A check mark appears next to your selection.
There’s more info about iCloud at the end of this chapter, or tap the What Is iCloud link on this screen for the party line from Apple.
Don’t worry: If you choose not to enable iCloud now, you can enable it at any time in the Settings app, as described in Chapter 15.
13. Tap the Next button in the upper-right corner to advance to the iCloud Backup screen.
14. Tap either Back Up to iCloud or Back Up to My Computer.
A check mark appears next to your selection. See Chapter 16 for the scoop on iCloud and iTunes backups (including instructions for restoring from them).
15. Tap the Next button in the upper-right corner to advance to the Find My iPad screen.
16. Tap either Use Find My iPad or Don’t Use Find My iPad.
A check mark appears next to your selection.
If you misplace your iPad, you can use Find My iPad to display its current location on a map. You can also choose to display a message or play a sound, lock the screen, or erase contents on your missing iPad.
Find My iPad won’t find your iPad if the battery is drained, the iPad is turned off, or no network connection (Wi-Fi or cellular) is available.
17. Tap the Next button in the upper-right corner to advance to the Siri screen.
18. Tap either Use Siri or Don’t Use Siri.
A check mark appears next to your selection.
 Your iPad mini offers the extremely desirable option, at least in our humble opinion, of using your voice to control your iPad as well as the capability to dictate (speech-to-text) text in any app that displays an onscreen keyboard.
You can find out more about using Siri and dictation in Chapter 14, but for now, let us just say that we love this feature and we use it when appropriate (which is often).
If you choose not to enable Siri at this time, you can switch on this feature at any time in the Settings app’s General pane.
19. Tap the Next button in the upper-right corner to advance to the Diagnostics screen.
20. Tap Automatically Send or Don’t Send to either send or not send anonymous diagnostic and usage data to Apple.
A check mark appears next to your selection.
21. Tap the Next button in the upper-right corner to advance to the Thank You screen.
22. Tap Start Using iPad to, well, start using your iPad.
Your iPad’s Home screen appears in all its glory.
If you’re using a computer-free iPad, that’s the end of the story. Rather than use iTunes on your Mac or PC as described in the next section, you have to make do with the available options in specific apps and in the Settings app (covered extensively in Chapter 15).
Note that these are the same steps you would follow after restoring your iPad to factory condition, as described in Chapter 16.
Syncing with iTunes
Synchronizing your iPad with iTunes on a Mac or PC provides three main advantages over computer-free iPad use.
![]() Media management: iTunes helps you manage your media — music, movies, apps, and so on — more easily than managing it directly on your iPad.
Media management: iTunes helps you manage your media — music, movies, apps, and so on — more easily than managing it directly on your iPad.
![]() Content management: Managing your iPad’s contents with iTunes provides numerous options that you won’t find anywhere on your iPad.
Content management: Managing your iPad’s contents with iTunes provides numerous options that you won’t find anywhere on your iPad.
![]() App and Home screen management: Managing your iPad’s apps and Home screen layouts is much easier in iTunes than on your iPad.
App and Home screen management: Managing your iPad’s apps and Home screen layouts is much easier in iTunes than on your iPad.
Synchronizing your iPad with your computer is a lot like syncing an iPod or iPhone with your computer. If you’re an iPod or iPhone user, the process is a piece of cake. But it’s not too difficult, even for those who’ve never used an iPod, an iPhone, or iTunes. Follow these steps:
1. Start by connecting your iPad to your computer with the USB cable that comes supplied with your iPad.
When you connect your iPad to your computer, iTunes should launch automatically. If it doesn’t, chances are that you plugged the cable into a USB port on your keyboard, monitor, or hub. Try plugging it into one of the USB ports on your computer instead. Why? Because USB ports on your computer supply more power to a connected device than do USB ports on a keyboard, monitor, or most hubs. Also, the iPad requires a lot of that power — even more than an iPod or an iPhone.
You may see an alert asking whether you want iTunes to open automatically when you connect this iPad. Click Yes or No, depending on your preference. You have the opportunity to change this setting, later if you like, so don’t give it too much thought.
If iTunes still doesn’t launch automatically, try launching it manually.
If you prefer to sync wirelessly (although it can be noticeably slower), just launch iTunes manually.
2. Select your iPad in the iTunes sidebar on the left side of the iTunes window.
You see the Set Up Your iPad pane, as shown in Figure 3-1. If you’ve already set up and named your iPad, you can skip Steps 3 and 4 and click the Summary pane to set up your options.
If you don’t see an iPad in the sidebar, and you’re sure that it’s connected to a USB port on your computer (not the keyboard, monitor, or hub), restart your computer. If you’re syncing wirelessly, your iPad and computer must be on the same Wi-Fi network, and your iPad must be plugged into a power source.
3. Name your iPad by typing a name in the Name text box.
We’ve named this one Bob L’s iPad 16 (3d-gen).
4. Decide whether you want iTunes to automatically synchronize the items shown in Figure 3-1 with your iPad every time you connect it to your computer:
• If you want iTunes to do any of these things automatically, select the check box next to the appropriate option so that it displays a check mark, click the Done button, and continue with the “Synchronizing Your Media” section, later in this chapter.
• If you want to synchronize manually, make sure that all three check boxes are deselected (refer to Figure 3-1), and click Done. The “Synchronizing Your Data” section, later in this chapter, tells you all about how to configure your contacts, calendars, bookmarks, notes, e-mail accounts, and applications manually; the “Synchronizing Your Media” section shows you how to sync apps, music, and so on.
You don’t have to decide now. If you’re not sure, leave all three check boxes deselected for now. It’s easy to enable one or all three at any time.
We’ve chosen to not select any of the three check boxes so that we can show you how to manually set up each type of sync in the upcoming sections.
After you click the Done button (it applies to you only if you’ve just performed Steps 3 and 4), the Summary pane appears.
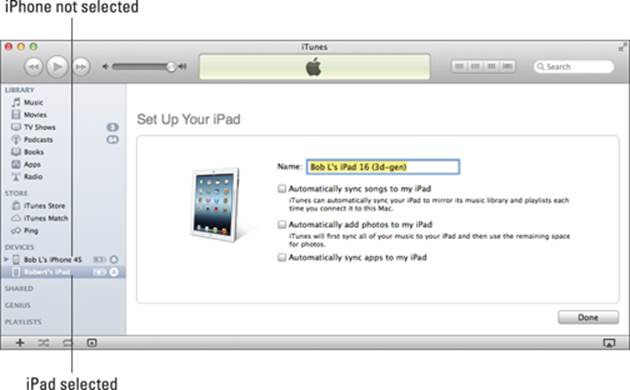
Figure 3-1: This is the first thing you see in iTunes.
If the Summary pane doesn’t appear, make sure that your iPad is still selected in the sidebar on the left side of the iTunes window and then click the Summary button near the top of the window, as shown in Figure 3-2.
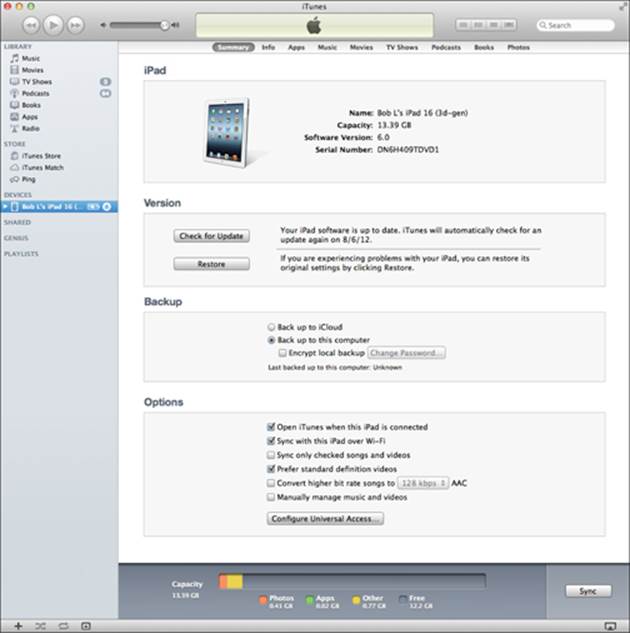
Figure 3-2: The Summary pane is pretty painless.
iPad backup
Whether you know it or not, your iPad backs up your settings, app data, and other information on your iPad whenever you connect to a computer and use iTunes to
![]() Sync with your iPad mini
Sync with your iPad mini
![]() Update your iPad mini
Update your iPad mini
![]() Restore your iPad mini
Restore your iPad mini
Every time you sync your iPad and computer, most (but not all) of your iPad content — including (but not limited to) photos in the Camera Roll, text messages, notes, contact favorites, sound settings, and more — is backed up to either your computer’s hard drive or to iCloud before the sync begins. Most of your media — including songs, TV shows, and movies — isn’t backed up in this process. This shouldn’t be a problem; these files are usually restored when you sync with iTunes again.
Backups are saved automatically and stored on your computer by default, or you can choose to back up to iCloud by clicking the appropriate button in the iTunes Summary pane.
To switch to backing up to iCloud using iTunes on your computer, follow these steps:
1. Connect the iPad to the computer.
If iTunes doesn’t launch automatically when you connect the iPad, launch it now.
2. Select your iPad in the sidebar on the left side of iTunes.
3. Click the Summary tab.
4. Click Back Up to iCloud or Back Up to This Computer.
If you choose to back up to your computer, you can encrypt your backup with a password by selecting the Encrypt iPad Backup check box.
If anything goes wonky or you get a new iPad, you can restore most (if not all) of your settings and files that aren’t synced with iCloud or iTunes on your computer. Or, if you’ve backed up an iPhone or iPod touch or another iPad, you can restore the new iPad from the older device’s backup.
If you’re using an iPad computer-free, here’s how to enable backing up to iCloud from your iPad, which we strongly suggest you do without further delay:
1. Tap Settings⇒iCloud⇒Storage & Backup.
2. Tap iCloud Backup to switch it on.
Choosing this option means your iPad no longer backs up automatically if you connect it to a computer.
If you are a computer-free iPad user, you don’t care, because you never connect your iPad to a computer. But if you sync your iPad with your computer, like many folks do, give some thought to which option suits your needs. Restoring from a computer backup requires physical or Wi-Fi access to that computer, but you don’t need Internet access. Restoring from iCloud requires Internet access and can happen anywhere on Earth that has it.
One last thing to look at on the Backup section: If you want to password-protect your iPad backups (your iPad creates a backup of its contents automatically every time you sync), be sure to also select the Encrypt iPad Backup check box from the Backup area.
Backups are good; pick one or the other and move on.
iPad options
From the Summary pane, you can set any options that you want from the Options area:
![]() Open iTunes When This iPad Is Connected check box: Select this option if you want iTunes to launch automatically whenever you connect your iPad to your computer.
Open iTunes When This iPad Is Connected check box: Select this option if you want iTunes to launch automatically whenever you connect your iPad to your computer.
Why might you choose not to enable this option? If you intend to connect your iPad to your computer to charge it, for example, you might not want iTunes to launch every time you connect it.
If you choose to enable it, iTunes launches and synchronizes automatically every time you connect your iPad.
Don’t worry about this too much right now. As usual, if you change your mind, you can always come back to the Summary pane and deselect the Open iTunes When This iPad Is Connected check box.
If you select the Open iTunes When This iPad Is Connected check box but you don’t want your iPad to sync automatically every time it’s connected, launch iTunes and choose iTunes⇒Preferences (Mac) or Edit⇒Preferences (PC). Click the Devices tab at the top of the window and select the Prevent iPods, iPhones, and iPads from Syncing Automatically check box. This method prevents your iPad from syncing automatically even if the Open iTunes When This iPad Is Connected option is selected. If you choose this option, you can sync your iPad by clicking either the Sync or Apply button that appears in the lower-right corner of the iTunes window when your iPad is selected in the sidebar. (It says Sync in Figure 3-2.)
![]() Sync with This iPad Over Wi-Fi: If you want to sync automatically over your Wi-Fi connection, select this check box.
Sync with This iPad Over Wi-Fi: If you want to sync automatically over your Wi-Fi connection, select this check box.
![]() Sync Only Checked Songs and Video: If you want to sync only items that have check marks to the left of their names in your iTunes library, select this check box.
Sync Only Checked Songs and Video: If you want to sync only items that have check marks to the left of their names in your iTunes library, select this check box.
![]() Prefer Standard Definition Videos: If you want high-definition videos you import to be automatically converted into smaller, standard-definition video files when you transfer them to your iPad, select this check box.
Prefer Standard Definition Videos: If you want high-definition videos you import to be automatically converted into smaller, standard-definition video files when you transfer them to your iPad, select this check box.
Standard-definition video files are significantly smaller than high-definition video files. You’ll hardly notice the difference when you watch the video on your iPad mini (though you’ll almost certainly notice on a third-or fourth-generation iPad with a Retina display), but you can have more video files on your iPad mini, because they take up less space.
 The conversion from HD to standard definition takes a long time, so be prepared for very long sync times when you sync new HD video and you have this option selected.
If you plan to use Apple’s Lightning Digital AV Adapter ($49) or Apple TV ($99) to display movies on an HDTV, consider going with high definition. Although the files will be bigger and your iPad mini will hold fewer videos, the HD versions look spectacular on a big-screen TV. There’s more info on these accessories in Chapter 17.
![]() Convert Higher Bit Rate Songs to 128 Kbps AAC: If you want songs with bit rates higher than 128 Kbps converted into smaller 128-Kbps AAC files when you transfer them to your iPad, select this check box.
Convert Higher Bit Rate Songs to 128 Kbps AAC: If you want songs with bit rates higher than 128 Kbps converted into smaller 128-Kbps AAC files when you transfer them to your iPad, select this check box.
A higher bit rate means that the song will have better sound quality but use a lot of storage space. Songs that you buy at the iTunes Store or on Amazon, for example, have bit rates of around 256 Kbps. So, a 4-minute song with a 256 Kbps bit rate is around 8MB; convert it to 128 Kbps AAC and it’s roughly half that size (that is, around 4MB), while sounding almost as good.
Most people don’t notice much (if any) difference in audio quality when listening to music on most consumer audio gear. So unless you have your iPad hooked up to a great amplifier and superb speakers or headphones, you probably won’t hear much difference — though your iPad can hold roughly twice as much music if you choose this option. Put another way, we’re picky about our audio, and we both select this option to allow us to carry more music around with us on our iPads. And neither of us has noticed much impact on sound quality with the headphones or speakers we use with our iPads.
![]() Manually Manage Music and Videos: To turn off automatic syncing in the Music and Video panes, select this check box.
Manually Manage Music and Videos: To turn off automatic syncing in the Music and Video panes, select this check box.
One more thing: If you decide to select the Prevent iPods, iPhones, and iPads from Syncing Automatically check box in the iTunes Preferences (that’s iTunes⇒Preferences on a Mac and Edit⇒Preferences on a PC) on the Devices tab, you can still synchronize manually by clicking the Sync or Apply button in the lower-right corner of the window.
 Why the Sync or Apply button? Glad you asked. If you’ve changed any sync settings since the last time you synchronized, the Sync button instead says Apply. When you click that button — regardless of its name — your iPad will start to sync.
Disconnecting the iPad
When the iPad is syncing with your computer, you see the Eject icon to the right of its name in the sidebar turn into a Sync icon, as shown in Figure 3-3, and spin around.
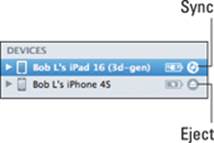
Figure 3-3: The Eject icon (Bob L’s iPhone 4S) turns into a Sync icon (Bob L’s iPad 16), during a sync.
At the same time, a message appears at the top of the iTunes window to inform you that your iPad is syncing, as shown in Figure 3-4.
When the sync is finished, the wheel in Figure 3-3 stops spinning and morphs back into an Eject icon, and the message in Figure 3-4 disappears.
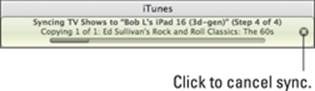
Figure 3-4: Click the x to cancel a sync.
If you disconnect your iPad before the sync finishes, all or part of the sync may fail. Though it isn’t usually a problem, it’s safer to cancel the sync and let it finish gracefully than to yank the cable out while a sync is in progress. So don’t do that, okay?
To cancel a sync properly and safely, disconnect your iPad from your Mac or PC and click the little x to the right of the sync message in iTunes (refer to Figure 3-4).
Synchronizing Your Data
Did you choose to set up data synchronization manually by not selecting any of the three check boxes in the Set Up Your iPad pane, as shown in Figure 3-1? If so, your next order of business is to tell iTunes what data you want to synchronize between your iPad and your computer. You do this by selecting your iPad in the sidebar on the left side of the iTunes screen. Then click the Info button, which is to the right of the Summary button.
The Info pane has five sections: Contacts, Calendars, Mail Accounts, Other, and Advanced.
On some displays, you may see only one or two sections at any time and have to scroll up or down to see the others.
One last thing: To use your iPad with your Google or Yahoo! account, you must first create an account on your iPad, as described in Chapter 5. After you’ve created a Yahoo! or Google account on your iPad, you can enable contact or calendar syncing with it in the Settings app’s Mail, Contacts, Calendars section.
Contacts
In Figure 3-5, note that the section is named Sync Contacts because this image was captured on a Mac. Contacts (formerly known as Address Book) is the Mac application that syncs with your iPad’s Contacts app.
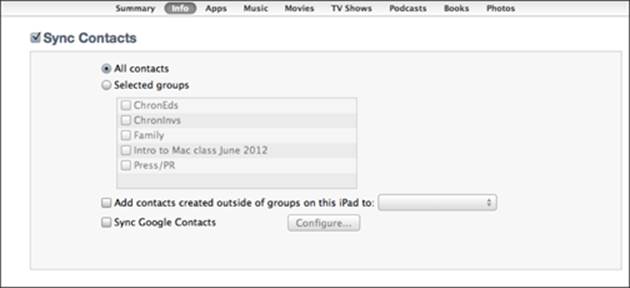
Figure 3-5: Want to synchronize your contacts? This is where you set up things.
If you use a PC, you see a drop-down list that gives you the choices of Outlook, Google Contacts, Windows Address Book, or Yahoo! Address Book. Don’t worry — the process works the same on either platform.
The iPad syncs with the following address book programs:
![]() Mac: Address Book and Contacts
Mac: Address Book and Contacts
![]() PC: Outlook or Windows Address Book
PC: Outlook or Windows Address Book
![]() Mac and PC: Yahoo! Address Book and Google Contacts
Mac and PC: Yahoo! Address Book and Google Contacts
You can sync contacts with multiple applications.
Here’s what each option does:
![]() All Contacts: One method is to synchronize all your contacts (refer to Figure 3-5). This synchronizes every contact in your Mac or PC address book with your iPad’s Contacts app.
All Contacts: One method is to synchronize all your contacts (refer to Figure 3-5). This synchronizes every contact in your Mac or PC address book with your iPad’s Contacts app.
![]() Selected Groups: You can synchronize any or all groups of contacts you’ve created in your computer’s address book program. Just select the appropriate check boxes in the Selected Groups list, and only those groups will be synchronized.
Selected Groups: You can synchronize any or all groups of contacts you’ve created in your computer’s address book program. Just select the appropriate check boxes in the Selected Groups list, and only those groups will be synchronized.
If you sync with your employer’s Microsoft Exchange calendar and contacts, any personal contacts or calendars already on your iPad will be wiped out.
Calendars
The Calendars section of the Info pane determines how synchronization is handled for your appointments, events, and reminders. You can synchronize all your calendars, as shown in Figure 3-6. Or you can synchronize any or all individual calendars you’ve created in your computer’s calendar program. Just select the appropriate check boxes.
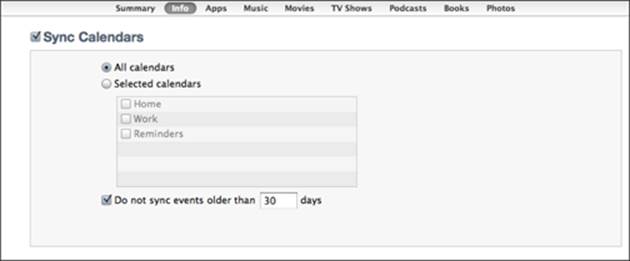
Figure 3-6: Setting up syncing for calendar events.
The iPad syncs with the following calendar programs:
![]() Mac: iCal or Calendar
Mac: iCal or Calendar
![]() PC: Microsoft Outlook 2003, 2007, and 2010
PC: Microsoft Outlook 2003, 2007, and 2010
![]() Mac and PC: Google and Yahoo! Calendars
Mac and PC: Google and Yahoo! Calendars
You can sync calendars with multiple applications.
Mail Accounts
You can sync account settings for your e-mail accounts in the Mail Accounts section of the Info pane. You can synchronize all your e-mail accounts (if you have more than one), or you can synchronize individual accounts, as shown in Figure 3-7. Just select the appropriate check boxes.
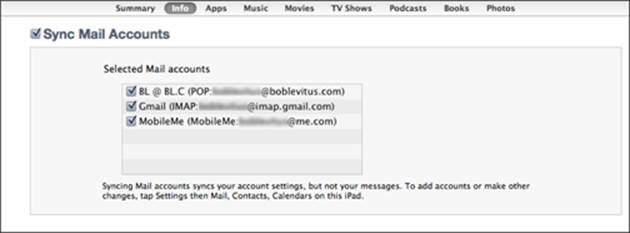
Figure 3-7: Transfer e-mail account settings to your iPad.
The iPad syncs with the following mail programs:
![]() Mac: Mail
Mac: Mail
![]() PC: Microsoft Outlook 2003, 2007, and 2010
PC: Microsoft Outlook 2003, 2007, and 2010
![]() Mac and PC: Gmail and Yahoo! Mail
Mac and PC: Gmail and Yahoo! Mail
E-mail account settings are synchronized only one way: from your computer to your iPad. If you make changes to any e-mail account settings on your iPad, the changes aren’t synchronized back to the e-mail account on your computer. Trust us: This is a good feature, and we’re glad Apple did it this way.
By the way, the password for your e-mail account may or may not be saved on your computer. If you sync an e-mail account and the iPad asks for a password when you send or receive mail, do this: Tap Settings on the Home screen, tap Mail, tap your e-mail account’s name, and then type your password in the appropriate field.
Other
The Other section has a single item: Sync Safari Bookmarks.
Select the Sync Safari Bookmarks check box if you want to sync your Safari bookmarks; don’t select it if you don’t.
Just so you know, the iPad syncs bookmarks with the following web browsers:
![]() Mac: Safari
Mac: Safari
![]() PC: Microsoft Internet Explorer and Safari
PC: Microsoft Internet Explorer and Safari
Advanced
Every so often, the contacts, calendars, mail accounts, or bookmarks on your iPad get so screwed up that the easiest way to fix things is to erase that information on your iPad and replace it with information from your computer.
If that’s the case, go to the Advanced section of the Info pane and click to select the appropriate check boxes, as shown in Figure 3-8. Then, the next time you sync, that information on your iPad is replaced with information from your computer.
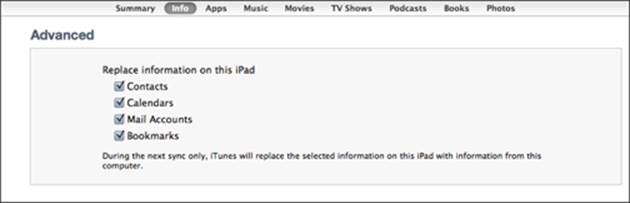
Figure 3-8: Replace the information on your iPad with the information on your computer.
Because the Advanced section is at the bottom of the Info pane and you have to scroll down to see it, you can easily forget that the section is there. Although you probably won’t need to use this feature often (if ever), if you do need it, you’ll be happy that you remembered it’s there.
Synchronizing Your Media
If you chose to let iTunes manage synchronizing your data automatically, welcome. This section looks at how you get your media — your music, podcasts, videos, and photos — from your computer to your iPad.
Podcasts and videos (but not photos) from your computer are synced only one-way: from your computer to your iPad. If you delete a podcast or a video that got onto your iPad via syncing, the podcast or video won’t be deleted from your computer when you sync.
That said, if you buy or download any of the following items on your iPad, the item will be copied back to your computer automatically when you sync:
![]() Songs
Songs
![]() Podcasts
Podcasts
![]() Videos
Videos
![]() iBooks, e-books, and audiobooks
iBooks, e-books, and audiobooks
![]() Apps
Apps
![]() Playlists that you create on your iPad
Playlists that you create on your iPad
And if you save pictures from e-mail messages, the iPad camera, web pages (by pressing and holding on an image and then tapping the Save Image button), or screen shots (which can be created by pressing the Home and Sleep/Wake buttons simultaneously), these too can be synced.
Taking a screen shot creates a photo of what’s on your screen. It’s a handy tool, and it’s what we used to generate almost every figure in this book.
You use the Apps, Tones, Music, Podcasts, Movies, TV Shows, iTunes U, Books, and Photos panes to specify the media that you want to copy from your computer to your iPad. The following sections explain the options you find in each pane.
To view any of these panes, make sure that your iPad is still selected in the sidebar and then click the appropriate button near the top of the window.
The following sections focus only on syncing. If you need help acquiring apps, music, movies, podcasts, or anything else for your iPad, this book contains chapters dedicated to each of these topics. Flip to the most applicable chapter for help.
The last step in each section is “Click the Sync or Apply button in the lower-right corner of the window.” You have to do this only when selecting that item for the first time and if you make any changes to the item afterward.
Apps
If you’ve downloaded or purchased any iPad apps from the iTunes App Store (see Chapter 11), set your automatic syncing options as follows:
1. Click the Apps button, and then select the Sync Apps check box.
2. Choose the individual apps you want to transfer to your iPad by selecting their check boxes.
For your convenience, a pop-up menu lets you sort your applications by kind, name, category, date, or size. Or you can type a word or phrase into the Search field (the oval with the magnifying glass in the upper-right corner of the iTunes window) to search for a specific app.
If you also use an iPhone or iPod touch, choose Show Only iPad Apps in the pop-up menu to hide iPhone and iPod touch apps that aren’t optimized for your iPad.
3. (Optional) Rearrange app icons in iTunes by dragging them where you want them to appear on your iPad (see Figure 3-9).
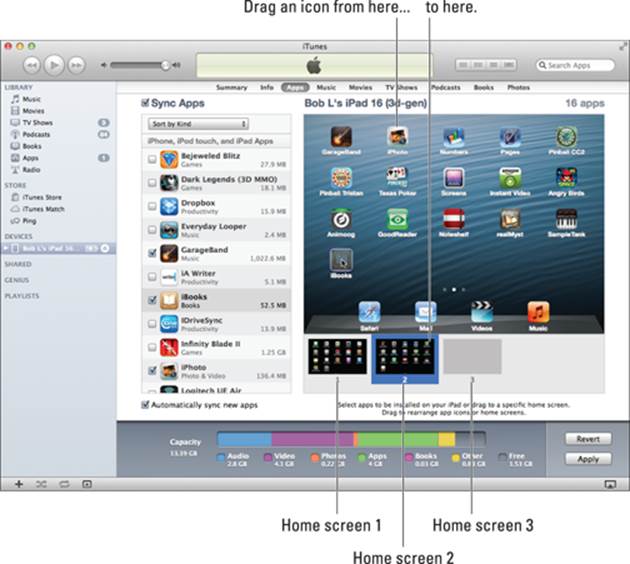
Figure 3-9: Dragging the iPhoto icon from the list of iPhone, iPod touch, and iPad apps to Home screen 2.
Your iPad comes supplied with 4 apps at the bottom of the screen in the Dock, plus 16 apps on its Home screen. As you acquire new apps, your iPad creates additional Home screens automatically — up to 10 of them — to display the overflow.
In iTunes, you can see the number of screens on the right (three Home screens are shown in Figure 3-9; no apps are on Home screen 3 yet).
On your iPad, look for a series of little dots above the Dock. These indicate the number of Home screens; so in Figure 3-9, three dots mean three Home screens. Note that the middle (second) dot is lit up in white, to indicate which Home screen you’re viewing (Home screen 2 in Figure 3-9).
iTunes also displays little Home screen proxies below the big Home screen (numbered 1, 2, and 3); note that Home screen 2 is highlighted in blue.
You can even drag app icons from one Home screen to another, if you like: Drag an icon onto the Home screen proxy and it’s moved to that Home screen. Click any proxy to rearrange the icons on that page.
If you have a lot of apps, you’re sure to love this feature (which was introduced in iTunes 9) as much as we do. But if you don’t care which apps go where, just select the check boxes for the apps you want on the iPad.
4. Click the Sync or Apply button in the lower-right corner of the window.
Your apps are synced, and your icons are rearranged on your iPad just the way you arranged them in iTunes.
Note that apps are so darn cool we’ve given them an entire chapter of their own — namely, Chapter 11, where you discover how to find, rearrange, review, and delete apps and much, much more. Plus, two entire chapters in Part VI are dedicated to cool apps.
Music, music videos, and voice memos
To transfer music to your iPad, follow these steps:
1. Click the Music button, and then select the Sync Music check box in the Music pane.
2. Select the Entire Music Library radio button or the Selected Playlists, Artists, Albums, and Genres radio button.
If you choose the latter, select the check boxes next to particular playlists, artists, albums, and genres you want to transfer. You can also choose to include music videos or voice memos, or both, by selecting the appropriate check boxes at the top of the pane (see Figure 3-10).
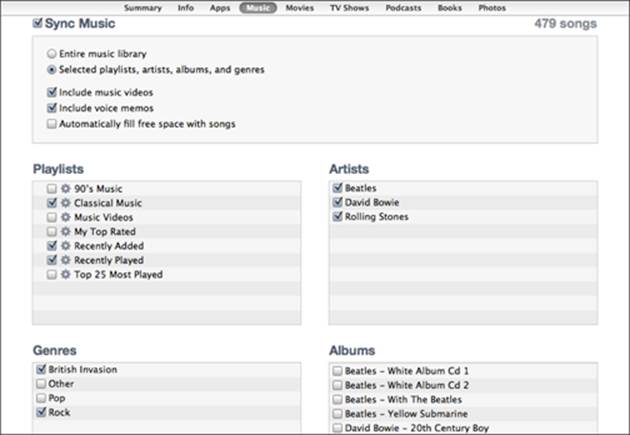
Figure 3-10: Use the Music pane to copy music, music videos, and voice memos from your computer to your iPad.
If you select the Automatically Fill Free Space with Songs check box, iTunes fills any free space on your iPad with music.
If you choose this option, you may find yourself with too little free space on your iPad to take new photos or movies, download new apps, or save documents you create on your iPad.
If you have more music in your iTunes Library than your iPad will hold, you’re going to love iTunes Match, Apple’s $25-a-year service for storing your music in iCloud, a service you hear much more about in Chapter 7.
3. Click either the Sync or Apply button in the lower-right corner of the window.
Your music, music videos, and voice memos are synced.
Music, podcasts, and especially videos are notorious for chewing up massive amounts of storage space on your iPad. If you try to sync too much media, you see error messages warning you that you don’t have enough room on your iPad for everything you tried to sync. Forewarned is forearmed. To avoid these errors, select playlists, artists, and/or genres that total less than the free space on your iPad.
How much free space does your iPad have? Glad you asked. Look near the bottom of the iTunes window while your iPad is selected (refer to Figure 3-9). You see a chart that shows the contents of your iPad, color-coded for your convenience. See Chapter 20 for a tip on working with this graph.
Movies
To transfer movies to your iPad, follow these steps:
1. Click the Movies button and select the Sync Movies check box.
2. Choose an option from the pop-up menu for movies that you want to include automatically, as shown in Figure 3-11, or select the check box for each movie you want to sync.
 Regardless of the choices you make in the pop-up menu, you can always select individual movies by selecting their check boxes.
3. Click the Sync or Apply button in the lower-right corner of the window.
Your movies are synced.
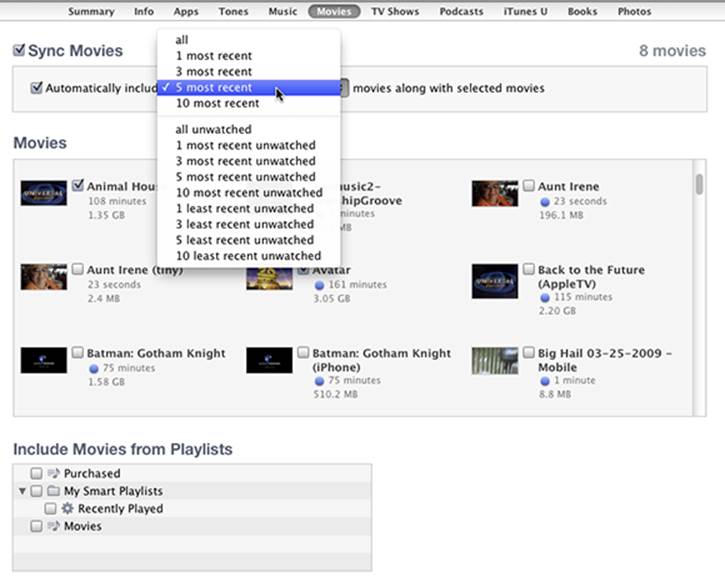
Figure 3-11: Your choices in the Movies pane determine which movies are copied to your iPad.
TV shows
The procedure for syncing TV shows is slightly different from the procedure for syncing movies. Here’s how it works:
1. Click the TV Shows button and select the Sync TV Shows check box to enable TV show syncing.
2. Choose how many episodes to include from the pop-up menu in the upper-left corner, as shown in Figure 3-12.
3. In the upper-right corner, choose whether you want all shows or only selected shows from the pop-up menu. (Again, refer to Figure 3-12.)
4. If you want to also include individual episodes or episodes on playlists, select the appropriate check boxes in the Episodes section (which is labeled South Park Episodes in Figure 3-12) and the Include Episodes from the Playlists section of the TV Shows pane.
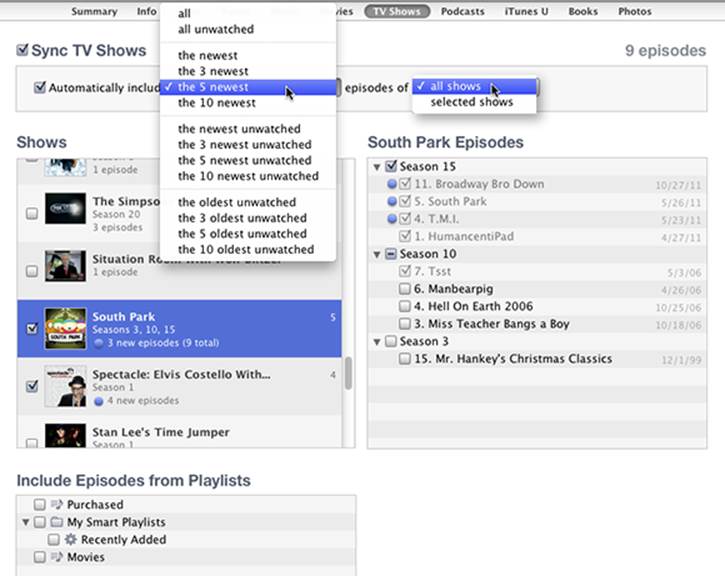
Figure 3-12: These menus determine how TV shows are synced with your iPad.
5. Click the Sync or Apply button in the lower-right corner of the window.
Your TV shows are synced.
Regardless of the choices you make in the pop-up menus, you can always select individual episodes by selecting their check boxes.
Podcasts
To transfer podcasts to your iPad, follow these steps:
1. Click the Podcasts button and select the Sync Podcasts check box in the Podcasts pane.
Two pop-up menus allow you to specify which episodes and which podcasts you want to sync.
2. Select how many episodes of a podcast you want to sync in the pop-up menu on the left.
3. Choose whether to sync all podcasts or only selected podcasts from the pop-up menu in the upper-right corner.
4. If you have podcast episodes on playlists, you can include them by selecting the appropriate check boxes under Include Episodes from Playlists.
5. Click the Sync or Apply button in the lower-right corner of the window.
Your podcasts are synced.
Regardless of the choices you make from the pop-up menus, you can always select individual episodes by selecting their check boxes.
iTunes U
To sync educational content from iTunes U, follow these steps:
1. Click the iTunes U button and select the Sync iTunes U check box to enable iTunes U syncing.
2. Choose how many items to include using the first pop-up menu.
3. Choose whether you want all collections or only selected collections from the second pop-up menu.
4. If you want to also include individual items on playlists, select the appropriate check boxes in the Collections and Items sections of the iTunes U pane.
5. Click the Sync or Apply button in the lower-right corner of the window.
Your iTunes U episodes are synced.
Regardless of the choices you make in the pop-up menus, you can always select individual items by selecting their check boxes.
Books
To sync e-books and audiobooks, follow these steps:
1. Click the Books button and select the Sync Books check box to enable book syncing.
Two pop-up menus at the top of the Books section may make it easier to manage your book collection. The first pop-up lets you see only books or only PDF Files, or both. The second lets you sort your books by either title or author.
2. Choose All Books or Selected Books by selecting the appropriate radio button.
3. If you chose Selected Books, select the check boxes of the books you want to sync.
4. Scroll down the page a little and select the Sync Audiobooks check box to enable audiobook syncing.
5. Choose All Audiobooks or Selected Audiobooks.
6. If you chose Selected Audiobooks, select the check boxes of the audiobooks you want to sync.
If the book is divided into parts, you can select check boxes for the individual parts, if you want.
7. Click the Sync or Apply button in the lower-right corner of the window.
Your books and audiobooks are synced.
Photos
The iPad syncs photos with the following programs:
![]() Mac: iPhoto 9.2 or later or Aperture 3 or later
Mac: iPhoto 9.2 or later or Aperture 3 or later
![]() PC: Adobe Photoshop Elements 8 or later
PC: Adobe Photoshop Elements 8 or later
You can also sync photos with any folder on your computer that contains images. To sync photos, follow these steps:
1. Click the Photos button and select the Sync Photos From check box.
2. Choose an application or a folder from the pop-up menu (which says iPhoto in Figure 3-13).
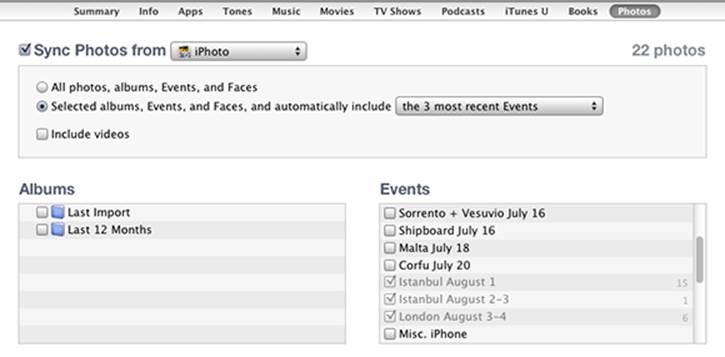
Figure 3-13: The Photos pane determines which photos will be synchronized with your iPad.
3. To further refine what photos are synced, choose any of the following options:
• Select albums, events, and more: If you choose an application that supports photo albums, events, and/or facial recognition, as we have done in Figure 3-13, by choosing iPhoto, you can automatically include events by making a selection from the pop-up menu or select specific albums, events, and/or faces to sync by selecting them in the areas below.
• Search for photos to sync: If you’re using iPhoto, you can also type a word or phrase into the Search field (the oval with the magnifying glass) to search for a specific event(s).
• Select a folder of images: If you choose a folder full of images, you can create subfolders inside it that appear as albums on your iPad.
If you choose an application that doesn’t support albums or events, or a single folder full of images with no subfolders, you have to transfer all or nothing.
Because iPhoto ’09 and ’11 — the two most recent releases — support events and faces in addition to albums, you also have the option of syncing events, albums, or faces — or all three.
4. Click the Sync or Apply button in the lower-right corner of the window.
Your photos are synced.
iCloud: Apple’s Free-and-Easy Wireless Service
Apple’s iCloud service is more than just a wireless hard drive in the sky. Rather, iCloud is a complete wireless storage and data synchronization solution. In a nutshell, iCloud stores and manages your digital stuff — your music, photos, contacts, events, and more — keeping everything updated on all your computers and i-devices automatically with no physical (wired) connection or action on your part. Like so many things Apple makes, iCloud just works.
iCloud “pushes” information such as e-mail, calendars, contacts, and bookmarks to and from your computer and to and from your iPad and other i-devices sporting iOS 5 or later, and then keeps those items updated on all devices wirelessly and without human intervention. It also includes non-synchronizing options, such as Photo Stream (see Chapter 9), e-mail (see Chapter 5), Find My iPad, Find My Friends, and 5GB of online storage.
Your free iCloud account includes 5GB of free storage, which is all many (if not most) users will need. If you find yourself needing more storage, 10, 20, and 50 gigabyte upgrades are available for $20, $40, and $100 a year, respectively.
A nice touch is that music, apps, books, periodicals, movies, and TV shows purchased from the iTunes Store, as well as photos in your Photo Stream, don’t count against your 5GB of free storage. (If you don’t know what your iPad’s delicious Photo Stream and Shared Photo Streams are all about, find out more in Chapter 9.)
And, you’ll find that the things that do count — such as mail, documents, account information, settings, and other app data — don’t use much space. So, that free 5GB is all many users require.
If you want to have your e-mail, calendars, contacts, and bookmarks synchronized automatically and wirelessly (and — believe us — you do), here’s how to enable iCloud syncing on your iPad:
1. Tap Settings on your Home screen.
2. Tap iCloud in the list of settings on the left.
3. Provide your Apple ID and password.
4. Sign in.
Now you can tap any of the individual On/Off switches to enable or disable iCloud sync for
![]() Mail
Mail
![]() Contacts
Contacts
![]() Calendars
Calendars
![]() Reminders
Reminders
![]() Safari
Safari
![]() Notes
Notes
![]() Photo Stream
Photo Stream
![]() Documents & Data
Documents & Data
![]() Find My iPad
Find My iPad
Note that even though iCloud lets you stream or download movies, TV shows, songs, podcasts, or other media files from the iTunes Store, if you don’t have a speedy Internet connection, you may not be able to enjoy them because they will stutter or stall.