iPad mini For Dummies (2013)
Part II. The Internet iPad mini
The first thing most people want to do with their iPad mini is surf the Internet with the delightfully large and colorful touchscreen. Safari, the iPad’s web browser, is the place to start, and that’s where this part begins as well — with an introduction to navigating the web with Safari.
Then we visit the Mail and Messages programs to see how easy it is to set up e-mail and iMessage accounts and to send and receive honest-to-goodness e-mail messages and attachments and iMessages.
Finally, in Chapter 6, we examine the new and improved Maps app. It can help you determine businesses and restaurants to visit, provide step-by-step driving directions and traffic info while you’re en route, and take full advantage of the iPad’s unerring ability to show you where you are on a map.
Chapter 4. Going on a Mobile Safari
In This Chapter
![]() Surfing the ’Net with Safari
Surfing the ’Net with Safari
![]() Navigating the web
Navigating the web
![]() Having fun with bookmarks and Reading Lists and History Lists
Having fun with bookmarks and Reading Lists and History Lists
![]() Sharing websites
Sharing websites
![]() Searching the World Wide Web
Searching the World Wide Web
![]() Securing Safari
Securing Safari
“You feel like you’re actually holding the web right in the palm of your hand.”
Marketers use lines like that one because, well, that’s what marketers do. Except that when an Apple marketer says such a thing to describe surfing the web on the iPad, a lot of truth is behind it, especially on the larger iPad’s spectacular Retina display. But the 7.9-inch display on the iPad mini is no slouch. The screen, in combination with the snappy, dual-core, Apple-designed dual-core A5 chip inside the machine, makes browsing on the mini an absolute delight. In this chapter, you discover the pleasures — and the few roadblocks — in navigating cyberspace on your iPad mini.


Living on the EDGE
Wi-Fi is the chief way to prowl the virtual corridors of cyberspace (or send e-mail, access the App Store or iTunes Store, or check out YouTube) on the iPad. But for all the places you can find an Internet hotspot nowadays — airports, colleges, coffeehouses, offices, schools, and — yes — homes — Wi-Fi still isn’t available everywhere.
If you bought an iPad mini Wi-Fi + Cellular model, you often have a viable alternative when Wi-Fi isn’t available. In the United States, such models are available from AT&T, Verizon, and Sprint. In the United States, they work with geeky-sounding networks — CDMA EV-DO Rev. A and Rev. B, UMTS/HSPA+/DC-HSDPA, GSM/EDGE, and LTE, depending on your carrier.
You can safely avoid the jargon. (These models also work with another wireless technology, Bluetooth, but it serves a different purpose and is addressed in Chapter 15.)
Cellular customers prepay for cellular access using credit cards. Monthly data is as follows: On AT&T, it’s $14.99 for 250MB, $30 for 3GB, or $50 for 5GB; on Verizon, $20 for 1GB, up to $80 for 10GB; and on Sprint, it’s $14.99 for 300MB, $34.99 for 3GB, $49.99 for 6GB, or $79.99 for 12GB. But plans vary, and are subject to change, and you might exhaust those limits quicker than you’d like and rack up higher charges.
Fortunately, no one- or two-year contract commitment is required, as is most likely the case with the cellphone in your pocket. That means if you’re hiking in the Swiss Alps for a month or you’re otherwise indisposed, you don’t have to pay AT&T, Sprint, or Verizon for Internet access you’ll never use.
You pay more money for an iPad mini with cellular upfront and whenever you need cellular service. But when a 4G network such as Long Term Evolution (LTE) is available — and the carriers are busily building their LTE networks, with Verizon available in more places than AT&T and Sprint as of this writing — you can surf at a blistering pace. See Chapter 2 for prepaid (but no contract) 4G data rates in the United States.
Cellular-ready iPads also work on GSM/UMTS network technologies that perform outside the United States, though you may have to pop in a SIM card to get it going abroad without Wi-Fi.
The iPad automatically hops onto the fastest available network, which is almost always Wi-Fi — the friendly moniker applied to the far-geekier 802.11 designation. And “eight-oh-two-dot-eleven” (as it’s pronounced) is followed by a letter — typically (but not always) b, g, or n. You see it written as 802.11b, 802.11g, and so on. The letters relate to differing technical standards that have to do with the speed and range you can expect from the Wi-Fi configuration. But we certainly wouldn’t have you lose any sleep over this issue if you haven’t boned up on this geeky alphabet.
For the record, because the iPad adheres to dual-band 802.11a, b, g, and n standards, you’re good to go pretty much anywhere you can find Wi-Fi. If you have to present a password to take advantage of a for-fee hotspot, you can enter it by using the iPad’s virtual keyboard.
As we point out, the problem with Wi-Fi is that it’s far from ubiquitous, which leads us right back to the cellular data network. Fortunately, 4G is appearing in more and more places. When neither 3G nor 4G is available and you don’t have Wi-Fi, the pokier EDGE on AT&T or its counterpart EV-DO, on Verizon, takes over — not the most pleasant experience.
If you’re ever on a million-dollar game show and have to answer the question, EDGE is shorthand for Enhanced Datarate for GSM Evolution. It’s based on the global GSM phone standard. You may also see an indicator for GPRS, shorthand for General Packet Radio Service, another poky data service.
4G, which stands for fourth generation, is your best bet among available cellular options for the iPad. The bottom line is this: Depending on where you live, work, or travel, you may feel like you’re teetering on the EDGE in terms of acceptable Internet coverage, especially if Wi-Fi, 4G, or 3G is beyond your reach. We’ve used the iPad’s cousin, the iPhone, in areas where web pages load extremely slowly, not-so-vaguely reminiscent of dialup telephone modems for your computer.
But the picture is brightening. 4G is in more places than ever. And the same can be said of Wi-Fi.
One last thing: At the risk of repeating ourselves, don’t forget that streaming movies or downloading huge files will chew through your megabytes or gigabytes long before the end of your monthly plan, even in a matter of hours if you’re not careful. Find some free Wi-Fi access if you want to watch movies or stream other large files.
To monitor your cellular network usage, tap Settings⇒General⇒Usage⇒Cellular Usage. We recommend tapping the Reset Statistics button at the bottom of the Usage pane (you may have to scroll down to see it) on the day you start your monthly data plan.
Surfin’ Dude
One particular version of the Apple Safari web browser is a major reason that the ’Net on the iPad mini is very much like the ’Net you’ve come to expect on a more traditional computer, even with its smaller display. Safari for the Mac and for Windows is one of the best web browsers in the business. In our view, Safari on the iPhone has no rival as a cellphone browser. As you might imagine, Safari on the iPad mini is equally appealing.
Exploring the browser
We start our cyberexpedition with a quick tour of the Safari browser. Take a gander at Figure 4-1: Not all browser controls found on a Mac or PC are present. Still, Safari on the iPad has a familiar look and feel. We describe these controls and others throughout this chapter.
Before you plunge in, we recommend a little detour. Read the “Living on the EDGE” sidebar, earlier in this chapter, to find out more about the wireless networks that enable you to surf the web on the iPad in the first place.
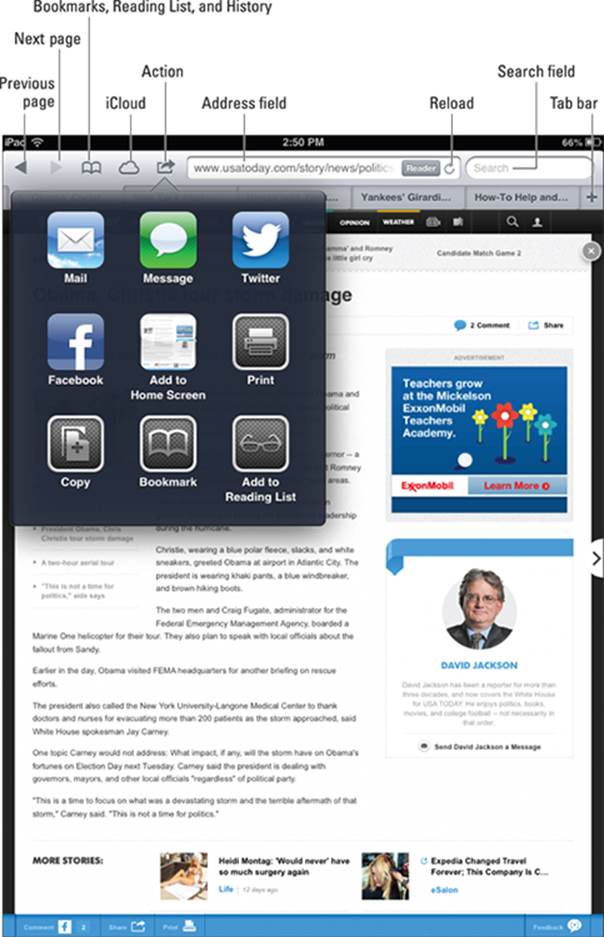
Figure 4-1: The iPad’s Safari browser.
Blasting off into cyberspace
Surfing the web begins with a web address, of course. When you start by tapping the address field in iPad’s Safari, the virtual keyboard appears.
 Here are a few tips for using the keyboard in Safari (and see Chapter 2 for more help with using the virtual keyboard):
![]() Because so many web addresses end with the suffix .com (pronounced “dot com”), the virtual keyboard has a dedicated .com key. For other common web suffixes — .edu, .net, .org, .us, .ro, .eu — press and hold the .com key and choose the relevant domain type.
Because so many web addresses end with the suffix .com (pronounced “dot com”), the virtual keyboard has a dedicated .com key. For other common web suffixes — .edu, .net, .org, .us, .ro, .eu — press and hold the .com key and choose the relevant domain type.
![]() Of equal importance, both the period (.) and the slash (/) are on the virtual keyboard because you frequently use them when you enter web addresses.
Of equal importance, both the period (.) and the slash (/) are on the virtual keyboard because you frequently use them when you enter web addresses.
![]() The moment you tap a letter, you see a list of web addresses that match those letters. For example, if you tap the letter E (as we did in the example shown in Figure 4-2), you see web listings for ESPN, eBay, and others. Tapping U or H instead may display listings for USA TODAYor the Houston Chronicle (shameless plugs for the newspapers where we’re columnists).
The moment you tap a letter, you see a list of web addresses that match those letters. For example, if you tap the letter E (as we did in the example shown in Figure 4-2), you see web listings for ESPN, eBay, and others. Tapping U or H instead may display listings for USA TODAYor the Houston Chronicle (shameless plugs for the newspapers where we’re columnists).
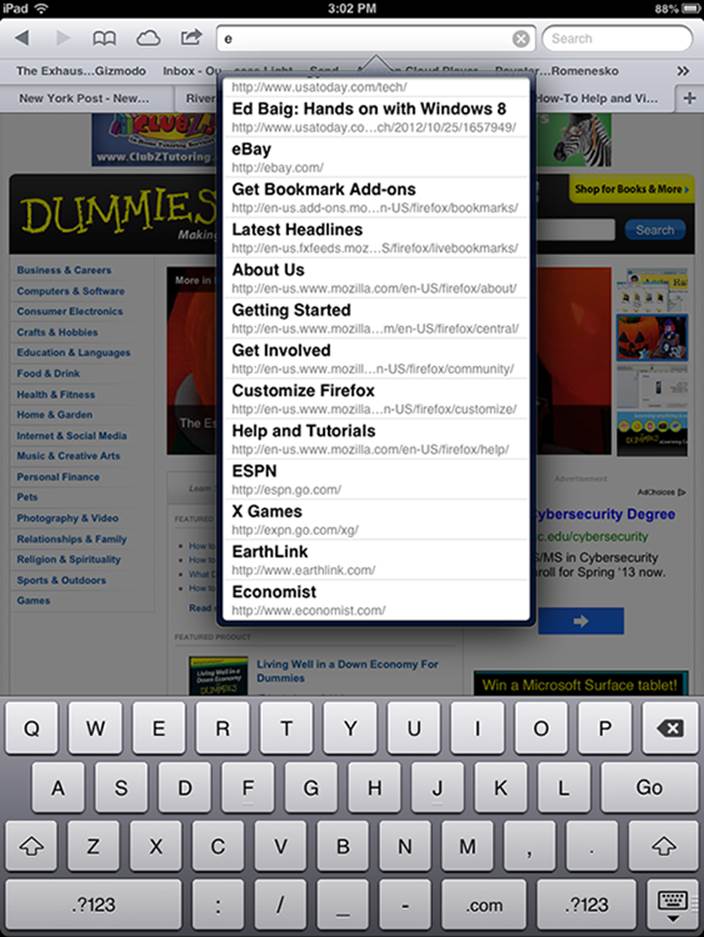
Figure 4-2: Web pages that match your search letter.
You don’t see the Microphone icon on the virtual keyboard that appears in Safari. That rules out the use of dictation. But models with Siri can lend a hand, um, voice. If you call upon Siri and ask her to open the Safari app, she obliges. If you mention a specific website to Siri, such as “ESPN.com,” Siri opens your designated search engine (Google, Bing, or Yahoo!) as discussed later in this chapter. And if Siri heard you right, the site you mentioned appears at the top of the search results.
The iPad has two ways to determine websites to suggest when you tap certain letters:
![]() Bookmarks: The websites you already bookmarked from the Safari or Internet Explorer browsers on your computer (and synchronized, as we describe in Chapter 3). More on bookmarks later in this chapter.
Bookmarks: The websites you already bookmarked from the Safari or Internet Explorer browsers on your computer (and synchronized, as we describe in Chapter 3). More on bookmarks later in this chapter.
![]() History: Sites from the History List — those cyberdestinations where you recently hung your hat. Because history repeats itself, we also tackle that topic later in this chapter.
History: Sites from the History List — those cyberdestinations where you recently hung your hat. Because history repeats itself, we also tackle that topic later in this chapter.
You might as well open your first web page now — and it’s a full HTML page, to borrow from techie lingo:
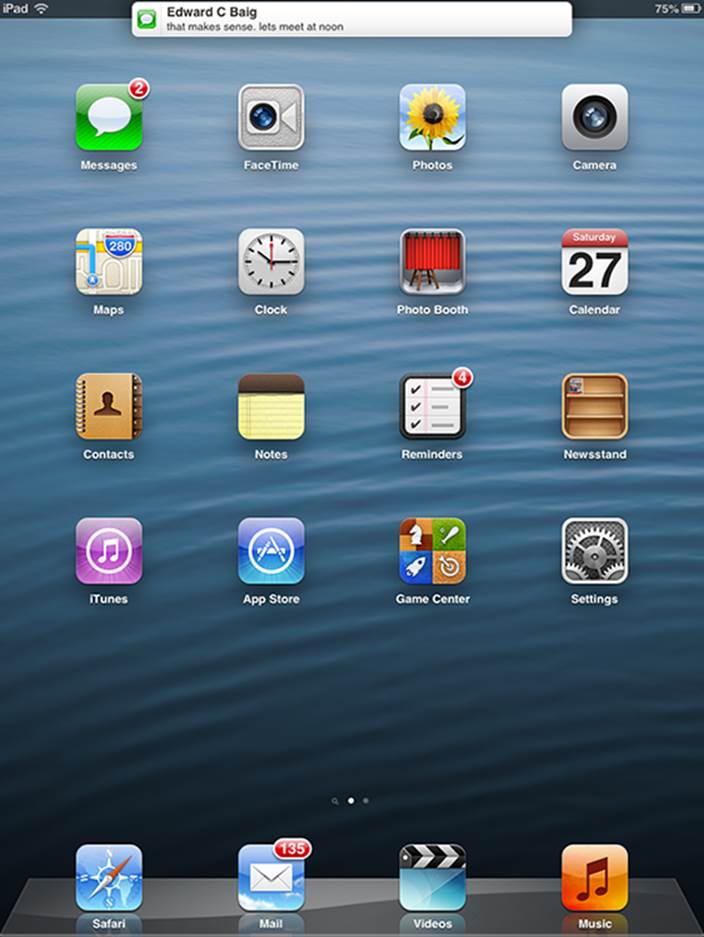
1. Tap the Safari icon docked at the bottom of the Home screen.
If you haven’t moved the icon, it’s a member of the Fantastic Four on the Dock (along with Mail, Videos, and Music). Chapter 1 introduces the Home screen.
2. Tap the address field (refer to Figure 4-1).
3. Begin typing the web address, or URL, on the virtual keyboard that slides up from the bottom of the screen.
4. Do one of the following:
• To accept one of the bookmarked (or other) sites that show up in the list, merely tap the name.
Safari automatically fills in the URL in the address field and takes you where you want to go.
• Keep tapping the proper keyboard characters until you enter the complete web address for the site you have in mind, and then tap the Go key on the right side of the keyboard.
 You don’t need to type www at the beginning of a URL. So, if you want to visit www.theonion.com (for example), typing theonion.com is sufficient to transport you to the humor site. For that matter, Safari can take you to this site even if you type theonion without the.com.
 Because Safari on the iPad mini runs a variation of the iPhone mobile operating system, every so often you may run into a site that serves up the light, or mobile, version of a website, sometimes known as a WAP site. Graphics may be stripped down on these sites. Alas, the producers of these sites may be unwittingly discriminating against you for dropping in on them by using an iPad. In fact, you may be provided a choice of which site you want — the light or the full version. Bravo! If not, you have our permission to berate these site producers with letters, e-mails, and phone calls until they get with the program.
Zoom, zoom, zoom
If you know how to open a web page (if you don’t, read the preceding section in this chapter), we can show you how radically simple it is to zoom in on pages so that you can read what you want to read and see what you want to see, without enlisting a magnifying glass.
Try these neat tricks for starters:
![]() Double-tap the screen so that the area of the display that you make contact with fills the entire screen. It takes just a second before the screen comes into focus. By way of example, check out Figure 4-3, which shows two views of the same Sports Illustrated web page. In the first view, you see what the page looks like when you first open it. In the second one, you see how the Top Stories box takes over much more of the screen after you double-tap it. The area of the screen you double-tapped is the area that swells up. To return to the first view, double-tap the screen again.
Double-tap the screen so that the area of the display that you make contact with fills the entire screen. It takes just a second before the screen comes into focus. By way of example, check out Figure 4-3, which shows two views of the same Sports Illustrated web page. In the first view, you see what the page looks like when you first open it. In the second one, you see how the Top Stories box takes over much more of the screen after you double-tap it. The area of the screen you double-tapped is the area that swells up. To return to the first view, double-tap the screen again.
![]() Pinch the page. Sliding your thumb and index finger together and then spreading them apart (or as we like to say, unpinching) also zooms in and out of a page. Again, wait just a moment for the screen to come into focus.
Pinch the page. Sliding your thumb and index finger together and then spreading them apart (or as we like to say, unpinching) also zooms in and out of a page. Again, wait just a moment for the screen to come into focus.
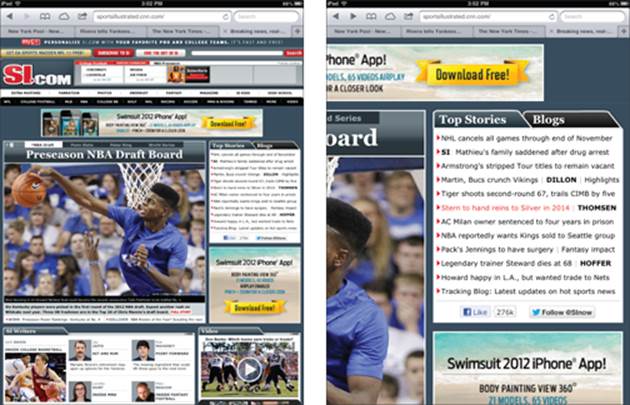
Figure 4-3: Doing a double-tap dance zooms in and out.
![]() Press down on a page and drag it in all directions, or flick through a page from top to bottom. You’re panning and scrolling, baby.
Press down on a page and drag it in all directions, or flick through a page from top to bottom. You’re panning and scrolling, baby.
![]() Rotate the iPad to its side. This reorients from portrait mode to widescreen landscape mode. The keyboard is also wider in this mode, making it a little easier to enter a new URL.
Rotate the iPad to its side. This reorients from portrait mode to widescreen landscape mode. The keyboard is also wider in this mode, making it a little easier to enter a new URL.
However, this little bit of rotation magic doesn’t happen if you’ve set and enabled the Screen Orientation Lock feature that we describe in Chapter 1.
Reader
Safari’s superb Reader feature has been in the Mac and Windows versions of Safari for a while. You’ll be glad that the feature is part of Safari for the iPad as well.
Think of Reader as a clutter remover. Just tap the Reader button in the Web Address field and you can read the article sans extraneous bits and pieces. A picture is, in this case, worth a thousand words, so feast your eyes on Figure 4-4 and compare it with Figure 4-1, which is the same page before invoking Reader.
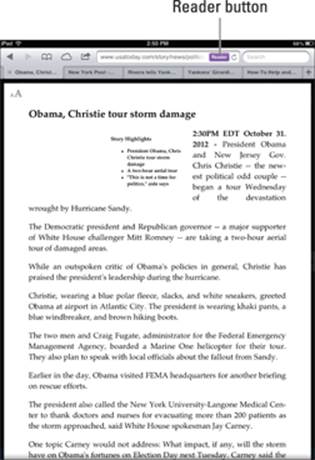
Figure 4-4: This is the same web page as Figure 4-1 but with Reader enabled.
Finding Your Way Around Cyberspace
In this section, we discuss ways to navigate the Internet on your iPad with links and tabs.
Looking at lovable links
Because Safari functions on the iPad mini the same way that browsers work on your Mac or PC, links on the device behave in much the same way.
Text links that transport you from one site to another are typically underlined or shown in blue, red, or bold type, or merely as items in a list. Tap the link to go directly to that site or page.
Tapping other links leads to different outcomes:
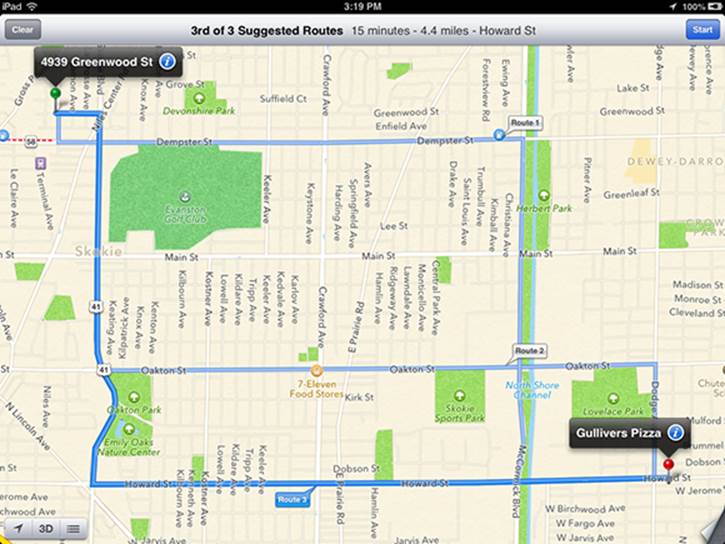
![]() Open a map: Tapping a map launches the Apple Maps application that is, um, addressed in Chapter 6.
Open a map: Tapping a map launches the Apple Maps application that is, um, addressed in Chapter 6.
![]() Prepare an e-mail: Tap an e-mail address, and the iPad opens the Mail program (see Chapter 5) and prepopulates the To field with that address. The virtual keyboard is also summoned so that you can add other e-mail addresses and compose a subject line and message. This shortcut doesn’t always work when an e-mail address appears on a web page.
Prepare an e-mail: Tap an e-mail address, and the iPad opens the Mail program (see Chapter 5) and prepopulates the To field with that address. The virtual keyboard is also summoned so that you can add other e-mail addresses and compose a subject line and message. This shortcut doesn’t always work when an e-mail address appears on a web page.
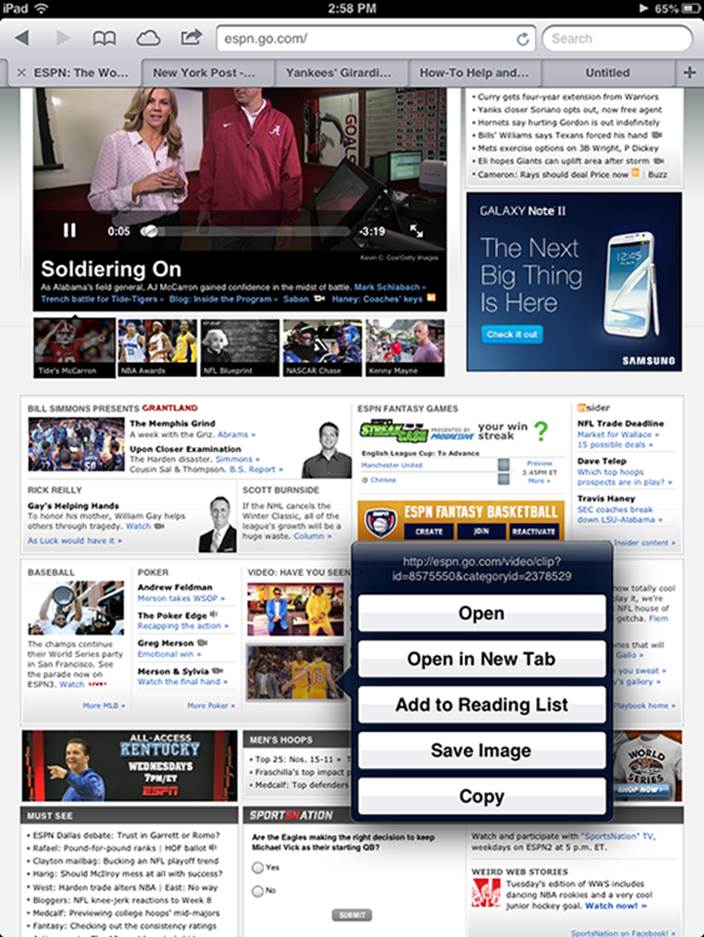
To see the URL for a link, press your finger on the link and hold it there until a list of options appears, as shown in Figure 4-5.
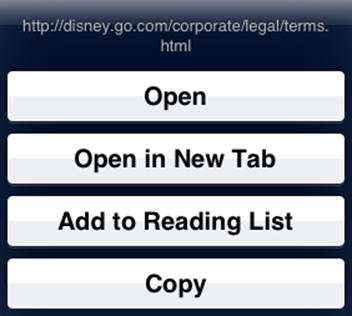
Figure 4-5: Press and hold on a link (Terms of Use), and a list of options appears.
Use this method also to determine whether a picture has a link. Just hold your finger down on the picture and, if it’s linked, you see the web address the link points to.
As for the other link options shown in Figure 4-5, here’s what two of them do:
![]() Open: Opens the page in this tab.
Open: Opens the page in this tab.
![]() Copy: Copies the link’s URL to your iPad’s clipboard so that you can paste it elsewhere.
Copy: Copies the link’s URL to your iPad’s clipboard so that you can paste it elsewhere.
You hear more about the other two options — Open in New Tab and Add to Reading List — a little later in this chapter.
Not every web link cooperates with the iPad. As this book goes to press, the iPad mini doesn’t support some common web standards — most notably, Adobe Flash video. If you see an incompatible link, nothing may happen — or a message may appear, asking you to install a plug-in. For more about getting Flash to work on your iPad, see the nearby sidebar, “Support for the Flash-deprived.”
Tabbed browsing
When we surf the web on a Mac or PC, we rarely go to a single web page and call it a day. In fact, we often have multiple web pages open at the same time. Sometimes, we choose to hop around the web without closing the pages we visit. Sometimes, a link automatically opens a new page without shuttering the old one. (If these additional pages are advertisements, this behavior isn’t always welcome.)
Support for the Flash-deprived
The iPad’s lack of support for Adobe Flash video is a void that, frankly, is unlikely to ever get addressed: Even Adobe is no longer embracing Flash for mobile devices. But because Flash has been the backbone of video and animations across cyberspace, you may still come across web destinations that rely on it. All is not lost, even with the absence of Flash. Apple does support an emerging standard for audio and video — HTML5, among others. And Adobe, too, is now backing HTML5.
In the meantime, you may be able to open Flash videos on the iPad through a couple of workarounds. Skyfire Labs sells a $4.99 iPad app that can support Flash on many sites. But Skyfire’s alternative browser is limited to videos; it doesn’t support Flash games or animations. Meanwhile, the free-to-try (free for ten minutes; the cost after the brief trial is $4.99) iSwifter app from YouWeb promises to address this shortcoming. So along with video, the iSwifter browser can deliver Flash games on Facebook and Google, though not on certain other sites.
Another workaround for some: Tap into your virtual private network (VPN) connection to control your desktop computer from the iPad. If such a connection is available, you can access the browser on that computer.
Safari on the iPad mini lets you open up to nine pages simultaneously, and through iOS gives you a brilliant rendition of tabbed browsing similar to the desktop version of browsers like Safari.
After you have one page open, here are two ways to open additional web pages in Safari so that they appear on the tab bar at the top of the screen (rather than replace the page you’re viewing):
![]() Tap the + button (see Figure 4-6) on the right side of the tab bar near the top of the screen. A blank tab named Untitled appears, as shown in Figure 4-6. Now type a URL, tap a bookmark, or initiate a search and it will appear on this tab.
Tap the + button (see Figure 4-6) on the right side of the tab bar near the top of the screen. A blank tab named Untitled appears, as shown in Figure 4-6. Now type a URL, tap a bookmark, or initiate a search and it will appear on this tab.

Figure 4-6: A new tab, ready to display any page you choose.
![]() Hold your finger on a link until a list of options appears (refer to Figure 4-5), and then tap Open in New Tab.
Hold your finger on a link until a list of options appears (refer to Figure 4-5), and then tap Open in New Tab.
To switch tabs, simply tap the tab. To close a tab, tap the gray X that appears on the left edge of the active tab.
iCloud Tabs
 Though the iPad is your likely traveling companion just about everywhere you go, we know that you also browse the web from your smartphone or personal computer. If that smartphone happens to be an iPhone and the computer is a Macintosh (or Windows PC with Safari and iCloud), you can take advantage of iCloud Tabs, a feature that lets you resume reading web pages that you started looking at on those other devices. It works with the iPod touch, too. To access iCloud Tabs, tap the icon that resembles a cloud near the upper-left corner of Safari (refer to Figure 4-1).
A window appears, revealing the tabs still open on your other devices. Tap the tab you want to return to on the list.
Revisiting Web Pages Time and Again
Surfing the web would be a real drag if you had to enter a URL every time you want to navigate from one page to another. That’s why bookmarks, Web Clips, Reading Lists, and History Lists are useful — all so you can find those favorite websites in the future.
Book(mark) ’em, Dano
You already know how useful bookmarks are and how you can synchronize bookmarks from the browsers on your computer. It’s equally simple to bookmark a web page directly on the iPad. Follow these steps:
1. Make sure that the page you want to bookmark is open, and then tap the Action button at the top of the screen.
The Action button looks like an arrow trying to escape a rectangle.
2. Tap Add Bookmark.
A new window opens with a default name for the bookmark, its web address, and its folder location.
3. To accept the default bookmark name and default bookmark folder, tap Save.
4. To change the default bookmark name, tap the X in the circle next to the name, enter the new title (using the virtual keyboard), and then tap Save.
5. To change the location where the bookmark is saved, tap the > symbol in the Bookmarks field, tap the folder where you want the bookmark to be kept, tap the Add Bookmark button in the upper-left corner of the screen, and then tap Save.
To open a bookmarked page after you set it up, tap the Bookmarks icon in the upper-left portion of the screen. (Refer to Figure 4-1.) If the bookmark you have in mind is buried inside a folder, tap the folder name first and then tap the bookmark you want. If you see History or Reading List (which you read more about in upcoming sections) instead of Bookmarks, tap the Bookmarks button at the top of the list, and then tap the appropriate bookmark.
If you tap Add to Home Screen rather than Add Bookmark in Step 1 of the preceding set of steps, your iPad adds an icon to your Home screen to let you quickly access the site, a topic we discuss in detail in the section “Clipping a web page,” later in this chapter. If you tap Mail instead, the Mail program opens, with a link for the page in the message and the name of the site in the subject line. You find out more about using the Mail app in Chapter 5.
Altering bookmarks
If a bookmarked site is no longer meaningful, you can change it or get rid of it:
![]() To remove a bookmark (or folder), tap the Bookmarks icon and then tap Edit. Tap the red circle next to the bookmark you want to toss off the list, and then tap Delete.
To remove a bookmark (or folder), tap the Bookmarks icon and then tap Edit. Tap the red circle next to the bookmark you want to toss off the list, and then tap Delete.
 To remove a single bookmark or folder, swipe its name from left to right and then tap the red Delete button.
![]() To change a bookmark name or location, tap Edit and then tap the bookmark. The Edit Bookmark screen appears, showing the name, URL, and location of the bookmark already filled in. Tap the fields you want to change. In the Name field, tap the X in the gray circle and then use the keyboard to enter a new title. In the Location field, tap the > symbol and scroll up or down the list until you find a new home for your bookmark.
To change a bookmark name or location, tap Edit and then tap the bookmark. The Edit Bookmark screen appears, showing the name, URL, and location of the bookmark already filled in. Tap the fields you want to change. In the Name field, tap the X in the gray circle and then use the keyboard to enter a new title. In the Location field, tap the > symbol and scroll up or down the list until you find a new home for your bookmark.
![]() To create a new folder for your bookmarks, tap Edit and then tap the New Folder button. Enter the name of the new folder and choose where to put it.
To create a new folder for your bookmarks, tap Edit and then tap the New Folder button. Enter the name of the new folder and choose where to put it.
![]() To move a bookmark up or down in a list, tap Edit and then drag the three bars to the right of the bookmark’s name to its new resting place.
To move a bookmark up or down in a list, tap Edit and then drag the three bars to the right of the bookmark’s name to its new resting place.
 If you take advantage of iCloud, the web pages you’ve bookmarked on your Mac and on your other iOS devices will be available on the iPad and vice versa.
Saving it for later with the Reading List
When you visit a web page you’d like to read, but not now, the Reading List feature is sure to come in handy. Here’s how it works:
![]() Save a page for later: Tap the Action button and then tap Add to Reading List. Or, if you see a link to a page you’d like to read later, press on the link until a list of options appears (refer to Figure 4-5) and then tap Add to Reading List.
Save a page for later: Tap the Action button and then tap Add to Reading List. Or, if you see a link to a page you’d like to read later, press on the link until a list of options appears (refer to Figure 4-5) and then tap Add to Reading List.
![]() Read a page on your Reading List: Tap the Bookmarks icon and tap the page in the Reading List, as shown in Figure 4-7.
Read a page on your Reading List: Tap the Bookmarks icon and tap the page in the Reading List, as shown in Figure 4-7.
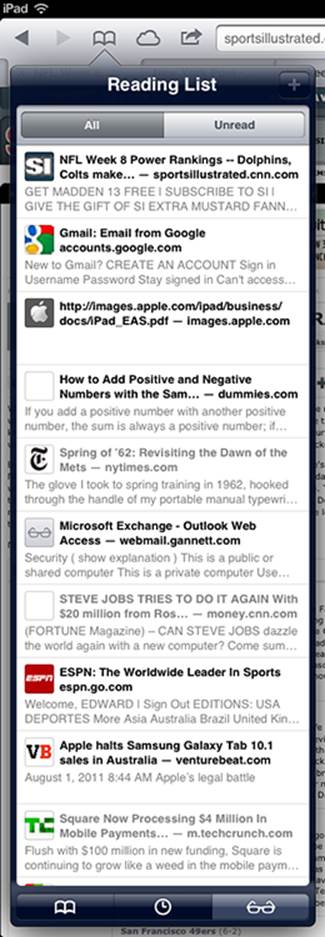
Figure 4-7: Tap a page in the Reading List to read it.
![]() Keep track of what you’ve read: Any headlines you’ve already read appear in gray. The headlines that are still bold are unread.
Keep track of what you’ve read: Any headlines you’ve already read appear in gray. The headlines that are still bold are unread.
![]() Remove items from the Reading List: Swipe the item from left to right or right to left, and then tap its red Delete button.
Remove items from the Reading List: Swipe the item from left to right or right to left, and then tap its red Delete button.
The Reading List feature doesn’t require an active Internet connection. But for an alternative Reading List experience that lets you read web pages later without an Internet connection, check out Marco Arment’s superb Instapaper app. It’s only $4.99 in the App Store; you can read more about Instapaper in Chapter 19.
Finally, don’t forget that you can share your Reading List (and Bookmarks) among your computers and iOS devices with iCloud, as described in Chapter 3.
Clipping a web page
You frequent lots of websites, but some way more than others. You’re constantly online to consult your daily train schedule, for example. In their infinite wisdom, the folks at Apple let you bestow special privileges on frequently visited sites, not just by bookmarking pages but also by affording them their unique Home screen icons. Apple calls them Web Clips, and creating one is dead simple. Follow these steps:
1. Open the web page in question and tap the Action button.
2. Tap Add to Home Screen.
Apple creates an icon out of the area of the page that was displayed when you saved the clip, unless the page has its own, custom icon.
3. Type a new name for your Web Clip or leave the one that Apple suggests.
4. Tap Add.
The icon appears on your Home screen.
As with any icon, you can remove a Web Clip by pressing and holding its icon until it starts to wiggle. Then tap the X in the corner of the icon and tap Delete. The operation is complete when you press the Home button. Of course, you can also move the Web Clip to a more preferred location on one of your Home screens.
Letting history repeat itself
Sometimes, you want to revisit a site that you failed to bookmark, but you can’t remember the darn destination or what led you there in the first place. Good thing you can study the history books.
Safari records the pages you visit and keeps the logs on hand for several days. Here’s how to access your history:
1. Tap the Bookmarks icon and then tap the History icon.
The icon appears as a little clock at the bottom of the Bookmarks list.
2. Tap the day you think you hung out at the site.
3. When you find the listing, tap it.
You’re about to make your triumphant return.
To clear your history so that nobody else can trace your steps (and just what is it you’re hiding?), tap Clear History at the upper-right corner of the History List. Alternatively, starting on the Home screen, tap Settings⇒Safari⇒Clear History. In both instances, per usual, you have a chance to back out without wiping the slate clean.
Sharing Your Web Experiences
When you find a great website that you must share, Safari lets you tweet it, post it to Facebook, or — go old school — print it.
To make Twitter and Facebook work, of course, the iPad must know your username and password, which you can fill in inside Settings (see Chapter 15).
Tweeting a web page
If you’re one of the legions of people who tweets or merely a person who follows others on the enormously popular Twitter microblogging service, then you know that lots of folks share tidbits they come across on the web. Apple makes it a breeze to tweet web pages from the iPad. Tap the Action button and tap Tweet, and a window appears with the web page already attached. You’re given room to add a comment of up to 120 characters of text. If you wish, you can tap Add Location to let everyone know from where it is you’re tweeting. When you’re ready, tap Send, or tap Cancel if you change your mind.
Sharing a page on Facebook
You probably noticed, while tapping the Action button, an icon for the world’s most popular social network Facebook. If you tap that icon, you can share the page you’re looking at with all your friends on Facebook. Once again, you have the option to add your location by— you guessed it — tapping Add Location.
Printing a web page
If you come to a web page that you want to print, tap the Action button. Tap Print from the menu that appears. You need a compatible AirPrint printer, as we explain in Chapter 2.
Saving web pictures
You can capture most pictures you come across on a website — but be mindful of any potential copyright violations, depending on what you plan to do with the images. To copy an image from a website, follow these steps:
1. Press your finger against the image.
2. Tap the Save Image button that appears, as shown in Figure 4-8 (or tap Copy, depend-ing on what you want to do with the image):
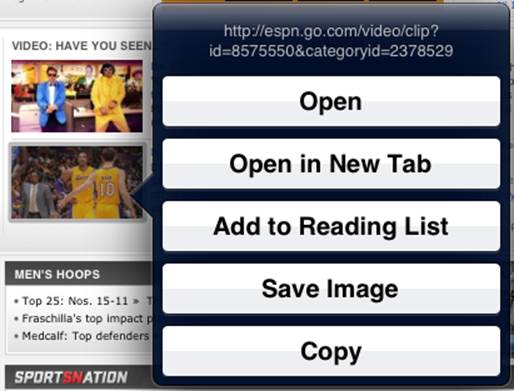
Figure 4-8: Hold your finger against a picture in Safari to save it to the iPad.
• Saved images end up in your Camera Roll, from which they can be synced back to a computer.
• If you tap Copy instead, you can paste the image into an e-mail or as a link in a program, such as Notes.
In some cases — typically, advertisements — you also see an Open button or an Open in New Tab button, which takes you to the ad image. And sometimes, you see the Add to Reading List option as well.
Launching a Mobile Search Mission
Most people spend a lot of time using search engines on the Internet. And the search engines we summon most often are Google, Yahoo!, and Microsoft’s Bing. So it goes on the iPad mini.
Although you can certainly use the virtual keyboard to type google.com, yahoo.com, or bing.com in the Safari address field, Apple doesn’t require that tedious effort. Instead, you tap into Google, Yahoo!, or Bing by using the dedicated search box shown in Figure 4-9. The default search engine on the iPad is Google.
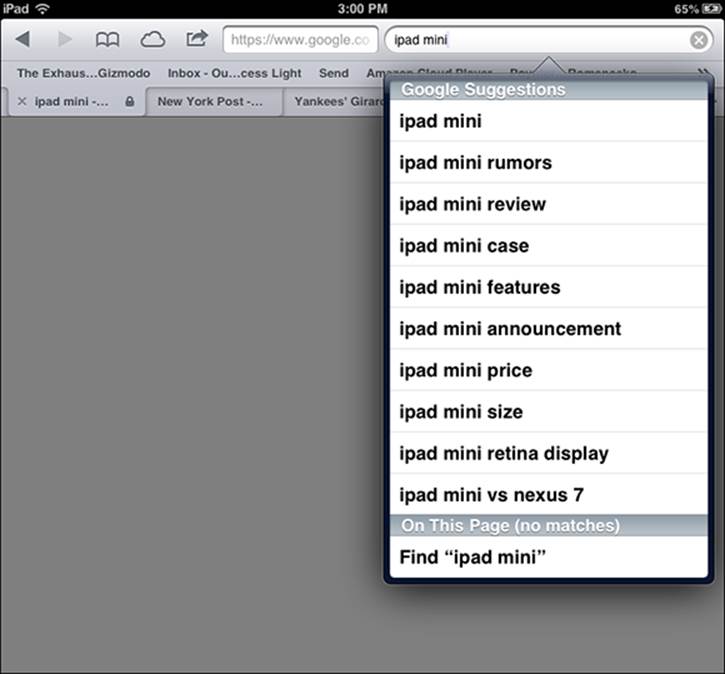
Figure 4-9: Conducting a Google search about iPads on the iPad.
To conduct a web search on the topic of the iPad, follow these steps:
1. Tap the search field.
A funny thing happens. The search field expands (as if Google, Yahoo!, or Bing expected you to enter more text than could fit in the field initially). At the same time, the address bar gets smaller and your ever-obedient virtual keyboard slides up from the bottom. In Chapter 2, we explain how the keyboard adapts to what you’re doing. The one that shows up now has a Search key.
2. Enter your search term or phrase, and then tap the Search key to generate pages of results.
3. Tap any search result that looks promising.
You can find a search word or phrase on the very web page you have open onscreen. Simply enter a search term in the search field as before. At the bottom of the search results list, tap On This Page. (Refer to Figure 4-9.) You may have to scroll down the list to see it. The first occurrence of your search term is highlighted. Tap the Next button at the lower-left corner of the screen to find the next match. Tap Next again for the match after that, and so on.
To switch the search box from Google to Yahoo! or Bing or whatever is your preference, check out the “Smart Safari Settings” section, later in this chapter.
Earlier in this chapter, we tell you that Siri can open Safari — all you have to do is ask. We also mention that she can (in some cases, anyway) take you to your favorite search engine, if you simply utter the name of a website.
Of course, much of what Suri can do is webcentric. So now is as good a time as any to recommend Chapter 14. You’ll get an excellent sense of all that she can do.
Smart Safari Settings
Along with the riches galore found on the Internet are places in cyberspace where you’re hassled. You might want to take action to protect your privacy and maintain your security.
To get started, tap the Settings icon on the Home screen and then tap Safari.
The following settings enable you to tell your iPad what you want to be private and how you want to set your security options:
![]() Search Engine: Tap the search engine you desire (as long as that search engine happens to be Google, Yahoo!, or Bing).
Search Engine: Tap the search engine you desire (as long as that search engine happens to be Google, Yahoo!, or Bing).
![]() AutoFill: Safari can automatically fill out web forms by using your personal contact information, usernames and passwords, or information from your other contacts. Tap AutoFill and then tap the On/Off switch to enable or disable AutoFill.
AutoFill: Safari can automatically fill out web forms by using your personal contact information, usernames and passwords, or information from your other contacts. Tap AutoFill and then tap the On/Off switch to enable or disable AutoFill.
Tap My Info to select yourself in your contacts so that Safari knows which address, phone numbers, e-mail addresses, and other information to use when it fills in a form.
Tap the Names and Passwords On/Off switch to enable or disable Safari’s capability to remember usernames and passwords for websites.
 Turning on AutoFill can compromise your security if someone gets hold of your iPad.
Finally, tap Clear All to permanently delete all saved AutoFill names and passwords.
![]() Open New Tabs in Background: Enable this, and when you open new tabs in Safari, they load, even if you’re reading a different page on another tab.
Open New Tabs in Background: Enable this, and when you open new tabs in Safari, they load, even if you’re reading a different page on another tab.
![]() Always Show Bookmarks Bar: Enable this option to always see Safari’s Bookmarks bar between the Address field and Tab bar. (Refer to Figure 4-9.)
Always Show Bookmarks Bar: Enable this option to always see Safari’s Bookmarks bar between the Address field and Tab bar. (Refer to Figure 4-9.)
![]() Private Browsing: Enable this option, and Safari stops tracking the pages you visit, so your History won’t reveal a trace of where you’ve been.
Private Browsing: Enable this option, and Safari stops tracking the pages you visit, so your History won’t reveal a trace of where you’ve been.
The history of pages you’ve visited can be useful and a huge timesaver, so don’t forget to disable the Private Browsing option again when you’re done doing whatever it is that you don’t want people to know you’re doing.
![]() Accept Cookies: We’re not talking about crumbs you may have accidentally dropped on the iPad. Cookies are tiny bits of information that a website places on the iPad when you visit so that the site recognizes you when you return. You need not assume the worst; most cookies are benign.
Accept Cookies: We’re not talking about crumbs you may have accidentally dropped on the iPad. Cookies are tiny bits of information that a website places on the iPad when you visit so that the site recognizes you when you return. You need not assume the worst; most cookies are benign.
If this concept wigs you out, you can take action: Tap Accept Cookies and then tap Never. Theoretically, you will never again receive cookies on the iPad. A good middle ground is to accept cookies only from the sites you visit. To do so, tap From Visited. You can also tap Always to accept cookies from all sites.
If you set the iPad so that it doesn’t accept cookies, certain web pages won’t load properly, and other sites such as Amazon won’t recognize you or make any of your preferred settings or recommendations available.
Tap Safari to return to the main Safari Settings page.
![]() Clear History: Tap this button to erase everything in Safari’s History, leaving nary a trace of the pages you’ve visited.
Clear History: Tap this button to erase everything in Safari’s History, leaving nary a trace of the pages you’ve visited.
![]() Clear Cookies and Data: Tap this button to clear all your stored cookies (for more details, see the earlier bullet about accepting cookies).
Clear Cookies and Data: Tap this button to clear all your stored cookies (for more details, see the earlier bullet about accepting cookies).
![]() Fraud Warning: Safari can warn you when you land on a site whose producers have sinister intentions. The protection is better than nothing, but don’t let down your guard. The Fraud Warning feature isn’t foolproof. The setting is on by default.
Fraud Warning: Safari can warn you when you land on a site whose producers have sinister intentions. The protection is better than nothing, but don’t let down your guard. The Fraud Warning feature isn’t foolproof. The setting is on by default.
![]() JavaScript: Programmers use JavaScript to add various kinds of functionality to web pages, from displaying the date and time to changing images when you mouse over them. However, some security risks have also been associated with JavaScript. If you do turn it off, though, some things might not work as you expect.
JavaScript: Programmers use JavaScript to add various kinds of functionality to web pages, from displaying the date and time to changing images when you mouse over them. However, some security risks have also been associated with JavaScript. If you do turn it off, though, some things might not work as you expect.
![]() Block Pop-Ups: Pop-ups are those web pages that appear whether or not you want them to. Often, they’re annoying advertisements. But on some sites, you welcome the appearance of pop-ups, so remember to turn off blocking under such circumstances.
Block Pop-Ups: Pop-ups are those web pages that appear whether or not you want them to. Often, they’re annoying advertisements. But on some sites, you welcome the appearance of pop-ups, so remember to turn off blocking under such circumstances.
![]() Advanced: Unless you happen to be a developer, you don’t need to pay much attention to this setting. It lets you turn a debug console (showing errors, warnings, tips, logs, and similar details that developers find useful) on or off.
Advanced: Unless you happen to be a developer, you don’t need to pay much attention to this setting. It lets you turn a debug console (showing errors, warnings, tips, logs, and similar details that developers find useful) on or off.