iPad mini For Dummies (2013)
Part III. The Multimedia iPad mini
Your iPad is arguably the best iPod ever invented. So in this part we look at the multimedia side of your tablet — audio, video, pictures, and books. Never before has a tablet been this much fun to use; in this part, we show you how to wring the most out of every multimedia bit of it.
First we explore how to enjoy listening to music, podcasts, and audiobooks on your iPad mini. Then we look at some video, both literally and figuratively. You find out how to use the video camera, how to find good video for your iPad, and instructions for watching video on your iPad.
In Chapter 9, you find everything you always wanted to know about taking, managing, and displaying photos: how to take still photos with your iPad, how to find photos on your iPad, how to use the iPad’s unique Picture Frame feature, how to create and display slide shows, and how to do other interesting things with them.
Finally, in Chapter 10, you visit the iBookstore, Apple’s nifty digital bookstore. You’ll be amazed at how many books you can carry without breaking your back.
Chapter 7. Get in Tune(s): Audio on Your iPad mini
In This Chapter
![]() Checking out your iPad’s inner iPod
Checking out your iPad’s inner iPod
![]() Browsing your library
Browsing your library
![]() Taking control of your tunes
Taking control of your tunes
![]() Customizing your audio experience
Customizing your audio experience
![]() Shopping with the iTunes app
Shopping with the iTunes app
Your iPad is perhaps the best iPod ever — especially for working with audio and video. In this chapter, we show you how to use your iPad mini for audio; in Chapter 8, we cover video.
We start with a quick tour of the iPad’s Music application. Then we look at how to use your iPad as an audio player. After you’re nice and comfy with using it this way, we show you how to customize the listening experience so that it’s just the way you like it. Then we offer a few tips to help you get the most out of using your iPad as an audio player. Finally, we show you how to use the iTunes application to buy music, audiobooks, videos, and free content such as podcasts and iTunes U courses.
We assume that your iPad already contains audio content — songs, podcasts, or audiobooks. If you don’t have any audio on your iPad yet, we humbly suggest that you get some before you read the rest of this chapter — or Chapter 8, for that matter. You can get audio by syncing (flip to Chapter 3 and follow the instructions) or buying it from the iTunes Store (see the last section in this chapter) on your iPad.
Okay, now that you have some audio content on your iPad to play with, are you ready to rock?

Introducing the iPod inside Your iPad mini
To use your iPad as an iPod, tap the Music icon on the right side of the Dock at the bottom of the screen (unless you’ve moved the app elsewhere).
Figure 7-1 provides a quick overview of the Music app for your enjoyment and edification.
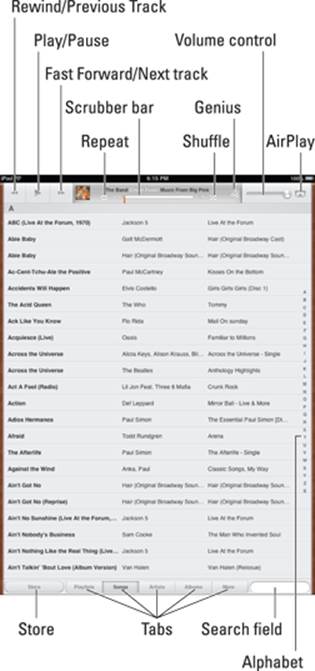
Figure 7-1: These components are what you find on the Music app’s main screen.
At the top of the screen are the music controls and buttons; at the bottom are five tabs: Playlists, Songs, Artists, Albums, and More. Because the Songs tab is selected in Figure 7-1, the middle of the screen displays the songs available on our iPad.
 If you don’t see every song in your library, chances are you’ve typed something into the Search field or you’re looking at a shared Music library instead of the songs on your iPad.
Along the right side of the screen, you see the letters of the alphabet, from A to Z. Tap one to jump to that letter instantly when you’re browsing playlists, songs, artists, or albums.
If you don’t see the alphabet on the right side of the screen, you may not have enough items on that tab to warrant it, or you may be looking at a category such as Genres (described in the “Browsing among the tabs” section, later in the chapter), which doesn’t have an alphabetical index. Don’t worry.
You can find a particular song, artist, album, genre, composer, podcast, audiobook, or iTunes U course by either using the Search field or browsing the tabs. The following sections show you how.
iTunes Match: All your music, all the time, on all your devices
If you own more music than your iPad can hold, or if you’d prefer to devote your gigabytes to something other than music — such as photos or videos — you’ll like the Apple iTunes Match service. For a mere $24.99 a year, Apple stores your music library — as many as 25,000 songs — on iCloud (see Chapter 3) and lets you stream or download any of them any time you like on up to ten devices.
It all happens in iTunes, and it works beautifully. When you enable iTunes Match, the first thing it does is compare your iTunes Library with tracks available in the iTunes Store (20 million tracks and growing). If it finds a match, the song is already available from iCloud, and you can listen to it or download it to your device at any time (as long as you have an Internet connection, of course).
After it matches all the songs it can, iTunes uploads all songs it couldn’t match (to a maximum of 25,000). In a few hours (or days), those songs are also available from iCloud on all your devices on demand.
Here are three more cool things you should know about iTunes Match:
![]() Songs purchased from the iTunes Store don’t count against your total of 25,000 songs.
Songs purchased from the iTunes Store don’t count against your total of 25,000 songs.
![]() Your iTunes Match content doesn’t count against your free 5GB of iCloud storage.
Your iTunes Match content doesn’t count against your free 5GB of iCloud storage.
![]() All the songs that iTunes matches (with its 20 million-plus tracks) are 256 Kbps AAC DRM-free files, even if your original was of lower quality. The songs you stream or download from iCloud are therefore likely to sound better than the originals in your iTunes Library.
All the songs that iTunes matches (with its 20 million-plus tracks) are 256 Kbps AAC DRM-free files, even if your original was of lower quality. The songs you stream or download from iCloud are therefore likely to sound better than the originals in your iTunes Library.
For only $25 a year, you can ignore the whole syncing thing between your Mac or PC and your iPad (Chapter 3 covers syncing), at least for music. As long as Internet access is available, your entire music library is available on your iPad (and up to nine other devices).
Finding music with the Search field
With the Music app open, the easiest way to find music is to type a song, an artist, an album, or a composer name into the Search field in the lower-right corner of the screen.
You can also find songs (or artists, for that matter) without opening the Music app by typing their names in a Spotlight search, as we mention in Chapter 2.
Browsing among the tabs
To browse your music library, tap the appropriate tab at the bottom of the screen — Playlists, Songs, Artists, or Albums — and all items of that type appear. Or tap the More button to browse genres or composers or to connect to a shared library, as described later in this chapter.
Now you can find a song, an artist, an album, a genre, or a composer by
![]() Flicking upward or downward to scroll up and down the list until you find what you’re looking for
Flicking upward or downward to scroll up and down the list until you find what you’re looking for
or
![]() Tapping one of the little letters on the right side of the screen to jump to that letter in the list (all categories except Genres)
Tapping one of the little letters on the right side of the screen to jump to that letter in the list (all categories except Genres)
Then, when you find what you’re looking for, here’s what happens, based on which tab is selected:
![]() Playlists: A grid of available playlists on this iPad appears. Tap a playlist, and the songs it contains appear in a list (refer to Figure 7-1). Tap a song to play it.
Playlists: A grid of available playlists on this iPad appears. Tap a playlist, and the songs it contains appear in a list (refer to Figure 7-1). Tap a song to play it.
![]() Songs: The song plays.
Songs: The song plays.
 If you’re not sure which song you want to listen to, try this: Tap the Shuffle button at the top of the screen (shown earlier, in Figure 7-1). Your iPad then plays songs from your music collection at random.
![]() Artists: A list of artists’ names appears. Tap an artist, and all the albums and songs by that artist appear; tap a song, and it plays.
Artists: A list of artists’ names appears. Tap an artist, and all the albums and songs by that artist appear; tap a song, and it plays.
To see the list of artists, you can either tap the Artists button near the upper-left corner of the screen or tap the Artists tab at the bottom of the screen.
Figure 7-2 is what you see after you tap an artist’s name. (In this case, the artist is Dirk Etienne, one of Bob’s favorite singers.)
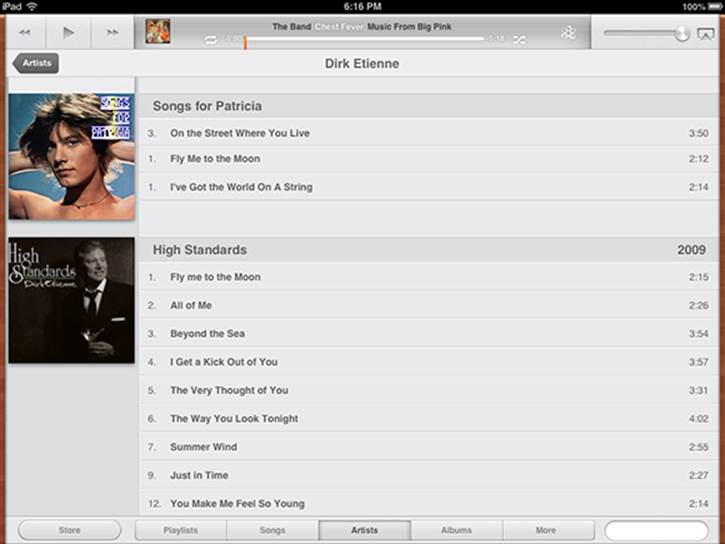
Figure 7-2: Bob tapped Dirk Etienne in the list of artists, and this appeared.
![]() Albums: The Albums option works much the same way as Artists, except that you see a grid of album covers instead of a list of artists. Tap an album, and its contents appear.
Albums: The Albums option works much the same way as Artists, except that you see a grid of album covers instead of a list of artists. Tap an album, and its contents appear.
To play one of the songs on the album, tap the song. To return to the grid of album covers, tap anywhere outside the overlay.
![]() More: Tap More to see one of these elements:
More: Tap More to see one of these elements:
• Genres: When you tap Genres, a grid of genres — Comedy, Rock, Pop, Hip Hop/Rap, and so on — appears. Tap a genre, and a list of the songs in that genre appears.
If the list of songs in an overlay is long enough, you may have to flick upward to see the rest of the songs.
• Composers: A list of composers appears. Tap a composer, and all the albums and songs by that composer appear. Tap a song, and it plays; tap an album cover, and all the songs from that album play; or tap the Play All Songs button, just below the Search field, to play all songs from all albums by that composer. Tap the Composers button near the top of the screen and just to the right of the word Library, or tap the Composers tab at the bottom of the screen to return to the list of composers.
• Shared: You see this item only when a computer with Home Sharing enabled in iTunes is sharing the Wi-Fi network with your iPad mini.
If you’re looking for other iTunes content — such as movies, TV shows, iTunes U courses, or podcasts — you find them in their own, separate apps (Video, iTunes U, and Podcasts), which we cover in Chapter 8.
What’s the difference between artists and composers?
If you’re wondering about the difference between an artist and a composer, imagine this, if you will: You have a recording in your iTunes Library of a track entitled Symphony No. 5 in C Minor. The composer will always be Ludwig van Beethoven, but the artist can be the London Symphony Orchestra, the Los Angeles Philharmonic, the Austin Klezmer Ensemble, or many other performers. Here’s another example: The ballad “Yesterday” was composed by John Lennon and Paul McCartney but has been performed by artists that include The Beatles, Ray Charles, Boyz II Men, Dave Grusin, Marianne Faithful, and many others.
Now you may be wondering where your iPad gets this kind of info, because you know you didn’t supply it. Check this out: Click a track in iTunes on your computer, choose File⇒Get Info, and then click the Info tab at the top of the window.
That’s only some of the information that can be embedded in an audio track. These bits of embedded information, sometimes referred to as the track’s tags, is what your iPad uses to distinguish between artists and composers. If a track doesn’t have a composer tag, you won’t find it on the Composers tab on your iPad.
Taking Control of Your Tunes
If you’re reading along in this chapter, you have the iPad mini’s musical basics down and can find and play songs. Here we take a look at some of the things you can do with your iPad when it’s in Music mode.
Playing with the audio controls
First things first: In this section, we look at the controls you use after you tap the title of a song to play it. Take a peek at Figure 7-1, earlier in this chapter, to see exactly where all these controls are located on the screen:
![]() Volume control: Drag the little dot to the left or right to reduce or increase the volume level.
Volume control: Drag the little dot to the left or right to reduce or increase the volume level.
![]() Previous Track/Rewind button: When a track is playing, tap once to go to the beginning of the track, or tap twice to go to the start of the preceding track in the list. Touch and hold this button to rewind the track at double speed.
Previous Track/Rewind button: When a track is playing, tap once to go to the beginning of the track, or tap twice to go to the start of the preceding track in the list. Touch and hold this button to rewind the track at double speed.
![]() Play/Pause button: Tap to play or pause the track.
Play/Pause button: Tap to play or pause the track.
![]() Next Track/Fast Forward button: Tap to skip to the next track in the list. Touch and hold this button to fast-forward at double speed.
Next Track/Fast Forward button: Tap to skip to the next track in the list. Touch and hold this button to fast-forward at double speed.
You can display playback controls anytime a track is playing. Better still, this trick works even when you’re using another app or your Home screen(s): Double-tap the Home button and swipe the multitasking bar from left to right, and the controls appear at the bottom of the screen, as shown in Figure 7-3.
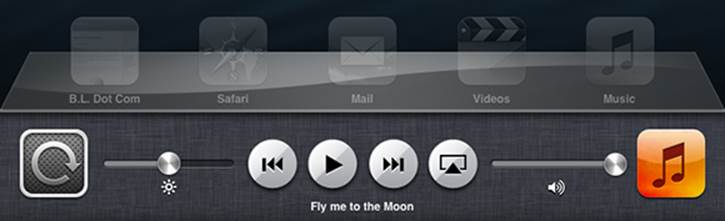
Figure 7-3: These controls appear — even if you’re using another app — when you double-tap the Home button and swipe the multitasking bar from left to right while a track plays.
 The playback controls don’t appear if you’re using an app that has its own audio, such as many games, any app that records audio, or VoIP (Voice over Internet Protocol) apps such as Skype.
A similar set of controls appears at the top of the screen when you double-tap the Home button while your iPad is locked.
![]() Scrubber bar and Playhead: Drag the little dot (the Playhead) along the Scrubber bar to skip to any point within the track.
Scrubber bar and Playhead: Drag the little dot (the Playhead) along the Scrubber bar to skip to any point within the track.
You can adjust the scrub rate by sliding your finger downward on the screen as you drag the Playhead along the Scrubber bar. Check out the section on the hidden iTunes scrub-speed tip in Chapter 20 for additional details. By the way, this slick trick also works in many other apps that use a Scrubber bar — most notably, the Videos app.
![]() Repeat: Tap once to repeat all songs in the current list (that is, playlist, album, artist, composer, or genre) and play them all over and over. Tap again to repeat the current song again and again. Tap again to turn off Repeat.
Repeat: Tap once to repeat all songs in the current list (that is, playlist, album, artist, composer, or genre) and play them all over and over. Tap again to repeat the current song again and again. Tap again to turn off Repeat.
The button appears in blue after one tap, in blue with a little numeral 1 inside after two taps, and in black-and-white when Repeat is turned off.
![]() Shuffle: Tap this button to play songs at random; tap again to play songs in the order they appear onscreen.
Shuffle: Tap this button to play songs at random; tap again to play songs in the order they appear onscreen.
![]() Genius: This feature is so cool that we devote an entire section to it. See the section “It doesn’t take a Genius,” later in this chapter.
Genius: This feature is so cool that we devote an entire section to it. See the section “It doesn’t take a Genius,” later in this chapter.
But wait — there’s more. If you tap the album art for the song that’s playing (between the Fast Forward/Next Track button and the Repeat button at the top of the screen), the album art fills the screen. Tap anywhere to see the controls and tabs at the top and bottom of the screen.
Notice that when album art is onscreen, the Store button and Search field at the bottom of the screen disappear and the Back and Track List buttons take their places, as shown in Figure 7-4.

Figure 7-4: You see these additional buttons after you tap the album art.
Earlier in this section, we explain how to use the volume control, Rewind/Previous Track button, Play/Pause button, Fast Forward/Next Track button, and Scrubber bar/Playhead. These elements may look slightly different on this screen, but they work in exactly the same way.
These new buttons are at the bottom of the screen:
![]() Back: Tap this button to return to the preceding screen.
Back: Tap this button to return to the preceding screen.
![]() Track List: Tap this button to see all the tracks on the album that’s playing, as shown in Figure 7-5.
Track List: Tap this button to see all the tracks on the album that’s playing, as shown in Figure 7-5.
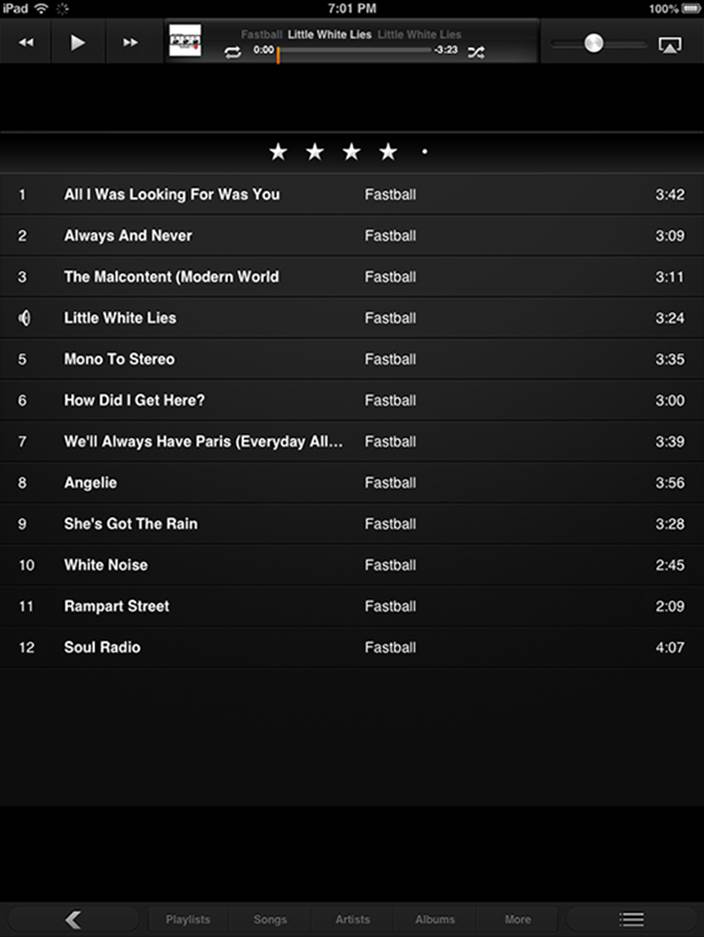
Figure 7-5: We’ve given this tune a rating of four (out of five) stars.
Tap any song in this list to play it. Or swipe your finger across the dots just beneath the Scrubber bar to rate the song from one to five stars. In Figure 7-5, we’ve rated the song that’s playing — “Across the Universe” — four stars.
Why would you want to assign star ratings to songs? One reason is that you can use star ratings to filter songs in iTunes on your Mac or PC. Another is that you can use them when you create Smart Playlists (described later in this chapter) in iTunes. And last but not least, they look cool.
It doesn’t take a Genius
Genius selects songs from your music library that go great together. To use it, tap the Genius button, and your iPad generates a Genius playlist of 25 songs that it picked because it thinks they go well with the song that’s playing.
If you tap the Genius button on the main screen (refer to Figure 7-1) and no song is playing, an alphabetical list of songs appears. You need to select a song before the Genius playlist can be generated.
When you create a Genius playlist, you find an item called Genius in your library list; tap it and you see the 25 songs that Genius selected. You see three buttons in the upper-right corner of the list:
![]() New: Select a different song to use as the basis for a Genius playlist.
New: Select a different song to use as the basis for a Genius playlist.
![]() Refresh: See a list of 25 songs that “go great with” the song you’re listening to (or the song you selected).
Refresh: See a list of 25 songs that “go great with” the song you’re listening to (or the song you selected).
![]() Save: Save this Genius playlist so that you can listen to it whenever you like.
Save: Save this Genius playlist so that you can listen to it whenever you like.
When you save a Genius playlist, it inherits the name of the song it’s based on and appears in your library with the Genius icon, which looks like the Genius button. And the next time you sync your iPad, the Genius playlist magically appears in iTunes.
The less popular the song, artist, or genre, the more likely Genius will “choke” on it. When it chokes, you see an alert that asks you to try again because this song doesn’t have enough related songs to create a Genius playlist.
If you like the Genius feature, you can also create a new Genius playlist in iTunes and then sync it with your iPad.
A brief AirPlay interlude
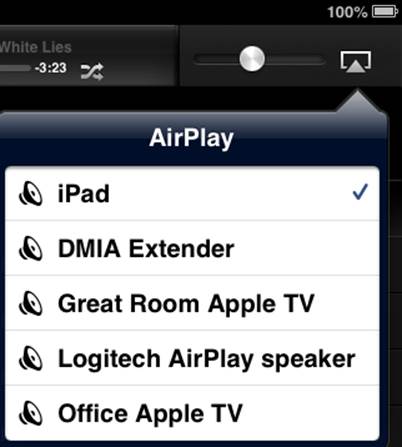
You may or may not see one icon in your iPad’s Music app, and it’s the AirPlay icon, which looks like the image on the left in the figure. AirPlay is a wicked-cool technology baked into every copy of iOS. AirPlay lets you wirelessly stream music, photos, and video to AirPlay-enabled devices, such as Apple’s AirPort Extreme, AirPort Express Wi-Fi base stations, and Apple TV, as well as third-party AirPlay-enabled devices, including (but not limited to) speakers and (someday, we hope) HDTVs.
AirPlay Selector appears only if it detects an AirPlay-enabled device on the same Wi-Fi network. Bob has an Apple TV in his den, so he sees the options in the figure on the right when he taps the AirPlay Selector icon. Tapping Family Room Apple TV sends whatever is playing on the Music app to the Apple TV in his den. The Apple TV is, in turn, connected to his home theater audio system and to HDTV via HDMI and/or optical audio cables.
If you use an Apple TV as your AirPlay-enabled device, you can also stream music, video, and photos from your iPad to your HDTV.
Finally, the iPad mini offers a cool video-mirroring option when used with a second- or third-generation Apple TV. To use this new feature, double-tap the Home button and swipe the multitasking bar from left to right to reveal the music controls. Now tap the AirPlay Selector and then Apple TV. Switch on the Mirroring option, and whatever appears on the iPad’s screen also appears on the HDTV screen.
If you have an HDMI-equipped TV and/or a decent sound system and you have decent Wi-Fi bandwidth, you’ll love Apple TV and AirPlay.
![]()
Creating playlists
A playlist lets you organize songs around a particular theme or mood: operatic arias, romantic ballads, British invasion — whatever. Younger folks sometimes call it a mix.
Although it may be easier to create playlists in iTunes on your computer, your iPad makes it relatively easy to create (and listen to) playlists:
![]() To create a playlist on your iPad, tap the Playlists tab at the bottom of the screen, and then tap the New button in the upper-right corner of the screen. You’re asked to name your playlist. Do so and then tap Save. After you do this, you see a list of the songs on your iPad in alphabetical order. Tap the ones you want to have in this playlist, or tap the Add All Songs button to add them all. Songs you add turn gray, as shown in Figure 7-6.
To create a playlist on your iPad, tap the Playlists tab at the bottom of the screen, and then tap the New button in the upper-right corner of the screen. You’re asked to name your playlist. Do so and then tap Save. After you do this, you see a list of the songs on your iPad in alphabetical order. Tap the ones you want to have in this playlist, or tap the Add All Songs button to add them all. Songs you add turn gray, as shown in Figure 7-6.
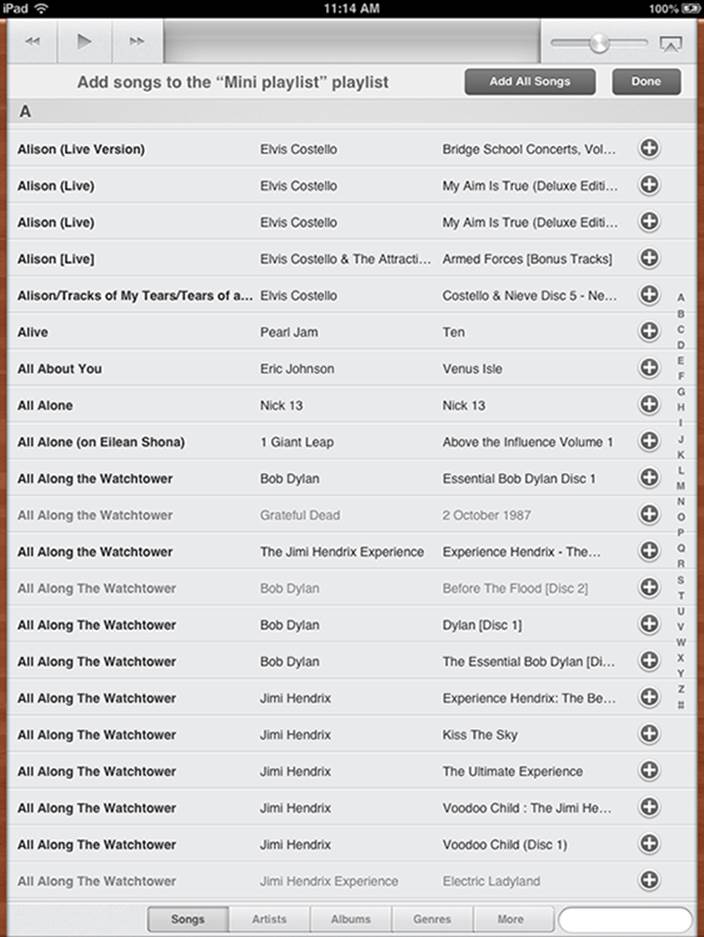
Figure 7-6: Creating a playlist on your iPad.
After you’ve tapped every song you want in the list, tap the Done button in the upper-right corner.
You can select tracks for your playlist from the Artists, Albums, Genres, or More (Composers, Audiobooks, or Podcasts) tab by tapping the appropriate tab at the bottom of the screen.
![]() To listen to a playlist, tap its name in your library, and you see a list of the songs it contains. If the list is longer than one screen, flick upward to scroll down. Tap a song in the list, and the song plays. When that song is over or you tap the Next Song button, the next song in the playlist plays. This continues until the last song in the playlist has played, at which point your iPad stops playing music.
To listen to a playlist, tap its name in your library, and you see a list of the songs it contains. If the list is longer than one screen, flick upward to scroll down. Tap a song in the list, and the song plays. When that song is over or you tap the Next Song button, the next song in the playlist plays. This continues until the last song in the playlist has played, at which point your iPad stops playing music.
Of course, songs don’t play in order if you’ve enabled the Shuffle or Repeat functions (both discussed in “Playing with the audio controls,” earlier in this chapter).
Although you can’t create Smart Playlists on your iPad, they totally rock. What is a Smart Playlist? Glad you asked. A Smart Playlist is a special playlist that selects tracks based on criteria you specify, such as artist name, date added, rating, genre, year, and many others. Fire up iTunes on your computer and choose File⇒New Smart Playlist to get started.
That’s all there is to selecting, creating, and playing songs in a playlist.
Customizing Volume and Equalizer Settings
You can tweak volume and equalizer settings to customize your iPad-as-an-iPod experience. If you’ve noticed, and been bothered, that the volume of some songs is higher than others, check out the iTunes Sound Check feature. If you want to adjust certain frequencies, the equalizer enables you to do so. And if you want to set a maximum volume limit, tell your iPad to make it so. The following sections explain how.
Play all songs at the same volume level
The iTunes Sound Check option automatically adjusts the level of songs so that they play at the same volume relative to each other. That way, one song never blasts out your ears even if the recording level is much louder than that of the song before or after it. To tell the iPad to use these volume settings, you first have to turn on the feature in iTunes on your computer. Here’s how to do that:
1. Choose iTunes⇒Preferences (Mac) or Edit⇒Preferences (PC).
2. Click the Playback tab.
3. Select the Sound Check check box to enable it.
Now you need to tell the iPad to use the Sound Check settings from iTunes. Here’s how to do that:
1. Tap the Settings icon on the iPad’s Home screen.
2. Tap Music in the list of settings.
3. Tap the Sound Check On/Off switch so that it says On.
Choose an equalizer setting
An equalizer increases or decreases the relative levels of specific frequencies to enhance the sound you hear. Some equalizer settings emphasize the bass (low-end) notes in a song; other equalizer settings make the higher frequencies more apparent. The iPad has more than a dozen equalizer presets, with names such as Acoustic, Bass Booster, Bass Reducer, Dance, Electronic, Pop, and Rock. Each one is ostensibly tailored to a specific type of music.
The way to find out whether you prefer using equalization is to listen to music while trying different settings. To do that, first start listening to a song you like. Then, while the song is playing, follow these steps:
1. Tap the Home button on the front of your iPad.
2. Tap the Settings icon on the Home screen.
3. Tap Music in the list of settings.
4. Tap EQ in the list of Music settings.
5. Tap different EQ presets (Pop, Rock, R&B, or Dance, for example), and listen carefully to the way they change how the song sounds.
6. When you find an equalizer preset that you think sounds good, tap the Home button and you’re finished.
If you don’t like any of the presets, tap Off at the top of the EQ list to turn off the equalizer.
At the risk of giving away one of the tips in Chapter 20, we feel obliged to mention that you may improve the battery life if you turn off EQ.
Set a volume limit for music (and videos)
You can instruct your iPad to limit the loudest listening level for audio or video. To do so, here’s the drill:
1. Tap the Settings icon on the Home screen.
2. Tap Music in the list of settings.
3. Tap Volume Limit in the list of Music settings.
4. Drag the slider to adjust the maximum volume level to your liking.
5. (Optional) Tap Lock Volume Limit to assign a four-digit passcode to this setting so that others can’t easily change it.
The Volume Limit setting limits the volume of only music and videos; it doesn’t apply to podcasts or audiobooks. And although the setting works with any headset, headphones, or speakers plugged into the headset jack on your iPad, it doesn’t affect the sound played on your iPad’s internal speaker.
By the way, speaking of that lone internal iPad speaker, it’s not in stereo — although it sounds pretty good just the same. Of course, when you plug in headphones, you hear rich stereo output.
Shopping with the iTunes App
Last but certainly not least, the iTunes app lets you use your iPad to download, buy, or rent just about any song, album, movie, or TV show. And if you’re fortunate enough to have an iTunes gift card or gift certificate in hand, you can redeem it directly from your iPad.
If you want to do any of that, however, you must first sign in to your iTunes Store account. Follow these steps:
1. Tap the Settings icon on the Home screen.
2. Tap Store in the list of settings.
3. Tap Sign In.
4. Type your username and password.
Or, in the unlikely event that you don’t have an iTunes Store account already, follow these steps:
1. Tap the Settings icon on the Home screen.
2. Tap Store in the list of settings.
3. Tap Create New Account.
4. Follow the onscreen instructions.
After the iTunes Store knows who you are (and, more importantly, knows your credit card number), tap the iTunes icon on your Home screen (or the Store button in the Music app) and shop until you drop. It works almost exactly the same as the iTunes App Store, which you can read about in Chapter 11.
If you had an iPad before buying your iPad mini, you should know that in iOS 6, you no longer download and manage podcasts and iTunes U courses with the iTunes app. For that, download the free Podcasts and iTunes U apps from the App Store, as described in Chapter 11.
All materials on the site are licensed Creative Commons Attribution-Sharealike 3.0 Unported CC BY-SA 3.0 & GNU Free Documentation License (GFDL)
If you are the copyright holder of any material contained on our site and intend to remove it, please contact our site administrator for approval.
© 2016-2026 All site design rights belong to S.Y.A.