Teach Yourself VISUALLY iPhoto for iPad (2013)
Chapter 2: Taking and Importing Photos
iPhoto is designed to work with the Camera and Photos apps to take, view, import, and manage photo collections. Use Camera to take photos. Use Photos to view and organize them. You can also import photos from an external camera using the Camera Connection Kit.
Understanding the Camera App
Take Photos with Camera
Using Camera Options
Control Exposure and Focus
Take Photos from the Lock Screen
Record Video
Understanding Photo Management
Get Started with the Photos App
Using the Camera Roll
Save and Share Photos
Using the Camera Connection Kit
Copy Photos to a Mac or PC
Understanding the Camera App
All iPhone and recent iPad devices include at least one built-in camera, and some models include multiple cameras with a built-in LED flash. You can use the Camera app to take photos with these cameras.
Although Camera looks simple, it has some clever hidden features. You can use them to create impressive special effects. Camera is also good for quick snaps and can be accessed through the lock screen without unlocking your device.
Select a Camera
The iPhone 4 and later and the iPad 2 and later include a front camera and a rear camera. You can select either in the Camera app. The front-facing camera is designed for live video with FaceTime, Skype, and similar services. Photo quality is limited, but you can use it to take snaps of yourself without having to use a mirror. The rear-facing camera takes better quality photos. It also works with the LED flash, if your device has one.

Using Camera Controls
iDevice cameras are automatic, so you cannot set the focus, exposure, or shutter speed. However, you can use a manual digital zoom to zoom into part of your photo. You can also tap the photo preview window to force the camera to focus on a small area in the photo. The camera tries to make this area as sharp as possible in the photo, and also uses the brightness of the area to estimate exposure. You can use this feature to create silhouettes, shoot into a bright light, focus on a background and blur a foreground, or deliberately overexpose a photo for special effects.

Using Camera Options
Depending on your iDevice, you can choose various camera options. The grid displays a grid that divides the photo preview into nine boxes called thirds. This is a standard feature on more expensive cameras. You can use it to improve the composition of your shot. The HDR (High Dynamic Range) option is available on the iPhone 4 and later. It combines three photos with different brightness levels into a single photo with enhanced detail in shadows and highlights. The HDR feature is described in Chapter 14.
Using the Lock Screen and the Side Button
You need to be quick to catch some photo opportunities. If your iDevice is locked, it can take a while to unlock it, launch the Camera app, and take a snap. To solve this problem, the iPhone includes quick access to Camera on the lock screen, so you can take photos without unlocking your device. Another hidden feature is side button snapping. In some orientations the on-screen button in Camera is awkwardly placed, but the top side button does the same job and is easier to reach. It also has a positive physical click, so you are less likely to move the camera when you use it.

Record Video
Both front and rear cameras — where available — can record video. This option is easy to use. You simply select video or stills with an on-screen switch, and tap the Recording button (![]() ) to begin recording. The button graphics change to remind you what you are capturing. Video quality on the rear camera of the iPhone and 3rd and 4th generation iPads can be surprisingly good.
) to begin recording. The button graphics change to remind you what you are capturing. Video quality on the rear camera of the iPhone and 3rd and 4th generation iPads can be surprisingly good.

Take Photos with Camera
You can take a photo with the Camera app by tapping the on-screen snap button or the top side button on the case. The mechanical button is often easier to reach, although you may need to use two hands.
You can also select the forward or rear cameras manually before you take your photo, and on models with a flash, set the flash so it always fires, never fires, or fires only when the light is poor. Not all devices support the extra options. If they are not available, the buttons for them do not appear in the display.
Take Photos with Camera
![]() Launch the Camera app by tapping the Camera icon on the Home screen.
Launch the Camera app by tapping the Camera icon on the Home screen.
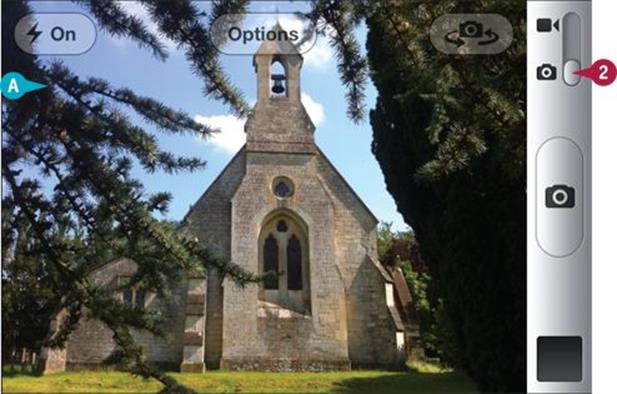
A iPhoto displays the photo preview window.
![]() Move the switch to select the still camera if it is not already selected.
Move the switch to select the still camera if it is not already selected.
Note: This example uses the iPhone screens because an iPhone is more portable than an iPad. The screen layout is different on the iPad, and some options are not available.
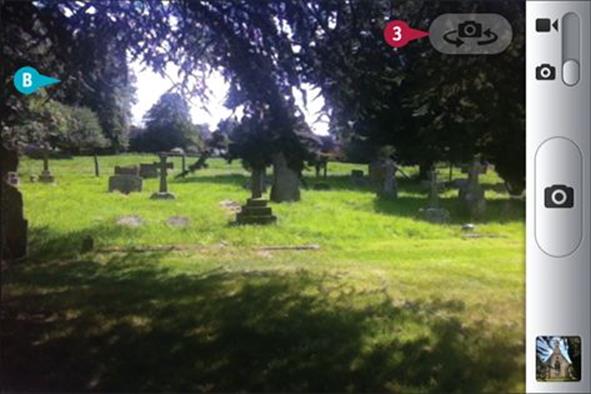
![]() Tap the front/rear camera selector icon (
Tap the front/rear camera selector icon (![]() ) to select a camera.
) to select a camera.
B Camera flips the preview window and shows the view from the other camera.
Note: The front-facing camera is not available on all devices.
Note: Flash and other options are not available when using the front-facing camera.
Note: The front-facing camera usually shows you. (This example deliberately hides the author.)
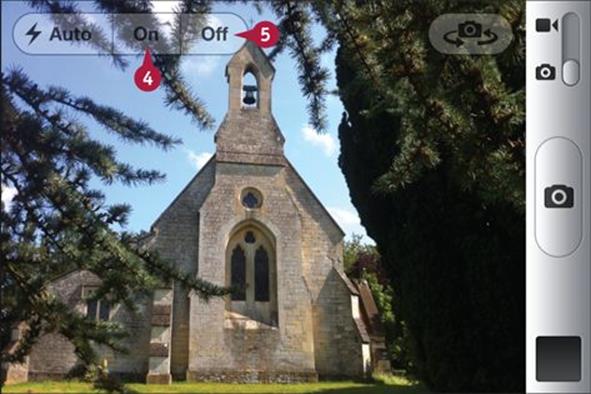
![]() Tap the Flash mode button to display the flash options.
Tap the Flash mode button to display the flash options.
Note: The mode button always shows the current flash mode.
![]() Tap one of the modes to select it.
Tap one of the modes to select it.
Note: Auto mode automatically fires the flash in poor light but does not fire it in good light.
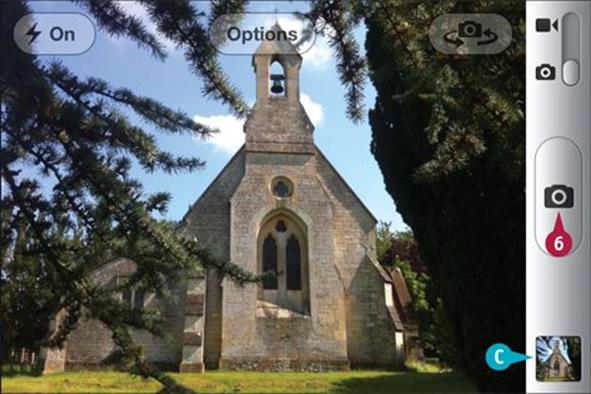
![]() Tap the camera icon (
Tap the camera icon (![]() ) to take a photo.
) to take a photo.
C Camera takes a photo and adds it to the camera roll.
Note: A shutter graphic covers the preview window while Camera takes the photo.
Note: It can take Camera a few seconds to take a photo, especially in poor light. Try to keep the camera still while the shutter is visible.
TIPS
Why is there such a difference between the front and rear cameras?
The rear camera is designed for photography. The front camera is really a webcam and is officially called the iSight/FaceTime camera. Use the rear camera when you can. The front camera is good enough for front-facing snaps in good light, but photos from the rear camera always look smoother and more detailed.
Why would I use flash in daylight?
Photographers often use fill-in flash in daylight to add extra light to a scene. The built-in flash is not very powerful, but you can still use it for basic fill-in flash. Turn on the flash before you take a photo. If the subject is lit from the side or the rear, the flash adds extra light from the front. The results can be dramatic.
Using Camera Options
You can use a built-in digital zoom to bring distant objects closer before you snap them with the Camera app. You can also display a nine-cell grid to help you frame your photo.
Both options are partly hidden. The zoom feature is slightly awkward to use. You can pinch zoom with two fingers on the photo preview, but you may find it easier to tap with two fingers and drag the zoom slider with a single finger. The other camera options appear when you tap the translucent Options button.
Using Camera Options
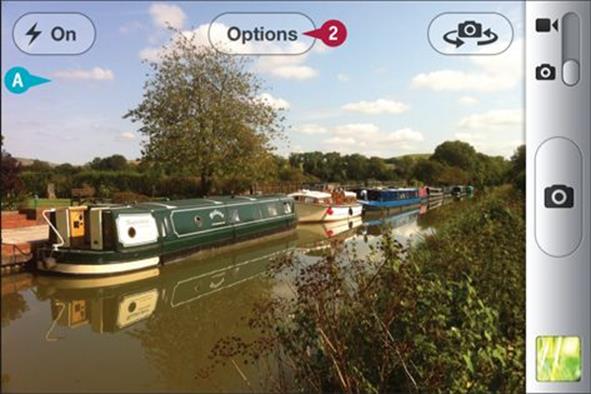
![]() Launch the Camera app by tapping the Camera icon on the Home screen.
Launch the Camera app by tapping the Camera icon on the Home screen.
A iPhoto displays the photo preview window.
![]() Tap the Options button to view your camera’s options.
Tap the Options button to view your camera’s options.
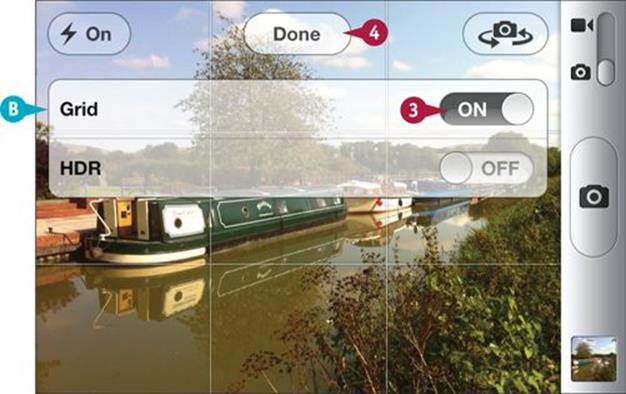
B Camera displays options.
![]() Tap the Grid switch to enable the grid overlay.
Tap the Grid switch to enable the grid overlay.
![]() Tap Done to save and hide the options.
Tap Done to save and hide the options.
Note: You can also tap anywhere on the screen outside the Options box.
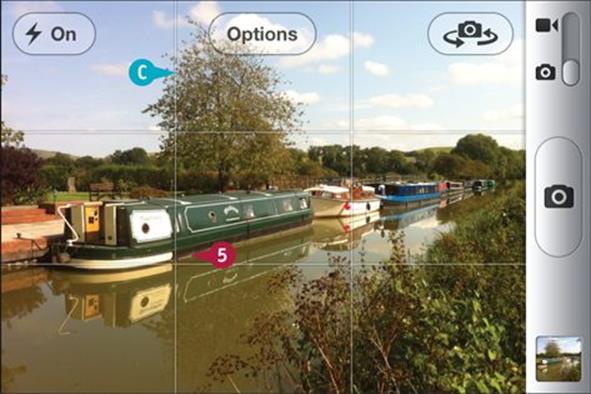
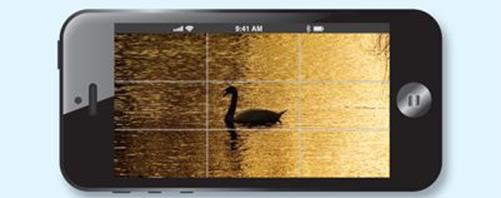
C iPhoto displays a grid of thirds in the photo preview area.
Note: The grid does not appear in your photos.
![]() For good results experiment with placing objects and lines in your photos on lines or points on the grid.
For good results experiment with placing objects and lines in your photos on lines or points on the grid.
Note: The grid is one suggested way to improve your photos, but your photos may still look good with features placed elsewhere.
Note: The HDR option is described in Chapter 14.
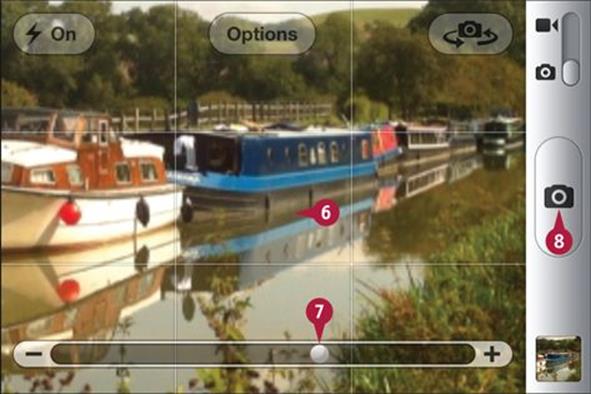
![]() Tap with two fingers on the preview window to show the zoom slider.
Tap with two fingers on the preview window to show the zoom slider.
![]() Drag the slider left or right to change the zoom magnification.
Drag the slider left or right to change the zoom magnification.
Note: You can also pinch and expand with two fingers on the preview, but this often feels less precise than the zoom slider.
Note: As in this example, the photo may look fuzzy if you zoom in too much.
![]() Tap the camera icon (
Tap the camera icon (![]() ) to take the photo.
) to take the photo.
TIPS
Is the zoom digital or optical?
The zoom is digital — it is really a crop. Because camera resolution is limited, the image quality gets worse the more you zoom in. The cameras on the iPhone 4S and 5 are just about good enough to support the maximum zoom. The cameras on earlier iPhones and on iPads can zoom in to around two-thirds of the maximum. If you zoom in further the image becomes very fuzzy.
What is the grid for?
Photographers use the Rule of Thirds when composing a shot. Photos often look good when strong lines in the image line up with the lines on the grid, or when important features are on the crossing points. For more details, search the web for “Rule of Thirds.”
Control Exposure and Focus
Although you cannot set the camera’s exposure and focus manually, you can use a hidden feature to force the camera to look at part of a scene and estimate the brightness and focus from a smaller area.
If you tap once, the camera measures the light in the area you select, but continues to update the exposure if you move the camera or the light changes. If you tap and hold on the screen, the camera locks the exposure and focus. If you move the camera, exposure and focus do not change.
Control Exposure and Focus
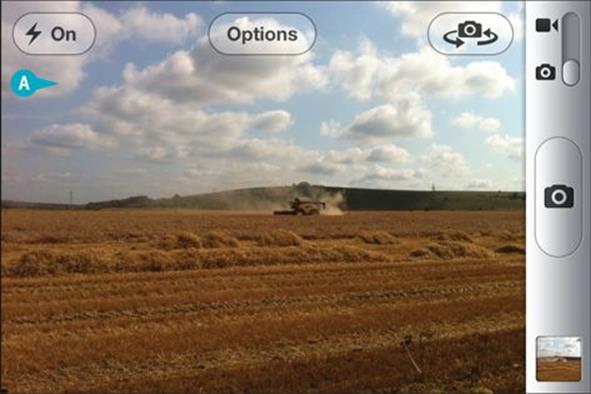
![]() Launch the Camera app by tapping the Camera icon on the Home screen.
Launch the Camera app by tapping the Camera icon on the Home screen.
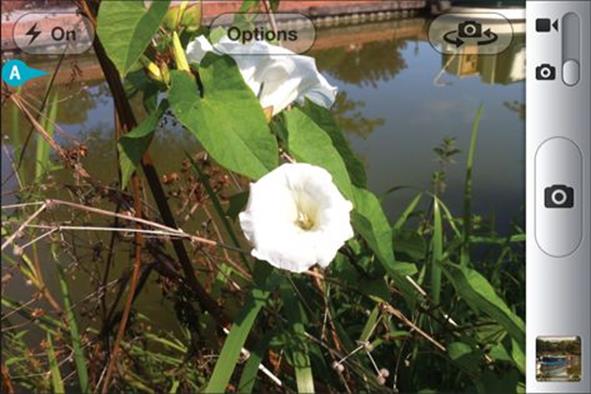
A iPhoto displays the photo preview window.
![]() Point the camera at brighter or darker parts of a scene. (This example points at a darker area.)
Point the camera at brighter or darker parts of a scene. (This example points at a darker area.)
The camera automatically corrects the exposure by measuring the brightness in the entire preview area.
Note: To demonstrate this even more clearly, point the camera at the sun or sky and then the ground.
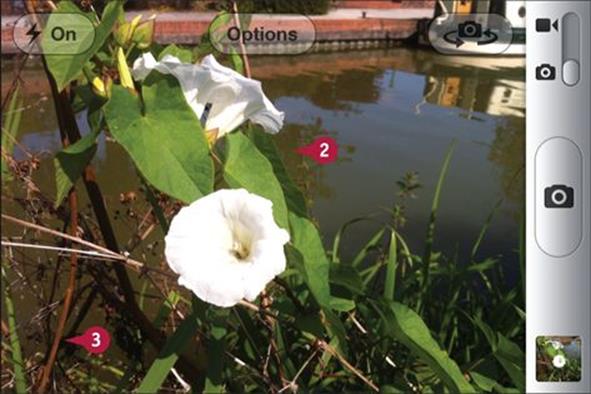
![]() Without moving the camera, tap a darker area in the preview.
Without moving the camera, tap a darker area in the preview.
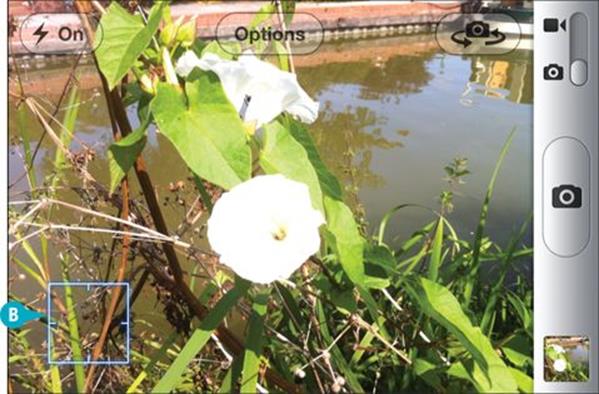
B Camera displays a small square used to estimate the exposure.
Note: If the area is in shadow, Camera lightens the shot. If the area is brightly lit, Camera darkens the shot. In this mode, Camera ignores the brightness in the rest of the scene.
Note: You can tap again as often as you want to select other areas.
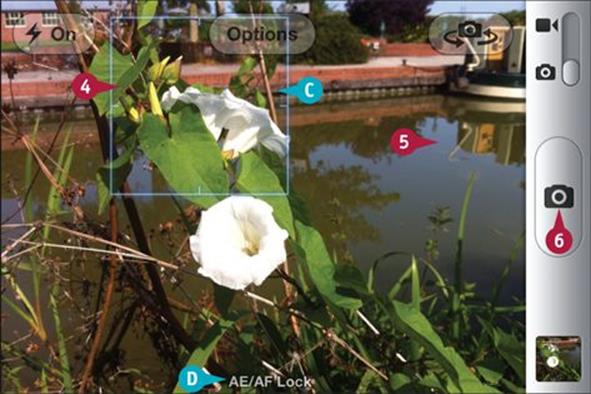
![]() Tap and hold with a finger in the preview area.
Tap and hold with a finger in the preview area.
C Camera displays an animated square.
D Camera displays the “AE/AF lock” message at the bottom of the preview. AE/AF is short for AutoExposure/AutoFocus.
Note: The exposure and focus are now locked. They no longer follow changes in light or camera position.
![]() Tap anywhere in the preview area to unlock exposure and focus.
Tap anywhere in the preview area to unlock exposure and focus.
![]() Tap the camera icon (
Tap the camera icon (![]() ) to take a photo.
) to take a photo.
TIPS
How can I use this feature?
If you tap and hold a bright area in a scene, you can force the camera to underexpose your photo, creating silhouettes and shadows. If you tap and hold a dark area, you can deliberately create a washed-out look. You can also use this feature to highlight the ground or the sky when snapping landscapes. Tap and hold on the sky, and the camera captures a cloudscape. Tap and hold the landscape and the sky becomes white, but the landscape is exposed correctly.
Is this feature like the AE/AF lock on bigger cameras?
It is the iPhone/iPad equivalent. Unfortunately, you cannot lock focus and exposure separately — they always work together.
Take Photos from the Lock Screen
If you have an iPhone, you can take photos without unlocking it first. You can load the Camera app directly from the lock screen by flicking the camera icon upwards.
Photo opportunities can disappear in moments, but unlocking your iPhone and launching Camera can take a few seconds. You can use the lock screen option to snap a scene quickly before you lose it forever.
Take Photos from the Lock Screen
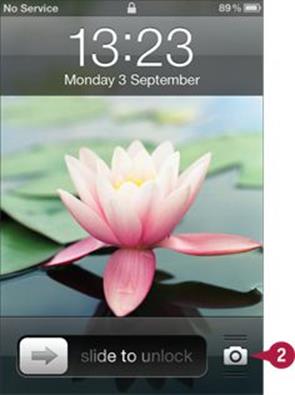
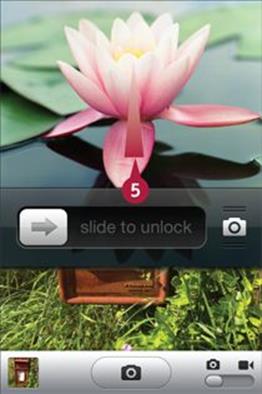
![]() If your phone’s display is dark, tap the power button or home button to display the lock screen.
If your phone’s display is dark, tap the power button or home button to display the lock screen.
![]() Tap and hold the camera icon (
Tap and hold the camera icon (![]() ).
).
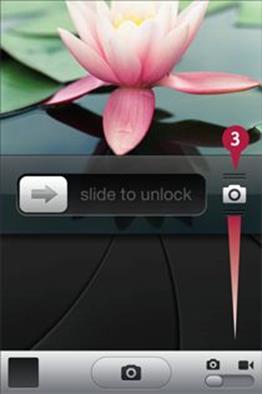
![]() Drag the camera icon (
Drag the camera icon (![]() ) upwards.
) upwards.
Note: Do not drag the unlock slider next to the icon.
Note: The shutter display may appear briefly while Camera launches.
![]() Use any of Camera’s features to take one or more photos.
Use any of Camera’s features to take one or more photos.
Note: All of Camera’s features work as normal.
Note: You can rotate your iPhone to take photos in landscape orientation after you unlock it.
![]() Swipe down in the top half of the preview window to lock your device again.
Swipe down in the top half of the preview window to lock your device again.
Note: Swiping in the lower half of the window does nothing.
TIPS
Can I use the top button to take a photo from the lock screen?
Unfortunately not. You must slide the Camera app up from the bottom of the lock screen before you can take a photo with the top button. The button does nothing while the lock screen is visible.
Does this feature work on the iPad?
The iPad does not support the lock screen camera feature. Instead, you can turn your iPad into a digital picture frame. A couple of seconds after you tap the lock screen icon, the iPad displays an animated slide show with photos selected from the albums and events on your device. You can stop the slide show by tapping the screen again and either tapping the slide show icon or unlocking the device.
Record Video
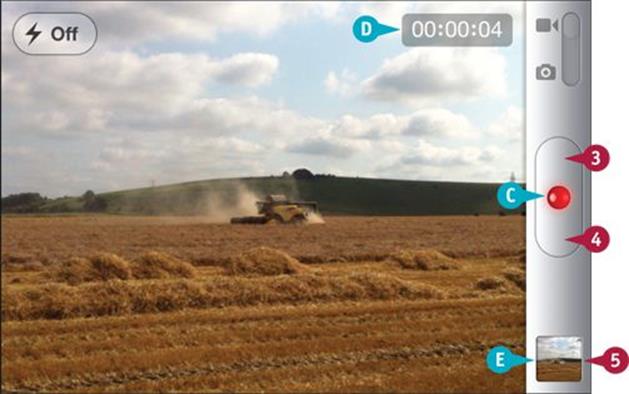
You can record video on all iPhones more recent than the 3G and all iPads from the iPad 2 onwards. Video is saved to the camera roll — described later in this chapter — just like photo stills. To record video, flick a switch in the Camera app. Instead of a camera icon, Camera displays a red button, which flashes as you record.
Video uses more storage space than photos. If you record a lot of video on your device, copy it to a Mac or PC as soon as you can to avoid wasting space.
Record Video
![]() Launch the Camera app by tapping the Camera icon on the Home screen.
Launch the Camera app by tapping the Camera icon on the Home screen.
A iPhoto displays the photo preview window.
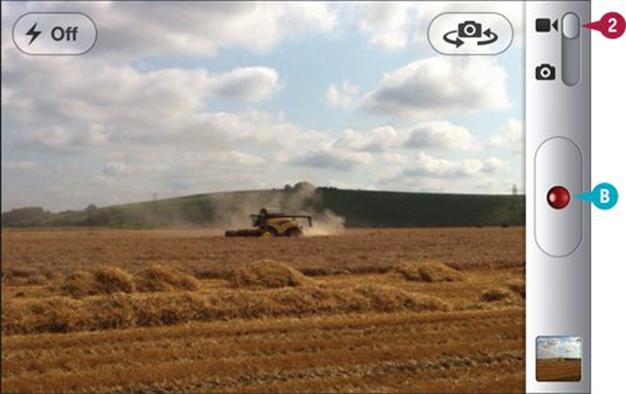
![]() Move the switch to select the video camera if it is not already selected.
Move the switch to select the video camera if it is not already selected.
B Camera displays the shutter graphic for a second or so while it changes modes, and also replaces the camera icon with a recording icon with a red LED.
![]() Tap the recording icon (
Tap the recording icon (![]() ) to begin recording video.
) to begin recording video.
C Camera beeps once and flashes the LED while it records video.
D Camera displays a time counter so you can see how much video you have recorded.
![]() Tap the recording icon (
Tap the recording icon (![]() ) again to stop recording video.
) again to stop recording video.
E Camera beeps again and adds the video to the camera roll.
![]() Tap the camera roll to view your photos and recordings.
Tap the camera roll to view your photos and recordings.
![]() Tap the video to prepare it for playback.
Tap the video to prepare it for playback.
Note: For more information about previewing and viewing the camera roll, see the section later in this chapter.

![]() Tap the play icon (
Tap the play icon (![]() ) to view the video.
) to view the video.
TIPS
Why do some of the camera options disappear?
Video recording uses a fixed zoom with a small amount of magnification. You can turn on the flash to use it as a constant light source for your video. Other options are not available, so you cannot use the grid or enable HDR mode.
Can I edit the video?
Camera has no movie editing options. But iMovie ($4.99 from the App Store) includes basic clip trimming, transitions (that is, clip crossfades and other animations) and basic support for titles, music dubbing, and online sharing. If you want to edit videos, iMovie is an affordable but powerful option.
Understanding Photo Management
iPhoto includes very limited photo management. To manage photos, use the free Photos app. Both apps access the same photo library, which holds all the photos on your device.
Photos in the library can be collected into albums and events. Albums collect photos by theme, and events group photos by import date. Some albums are created automatically. For example, the camera roll holds all photos taken with the Camera app. You can create other albums using iPhoto on a Mac, and import them to your device with iTunes. You can also import photos from an attached camera or memory card using the iPad Camera Connection Kit.
Understanding the Photo Library
You can use the photo library to preview every photo on your device. The library appears in Photos and in iPhoto. You can select it by tapping the Photos icon on the main page in either app. Both apps display the photos as small thumbnail previews. Photos are sorted in date order using the date the photo was created as a file. Original photos are sorted correctly, but if you copy a photo or save it from a web page, the copy date overrides the original creation date, and the library can easily become a disorganized jumble. Fortunately, photos can be grouped in other ways.

Understanding Albums and Events
You can get more from the photos in the library by grouping them into collections. You can use albums to collect related photos together — by subject, person, color, mood, or for any other reason. You can tag photos with useful words, and iPhoto automatically groups photos with matching words into albums for you. Your iDevice also creates some albums automatically — for example, iPhoto includes a Beamed album for photos sent manually from other devices. Events organize photos by date. Although you can create albums in Photos, and both iPhoto and Photos can create events, both options are easier to use on a Mac. Many users create albums and events in iPhoto on a Mac or some other application such as Aperture, Photoshop, or Photoshop Elements and use their iDevice as a portable photo album. (For more about creating albums in Photos, see Chapter 5.)

Understanding the Camera Roll
The camera roll is a special album. The Camera app adds photos to it whenever you take a snap. Some apps, including iPhoto, Mail, and Safari, can also save photos to the camera roll. You can copy the photos on the camera roll to a Mac or PC, upload them to iPhoto on a Mac, or share them to an e-mail, text message, or Twitter post. You can access the camera roll in iPhoto and Photos or indirectly through the Camera app.

Understanding Places
Many cameras including the iPhone and some iPad models embed location information into photos as you take them. The Places feature in the Photos app displays your photo locations on a map with pins for each location. When you zoom out of the map, Places automatically groups nearby locations under a single pin to help keep the display clear and uncluttered. As you zoom in, nearby locations are split and shown with pins of their own. iPhoto on the Mac has an equivalent feature. Unfortunately, iPhoto for iOS does not show places, but if you add photos to a journal, you can show the location of each photo on a separate map. For details see Chapter 13.

Understanding the iPad Camera Connection Kit
The iPad Camera Connection Kit is a pair of adapters that plug into a standard iDevice socket or, via a further optional adapter, into the new iPhone 5 socket. One adapter has a slot for an SD memory card. The other has a standard full-sized flat USB socket. Both adapters work the same way. If you plug in a memory card or a camera via a USB cable, iPhoto imports the photos it finds and collects them into events. The kit is not compatible with the iPhone.

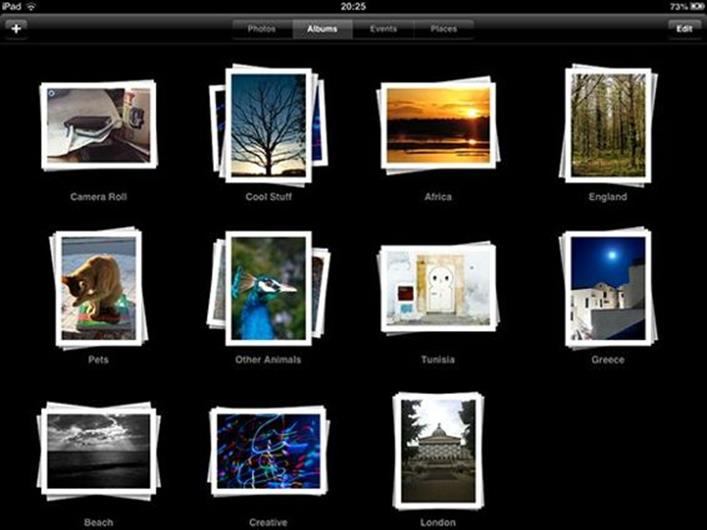
Get Started with the Photos App
You can use the Photos app to view and manage the photos, albums, and events on your device. iPhoto and Photos share the same library so you can see the same photos, albums, and events in both. Use Photos to preview and manage your photos, and iPhoto to edit and enhance them.
Photos is included with every iDevice, so you do not need to download it. It is included on devices that lack a camera, because you can use Photos to view photos, albums and events you download to your device with iTunes.
Get Started with the Photos App
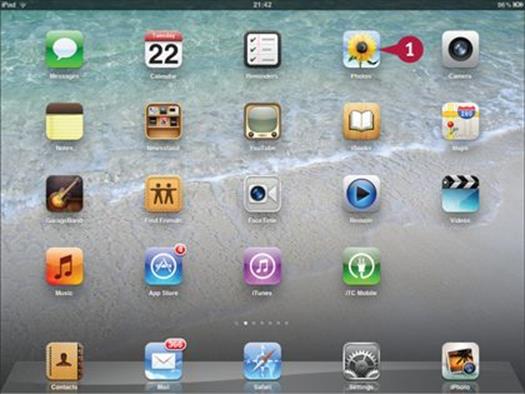
![]() Tap the Photos icon on the Home screen to launch the Photos app.
Tap the Photos icon on the Home screen to launch the Photos app.
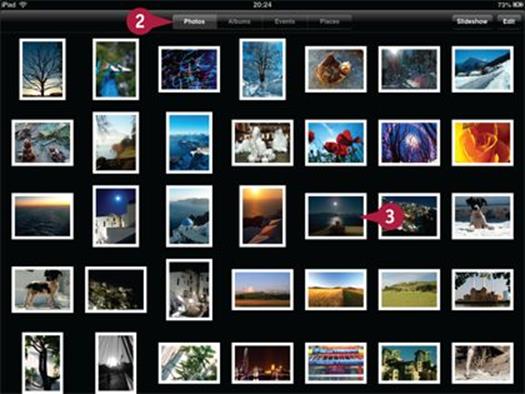
![]() Tap the Photos button to view all the photos in your device library.
Tap the Photos button to view all the photos in your device library.
![]() Tap any photo to view it.
Tap any photo to view it.
Note: Photos displays a line of mini-thumbnails under a photo when you preview it. The thumbnails fade out after a second or so, and you can view the photo full screen. Tap the screen again to see the thumbnails.
Note: You can view photos by tapping their thumbnails and by swiping left and right.
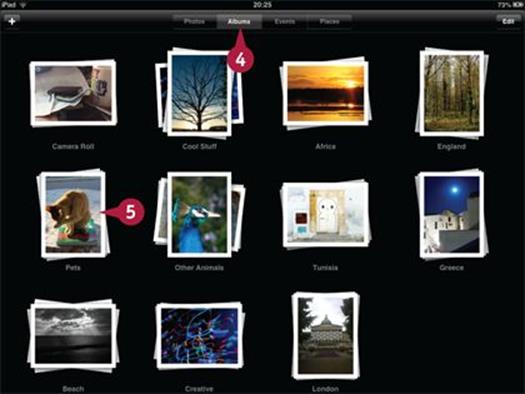
![]() Tap the Albums button or the Events button to view the albums and events in your device library.
Tap the Albums button or the Events button to view the albums and events in your device library.
![]() Tap any album or event to view the photos it holds.
Tap any album or event to view the photos it holds.
Note: For more about creating and deleting albums in Photos, see Chapter 5.
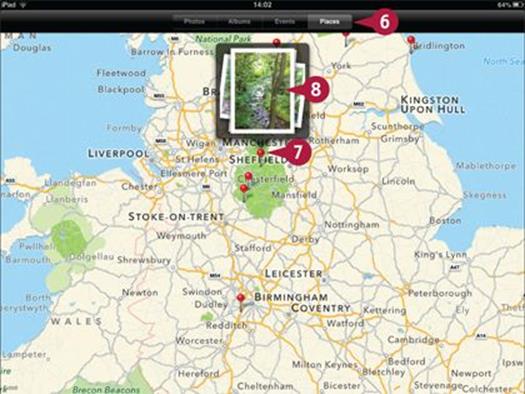
![]() Tap the Places button to see a map with pins for photo locations.
Tap the Places button to see a map with pins for photo locations.
![]() Tap a pin to view a popover with a preview of the photo or photos at that location.
Tap a pin to view a popover with a preview of the photo or photos at that location.
![]() Tap the popover to view all the photos at that location.
Tap the popover to view all the photos at that location.
Note: If you zoom into a location, more pins may appear. Photos groups nearby locations under a single pin to keep the display uncluttered.
TIPS
Can I edit photos with Photos?
If you tap a photo in Photos and tap the Edit button, you can apply Rotate, Enhance, Red-Eye, and Crop tools. These are simpler than the equivalent editing tools in iPhoto, which are described in Chapters 7 to 11 of this book.
When should I use Photos instead of iPhoto?
Photos offers full-screen photo viewing. iPhoto does not. You can select any album or event in Photos, tap to select a photo, and after a couple of seconds the top and bottom tool bars disappear. You can now drag-scroll through that collection, viewing the photos full screen. You can also rotate your device to get the best view in portrait or landscape mode.
Using the Camera Roll
The camera roll is a special album that stores the most recent images added to your iDevice. You can access it through iPhoto, Photos, and — indirectly — through the Camera app. Many third-party photo apps also work with the camera roll.
When you take a photo with your device’s camera, the photo is saved to the camera roll. You can also save photos to the camera roll from other sources, including e-mails and web pages.
Using the Camera Roll
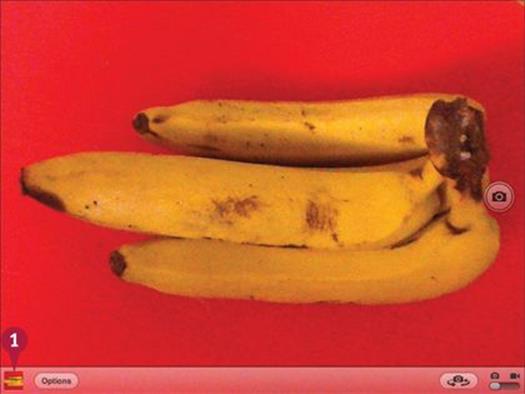
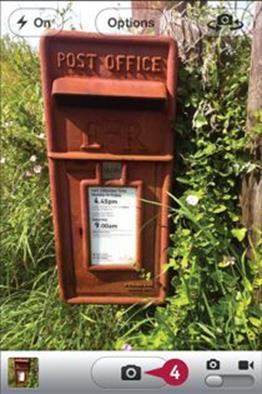
![]() In Camera, tap the thumbnail in the toolbar to open the camera roll.
In Camera, tap the thumbnail in the toolbar to open the camera roll.
Note: You can also open the camera roll by tapping the Camera Roll album in iPhoto and Photos.
Note: This example uses the iPad 2 camera.

![]() Tap one of the mini-thumbnails to view a photo.
Tap one of the mini-thumbnails to view a photo.
A The camera roll displays the number of the current photo and the total number of photos in the roll.
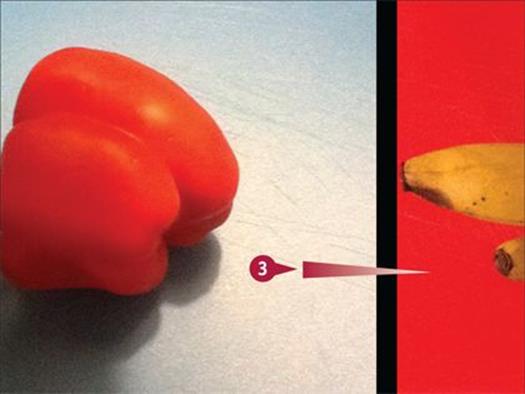
![]() Swipe left or right to view other photos in the roll.
Swipe left or right to view other photos in the roll.

![]() Tap the trash can icon (
Tap the trash can icon (![]() ) to delete a photo.
) to delete a photo.
![]() Tap Delete Photo in the popover to confirm.
Tap Delete Photo in the popover to confirm.
Note: There is no Undo option; you cannot recover a photo after you delete it.
Note: You can delete photos only from the camera roll. You cannot delete photos from events or from other albums.
TIPS
How is the camera roll different from other albums?
iDevices have tight security, so you must use special software such as iTunes to copy and manage most of your albums and events. The camera roll works differently. You can copy the photos in it to a Mac or PC. Only the camera roll and the imported photo albums allow this.
Why does iPhoto sometimes display an Updating Photo Library message?
If you add or remove photos from the photo library on your device — for example, by saving photos to the camera roll — iPhoto notices the change and reloads the library automatically to keep it up to date.
Save and Share Photos
iPhoto includes sophisticated photo sharing options which are introduced in Chapter 12. But you can also save photos from web pages and e-mail to the camera roll, and share any photo in the camera roll to some other destination.
As of iOS 6 you can share photos by e-mail, Twitter, and Facebook. You can also print a photo, save it as your device wallpaper, copy it to paste it into another app, and assign it to an address book contact.
Save and Share Photos
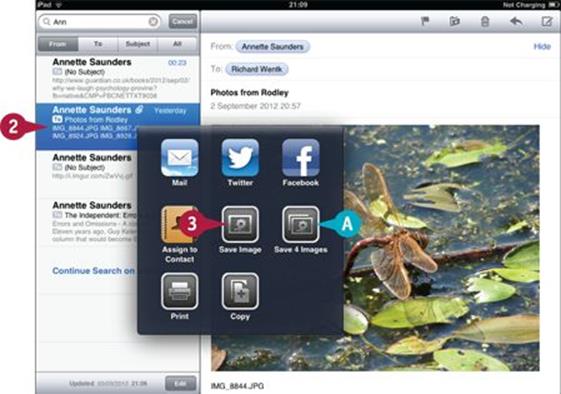
Save a Photo from an E-Mail Message
![]() Launch the Mail app from the Home screen.
Launch the Mail app from the Home screen.
![]() Select any e-mail that includes a photo attachment and tap the photo preview.
Select any e-mail that includes a photo attachment and tap the photo preview.
![]() Tap the Save Image icon to save a single image.
Tap the Save Image icon to save a single image.
A You can tap the Save Images icon to save all the images in the e-mail at once.

![]() Launch the Photos app and tap the Camera Roll album to open it.
Launch the Photos app and tap the Camera Roll album to open it.
![]() Tap the most recent mini-thumbnails at the right of the list.
Tap the most recent mini-thumbnails at the right of the list.
B Photos displays the photo you saved from the e-mail.
Save a Photo from a Website
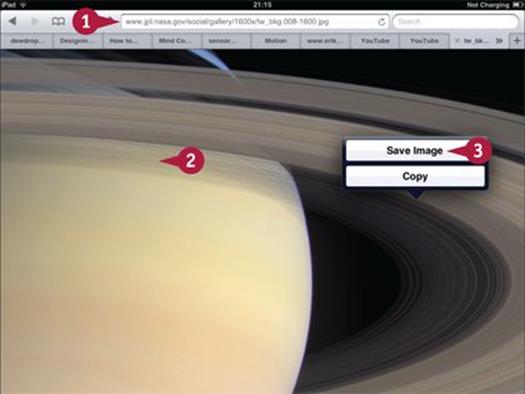
![]() Launch Safari and open a web page.
Launch Safari and open a web page.
![]() Tap and hold any image on the page.
Tap and hold any image on the page.
Note: Images can be any size, anywhere on the page. They do not have to fill the screen.
![]() Tap Save Image to save the image to the camera roll.
Tap Save Image to save the image to the camera roll.
Share a Photo
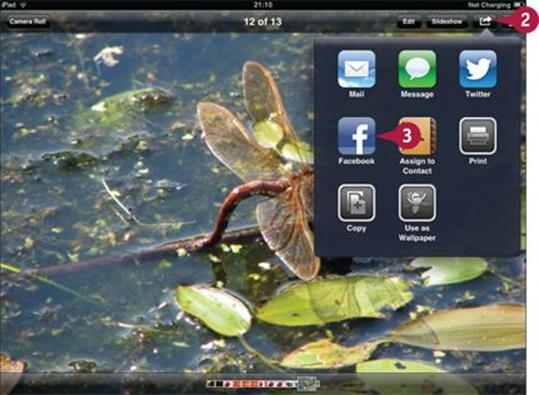
![]() Return to Photos and view the camera roll album.
Return to Photos and view the camera roll album.
![]() Tap the Share icon (
Tap the Share icon (![]() ) to share a photo.
) to share a photo.
![]() Tap one of the options in the popover to select a sharing option.
Tap one of the options in the popover to select a sharing option.
iPhoto displays a sharing tool for each option. For more details, see Chapter 12.
TIPS
Are uploaded photos full sized?
Between them, iPhoto and Facebook shrink photos to a manageable size, usually a few hundred pixels on a side. iPhoto does not upload the original full-sized versions of your photos. Although web users can still download and link to your photos, they cannot make high-resolution prints or copies.
Do the photos include location information?
iPhoto uploads location information to Facebook, and you can add a location to the photo on Facebook if you choose to. However, location information is stripped out of the photo. If someone downloads a photo, he cannot see your location.
Using the Camera Connection Kit
You can use Apple’s optional Camera Connection Kit to import photos into your device. The official Apple version of the kit includes two connectors — one with a slot for an SD card and one with a standard USB socket. The Camera Connection Kit can read JPEG, PNG, and RAW format files.
To get started, plug one end of the connector into your device’s main port. Insert an SD card or connect a USB camera — you can use another iDevice as a source. The Photos app launches automatically. You can then start importing your photos.
Using the Camera Connection Kit
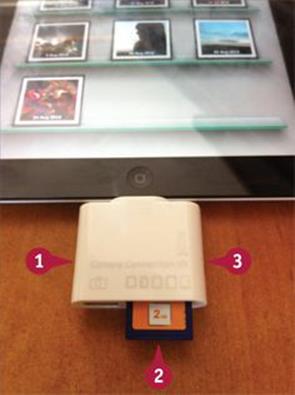
![]() Plug one of the connectors into the main port of your device.
Plug one of the connectors into the main port of your device.
Note: This example uses a single combined budget non-Apple connector with a built-in card reader and USB socket.
![]() Insert a card into the slot.
Insert a card into the slot.
![]() If you are using a combined reader with a switch, set the switch to the SD or Card position.
If you are using a combined reader with a switch, set the switch to the SD or Card position.
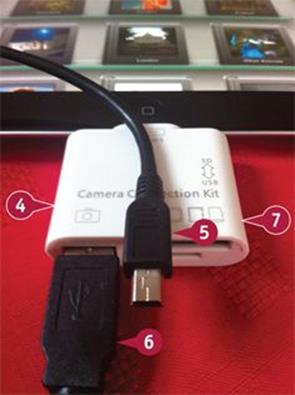
![]() Alternatively, plug a connector with a USB socket into your device.
Alternatively, plug a connector with a USB socket into your device.
![]() Connect your camera with a USB cable that matches its socket.
Connect your camera with a USB cable that matches its socket.
Note: Many cameras use the “Mini-B” plug shown here. Some use smaller plugs called “Micro-AB” or “Micro-B.” Check your camera’s manual for details.
![]() Plug the end of the USB cable with the standard plug into the connector.
Plug the end of the USB cable with the standard plug into the connector.
![]() Set the side switch to USB, if necessary.
Set the side switch to USB, if necessary.

The Photos app launches automatically.
Photos begins to load preview images from the camera or card, and displays a grid of empty thumbnails and a Loading icon.
After a while, typically a few minutes, Photos finishes loading the thumbnails.
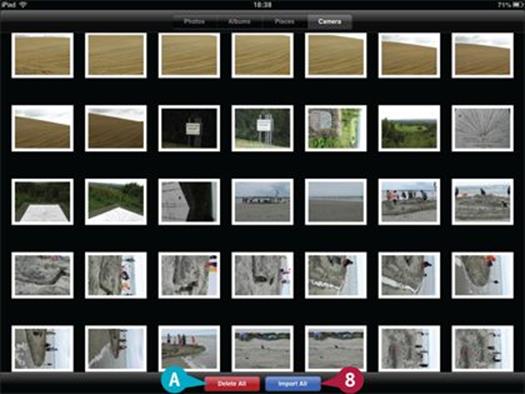
![]() Tap Import All to begin importing the photos.
Tap Import All to begin importing the photos.
A You can alternatively tap Delete All to clear the photos from the card or camera.
Note: If you delete the photos, you lose them forever.
TIPS
Which memory cards and cameras are supported?
The official Apple Camera Connection Kit supports SD and SDHC cards. SDXC cards do not work. You can use CF and other flash cards with a separate non-Apple converter — look on Amazon, eBay, and photo accessory stores. Most cameras with a USB connector are compatible with the USB adapter. You can also import photos from any USB drive or supported card by copying them to a folder named DCIM.
Can I buy a cheaper adapter?
eBay and Amazon sell budget alternatives of the official Apple Camera Connection Kit. Many are all-in-one designs that combine a USB socket with a card reader. Some have extra slots for a wider range of memory cards. Prices are extremely low compared to the Apple model, but reliability cannot be guaranteed.
When you use the Camera Connection Kit, the Photos app launches automatically and displays a grid of thumbnails. You cannot pick and choose the photos you want — you must import them all, or cancel the import completely. As the photos import, Photos marks them with a green check mark. After import you can choose to keep the photos on the source or delete them. Photos automatically creates Last Import and All Imported albums, and splits the photos into events by date. You can view the albums and events in Photos or in iPhoto.

Photos begins to import the photos. Each photo is marked with a green check after import.
A You can optionally tap Stop Import to end the import.
Note: Photos keeps the photos already imported if you stop early.
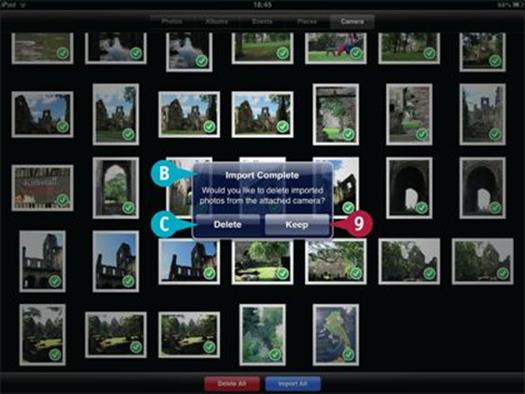
B Photos asks if you want to delete the photos from your card or camera.
![]() Tap Keep to keep the photos.
Tap Keep to keep the photos.
C You can tap Delete to delete the photos.
Note: You cannot recover the photos if you delete them.
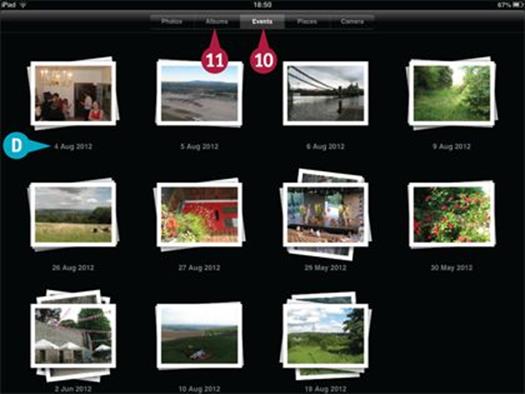
![]() Tap the Events button.
Tap the Events button.
D Photos automatically splits the photos into events grouped by date.
Note: All the photos taken on the same date appear in a single event.
![]() Tap the Albums button.
Tap the Albums button.
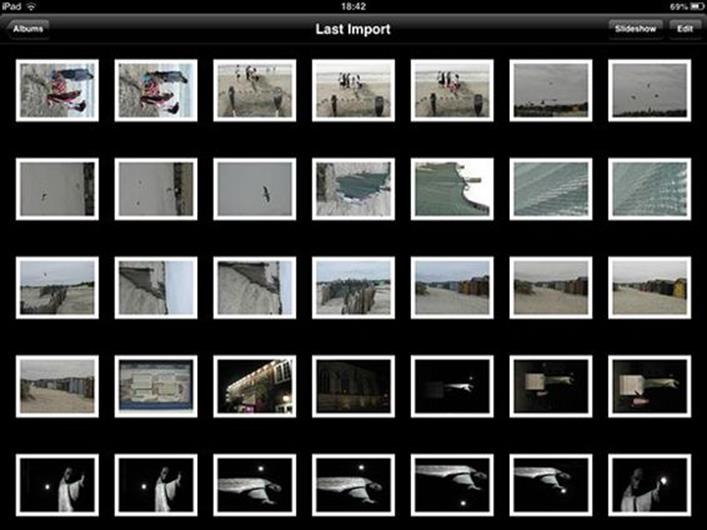
![]() Tap the Last Import album to open it.
Tap the Last Import album to open it.
Photos automatically collects all the photos from the last import into this album.
Note: Photos also creates an album called All Imported, which holds photos from every import.
Note: Import does not rotate photos, so if any of your photos are sideways you must rotate them manually in iPhoto or Photos.
TIPS
Can I add imported photos to an album?
You cannot add the imported photos to an existing album. However, you can create a completely new album and add as many photos as you want to that. You also cannot add the new photos to an existing event.
What happens when I next sync my device?
iTunes does not automatically import the new photos, events, or albums to your Mac. Photos in the Last Import and All Imported albums can be imported to a Mac or PC just like the photos on your camera roll, but they are not grouped into albums. If you have iPhoto for the Mac, you can place them into albums by hand.
Copy Photos to a Mac or PC
You can copy the photos in your camera roll and all photos imported with the Camera Connection Kit from your device to a Mac or PC. To access photos in albums or events, use the sharing options introduced in Chapter 12.
Use manual copying if you do not have iPhoto for the Mac or if you are using a PC. A device plugged into a PC appears as an external USB drive. This option is not available on a Mac, but you can import the photos using an application called Image Capture.
Copy Photos to a Mac or PC
Copy Photos to a Mac
![]() Plug your device into your Mac.
Plug your device into your Mac.
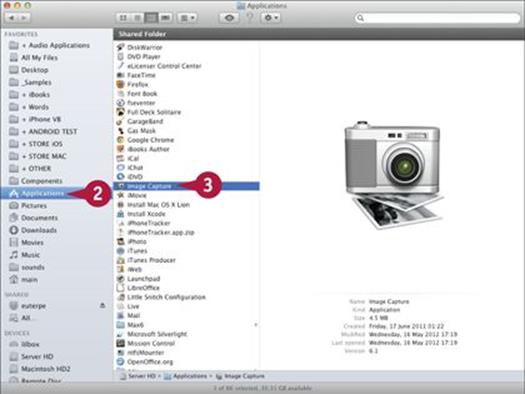
![]() Open the Applications folder in Finder.
Open the Applications folder in Finder.
![]() Double-click the Image Capture application.
Double-click the Image Capture application.
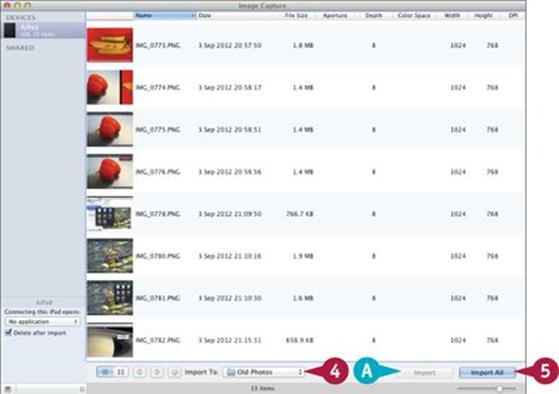
![]() Use the file selector to choose a folder for your photos.
Use the file selector to choose a folder for your photos.
![]() Click Import All to import all photos.
Click Import All to import all photos.
A You can press and hold ![]() on the keyboard and click single photos to select them and then click Import to import the selected photos.
on the keyboard and click single photos to select them and then click Import to import the selected photos.
Note: You can use the connection and delete options at the bottom left to choose what happens on connection and import.
Copy Photos to a PC

![]() On a PC, plug your device into a USB socket.
On a PC, plug your device into a USB socket.
The AutoPlay dialog box appears.
![]() Click Open device to view files.
Click Open device to view files.
Note: You may need to scroll down a list to see this option.
B You can optionally click Always do this for this device (![]() changes to
changes to ![]() ) to view the files automatically without seeing the dialog box.
) to view the files automatically without seeing the dialog box.
Note: If you have image editing software installed, you may be able to import the photos into it directly.
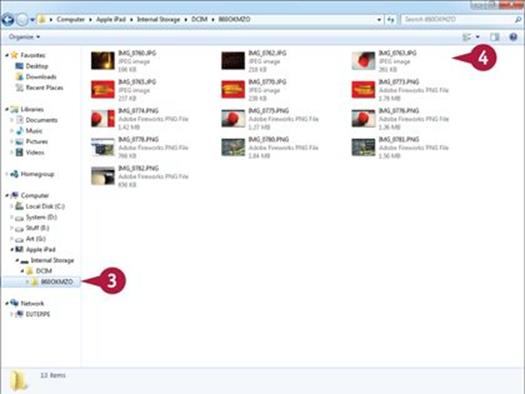
![]() Click through the folders on the device until you open the folder at the lowest level inside the DCIM (Digital Camera Import) folder.
Click through the folders on the device until you open the folder at the lowest level inside the DCIM (Digital Camera Import) folder.
![]() Drag some or all of the photos from the device and drop them into any other folder.
Drag some or all of the photos from the device and drop them into any other folder.
TIPS
Can I copy photos from a computer to the device?
You cannot add photos to a device. To import photos on a Mac or PC for viewing, use iTunes. On a Mac, you can import photos from the Pictures folder or from the Mac version of iPhoto. On a PC you can select a folder by name. Copying photos adds them to an event or folder, but not to the camera roll.
Why is there no way to file-copy photos on a Mac?
For security reasons, Apple devices are locked to specific software. When you plug your device into your Mac, it does not appear in Finder as a USB drive. You can access the photos on the camera roll only through iTunes and Image Capture.
All materials on the site are licensed Creative Commons Attribution-Sharealike 3.0 Unported CC BY-SA 3.0 & GNU Free Documentation License (GFDL)
If you are the copyright holder of any material contained on our site and intend to remove it, please contact our site administrator for approval.
© 2016-2025 All site design rights belong to S.Y.A.