Switching to the Mac: The Missing Manual, Mavericks Edition (2014)
Part III. Mavericks Online
Chapter 13. Messages
Somewhere between email and the telephone lies the joyous communication tool called instant messaging. Plenty of instant messenger programs run on the Mac, but OS X comes with its very own instant messenger program called Messages. (It used to be called iChat.) It’s built right into the system and ready to connect to your friends on the Yahoo, AIM, Jabber, Facebook, or Google Talk networks.
This chapter covers how to use Messages to communicate by video, audio, and text with your online pals.
Welcome to Messages
Messages does seven things very well:
§ Instant messaging. If you don’t know what instant messaging is, there’s a teenager near you who does.
Instant messaging combines the privacy of email and the immediacy of the phone. You type messages in a chat window, and your friends type replies back to you in real time.
In this regard, Messages is a lot like the popular standalone messenger apps from AOL and Yahoo. But Messages lets you type back and forth with anyone from the AOL, Yahoo, Google Talk, and Facebook chat networks, all in a single program, which is a huge advantage. And Messages’ visual design is pure Apple.
§ Unified chat/text messages with phones (iMessages). This is huge. If you and your conversation partner both have iCloud accounts, then you can move freely from phone to tablet to Mac. Your conversation is auto-synced between gadgets. If you started texting someone on the train home, you can sit down at your Mac and open Messages—and pick up right from where you left off.
You can also fire off a text message to somebody’s phone while seated at your Mac—a mind-bending violation of the usual rules that limit text messages to the cellular network only.
The messages, which Apple calls iMessages, are a lot more flexible than regular text messages. They can be much longer than 160 characters. They can include photos, movies, or other kinds of files. They give you feedback that lets you know when a message has arrived on the recipient’s gadget.
And above all, they don’t count as text messages. They’re routed through the Internet rather than the cellphone voice network. As far as your cellphone company is concerned, you’re not texting at all, and therefore you don’t have to pay for a texting plan.
§ Free long distance. If your Mac has a microphone, and your buddy’s does, too, then the two of you can also chat out loud, by talking, using the Internet as a free long-distance phone. Wait, not just the two of you—the 10 of you, thanks to Messages’ party-line feature.
§ Free videoconferencing. If you and your buddies all have fast Internet connections and cameras like the ones built into most Mac models, then up to four participants can join in video chats, all onscreen at once, no matter where they happen to be in the world. This jaw-dropping visual stunt can bring distant collaborators face to face without plane tickets—and it costs about $99,900 less than professional videoconferencing gear.
§ File transfers. Got an album of high-quality photos or a giant presentation file that’s too big to send by email? Forget about using some online file-transfer service or networked server; you can drag that monster file directly to your buddy’s Mac, through Messages, for a direct machine-to-machine transfer. (It lands in the other Mac’s Downloads folder.)
§ Presentations. You can open up most kinds of documents, at nearly full size, to show your video buddy, right there in the Messages window, without actually having to transfer them. That’s Messages Theater.
§ Screen sharing. Next time some parents or neighbors are throwing themselves upon your mercy for tech support, remember this: Messages lets you see their screen, and even control it, from across the Internet. Or you can volunteer your own screen for sharing, so you can demonstrate things to them.
iMessages
As you’re about to discover, Messages is like an MP3 toothbrush or a carboat. It’s a hybrid app—two very different functions mashed into a single body.
First, Messages is your Mac’s gateway to iMessages. They’re a lot like text messages on cellphones, except for the following:
§ They’re unlimited and free.
§ There’s almost no length limit.
§ They can include photos, videos, and other huge files.
§ They can go to Macs, iPhones, and tablets—and, in fact, they appear simultaneously on all of yours.
§ Unlike traditional chat, your pal doesn’t have to be online to get your message. An iMessage will be there when he turns his gadget on again.
The only requirement is that both of you, sender and receiver, have to have iCloud accounts (Chapter 10).
But Messages also does what its predecessor, iChat, did: It’s a traditional chat program, capable of exchanging audio, video, and typed messages with people on other chat networks (AIM, Yahoo, and so on).
This chapter covers both of these major functions in turn. First up: iMessages.
Getting Started with iMessages
All right. You have an iCloud account, and you have at least one Apple machine. The first time you opened Messages, you were asked for your iCloud address (and offered the chance to get one). If you bowed out, you can still fill in that info in Messages→Preferences→Accounts. Basically, Messages keeps demanding your iCloud or Apple ID until you submit. See Figure 13-1.
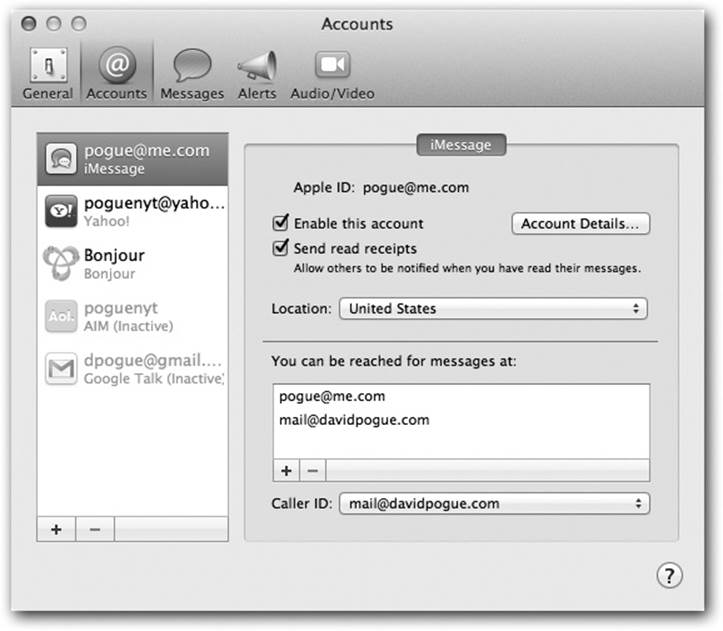
Figure 13-1. You have to specify an email address to anchor your iMessages life. You can specify more than one, actually (click the ![]() button under “You can be reached for messages at”). If you do that, you should also choose one that Messages will use as your return address (the “Caller ID” address). Turn on “Enable this account” to make it work. Turn on “Send read receipts” if you want your correspondents to know when you’ve read their messages.
button under “You can be reached for messages at”). If you do that, you should also choose one that Messages will use as your return address (the “Caller ID” address). Turn on “Enable this account” to make it work. Turn on “Send read receipts” if you want your correspondents to know when you’ve read their messages.
Begin the iMessage Conversation
To begin a conversation with somebody who’s on iCloud, start typing her name into the To box at the top of the Messages list. (If you don’t see the To box, then click the Compose button [![]() ] next to the search box.) As you type, Messages sprouts a list of matching names from your Contacts. Look for the blue speech bubble (
] next to the search box.) As you type, Messages sprouts a list of matching names from your Contacts. Look for the blue speech bubble (![]() ) next to somebody’s name, email address, or phone number. That’s your cue that you’ve found someone on iCloud, someone with whom you can exchange iMessages.
) next to somebody’s name, email address, or phone number. That’s your cue that you’ve found someone on iCloud, someone with whom you can exchange iMessages.
NOTE
Until the fall of 2012, the only way to send a true iMessage (one that appears on all of your recipient’s Apple gadgets) was to send it to an email address that he’d registered with iCloud. Today, however, anyone can register a phone number with iCloud, too, so that any message you send to an email address or a phone number arrives on all of your correspondent’s Apple gadgets at once.
And the best news of all: In Mavericks, Apple finally fixed the messages-arriving-out-of-order bug.
You can also click the ![]() button to get a pop-up version of your Contacts, complete with a search bar at the top.
button to get a pop-up version of your Contacts, complete with a search bar at the top.
Once you’ve selected your lucky conversation partner(s), just type what you want to say into the iMessage box at the bottom of the window. Remember, this isn’t a text message. You can type outrageously long messages; you can use fonts and colors; you can use the smiley-face pop-up menu (at the right end of the typing box) to insert emoticons and smileys.
You can even drag photos, movies, or other files (up to 100 megabytes!) into the typing box. They’ll show up on the other guy’s Mac, phone, or tablet just fine; he can double-click to open them up.
Now, if you have multiple Apple gadgets, and you’ve set up your iMessages email address or phone number in the Settings or System Preferences of each one, then some mind-boggling stuff might start to happen. Your conversation appears simultaneously on all the gadgets.
That’s extremely useful, because it means that you can (for example) start texting on your phone when you’re out and about, and pick up seamlessly on your Mac when you get home, enjoying the real keyboard and big screen.
If you find that typing is losing too much emotional nuance, you can jump into a video call at any point—just click the FaceTime button (![]() ) in the upper right of the Messages window and choose your long-suffering friend’s name. The FaceTime app opens, and you can proceed as described on DVD Player.
) in the upper right of the Messages window and choose your long-suffering friend’s name. The FaceTime app opens, and you can proceed as described on DVD Player.
As you get used to iMessages, you’ll discover that they have many advantages over regular text messages. For example, the tiny word “received” appears beneath any message you send to let you know that your recipient’s gadget has received it. If the recipient has turned on “Show read receipts” (Figure 13-1), you’ll even see the word “read” to let you know that the person has actually read the message.
If you’re in a back-and-forth conversation, the text messages show up on a single screen, scrolling up in conversation balloons like a chat session. While the other guy is typing, you see “…” in his balloon, so you know he’s working on a response and not just ignoring you.
Finally, Messages means that you can keep your text messages. They’re not locked onto your phone, like regular text messages, and they don’t scroll away forever, like regular text messages. You can archive them, search them, copy and paste them, print them, forward them, and so on.
Messages blurs the line between text messages, chats, and email. And it gives birth to this frequently asked question: “Are you on the phone or the Mac?” For the first time, there’s no way to know.
The Traditional Chat Networks
Under its skin, Messages is still iChat—an instant-messaging program that connects you to chat partners on several different networks: AOL Instant Messenger (AIM), Yahoo, Jabber, or Google Talk.
NOTE
Jabber is a chat network whose key virtue is its open-source origins. In other words, it wasn’t masterminded by some corporate media behemoth; it’s an all-volunteer effort, joined by thousands of programmers all over the world. There’s no one Jabber chat program (like AOL Instant Messenger). There are dozens, available for OS X, Windows, Linux, Unix, iPhone, and so on. They can all chat with one another across the Internet in one glorious frenzy of typing.
Behind the scenes, Google Talk uses the Jabber network, so Google Talk doesn’t really count as a different network. But it does mean you can use Messages to converse with all those Google Talkers, too.
Finally, thanks to the Bonjour network-recognition technology, you can communicate with other Macs on your own office network without signing up for anything at all—and without being online. This is a terrific feature when you’re sitting around a conference table, idly chatting with colleagues using your wireless laptop (and the boss thinks you’re taking notes). It’s also handy when you want to type little messages throughout the day to a family member downstairs, or to a roommate 15 feet away.
Your contacts from all of these services are consolidated into a single buddy list.
You log into each network separately using the Messages→Accounts submenu, but you can also be logged into all of them at once. This is a great option if your friends are spread out among different chat networks.
NOTE
If you’re on AOL’s AIM service or Yahoo’s Messenger service, why would you want to use Messages instead of those companies’ dedicated chat programs? Easy: Because Messages is a nice, cleanly designed program that’s free of advertisements, chatbots, and clunky interface elements.
On the other hand, there are some great chat apps that Messages can’t touch. One is the popular Adium, a single program that works with Messages’ chat services and many others, including MSN and ICQ. And then, of course, there’s Skype, the granddaddy of all chat programs, which offers audio and video chats like Messages, but happily connects to Skype running on Windows, iPhones, Android phones, and so on.
Chatting and videoconferencing work identically on all of these networks. Keep that in mind as you read the following pages.
Setting Up Your Chat Accounts
When you open Messages for the first time, you’re invited to enter (or sign up for) your iCloud or Apple account. Or, to use Messages with a different chat service, click Not Now; you’re now offered a more generic Account Setup window; see Figure 13-2.
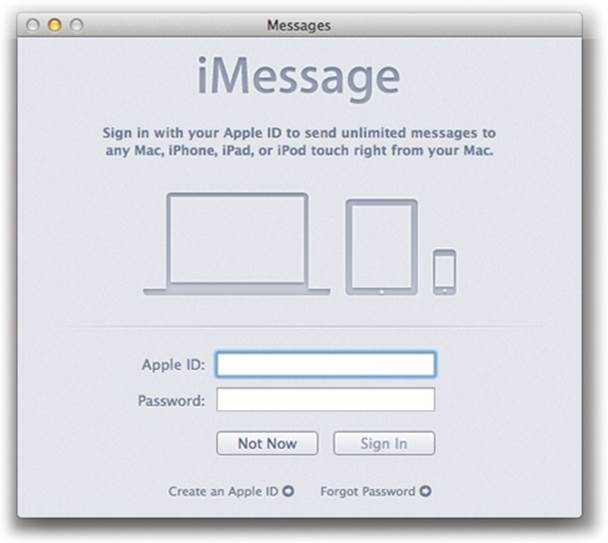
Figure 13-2. When you open Messages for the first time, it really, really wants you to enter (or sign up for) an iCloud/Apple ID, so you can become part of the great iMessages global family. But you can, instead, or in addition, enter Google, Jabber, Yahoo, or AIM account details.
If you already have an AIM, Yahoo, Google Talk, or Jabber account, then enter your name and password and click Continue. (If you’re an America Online member, then your existing screen name and password work for AIM purposes.)
If you don’t have one, it’s easy enough to get one. Sign up for a free account at the relevant company’s Web site (at gmail.com or yahoo.com, for example).
You can also input account information later—the setup assistant isn’t your only opportunity. You can do it in either of two places:
§ In System Preferences, click Internet Accounts, described in Chapter 16.
§ In Messages, choose Messages→Preferences, click the Accounts button, click the ![]() button, choose the chat service you want, and fill in your account info.
button, choose the chat service you want, and fill in your account info.
Once you’ve set up your accounts, you can activate or deactivate them either in Messages→Preferences→Accounts or by using the Messages→Accounts submenu. You might want to deactivate an account when, for example, you don’t want to be bugged by the rabble on that particular service.
NOTE
Incidentally, it’s possible to get good mileage out of Messages even if you don’t have a chat account. Messages comes ready to connect you with other people in your building, over the office network, thanks to a technology called Bonjour. You can’t add names to your Bonjour list; anyone who’s on the network and running Messages appears there automatically.
The Buddy List
Once you’ve entered your account information, you’re technically ready to start chatting. All you need now is a chatting companion, or, as he’s called in instant-messaging circles, a buddy. Messages comes with a unified Messages Buddies window where you can house the chat “addresses” for all your chat partners from all the different chat services, in a single list.
TIP
If you like, you can restore Messages to the old way of doing things, where each service (AIM, Yahoo, and so on) had its own separate buddy list window. To do that, choose Messages→Preferences→General; turn off “Show all my accounts in one list.” Now you can use the Window menu to reveal each service’s buddy list separately.
A tiny icon appears next to each name in your list, indicating that person’s availability to chat—and what kinds of multimedia chats are available. A phone icon means “equipped for an audio chat”; a camcorder means “equipped for a video chat.” The little colored dots mean “available” (green), “away” (red), “idle” (orange), and “undetermined—probably on a cellphone” (gray). A little ![]() icon means you’re chatting with someone on a cellphone.
icon means you’re chatting with someone on a cellphone.
Making a List
When you start Messages, your buddy list automatically appears (Figure 13-3). If you don’t see it, then choose Buddies from the Window menu.
Adding a buddy to this list entails knowing that person’s account name/address (for example, bunnyface23@aim.com or harold1968@yahoo.com).
Once you have it, click the ![]() button in the bottom-left corner of the Buddies window; in the resulting window, click Add Buddy.
button in the bottom-left corner of the Buddies window; in the resulting window, click Add Buddy.
Down slides a sheet attached to the buddy list window, offering a window into your Contacts program (Chapter 11). Using the “Add to” pop-up menu, choose the service you want to use for chatting with this person (Yahoo, Google, AIM, whatever).
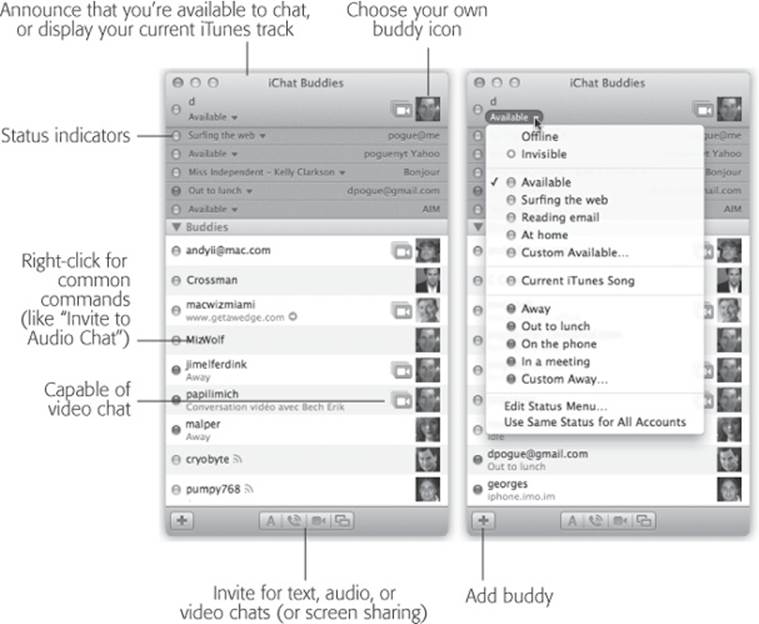
Figure 13-3. Left: The buddy list combines all your contacts from all chat services. Each chat account has its own status menu at the top. Right: You can also choose Edit Status Menu to set up more creative alternatives to “Available” and “Away.”
If your companion’s chat address is already in Contacts, then double-click the person’s name, or click it and then click Add.
If not, then enter your pal’s chat address in “Account name.” Enter this person’s real first and last names in the appropriate boxes, if you like.
TIP
Just to make things more complicated—er, flexible—Messages lets you organize buddies into groups, like Work, Family, and Fantasy Badminton League. Use the “Add to group” pop-up menu here to specify which group you want—or just choose Buddies to leave the new person in the general sloshing bucket of humanity.
When everything looks good, click Add.
Broadcasting Your Status
Using the pop-up menu just below your name (Figure 13-3, right), you can display your current mental status to other people’s chat programs. You can announce that you’re Available, Away, On the Phone, Drunk, and so on. (You have to choose Edit Status Menu for that last one.)
Better yet, if you have music playing in iTunes, you can tell the world what you’re listening to by choosing Current iTunes Song. (Your buddy can even click that song’s name to open its screen on the iTunes Store, all for instant purchase gratification.)
For some people, by far the juiciest status option is Invisible (available for me.com and AIM accounts only). It’s like a Star Trek cloaking device for your onscreen presence. Great for stalkers!
You can display the same status to your friends on all the different chat networks—Available, say, or Out to Lunch. Or you can set the status for each account separately, so that the lowlifes on Yahoo believe you to be “In a meeting” but the sophisticates on AIM realize that you’re “Available.”
To control whether your status message appears identically to all services, choose Use Same Status for All Accounts from the Status pop-up menu (Figure 13-3, right).
TIP
You can also add a Messages menulet to the top of your screen. Choose Messages→Preferences→General, and turn on “Show status in menu bar.” From now on, you can change your status even when Messages isn’t running. If other people see you as anything besides Offline or Invisible, they can send you a message—and Messages will open automatically.
If you become a hard-core chataholic, don’t miss the options in Messages→Preferences→General. Here you can set up automatic status changes.
For example, “Set my status to Away after the computer is inactive” changes your status to Away when you haven’t touched your Mac in 15 minutes, or when the Mac goes to sleep or the screen saver kicks in. That way, people seeking your witty repartee won’t think you’re just ignoring them.
You can also select what happens when you return to your computer after your status has been set to Away.
Sorting and Sizing Your Friends
In View→Sort Buddies, you can rearrange your buddies as they’re listed in the buddy list (by availability, name, or manually—drag the names up and down).
Once you get a lot of people piled on your list, all with their buddy pictures and audio/video chat icons, you may feel like Messages is taking up way too much screen real estate. If you want a more space-efficient view of your buddy list, then go to the View menu and turn off Show Buddy Pictures, Show Audio Status, or Show Video Status. You can turn off Buddy Groups here as well, if you’d prefer to see your buddies in one undivided list.
Let the Chat Begin
As with any conversation, somebody has to talk first. In chat circles, that’s called inviting someone to a chat.
They Invite You
If someone invites you to chat, Messages opens automatically and displays an invitation message like the one in Figure 13-4. If the person initiating a chat isn’t already in your buddy list, the note says, “[service] Message from [name of the person].”
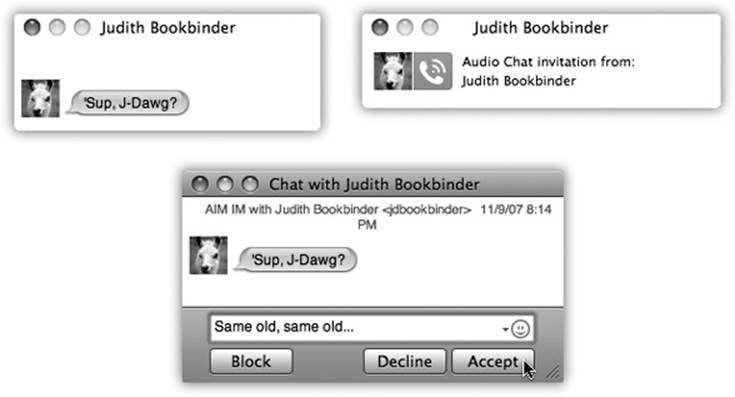
Figure 13-4. You’re being invited to a chat! Your buddy wants to have a typed chat (top left) or a spoken one (top right). To begin chatting, click the invitation window, type a response in the bottom text box if you like (for text chats), and click Accept (or press Return). Or click Block to lock out the person sending you messages—a good trick if someone’s harassing you.
(If you’ve set your status to Offline, on the other hand, you won’t see those invitation messages. You’ll see me.com and AIM invitations once you’re online again, but if the invites come from the other services, you’ve missed out.)
TIP
If you’re getting hassled by someone on AIM or me.com, click his name in the buddy list, or in the window containing the invitation, and choose Buddies→Block Person. If the person isn’t online at the time, go to Messages→Preferences→Accounts→Security and then click the button for “Block specific people.” Click the Edit List button, and then type in the screen name of the person you want out of your IM life. (The other chat network types don’t offer security options like this.)
You Invite Them
To begin a chat:
§ One-to-one typed conversations (instant messaging). To message someone, double-click the person’s name, type a quick invite (“You there?”), and press Return. You’ve just triggered what Apple calls an instant messaging session, which is a one-to-one affair.
TIP
If this person is on more than one chat network, then open the flippy triangle and choose the account you want to use. The flippy triangle is in the little strip called the Recipient bar; if you don’t see it, choose View→Show Recipient Bar.
§ Multiperson typed conversations (chat). To start a chat instead, click someone’s name in the buddy list and then choose Buddies→Invite to Chat. Now, each time you click the ![]() button at the bottom of the Participants list, you choose another person to invite. (Or ⌘-click each name in the buddy list to select several people at once and then click the
button at the bottom of the Participants list, you choose another person to invite. (Or ⌘-click each name in the buddy list to select several people at once and then click the ![]() button below the list to start the text chat.) Everyone sees all the messages anyone sends, and anyone can add new participants.
button below the list to start the text chat.) Everyone sees all the messages anyone sends, and anyone can add new participants.
§ Audio or video chats. To start an audio or video chat, click the microphone or movie-camera icon in your buddy list.
To initiate a chat with someone who isn’t in the buddy list, choose File→New Chat. Type the account name, and then click OK to send the invitation.
Text Chatting
A typed chat works like this: Each time you or your chat partner types something and then presses Return, the text appears on both of your screens (Figure 13-5).
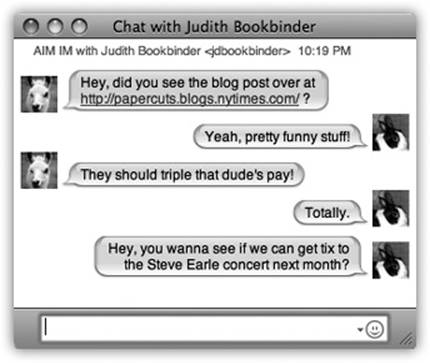
Figure 13-5. As you chat, your comments always appear on the right. If you haven’t yet created a custom icon, you’ll look like a blue globe or an AOL running man. You can choose a picture for yourself either in your own Contacts card or right in Messages. And Web links your pals paste into messages are perfectly clickable—your Web browser leaps right up to take you to the site your friend has shared.
Messages displays each typed comment next to an icon, which can be any of these three things:
§ A picture the other person added. If the buddy added her own picture—to her own copy of Messages, a Jabber program, AOL Instant Messenger, or Yahoo Messenger—then it will be transmitted to you, appearing automatically in the chat window. Cool!
§ A picture you added. If you’ve added a picture of that person to the buddy list or to Contacts, you see it here instead. (After all, your vision of what somebody looks like may not match his own self-image.)
§ Generic. If nobody’s done any icon dragging of any sort, you get a generic silhouette icon.
To choose a graphic to use as your own icon, click the square picture to the right of your own name at the top of the buddy list. From the pop-up palette of recently selected pictures, choose Edit Picture to open a pop-up image-selection palette, where you can take a snapshot with your Mac’s camera or choose a photo file from your hard drive. Feel free to build an array of graphics to represent yourself—and to change them in midchat, using this pop-up palette, to the delight or confusion of your conversation partner.
TIP
When you minimize the Messages message window, its Dock icon displays the icon of the person you’re chatting with—a handy reminder that she’s still there.
In-Chat Fun
Typing isn’t the only thing you can do during a chat. You can also perform any of these stunts:
§ Format your text. You can press ⌘-B or ⌘-I to make your next typed utterance bold or italic. Or change your color or font by choosing Format→Show Colors or Format→Show Fonts, which summons the standard OS X color or font palettes. (If you use some weird font that your chat partners don’t have installed, then they won’t see the same typeface.)
§ Insert a smiley. When you choose a face (like Undecided, Angry, or Frown) from this quick-access menu of smiley options (at the right end of the text-reply box), Messages inserts it as a graphic into your response.
On the other hand, if you know the correct symbols to produce smileys—that “:)” means a smiling face, for example—you can save time by typing them instead of using the pop-up menu. Messages converts them into smiley icons on the fly, as soon as you send your reply.
§ Send a file. Choosing Buddies→Send File lets you send a file to all the participants in your chat.
Better yet, just drag the file’s icon from the Finder into the box where you normally type. (This trick works well with pictures, because your conversation partner sees the graphic right in his Messages window. And it can handle files as big as 100 megabytes.)
This is a fantastic way to transfer a file that would be too big to send by email. A chat window never gets “full,” and no attachment is too large to send.
This method halves the time of transfer, too, since your recipients get the file as you upload it. They don’t have to wait 20 minutes for you to send the file and then another 20 minutes to download it, as they would with email or FTP.
If you have multiple conversations taking place—and are flinging files around to a bunch of people—you can keep an eye on each file’s progress with the File Transfer Manager. Choose Window→File Transfers (or press Option-⌘-L) to pop open an all-in-one document delivery monitor.
§ Get Info on someone. If you click a name in your buddy list and then choose Buddies→Show Info (or right-click someone’s name and choose Show Info from the shortcut menu), you get a little Info window about your buddy where you can edit her name, email address, and picture. (If you change the picture here, you’ll see it instead of the graphic your buddy chose for herself.)
If you click the Alerts tab at this point, you can make Messages react when this particular buddy logs in, logs out, or changes status—for example, by playing a sound or saying, “She’s here! She’s here!”
§ Send an Instant Message. Not everything in a chat session has to be “heard” by all participants. If you choose Buddies→Send Instant Message, you get a private chat window, where you can “whisper” something directly to a special someone behind the other chatters’ backs.
§ Send Email. If someone messages you, “Hey, will you email me directions?” you can do so on the spot by choosing Buddies→Send Email. Your email program opens up automatically so you can send the note along; if your buddy’s email address is part of his Contacts info, then the message is even preaddressed.
Popping the Balloons
The words you might have for Messages’ word-balloon design might be “cute” and “distinctive.” But it’s equally likely that your choice of adjectives includes “juvenile” and “annoying.”
UP TO SPEED: THE CHAT TRANSCRIPT
When you close a chat by clicking the ![]() in its left-side tab, Messages asks if you’re sure you know what you’re doing. If you proceed, you lose the transcript of that chat forever. That prose is hosed.
in its left-side tab, Messages asks if you’re sure you know what you’re doing. If you proceed, you lose the transcript of that chat forever. That prose is hosed.
On the Messages→Preferences→Messages panel, you can turn on “Save history when chats are closed.” From now on, the text of your conversations is automatically saved. You can retrieve them using the File→Recent Items command; by starting another chat with the same person (the history reappears); or by opening your Library→Messages→Archives folder. (To get to your Library folder, press Option as you choose Go→Library in the Finder.)
If you do have “Save history” turned on, and you wind up having a particularly incriminating chat, you can tell Messages not to save its transcript by pressing ⌘-Delete.
Fortunately, behind Messages’ candy coating are enough options tucked away in the View→Messages menu that you’ll certainly find one that works for you (see Figure 13-6).
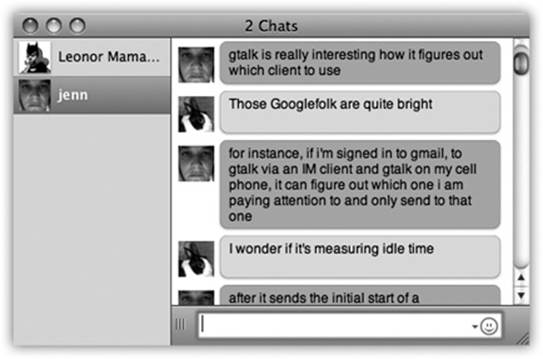
Figure 13-6. Messages can look like almost anything. Here, for example, is what a chat looks like with the balloon effect turned off (giving you colored rectangles instead). You can even turn off pictures if they bother you, or hide the names. You can also change the color and typeface settings in the Messages→Preferences→Messages panel.
Audio Chats
Messages becomes much more exciting when you exploit its AV Club capabilities. Even over slow Internet connections, you can conduct audio chats, speaking into your microphone and listening to the responses from your speaker.
If you have a broadband connection, though, you get a much more satisfying experience: Up to 10 of you can join in one massive, free conference call from across the Internet.
A telephone icon next to a name in your buddy list tells you that the buddy has a microphone and is ready for a free Internet “phone call.” If you see what appear to be stacked phone icons, then your pal’s Mac has enough horsepower to handle a multiple-person conference call.
To begin an audio chat, you have three choices:
§ Click the telephone icon next to the buddy’s name.
§ Highlight someone in the buddy list, and then click the telephone icon at the bottom of the list.
§ If you’re already in a text chat, choose Buddies→Invite to Audio Chat.
Once your invitation is accepted, you can begin speaking to each other. The bars of the sound-level meter let you know that the microphone—which you’ve specified in the Messages→Preferences→Audio/Video tab—is working.
TIP
Although the audio is full duplex (you can hear and speak simultaneously, like a phone but unlike a walkie-talkie), there may be a delay, like you’re calling overseas on a bad connection. If you can’t hear anything at all, then check out Messages’ Help system, which contains some suggestions.
Video Chats
If you and your partner both have broadband Internet connections, even more impressive feats await. You can conduct a free video chat with up to four people, who show up on three vertical panels, gorgeously reflected on a shiny black table surface. This isn’t the jerky, out-of-audio-sync, Triscuit-sized video of days gone by. If you’ve got the Mac muscle and bandwidth, your partners are as crisp, clear, bright, and smooth as television—and as big as your screen, if you like.
People can come and go; as they enter and leave the “videosphere,” Messages slides their glistening screens aside, enlarging or shrinking them as necessary to fit on your screen.
Equipment Requirements
Everyone in a video chat has to be on the same service (me.com/AIM, Yahoo, or Jabber), and everyone needs pretty high-horsepower computers and Internet connections.
TIP
For better audio quality during your video calls—both hearing and broadcasting—wear a headset. For example, you can pair a wireless Bluetooth headset with your Mac in Messages→Preferences→Audio/Video→Set Up Bluetooth Headset. This fires up the Mac’s Bluetooth Setup Assistant program to guide you through the process.
After you get your Bluetooth headset married to your Mac, then go to ![]() →System Preferences→Output and select your headset in the list.
→System Preferences→Output and select your headset in the list.
For example, your Mac needs a video camera (like the one that came built in), a camcorder, or a FireWire version of one of those golf-ball Webcams.
TIP
You and your buddy don’t both need the gear. If only you have a camera, for example, you can choose Buddies→Invite to One-Way Video Chat (or Audio Chat). Your less-equipped buddy can see you, but has to speak (audio only) or type in response.
You need pretty decent Internet speeds, too.
Starting the Video Call
If you see a ![]() icon next to a buddy’s name, you can have a full-screen, high-quality video chat with that person, because they, like you, have a suitable camera and a high-speed Internet connection. If you see a stacked camcorder icon, then that person has a Mac that’s capable of joining a four-way video chat.
icon next to a buddy’s name, you can have a full-screen, high-quality video chat with that person, because they, like you, have a suitable camera and a high-speed Internet connection. If you see a stacked camcorder icon, then that person has a Mac that’s capable of joining a four-way video chat.
To begin a video chat, click the ![]() icon next to a buddy’s name, or highlight someone in the buddy list and then click the camcorder icon at the bottom of the list. Or, if you’re already in a text chat, choose Buddies→Invite to Video Chat.
icon next to a buddy’s name, or highlight someone in the buddy list and then click the camcorder icon at the bottom of the list. Or, if you’re already in a text chat, choose Buddies→Invite to Video Chat.
A window opens, showing you. This Preview mode is intended to show what your buddy will see. (You’ll probably discover that you need some kind of light in front of you to avoid being too shadowy.) As your buddies join you, they appear in their own windows (Figure 13-7).

Figure 13-7. That’s you in the smaller window. To move your own miniwindow, click a different corner, or drag yourself to a different corner. If you need to blow your nose or do something else unseemly, Option-click the microphone button to freeze the video and mute the audio. Click again to resume.
And now, some video-chat notes:
§ If your conversation partners seem unwilling to make eye contact, it’s not because they’re shifty. They’re just looking at you, on the screen, rather than at the camera—and chances are you aren’t looking into your camera, either.
§ Don’t miss the ![]() button in the upper-right corner of the window. It takes your video into full screen. Wild.
button in the upper-right corner of the window. It takes your video into full screen. Wild.
§ If you’re the one who started the call, then you can add more people by clicking the ![]() button in the chat window or dragging a buddy’s name into the window. (If that person doesn’t have a camera, she can still enjoy audio or typing privileges.)
button in the chat window or dragging a buddy’s name into the window. (If that person doesn’t have a camera, she can still enjoy audio or typing privileges.)
§ You can have video chats with Windows PCs, too. Be prepared for disappointment, though; the video is generally jerky, small, and slightly out of sync. That’s partly due to the cheap USB Webcams most PCs have, and partly due to the poor video codec (compression scheme) built into many Windows chat programs.
§ You can capture a still “photo” of a video chat by ⌘-dragging the image to your desktop, or by choosing Video→Take Snapshot (Option-⌘-S). Or just use the Copy command (⌘-C) to copy an image of the chat to the Clipboard, ready for pasting in another program.
§ Don’t want to see yourself in the picture-in-picture window during your video chat? Choose Video→Hide Local Video.
§ This cutting-edge technology can occasionally present cutting-edge glitches. The video quality deteriorates, the transmission aborts suddenly, the audio has an annoying echo, and so on. When problems strike, Messages Help offers a number of tips; the Video→Connection Doctor can identify your network speed. (Messages video likes lots of network speed.)
TIP
If the Messages video seems to be struggling too much to be worthwhile, consider using FaceTime instead. It’s designed to deliver good video quality over less-beefy Internet connections.
§ Just as you can save your typed transcripts of instant message conversations, you can record your audio and video chats. Once you start a chat, choose Video→Record Chat. Your buddy is asked if it’s OK for you to proceed with the recording (to ward off any question of those pesky wiretapping laws); if permission is granted, then Messages begins recording the call.
When you’ve got what you want, click Stop. Your recordings are automatically saved into Home→Documents→Messages (AAC files for audio conversations, MPEG-4 files for video chats). From there, you can drag them into iTunes to play or sync them up with an iPod or iPhone. Yes, you can now relive those glorious Messages moments when you’re standing in line at the grocery store.
Bluescreen Backdrops and Video FX
If your video chats look like a bunch of cubicle-dwellers sitting around chatting at their desks, then you can liven things up with one of Messages’ most glamorous and jaw-dropping features: photo or video backgrounds for your talking head. Yes, now you can make your video chat partners think you’re in Paris, on the moon, or even impersonating a four-panel Andy Warhol silkscreen.
NOTE
The Messages and Photo Booth backdrop effects require bandwidth, man, serious bandwidth—at least 128 Kbps for both upload and download speeds.
Here’s how to prepare your backdrop for a video chat that’s under way:
1. Choose Video→Show Video Effects.
The Effects box appears, looking a lot like the one in Photo Booth (Chapter 18); visual backdrops are the same. Click the various squares to see how each effect will transform you in real time.
The first three pages of effects all do video magic on you and everything else in the picture. The second two pages of effects, however, don’t do anything to your image. Instead, they replace the background.
This is the really amazing part. In TV and movies, replacing the background is an extremely common special effect. All you have to do is set up a perfectly smooth, evenly lit, shadowless blue or bright green backdrop behind the subject. Later, the computer replaces that solid color with a new picture or video of the director’s choice.
Messages, however, creates exactly the same special effect (Figure 13-8) without requiring the bluescreen or the greenscreen. Read on.

Figure 13-8. Top left: You have plenty of backgrounds to choose from for your next video chat. Click an effect to add it to your chat window. Click the small arrows at the bottom of the window to advance or retreat through the various effects styles. Click the Original square in the middle of the window to erase the effect and start again from scratch. Lower right: Let the live bluescreen action begin!
2. Click the background effect you want.
Suppose, for example, that you’ve clicked the video loop showing the Eiffel Tower with people walking around. At this point, a message appears on the screen that says, “Please step out of the frame.”
3. Duck out of camera range (or move off to one side).
See, Messages intends to memorize a picture of the real background—without you in it. When you return to the scene, your Mac then compares each pixel of its memorized image with what it’s seeing now. Any differences, it concludes, must be you. And that is how it can create a bluescreen effect without a bluescreen.
NOTE
To make this work, both the camera and the background must be perfectly still. If the lighting or the visuals shift or change in any way, you may get some weird, glitchy effects where your real background bleeds through.
4. When the screen says, “Background detected,” step back into the frame.
Sacré bleu! You’re now in virtual Paris. Go ahead and start the video chat with your friends, and don’t forget your beret.
If you want to clear out the background, or change it, click the Original square in the middle of the Effects palette and then choose a different backdrop. (You can also change backdrops in midchat by clicking Effects again.)
If things get too weird and choppy onscreen, you can restore the normal background by choosing Video→Reset Background. (That’s also handy if you suddenly have to have a video talk with your boss about your excessive use of Messages while he’s away on his business trip.)
TIP
You can use one of your own photos or video clips as a Messages backdrop, too. In the Video Effects box, click the arrows on the bottom until you get to the screen with several blank User Backdrop screens. Next, drag a photo or video from the desktop directly onto one of the blank screens. Click it just like you would any of Apple’s stock shots.
Juggling Chats and Windows
Once you become a Messages addict, you often wind up with multiple chats in progress. These days, Messages contains all your conversations in a single window, as shown in Figure 13-9.
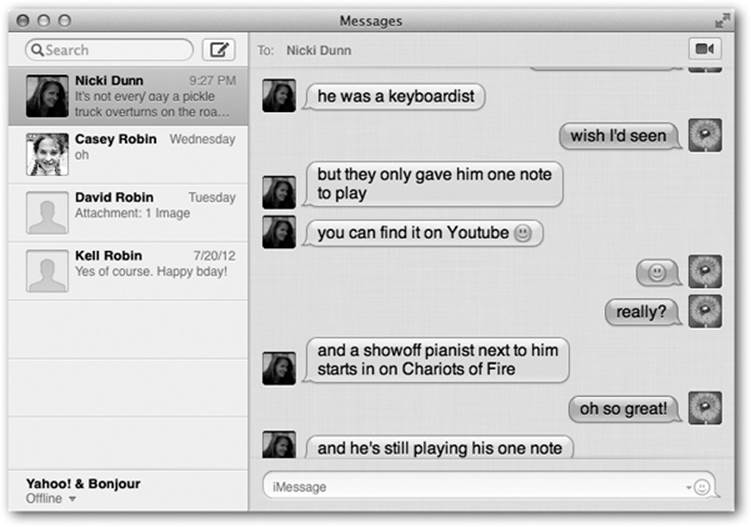
Figure 13-9. Messages keeps tabs on your various simultaneous conversations—literally. Click the different tabs to switch chats. Double-click one to open it into its own window, without the tabs taking up space.
TIP
You can press Control-Tab to switch from chat to chat in a multi-chat window. Add the Shift key to move the other way.
Sharing Your Screen
As you’ve seen already in this chapter, Messages lets you share your thoughts, your voice, and your image with the people on your buddy list. And now, for its next trick, it lets you share…your computer.
Messages’ screen-sharing feature is a close relative of the network screen-sharing feature described in Chapter 15. It lets you not only see what’s on a faraway buddy’s screen, but also control it, taking command of the distant mouse and keyboard. (You can share your screen with the other guy, too.)
You can open folders, create and edit documents, and copy files on the shared Mac screen. Sharing a screen makes collaborating as easy as working side by side around the same Mac, except now you can be sitting in San Francisco while your buddy is banging it out in Boston.
And if you’re the family tech-support specialist—but the family lives all over the country—screen sharing makes troubleshooting a heckuva lot easier. You can now jump on your Mom’s shared Mac and figure out why the formatting went wacky in her Word document, without her having to attempt to explain it to you over the phone. (“And then the little thingy disappeared and the doohickey got scrambled…”)
TIP
Once you’re controlling someone else’s screen remotely, your keyboard shortcuts operate her Mac instead of yours. Press ⌘-Tab to bring up the application switcher, hit ⌘-Q to quit a program, use all the Mission Control and Spotlight shortcuts, and so on.
POWER USERS’ CLINIC: MESSAGES ON AUTOPILOT
Messages is capable of responding to chat invitations by running an AppleScript. And AppleScript is capable of…almost anything.
As a proof of concept, Apple’s AppleScript product manager has created a truly evil script that you can choose in the Messages→Preferences→Alerts→Run AppleScript pop-up menu. It’s called Messages Autopilot; you can download it from this book’s “Missing CD” page at www.missingmanuals.com.
In short, this very special script simulates your end of the chat. It carries on a fairly generic conversation, periodically typing perfectly plausible all-purpose utterances, occasionally excusing yourself while you answer the doorbell, and otherwise doing an excellent impersonation of a distracted, preoccupied, but still well-meaning you.
Let it run. Give your buddies the satisfaction of knowing you’re there for them. Even though you’re really watching TV downstairs.
For more on AppleScript, check this book’s Missing CD page at www.missingmanuals.com for a free PDF appendix called “AppleScript.”
To make Messages’ screen sharing work, you and your buddy must both be using AIM, Google Talk, Jabber, or Bonjour accounts; sadly, you can’t share your screen using an iCloud or Yahoo account.
To begin, click the sharee’s name in your buddy list.
§ To share your screen, choose Buddies→Share My Screen with [person’s name].
§ To see his screen, choose Buddies→Ask to Share [person’s name]’s Screen.
NOTE
Similar commands are available in the Screen Sharing pop-up button—the two overlapping squares at the bottom of the Buddies window.
Once the invitation is accepted, the sharing begins, as shown in Figure 13-10. To help you communicate further, Messages politely opens up an audio chat with your buddy so you can have a hands-free discussion about what you’re doing on the shared machine.
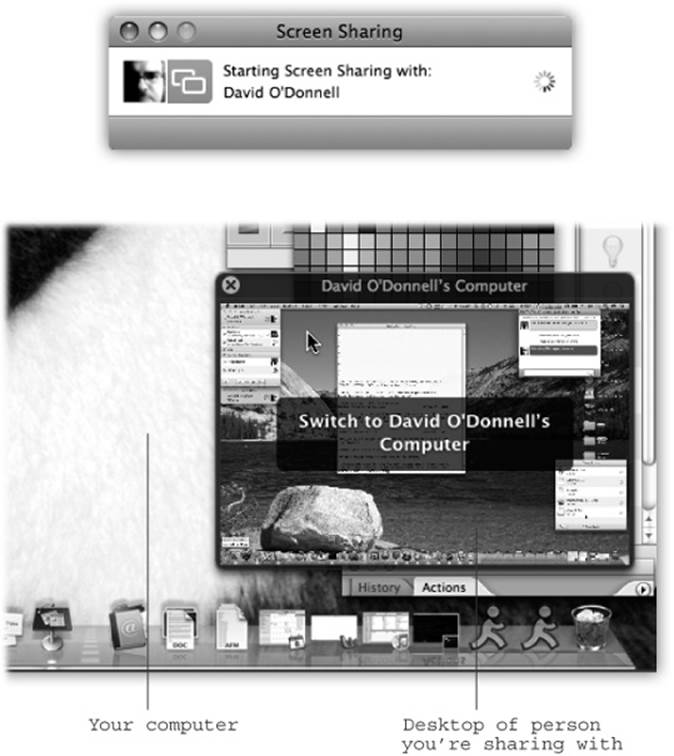
Figure 13-10. Top: You either send or receive an invitation to start sharing your screen, but make sure you know with whom you’re dealing before accepting the offer and starting the sharing process. Bottom: When you’re sharing someone else’s screen, you have the option to click back and forth between the two Mac screens. New in Mavericks: You can move the cursor, click things, and even highlight text on the other guy’s screen. That’s great for explaining to someone, via remote control, how to perform some task.
If you’re seeing someone else’s screen, you see his Mac desktop in full-screen view, right on your own machine. You also see a small window showing your own Mac; click it to switch back to your own desktop.
TIP
To copy files from Mac to Mac, drag them between the two windows. Files dragged to your Mac wind up in your Downloads folder.
To bail out, press Control-Esc on the Mac’s keyboard.