Switching to the Mac: The Missing Manual, Mavericks Edition (2014)
Part IV. Putting Down Roots
Chapter 18. The Freebie Programs
Right out of the box, OS X comes with a healthy assortment of about 50 freebies: programs for sending email, writing documents, doing math, even playing games. They’re designed not only to show off some of OS X’s most dramatic technologies, but also to let you get real work done without having to invest in additional software.
Your Free OS X Programs
A broad assortment of programs sits in the Applications folder in the main hard drive window, and another couple dozen less frequently used apps await in the Applications→Utilities folder.
This chapter guides you through every item in your new software library, one program at a time. (Of course, your Applications list may vary. Apple might have blessed your particular Mac model with some bonus programs, or you may have downloaded or installed some on your own.)
TIP
A reminder: You can jump straight to the Applications folder in the Finder by pressing Shift-⌘-A (the shortcut for Go→Applications), or by clicking the Applications folder icon in the Sidebar. You might consider adding the Application folder’s icon to the Dock, too, so you can access it no matter what program you’re in. Shift-⌘-U (or Go→Utilities) takes you, of course, to the Utilities folder.
App Store
See the beginning of Chapter 4 for full details on the Mac App Store.
Automator
This software-robot program is described in a free PDF appendix to this chapter, “AppleScript and Automator,” which is available on this book’s “Missing CD” page at www.missingmanuals.com.
Calculator
The Calculator is much more than a simple four-function memory calculator. It can also act as a scientific calculator for students and scientists, a conversion calculator for metric and U.S. measures, and even a currency calculator for world travelers.
The little Calculator widget in the Dashboard is quicker to open, but the standalone Calculator program is far more powerful. For example:
§ Calculator has three modes: Basic, Advanced, and Programmer (Figure 18-1). Switch among them by choosing from the View menu (or pressing ⌘-1 for Basic, ⌘-2 for Advanced, or ⌘-3 for Programmer).
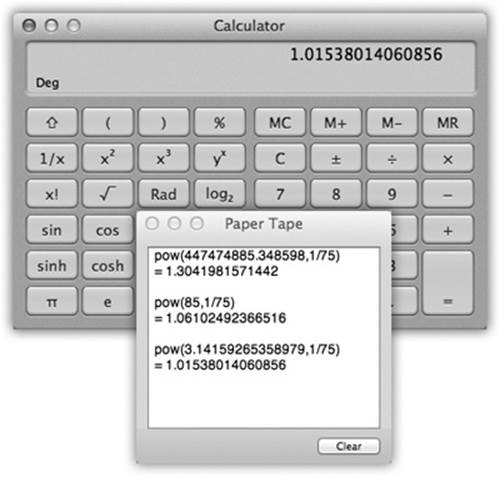
Figure 18-1. The Calculator program offers a four-function Basic mode, a full-blown scientific calculator mode, and a programmer’s calculator (shown here, and capable of hex, octal, decimal, and binary notation). The first two modes offer a “paper tape” feature (Windows→Paper Tape) that lets you correct errors made way back in a calculation. To edit one of the numbers on the paper tape, drag through it, retype, and then click Recalculate Totals. You can also save the tape as a text file by choosing File→Save Tape As, or print it by selecting File→Print Tape.
§ You can operate Calculator by clicking the onscreen buttons, but it’s much easier to press the corresponding number and symbol keys on your keyboard.
§ Press the C key to clear the calculator display.
§ As you go, you can make Calculator speak each key you press. The Mac’s voice ensures that you don’t mistype as you keep your eyes on the receipts in front of you, typing by touch.
Just choose Speech→Speak Button Pressed to turn this feature on or off. (You choose which voice does the talking in the Speech panel of System Preferences.)
§ Once you’ve calculated a result, you can copy it (using Edit→Copy, or ⌘-C) and paste it directly into another program.
§ Calculator even offers Reverse Polish Notation (RPN), a system of entering numbers that’s popular with some mathematicians, programmers, and engineers, because it lets them omit parentheses. Choose View→RPN to turn it on and off.
TIP
How cool is this? In most programs, you don’t need Calculator or even a Dashboard widget. Remember that the Spotlight menu is a calculator, too. Type or paste an equation into the Spotlight search box; instantly, the answer appears in the results menu.
Conversions
Calculator is more than a calculator; it’s also a conversion program. No matter what units you’re trying to convert—meters, grams, cubic inches, miles per hour, euros—Calculator is ready.
1. Clear the calculator (for example, press C on your keyboard). Type in the starting measurement.
To convert 48 degrees Celsius to Fahrenheit, for example, type 48.
2. From the Convert menu, choose the kind of conversion you want.
In this case, choose Temperature. When you’re done choosing, a dialog box appears.
3. Use the pop-up menus to specify which units you want to convert to and from.
To convert Celsius to Fahrenheit, choose Celsius from the first pop-up menu, and Fahrenheit from the second.
4. Click OK.
That’s it. The Calculator displays the result—in degrees Fahrenheit, in this example.
The next time you want to make this kind of calculation, you can skip steps 2, 3, and 4. Instead, just choose your desired conversion from the Convert→Recent Conversions submenu.
Calculator is especially amazing when it comes to currency conversions—from pesos to American dollars, for example—because it actually does its homework. It goes online to download up-to-the-minute currency rates to ensure that the conversion is accurate. (Choose Convert→Update Currency Exchange Rates.)
TIP
If you’re working with big numbers, don’t forget to turn on View→Show Thousands Separators. Calculator will add commas (like 1,242,939) to help you read your big numbers more easily.
Calendar
The calendar program that was called iCal for many years is now called Calendar, so that it matches up better with the iPhone and iPad.
Calendar is not so different from those “Hunks of the Midwest Police Stations” paper calendars that people leave hanging on the walls for months past their natural life span.
TIP
Calendar’s Dock icon displays today’s date—even when Calendar isn’t running.
For example, Calendar still offers several advantages over paper calendars:
§ It can automate the process of entering repeating events, such as weekly staff meetings or gym workouts.
§ Calendar can give you a gentle nudge (with a sound, a dialog box, or even an email) when an important appointment is approaching.
§ Calendar can share information with Contacts, with Mail, with your iPod/iPad/iPhone, with other Macs, or with “published” calendars on the Internet. Some of these features require one of those iCloud accounts described in Chapter 10. But Calendar also works fine on a single Mac, even without an Internet connection.
§ Calendar can subscribe to other people’s calendars. For example, you can subscribe to your spouse’s calendar, thereby finding out when you’ve been committed to after-dinner drinks on the night of the big game on TV. You can also tell Calendar to display your online calendars from Google and Yahoo, or even your company’s Exchange calendar (Chapter 8).
Working with Views
When you open Calendar, you see something like Figure 18-2. By clicking one of the View buttons above the calendar, or by pressing ⌘-1, ⌘-2, ⌘-3, or ⌘-4, you can switch among these views:
§ Day looks exactly like a day-at-a-time desk calendar. On the right-side “page,” you see today’s schedule on an hour-by-hour chart. On the left “page,” you get a simple list of appointments for today and the next few days.
If you choose Calendar→Preferences, you can specify what hours constitute a workday. This is ideal both for those annoying power-life people who get up at 5 a.m. for two hours of calisthenics and for the more reasonable people who sleep until 11 a.m.
TIP
Calendar provides three quick ways to get to the current day’s date. Click Today (upper-left corner, between the ![]() and
and ![]() ), choose View→Go to Today, or press ⌘-T.
), choose View→Go to Today, or press ⌘-T.
§ Week fills the main display area with seven columns, reflecting the current week. (You can establish a five-day workweek instead in Calendar→Preferences.)
TIP
If you double-click the date above the calendar, you open the Day view for that day.
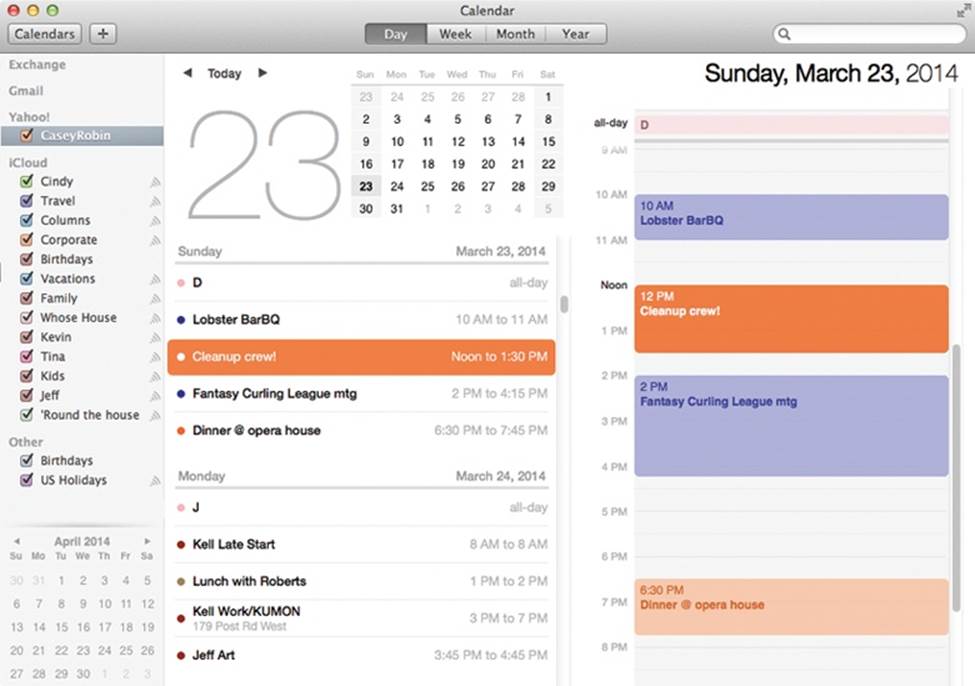
Figure 18-2. In Calendar, the ![]() and
and ![]() buttons at top left take you to the previous or next day, week, month, or year (depending on your current view). In the Day view, shown here, you can click the tiny numbers on the mini-calendars to change days. Double-click any appointment to open its Info balloon, shown in Figure 18-4.
buttons at top left take you to the previous or next day, week, month, or year (depending on your current view). In the Day view, shown here, you can click the tiny numbers on the mini-calendars to change days. Double-click any appointment to open its Info balloon, shown in Figure 18-4.
§ Month shows the entire current month; a thicker gray line identifies the current week to help you get your bearings. The time of each appointment is listed in gray off to the right of each square. Double-click a date number to open the Day view for that date.
If a Month-view square is too small to show everything you’ve got scheduled that day, you’ll see a notation at the bottom of the square like, “3 more…” Sometimes, making the window bigger (or full screen) helps make more room, or you can just double-click the date’s number to switch to Day view and see everything at once.
TIP
If your mouse has a scroll wheel, you can use it to great advantage in Calendar. For example, when entering a date, turning the wheel lets you jump forward or backward in time. It also lets you change the priority level of a To Do item you’re entering, or even tweak the time zone as you’re setting it.
§ Year view displays a “heat map” of the entire year (Figure 18-3).
In any of the views, double-click an appointment to see more about it. The very first time you do that, you get the summary balloon shown at top right in Figure 18-4. If you want to make changes, you can then click the Edit button to open a more detailed view.
TIP
In Week or Day view, Calendar sprouts a handy horizontal line that shows where you are in time right now. (Look in the hours-of-the-day “ruler” down the left side of the window to see this line’s little red bulb.) A nice touch, and a handy visual aid that can tell you at a glance when you’re already late for something.
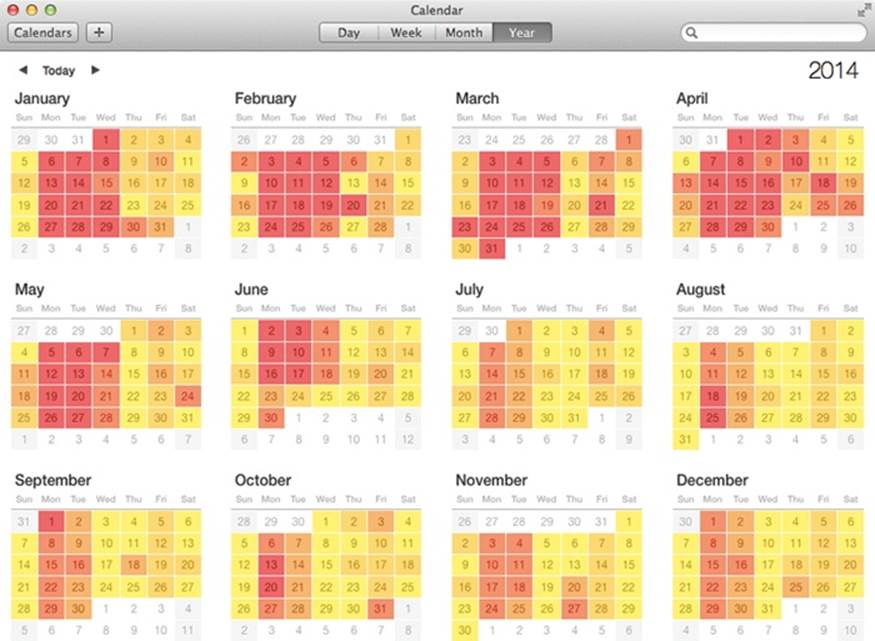
Figure 18-3. Year view shows the entire year. The colors of the squares are a “heat map” that indicate how hectic your schedule is. You see a range of shades from light yellow (not very busy) to deep red (you’re in big trouble). Double-click a date to open the Day view for that date.
Also in any view, you can switch into full-screen view by clicking the ![]() icon in the upper-right corner of the window. See Full Screen Mode for more on Full Screen mode.
icon in the upper-right corner of the window. See Full Screen Mode for more on Full Screen mode.
TIP
Each view scrolls smoothly and endlessly into the past or future. Day and Month views scroll vertically; Week view scrolls horizontally. There’s no requirement that your view begin with the first day of the week or first week of the month.
Making an Appointment
The basic Calendar is easy to figure out. After all, with the exception of one unfortunate Gregorian incident, we’ve been using calendars successfully for centuries.
Even so, there are two ways to record a new appointment: using the mouse, or using the new Quick Event box.
The mousy way
You can quickly record an appointment using any of several techniques, listed here in order of decreasing efficiency:
§ In Month view, double-click a blank spot on the date you want. Type the name of the event and a time slot—for example, Sales meeting 9am-4:30. (See The Quick Event way, below, for details on how Calendar interprets these time notations.)
§ In Day or Week view, double-click the starting time to create a one-hour appointment. Or drag vertically through the time slots that represent the appointment’s duration. Either way, type the event’s name inside the newly created colored box.
§ In any view, right-click (or two-finger click) a date and choose New Event from the shortcut menu. Type the event’s name.
Unless you use the drag-over-hours method, a new event believes itself to be one hour long. But in Day or Week view, you can adjust its duration by dragging the bottom edge vertically. Drag the dark top bar up or down to adjust the start time.
In many cases, that’s all there is to it. You’ve just specified the day, time, and title of the appointment. Now you can get on with your life.
TIP
If the Edit balloon is blocking a part of the calendar you need to see, no biggie: Just drag the balloon out of the way, using any blank spot as a handle. It “tears off” and becomes independent.
The Quick Event way
In the Quick Event method, the program spares you the trouble of manually selecting dates, start times, and end times. Instead, the program understands notations like “7 pm Friday,” and puts your new appointment into the right time slot automatically.
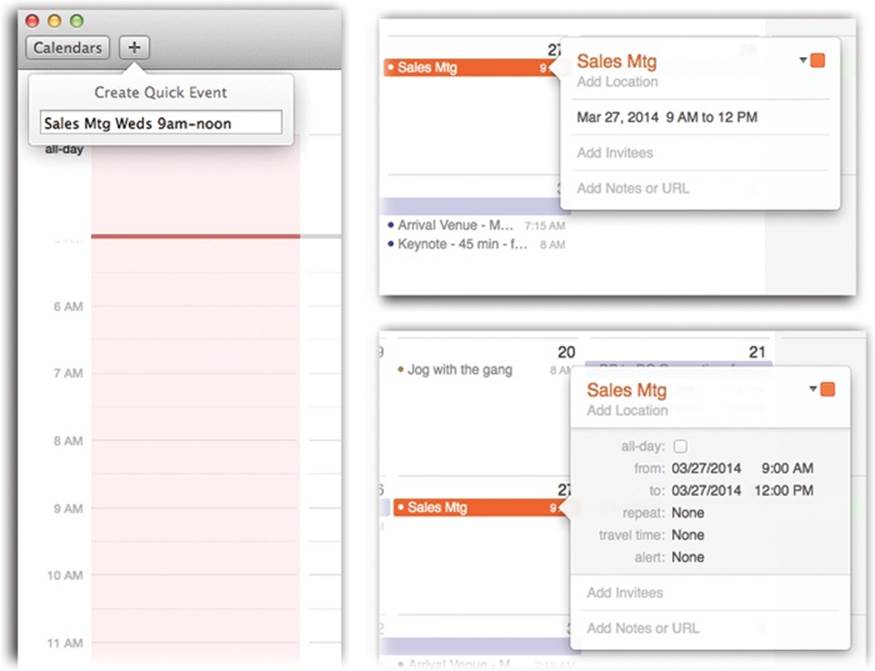
Figure 18-4. Left: Type a plain-English shorthand for an appointment, like “Sales Mtg Weds 9am-noon.” Press Enter. Marvel as Calendar interprets the times you typed and inserts your meeting into the right time slot. Top right: All the details for an appointment appear right in this balloon/box. Click a detail, like the time, to expand the balloon so that you can edit it (bottom right).
To use this feature, press ⌘-N. (Or click ![]() —top left of the window—or choose File→New Event). The Quick Event box appears. Proceed as shown in Figure 18-4.
—top left of the window—or choose File→New Event). The Quick Event box appears. Proceed as shown in Figure 18-4.
NOTE
Calendar proposes adding the new appointment to your default calendar—that is, the category you use most often (read on for details on these calendar categories). Supposedly, you’ve already told it which category is your preferred one by using the Calendar→Preferences→General→Default Calendar pop-up menu.
But as you add a new appointment this way, you can override that setting by holding down the ![]() button. You get a pop-up menu of your calendar categories; only after you click the one you want do you see the Quick Event box shown in Figure 18-4.
button. You get a pop-up menu of your calendar categories; only after you click the one you want do you see the Quick Event box shown in Figure 18-4.
Into the Quick Event box, you’re supposed to type the name of your appointment and its date and time. For example, you could type Report deadline Aug 12, or “Titanic 2: The Return” Sat 7 pm, or Cara date 11-11:15am.
When you press Return, Calendar interprets what you typed, using these rules:
§ If you didn’t specify an ending time, Calendar sets the appointment to 1 hour long.
§ If you didn’t enter any time information, Calendar figures you meant an all-day event like a birthday, holiday, or deadline.
§ If you typed breakfast or morning, Calendar sets the appointment to start at 9 a.m.; lunch or noon, it starts at 12 p.m.; dinner or night, it starts at 8 p.m.
§ If you enter a weekday (for example, Chicago Monday), Calendar assumes you mean the very next occurrence of that day. (If that’s not what you want, enter the date, like Chicago Jul 3.)
§ If you enter a time but not a date or day (for example, Fishing 3:30 pm), Calendar assumes you mean today.
Location, alarms, travel time, and other details
No matter which method you use to create the basic event (the mouse way or the Quick Event way), you’re now presented with the information balloon shown at right in Figure 18-4. Here’s where you go to town filling in the details. (This same balloon will appear when you double-click any existing appointment later.)
TIP
You can also open the Info balloon by clicking the appointment and then pressing ⌘-E (which is short for Edit→Edit Event).
Or you know what? You might prefer keeping a permanent floating Info bubble in one spot on your screen, rather than having to deal with a bubble that pops out of each appointment. Just choose View→Show Inspector. You can move the resulting editing panel anywhere on the screen and leave it there; it shows the details of any appointment you select.
For each appointment, you can Tab your way to the following information areas:
§ subject. That’s the large, bold type at the top—the name of your appointment. For example, you might type Fly to Phoenix.
§ calendar. A calendar, in Calendar’s terminology, is a subset—a category—into which you can place appointments. You can create one for you, one for family-only events, one for book-club appointments, and so on. You can hide and show these categories at will. Details begin onPrinting events; for now, note that the tiny colored square in the top-right corner of the Info bubble is a pop-up menu of your calendars.
TIP
Use this same pop-up menu to change an appointment’s category. If you filed something in “Company Memos” that should have been in “Sweet Nothings for Honey-Poo,” then open the event’s information balloon and reassign it. Quick.
§ location. This field makes a lot of sense; if you think about it, almost everyone needs to record where a meeting is to take place. You might type a reminder for yourself like My place, a specific address like 212 East 23, or some other helpful information, like a contact phone number or flight number.
As you type, Calendar busily consults Apple’s worldwide database of street addresses—and proposes a few matches, as shown in Figure 18-5 (top left). You’re under no obligation to choose one of these; you can ignore the suggestions and type “Casey’s treehouse,” for all Apple cares. But if you do choose from Apple’s list of proposals, some cool things happen.
For example, you get a little map (which you can click to open the Maps app for a bigger view), as shown in Figure 18-5 (top right). You get to see the current weather, so you know how much to bundle up. And you get to use the travel-time feature described below.
NOTE
The next few controls appear only when you expand the Info bubble to see the time and date information. To do that, click whatever time is listed now—or, if you’ve just tabbed your way to the times, press Enter.
§ all-day. An “all-day” event, of course, refers to something that has no specific time of day associated with it: a holiday, a birthday, a book deadline. When you turn on this box, you see the name of the appointment jump to the top of the Calendar screen, in the area reserved for this kind of thing.
§ from, to. You can adjust the times shown here by typing, clicking buttons, or both. Press Tab to jump from one setting to another, and from there to the hours and minutes of the starting time.
NOTE
The little calendar that pops up when you click the date is handier than typing a date manually.
For example, start by clicking the hour, and then increase or decrease this number either by pressing ![]() and
and ![]() or by typing a number. Press Tab to highlight the minutes and repeat the arrow-buttons-or-keys business. Finally, press Tab to highlight the AM/PM indicator, and type either A orP—or press
or by typing a number. Press Tab to highlight the minutes and repeat the arrow-buttons-or-keys business. Finally, press Tab to highlight the AM/PM indicator, and type either A orP—or press ![]() or
or ![]() —to change it, if necessary.
—to change it, if necessary.
TIP
If you specify a different ending date, a banner appears across the top of the calendar.
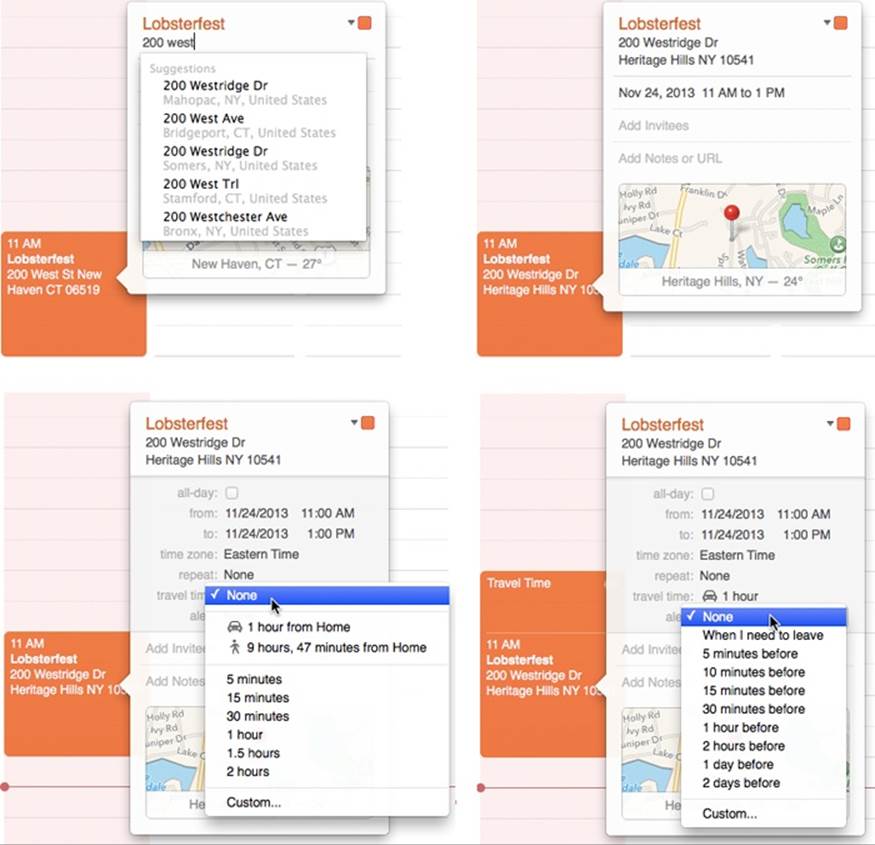
Figure 18-5. Here’s the life cycle of OS X’s location and travel-time feature. Top left: To make the travel-time calculation work, you must choose from Calendar’s list of location suggestions, based on what you’ve typed. Top right: You get a map and weather report for that location. Bottom left: Calendar knows how long it will take to get there… Bottom right: … and will remind you when it’s time to get going!
§ time zone. This option appears only after you choose Calendar→Preferences→Advanced and then turn on “Turn on time zone support.” And you would do that only if you plan to be traveling on the day this appointment comes to pass.
Once you’ve done that, a time zone pop-up menu appears. It starts out with “America/New York” (or whatever your Mac’s usual time zone is); if you choose Other, a tiny world map appears. Click the time zone that represents where you’ll be when this appointment comes due. From the shortcut menu, choose the major city that’s in the same zone you’ll be in.
TIP
The time zone pop-up menu remembers each new city you select. The next time you travel to a city you’ve visited before, you won’t have to do that clicking-the-world-map business.
Now, when you arrive in the distant city, use the time zone pop-up menu at the top-right corner of the Calendar window to tell Calendar where you are. You’ll see all of Calendar’s appointments jump, like magic, to their correct new time slots.
§ repeat. The pop-up menu here contains common options for recurring events: every day, every week, and so on. It starts out saying None.
Once you’ve made a selection, you get an end pop-up menu that lets you specify when this event should stop repeating. If you choose “Never,” you’re stuck seeing this event repeating on your calendar until the end of time (a good choice for recording, say, your anniversary, especially if your spouse might be consulting the same calendar). You can also turn on “After (a certain number of times),” which is a useful option for car and mortgage payments. And if you choose “On date,” you can specify the date when the repetitions come to an end; use this option to indicate the last day of school, for example.
“Custom” lets you specify repeat schedules like “First Monday of the month” or “Every two weeks.”
§ travel time. This item automatically builds travel time into Calendar’s understanding of any appointment. After all, it’s not very useful to get a reminder like “Lunch with Jenkins at 1 p.m.” 10 minutes beforehand if it takes half an hour to get there.
Now, then: If Calendar is to calculate travel time, it has to know where you’re starting out and where you’re going.
To figure out your starting point, the Mac consults your “me” card in the Contacts app (Contacts (Address Book)), and uses either your home address or your work address, depending on the time of day. (How does Calendar know when you’re at work? It cleverly uses the “Day starts at” and “Day ends at” settings in Calendar→Preferences→General.)
If you haven’t specified home and work addresses on your “me” card, then Calendar uses the current location of your Mac as the starting point. (And that works only if you’ve allowed the Mac to track your location by turning on Location Services in System Preferences→Security & Privacy→Privacy.)
For the arrival location, the Travel Time feature requires that you’ve accepted one of the Mac’s address suggestions, as described above (Figure 18-5, top left).
Once all that’s done, the “travel time” pop-up menu shows you both the driving and walking times to your appointment. You can override these suggestions if you like; you can choose any time interval from 5 minutes to 2 hours, or choose Custom to plug in something not listed here.
The real payoff, of course, comes when you set a reminder for yourself; read on.
§ alert. This pop-up menu tells Calendar how to notify you when a certain appointment is about to begin. Calendar can send four kinds of flags to get your attention. It can display a message (with a sound, if you like), send you an email, run an AppleScript, or open a file on your hard drive. (You could use this unusual option to ensure that you don’t forget a work deadline by having Calendar fling the relevant document open in front of your face at the eleventh hour.)
Once you’ve specified an alarm type, a new pop-up menu appears to let you specify how much advance notice you want for this particular appointment. If it’s a TV show, a reminder 5 minutes before airtime is fine. If it’s a birthday, you might set up a two-day warning, so there’s time to buy a present.
And if you’ve used the travel-time feature described above, you can even choose “When I need to leave” (Figure 18-5, lower right), which factors travel time into the reminder. (Alas, the Mac does not factor in traffic conditions.)
TIP
You can set up more than one alarm for the same appointment, each with its own advance-warning interval. Just click the ![]() button to add a new one.
button to add a new one.
§ show as (busy/free/tentative/out of office). This little item shows up only if you’ve subscribed to a calendar server, like an Internet-based calendar (in geek-speak, a CalDAV server) or your company’s Exchange calendar (Chapter 8). It communicates to your colleagues when you might be available for meetings.
NOTE
If your calendar comes from a CalDAV server, then your only options are “busy” and “free.” The factory setting for most appointments is “busy,” but for all-day events it’s “free.” Which is logical; just because it’s International Gecko Appreciation Day doesn’t mean you’re not available for meetings (rats!).
You might think: “Well, duh—if I’ve got something on the calendar, then I’m obviously busy!” But not necessarily. Some Calendar entries might just be placeholders, reminders to self, TV shows you wanted to watch, appointments you’d be willing to change—not things that would necessarily render you unavailable if a better invitation should come along.
§ invitees. If the appointment is a meeting or some other gathering, you can type the participants’ names here. If a name is already in your Contacts program, Calendar proposes autocompleting the name for you.
If you separate several names with commas, Calendar automatically turns each into a shaded oval button. You can click it for a pop-up menu of commands like Remove Attendee and Send Email. (That last option appears only if the person in Contacts has an email address, or if you typed a name with an email address in brackets, like this: Chris Smith <chris@yahoo.com>.)
TIP
If you and your invitees are on the same CalDAV or Exchange calendar service—usually, this means coworkers at the same company—Calendar can show a “time map” of the invitees’ days, all in a handy scrolling window, so you can find a time when everybody’s free. To see this map, click the Available Meeting Times link beneath the addresses of the invitees you’ve specified, or choose Window→Availability Panel (see Figure 18-6).
Once you’ve specified some attendees, a Send button appears in the Info box. If you click it, Calendar fires up Mail and prepares ready-to-send messages, each with an iCal .ics attachment: a calendar-program invitation file. See the box below.
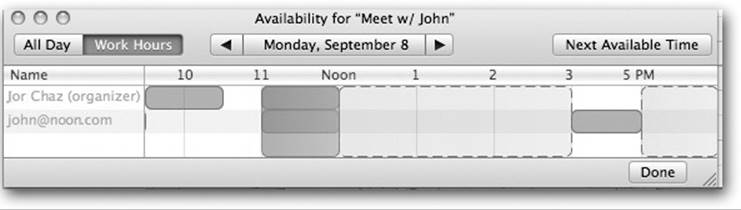
Figure 18-6. This scrolling display lets you spot times when your invitees are free for a meeting. Drag the vertical block (your proposed meeting) to a different time slot, or click Next Available Time to seek a time slot where everybody’s free. Good luck with that.
§ url. A URL is a Uniform Resource Locator, better known as a Web address, like www.apple.com. If there’s a URL relevant to this appointment, by all means type it here. Type more than one, if it’ll help you; just be sure to separate them all with commas.
§ note. Here’s your chance to customize your calendar event. You can type, paste, or drag any text you like in the note area—driving directions, contact phone numbers, a call history, or whatever.
Your newly scheduled event now shows up on the calendar, complete with the color coding that corresponds to the calendar category you’ve assigned.
What to Do with an Appointment
Once you’ve entrusted your agenda to Calendar, you can start putting it to work. Calendar is only too pleased to remind you (via pop-up messages) of your events, reschedule them, print them out, and so on. Here are a few of the possibilities.
UP TO SPEED: INVITING GUESTS
When you click Send at the bottom of the info balloon, your guests receive your invitation. If they use Calendar, the invitation appears in their Notifications panels. (To open the Notifications panel, click the tiny envelope icon in the lower-left corner of the window.) They can click Accept, Decline, or Maybe.
In your Notifications window, you then see the status of each invitee’s name: a checkmark for Accepted, an X for Declined, a ? for Maybe, and an arrow for Not Yet Responded. (Your guests, meanwhile, will be delighted to find that the appointment automatically appears on their calendars once they commit.)
Now, suppose you send an invitation to your sister, who doesn’t have a Mac. She just gets an email message that says, “Chris Smith has invited you to the event: Company Hoedown, scheduled for February 02, 2013 at 3:00 PM. To accept or decline this invitation, click the link below.” Unfortunately, there generally is no link. She just has to know to open the .ics attachment.
If she uses a calendar program that understands this attachment, the appointment appears on her calendar, and her RSVP shows up in your Calendar Notification panel.
Editing events
To edit a calendar event’s details, click to open its Info balloon (Figure 18-4).
And if you want to change only an appointment’s “calendar” category, right-click (or two-finger click) anywhere on the appointment and choose from the resulting Calendar shortcut menu. That way, you bypass the need to open the Info balloon.
Rescheduling events
If an event in your life gets rescheduled, you can drag an appointment block vertically in a Day- or Week-view column to make it later or earlier the same day, or horizontally to another date in any view. (If you reschedule a recurring event, Calendar asks if you want to change only thisoccurrence, or this and all future ones.)
If something is postponed for, say, a month or two, you’re in trouble, since you can’t drag an appointment beyond its month window. You have no choice but to open the Info balloon and edit the starting and ending dates or times—or just cut and paste the event to a different date.
Lengthening or shortening events
If a scheduled meeting becomes shorter or your lunch hour becomes a lunch hour-and-a-half (in your dreams), changing the length of the representative calendar event is as easy as dragging the bottom border of its block in any column view (see Figure 18-7).
TIP
In Week view, if you’ve grabbed the bottom edge of an appointment’s block so that the cursor changes, you can drag horizontally to make an appointment cross the midnight line and extend into a second day.

Figure 18-7. You can resize any Calendar event just by dragging its bottom border. As your cursor touches the bottom edge of an event, it turns into a double-headed arrow. You can now drag the event’s edge to make it take up more or less time on your calendar.
Printing events
To commit your calendar to paper, choose File→Print, or press ⌘-P. The resulting Print dialog box lets you include only a certain range of dates, only events on certain calendars, with or without To Do lists or mini-month calendars, and so on.
Searching for events
You should recognize the oval text box at the top of the Calendar screen immediately: It’s almost identical to the Spotlight box. This search box is designed to let you hide all appointments except those matching what you type into it. Figure 18-8 has the details.
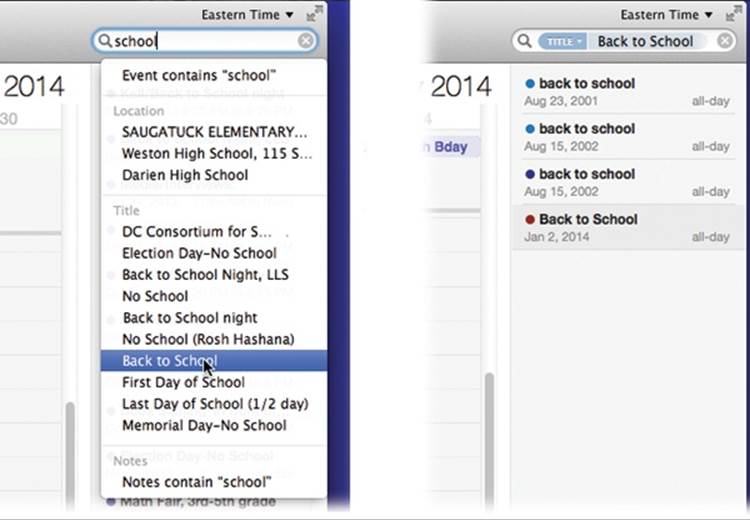
Figure 18-8. Left: Type into the search box; Calendar sprouts a list of suggestions (“Event contains ‘school,’ “Notes contains ‘school,’” and so on). Right: Click one to create a search token exactly like the ones that Spotlight and Mail use. They let you build up complex searches, bubble by bubble. Double-click any row of the list to jump to the corresponding event on the calendar and open up its summary balloon.
Deleting events
To delete an appointment, just select it and then press the Delete key. If you delete a recurring event (like a weekly meeting), Calendar asks whether you want to delete only that particular instance of the event, or the whole series from that point forward.
The “Calendar” Category Concept
Just as iTunes has playlists that let you organize songs into subsets and iPhoto has albums that let you organize photos into subsets, Calendar has calendars that let you organize appointments into subsets. They can be anything you like. One person might have calendars called Home, Work, and TV Reminders. Another might have Me, Spouse ’n’ Me, and Whole Family. A small business could have categories called Deductible Travel, R&D, and R&R.
And now, the Calendars Tip-O-Rama:
§ To create a calendar, choose File→New Calendar. You now have to specify where you want this category to live: On My Mac (meaning on your Mac), or on one of your online accounts, like iCloud, Google, Yahoo, or Exchange. Type a name that defines the category in your mind.
NOTE
Read this slowly: When you set up an iCloud account in System Preferences or when you first run Mavericks, Calendar automatically tranfsers your “On My Mac” categories to iCloud. You can no longer create categories that live only on your Mac. (There’s one exception: If you created your iCloud account in Calendar Preferences, then you can have an “On My Mac” category.)
§ To see your list of categories, click the Calendars button (upper left of the window). A sidebar list appears.
§ Hide or show an entire category of appointments at once by turning on or off the appropriate checkbox in the Calendars sidebar.
§ To change the color of a category, right-click (or two-finger click) its name in the sidebar list; from the shortcut menu, choose Get Info. The Calendar Info box appears. Here you can change the name, color, or description of this category—or turn off its alarms.
§ To specify your default calendar, choose Calendar→Preferences→General. Choose from the Default Calendar pop-up menu. (The Default calendar is the category that every new appointment falls into unless you change it. It’s also the category that other apps‚ like Mail, propose putting new appointments into.)
§ To assign a new appointment to a calendar, click the color swatch in the corner of its Info balloon.
§ To change an appointment’s calendar category, right-click (or two-finger click) the appointment’s name and choose a calendar name from the shortcut menu.
§ You may be able to make calendar groups, too. That’s a container that consolidates the appointments from several other calendars. For example, you could have a calendar group called Kids, containing the individual calendars for each of your offspring. Super-calendars like this make it easier to manage, hide, show, print, and search subsets of your appointments. (Sadly, this feature is available only for “On My Mac” categories, as described above—not for online accounts.)
To create a calendar group, choose File→New Calendar Group. Name the resulting item in the Calendar list; for the most part, it behaves like any other calendar. Drag other calendar names onto it to include them. Click the flippy triangle to hide or show the component calendars.
“Publishing” Calendars to the Web
One of Calendar’s best features is its ability to post your calendar on the Web, so that other people can subscribe to it, which adds your appointments to their calendars. Anyone with a Web browser—or only people you designate—can also view your calendar, right online.
For example, you might use this feature to post the meeting schedule for a club that you manage, or to share the agenda for a series of upcoming financial meetings that all your coworkers will need to consult.
Publishing
The steps for sharing a calendar depend on whether or not you have an iCloud account. Voilà.
If you and your buddy both have iCloud accounts: See Figure 18-9 for step-by-steps. Note that you can specify whether each person can just see the appointments, or be able to edit them, too. That’s a delightful, two-way collaboration—a terrific way for a couple or a family to coordinate everyone’s calendars, for example.
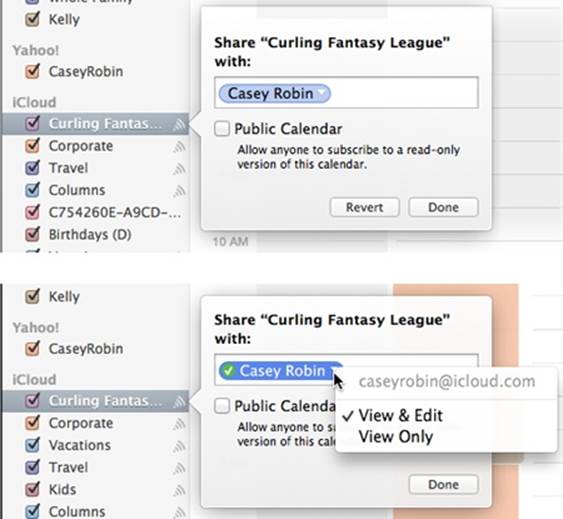
Figure 18-9. Top: Point to the name of the iCloud calendar you want to publish; click the “shared” icon (![]() ) that appears next to its name. In this pop-out panel, enter the email address of the lucky recipient (use the Mac’s suggestions from your Contacts to help you). You can invite multiple people; just keep tying addresses. The Public Calendar option means that the whole Internet can see this calendar category (if they know the secret URL). Click Done. Bottom: After the recipient has accepted the invitation, click the
) that appears next to its name. In this pop-out panel, enter the email address of the lucky recipient (use the Mac’s suggestions from your Contacts to help you). You can invite multiple people; just keep tying addresses. The Public Calendar option means that the whole Internet can see this calendar category (if they know the secret URL). Click Done. Bottom: After the recipient has accepted the invitation, click the ![]() icon again; this time, a green checkmark appears next to the person’s name. Use the
icon again; this time, a green checkmark appears next to the person’s name. Use the ![]() to specify whether this person can see your appointments (View Only) or make changes to them, too (View & Edit).
to specify whether this person can see your appointments (View Only) or make changes to them, too (View & Edit).
Behind the scenes, Calendar sends an invitation to the recipient. She’ll see a notification on her Mac (in Calendar or iCal), iPhone or iPad, at iCloud.com, and in her copy of Microsoft Outlook. It probably looks something like this: ![]() . Once she clicks it, clicks the invitation and clicks Accept, your shared calendar shows up on her machine.
. Once she clicks it, clicks the invitation and clicks Accept, your shared calendar shows up on her machine.
Later, you can modify the settings (Figure 18-9, bottom). Or you can stop sharing by clicking the calendar name and then choosing Edit→Stop Sharing.
TIP
You can also share an iCloud calendar at icloud.com. Just click the ![]() icon beside a calendar’s name.
icon beside a calendar’s name.
If you don’t have iCloud: If you don’t have an iCloud account, then you’ll need a Web site of your own, where your online calendar can be hung. And it has to be a WebDAV-compatible server (ask your Web-hosting company). You know what? It might just be easier to sign up for a free iCloud account and do it that way.
In any case, begin by making sure that the Calendars list is open. Click the calendar you want to share. Choose Edit→Publish Calendar.
TIP
You have to perform this step individually for each calendar category. If you want to publish more than one calendar simultaneously, then create a calendar group, and publish that.
A dialog box appears. This is where you specify your Web address, its password (if necessary), and how your saved calendar is going to look and work. If you turn on “Publish changes automatically,” then whenever you edit the calendar, Calendar connects to the Internet and updates the copy there. (Otherwise, you can right-click the calendar’s name and choose Refresh whenever you want to update the Web copy.)
When you click Publish, your Mac connects to the Web and then shows you the Web address (the URL) of the finished page, complete with a Send Mail button that lets you fire the URL off to your colleagues.
TIP
Whenever you want to send someone the subscription information, click the calendar category you’ve published and choose Edit→Send Publication Email. Calendar will prepare an outgoing email message containing details on subscribing to your calendar.
To stop publishing that calendar, click its name in the Calendars pop-up list and then choose Edit→Stop Publishing.
Subscribing
If somebody else has published a calendar, you can subscribe to it by choosing File→New Calendar Subscription. In the Subscribe to Calendar dialog box, type in the Internet address you received from the person who published the calendar.
You can also provide your own name for this category, specify how often you want your own copy to be updated (assuming you have a full-time Internet connection), and indicate whether or not you want to be bothered with the publisher’s alarms and notes.
When it’s all over, you see a new “calendar” category in your left-side list, representing the published appointments.
TIP
Want to try it out right now? Visit www.icalshare.com, a worldwide clearinghouse for sets of Calendar appointments. You can subscribe to calendars for shuttle launches, Mac trade shows, National Hockey League games, NASCAR races, soccer matches, the Iron Chef and Survivor TV shows, holidays, and much more. You’ll never suffer from empty-calendar syndrome again.
Google, Yahoo, and Facebook Calendars
If you maintain a calendar online—at Google, Yahoo, or Facebook, for example—you may take particular pleasure in discovering how easy it is to bring those appointments into Calendar. It’s one handy way to keep, for example, a husband’s and wife’s appointments visible on each other’scalendars.
Setting this up is ridiculously easy. Choose Calendar→Preferences→Accounts. Click the ![]() button below the list. Enter your Google, Yahoo, or Facebook address (for example, psmithers@gmail.com) and password. Click Create.
button below the list. Enter your Google, Yahoo, or Facebook address (for example, psmithers@gmail.com) and password. Click Create.
In a minute or so, you’ll see all your Google, Yahoo, or Facebook events show up in Calendar. (Each Web calendar has its own heading in the left-side list.) Better yet: It’s a two-way sync; changes you make to these events in Calendar show up on the Web, too.
Syncing Calendar with Your iPhone, iPad, and Other Computers
Here’s the real magic of Calendar, iCloud, and the rest of Apple’s software archipelago: Your calendar can be autosynced among all your machines, like your iPhone, iPad, and Macs. Add an appointment on your phone, change an appointment on your iPad, whatever—all your other gadgets are wirelessly and automatically synced to match. See Chapter 10 for details on this amazing setup.
Chess
OS X comes with only one game, but it’s a beauty (Figure 18-10). It’s a traditional chess game played on a gorgeously rendered board with a set of realistic 3-D pieces.
NOTE
The program is actually a sophisticated Unix-based chess program, Sjeng, that Apple packaged up in a new wrapper.
Playing a Game of Chess
When you launch Chess, you’re presented with a fresh, new game that’s set up in Human vs. Computer mode—meaning that you, the Human (light-colored pieces) get to play against the Computer (your Mac, on the dark side). Drag the chess piece of your choice into position on the board, and the game is afoot.
If you choose Game→New Game, however, you’re offered a pop-up menu with choices like Human vs. Computer, Human vs. Human, and so on. If you switch the pop-up menu to Computer vs. Human, then you and your Mac trade places; the Mac takes the white side of the board and opens the game with the first move, and you play the black side.
On some night when the movie theater is closed and you’re desperate for entertainment, you might also want to try the Computer vs. Computer option, which pits your Mac against itself. Pour yourself a beer, open a bag of chips, and settle in to watch until someone—either the Mac or the Mac—gains victory.
Chess Prefs
Choose Chess→Preferences to find some useful controls like these:
§ Style. Apple has gone nuts with the computer-generated materials options in this program. (Is it a coincidence that Steve Jobs was also the CEO of Pixar, the computer-animation company?)
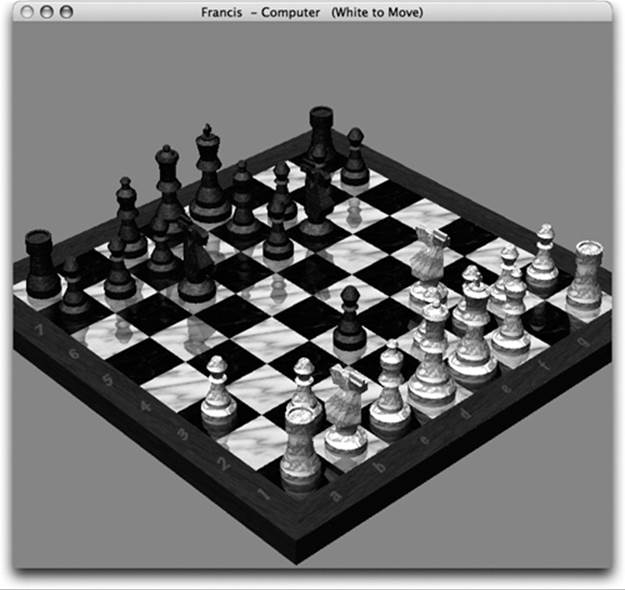
Figure 18-10. You don’t have to be terribly exact about grabbing the chess pieces when it’s time to make your move. Just click anywhere within a piece’s current square to drag it into a new position on the board (shown here in its Marble incarnation). And how did this chessboard get rotated like this? Because you can grab a corner of the board and rotate it in 3-D space. Cool!
In any case, you can choose all kinds of wacky materials for the look of your game board (Wood, Metal, Marble, or Grass) and for your playing pieces (Wood, Metal, Marble, or Fur).
§ Computer Plays. Use this slider to determine how frustrated you want to get when trying to win at Chess. The farther you drag the slider toward the Stronger side, the more calculations the computer runs before making its next move—and, thus, the harder it gets for you to outthink it. At the Faster setting, Chess won’t spend more than 5 seconds ruminating over possible moves. Drag the slider all the way to the right, however, and the program may analyze each move for as long as 10 fun-filled hours. This hardest setting, of course, makes it all but impossible to win a game (which may stretch on for a week or more anyway).
Choosing the Faster setting makes it only mildly impossible.
§ Speech. The two checkboxes here let you play Chess using the Mac’s built-in voice-recognition features, telling your chess pieces where to go instead of dragging them, and listening to the Mac tell you which moves it’s making.
TIP
If your Chess-playing skills are less than optimal, the Moves menu will become your fast friend. The three commands there undo your last move (great for recovering from a blunder), suggest a move when you’re stuck, and display a previous move (in case you failed to notice what the computer just did).
Studying Your Games
You can choose Game→Save to save any game in progress, so you can resume it later.
To analyze the moves making up a game, use the Window→Game Log command, which displays the history of your game, move by move. A typical move would be recorded as “Nb8 – c6,” meaning the knight on the b8 square moved to the c6 square. Equipped with a Chess list document, you could recreate an entire game, move by move.
TIP
If you open this window before you begin a new game, you can see the game log fill in the moves as they happen.
Contacts
See the end of Chapter 11 for details.
Dashboard
Dashboard, described in Chapter 4, is a true-blue, double-clickable application. As a result, you can remove its icon from your Dock, if you like.
Dictionary
For word nerds everywhere, the Dictionary (and thesaurus) is a blessing—a handy way to look up word definitions, pronunciations, and synonyms (Figure 18-11). To be precise, OS X comes with electronic versions of multiple reference works in one:
§ The entire New Oxford American Dictionary. The third edition, actually. You’ll note that its entries give you more examples, background, and tables that help to differentiate fine shades of meaning (look up weak for an example).
§ The complete Oxford American Writer’s Thesaurus.
§ Two venerable guides to British English: the Oxford Dictionary of English and Oxford Thesaurus of English.
§ A dictionary of Apple terms, from “A/UX” to “Xsan.” (Apparently there aren’t any Apple terms that begin with Y or Z.)
§ Wikipedia. This famous citizen-created encyclopedia isn’t actually on your Mac. Dictionary just gives you an easy way to search the online version, and display the results right in the comfy Dictionary window.
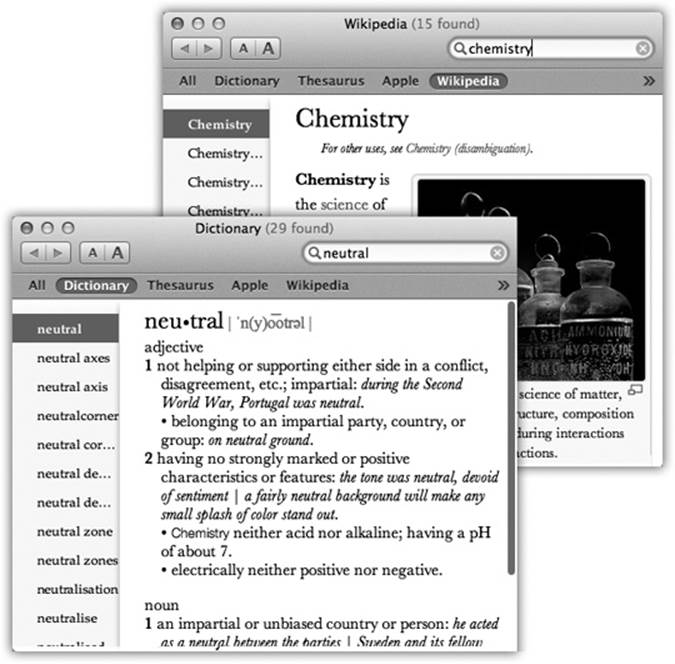
Figure 18-11. When you open the Dictionary, it generally assumes that you want a word’s definition (lower left). If you prefer to see the Wikipedia entry (top right) at startup time instead, for example, choose Dictionary→Preferences—and drag Wikipedia upward so that it precedes New Oxford American Dictionary. That’s all there is to it!
§ Foreign language dictionaries: Japanese, French, Spanish, German, Dutch, Korean, Italian, and Chinese.
TIP
You don’t ordinarily see these reference books. You have to turn them on in Dictionary→Preferences.
OS X also comes with about a million ways to look up a word:
§ Search it in Spotlight. Press ⌘-space, type the word you want into the Spotlight search box, and marvel as the dictionary entry appears at the bottom of the results list. To read the definition, just point to it without clicking.
§ If you have a trackpad, point to a word in a basic Mac program, and then double-touch the trackpad (don’t actually click) with three fingers. That’s the gesture for the same dictionary panel described above. (It doesn’t work unless you’ve turned it on in System Preferences→Trackpad.)
§ Double-click the Dictionary icon. You get the window shown at bottom in Figure 18-11. As you type into the Spotlight-y search box, you home in on matching words; click a word, or highlight it and press Return, to view a full, typographically elegant definition, complete with sample sentence and pronunciation guide.
TIP
And if you don’t recognize a word in the definition, click that word to look up its definition. (Each word turns blue and underlined when you point to it, as a reminder.) You can then click again in that definition—and on, and on, and on.
(You can then use the ![]() and
and ![]() buttons on the toolbar, or the ⌘-[ and ⌘-] keystrokes to go back and forward in your chain of lookups. Hold down the
buttons on the toolbar, or the ⌘-[ and ⌘-] keystrokes to go back and forward in your chain of lookups. Hold down the ![]() for a pop-up menu of recent lookups.)
for a pop-up menu of recent lookups.)
It’s worth exploring the Dictionary→Preferences dialog box, by the way. There you can choose U.S. or British pronunciations and adjust the font size.
§ Press ![]() . Yes, the Dictionary is one of the widgets in Dashboard (Pictures for Every Desktop).
. Yes, the Dictionary is one of the widgets in Dashboard (Pictures for Every Desktop).
§ Right-click (or two-finger click) a highlighted word in a Cocoa program. From the shortcut menu, choose Look Up [word]. You get a panel that pops out of the highlighted word, showing the Dictionary page for that word.
§ Use the dict:// prefix in Safari. This might sound a little odd, but it’s actually ultra-convenient, because it puts the dictionary right where you’re most likely to need it: on the Web.
Turns out that you can look up a word (for example, preposterous) by typing dict://preposterous into the address bar. When you hit Return, Dictionary opens automatically and presents the search results from all of its resources (dictionary, thesaurus, Apple terms, and Wikipedia).
§ Point to a word in a basic Mac program, and then press Control-⌘D. That keystroke makes the definition panel sprout right from the word you were pointing to. (The advantage here, of course, is that you don’t have to highlight the word first.) “Basic Mac program,” in this case, means one of the Apple standards: Mail, Stickies, Safari, TextEdit, Messages, and so on.
The front matter of the Oxford American Dictionary (the reference section at the beginning) is here, too. It includes some delicious writers’ tools, including guides to spelling, grammar, capitalization, punctuation, chemical elements, and clichés, along with the full text of the Declaration of Independence and the U.S. Constitution. Just choose Go→Front/Back Matter—and marvel that your Mac comes with a built-in college English course.
TIP
Got a big screen or poor eyesight? Then bump up the type size. Dictionary’s toolbar has bigger/smaller buttons, and there’s a Font Size pop-up menu in the Preferences window.
DVD Player
DVD Player, your Mac’s built-in movie projector, is described in Chapter 9.
FaceTime
FaceTime is Apple’s video-chat program. It lets you make free video calls to other Macs, or to i-gadgets like iPhones, iPads, and iPod Touches. (This assumes of course, that you and your conversation partner both have high-speed Internet connections. You also both need Macs with Mac OS 10.6.6 or later, and cameras, either built-in or external. And you need an Apple ID; see the box below. If this is your first time, enter your Apple ID and password on the right side of the window, and click Sign In.)
To make a video call, open FaceTime. It starts out looking a little weird—the panel that displays the actual video (you, at first) is tall and skinny, as though you’re using—what else?—an iPhone.
Place a FaceTime Call
Now you have to choose someone to call. Ironically, this setup step usually begins with a more old-fashioned communication—a phone call or a text message, for example. (“Want to FaceTime now?”)
The panel on the right side of the window offers three tab buttons (at the bottom). Click Contacts to see everyone in your OS X address book. If there is nobody in your address book, click the ![]() button at upper right and enter the FaceTime contact information of your first calling buddy. If you’re calling an iPhone, the contact info should be a phone number. For any other machine, it’s an email address. Click Done when you’ve entered the information.
button at upper right and enter the FaceTime contact information of your first calling buddy. If you’re calling an iPhone, the contact info should be a phone number. For any other machine, it’s an email address. Click Done when you’ve entered the information.
UP TO SPEED: THE APPLE (ICLOUD) ID
Once you become a member of the Apple cult, the key that unlocks all Apple doors is your Apple ID. The same email address and password gets you into iCloud, the iTunes Store, the Apple Store, the App Store, Messages, FaceTime, and almost any other Apple service that requires you to log in. In the unlikely event that you don’t yet have an Apple ID, you can get one by opening System Preferences→iCloud and clicking “Create new Apple ID.”
(As in the actual Contacts app, you can put people into groups, like “Work” or “Social Circle.” If you plan to use this feature, be sure to click Groups and select the proper one before you click ![]() to add a new person.)
to add a new person.)
TIP
If you’re smart, you’ll pluck out the people you plan to FaceTime with most frequently and put them into your Favorites list (the first tab at the bottom). To do that, click the person’s name on the Contacts tab and then click Add to Favorites. (If there’s more than one email address or phone number, a subsequent screen lets you click the one you want to use.)
To remove someone from the Favorites list, click the Edit button (on the Favorites tab) and then click the ![]() button next to the person’s name.
button next to the person’s name.
All right then. To make the actual call, take one of these steps:
§ Click the person’s name in your Favorites list.
§ Click the Recents tab, where you’ll see a list of FaceTime calls you’ve recently made or received. Click the person’s name.

Figure 18-12. Yes, Messages also offers video calls—but FaceTime doesn’t need as fast an Internet connection. You’ll often be able to make FaceTime video calls in situations when Messages gives up.
TIP
If you right-click (or two-finger click) FaceTime’s Dock icon, you get a handy pop-up menu of Recent Calls. In other words, if you keep FaceTime in your Dock, you can place a new call to somebody on the spur of the moment, whatever you’re doing, without having to open FaceTime first.
§ Click Contacts. Click Groups, if you use the Groups feature, and click the group the person is in. Use the search box, or just scroll, to find the person you want to call. Click the name; if you have multiple email addresses or phone numbers for that person, click the one you want.
In any case, your Mac now attempts to connect to your FaceTime-equipped buddy. After a moment, the video image of you is replaced by the video image of your calling buddy (Figure 18-12). If you both have fast Internet connections, and if the other guy has a recent Mac (with a so-called FaceTime HD camera), the video should look pretty amazing—hi-def, actually.
Once You’re Connected
Once the FaceTime session has begun, just talk normally. You’re on camera!
Here’s some of the fun you can have during your call:
§ Resize the window. Drag any window edge, click the Zoom button (upper left), or choose Window→Zoom to make the window fill the screen.
§ Go full-screen. Click the ![]() button (upper right) to make the window fill your entire screen. (Click it again to restore the window.)
button (upper right) to make the window fill your entire screen. (Click it again to restore the window.)
TIP
You can also enter or exit Full Screen mode by spreading or pinching two fingers on your trackpad.
§ Move the inset. The little picture-in-picture rectangle shows you. You can drag it to a different corner of the video window, if you like.
§ Rotate the screen. If you’re calling an iPad/iPhone/iPod Touch, the shape of the video-image rectangle changes automatically to match. But you can change the orientation of the window yourself, too. Either use the Video menu (choose Use Portrait or Use Landscape), or click the curved arrow in the inset that shows you, or use the Rotate gesture on your trackpad (two fingers, rotate).
§ Mute the mike. Either choose Video→Mute, or click the ![]() button at the bottom of the video window. The video continues. This is handy when you have to make ugly throat-clearing sounds or yell at your kid in the background.
button at the bottom of the video window. The video continues. This is handy when you have to make ugly throat-clearing sounds or yell at your kid in the background.
§ Pause the call. You can also pause the audio and video, for use when you have to perform small acts of personal grooming. To do that, choose FaceTime→Hide FaceTime, or right-click (two-finger click) the FaceTime icon in the Dock and choose Hide from the shortcut menu.
TIP
The call is also paused whenever you minimize FaceTime.
Receiving Calls
Life is even simpler when somebody calls you. You hear the little chirpy incoming-call sound, and a message appears on your screen. (If iTunes is playing music, it pauses automatically. Sweet.)
Click Accept to start the call, or Decline if now is not the time. (In that case, your caller will be told that you’re not available.)
FaceTime doesn’t have to be running for you to receive a call. That’s generally a cool feature—but if you really don’t want to be interrupted, you can hang up a digital “Do Not Disturb” sign in any of these ways:
§ In FaceTime, choose FaceTime→Turn FaceTime Off.
§ In FaceTime, choose FaceTime→Preferences; click the Off switch.
§ Right-click (or two-finger click) the FaceTime icon in the Dock; from the shortcut menu, choose Turn FaceTime Off.
§ Use Mavericks’ new Do Not Disturb feature (Dismiss One Bubble).
§ Sign out of FaceTime. (Choose FaceTime→Preferences, click Account, and then click Sign Out.)
Font Book
For details on this font-management program, see Chapter 9.
Game Center
The Mac has had its share of games over the years, but it’s never been much of a haven for gamers. But the Game Center app does make the Mac a little bit more of a hospitable place for the games people play.
Game Center began life on iPhones and iPads in 2010 as a way to compare scores with friends and challenge buddies to games. Several updates and 130 million people later, Game Center on iPhones/iPads is a certified hit.
Little wonder then, that Apple would want to create a Mac version of Game Center to promote gaming on the Mac. It performs the same functions as the iPhone version of Game Center—but opens up the possibility of playing games on your Mac against people with phones and tablets. (That miracle, of course, is possible only in cases when the same game is available on those different gadgets.) Someday soon, Apple hopes, there will be one glorious, universal game ecosystem of Apple machines.
Getting Started
When you open the Game Center app, start by signing in. If you’ve used Game Center on your phone or tablet, your Apple ID appears automatically; just type your password. From there, Game Center imports everything—your nickname, your list of existing Game Center friends, and even the photo you use to identify yourself.
If this is your first time with Game Center, fill in your Apple ID (DVD Player) and password. You’re asked to create a nickname—“AngriestBird” or “BobSmith2000,” for example. This nickname is public and can appear on the leaderboards for games (scoreboards that show the highest point winners); you can also use this nickname when you play games against other people. Within your Game Center account, you can also turn two settings on and off: One lets friends invite you to play games; the other makes your public profile visible to other Game Center members.
That public profile includes space for a short description and photo of yourself. You can grab a picture from a list of recent photos (any images you’ve used as your Messages icon, for example), Apple’s standard OS X icons, or a photo you take with your Mac’s built-in camera. The Mac’s Game Center gives you a few more photo editing options than you get in the iOS version: In addition to zooming and placing the image, you can also apply a filter, giving your photo a tinted, distorted, or pixelated look.
TIP
Any change you make to your Game Center profile on a Mac will also show up on Game Center on your iPhone or iPad—and vice versa.
Once all that’s in place, the Me tab in Game Center displays your nickname, that clever little phrase you wrote, and your picture. Beneath that, multicolored banners display the number of Game Center–compatible games you own (either iOS or Mac games), the number of Game Center friends you have, and—perhaps most significantly—the number of points you’ve accrued from your gaming activities.
Points and Achievements
Points play a leading role in Game Center. You earn them by racking up achievements in Game Center–compatible apps. Smash enough blocks in one of the many versions of Angry Birds, or expand your territory in Civilization, and you unlock achievements in those games; those achievements translate to points, which show up in your Game Center profile.
Those points also provide a way to measure your personal worth against your friends’. On Game Center’s Friends tab, your friends appear in a pane on the left side of the Friends window (Figure 18-13).
If you click a friend’s name in that left pane, you get a choice of three views: the games your friends play, the names of their friends, and the number of points they’ve tallied. The points view features a side-by-side comparison showing your respective accomplishments in commonly played games, so you can settle once and for all who’s tops at Cubemen. (Game Center also shows the points your friends have racked up in games you don’t own, which is Apple’s way of suggesting that maybe you should download more games.)
Making Friends
Of course, before you can compare your scores with your friends’, it helps to have some friends. (Insert your own joke about hard-core gamers here.)
You can invite your real-life pals to join you in Game Center by clicking the Add Friends banner near the top of the left-hand pane on the Friends window. You get a pop-up message window, where you can type in a person’s Game Center nickname or email address to send a friend invitation. (Email is probably the better choice, as you may not know your friend’s Game Center nickname; he might not even be signed up to the service.) You can also issue invitations from the Requests tab, which is where you typically accept invitations that come in from other Game Center users who want to befriend you.
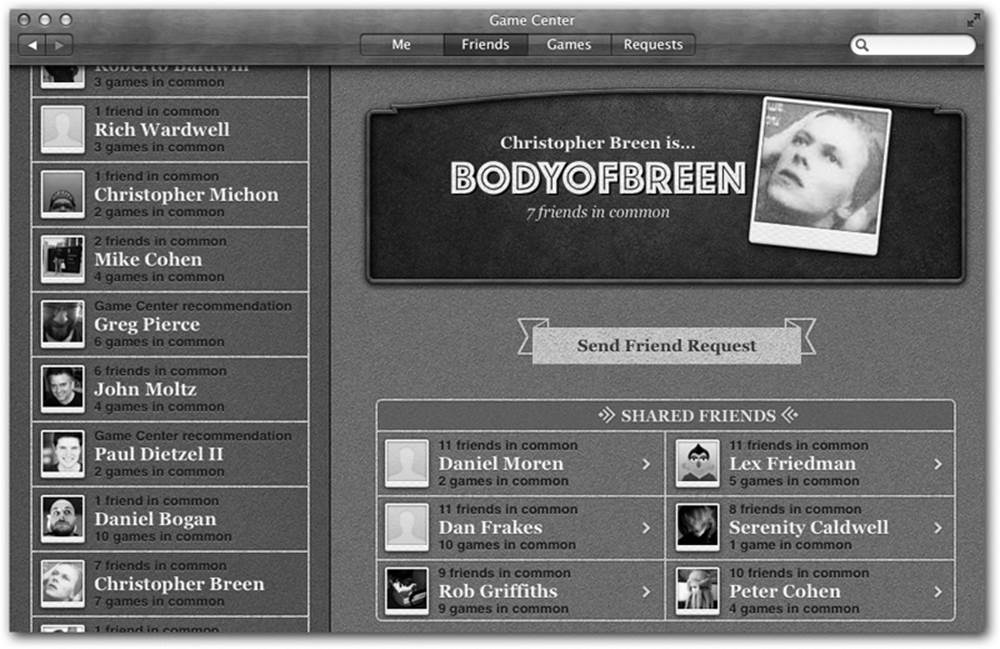
Figure 18-13. You can sort the Friends list alphabetically, by how recently your friends have played a game, or by the total points they’ve accumulated in Game Center apps.
But what if you don’t have any existing friends, or at least none that you know are on Game Center? Above the Add Friends banner, a Friend Recommendations button brings up a list of potential buddies. These are strangers, of course, but they’re based on friends and games you have in common. Clicking on one of those names takes you to a page that shows common friends, if any, and a Send Friend Request banner.
You can also find gaming companions through your other Game Center friends. Just click one of your friends’ names, and then select the Friends view on her page to see who she hangs out with in Game Center (when she’s not matching scores with you, of course). The list of her Game Center friends appears under a list of shared friends and notes how many games you have in common with this would-be buddy.
Finding Games
Game Center can also help you find games to play—well, at least games that are designed to tie in with Game Center. The top of the Games tab features a Recommendations section that takes you to a list of suggested games. Game Center bases these recommendations on what you already own, what your friends play, and popular App Store downloads.
While you decide what games you want to learn, you can always fool around with the Chess game that comes with Mavericks; it’s Game Center–ready.
Managing Game Center
You get to most of the Game Center management features from the Me tab. That’s where you can change your photo and status message, manage your privacy settings, and even sign out of Game Center. But there’s another aspect of Game Center that you manage in a completely different place.
Game Center notifies you whenever anyone asks to friend you or accepts your Game Center invitation. These notifications usually appear as banners, flashing in your upper-right corner briefly before they disappear. You can, of course, shut them up; open System Preferences→Notifications, click Game Center, and customize the settings as described on Messaging, Tweeting, or Facebooking.
GarageBand
GarageBand, Apple’s do-it-yourself music construction kit, isn’t actually part of OS X. If you have a copy, that’s because it’s part of the iLife suite that comes on every new Mac (along with iMovie and iPhoto).
iBooks
iBooks is Apple’s ebook reading program. For years, it’s turned the iPhone or iPad into a sort of pocket-sized Kindle. It lets you carry around dozens or hundreds of books in your pocket, which, in the pre-ebook days, would have drawn some funny looks in public.
And now, in Mavericks, it comes to the Mac.
The beauty of all this is iCloud syncing. If you’re reading a book on your iPhone in line for the Department of Motor Vehicles, you’ll find that your iPad opens up to exactly the same page when you’re on the train home. And when you open your MacBook at home, it’ll be on the same page as where you left the iPad. Your books, documents, notes, highlighting, and other details are synced among your Apple gadgets, too. (You can turn that syncing feature off in iBooks→Preferences→General if it spooks you.)
Most people think of iBooks as a reader for books that Apple sells on its iTunes bookstore—bestsellers and current fiction, for example—and it does that very well. But you can also load it up with your own PDF documents, as well as thousands of free, older, out-of-copyright books.
TIP
iBooks is very cool and all. But in the interest of fairness, it’s worth noting that Amazon’s free Kindle app, and Barnes & Noble’s free B&N eReader app, are much the same thing—but offer much bigger book libraries at lower prices than Apple’s.
Downloading Books
To shop the iBooks bookstore, open the iBooks app. Click iBooks Store in the upper-left corner; the iBooks app becomes the literary equivalent of the App Store, complete with the icons across the bottom. The links here offer everything you’d need in your bibliographic quest: “NY Times” (bestseller lists), “Top Authors,” “Best of the Month,” “Books Made into Movies,” “Free Books,” and so on. You can also search by name or click Purchased to see what you’ve bought.
TIP
Once you’ve bought a book from Apple, you can download it again on other Macs, iPhones, iPod Touches, and iPads. Buy once, read many times. That’s the purpose of the Not In My Library tab, which appears when you click Purchased.
But unless you have some kind of privacy concern, you may as well tell iBooks to download your books automatically as you buy them on your other Apple gadgets. Open iBooks→Preferences→Store and turn on “Download new purchases automatically.” That way you’ll never forget what you bought on your iPad as you sit down at your Mac.
Once you find a book that looks good, you can click Get Sample to download a free chapter, read ratings and reviews, or click the price itself to buy the book and download it straight to the phone.
If you see a book cover bearing the ![]() icon, that’s a book you own—it’s available in your online locker—but you haven’t downloaded it to this Mac yet. Click to download.
icon, that’s a book you own—it’s available in your online locker—but you haven’t downloaded it to this Mac yet. Click to download.
ePub Files
Apple’s bookstore isn’t the only way to get books. You can also load up your ebook reader from your computer, feeding it with ePub files.
Actually, ePub is the normal iBooks format. It’s a very popular standard for ebook readers, Apple’s and otherwise. The only difference between ePub documents you create and the ones Apple sells is that Apple’s are copy protected.
To add your own ePub documents to your iBooks library, just drag their icons off the desktop and into the iBooks window. Or choose File→Add to Library.
And where are you supposed to get all these files? Free (and not free) ebooks in ePub format are everywhere. There are 33,000 free downloadable books at gutenberg.org, for example, and over a million at books.google.com—oldies, but classic oldies, with lots of Mark Twain, Agatha Christie, Herman Melville, H.G. Wells, and so on. (Lots of these are available in the Free pages of Apple’s own iBooks store, too.)
PDF Files
iBooks can display and catalog PDF documents, too. PDFs are everywhere—people send them as attachments, and you can turn any document into a PDF file. (For example, on the Mac, in any program, choose File→Print; in the resulting dialog box, click PDF→Save as PDF.) You bring them into iBooks by dragging them into its window, or with File→Add to Library.
When you double-click one, though, it doesn’t open in iBooks; it opens into Preview. Which is, after all, a program expressly designed for reading PDF documents.
You’ve been warned.
Your Library
When you open iBooks, you see your own personal library represented as little book covers (Figure 18-14). Mostly what you’ll do here is click a book to open it. But there are all kinds of other activities waiting for you:
§ You can reorganize your bookshelf. Use the Sort By pop-up menu to choose Most Recent or Title—or Sort Manually, which means that you can drag books around into any order you like.
§ You can view your library as a compact list. Click List at the top to switch the book-cover view to a much more boring (but more compact) list view. The column headings let you sort the list by author, title, category, and so on. And there’s a search box, too, which lets you search your books’ titles—helpful if you have an enormous library.
§ To delete a book, click it and then press the Delete key; confirm in the warning box. Of course, deleting a book from the Mac doesn’t delete your safety copy on your other gadgets or online.
§ Organize your books into folders. In iBooks, the “folders” are called collections, but it’s the same idea. You might have one for school, one for work, and a third for somebody who shares your Mac, for example.
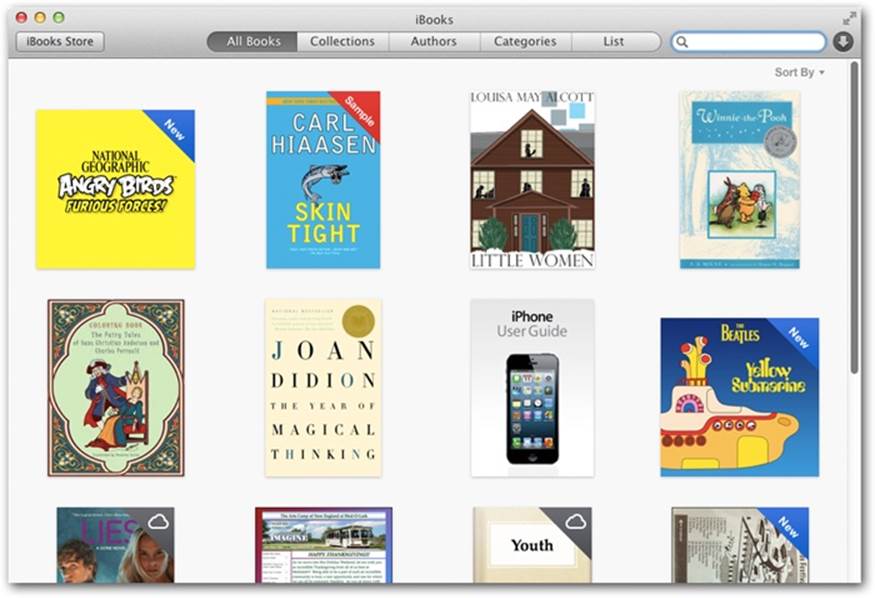
Figure 18-14. Your iBooks library is more than just book covers. Stamps at the top-right corner indicate which are new, which are free samples, and which are actually online, waiting to be downloaded. In the “Sort By” pop-up menu, you can choose Show Title & Author to add that information beneath the book covers.
To see your collections, click Collections; the Collections list opens at the left side. Make a new collection by clicking the ![]() button (or choose Use File→New Collection; type to name it.
button (or choose Use File→New Collection; type to name it.
Now, to file your books away, select them (you can press ⌘ as you click to select multiple books); then choose File→Add to Collection and choose the name of the collection you want them in.
Reading
But come on—you’re a reader, not a librarian. Here’s how you read an ebook.
Open the book by double-clicking the book cover. Now the book opens, ready for you to read. Looks great, doesn’t it (Figure 18-15)? If you’re returning to a book you’ve been reading, iBooks remembers your place.
TIP
You can open several books at once, you multitasking maniac.
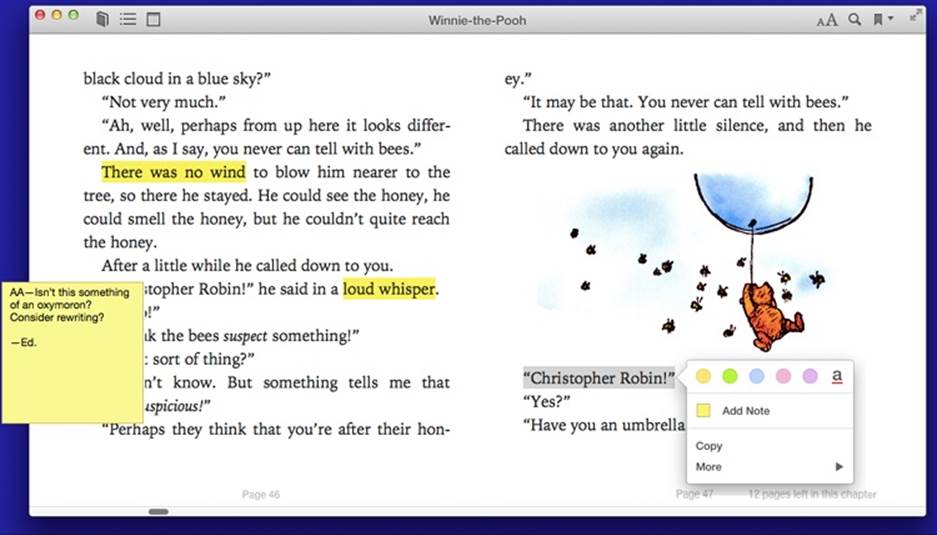
Figure 18-15. Here’s a composite shot showing all kinds of iBooks features: a Note open (left), the highlighting palette (right), and the navigation bar (top). Ordinarily, the reading experience is much quieter.
In general, reading is simple: Just read. Turn pages like this:
§ Press the space bar. (Add Shift to turn back a page.)
§ Tap the ![]() key. (Press
key. (Press ![]() to turn back.)
to turn back.)
§ Point to the right margin; click the > button that appears. (Left margin to go back.)
§ Swipe two fingers across the trackpad—to the right (to go forward) or left (to go back a page).
You should also take a moment to adjust your reading environment. For example:
§ Enter Full Screen mode for the biggest, least distracting view of your book (see Full Screen Mode).
§ Specify either a one-page or a two-page spread (use the Single Page or Two Pages commands in the View menu). In Full Screen mode, Single Page isn’t available.
§ Adjust the type size using the ![]() button. That’s a huge feature for people with tired or over-40 eyes. And it’s something paper books definitely can’t do.
button. That’s a huge feature for people with tired or over-40 eyes. And it’s something paper books definitely can’t do.
The same pop-out panel offers a Fonts button, where you can choose from five different typefaces for your book.
§ Adjust the background color. The ![]() button also offers a Themes button, which lets you specify whether the page itself is white, black (with white text, for nighttime reading), or Sepia (off-white).
button also offers a Themes button, which lets you specify whether the page itself is white, black (with white text, for nighttime reading), or Sepia (off-white).
While you’re reading, iBooks makes all the onscreen controls fade away so you can read in peace. But if you move your mouse to the top of the window, a row of additional controls appears (Figure 18-15):
§ ![]() takes you back to the bookshelf (Library view).
takes you back to the bookshelf (Library view).
§ ![]() opens the Table of Contents panel. The chapter or page names are “live”—you can click one to jump there.
opens the Table of Contents panel. The chapter or page names are “live”—you can click one to jump there.
§ ![]() opens the Notes panel, described below.
opens the Notes panel, described below.
§ ![]() opens the search box. It lets you search for text within the book you’re reading, which can be extremely useful.
opens the search box. It lets you search for text within the book you’re reading, which can be extremely useful.
§ ![]() adds a bookmark to the current page. This isn’t like a physical bookmark, where there’s only one in the whole book; you can use it to flag as many pages, for as many reasons, as you like.
adds a bookmark to the current page. This isn’t like a physical bookmark, where there’s only one in the whole book; you can use it to flag as many pages, for as many reasons, as you like.
Once you’ve accumulated a bookmark or two, use the ![]() next to the
next to the ![]() menu to see a list of them—and to jump back to one.
menu to see a list of them—and to jump back to one.
TIP
An iBook can include pictures and even videos. Double-click a picture in a book to zoom in on it.
Notes, Bookmarks, Highlighting, Dictionary
Here are some more stunts that you’d have trouble pulling off in a printed book. If you double-click a word, you get a graceful, elegant page from iBooks’ built-in dictionary. You know—in the unlikely event that you encounter a word you don’t know.
And if you drag across some text to highlight it, you get some surprise options (Figure 18-15):
§ Highlight. Click one of the colored dots to add tinted, transparent highlighting, or underlining, to the word you clicked. (To remove highlighting, click inside a highlighted area and click Remove Highlighting.)
§ Note. When you click Add Note, iBooks creates highlighting on the selected passage and opens an empty, colored sticky note so you can type in your own annotations. When you click outside the note, it collapses down to a tiny Post-it square in the margin. Click to reopen it.
To delete a note, click the highlighted text. Click Remove Note or Remove Highlight & Note.
§ Copy copies the highlighted text, ready for pasting in some other program.
In the More menu, a few additional options lurk:
§ Search Book opens the same search box that you’d get by clicking the ![]() icon—except that this time, the highlighted word is already filled in, saving you a bit of typing.
icon—except that this time, the highlighted word is already filled in, saving you a bit of typing.
§ Search Web, Search Wikipedia hand off the highlighted text to Safari, which searches Google or Wikipedia.
§ Facebook, Messages, Twitter, Email opens the Share sheet (The OS X Spelling and Grammar Checker) so you can send the highlighted material to somebody else by message or email, or post a favorite quote on Twitter or Facebook.
§ Speak reads the highlighted passage aloud.
TIP
The Mac’s speaking feature isn’t limited to a blob of text that you’ve highlighted. You can use the Edit→Speech→Start Speaking command to have the entire book read to you—in a voice that’s only a little robotic. Yes, this is exactly the feature that debuted in the Amazon Kindle and was then removed when publishers screamed bloody murder—but somehow, so far, Apple has gotten away with it.
Once you’ve added bookmarks, notes, and highlighting to your book, they’re magically and wirelessly synced to any other copies of that book—on other gadgets, like the iPad or iPod Touch, other iPhones, or other Mavericks Macs. Very handy indeed.
Furthermore, if you click the ![]() button, you’ll see the Notes pane. It presents a tidy list of all your bookmarked pages, notes, and highlighted passages. You can click one of the listings to jump to the relevant page.
button, you’ll see the Notes pane. It presents a tidy list of all your bookmarked pages, notes, and highlighted passages. You can click one of the listings to jump to the relevant page.
iBooks Settings
If you’ve embraced the simple joy of reading electronic books, then you deserve to know where to make settings changes: in iBooks→Preferences. Here are the options waiting there.
General tab
§ Let lines break naturally. Ordinarily, iBooks presents text with ragged-right margins. Select “Justify text” if you like the text to stretch from edge to edge of the screen.
§ Auto-hyphenate words. Sometimes, typesetting looks better if hyphens allow partial words to appear at the right edge of each line. Especially if you’ve also turned on “Justify text.”
§ Sync. Turn this on if you’d like your bookmarks, highlighting, and book collections to be synced with your other Apple gadgets.
Store tab
See the tip on Tip.
Parental tab
If you’re a parent, you might wish to shield your impressionable offspring from dirty reading material—or to shield your credit card from wild teenage book-spending sprees (we should all have that problem!).
Click the ![]() and enter your administrator’s password; now you can turn on “Disable the iBooks Store” to prevent purchases, or “Restrict books with explicit content” to block the downloading of raunchy material.
and enter your administrator’s password; now you can turn on “Disable the iBooks Store” to prevent purchases, or “Restrict books with explicit content” to block the downloading of raunchy material.
Image Capture
This unsung little program was originally designed to download pictures from a camera and then process them automatically (turning them into a Web page, scaling them to emailable size, and so on). Of course, after Image Capture’s birth, iPhoto came along, generally blowing its predecessor out of the water.
Even so, Apple includes Image Capture with OS X for these reasons:
§ Image Capture is a smaller, faster app for downloading all or only some pictures from your camera (Figure 18-16). iPhoto can do that nowadays, but sometimes that’s like using a bulldozer to get out a splinter.
§ Image Capture can grab images from scanners, too, not just cameras.
§ Image Capture can download your sounds (like voice notes) from a digital still camera; iPhoto can’t.
You can open Image Capture in either of two ways: You can simply double-click its icon in your Applications folder, or you can set it up to open automatically whenever you connect a digital camera and turn it on. To set up that arrangement, open Image Capture manually. Using the “Connecting this camera opens:” pop-up menu, choose Image Capture.
Once Image Capture is open, it looks like Figure 18-16. When you connect your camera, cellphone, or scanner, its name appears in the left-side list. To begin, click it. After a moment, Image Capture displays all the photos on the camera’s card, in either list view or icon view (your choice).
Import To:
Use this pop-up menu to specify what happens to the imported pictures. Image Capture proposes putting photos, sounds, and movies from the camera into your Home folder’s Pictures folder. But you can specify any folder (choose Other from the pop-up menu).
Furthermore, there are some other very cool options here:
§ iPhoto. Neat that you can direct photos from your camera to iPhoto via Image Capture. Might come in handy when you didn’t expect to want to load photos into your permanent collection, but you change your mind when you actually look them over in Image Capture.

Figure 18-16. In many ways, Image Capture is like a mini iPhoto; use the slider in the lower right to change the thumbnail sizes. Use the “Delete after import” checkbox (lower left) if you want your camera’s card erased after you slurp in its photos. You can choose the individual pictures you want to download, rotate selected shots (using the buttons at the top), or delete shots from the camera.
§ Preview opens the fresh pictures in Preview so you can get a better (and bigger) look at them.
§ Mail sends the pix directly into the Mac’s email program, which can be handy when the whole point of getting the photos off the camera is to send them off to friends.
§ Build web page creates an actual Web page of your downloaded shots. Against a dark-gray background, you get thumbnail images of the pictures in a Web page document called index.html. Just click one of the small images to view it at full size, exactly as your Web site visitors will be able to do once this page is actually on the Web. (Getting it online is up to you.)
NOTE
Image Capture puts the Web page files in a Home folder→Pictures→Webpage on [today’s date and time] folder. It contains the graphics files incorporated into this HTML document; you can post the whole thing on your Web site, if you like.
Image Capture automatically opens up this page in your Web browser, proud of its work.
§ MakePDF. When you choose this option, you wind up with what looks like a Preview window, showing thumbnails of your photos. If you choose Save right now, you’ll get a beautiful, full-color PDF of the selected photos, ready to print out and then, presumably, cut apart with scissors or a paper cutter. But if you use the Layout menu, you can choose different layouts for your photos: 3 x 5, 4 x 6, 8 x 10, and so on.
§ Other. The beauty of the Image Capture system is that people can, in theory, write additional processing scripts. Once you’ve written or downloaded them, drop them into your System→Library→Image Capture→Automatic Tasks folder. Then enjoy their presence in the newly enhanced Import To pop-up menu.
TIP
You can set up Image Capture to download everything on the camera automatically when you connect it. No muss, no options, no fuss.
To do that, connect the camera. Click its name in the Devices list. Then, from the “Connecting this camera opens” pop-up menu, choose AutoImporter. From now on, Image Capture downloads all pictures on the camera each time it’s connected. When the downloading process is complete, a little green checkmark appears on the thumbnail of each imported photo.
Import Some, Import All
Clicking Import All, of course, begins the process of downloading the photos to the folder you’ve selected. A progress dialog box appears, showing you thumbnail images of each picture that flies down the wire.
If you prefer to import only some photos, select them first. (In list view, you click and Shift-click to select a bunch of consecutive photos, and ⌘-click to add individual photos to the selection. In icon view, you can both ⌘-click and Shift- click to select individual photos.) Then click Import.
Scanning
If you own a scanner, chances are good that you won’t be needing whatever special scanning software came with it. Instead, OS X gives you two programs that can operate any standard scanner: Image Capture and Preview. In fact, the available controls are identical in both programs.
To scan in Image Capture, turn on your scanner and click its name in the left-side list. Put your photos or documents into the scanner.
NOTE
You can share a scanner on the network, if you like, by turning on Scanner Sharing in System Preferences→Sharing. That’s sort of a weird option, though, for two reasons. First, what do you gain by sitting somewhere else in the building? Do you really want to yell or call up to whomever’s sitting next to the scanner: “OK! Put in the next photo!”?
Second, don’t forget that anyone else on the network will be able to see whatever you’re scanning. Embarrassment may result. You’ve been warned.
Now you have a couple of decisions to make:
§ Separate and straighten? If you turn on “Detect separate items” in the Scan Size menu, OS X will perform a nifty little stunt indeed: It will check to see if you’ve put multiple items onto the scanner glass, like several small photos. (It looks for rectangular images surrounded by empty white space, so if the photos are overlapping, this feature won’t work.)
If it finds multiple items, Image Capture automatically straightens them, compensating for haphazard placement on the glass, and then saves them as individual files.
§ Where to file. Use the “Scan to” pop-up menu to specify where you want the newly scanned image files to land—in the Pictures folder, for example. You have some other cool options beyond sticking the scans in a folder; for example, you can send the resulting image to iPhoto, Preview, or Mail.
Once you’ve put a document onto it or into it, click Scan. The scanner heaves to life. After a moment, you see on the screen what’s on the glass. It’s simultaneously been sent to the folder (or post-processing task) you requested using the “Scan to” pop-up menu.
More power to you
As you can see, Apple has tried to make basic scanning as simple as possible: one click. That idiotproof method gives you very few options, however.
If you click Show Details before you scan, though, you get a special panel on the right side of the window that’s filled with useful scanning controls (Figure 18-17).
Figure 18-17. When you use the Show Details button, you get a new panel on the right, where you can specify all the tweaky details for the scan you’re about to make: resolution, size, and so on. See how the three photos have dotted lines around them? That’s because Detect Separate Items is turned on. These will be scanned into three separate files.
Here are some of the most useful options:
§ Resolution. This is the number of tiny scanned dots per inch. 300 is about right for something you plan to print out; 75 is standard for graphics that will be viewed on the screen, like images on a Web page.
§ Name. Here you can specify how you want each image file named when it lands on your hard drive. If it says Scan, then the files will be called Scan 1, Scan 2, and so on.
§ Format. Usually, the file format for scanned graphics is TIFF. That’s a very high-res format that’s ideal if you’re scanning precious photos for posterity. But if these images are bound for the Web, you might want to choose JPEG instead; that’s the standard Web format.
§ Image Correction. If you choose Manual from this pop-up menu, then, incredibly, you’ll be treated to a whole expando-panel of color-correction tools: brightness, tint, saturation, a histogram, and so on.
Opening the Details panel has another handy benefit, too: It lets you scan only a portion of what’s on the scanner glass.
Once you’ve put the document or photo into the scanner, click Overview. Image Capture does a quick pass and displays on the screen whatever is on the glass. You’ll see a dotted-line rectangle around the entire scanned image—unless you’ve turned on “Detect separate images,” in which case you see a dotted-line rectangle around each item on the glass.
You can adjust these dotted-line rectangles around until you’ve enclosed precisely the portion of the image you want scanned. For example, drag the rectangles’ corner handles to resize them; drag inside the rectangles to move them; drag the right end of the line inside the rectangle to rotate it; preview the rotation by pressing Control and Option.
Finally, when you think you’ve got the selection rectangle(s) correctly positioned, click Scan to trigger the actual scan.
NOTE
These instructions apply to the most common kind of scanner—the flatbed scanner. If you have a scanner with a document feeder—a tray or slot that sucks in one paper document after another from a stack—the instructions are only slightly different.
You may, for example, see a Mode or Scan Mode pop-up menu; if so, choose Document Feeder. You’ll want to use the Show Details option described above. You may also be offered a Duplex command (meaning, “scan both sides of the paper”—not all scanners can do this).
iMovie, iPhoto
Here’s another pair of iLife apps—not really part of OS X, but kicking around on your Mac because iLife comes with all new Macs.
TIP
Masterfully written, in-depth guides to these programs are available in the form of iMovie ’11: The Missing Manual and iPhoto ‘11: The Missing Manual. (Corresponding Missing Manual titles are available for earlier versions of these programs, too.)
iTunes
iTunes is Apple’s beloved digital music–library program. Chapter 9 tells all.
Launchpad
See Chapter 4 for the full story about the program-opening Home screen.
See Chapter 11 for the missing Mail manual.
Maps
Here it is, folks: the Maps that made international headlines.
When Apple brought its own Maps to the iPhone in 2012, the underlying databases had a lot of problems. They didn’t include nearly as many points of interest (buildings, stores, landmarks) as Google. Addresses were sometimes wrong. Satellite view showed bridges and roads melting into the sea. In a remarkable apology letter, CEO Tim Cook recommended using one of Maps’ rivals.
But some of Maps’ features are pretty great—and now that Maps is a Mac app too (Figure 18-18), there’s some handy synergy with the iPhone or iPad. You can look up an address on the Mac, and then wirelessly shoot it over to the phone for navigation in the car, for example. And Maps’ smarts are now wired into other OS X programs, like Calendar, Contacts, and Safari.
Meet Maps
When you open Maps, you see a blue dot that represents your current location. You can manipulate the map in all the usual ways:
§ Zoom in or out using the keyboard (press ⌘-plus or ⌘-minus), the mouse (double-click to zoom in, add the Option key to zoom out—or just click the ![]() or
or ![]() buttons), or the trackpad (pinch two fingers to zoom out, spread them to zoom in).
buttons), or the trackpad (pinch two fingers to zoom out, spread them to zoom in).
§ Scroll around the map using the keyboard (press the arrow keys), the mouse (drag), or the trackpad (swipe two fingers in any direction).
§ Rotate the map using the mouse (drag the small compass at lower right) or the trackpad (rotate two fingers). You can return the map to “North is up” by pressing ⌘-![]() , by clicking the compass, or by double-tapping two fingers on the trackpad.
, by clicking the compass, or by double-tapping two fingers on the trackpad.
§ You can tilt into a 3-D view, which makes it look more like you’re surveying the map at an angle instead of straight down. You can do that with the mouse (click the ![]() ), keyboard (press ⌘-0), or the trackpad (press Option and drag with two fingers).
), keyboard (press ⌘-0), or the trackpad (press Option and drag with two fingers).
Figure 18-18. Maps lets you type in any address or point of interest and see it plotted on a map, with turn-by-turn driving directions, just like a $300 windshield GPS unit. It also gives you a live national Yellow Pages business directory and real-time traffic-jam alerts. You have a choice of a street-map diagram or actual aerial photos, taken by satellite.
At any time, you can click any of the buttons above the map for your choice of amazing map views: Standard (street-map illustration), Satellite (stunning aerial photos), or Hybrid (photos superimposed with street names).
There’s no guarantee that the Satellite view provides a very recent photo—different parts of the Maps database use photography taken at different times—but it’s still very cool.
Finding Yourself
Maps’ first trick is to show you where you are.
Click the ![]() button at the top left of Maps. When the button is blue, the Mac is showing you your location. (Click it to turn it black, which makes it stop showing your dot.)
button at the top left of Maps. When the button is blue, the Mac is showing you your location. (Click it to turn it black, which makes it stop showing your dot.)
Searching the Maps
You’re not always interested in finding out where you are; often, you know that much perfectly well. Instead, you want to see where something else is.
Click in the search box and type what you’re seeking. (If there’s already something in the box, click ![]() to clear it out.) Here’s what Maps can find for you:
to clear it out.) Here’s what Maps can find for you:
§ An address. You can skip the periods (and usually the commas, too). And you can use abbreviations. Typing 710 w end ave ny ny will find 710 West End Avenue, New York, New York. (In this and any of the other examples, you can type a Zip code instead of a city and a state.)
§ An intersection. Type 57th and lexington, ny ny. Maps will find the spot where East 57th Street crosses Lexington Avenue in New York City.
§ A city. Type chicago il to see that city. You can zoom in from there.
§ A Zip code or a neighborhood. Type 10024 or greenwich village.
§ A point of interest. Type washington monument or niagara falls.
§ A business type. Type drugstores in albany ny or hospitals in roanoke va. (Figure 18-18 shows this idea.)
When Maps finds a specific address, an animated, red-topped pushpin comes flying down onto its precise spot on the map. A bubble identifies the location by name.
Click outside the bubble to hide it. Click the map pin to bring the bubble back. Click Directions for instant driving directions.
TIP
Or walking directions. Click the little ![]() button at the top of the directions panel.
button at the top of the directions panel.
Click the ![]() to open the Location page; read on.
to open the Location page; read on.
The Details Screen
Once you’ve found something on the map—your current position, say, or something you’ve searched for—you can drop a pin there for future reference. Choose View→Drop Pin. A blue pushpin appears. (You can drag the pin to move it, if your aim wasn’t exact.)
Red pushpins represent addresses you’ve looked up. And the tiny icons represent restaurants, stores, and other establishments in Apple’s (actually Yelp’s) database.
All of these pushpins and nano-icons are clickable. You get little labels that identify them. And if you click the ![]() button on a label, you open a details screen (Figure 18-19).
button on a label, you open a details screen (Figure 18-19).
Bookmarks, Recents, Contacts
Maps is also plugged into your Contacts list, which makes it especially easy to find a friend’s house (or just to see how ritzy his neighborhood is).
Instead of typing an address into the empty search bar, click the ![]() button next to it. You arrive at the Bookmarks/Recents/Contacts screen, which can save you a lot of typing.
button next to it. You arrive at the Bookmarks/Recents/Contacts screen, which can save you a lot of typing.
The list at left offers one-click access to Recents (locations you’ve looked up recently—on your Mac or your iOS gadgets), Bookmarks (locations you’ve bookmarked), and Contacts. Yes, your master address book (Contacts (Address Book)) is accessible here; you can search All Contacts or any one of your accounts.
When you click an entry in any of these lists, Maps drops a red, animated pushpin onto the map to identify that address.
Finding Friends and Businesses
That pushpin business also comes into play when you use Maps as a glorified national Yellow Pages. If you type, for example, pharmacy 60609, then those red pushpins show you all the drugstores in that Chicago Zip code. It’s a great way to find a gas station, a cash machine, or a hospital in a pinch. Click a pushpin to see the name of the corresponding business.
Figure 18-19. On the Details screen that sprouts when you click a red pushpin, buttons let you bookmark the spot, get directions, or add the information to Contacts. If the location is a restaurant or a business, you might strike gold: The details screen might offer several screens full of useful information, courtesy of Yelp.com. You’ll see customer reviews, photos, hours of operation, delivery and reservation information, and so on. Best of all, the ![]() button lets you share this location with other people—via AirDrop, email, text message, Facebook, or Twitter—or with yourself. In this example, “Goldie” is the name of an iPhone, one of three iOS devices that can accept location pointers from Maps on your Mac.
button lets you share this location with other people—via AirDrop, email, text message, Facebook, or Twitter—or with yourself. In this example, “Goldie” is the name of an iPhone, one of three iOS devices that can accept location pointers from Maps on your Mac.
As usual, you can click the ![]() button in the map pin’s label bubble to open a details screen. If you’ve searched for a friend, then you see the corresponding Contacts card. If you’ve searched for a business, then you get a screen containing its phone number, address, Web site, and so on; often, you get a beautiful page of Yelp information (photos, reviews, ratings).
button in the map pin’s label bubble to open a details screen. If you’ve searched for a friend, then you see the corresponding Contacts card. If you’ve searched for a business, then you get a screen containing its phone number, address, Web site, and so on; often, you get a beautiful page of Yelp information (photos, reviews, ratings).
Remember that you can click a Web address to open it or send the phone number to your phone to dial it. (“Hello, what time do you close today?”)
Directions
The Directions panel at right opens when you click any Directions button in Maps. It actually offers two search bars: Start and End. Plug in two addresses—the Start address may already say “Current Location”—and let Maps guide you from the first to the second.
TIP
If you click the ![]() button, you swap the Start and End points. That’s a great way to find your way back after a trip.
button, you swap the Start and End points. That’s a great way to find your way back after a trip.
When everything looks good, clicking Maps displays an overview of the route you’re about to follow. In fact, it usually proposes several different routes. They’re labeled with little tags that show how long they’ll take: “1 hr 9 min,” “1 hr 15 min,” and “1 hr 28 min,” for example.
If you click one of these tags, the top of the Directions panel lets you know the distance and estimated time for that option and identifies the main roads you’ll be on.
Click the Route label you want.
Now, nobody expects you to use your Mac as a portable GPS device. You’re not going to park it on your dashboard and have it tell you when to turn.
What you can do, though, is send your selected directions to an iPhone or an iPad and use that as your GPS. See Figure 18-19.
Or, if you’re just planning your trip, click any of the steps in the Directions panel; the map zooms in to that particular turn. Your route looks like it’s been drawn in with blue highlighter.
Traffic
How’s this for a cool feature? Free, real-time traffic reporting. Just click the ![]() button. Now traffic jams appear on the relevant roads, for your stressing pleasure; orange dotted lines for slow traffic, and red ones for true stop-and-go nightmares.
button. Now traffic jams appear on the relevant roads, for your stressing pleasure; orange dotted lines for slow traffic, and red ones for true stop-and-go nightmares.
If you don’t see any dotted lines, it’s either because traffic is moving fine or because Apple doesn’t have any information for those roads. Usually, you get traffic info only for highways, and only in metropolitan areas.
Tiny icons also appear, representing accidents, construction sites, closed roads, and general alerts. Click the icon to make a quick description tag appear (like “Accident, Park Ave at State St”); click that tag to read a full-screen account of what’s going on.
Flyover
You don’t need to be headed somewhere to use Flyover, the Maps app’s most dazzling feature; it has nothing to do with navigation, really. You can operate it even while you’re lying on your couch like a slug; see Figure 18-20.
To engage Flyover, click the ![]() and switch into either Hybrid or Satellite view.
and switch into either Hybrid or Satellite view.
Now you can go nuts, conducting your own virtual chopper tour of the city using the zooming and rotating tricks described earlier. Only a couple of things have changed:
§ To move around the map, drag it—or use two fingers on the trackpad.
§ To change your camera angle relative to the ground, press Option as you use two fingers on the trackpad—or drag up or down on the compass at lower right.
It’s immersing, completely amazing, and very unlikely to make you airsick.
Figure 18-20. Flyover is a dynamic, interactive, photographic 3-D model of certain major cities. It looks something like an aerial video, except that you control the virtual camera. You can pan around these scenes, looking over and around buildings to see what’s behind them. To create this feature, Apple says, it spent two years filming cities from helicopters.
Messages
See Chapter 13 for details on Messages, the Mac’s instant-messaging/audiochat/videochat/text-messaging program.
Mission Control
Chapter 4 covers OS X’s window-management tool.
Notes
The Notes app, a clone of the one on the iPhone/iPad, lets you jot down lists, recipes, driving directions, and brainstorms—and they all sync effortlessly among your Apple phones, tablets, and other computers.
To create a new page of notes, choose File→New Note (⌘-N), or click the ![]() button at lower left. Once the new lined page appears, type away (Figure 18-21).
button at lower left. Once the new lined page appears, type away (Figure 18-21).
Interior Design
You can dress up your Mac’s Notes pages far more elaborately than you can on the iPhone. For example:
§ You have control over fonts, type sizes, colors, paragraph alignment, and indentation, using the commands in the Format menu. Notes can even create automatic bulleted, dashed, or numbered lists; check out the Format→Lists submenus.
Figure 18-21. The first line of each page becomes the name of that note, as represented in the searchable list of notes (center column). In this illustration, somebody has also opened up the Folders list, the skinny column at far left. Here you can choose which account’s notes you want to see: your iCloud notes, Gmail, Exchange, or what have you.
§ You can paste or drag photos and other graphics into your notes, too—or even documents, like PDF files, Word documents, or Excel spreadsheets. Drag such a document into a note from the desktop; there it becomes an icon that you can double-click to open later.
§ You can drag or paste a link into a note. Later, when you click it, it opens into the corresponding Web site.
NOTE
Not all interior decoration gets synced to your phone or tablet. Pictures, for example, don’t survive the transition, and not all of your Mac fonts are available on your phone. But, for the first time, Notes’ typographical skills extend beyond Marker Felt and Helvetica.
A couple of handy icons appear at the bottom of each Notes page. You can click ![]() to delete the current note. Or you can click
to delete the current note. Or you can click ![]() to send the note to someone, either by email or in Messages (Chapter 13).
to send the note to someone, either by email or in Messages (Chapter 13).
TIP
You can also print a note; choose File→Print. Just pointing that out.
As you create more pages, the Notes list (the center column in Figure 18-21) becomes more useful. It’s your table of contents for the Notes pad. It displays the first lines of your notes (most recent at the top), along with the time or date you last edited them. (The ![]() button appears here, too.) To open a note, click its name.
button appears here, too.) To open a note, click its name.
There’s a search box here, too. You can search all your notes instantly.
Pinning Notes
Here’s an undocumented special: If you double-click a note’s name, it opens into a new window, floating on your screen. You can open multiple notes this way, drag them around the screen, and leave them floating there permanently, as though held by magnets on the great refrigerator door of life. In fact, if you choose Window→Float On Top, the note remains in front of all other windows. (You can drag it around using the title or the bottom as a handle.)
TIP
Notes is a card-carrying full-screen app, as described on Full Screen Mode.
Notes Folders
Chances are fairly good that your Mac’s screen is bigger than your phone’s. So Apple gave the Mac version of Notes a few features that require some extra space—and one of them is the side panel of Notes folders. That is, you can organize your notes into various categories, for ease of wading through them. (Any folders you create on the Mac also show up on your iPhone/iPad.)
The key to understanding this feature is the slide-out Folders list, which you can see in Figure 18-21. You can make it appear either by clicking ![]() or by choosing View→Show Folders List. You can hide it again by clicking the
or by choosing View→Show Folders List. You can hide it again by clicking the ![]() next to it. Either way, you can adjust the Folder list’s width by dragging the vertical line at its right edge.
next to it. Either way, you can adjust the Folder list’s width by dragging the vertical line at its right edge.
To make a new folder, choose File→New Folder; name the folder and then press Enter. You can then drag existing notes into its name in the Folders list. (The usual rules apply: You can select a swath of notes in a list by clicking the first and then Shift-clicking the last. Or you can click individual, nonconsecutive notes by clicking with the ⌘ key pressed.)
TIP
If you press Option as you drag a note, you make a copy of it in the new folder instead of moving the original.
Click a folder’s name to see the notes inside it. (Click “All [account name]” to see all the notes in that account.)
To create a new note within a folder, click the folder’s name first. If you don’t click any folder’s name before you create the note, it goes into the general Notes category.
You can also rename a folder (right-click or two-finger click its name; choose Rename Folder), delete one (right-click or two-finger click its name; choose Delete Folder), put one inside another (drag its name), and move a folder to a different account—for example, from your iCloud account to your Google one—by dragging it.
Syncing Notes
The real beauty of this app is that it can synchronize your collection of Notes with all kinds of other Apple gear—iPhones, iPads, and other Macs (Mountain Lion or later)—so the same notes are waiting for you everywhere you look.
Just make sure Notes is turned on in System Preferences→iCloud (on your Mac), and in Settings→Mail, Contacts, Calendars→iCloud (on your phone or tablet). The rest is automatic.
TIP
If you’re using the Folders feature, here’s how to see them on your phone or tablet: Click the Accounts button in the upper-left corner of the Notes window. The list of accounts and folders appears, much as it does on your Mac.
Notes Accounts
Notes can also show you the contents of the Notes modules on Google, Yahoo, AOL, or another IMAP email account. You’ll see each account’s worth of notes in the Folder list, as you can see in Figure 18-21—and from there, you can drag notes hither and yon, among accounts, with abandon.
To set this up, open System Preferences→Internet Accounts. Click the account you want (Exchange, Gmail, Yahoo, AOL, or whatever); finally, turn the Notes switch On.
That should do it. Now each account’s notes appear under its own heading in the Folders list. And your notes are synced, both ways.
All of this makes life a little more complex, of course. For example, when you create a note, you have to worry about which account it’s about to go into. To do that, be sure to specify an account name (and a folder within it, if necessary) before you create the new note.
Photo Booth
It may be goofy, it may be pointless, but the Photo Booth program is a bigger time drain than Solitaire, the Web, and Dancing with the Stars put together.
It’s a match made in heaven for any Mac with a video camera above the screen, but you can also use it with a camcorder, iSight, or Webcam. (Photo Booth doesn’t even open if your Mac doesn’t have some kind of camera.)
Open this program and then peer into the camera. Photo Booth acts like a digital mirror, showing whatever the camera sees—that is, you.
But then click the Effects button. You enter a world of special visual effects—and we’re talking very special. Some make you look like a pinhead, or bulbous, or like a Siamese twin; others simulate Andy Warhol paintings, fisheye lenses, and charcoal sketches (Figure 18-22). In fact, there are five whole pages of effects, nine previews on a page. (The last two pages hold backdrop effects, described below.)
To page through them, click the left or right arrow buttons, or press ![]() or
or ![]() , or swipe with two fingers on your trackpad (one finger on the Magic Mouse).
, or swipe with two fingers on your trackpad (one finger on the Magic Mouse).
The first page contains eight effects, some of which use sophisticated face-recognition smarts to track your face as it moves around the frame. That’s how Dizzy and Lovestruck are able to keep the animated birds or hearts circling your head, and how Chipmunk, Nose Twirl, and Bug Out are able to distort your cheeks, nose, and eyeballs even as you move around.

Figure 18-22. The Photo Booth effects must have been dreamed up one night in the midst of a serious beer party at Apple. They’re disturbingly creative. If you decide that you really look best without any help from Apple’s warped imagery, click the Normal icon in the center. A few of them are new in Mavericks.
Some of the effects have sliders that govern their intensity; you’ll see them appear when you click the preview.
Still Photos
When you find an effect that looks appealing (or unappealing, depending on your goals here), click the camera button, or press ⌘-T. You see and hear a 3-second countdown, and then snap!—your screen flashes white to add illumination, and the resulting photo appears on your screen. Its thumbnail joins the collection at the bottom.
TIP
If that countdown is getting on your nerves, Option-click the camera button. You can get rid of the screen flash, too, by Shift-clicking. Needless to say, if you press Option and Shift, you get neither the countdown nor the flash.
4-Up Photos
If you click the 4-Up button identified in Figure 18-22, then when you click the Camera icon (or press ⌘-T), the 3-2-1 countdown begins, and then Photo Booth snaps four consecutive photos in 2 seconds. You can exploit the timing just the way you would in a real photo booth—make four different expressions, horse around, whatever.
The result is a single graphic with four panes, kind of like what you get at a shopping-mall photo booth. (In Photo Booth, they appear rakishly assembled at an angle; but when you export the image, they appear straight, like panes of a window.) Its icon plops into the row of thumbnails at the bottom of the window, just like the single still photos.
GEM IN THE ROUGH: STILL AND VIDEO BACKDROPS
Photo Booth and Messages are cousins, and they’re closer than ever. One particular feature, in fact, is identical in each: custom backdrops. You can replace the actual, mundane background of your office or den with something far more exciting: a rushing waterfall, for example, or a rider’s-eye view of a roller coaster. In fact, you can use any photo or video you want as the background.
It’s just like the bluescreen or greenscreen technology that Hollywood uses to put actors someplace they’re not—but without the bluescreen or greenscreen.
To replace your background in Photo Booth, click Effects. The fourth page of effects offers eight canned backgrounds, prepared by Apple for your enjoyment: various spectacular stills (cloudscape, color dots, the moon) and videos (Eiffel Tower plaza, aquarium, roller coaster, tropical beach, Yosemite waterfall).
The final page offers eight empty preview squares. You’re supposed to drag a still or a video from your desktop (or iPhoto) into these empty squares, making them not so empty.
In any case, prepare the backdrop by clicking one of the preview squares. Photo Booth says, “Please step out of the frame.” Do it. Photo Booth is going to memorize what its field of view looks like without you in it, so that when you reappear, it can tell you apart from your boring office background.
Now, when you record the movie or take the photo, you’ll be amazed to discover that Photo Booth has just transplanted you to the far more exotic locale you selected. (Alas, blotches may result if the background includes movement or highly contrasting elements.)
Movies
Photo Booth can also record videos, complete with those wacky distortion effects. Click the third icon below the screen, the Movie icon (Figure 18-22), and then click the camera button (or press ⌘-T). You get the 3-2-1 countdown—but this time, Photo Booth records a video, with sound, until you click the Stop button. (The little digital counter at left reminds you that you’re still filming.) When it’s over, the movie’s icon appears in the row of thumbnails, ready to play or export.
TIP
If you click a movie’s thumbnail after recording it, a Trim button appears at the right end of the scroll bar. When you click it, yellow trim handles appear at both ends of the scroll bar (the same ones you’d see when trimming a video on the iPhone or iPad, or in iPhoto). Drag them inward to trim off any dead air at the beginning or end of your video clip. Hit the space bar to check your work. If the trim is OK, click the ![]() button to confirm the trim.
button to confirm the trim.
Exporting Shots and Movies
To look at a photo or movie you’ve captured, click its thumbnail in the scrolling row at the bottom of the screen. (To return to camera mode, click the ![]() .)
.)
Fortunately, these masterpieces of goofiness and distortion aren’t locked in Photo Booth forever. You can share them with your adoring public in any of these ways:
§ Click the photo or movie, and then choose File→Export. You’re asked to name and save the exported image or video.
TIP
If you choose File→Export Original instead, the exported photo or video lacks any of the effects that you’ve applied. You get the original, undistorted, underlying photo.
§ Drag a thumbnail out of the window to your desktop.
§ Right-click (or two-finger click) a thumbnail. From the shortcut menu, choose Reveal in Finder. You’re taken to the actual image or movie file on your hard drive, ready for copying, moving, deleting, renaming, or whatever.
NOTE
These files are stored in a single icon, a package file, that sits in your Home→Pictures folder. It’s called Photo Booth Library. You’ll find one JPEG apiece for single shots, four JPEG files for a 4-up, and a MOV file for videos.
§ Click Email to send the photo or movie as an outgoing attachment in Mail.
§ Click the Add to iPhoto button to import the shot or movie into iPhoto.
§ Click User Picture to make this photo represent you on the Login screen.
§ Click Buddy Picture to make this photo represent you in Messages (Chapter 13).
TIP
You can choose one frame of a Photo Booth movie to represent you. As the movie plays, click the Pause button, and then drag the scroll-bar handle to freeze the action on the frame you want. Then click User Picture or Buddy Picture.
Similarly, you can click your favorite one pane of a 4-up image to serve as your account photo—it expands to fill the Photo Booth screen—before clicking User Picture or Account Picture.
And speaking of interesting headshots: If you export a 4-up image and choose it as your Buddy Picture, you’ll get an animated buddy icon. That is, your tiny icon cycles among the four images, creating a crude sort of animation. It’s sort of annoying, actually, but all the kids are doing it.
As you set off on your Photo Booth adventures, a note of caution: Keep it away from children. They won’t move from Photo Booth for the next 12 years.
TIP
Photo Booth is one of the certified full-screen apps. Click the ![]() icon in the upper right to make the app fill your screen, for added graphic juiciness.
icon in the upper right to make the app fill your screen, for added graphic juiciness.
Preview
Preview is OS X’s scanning software, graphics viewer, fax viewer, and PDF reader. It’s always been teeming with features that most Mac owners never even knew were there—but now it’s a flagship OS X program, offering all of Apple’s pet cutting-edge features like Autosave, Versions, Full Screen mode, saving to iCloud (Photo Stream), and a Share icon (![]() ) that lets you send a document to somebody else by email, AirDrop, or Messages, or via Facebook, Twitter, or Flickr (The Share Button).
) that lets you send a document to somebody else by email, AirDrop, or Messages, or via Facebook, Twitter, or Flickr (The Share Button).
TIP
Preview can even open Microsoft Office documents (Word, PowerPoint, Excel) and iWork documents (Pages, Numbers, Keynote). You can’t edit them in Preview, but you can read them, search them, and print them. No longer must you pay homage to Microsoft’s bottom line just to have a look at the documents people send you.
Importing Camera Photos
Preview can import pictures directly from a digital camera (or iPhone), meaning that there are now three OS X apps that can perform that duty. (iPhoto and Image Capture are the other two.) It’s sometimes handy to use Preview for this purpose, though, because it has some great tools for photos: color-correction controls, size/resolution options, format conversion, and so on.
GEM IN THE ROUGH: DE-MIRRORIZING YOUR PHOTOS
Technically, Photo Booth acts like a mirror, not a camera. That is, every picture you take is actually flipped, left-to-right. If there’s ever text in the picture—something written on your T-shirt, for example—or if you ever examine the way your hair is parted, you’ll realize that every image is backward.
That’s why you can click a thumbnail at the bottom of the window and then choose Edit→Flip Photo (⌘-F). You’ve just made the photo match what a camera would have seen.
Or choose Edit→Auto Flip New Photos if you want Photo Booth to do the flipping for you from now on.
The actual importing process, though, is exactly like using Image Capture. Connect your camera, choose File→Import from [your camera’s name], and carry on as described on Store tab.
Operating Your Scanner
Preview can also operate a scanner, auto-straighten the scanned images, and export them as PDF files, JPEG graphics, and so on.
This, too, is exactly like using Image Capture to operate your scanner. Only the first step is different. Open Preview, choose File→Import from Scanner→[your scanner’s name], and proceed as described on Import Some, Import All.
Clearly, Apple saved some time by reusing some code.
Multiple Pages, Multiple Views
One hallmark of Preview is its effortless handling of multiples: multiple fax pages, multiple PDF files, batches of photos, and so on. The key to understanding the possibilities is mastering the Sidebar, shown in Figure 18-23. The idea is that these thumbnails let you navigate pages or graphics without having to open a rat’s nest of individual windows.
TIP
You can drag these thumbnails from one Preview window’s Sidebar into another. That’s a great way to mix and match pages from different PDF documents into a single new one, for example.
Figure 18-23. The Sidebar can display thumbnails, a table of contents, or annotations, or it can appear as a full-screen array of thumbnail images. Drag the central scroll bar to make the Sidebar bigger; drag the lower-right corner of the Sidebar to make the whole Preview window bigger.
To hide or show the Sidebar, chose one of these three commands from the View menu:
§ Thumbnails. This standard view (Figure 18-23, left) offers a scrolling vertical list of miniature pages or photos. Click one to see it at full size in the main window. Make the thumbnails larger or smaller by dragging the window/Sidebar dividing line.
§ Highlights & Notes. Preview is a better PDF editor than ever. If you add comments and highlighting to a PDF document, as described later in this section, you can view all of them in this tidy list—and click one to jump to it.
§ Table of Contents. If you’re looking over photos, this option turns the Sidebar into a scrolling list of their names. If you’ve opened a group of PDFs all at once, you see a list of them. Or, if you have a PDF that contains chapter headings, you see them listed in the Sidebar as, yes, a table of contents.
§ Contact Sheet. When you choose this view, the main window scrolls away, leaving you with a full screen of thumbnail miniatures. It’s like a light table where you can look over all the photos or PDF pages at once. Make them bigger or smaller using the slider in the lower left.
TIP
You can also change among these views by pressing the keyboard shortcuts Option-⌘-1, -2, -3, and -4.
Preview as Graphics Viewer
Preview is surprisingly versatile. It can display and manipulate pictures saved in a wide variety of formats, including common graphics formats like JPEG, TIFF, PICT, and GIF; less commonly used formats like BMP, PNG, SGI, and TGA; and even Photoshop, EPS, and PDF graphics.
TIP
Don’t miss the Tools→Show Magnifier command. It gives you a loupe: a magnifying circle (or, in a PDF document, a magnifying rectangle) that lets you inspect part of your graphic or PDF file more closely.
Bunches o’ graphics
If you highlight a group of image files in the Finder and open them all at once (for example, by pressing ⌘-O), Preview opens the first one but lists the thumbnails of the whole group in the Sidebar. You can walk through them with the ![]() and
and ![]() keys, or you can choose View→Slideshow (Shift-⌘-F) to open a full-screen slideshow.
keys, or you can choose View→Slideshow (Shift-⌘-F) to open a full-screen slideshow.
TIP
You can change the order of the photos just by dragging them around in the Sidebar, in any of its views.
Cropping graphics
To crop graphics in Preview, drag across the part of the graphic that you want to keep. To redraw, drag the round handles on the dotted rectangle; or, to proceed with the crop, choose Tools→Crop. (The keyboard shortcut is ⌘-K.)
Since Preview is an Autosave program, you can always return to the original if you change your mind someday.
TIP
You can also rotate an image—even a PDF document—in 90-degree increments and then flip it vertically or horizontally, using the commands in the Tools menu. In fact, if you select several thumbnails in the Sidebar first, you can rotate or flip them all simultaneously.
Fixing up photos
Preview is no Photoshop, but it’s getting closer every year. Let us count the ways:
§ Choose Tools→Show Inspector. A floating palette appears. Click the first tab to see the photo’s name, when it was taken, its pixel dimensions, and so on. Click the second one for even more geeky photo details, including camera settings like the lens type, ISO setting, focus mode, whether the flash was on, and so on. The third tab lets you add keywords, so you’ll be able to search for this image later using Spotlight. (The fourth is for PDF documents only, not photos; it lets you add annotations. A fifth tab appears only in PDF documents—for rotating, cropping, and resizing the file.)
§ Choose Tools→Adjust Color. A translucent, floating color-adjustment palette appears, teeming with sliders for brightness, contrast, exposure, saturation (color intensity), temperature and tint (color cast), sharpness, and more. See Figure 18-24.
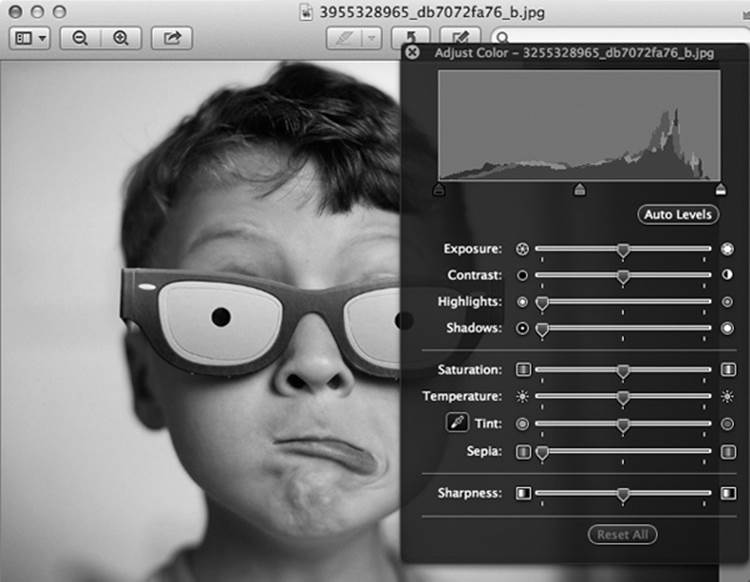
Figure 18-24. Humble little Preview has grown up into a big, strong mini-Photoshop. You can really fix up a photo if you know what you’re doing, using these sliders. Or you can just click the Auto Levels button. It sets all those sliders for you, which generally does an amazing job of making almost any photo look better.
§ Choose Tools→Adjust Size. This command lets you adjust a photo’s resolution, which comes in handy a lot. For example, you can scale an unwieldy 10-megapixel, gazillion-by-gazillion-pixel shot down to a nice 640 x 480 JPEG that’s small enough to send by email. Or you can shrink a photo down so it fits within a desktop window, for use as a window background.
There’s not much to it. Type in the new print dimensions you want for the photo, in inches or whatever units you choose from the pop-up menu. If you like, you can also change the resolution (the number of pixels per inch) by editing the Resolution box.
Converting file formats
Preview doesn’t just open all these file formats—it can also convert among most of them. You can pop open some old Mac PICT files and turn them into BMP files for a Windows user, pry open a TIFF file from a scanner and turn it into a JPEG for use on your Web site, and so on.
TIP
What’s even cooler is you can open raw PostScript files right into Preview, which converts them into PDF files on the spot. You no longer need a PostScript laser printer to print out high-end diagrams and page layouts that come to you as PostScript files. Thanks to Preview, even an inkjet printer can handle them.
All you have to do is open the file you want to convert and choose File→Export. In the dialog box that appears, choose the new format for the image using the Format pop-up menu (JPEG, TIFF, PNG, or Photoshop, for example); if you press the Option key, you’re offered even more file types. Finally, click Save to export the file.
Preview as PDF Reader
Preview is a nearly full-blown equivalent of Adobe Reader, the free program used by millions to read PDF documents. It lets you search PDF documents, copy text out of them, add comments, fill in forms, click live hyperlinks, add highlighting, circle certain passages, type in notes—features that used to be available only in Adobe’s Acrobat Reader. You can even fill out PDF forms, typing into boxes on the electronic document.
TIP
Don’t forget that Preview is one of OS X’s certified full-screen apps, as described on Full Screen Mode. You can also flip through the pages of a PDF using the “next page” gesture: a two-finger swipe on the trackpad.
Here are the basics:
§ Zoom in and out using ⌘-plus and ⌘-minus.
TIP
Another way to get a closer look: Press the ` key (upper left of your keyboard), or choose Tools→Show Magnifier. Now a big magnifying glass follows your cursor; you can even press ![]() or
or ![]() to zoom in or out within it. Dismiss the magnifier by pressing ` again.
to zoom in or out within it. Dismiss the magnifier by pressing ` again.
§ Use the View menu commands to control how the PDF document appears: as two-page spreads; as single scrolling sheets of “paper towel”; with borders that indicate ends of pages; and so on.
§ Press the space bar to page through a document (add Shift to page upward. The Page Up and Page Down keys do the same thing.)
TIP
Some PDF documents include a table of contents, which you’ll see in Preview’s Sidebar, complete with flippy triangles that denote chapter headings. Use the ![]() and
and ![]() keys to walk through these chapter headings, and then expand one that looks good by pressing the
keys to walk through these chapter headings, and then expand one that looks good by pressing the ![]() key. Collapse it again with the
key. Collapse it again with the ![]() key. In other words, you expand and collapse flippy triangles in Preview just as you do in a Finder list view. (The View→Sidebar submenu also includes Expand All and Collapse All commands.)
key. In other words, you expand and collapse flippy triangles in Preview just as you do in a Finder list view. (The View→Sidebar submenu also includes Expand All and Collapse All commands.)
§ Bookmark your place by choosing Bookmarks→Add Bookmark (⌘-D); type a clever name. You’ll be able to return to that spot by choosing its name from the Bookmarks menu.
These remain living, editable entities even after the document is saved and reopened. These are full-blown Acrobat annotations; they’ll show up when your PDF document is opened by Acrobat Reader or even on Windows PCs.
§ Turn smoothing on or off to improve readability. To find the on/off switch, choose Preview→Preferences, and click the PDF tab. Turn on “Smooth line art and text.” (Though antialiased text generally looks great, it’s sometimes easier to read very small type with antialiasing turned off. It’s a little jagged, but clearer nonetheless.)
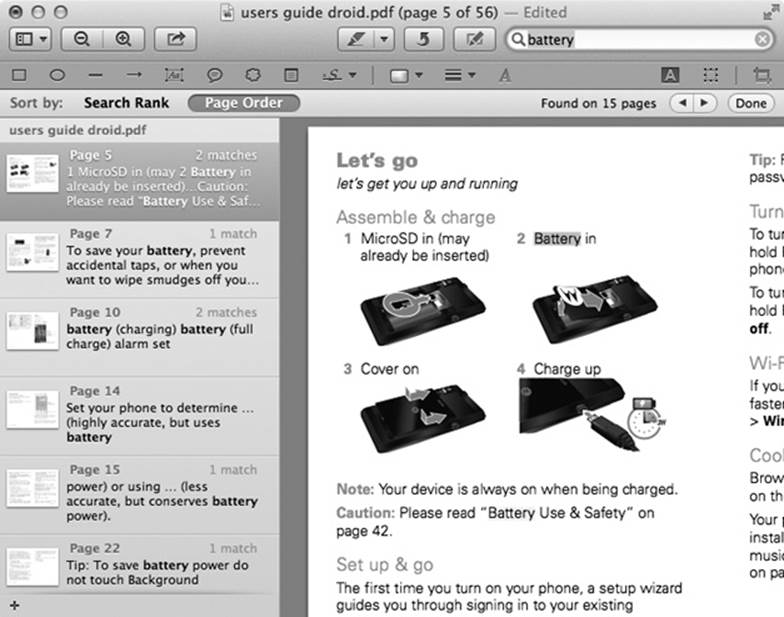
Figure 18-25. Type into the search box. Matches appear in the Sidebar, with page numbers; click one to go there. You can sort the found list either by rank (how likely Preview thinks it is to be what you’re looking for) or in page order; click the appropriate button to sort.
§ To find a word or phrase somewhere in a PDF document, press ⌘-F (or choose Edit→Find→Find) to open the Find box—or just type into the ![]() box at the top of the Sidebar, if it’s open. Proceed as shown in Figure 18-25.
box at the top of the Sidebar, if it’s open. Proceed as shown in Figure 18-25.
The search results show a snippet of the actual text surrounding each “find,” along with the number of matches per page, and even a thumbnail of the page itself. It’s all about context, baby.
§ If you want to copy material out of a PDF document—for pasting into a word processor, for example, where you can edit it—click the Text tool (the letter A on the toolbar) or choose Tools→Text Tool. Now you can drag through some text (and even graphics) and then choose Edit→Copy, just as though the PDF document were a Web page. You can even drag across page boundaries.
TIP
Ordinarily, dragging across text selects the text from one edge of the page to the other, even if the PDF document is laid out in columns. But Preview is a bit smarter. It can tell if you’re trying to get the text in only one column and highlights just that part automatically.
§ You can save a single page from a PDF as a TIFF file to use it in other graphics, word processing, or page layout programs that might not directly recognize PDF.
POWER USERS’ CLINIC: SCALING AND RESAMPLING
When you’re fooling around with a picture’s size and resolution in the Change Size dialog box, you might find that a couple of the options take a little explaining.
If “Scale proportionally” is turned on, Preview changes the Height number when you change the Width number, and vice versa. In other words, it won’t let you change the shape of the photo; that’s why a little padlock icon appears to bracket the Height and Width boxes.
If “Resample image” is turned off, then Preview adjusts the image’s size by making the existing dots bigger or smaller—but never changes the number of dots. (That’s why a padlock bracket links all three boxes together. For example, you can make the image larger—but you’ll lower the number of dots per inch.)
If “Resample image” is turned on, then you’re giving Preview permission to add or subtract pixels as necessary to scale the photo up or down. Of course, it can’t create detail that wasn’t there in the original, but if you’re scaling the picture up, it does a decent job of generating new pixels by averaging the colors of the neighboring ones.
To extract a page, use the usual File→Export command, making sure to choose the new file format from the pop-up menu. (If you choose a format like Photoshop or JPEG, Preview converts only the currently selected page of your PDF document. That’s because there’s no such thing as a multipage Photoshop or JPEG graphic. But you already knew that.)
TIP
In Mavericks, you can also scan a new page directly into an open PDF document. Just choose File→Import from Scanner.
§ Add keywords to a graphic or PDF (choose Tools→Show Inspector, click the ![]() tab, click the
tab, click the ![]() button). Later, you’ll be able to call up these documents with a quick Spotlight search for those details.
button). Later, you’ll be able to call up these documents with a quick Spotlight search for those details.
Annotations
You can type notes (in a box or a bubble), add clickable links (to Web addresses or other spots in the document), or use circles, arrows, rectangles, strikethrough, underlining, or colored highlighting to draw your PDF readers’ attention to certain sections. (You can dress up photos this way, too.) The trick is to open the Edit toolbar, as shown in Figure 18-26.
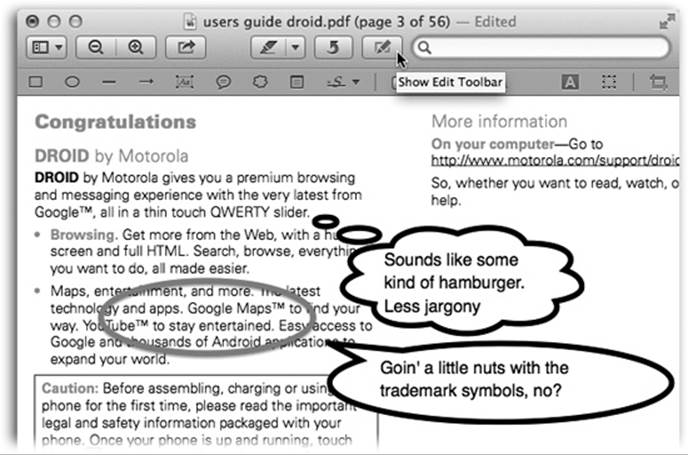
Figure 18-26. To make the annotation tools appear, click the main toolbar button indicated here by the cursor. Click the button you want, and then drag diagonally to define a rectangle, oval, arrow, link, speech bubble, or thought bubble. Look over the master list of notes using Tools→Show Inspector.
Once you’ve made an annotation, you can drag it around, drag its control dots to change its shape, edit the text inside it, and so on.
Later, you can view a tidy list of all such annotations by choosing View→Highlighting and Notes.
TIP
On the Highlights and Notes panel, Preview ordinarily displays each text note with your name and the date. If you’d rather not have that info added, choose Preview→Preferences, click PDF, and then turn off “Add name to annotations.”
Signing PDF Documents with Your Real Signature
Of OS X’s 47,000 features, very few are quite as slick or useful as the PDF signature option. It lets your Mac take a picture of your actual written signature, which Preview then stores so that you can slap it into the PDF documents that will come through your life.
The first step is to teach Preview what your signature looks like. To do that, sign your name on a piece of plain white paper, using black ink. On the Edit toolbar, click the Signature pop-up menu, ![]() , and choose Create Signature from Built-in Camera. (You’ll see your actual camera name, like iSight Camera or FaceTime HD Camera. And if you don’t see the Edit toolbar, which is shown in Figure 18-26, choose View→Show Edit Toolbar.) Now proceed as shown in Figure 18-27.
, and choose Create Signature from Built-in Camera. (You’ll see your actual camera name, like iSight Camera or FaceTime HD Camera. And if you don’t see the Edit toolbar, which is shown in Figure 18-26, choose View→Show Edit Toolbar.) Now proceed as shown in Figure 18-27.
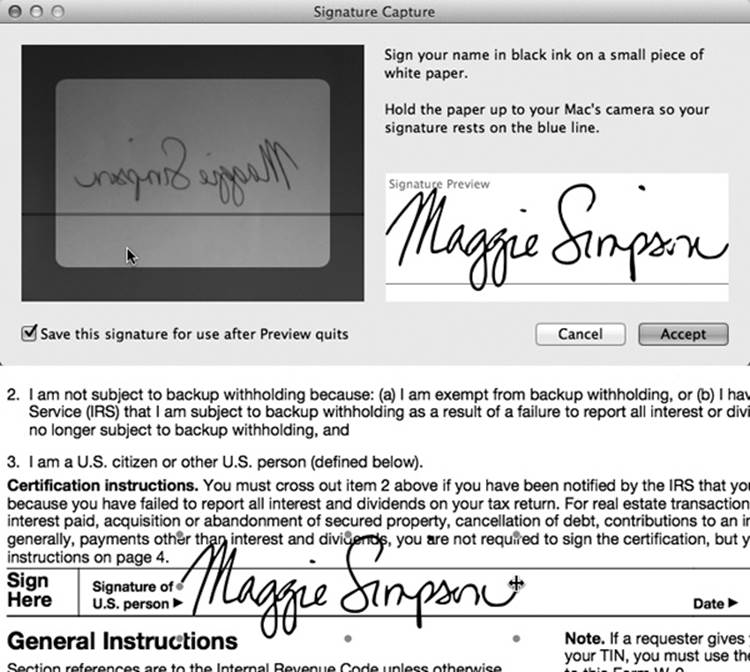
Figure 18-27. Hold up your written signature page in front of your Mac’s camera. Make sure it’s big enough to fill the box on the left side—never mind that it appears backward—and position it so that it sits on the blue line, as shown here. After a moment, your isolated, beautifully photographed signature appears in the Preview box.
When the positioning looks good, click Accept. You’ve just stored your signature. (You have to do this only once—per signature, anyway.)
When the time comes to sign a document, make the Edit toolbar visible. From the ![]() pop-up menu, choose the signature’s name. (Preview can store more than one signature; that’s why this step is necessary.)
pop-up menu, choose the signature’s name. (Preview can store more than one signature; that’s why this step is necessary.)
Now just click the document where you want the signature to appear. If there’s a line you’re supposed to sign on (such as a “Sign here” line), Preview is smart enough to shrink your scanned signature so that it fits on the line. Nice, huh?
You can delete signatures (and add new ones), if you like, using the Manage Signatures dialog box. Choose Manage Signatures from the ![]() pop-up menu on the Edit toolbar.
pop-up menu on the Edit toolbar.
Fill in PDF Forms
Here’s a feature that could save a lot of trees: fill-innable PDF forms.
Lots and lots of PDF documents are forms that you’re supposed to fill out—from IRS tax forms to school permission slips. Preview is smart enough to recognize boxes to fill in, lines to type on, and checkboxes to click, meaning that you don’t have to print, fill out, and then scan these things anymore. And it manages to find those lines, text boxes, and checkboxes on any PDF document, not just those that were originally designed to be filled in by PDF form-filling software. See Figure 18-28.
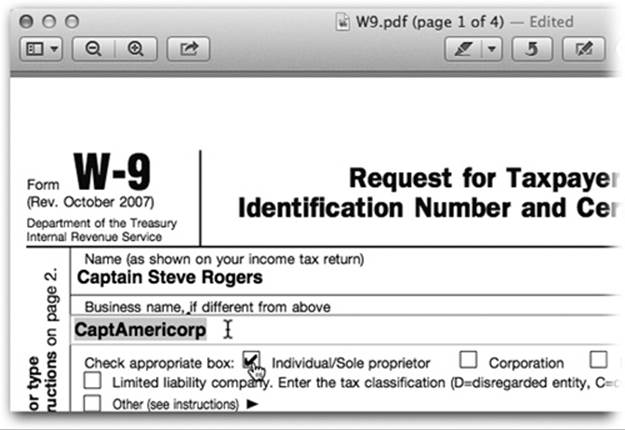
Figure 18-28. When you fill in a form, the cursor changes automatically into an insertion point when it detects a box or a line that you can fill in. And it turns into a pointing-finger icon when it’s over a checkbox, as shown here. Click to put a checkmark in that box; click again to remove the checkmark. It’s hours of fun for the whole family! When you’re finished, save the document as you would any other. Amazingly, you’ll be able to edit your responses when you open the PDF document again later.
The Toolbar
There’s a lot you can do with Preview’s toolbar. You can customize it (by choosing View→Customize Toolbar), rearrange its icons (by ⌘-dragging them sideways), and remove icons (by ⌘-dragging them downward).
QuickTime Player
This little app opens when you double-click any kind of movie file. Press Play to play and stop the show. The control toolbar at the bottom of the window fades away after a few seconds and reappears anytime your mouse moves back into the movie frame. Click the Full Screen button (![]() ) to make the video fill your entire monitor, just as though you’d chosen View→Enter Full Screen.
) to make the video fill your entire monitor, just as though you’d chosen View→Enter Full Screen.
But wait, there’s more! QuickTime Player is also QuickTime Editor. You can:
§ Edit movies using the Trim, Split, Cut, Copy, and Paste commands in the Edit menu.
§ Record movies (using your Mac’s camera) using File→New Movie Recording.
§ Record screen activity by choosing File→New Screen Recording and then clicking the red Record button. Click the ![]() button to stop recording.
button to stop recording.
§ Export your video directly to YouTube, Vimeo, Flickr, or Facebook by choosing from the ![]() menu. Sign into your online account, enter keywords and so on, and then click Share. (The same
menu. Sign into your online account, enter keywords and so on, and then click Share. (The same ![]() menu lets you send the movie as an email attachment, an iMessage, or a transmission to a nearby Mac by AirDrop.) Or use File→Export to save the movie to your hard drive.
menu lets you send the movie as an email attachment, an iMessage, or a transmission to a nearby Mac by AirDrop.) Or use File→Export to save the movie to your hard drive.
Reminders
Here’s another gift to you from the iPhone: Reminders. It’s a program that not only records your life’s little tasks, but also reminds you about them when the time comes. On a laptop, Reminders can even remind you about something based on where you are, just as it does on the iPhone and iPad. For example, it can remind you to feed your cats when you arrive home each day—or it can ask you if you’ve turned off the gas burners when you leave your vacation house.
If you have an iCloud account, your reminders sync across all your gadgets. Create or check off a task on your iPhone, and you’ll also find it created or checked off on your Mac, iPhone, iPad, iPod Touch, or PC. (Yes, PC. See www.apple.com/icloud/setup/pc.html).
The syncing business also explains why the location feature is useful even if you have a desktop Mac that doesn’t move around a lot. You can program a reminder on your Mac—and your phone or tablet will alert you when you move into or away from a specified place.
TIP
If you have an iPhone—oh, wow. Siri and Reminders are a match made in heaven. “Remind me to file the Jenkins report when I get to work.” “Remind me to set the TiVo for tonight at 8.” “Remind me about Timmy’s soccer game a week from Saturday.” “Add waffles to my Groceries list.” Speech recognition rocks when it comes to leaving notes for yourself. And iCloud will take care of copying those reminders to your Mac.
Once you’ve opened Reminders (Figure 18-29), you record a new task by clicking the ![]() button in the upper right, or choose File→New Reminder (⌘-N). A new blank line appears in your list. Type your reminder.
button in the upper right, or choose File→New Reminder (⌘-N). A new blank line appears in your list. Type your reminder.
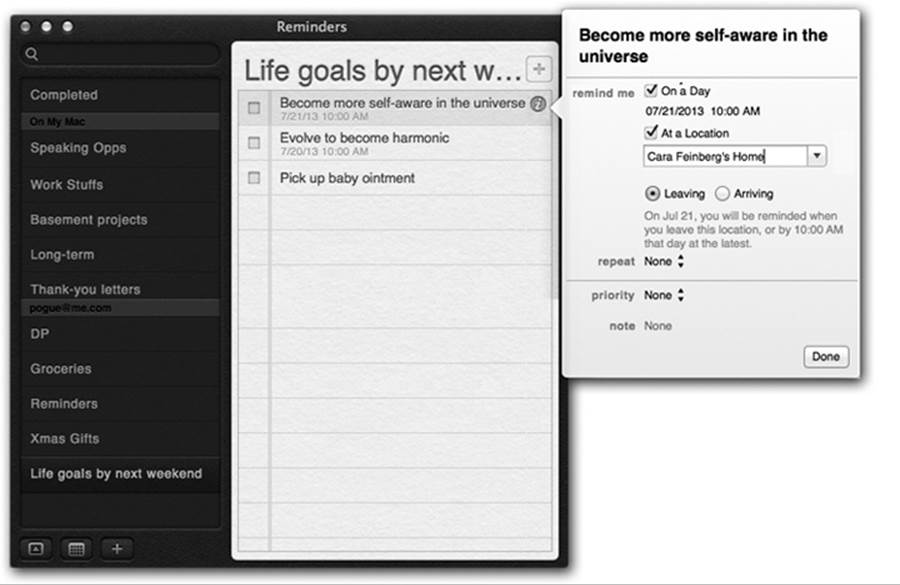
Figure 18-29. To open the Details panel, double-click the reminder item in the list, or click the ![]() button to its right. Here you can make your reminder pop up at a certain time or place, create an auto-repeating schedule for it, assign a priority level to it, or just type in some notes about it. To close the panel, click Done or click anywhere else in Reminders.
button to its right. Here you can make your reminder pop up at a certain time or place, create an auto-repeating schedule for it, assign a priority level to it, or just type in some notes about it. To close the panel, click Done or click anywhere else in Reminders.
Later, as you go through life completing tasks, click the checkbox next to each one. Doing that makes the item seem to disappear—but in fact, it whips into a separate list called Completed (the top of the list, shown in Figure 18-29).
The Details Bubble
If you double-click an item’s name (or click its ![]() button), you open the Details bubble. See Figure 18-29.
button), you open the Details bubble. See Figure 18-29.
Here are the options you’ll find:
§ On a Day. Reminders can remind you at a certain time on a certain date. In the Details bubble, next to “remind me,” turn on On a Day. The proposed time is the next “o’clock”—if it’s 12:15 now, the app suggests 1:00. But you can click the date to open a clickable mini-calendar (to change the date), or click the digits of the time to edit them.
§ At a location. If you turn on this checkbox, your Mac or phone will use its location circuits to remind you of this item when you arrive at a certain place or leave a certain place. (Your laptop will remind you, if it’s turned on and within a WiFi hotspot. But more often, this option will be useful if you have an iPhone or iPad that’s on the same iCloud account. Record the reminder on your Mac—receive the reminder on your phone.)
The little pop-up menu here proposes Current Location—wherever you are at the moment. That’s handy if, for example, you’re dropping off your dry cleaning and want to remember to pick it up the next time you’re driving by.
But you can click that line to specify Home (your home address, as you’ve set it up in Contacts). You can also start typing any city name, or the name of any person in your Contacts whose address you’ve specified. You’ll even see “Porky Pig Home” and “Porky Pig Work,” if Porky has a couple of addresses on file.
The final step here is to click either Leaving or Arriving. Later, your gadgets will remind you at the appointed time, or as you approach (or leave) the appointed address. It’s fairly mind-blowing the first few times it happens.
§ Repeat. Reminders can remind you about things that recur in your life, like quarterly tax payments, haircuts, and anniversaries. Click Repeat if you want this reminder to appear every day, week, two weeks, month, or year. (This option appears only if you’ve turned on the On a Day option.)
§ Priority. Click this pop-up menu to specify whether this item has High, Medium, or Low priority—or None. You’ll see one, two, or three exclamation marks (!!!) next to each item in your Reminders list, indicating its urgency. In some of the calendar programs that sync with Reminders, you can sort your task list by priority.
§ Notes. Here’s a handy place where you can record freehand notes about this item: an address, a phone number, details of any kind.
Click Done to close the Details bubble and record your changes.
The Calendar of Deadline Hell
As you now know, Reminders can give you warnings of upcoming deadlines and to-do items. You don’t have to wait until it gives you a reminder, though.
Below the list of lists, you’ll see a tiny ![]() icon. Click it to view the mini-calendar; see Figure 18-30.
icon. Click it to view the mini-calendar; see Figure 18-30.
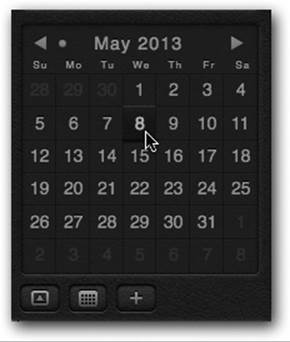
Figure 18-30. Click a date to see what to-do items are staring you down for that date. Click the ![]() and
and ![]() buttons to move to different months. Once you’ve clicked away from the current month, a • appears next to the month name; click it to jump back to this month.
buttons to move to different months. Once you’ve clicked away from the current month, a • appears next to the month name; click it to jump back to this month.
Lists
Handily enough, you can create more than one to-do list, each with its own name: a Groceries list, Kids’ Chores, a running tally of expenses, and so on. Here’s a great way to log what you eat if you’re on a diet, or to keep a list of movies people recommend.
If you share an iCloud account with another family member, you might create a different Reminder list for each person. (Of course, now you run the risk that your spouse might sneakily add items to your to-do list!)
If you have an Exchange account, one of your lists can be synced to your corporate Tasks list. It doesn’t offer all the features of the other lists in Reminders, but at least it’s kept tidy and separate. (Just set up your Exchange account in System Preferences→Internet Accounts.)
The list of lists is the dark-gray panel at the left side of Reminders; it’s visible in Figure 18-29. If you don’t see it—if you’re feeling a little listless—click the ![]() button at the lower-left corner of the window.
button at the lower-left corner of the window.
At the outset, the list of lists lists only two lists: Completed and Reminders. But you can create others. Click the ![]() button at the bottom-left corner, or choose File→New List. If you have any kind of online account set up, like an iCloud account, you’ll then have to specify either On My Mac or “[the account’s name]” from the submenu.
button at the bottom-left corner, or choose File→New List. If you have any kind of online account set up, like an iCloud account, you’ll then have to specify either On My Mac or “[the account’s name]” from the submenu.
In any case, you’ve just made a new list called New List. Type to rename it to “Groceries list,” “Movies list,” whatever you like. (You can also get rid of a list by clicking it and then pressing the Delete key.)
TIP
You can view the contents of more than one list simultaneously. Just Shift-click the names of the lists you want in the left column; the right-side pane displays a unified, combined list of all their contents.
You can also open a list into a window of its own, just by double-clicking its name in the left column.
Once you’ve created some lists, you have two ways to switch among them:
§ Swipe two fingers across the trackpad. The lists slide into view as though they’re successive photos in a slideshow.
§ Click a different list in the list of lists. Or press the ![]() and
and ![]() keys to “walk” through the list.
keys to “walk” through the list.
You can assign a task to a different list by dragging it. Click any blank part of its line (not the text itself), and drag carefully onto the name of a different list in the List list at left.
Syncing Reminders
Once you’ve set up a few reminders in Reminders, you’ll marvel as it gracefully integrates with the Notification Center when it wants your attention.
But the real power of Reminders becomes apparent when you see it auto-synchronize your to-do lists across other gadgets, like iPhones, iPads, iPod Touches, other Macs, and even Windows PCs.
To give it permission for that kind of sharing, open System Preferences→iCloud and turn on the Reminders checkbox.
Note, however, that Reminders can also coordinate with the to-do list features of Exchange and so-called CalDAV services (Yahoo is one). To set them up, open System Preferences→Internet Accounts. Click the account you want (like Exchange or Yahoo); finally, turn the Reminders switch On.
That should do it. Now your to-do lists are synced, both ways.
TIP
You can also export your lists as .ics files, which you can then import into Google Calendar or another program. Just click the list and then choose File→Export. You can also import an existing .ics file (from another computer, for example) into a Reminders list you’ve selected: It’s File→Import, of course.
By the way, you can also create lists that live only on your Mac and don’t get synced anywhere else. To create such a list, click the ![]() button below the list of lists; from the pop-up menu, choose On My Mac. Type a name for your new list, content that anything you put there won’t get synced anywhere else.
button below the list of lists; from the pop-up menu, choose On My Mac. Type a name for your new list, content that anything you put there won’t get synced anywhere else.
Safari
The secrets of Apple’s Web browser are revealed in Chapter 12.
Stickies
Even in the age of the far more modern Notes program, the old Stickies app is still creaking along. It creates virtual Post-it notes that you can stick anywhere on your screen.
You can use Stickies for quick notes and to-do items, Web addresses or phone numbers you need to remember, or any other little scraps and snippets of text you come across. They all show up whenever the Stickies program is running (Figure 18-31).
Creating Sticky Notes
The first time you launch Stickies, a few sample notes appear automatically, describing some of the program’s features. You can quickly dispose of each sample by clicking the close button in the upper-left corner of each note or by choosing File→Close (⌘-W). Each time you close a note, a dialog box asks if you want to save it. If you click Don’t Save (or press ⌘-D), the note disappears permanently.
To create a new note, choose File→New Note (⌘-N). Then start typing or:
§ Drag text in from any other program. Or drag text clippings from the desktop directly into your note. You can also drag a graphics file into a note to add a picture. You can even drag a sound or movie in.
§ Drag the icon of a PDF file into a note. (Stickies can even accommodate multipage PDF files. At first, you see only the first page, but the scroll bar reveals the rest.)
§ Choose File→Import and select any plain text file or RTF (Rich Text Format) document to bring it into a note.
§ Drag URLs into a note directly from a Web browser’s address bar.
TIP
If one particular note contains your most important information—your to-do list, say—you can force it to remain in front of all other windows, even if Stickies itself gets shunted to the background. Just click the note, and then choose Note→Floating Window.

Figure 18-31. In the old days of the Mac, the notes you created with Stickies were text-only, single-font deals. Today, however, you can use a mix of fonts, text colors, and styles within each note. You can even paste in graphics, sounds, and movies (like PICT, GIF, JPEG, QuickTime, AIFF, whole PDF files, and so on), creating the world’s most elaborate reminders and to-do lists.
§ In many Apple programs, you can select a chunk of text and then choose Make New Sticky Note from the program’s Services menu, or press Shift-⌘-Y. This command launches Stickies, creates a new note, and fills it with your selected text—all in one step.
NOTE
All your notes are stored in a file called StickiesDatabase, located in your Home→Library folder. You’re free to copy it, pass it along, and so on, just as you would any file.
Have a favorite style for your sticky notes? First create a new note, choosing the color and text style you like and setting it to the size you prefer. Then choose Note→Use as Default. All new notes you create now appear in the size, font, and color you’ve chosen.
Growing and Shrinking Notes
Stickies includes a few built-in tricks for managing a deskful of notes:
§ There’s a small resize handle on the lower-right corner of each note. Drag it to make notes larger or smaller onscreen.
§ Use the small triangle in the upper-right corner of each note to zoom and shrink note windows with a single click. The first click expands a note nearly to full-screen size. Another click pops the note back down to normal size.
§ The best option: Double-click anywhere along the dark strip at the top of each note to collapse it into a compact one-line mininote. You also can collapse a selected note by choosing Window→Collapse (⌘-M).
TIP
The most efficient way to use Stickies is to keep the notes in their collapsed state. When a note is collapsed, the first line of text shows up in tiny type in the collapsed title bar of the note, so you don’t have to expand the note to remember what’s in it. Plenty of notes can be summed up in a couple of words (“Pick up dry cleaning,” “Call Mom”), so you may even be able to leave your notes this way.
Formatting Notes
Stickies has word processor–like commands for creating designer sticky notes, with any combination of fonts, colors, and styles (explore the Font menu). You can also choose from six background colors from the Color menu.
Saving Sticky Notes
The notes you create in Stickies last only as long as you keep them open. If you close a note to get it out of the way (and click Don’t Save in the confirmation box), it vanishes permanently.
If you want to preserve the information you’ve stuffed into your notes in a more permanent form, use File→Export Text to save each note as a standalone TextEdit document.
System Preferences
This program opens the door to the nerve center of OS X’s various user preferences, settings, and options. Chapter 16 covers every option in detail.
TextEdit
TextEdit is a basic word processor—but it’s not nearly as basic as people think it is. You can create real documents with real formatting, using style sheets, colors, automatic numbering and bullets, tables, and customized line spacing. You can even open, edit, and create Microsoft Word documents. If you had to, you could write a children’s book in TextEdit, and it would look pretty decent.
Better yet, TextEdit (Figure 18-32) is now a showcase for OS X’s iPaddish features, like Full Screen mode, Auto Save, and Versions (see Chapter 4). It can also save your files into your iCloud locker, as described on QuickTime Player.
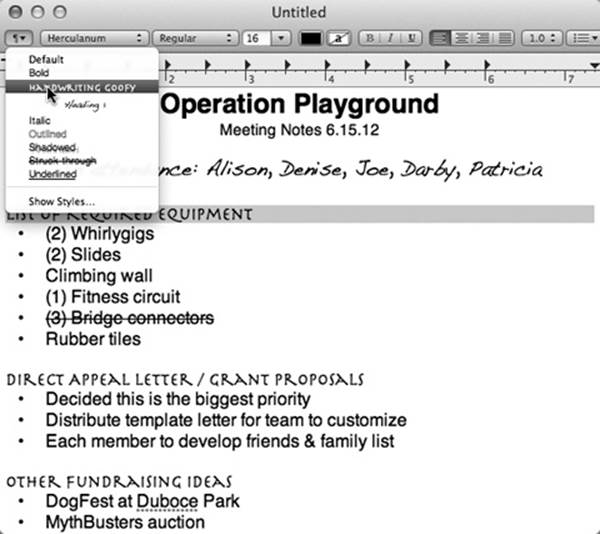
Figure 18-32. The text ruler gives you control over tab stops, paragraph justification, and so on. Pressing ⌘-R makes it appear and disappear. On the toolbar, the Style pop-up menu lists canned sets of character and paragraph formatting, so you can apply them consistently throughout a document.
And TextEdit works with OS X’s long list of built-in text-editing features: smart links, smart quotes, smart dashes, smart copy/paste, abbreviation expansion, auto–typo correction, data detectors, and so on. They’re all described in Chapter 5.
TIP
You can magnify the type size of a TextEdit document just the way you do on an iPhone or an iPad: by pinching or spreading. That is, spread two fingers on your trackpad to enlarge the type, or pinch on the trackpad to shrink it. Best. Tip. Ever.
TextEdit’s Two Personalities
The one confusing aspect of TextEdit is that it’s both a plain text editor (no formatting; globally compatible) and a true word processor (fonts, sizes, styles; compatible with other word processors). Here’s the scheme:
§ You can change a plain text document to a formatted one by choosing Format→Make Rich Text. The ruler appears automatically to remind you that a new world of formatting has just become available.
§ Conversely, you can change a formatted document (a Word file you’ve opened, for example) to a plain text document by choosing Format→Make Plain Text. An alert message appears to point out that you’re about to lose all formatting.
§ If you know what kind of document you always want to open, go to the TextEdit→Preferences dialog box; on the New Document tab, select Rich Text or Plain Text. That’s what you’ll get each time you choose File→New.
TIP
Here’s also where you can turn on smart links, smart quotes, smart dashes, and the other smart text-processing features described in Chapter 5.
Working in TextEdit
As you begin typing, all the usual word processing rules apply, with a few twists:
§ Choose bold, italic, and font sizes using the new formatting toolbar. (You can still use the commands in the Format menu.) You can even create subscripts or superscripts, change the color of the text (Format→Font→Show Colors), and so on.
§ Common paragraph-alignment options—Align Left, Align Right, Center, Justify—are all available as toolbar buttons and also reside in the Format→Text submenu. Adjust the line spacing (single, double, or any fraction or multiple) using the Spacing pop-up menu in the toolbar.
UP TO SPEED: THE DEAL WITH MICROSOFT WORD
Yes, it’s true: Humble TextEdit can open and create Microsoft Word documents! Your savings: the $400 price of Microsoft Office!
Well, sort of.
When you open a Microsoft Word document in TextEdit, most of the formatting comes through alive: bold, italic, font choices, colors, line spacing, alignment, and so on. Even very basic tables make it into TextEdit, although with different column widths.
A lot of Word-specific formatting does not survive crossing the chasm, however: borders, style sheets, footnotes, and the like. Bullets and numbered lists don’t make it, either, even though TextEdit can create its own versions of these. And TextEdit doesn’t recognize the comments and tracked changes your collaborators might use to mark up your manuscript.
Saving a new TextEdit document as a Word document is a better bet, because Word understands the many kinds of formatting that TextEdit can produce—including bullets, numbering, and tables. (You can create a Word file the first time you save it from TextEdit, or you can convert a document into Word format later by choosing File→Duplicate, and then File→Save.)
The one disappointment is that Word doesn’t recognize any style sheets you’ve set up in TextEdit. The formatting applied by those style names survives—just not the style names themselves.
Even so, a built-in Word-document editor is a huge, huge step for the Mac operating system. It means that in many cases, you can be a first-class citizen on the playing field of American business. Nobody ever needs to know that you’re (a) using a Mac, and (b) not using the real Microsoft Word.
§ The toolbar also offers automatic bulleting and numbering of paragraphs. Just choose the numbering style you prefer from the pop-up menu at the right end of the toolbar.
§ You can select several nonadjacent bits of text simultaneously. To pull this off, highlight your first piece of text by dragging, and then press ⌘ as you use the mouse to select more text. Bingo: You’ve highlighted two separate chunks of text.
When you’re done selecting bits of text here and there, you can operate on them en masse. For example, you can make them all bold or italic in one fell swoop. You can even use the Cut, Copy, and Paste commands, as described in the next section. When you cut or copy, the command acts upon all your selections at once.
You can also drag any one of the highlighted portions to a new area, confident that the other chunks will come along for the ride. All the selected areas wind up consolidated in their new location.
TIP
If you Option-drag one of the highlighted bits, you copy all selected chunks, leaving the originals in place.
§ Similarly, you can use the Find command. To do that, choose Edit→Find→Find (or just press ⌘-F). Fill in the search box; the sought-for term appears highlighted everywhere in your document at once. (You can also search and replace, using the other commands in the Edit→Find submenu.)
§ If you Option-drag vertically, you can freely select an arbitrary column of text (not necessarily the entire page width). This technique is very useful when you want to select only one column in a multicolumn layout, or when you want to select the numbers in a list and format them all at once.
Style Sheets
A style is a prepackaged collection of formatting attributes that you can apply and reapply with a click of the mouse (bold, 24-point Optima, double-spaced, centered, for instance). You can create as many styles as you need: chapter headings, sidebar styles, and so on. You end up with a collection of custom-tailored styles for each of the repeating elements of your document.
Once you’ve created your styles, you can apply them as you need them, safe in the knowledge that they’ll be consistent throughout the document. During the editing process, if you notice that you accidentally styled a headline using the Subhead style, you can fix the problem by simply reapplying the correct style.
NOTE
Unlike a real word processor, TextEdit doesn’t let you change a style’s formatting and thereby update every occurrence of it. Fortunately, you can search for all occurrences of a style and change them all simultaneously (see Style Sheets).
§ Creating a named style. To create a style, format some text so it looks the way you like it, complete with font, color, line spacing, tab settings, and so on.
Then, from the ![]() pop-up menu at the left end of the toolbar, choose Show Styles (Figure 18-33, top). Click Add to Favorites, type a name for the style, turn on both checkboxes (Figure 18-33, bottom), and then click Add.
pop-up menu at the left end of the toolbar, choose Show Styles (Figure 18-33, top). Click Add to Favorites, type a name for the style, turn on both checkboxes (Figure 18-33, bottom), and then click Add.
Figure 18-33. Top: Highlight the text you want to format. Then, from the ![]() pop-up menu in the toolbar, choose Show Styles. With each click of the
pop-up menu in the toolbar, choose Show Styles. With each click of the ![]() button, you summon a snippet of the next chunk of formatting. When you find one you like, you can either click Apply (to zap the highlighted text into submission) or Add To Favorites (to reuse this canned style later). In the latter case, you can give the new style a name (bottom).
button, you summon a snippet of the next chunk of formatting. When you find one you like, you can either click Apply (to zap the highlighted text into submission) or Add To Favorites (to reuse this canned style later). In the latter case, you can give the new style a name (bottom).
§ Applying a style. Later, when you want to reuse the formatting you set up, highlight some text and then choose the appropriate name from the ![]() pop-up menu. TextEdit applies the formatting immediately.
pop-up menu. TextEdit applies the formatting immediately.
TIP
If you simply click inside a paragraph, applying a style affects only paragraph attributes, like line spacing, tab stops, and alignment. If you highlight a random chunk of text instead, applying a style affects only character attributes, like the font and type size. If you highlight an entire paragraph, however, both text and paragraph formatting appear.
§ Deleting a style. To delete a superfluous style, choose Show Styles from the ![]() pop-up menu on the toolbar. Click the Favorite Styles button, choose the unwanted style’s name from the pop-up menu, and then click Remove From Favorites. (Deleting a style doesn’t affect any formatting that’s already in your document; it just removes the name from the Styles menu.)
pop-up menu on the toolbar. Click the Favorite Styles button, choose the unwanted style’s name from the pop-up menu, and then click Remove From Favorites. (Deleting a style doesn’t affect any formatting that’s already in your document; it just removes the name from the Styles menu.)
§ Replacing all occurrences. You can highlight every occurrence of a certain style at once—and then change, copy, or delete them all at once.
To make this work, choose Show Styles from the ![]() pop-up menu. Choose the style you want to work on. (If “Document styles” is selected, click the
pop-up menu. Choose the style you want to work on. (If “Document styles” is selected, click the ![]() button to page through the styles; if “Favorite styles” is selected, choose from the pop-up menu.) Then click Select.
button to page through the styles; if “Favorite styles” is selected, choose from the pop-up menu.) Then click Select.
In the little details sheet that appears, click the options you want, and then click Select. TextEdit highlights every occurrence of that style in the entire document (or selection). At this point, you can use any of the usual text-formatting controls to modify them all simultaneously.
§ Formatting by example. In TextEdit, you can also use Option-⌘-C and Option-⌘-V (Format→Font→Copy Style and Format→Font→Paste Style) to grab formatting from one place in your document and reuse it elsewhere. (Of course, you can’t apply styles in text-only documents.)
POWER USERS’ CLINIC: ADVANCED TYPOGRAPHY IN TEXTEDIT
If you just sprayed your coffee upon reading the heading of this sidebar, you’re forgiven. Advanced typography in TextEdit? Isn’t that a little bit like saying, “advanced page layout in Notepad”?
Not at all. TextEdit is a gleaming showcase for OS X’s typographical smarts.
Most of the commands in the Format→Font submenu should be familiar to you: Bold, Italic, Underline, and so on. But a few were once found only in expensive page-layout programs like InDesign and QuarkXPress. For example:
Kern. Use these commands, such as Tighten and Loosen, to nudge the letters of the selected text closer together or farther apart—an especially useful feature when you’re fiddling with headlines and headings.
There are no controls to set how much you want to kern the text, but you can apply these commands repeatedly to the same text selection to intensify them. If you want your text to be very tight, for example, just keep choosing the Tighten command. The characters creep closer and closer together until they crash into one another.
Ligature. Ligatures are letter pairs, such as fl and ff, that, in fancy typesetting, are often conjoined into special combination characters, as shown here. If you choose Format→Font→Ligature→Use Default (or Use All), then TextEdit displays these letter pairs with the appropriate ligatures. (This works only if the font you’re using has those ligatures built into it. New York, Charcoal, Apple Chancery, and all Adobe Expert fonts do, for example, but many other fonts don’t.)

Baseline. The baseline is the imaginary “floor” for text characters in a line of type. You can push text above this line or sink it below the baseline using the Raise and Lower commands in the Baseline submenu. The Superscript and Subscript commands, meanwhile, shift characters far above or below the baseline, so you can write stuff like “H2O.”
Character Shape. In a few fonts, such as Adobe Expert fonts, this submenu offers a choice between Traditional Form and specialized type treatments like Small Caps.
Copy Style/Paste Style. If mastering the Styles pop-up menu (described on Style Sheets) is too much effort, these commands offer another way to copy and paste just the font formatting to other text—the font, color, style, and size, but none of the actual text or paragraph attributes, such as alignment.
Tables
Tables can make life a heck of a lot easier when you want to create a resumé, agenda, program booklet, list, multiple-choice test, Web page, or another document where numbers, words, and phrases must be aligned across the page. In the bad old days, people did it by pressing the Tab key to line up columns—a technique that turned into a nightmare as soon as you tried to add or delete text. But using a word processor’s table feature is light-years easier and more flexible, because each row of a table expands to contain whatever you put into it. Everything else in its row remains aligned.
TIP
Tables are sometimes used for designing Web pages. Even though you can’t see the table outlines, many a Web page is filled with columns of text that are aligned invisibly by tables. And now that TextEdit can save your work as an HTML document, it’s suddenly a viable candidate for designing basic Web pages.
§ Create a table by choosing Format→Table. The floating Table palette appears (Figure 18-34). Use it to specify how many rows and columns you want. The placeholder table in your document adjusts itself in real time.
Figure 18-34. Note to Web designers: TextEdit may not be Dreamweaver, but it’s great for spinning out quick Web pages, thanks to the table features. Here you can see that a big table forms the underlying structure for this Web page, along with a couple of nested ones and color selections.
§ Format the table using the other controls in the Table palette. The Alignment controls let you specify how the text in the table cells hugs its border. Cell Border controls the thickness of the line around the selected cells’ borders (or, if you enter 0, makes the table walls invisible). The color swatch next to Cell Border specifies the color of the solid lines. The Cell Background controls let you color in the table cells with colors of your choice. (Choose Color Fill from the pop-up menu, and then click the color swatch.) This is an especially valuable option for Web designers.
§ Adjust the rows and columns by dragging the cell borders.
§ Merge two selected cells by clicking Merge Cells in the Table palette. Once you’ve done that, you can use the Split Cell button to split them apart again. (Split Cell doesn’t work except in cells you’ve previously merged.)
§ Nest one table inside a cell of another by clicking in the cell and then clicking Nest Table. Change the numbers in the Rows and Columns boxes to set up its dimensions (Figure 18-34).
TextEdit as Web Designer
The Table palette isn’t the only clue that Apple intends TextEdit to be a quick-and-dirty Web page design program. Consider these other tools:
§ You can easily add graphics to the page by dragging or pasting them into a document. The program understands TIFF, PICT, JPEG, and GIF formats.
§ You can add Web-style hyperlinks by highlighting “Click here” (or whatever the link says), choosing Edit→Add Link, and then entering the Web address in the resulting dialog box. Or just drag a link in from Safari, Mail, or another program. (To edit the link later, right-click it (or two-finger click it), and then choose Edit Link.)
TIP
Of course, you can also have TextEdit convert typed links into clickable ones automatically as you type them. That’s the purpose of the Smart Links option in TextEdit→Preferences.
§ To save a brand-new document as an HTML (Web page) file, choose File→Save; from the File Format pop-up menu, choose Web Page. (To save an existing TextEdit document as an HTML file, choose File→Duplicate and then File→Save; choose Web Page from the pop-up menu.)
§ Don’t miss the HTML options in TextEdit→Preferences. On the Open and Save tab, you can specify what kind of HTML document you want to produce, what cascading style sheets (CSS) setting you want, and whether or not you want TextEdit to include code to preserve blank areas (white space) in your layout.
Time Machine
This marquee feature of OS X is described in Chapter 5.
Utilities: Your OS X Toolbox
The Utilities folder (inside your Applications folder) is home to another batch of freebies: a couple of dozen tools for monitoring, tuning, tweaking, and troubleshooting your Mac.
The truth is, you’re likely to use only about six of these utilities. The rest are very specialized gizmos primarily of interest to network administrators or Unix geeks who are obsessed with knowing what kind of computer-code gibberish is going on behind the scenes.
TIP
Even so, Apple obviously noticed that as the sophistication of OS X fans grows, more people open the Utilities folder more often. That’s why there’s a menu command and a keystroke that can take you there. In the Finder, choose Go→Utilities (Shift-⌘-U).
Activity Monitor
Activity Monitor is designed to let the technologically savvy Mac fan see how much of the Mac’s available power is being tapped at any given moment.
The Processes table
Even when you’re only running a program or two on your Mac, dozens of computational tasks (processes) are going on in the background. The top half of the dialog box, which looks like a table, shows you all the different processes—visible and invisible—that your Mac is handling at the moment.
Check out how many items appear in the Process list, even when you’re just staring at the desktop. It’s awesome to see just how busy your Mac is! Some are easily recognizable programs (such as Finder), while others are background system-level operations you don’t normally see. For each item, you can see the percentage of the CPU being used, who’s using it (either your account name, someone else’s, or root, meaning the Mac itself), whether or not it’s been written as a 64-bit app, and how much memory it’s using.
Or use the pop-up menu above the list to see views like these:
§ All Processes. This is the complete list of running processes; you’ll notice that the vast majority are little Unix applications you never even knew you had.
§ All Processes, Hierarchically. In Unix, one process launches another, creating a tree-like hierarchy. The big daddy of them all is the process called launchd. Here and there, you’ll see some other interesting relationships: For example, the Dock launches DashboardClient.
§ My Processes. This list shows only the programs that pertain to your world, your login. There are still plenty of unfamiliar items, but they’re all running to serve your account.
§ System Processes. These are the processes run by root—that is, opened by OS X itself.
§ Other User Processes. Here’s a list of all other processes—“owned” by neither root nor you. Here you might see the processes being run by another account holder, for example (using Fast User Switching), or people who have connected to this Mac from across a network or the Internet.
§ Active Processes, Inactive Processes. Active processes are the ones that are actually doing something right now; inactive are the ones that are sitting there, waiting for a signal (like a keypress or a mouse click).
§ Windowed Processes. Now this is probably what you were expecting: a list of actual programs with actual English names, like Activity Monitor, Finder, Safari, and Mail. These are the only ones running in actual windows, the only ones that are visible.
Figure 18-35. The many faces of Activity Monitor. Top: It can be a graph of your processor (CPU) activity, your RAM usage at the moment, your disk capacity, and so on. For most people, only the processes listed here with tiny icons beside their names are actual windowed programs—those with icons in the Finder, the ones you actually interact with. The top-left Quit Process button (![]() ) is a convenient way to jettison a locked-up program when all else fails. Bottom: If you double-click a process’s name, you get a dialog box that offers stunningly complete reams of data (mostly of interest only to programmers) about what that program is up to. (The Open Files and Ports tab, for example, shows you how many files that program has opened, often invisibly.)
) is a convenient way to jettison a locked-up program when all else fails. Bottom: If you double-click a process’s name, you get a dialog box that offers stunningly complete reams of data (mostly of interest only to programmers) about what that program is up to. (The Open Files and Ports tab, for example, shows you how many files that program has opened, often invisibly.)
The System monitor tabs
At the bottom of Activity Monitor, you’re offered five tabs that reveal intimate details about your Mac and its behind-the-scenes efforts (Figure 18-35):
§ CPU. As you go about your usual Mac business, opening a few programs, playing QuickTime movies, playing a game, and so on, you can see the CPU graphs rise and fall, depending on how busy you’re keeping the CPU. You see a different graph color for each of your Mac’s cores (independent sub-chips on your processor), so you can see how efficiently OS X is distributing the work among them.
TIP
You may also want to watch this graph right in your Dock (choose View→Dock Icon→Show CPU Usage) or in a bar at the edge of your screen (choose Window→Floating CPU Window→Horizontally).
Finally, there’s the View→Show CPU History command. It makes a resizable, real-time monitor window float on top of all your other programs, so you can’t miss it.
§ Memory. Here’s a glorious revelation of the state of your Mac’s RAM at the moment.
The graph shows “memory pressure”—how much your programs are straining the Mac’s memory. If, when your Mac is running a typical complement of programs, this graph is nearly filled up, it’s time to consider buying more memory. You’re suffocating your Mac.
§ Energy. How much battery power is each of your programs responsible for sucking away? This fascinating tab, new in Mavericks, tells all—including which programs are currently enjoying an App Nap (Saving, Opening, and Moving Files).
§ Disk. Even when you’re not opening or saving a file, your Mac’s hard drive or flash storage is frequently hard at work, shuffling chunks of program code into and out of memory, for example. Here’s where the savvy technician can see exactly how frantic the disk is at the moment.
§ Network. Keep an eye on how much data is shooting across your office network with this handy tsunami of real-time data.
AirPort Utility
You use the AirPort Utility to set up and manage AirPort base stations (Apple’s wireless WiFi networking routers).
If you click Continue, it presents a series of screens, posing one question at a time: what you want to name the network, what password you want for it, and so on. Once you’ve followed the steps and answered the questions, your AirPort hardware will be properly configured and ready to use.
AppleScript Editor
This little program, formerly called Script Editor, is where you can type up your own AppleScripts. AppleScript is described in a free PDF appendix to this book, “AppleScript,” at www.missingmanuals.com.
Audio MIDI Setup
This program has a split personality; its name is a description of its two halves:
§ Audio. When you first open Audio MIDI Setup, you see a complete summary of the audio inputs and outputs available on your Mac right now. It’s a lot like the Sound pane of System Preferences, but with a lot more geeky detail. Here, for example, you can specify the recording level for your Mac’s microphone, or even change the audio quality it records.
For most people, this is all meaningless, because most Macs have only one input (the microphone) and one output (the speakers). But if you’re sitting in your darkened music studio, which is humming with high-tech audio gear whose software has been designed to work with this little program, you’ll smile when you see this tab.
There’s even a Configure Speakers button, for those audiophilic Mac fans who’ve attached stereo or even surround-sound speaker systems to their Macs.
TIP
Using the ![]() menu at the bottom of the window, you can turn your various audio inputs (that is, microphones, line inputs, and so on) on or off. You can even direct your Mac’s system beeps to pour forth from one set of speakers (like the one built into your Mac), and all other sound, like music, through a different set.
menu at the bottom of the window, you can turn your various audio inputs (that is, microphones, line inputs, and so on) on or off. You can even direct your Mac’s system beeps to pour forth from one set of speakers (like the one built into your Mac), and all other sound, like music, through a different set.
§ MIDI. MIDI stands for Musical Instrument Digital Interface, a standard “language” for inter-synthesizer communication. It’s available to music software companies who have written their wares to capitalize on these tools.
When you choose Window→Show MIDI Window, you get a window that represents your recording-studio configuration. By clicking Add Device, you create a new icon that represents one of your pieces of gear. Double-click the icon to specify its make and model. Finally, by dragging lines from the “in” and “out” arrows, you teach your Mac and its MIDI software how the various components are wired together.
Bluetooth File Exchange
One of the luxuries of using a Mac that has Bluetooth is the ability to shoot files (to colleagues who own similarly clever gadgets) through the air, up to 30 feet away. Bluetooth File Exchange makes it possible, as described on Via Bluetooth.
Boot Camp Assistant
This program helps you create (or destroy) a partition of your hard drive to hold a copy of Microsoft Windows. Details in Chapter 8.
ColorSync Utility
If you use ColorSync, then you probably know already that this utility is for people in the high-end color printing business. Its tabs include these two:
§ Profile First Aid. This tab performs a fairly esoteric task: repairing ColorSync profiles that may be “broken” because they don’t strictly conform to the ICC profile specifications. (ICC [International Color Consortium] profiles are part of Apple’s ColorSync color management system.) If a profile for your specific monitor or printer doesn’t appear in the Profiles tab of this program when it should, Profile First Aid is the tool you need to fix it.
§ Profiles. This tab lets you review all the ColorSync profiles installed on your system. The area on the right side of the window displays information about each ColorSync profile you select from the list on the left.
The other tabs are described on When You Have a Blank Disc on Hand.
Console
Console is a viewer for all of OS X’s logs—the behind-the-scenes, internal Unix record of your Mac’s activities.
Opening the Console log is a bit like stepping into an operating room during a complex surgery: You’re exposed to stuff the average person just isn’t supposed to see. (Typical Console entries: “kCGErrorCannotComplete” or “doGetDisplayTransferByTable.”) You can adjust the font and word wrapping using Console’s Font menu, but the truth is that the phrase “CGXGetWindowType: Invalid window -1” looks ugly in just about any font!
Console isn’t useless, however. These messages can be of significant value to programmers who are debugging software or troubleshooting a messy problem, or, occasionally, to someone you’ve called for tech support.
For example, your crash logs are detailed technical descriptions of what went wrong when various programs crashed, and what was stored in memory at the time.
Unfortunately, there’s not much plain English here to help you understand the crash, or how to avoid it in the future. Most of it runs along the lines of “Exception: EXC_BAD_ACCESS (0x0001); Codes: KERN_INVALID_ADDRESS (0x0001) at 0x2f6b657d.” In other words, it’s primarily for the benefit of programmers. Still, tech-support staff may occasionally ask to see the information in one of these logs.
DigitalColor Meter
DigitalColor Meter can grab the exact color value of any pixel on your screen, which can be helpful when matching colors in Web page construction or other design work. After launching the DigitalColor Meter, just point anywhere on your screen. A magnified view appears in the meter window, and the RGB (red-green-blue) color value of the pixels appears in the meter window.
Here are some tips for using the DigitalColor Meter to capture color information from your screen:
§ To home in on the exact pixel (and color) you want to measure, drag the Aperture Size slider to the smallest size—one pixel.
§ Press ⌘-X (View→Lock X) to freeze your cursor at its current horizontal position; you can now move it only horizontally. Or press ⌘-Y (View→Lock Y) to freeze your cursor at its current vertical position. You can also lock the cursor in both directions. (Press the keystroke again to unlock.) The idea is to make it easier for you to snap exactly the pixel you want.
§ When the Aperture Size slider is set to view more than one pixel, DigitalColor Meter measures the average value of the pixels being examined.
Disk Utility
This important program serves two key functions:
§ It serves as OS X’s own little Norton Utilities: a powerful hard drive administration tool that lets you repair, erase, format, and partition disks. You’ll probably use Disk Utility most often for its Repair Permissions feature, which solves an uncanny number of weird little Mac glitches. But it’s also worth keeping in mind in case you ever find yourself facing a serious disk problem.
§ Disk Utility also creates and manages disk images, electronic versions of disks or folders that you can exchange electronically with other people.
The following discussion tackles the program’s two personalities one at a time.
Disk Utility, the hard drive repair program
Here are some of the tasks you can perform with this half of Disk Utility:
§ Repair folders, files, and programs that don’t work because you supposedly don’t have sufficient “access privileges.” This is by far the most common use of Disk Utility, not to mention the most reliable and satisfying. Using the Repair Disk Permissions button fixes an astonishing range of bizarre OS X problems, from programs that won’t open to menulets that freeze up the works.
§ Get size and type information about any disks attached to your Mac.
§ Fix disks that won’t appear on your desktop or behave properly.
§ Completely erase disks—including rewritable CDs and DVDs (such as CD-RW and DVD-RW discs).
§ Partition a disk into multiple volumes (that is, subdivide a drive so that its segments appear on the desktop with separate disk icons).
TIP
Disk Utility can even create or enlarge disk partitions without requiring you to erase the entire hard drive. Details below.
§ Set up a RAID array (a cluster of separate disks that acts as a single volume).
NOTE
Disk Utility can perform some of its magic on the startup disk—the disk that’s running OS X at the moment. For example, it can check the disk for damage, fix the permissions of the disk, or even adjust its partitions.
But any other operation, like reformatting, erasing, or actually repairing the disk, still requires the Mac to start up from a different disk (an external hard drive, for example, or Mavericks’ secret recovery partition). Otherwise, it’d be like a surgeon performing an appendectomy on himself—not a great idea.
The left Disk Utility panel lists your hard drive and any other disks in or attached to your Mac at the moment. When you click the name of your hard drive’s mechanism, like “500 GB Hitachi iC25N0…” (not the “Macintosh HD” volume label below it), you see a panel with five tabs, one for each of the main Disk Utility functions:
§ First Aid. This is the disk-repair part of Disk Utility, and it does a terrific job at fixing many disk problems. When you’re troubleshooting, Disk Utility should always be your first resort.
To use it, click the icon of a disk and then click either Verify Disk (to get a report on the disk’s health) or Repair Disk (which fixes whatever problems the program finds). In other words, First Aid attempts to perform the same healing effects on a sick hard drive as, say, a program like Norton Utilities.
If Disk First Aid reports that it’s unable to fix the problem, then it’s time to invest in a program like DiskWarrior (www.alsoft.com).
You may wind up using the Verify and Repair Disk Permissions buttons even more often. Their function is to straighten out problems with the invisible Unix file permissions that keep you from moving, changing, or deleting files or folders. (The occasional software installer can create problems like this.) You’d be surprised how often running one of these permission checks solves little OS X glitches.
Chapter 15 has a more detailed discussion of permissions.
§ Erase. Select a disk, choose a format—always Mac OS Extended (Journaled), unless you’re formatting a disk for use on a Windows PC—give it a name, and then click Erase to wipe a disk clean.
TIP
The Erase tab is the key to using FileVault on flash drives and other external drives, as described in Chapter 14. In other words, you can encrypt external disks so that nobody can access them without a password. The trick is to erase the drive using “Mac OS Extended (Journaled, Encrypted)” format.
§ Partition. With the Partition tools, you can erase a hard drive in such a way that you subdivide its surface. Each chunk is represented on your screen by another hard drive icon (Figure 18-36).
There are some very good reasons not to partition a drive these days: A partitioned hard drive is more difficult to resurrect after a serious crash, requires more navigation when you want to open a particular file, and offers no speed or safety benefits.
On the other hand, there’s one very good reason to do it: Partitioning is the only way to use Boot Camp, described in Chapter 8. When you’re using Boot Camp, your Mac is a Mac when running off of one partition, and a Windows PC when starting up from another one. (But you don’t use Disk Utility in that case; use Boot Camp Assistant.)
§ RAID. RAID stands for Redundant Array of Independent Disks and refers to a special formatting scheme in which a group of separate disks are configured to work together as one very large, very fast drive. In a RAID array, multiple disks share the job of storing data—a setup that can improve speed and reliability.
Most Mac owners don’t use or set up RAID arrays, probably because most Mac owners have only one hard drive (and Disk Utility can’t make your startup disk part of a RAID array).
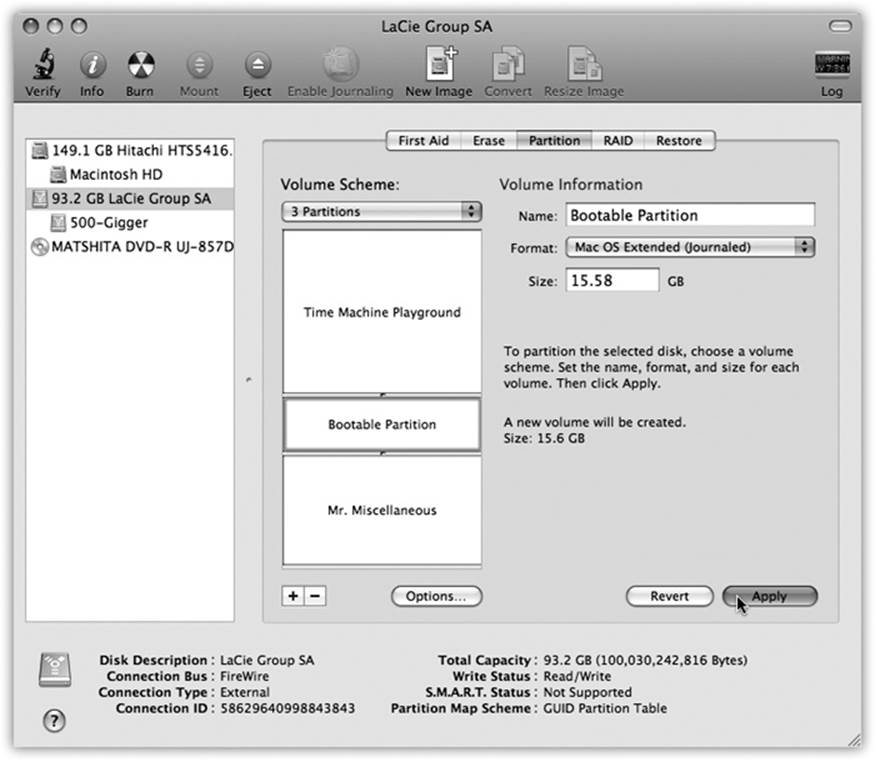
Figure 18-36. Partitioning your drive with Disk Utility no longer involves erasing it completely. Select the drive you want to partition from the list on the left, and then click the Partition tab. Click the ![]() button for each new partition you want. Now drag the horizontal dividers in the Volume Scheme map to specify the relative sizes of the partitions you want to create. Assign a name and a format for each partition in the Volume Information area, and then click Apply.
button for each new partition you want. Now drag the horizontal dividers in the Volume Scheme map to specify the relative sizes of the partitions you want to create. Assign a name and a format for each partition in the Volume Information area, and then click Apply.
But if you’re using multiple hard disks—in a Mac Pro, for example—you can use Apple RAID to merge them into one giant disk. Just drag the icons of the relevant disks (or disk partitions) from the left-side list of disks into the main list (where it says, “Drag disks or volumes here to add to set”). Use the RAID Type pop-up menu to specify the RAID format you want to use. (Stripe is a popular choice for maximizing disk speed; Mirror RAID is extra safe, because it creates a perfect backup clone of your main drive.) Name your new mega-disk, and then click Create. The result is a single “disk” icon on your desktop that actually represents the combined capacity of all the RAID disks.
§ Restore. This tab lets you make a perfect copy of a disk or a disk image, much like the popular shareware programs Carbon Copy Cloner and SuperDuper. You might find this useful when, for example, you want to make an exact copy of your old Mac’s drive on your new one. You can’t do that just by copying your old files and folders manually. If you try, you won’t get the thousands of invisible files that make up OS X. If you use the Restore function, though, they’ll come along for the ride.
Start by dragging the disk or disk image you want to copy from into the Source box. Then drag the icon of the disk you want to copy to into the Destination box.
TIP
If you want to copy an online disk image onto one of your disks, you don’t have to download it first. Just type its Web address into the Source field.
If you turn on Erase Destination, then Disk Utility obliterates all the data on your target disk before copying the data. If you leave this checkbox off, however, Disk Utility simply copies everything onto your destination, preserving all your old data in the process (although it replaces files that have the same names and locations as the ones you’re copying).
Finally, click the Restore button. (You might need to type in an administrator password.) Restoring can take a long time for big disks, so go ahead and make yourself a cup of coffee while you’re waiting.
Disk Utility, the disk-image program
Disk images are very cool. Each one is a single icon that behaves precisely like an actual disk—a flash drive or hard drive, for example—but can be distributed electronically. For example, a lot of OS X apps arrive from your Web download in disk-image form, as shown below.
POWER USERS’ CLINIC: PARTITION ADJUSTMENTS ON THE FLY
You can expand, shrink, or create partitions without having to erase the whole hard drive. If you’re into partitioning at all, this is a huge convenience.
Expanding a partition. Suppose, for example, that your main hard drive has two partitions: a main one (200 gigs) and a secondary one (50 gigs) that used to hold all your photos and movies. But you’ve outgrown the second partition and have moved all those photos and movies to their own external hard drive. Wouldn’t it be nice to add the newly unoccupied 50 gigs to your main partition?
You can do that without having to erase the whole hard drive. (This process, however, nukes everything on the second partition, so make sure you’re prepared to lose it all.)
Open Disk Utility. Click the name of the hard drive (for example, “Hitachi HTS541616J9SA00”—not “Macintosh HD”). Click Partition. You see a display like the one in Figure 18-36.
Click the second partition (or third, or whatever partition is just after the one you want to expand) and then click the ![]() button below the list. Poof! It’s gone.
button below the list. Poof! It’s gone.
Now you can drag the main partition’s bottom edge downward (or type a new size into the Size box), expanding it into the free area. Take a deep breath, and then click Apply.
Shrinking a partition. In Figure 18-36, you can see that a portion of the first partition is lightly shaded. (It’s blue in real life.) The blue represents data; you can’t shrink a partition so much that it crowds out your files. You can, however, shrink the partition to eliminate empty space. Just drag the lower edge of its map chunk upward.
Creating new partitions. Anytime there’s leftover space on the drive, you can create new partitions from it. To do that, click the ![]() button and proceed as described in Figure 18-36.
button and proceed as described in Figure 18-36.
Disk images are popular for software distribution for a simple reason: Each image file precisely duplicates the original master disk, complete with all the necessary files in all the right places. When a software company sends you a disk image, it ensures that you’ll install the software from a disk that exactly matches the master disk.
As a handy bonus, you can password-protect a disk image, which is the closest OS X comes to offering the ability to password-protect an individual folder.
By the way: There’s a difference between a disk-image file and the mounted disk (the one that appears when you double-click the disk image). You can drag the disk to the Trash after using it; the disk-image file (.dmg) will still be there to summon it.
TIP
After you double-click a disk image, click Skip in the verification box that appears. If something truly got scrambled during the download, you’ll know about it right away—your file won’t decompress correctly, or it’ll display the wrong icon, for example.
In fact, you can make Disk Utility always skip that verification business, which is a relic from the days of floppy disks. To do so, choose Disk Utility→Preferences, and turn off “Check images on locked media.”
You can create disk images, too. Doing so can be very handy in situations like these:
§ You want to create a backup of an important CD. By turning it into a disk-image file on your hard drive, you’ll always have a safety copy, ready to burn back onto a new CD. (This is an essential practice for educational CDs that kids will be handling soon after eating peanut butter and jelly.)
§ You want to replicate your entire hard drive—complete with all its files, programs, folder setups, and so on—onto a new, bigger hard drive (or a new, better Mac), using the Restore feature described earlier.
§ You want to back up your entire hard drive, or maybe just a certain chunk of it, onto an iPod or another disk. (Again, you can later use the Restore function.)
§ You want to send somebody else a copy of a disk via the Internet. You simply create a disk image, and then send that—preferably in compressed form.
Here’s how to make a disk image.
§ To image-ize a disk or partition. Click the name of the disk in the list, where you see your currently available disks. (The topmost item is the name of your drive, like “484.0 MB MATSHITA DVD-R” for a DVD drive or “74.5 GB Hitachi” for a hard drive. Beneath that entry, you generally see the name of the actual partition, like “Macintosh HD,” or the CD’s name as it appears on the screen.)
Then choose File→New→Disk Image from [the disk or partition’s name].
§ To image-ize a folder. Choose File→New→Disk Image from Folder. In the Open dialog box, click the folder you want, and then click Image. Either way, the next dialog box (Figure 18-37) offers some fascinating options.
§ Image Format. If you choose “read/write,” your disk image file, when double-clicked, turns into a superb imitation of a hard drive. You can drag files and folders onto it, drag them off of it, change icons’ names on it, and so on.
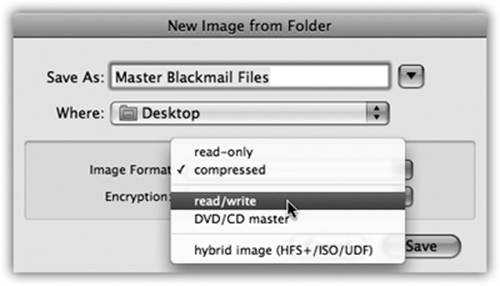
Figure 18-37. These two pop-up menus let you specify (a) what kind of disk image you want, and (b) whether or not you want it password-protected. The latter option is great when you want to password-protect one folder, without bothering with your entire Home folder.
If you choose “read-only,” however, the result behaves more like a CD. You can copy things off of it but not make any changes to it.
The “compressed” option is best if you intend to send the resulting file by email, post it for Web download, or preserve the disk image on some backup disk for a rainy day. It takes a little longer to create a simulated disk when you double-click the disk image file, but it takes up a lot less disk space than an uncompressed version.
Finally, choose “DVD/CD master” if you’re copying a CD or a DVD. The resulting file is a perfect mirror of the original disc, ready for copying onto a blank CD or DVD when the time comes.
§ Encryption. Here’s an easy way to lock private files away into a vault that nobody else can open. If you choose one of these two AES encryption options (choose AES-128, if you value your time), you’ll be asked to assign a password to your new image file. Nobody can open it without the password—not even you. On the other hand, if you save it into your Keychain (What to Do with an Appointment), it’s not such a disaster if you forget the password.
§ Save As. Choose a name and location for your new image file. The name you choose here doesn’t need to match the original disk or folder name.
When you click Save (or press Return), if you opted to create an encrypted image, you’re asked to make up a password at this point.
Otherwise, Disk Utility now creates the image and then mounts it—that is, turns the image file into a simulated, yet fully functional, disk icon on your desktop.
When you’re finished working with the disk, eject it as you would any disk (right-click or two-finger click it and choose Eject, for example). Hang onto the .dmg disk image file itself, however. This is the file you’ll need to double-click if you ever want to recreate your “simulated disk.”
Turning an image into a CD
One of the other most common disk-image tasks is turning a disk image back into a CD or DVD—provided that your Mac has a CD or DVD burner, of course.
All you have to do is drag the .dmg file into the Disk Utility window, select it, and click the Burn icon on the toolbar (or, alternatively, right-click or two-finger click the .dmg icon and choose Burn from the shortcut menu). Insert a blank CD or DVD, and then click Burn.
Grab
Grab takes pictures of your Mac’s screen, for use when you’re writing up instructions, illustrating a computer book, or collecting proof of some secret screen you found buried in a game. You can take pictures of the entire screen (press ⌘-Z, which for once in its life does not mean Undo) or capture only the contents of a rectangular selection (press Shift-⌘-A). When you’re finished, Grab displays your snapshot in a new window, which you can print, close without saving, or save as a TIFF file, ready for emailing or inserting into a manuscript.
Now, as experienced Mac enthusiasts already know, the Mac operating system has long had its own built-in shortcuts for capturing screenshots: Press Shift-⌘-3 to take a picture of the whole screen, and Shift-⌘-4 to capture a rectangular selection. (See iTunes: The Digital Jukebox for all the details.)
TIP
Don’t forget that you can choose different, easier-to-remember keyboard shortcuts for these functions, if you like. Just open System Preferences→Keyboard→Keyboard Shortcuts, click Screen Shots, click where it now says Shift-⌘-3 (or whatever), and then press the new key combo.
So why use Grab instead? In many cases, you shouldn’t. The Shift-⌘-3 and Shift-⌘-4 shortcuts work like a dream. But there are some cases when it might make more sense to opt for Grab. Here are three:
Figure 18-38. Unlike the Shift- ⌘-3 or Shift- ⌘-4 keystrokes, Grab lets you include the pointer/cursor in the picture—or hide it. Choose Grab→Preferences and pick one of the eight pointer styles, or choose to keep the pointer hidden by activating the blank button in the upper-left corner.
§ Grab can make a timed screen capture (choose Capture→Timed Screen, or press Shift-⌘-Z), which lets you enjoy a 10-second delay before the screenshot is actually taken. After you click the Start Timer button, you have an opportunity to activate windows, pull down menus, drag items around, and otherwise set up the shot before Grab shoots the picture.
§ With Grab, you have the option of including the cursor in the picture, which is extremely useful when you’re showing a menu being pulled down or a button being clicked. (OS X’s screenshot keystrokes, by contrast, always eliminate the pointer.) Use the technique described in Figure 18-38 to add the pointer style of your choice to a Grab screenshot.
TIP
If you’re really going to write a book or manual about OS X, the program you need is Snapz Pro X; a trial version is available from this book’s “Missing CD” at www.missingmanuals.com. It offers far more flexibility.
Grapher
This little unsung app is an amazing piece of work. It lets you create 2-D or 3-D graphs of staggering beauty and complexity.
When you first open Grapher, you’re asked to choose what kind of virtual “graph paper” you want: two-dimensional (standard, polar, logarithmic) or three-dimensional (cubic, spherical, cylindrical). Click a name to see a preview; when you’re happy with the selection, click Open.
Now the main Grapher window appears (Figure 18-39). Do yourself a favor. Spend a few wow-inducing minutes choosing canned equations from the Examples menu, and watching how Grapher whips up gorgeous, colorful, sometimes animated graphs on the fly.
Figure 18-39. In general, you type equations into Grapher just as you would on paper (like z=2xy). If in doubt, check the online help, which offers enough hints on functions, constants, differential equations, series, and periodic equations to keep the A Beautiful Mind guy busy for days.
When you’re ready to plug in an equation of your own, type it into the text box at the top of the window. If you’re not such a math hotshot, or you’re not sure of the equation format, work from the canned equations and mathematical building blocks that appear when you choose Equation→New Equation from Template or Window→Show Equation Palette (a floating window containing a huge selection of math symbols and constants).
Java Preferences
Java is a programming language used by a lot of corporate programs. These apps can run on any kind of computer (Mac, Windows, Linux).
To run a Java program, you need a Java runtime (sort of a playback engine)—and Mavericks doesn’t come with one. So the first time you open Java Preferences, or any Java program, the Mac offers to download and install one.
In any case, Java Preferences contains a bunch of advanced settings that geeks can use to modify how Java runs on their Macs.
Keychain Access
Keychain Access memorizes and stores all your secret information—passwords for network access, file servers, FTP sites, Web pages, and other secure items. For instructions on using Keychain Access, see Chapter 14.
Migration Assistant
This little cutie automates the transfer of all your stuff from another Mac or, in Mavericks, even a Windows PC, to your current Mac: your Home folder, network settings, programs, and more. This comes in extremely handy when you buy a newer, better Mac—or when you need Time Machine to recover an entire dead Mac’s worth of data. (It can also copy everything over from a secondary hard drive or partition.) The instructions on the screen guide you through the process (see Appendix A).
POWER USERS’ CLINIC: FOR MATHEMATICIANS (AND PHYSICISTS, SCIENTISTS, AND STUDENTS) ONLY
If you’re into math, science, or studying math or science, Grapher is a tremendous addition to OS X. There’s a whole lot to it—but if you’re just getting started, here are a few features not to miss.
You can calculate values, intercepts, derivatives, and integrals (even indefinite integrals) by using the Equation→Evaluation and Equation→Integration commands.
Some useful ready-made equation components await in the pop-up button at the right side of the equation text box. Using the Sum and Product symbols, for example, you can quickly calculate summations and products.
That same pop-up menu can help you generate piecewise, parametric, and other specialized kinds of graphs (this means you, math students).
Network Utility
Network Utility gathers information about Web sites and network citizens. It offers a suite of standard Internet tools like netstat, ping, traceroute, DNS lookup, and whois—advanced tools, to be sure, but ones that even Mac novices may be asked to fire up when calling a technician for Internet help.
Otherwise, you probably won’t need to use Network Utility to get your work done. However, Network Utility can be useful when you’re doing Internet detective work.
§ Whois (“who is”) can gather an amazing amount of information about the owners of any particular domain (such as apple.com)—including name and address info, telephone numbers, and administrative contacts. It uses the technique shown in Figure 18-40.
Figure 18-40. The whois tool is a powerful part of Network Utility. First enter a domain that you want information about, and then choose a whois server (you might try whois.networksolutions.com). When you click the whois button, you get a surprisingly revealing report about the owner of the domain, including phone numbers and contact names.
§ Use Ping to enter an address (either a Web address like www.google.com or an IP address like 192.168.1.110), and then “ping” (send out a “sonar” signal to) the server to see how long it takes for it to respond to your request. Network Utility reports the response time in milliseconds—a useful test when you’re trying to see if a remote server (a Web site, for example) is up and running. (The time it takes for the ping to report back to you also tells you how good your connection to it is.)
§ Traceroute lets you track how many “hops” are required for your Mac to communicate with a certain server (an IP address or Web address). You’ll see that your request actually jumps from one trunk of the Internet to another, from router to router, as it makes its way to its destination. You’ll learn that a message sometimes crisscrosses the entire country before it arrives at its destination. You can also see how long each leg of the journey took, in milliseconds.
RAID Utility
This program is used with an Apple RAID (multiple-disk system) card.
System Information
System Information is a great tool for learning exactly what’s installed on your Mac—in terms of both hardware and software. The people who answer the phones on Apple’s tech-support line are particularly fond of System Profiler, since the detailed information it reports can be very useful for troubleshooting nasty problems.
There are three ways to open System Information. Two of them involve a preliminary visit to the dialog box shown in Figure 18-41, a faster, better-designed, more consolidated view of the system information you might care most about.
Figure 18-41. This dialog box gives you a plain-English display of the Mac details you probably care the most about: memory, screen, storage, serial number, OS X version, and so on. (Click the tabs across the top for more details.) To proceed from here to the full System Information program, click System Report.
Anyway, here are the three ways:
§ Slow. Choose ![]() →About This Mac. You get a bare-bones info screen that reveals your OS X version, your Mac’s memory amount, and what processor it has inside.
→About This Mac. You get a bare-bones info screen that reveals your OS X version, your Mac’s memory amount, and what processor it has inside.
TIP
If you click your OS X version number twice in the About box, you get to see your Mac’s serial number!
If you then click More Info, you get the About This Mac details screen, shown in Figure 18-41. If that information isn’t all you need, then click System Report to open the actual System Information program.
§ Medium. Open Applications→Utilities; double-click System Information.
§ Fast. Hold down the Option key, which makes the ![]() →About This Mac command change to say System Information. Choose it, and then proceed as shown in Figure 18-42.
→About This Mac command change to say System Information. Choose it, and then proceed as shown in Figure 18-42.
When System Information opens, it reports information about your Mac in a list down the left side (Figure 18-42). The details fall into these categories:
§ Hardware. Click this word to see precisely which model Mac you have, what kind of chip is inside (and how many), how much memory it has, and its serial number.
If you expand the flippy triangle, you get to see details about which Memory slots are filled and the size of the memory module in each slot; what kind of Disc Burning your Mac can do (DVD-R, DVD+R, and so on); what PCI Cards are installed in your expansion slots; whatGraphics/Displays circuitry you have (graphics card and monitor); what’s attached to your SATA bus (internal drives, like your hard drive); what’s connected to your Thunderbolt, USB, and FireWire chains, if anything; and much more.
§ Network reveals details what WiFi components you have, what Internet connection Locations you’ve established, and so on.
§ Software shows which version of OS X you have and what your computer’s name is, as far as the network is concerned (“Chris’s Computer,” for example).
The Applications list documents every program on your system, with version information. It’s useful for spotting duplicate copies of programs.
Similar information shows up in the Extensions panel. Extensions are the drivers for the Mac’s various components, which sit in the System→Library→Extensions folder. Whatever is in that folder is what you see listed in this panel. Other categories include self-explanatory lists likeFonts, Preference Panes, and Startup Items.
Finally, the Logs panel reveals your Mac’s secret diary: a record of the traumatic events that it experiences from day to day. (Many of these are the same as those revealed by the Console utility; see Console.)

Figure 18-42. Does your MacBook’s chip run at 2 GHz or 2.6? What percentage of your external hard drive is filled up? What are the version numbers of every program installed on your Mac? Can your DVD burner burn dual-layer discs? Does your laptop have any open slots for extra RAM?
TIP
If any of these screens is showing you more technical information than you’d like, use the File→Show Less Information command to pare down the overload to just the human-recognizable items.
Saving a report
To create a handsomely formatted report that you can print or save, choose File→Export as Text, and then choose Rich Text Format from the File Format pop-up menu. Note, however, that the resulting report can be well over 500 pages long. In many cases, you’re better off simply making a screenshot of the relevant Profiler screen, as described on iTunes: The Digital Jukebox, or saving the thing as a PDF file.
Terminal
Underneath its shiny skin, OS X is actually Unix, one of the oldest and most respected operating systems in use today. But you’d never know it by looking; Unix is a world without icons, menus, or dialog boxes. You operate it by typing out memorized commands at a special prompt, called the command line. The mouse is almost useless here.
Wait a minute—Apple’s ultramodern operating system, with a command line?! What’s going on? Actually, the command line never went away. At universities and corporations worldwide, professional computer nerds still value the efficiency of pounding away at the little C: or $ prompts.
You never have to use OS X’s command line. In fact, Apple has swept it pretty far under the rug. There are, however, some tasks you can perform only at the command line.
Terminal is your keyhole into OS X’s Unix innards. There’s a whole chapter on it waiting for you on this book’s “Missing CD” page at www.missingmanuals.com.
VoiceOver Utility
The Mac has always been able to read stuff on the screen out loud. But Apple has taken this feature light-years further, turning it into a full-blown screen reader for the benefit of people who can’t see. VoiceOver doesn’t just read every scrap of text it finds on the screen—it also lets you control everything on the screen (menus, buttons, and so on) without ever needing the mouse.
On a Mac with a multitouch trackpad, you can interact with what’s visible on the screen by using the trackpad itself as a map of the current window or screen area; VoiceOver speaks whatever’s under your finger. You can flick in any direction to move to the next thing on the screen. You hear a sound whenever VoiceOver finds blank spaces on the screen, all in the name of helping you “feel” where everything is.
OS X can also read entire Web pages, navigate Web tables, hop from link to link, and so on. You can navigate by pressing arrow keys, using the mouse, or using the trackpad.
Obviously, learning VoiceOver is a huge task that can take days or weeks—but if it’s your ticket to being able to use a computer at all, you’ll probably be happy to have such a full-fledged monster of a program. You’ll find a detailed Apple user guide athttp://www.apple.com/voiceover/info/guide.