Teach Yourself VISUALLY MacBook Pro, 2nd Edition (2014)
Part III. Enjoying the Internet
Chapter 13. Communicating in Real Time
Chat with FaceTime
FaceTime is a great way to communicate because you can chat either via audio only or audio and video. You can use FaceTime to have a video chat with anyone who uses current versions of Macs, iPhones, iPod touches, or iPads. Before you can start having FaceTime chats, you need to set up FaceTime with your Apple ID. Once that is in place, conducting FaceTime chats is easy.
Chat with FaceTime
Configure FaceTime
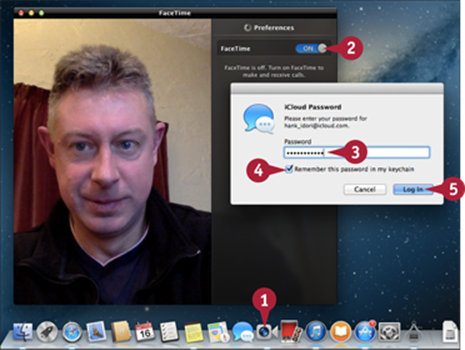
![]() Click FaceTime (
Click FaceTime (![]() ) on the Dock.
) on the Dock.
![]() Click the FaceTime switch to move it to the On position.
Click the FaceTime switch to move it to the On position.
The first time you turn on FaceTime, it prompts you to type your iCloud password.
![]() Type your password.
Type your password.
![]() Select the Remember this password in my keychain check box (
Select the Remember this password in my keychain check box (![]() changes to
changes to ![]() ) if you want to store the password.
) if you want to store the password.
![]() Click Log In.
Click Log In.
![]() Confirm or update your e-mail address.
Confirm or update your e-mail address.
Note: People use your e-mail address to request a FaceTime session.
![]() Click Next.
Click Next.
FaceTime verifies the address you used, and then displays the Contacts pane.
Conduct a FaceTime Chat

![]() Click Contacts.
Click Contacts.
You see the contacts in your Contacts.
![]() Click the contact with whom you want to have a FaceTime session.
Click the contact with whom you want to have a FaceTime session.
The contact's details appear.
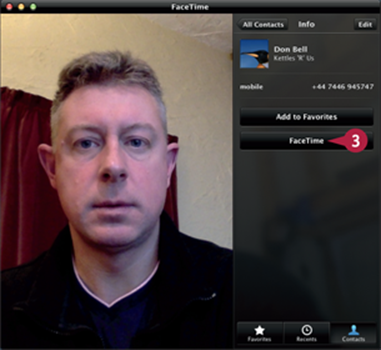
![]() Click FaceTime.
Click FaceTime.
Note: To use a phone number, the person with whom you want to have a FaceTime session must have an iPhone 4 or later.
FaceTime notifies the contact and requests a session.
If the contact accepts your request, the FaceTime session starts and you can hear and see your contact. If the contact declines, is not available, or does not have a FaceTime capable device, you see a “not available” message.
Note: If you do not see the buttons on the screen, move the pointer over the window and they appear.
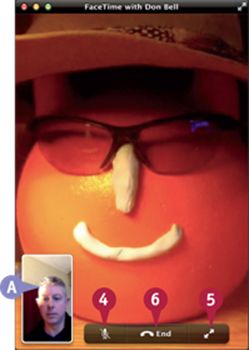
A You can drag the preview window that the other person is seeing to change its location.
![]() Mute the audio and darken the video by clicking Mute (
Mute the audio and darken the video by clicking Mute (![]() ).
).
![]() Click Full Screen (
Click Full Screen (![]() ) to have a full screen FaceTime window.
) to have a full screen FaceTime window.
![]() Click End to end the FaceTime session.
Click End to end the FaceTime session.
TIP
Are there easier ways to find someone to have a FaceTime chat with?
Yes. Click the Recents tab at the bottom of the Contacts pane to display a list of the people with whom you have had a FaceTime chat recently. You can request a FaceTime session by clicking one of the recent FaceTime chats. You can also save a contact as a favorite by viewing the contact and clicking Add to Favorites; you can then request a chat from the contact by double-clicking the favorite on the Favorites tab.
Explore Messages
The Messages application has all the features that you need for text, audio, and video chats. After you configure Messages, you can use it to communicate with people in any format you choose. Messages can even help when you have computer problems, because you can use it to share the desktop of your MacBook Pro with someone else over the Internet or over a local network.
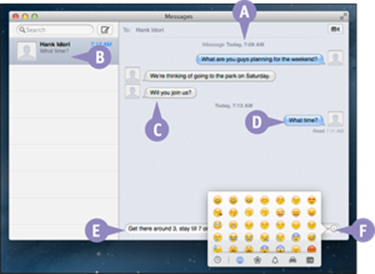
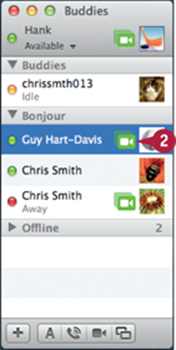
A Messages Window
Text conversations appear in the Messages window.
B Person You Are Texting
At the top of the window, you see the person with whom you are texting.
C Other Person's Last Text
On the left side of the window, you see the last text from the other person involved in the conversation.
D Your Recent Comments
On the right side of the window, you see your most recent contributions to the conversation.
E Text Box
When you want to add to the conversation, you can type text in the text box.
F Emoticon Menu
You can add emoticons to a conversation by selecting them from the menu.
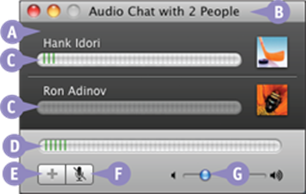
A Audio Chat Window
When you audio chat with people, you see a visual representation of the sounds you hear.
B Person Involved or Number of People
At the top of the window, you see the name of the person you are chatting with. If you are chatting with multiple people, you see the number of people.
C Each Person Participating
Participants in the conversation have their own sound bar so that you can see when they speak.
D Your Volume Level
The bottom bar represents how loud your speech is.
E Add Button
You can click Add (![]() ) to add more people to the conversation.
) to add more people to the conversation.
F Mute Button
You can click Mute (![]() ) to mute your sound.
) to mute your sound.
G Volume Slider
You can use this slider to set the volume level of a conversation.
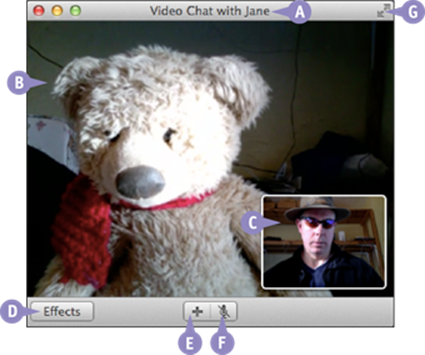
A Video Chat Window
This window shows each of the people with whom you are having a video conference.
B Participant Windows
Each participant gets her own window for the chat.
C Your Window
During a video chat, you see yourself as the other participants see you.
D Effects
You can use the Effects tools to apply a variety of interesting effects to the video.
E Add
You can add up to three other people in a video conference.
F Mute
You can click Mute (![]() ) to block sound from your end.
) to block sound from your end.
G Full Screen
When you click Full Screen (![]() ), the video conference fills the desktop.
), the video conference fills the desktop.
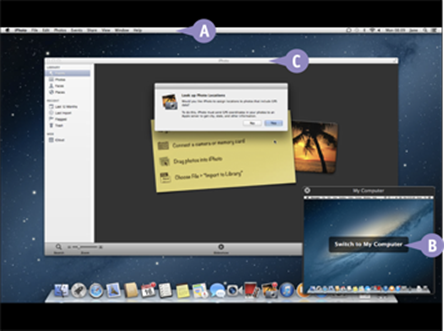
A Shared Screen
You can use Messages to view and control another person's computer.
B Your Computer
When you are sharing a desktop, you see a preview of your desktop; you can click it to move back to your computer.
C Shared Applications
When someone shares a screen with you, you can work with applications and documents on her computer just as if you were seated in front of it.
Configure Messages Accounts
Before you start chatting, you need to configure the accounts you are going to use to chat. With an iCloud account, you can have text chats. With an America Online Instant Messenger, or AIM, account, you can also have audio and video chats. You can also chat with the Jabber instant message service and with Google Talk. To set up chat accounts, you use the Messages Preferences window. The type of account you use determines which features you can use in Messages.
Configure Messages Accounts
Create Accounts
![]() Click Messages (
Click Messages (![]() ) on the Dock.
) on the Dock.
The Messages application opens.
Note: The first time you start up Messages, the Setup Assistant walks you through creating an account.
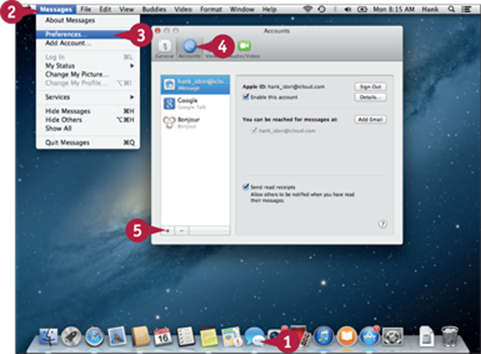
![]() Click Messages.
Click Messages.
The Messages menu opens.
![]() Click Preferences.
Click Preferences.
The Preferences window opens.
![]() Click Accounts.
Click Accounts.
![]() Click Add (
Click Add (![]() ).
).
The Choose a messages account to add dialog opens.
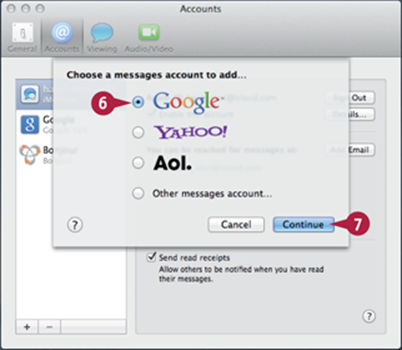
![]() Select the account type (
Select the account type (![]() changes to
changes to ![]() ). This example uses Google.
). This example uses Google.
![]() Click Continue.
Click Continue.
A dialog for entering the account information opens.
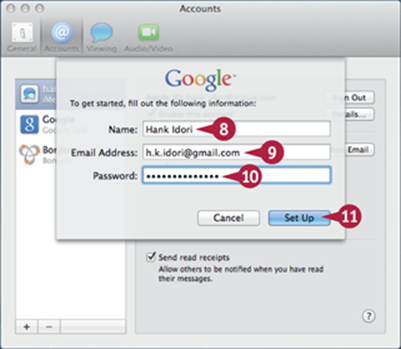
![]() Type your name the way you want it to appear.
Type your name the way you want it to appear.
![]() Type your e-mail address.
Type your e-mail address.
![]() Type your password.
Type your password.
![]() Click Set Up.
Click Set Up.
A dialog opens, showing controls for choosing which applications to use with the account.
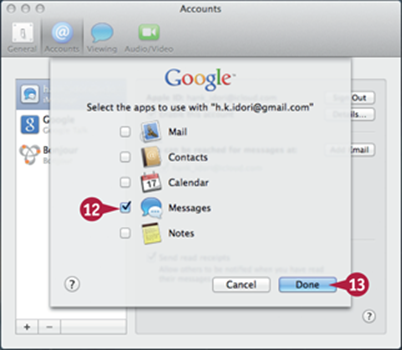
![]() Select the check box (
Select the check box (![]() changes to
changes to ![]() ) for each application you want to use.
) for each application you want to use.
![]() Click Done.
Click Done.
The account appears in the Accounts pane in the Preferences window.
TIPS
How do I disable a chat account I am not using?
Click Messages and then click Preferences to open the Preferences window. Click Accounts in the upper tab bar to display the Accounts pane. Click Account Information in the lower tab bar to display the Account Information pane. Deselect the Enable this account check box (![]() changes to
changes to ![]() ).
).
How do I change the format of my text messages?
Click Messages and then click Preferences to open the Preferences window. Click Viewing to display the Viewing pane. Here, you can change the fonts and colors used during text chats along with the background colors.
Chat with Text
Text chatting is a great way to have real-time conversations with other people while not consuming all of your and their attention throughout the conversation. With Messages, you can also include photos and documents in your chats.
The easy way to start chats with your contacts is to set them up as buddies in Messages. You can then quickly access your buddies from the Buddies list.
Chat with Text
Add a Buddy
![]() In the Messages application, press
In the Messages application, press ![]() +
+![]() .
.
The Buddies window opens.
Note: You can also click Window on the menu bar and then click Buddies to open the Buddies window.
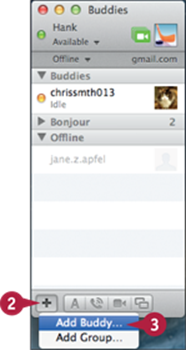
![]() At the bottom of the Buddies list, click Add (
At the bottom of the Buddies list, click Add (![]() ).
).
![]() Click Add Buddy.
Click Add Buddy.
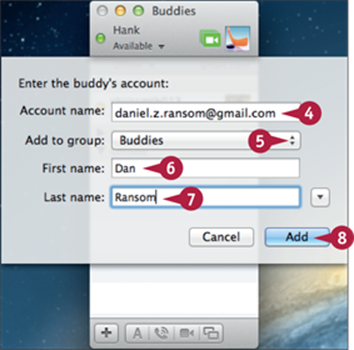
![]() Type the buddy's account name.
Type the buddy's account name.
![]() Select the group in which you want to place the buddy.
Select the group in which you want to place the buddy.
![]() Type the buddy's first name.
Type the buddy's first name.
![]() Type the buddy's last name.
Type the buddy's last name.
![]() Click Add.
Click Add.
Messages adds the person to your Buddies list.
Start a Text Chat
![]() Press
Press ![]() +
+![]() .
.
The Buddies window opens.
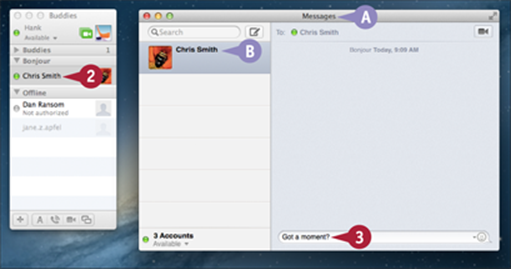
![]() Double-click the buddy with whom you want to chat.
Double-click the buddy with whom you want to chat.
A The Messages window becomes active.
B An entry appears in the left column for the buddy with whom you plan to chat.
![]() Type your message.
Type your message.
![]() Press
Press ![]() .
.
Messages sends your message and adds it to the message log at the top of the window next to your icon.
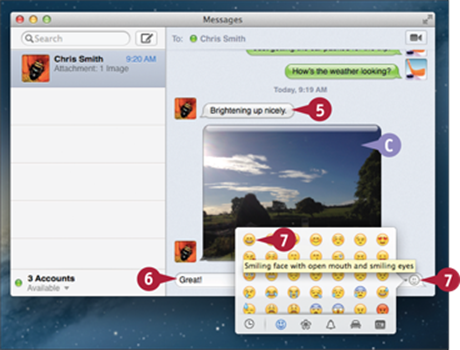
![]() Read the reply.
Read the reply.
C You can view images included in the chat.
![]() Type your response.
Type your response.
![]() To add an emoticon, click the pop-up menu and select the appropriate icon.
To add an emoticon, click the pop-up menu and select the appropriate icon.
![]() Press
Press ![]() .
.
TIPS
How do I respond when someone wants to chat with me?
When someone wants to chat with you, a new message appears in the Message list along the left side of the Messages window and you hear the new message sound. Click the message and read its content. You can then reply to the message.
How can I send a photo in a text chat?
Drag the photo's file from a Finder window or the desktop and drop it into the conversation. Messages adds it as a button in the text field. If you want to send text along with the photo, type the text. Press ![]() . Messages sends the text and photo to the person with whom you are chatting. When that person accepts the file transfer, the photo appears in the Messages window.
. Messages sends the text and photo to the person with whom you are chatting. When that person accepts the file transfer, the photo appears in the Messages window.
Chat with Audio
Text chatting is great, but being able to talk to someone can be even better. Using the Messages audio chat feature, you can have conversations with one or more people at the same time at no cost to you. Before you start talking, take a moment to set up your MacBook Pro microphone; you can use the built-in microphone or you can use an external microphone, such as a USB or Bluetooth headset.
Chat with Audio
Check the Microphone
![]() Control+click System Preferences (
Control+click System Preferences (![]() ) on the Dock.
) on the Dock.
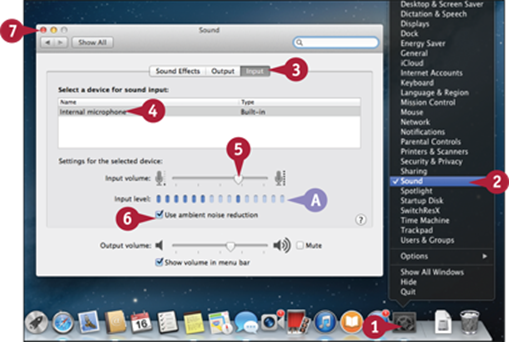
![]() Click Sound.
Click Sound.
![]() Click Input.
Click Input.
![]() Click the microphone to use.
Click the microphone to use.
A As you speak, the input level indicator shows the relative input volume.
![]() Drag the input volume slider to set the input volume.
Drag the input volume slider to set the input volume.
![]() Select the Use ambient noise reduction check box (
Select the Use ambient noise reduction check box (![]() changes to
changes to ![]() ) to reduce background noise.
) to reduce background noise.
![]() Click Close (
Click Close (![]() ).
).
Audio Chat
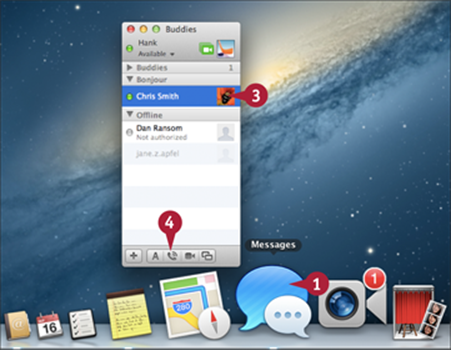
![]() Click Messages (
Click Messages (![]() ) on the Dock.
) on the Dock.
![]() Press
Press ![]() +
+![]() to open the Buddies window if it is not open already.
to open the Buddies window if it is not open already.
![]() Click the buddy with whom you want to chat.
Click the buddy with whom you want to chat.
![]() Click Start an Audio Chat (
Click Start an Audio Chat (![]() ).
).
Note: If the Start an Audio Chat icon (![]() ) is unavailable, the buddy is not capable of audio chatting with you.
) is unavailable, the buddy is not capable of audio chatting with you.
The Audio Chat window opens and Messages attempts to connect to the buddy you selected. If the person is available and accepts your chat request, the audio chat begins.
![]() Speak to the person and listen as you would on a telephone.
Speak to the person and listen as you would on a telephone.
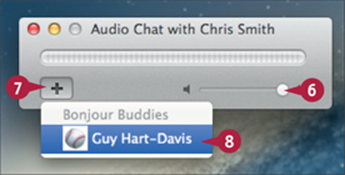
![]() To change the volume, drag the slider to the left to decrease the volume level, or to the right to increase it.
To change the volume, drag the slider to the left to decrease the volume level, or to the right to increase it.
![]() To add another person to the chat, click Add (
To add another person to the chat, click Add (![]() ).
).
![]() Click the buddy you want to add.
Click the buddy you want to add.
After the second person accepts, all three of you are able to hear each other.
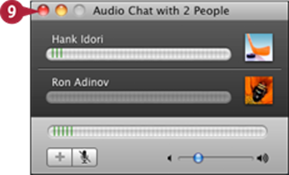
Note: You can add further people by repeating steps 7 and 8.
![]() When you are done, click Close (
When you are done, click Close (![]() ).
).
The chat window closes.
TIPS
How do I avoid chat requests?
To prevent any chat requests from popping up, you need to quit Messages. If you want to show your status to others, open the Status pop-up menu just below your name at the top of the Buddies window. Choose the status you want them to see on their Buddy lists. Select Offline if you do not want to chat. To chat again, select Available from the menu.
How do I respond to an audio chat request?
When someone wants to have an audio chat, a prompt appears and you hear the invite tone. Click the prompt. Click Accept to start the chat, click Decline to avoid it, or click Text Reply to reply with text. If you decline, the person who requested the chat sees a message saying that you have declined.
Chat with Video
Earlier, you saw how easy it is to use FaceTime to video chat with someone. You can also use Messages to video chat. Messages has some benefits over FaceTime. One is that you can chat with more than one person at the same time. Another benefit is that the people with whom you chat only need a video chat-capable application, instead of requiring FaceTime. Conducting a video chat is similar to an audio chat. First, make sure your video and audio are set up correctly. Second, start a chat.
Chat with Video
Check the Camera
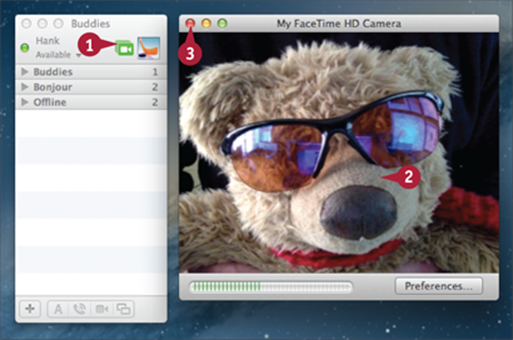
![]() Click Camera (
Click Camera (![]() ) next to your name at the top of the Buddies or Bonjour list.
) next to your name at the top of the Buddies or Bonjour list.
The My FaceTime HD Camera window opens.
![]() Move your MacBook Pro or yourself until the image is what you want others to see.
Move your MacBook Pro or yourself until the image is what you want others to see.
![]() When you are satisfied with the view, click Close (
When you are satisfied with the view, click Close (![]() ).
).
The My FaceTime HD Camera window closes.
Video Chat
![]() Press
Press ![]() +
+![]() to open the Buddies window if it is not open already.
to open the Buddies window if it is not open already.
![]() Click Camera (
Click Camera (![]() ) to the right of your buddy.
) to the right of your buddy.
Note: If the Camera button does not appear, the buddy is not able to video chat with you.
The Video Chat window opens and Messages attempts to connect to the buddy you selected. If the person is available and accepts your chat request, the video chat begins.

A You see the buddy's image in the window.
B The inset preview window shows you what the other person is seeing in his chat window.
![]() Drag the preview window to where you want it to be on the screen.
Drag the preview window to where you want it to be on the screen.
Note: See the section “Add Effects and Backgrounds to Video Chats” to apply interesting effects during your chats.
![]() To mute your end of the conversation, click Mute (
To mute your end of the conversation, click Mute (![]() ); click it again to resume your conversation.
); click it again to resume your conversation.
C To make the window fill the desktop, you can click Full Screen (![]() ).
).
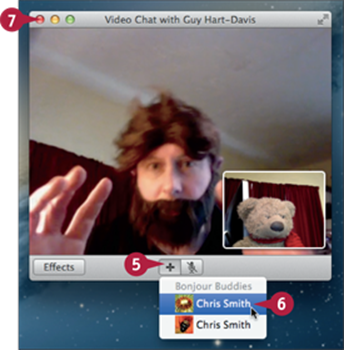
![]() To add another person to the conversation, click Add (
To add another person to the conversation, click Add (![]() ).
).
The Add pop-up menu opens.
![]() Click the buddy you want to add.
Click the buddy you want to add.
When the person accepts your invitation, a third video window appears and you see the second person.
You can see and talk to the other people, and they can see and talk to each other.
![]() When you are done, click Close (
When you are done, click Close (![]() ).
).
The Video Chat window closes.
TIP
How many people can I have in a video or audio conference at the same time?
You can have up to four participants, including yourself, in a single video conference. You can have up to ten people, including yourself, in an audio conference at the same time.
Add Effects and Backgrounds to Video Chats
To enliven your video chats, you can apply special effects to the images being shown during a video chat, and you can apply background images or movies to video chats to make them more interesting. With a motion background, it appears as if you are in front of or in whatever the background is; this is like the green screen technique used during weather broadcasts, movies, and so on. A static image as a background can also make it appear that you are somewhere you are not.
Add Effects and Backgrounds to Video Chats

![]() Start a video chat.
Start a video chat.
Note: You can apply an effect after placing a call and before your buddy answers.
![]() Click Effects.
Click Effects.
The Video Effects palette opens.
A You can click Next (![]() ) and Previous (
) and Previous (![]() ) to move through the various Effects screens.
) to move through the various Effects screens.
![]() Click the effect, image, or video that you want to apply.
Click the effect, image, or video that you want to apply.
B Messages applies the effect to your image.
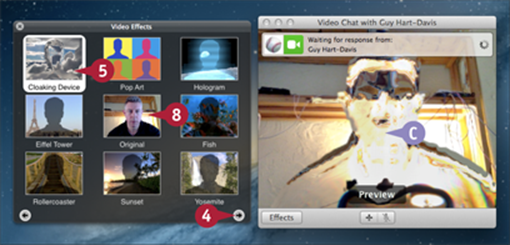
![]() Click Next (
Click Next (![]() ) until you see the video backgrounds.
) until you see the video backgrounds.
![]() Click a video background.
Click a video background.
![]() Move out of the camera view at the prompt.
Move out of the camera view at the prompt.
![]() When the prompt disappears, move back into the picture.
When the prompt disappears, move back into the picture.
C Messages applies the background to your video.
![]() Click Original in the middle of the Video Effects palette to remove the effect.
Click Original in the middle of the Video Effects palette to remove the effect.
Share Documents via Messages
Chatting via Messages is a great way to collaborate on work as well as to catch up with friends. Whether you are using Messages for work or for play, you might want to transfer files back and forth. For example, if you are discussing a work project, you might want to share a document or a spreadsheet.
You can send and receive files easily, either directly from Messages or by dragging in the files from a Finder window. The recipient gets to decide whether to accept the file.
Share Documents via Messages
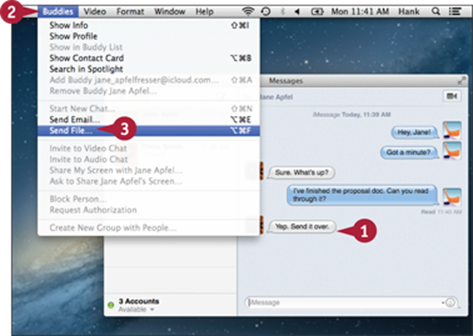
![]() Start a chat.
Start a chat.
This example shows a text chat, but you can share files during an audio chat or a video chat as well.
![]() Click Buddies.
Click Buddies.
The Buddies menu opens.
![]() Click Send File.
Click Send File.
The Send File sheet opens.
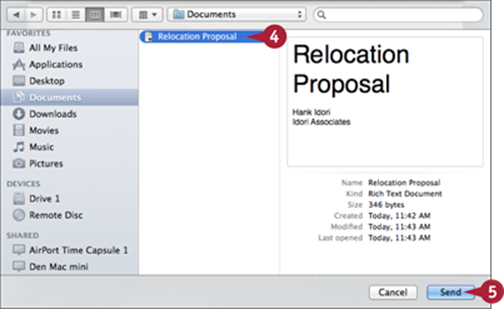
![]() Navigate to the file and click it.
Navigate to the file and click it.
![]() Click Send.
Click Send.
Messages adds a button for the file to the text box.
![]() Type any explanatory text needed.
Type any explanatory text needed.
![]() Press
Press ![]() .
.
Note: You can also send a file to a buddy by Control+clicking the buddy's icon in the Buddies list and then clicking Send File. In the sheet that opens, click the file, and then click Send to send it.
Share Desktops with Others
You can share your desktop so that the people with whom you are chatting can see and control what happens on your computer. When you share someone else's screen, you can see and control his computer. Sharing screens is a great way to collaborate on projects, to share information, or to troubleshoot Mac problems.
Share Desktops with Others
Share Your Desktop
![]() Press
Press ![]() +
+![]() to open the Buddies window if it is not open already.
to open the Buddies window if it is not open already.
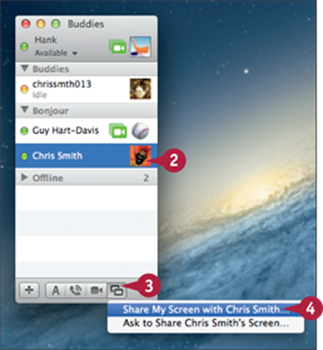
![]() Click your buddy.
Click your buddy.
![]() Click Start Screen Sharing (
Click Start Screen Sharing (![]() ).
).
![]() Click Share My Screen with buddy, where buddy is the name of the buddy you selected.
Click Share My Screen with buddy, where buddy is the name of the buddy you selected.

A When the buddy accepts your invitation, he can control your MacBook Pro and see what you do on the desktop. You can chat to discuss what you are doing.
B The Screen Sharing menu icon appears and alternates between ![]() and
and ![]() .
.
![]() To end screen sharing, click Screen Sharing (
To end screen sharing, click Screen Sharing (![]() or
or ![]() ) on the menu bar.
) on the menu bar.
The Screen Sharing menu opens.
![]() Click End Screen Sharing.
Click End Screen Sharing.
The sharing connection ends.
Share a Desktop Belonging to Someone Else
![]() Press
Press ![]() +
+![]() to open the Buddies window.
to open the Buddies window.
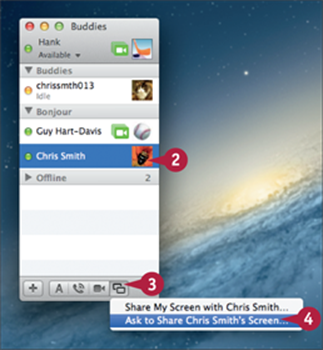
![]() Click your buddy.
Click your buddy.
![]() Click Start Screen Sharing (
Click Start Screen Sharing (![]() ).
).
![]() Click Ask to Share buddy's Screen.
Click Ask to Share buddy's Screen.
Messages sends a share request to the buddy. When he accepts, screen sharing begins.

C Your buddy's desktop appears on your screen, either full screen or in a large window.
D Your desktop appears in a small window labeled My Computer.
Note: You can move the My Computer window around the screen if it blocks the part of the shared desktop that you want to see.
![]() You can work with the buddy's computer just as if you were sitting in front of it.
You can work with the buddy's computer just as if you were sitting in front of it.
![]() To move back to your desktop, click the My Computer window.
To move back to your desktop, click the My Computer window.
The two windows flip-flop so that your desktop now appears full screen.
![]() To end screen sharing, click Screen Sharing (
To end screen sharing, click Screen Sharing (![]() or
or ![]() ) on the menu bar.
) on the menu bar.
![]() Click End Screen Sharing.
Click End Screen Sharing.
The sharing connection ends.
TIP
How do I know when someone wants to share his screen with me?
You receive a screen-sharing invitation in Messages. When you click the invitation, you have the following options: Accept to start screen sharing, Decline to prevent it, or Text Reply to send back a text message. If you choose to share the person's screen, you are able to see and control that person's computer.
Communicate with Twitter
Twitter is a popular way to communicate in very short messages called tweets. Each tweet can be up to 140 characters long. You can follow someone on Twitter, which means you can see any messages she posts to her Twitter account. You can respond to tweets on someone's account. You can also post messages on your account, and people who follow you can read them. To use Twitter, you need a Twitter account; you can then tweet either using an application or the Twitter website, which you can access in Safari or another browser. A Twitter account is free, as are many Twitter applications.
Communicate with Twitter
Set Up Your Twitter Account
Note: To obtain a Twitter account, visit http://twitter.com.
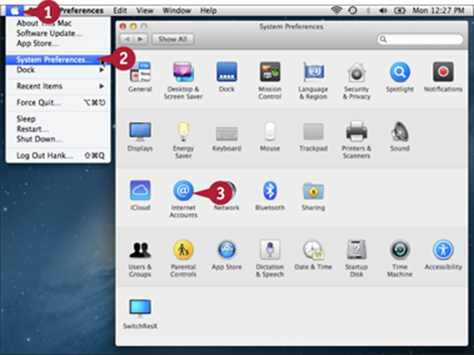
![]() Click Apple (
Click Apple (![]() ).
).
The Apple menu opens.
![]() Click System Preferences.
Click System Preferences.
The System Preferences window opens.
![]() Click Internet Accounts.
Click Internet Accounts.
The Internet Accounts pane opens.
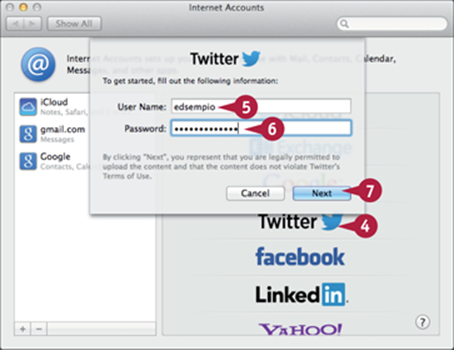
![]() Click Twitter.
Click Twitter.
The Twitter dialog opens.
![]() Type your user name.
Type your user name.
![]() Type your password.
Type your password.
![]() Click Next.
Click Next.
Another Twitter dialog opens.
![]() Click Sign In.
Click Sign In.
OS X signs you into Twitter.
Your Twitter account appears in the Internet Accounts pane.
Send and Read Twitter Messages
![]() Open your Twitter application and sign in to your Twitter account if required.
Open your Twitter application and sign in to your Twitter account if required.
Note: You can also use Twitter by visiting http://twitter.com.
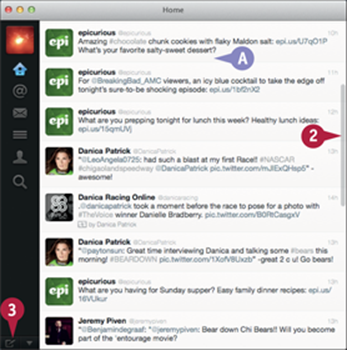
A You see the messages from people you are following.
![]() Scroll the window to read all the tweets.
Scroll the window to read all the tweets.
![]() To tweet a message to your followers, click Tweet (
To tweet a message to your followers, click Tweet (![]() ).
).
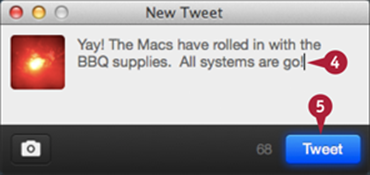
![]() Type your tweet.
Type your tweet.
![]() Click Tweet.
Click Tweet.
Anyone who follows you can see the message in his Twitter feed.
TIPS
How do I find and install a Twitter application?
Open the App Store application. In the Search box, type Twitter. There are a number of Twitter applications. Click the Install button for the application you want to use. OS X downloads the application and installs it. You can then run the application from Launchpad.
How else can I use Twitter?
You can share photos and other content on Twitter. To do so, select the item you want to send via Twitter, click the Share button, and click Twitter. The item you selected is sent in a tweet.
All materials on the site are licensed Creative Commons Attribution-Sharealike 3.0 Unported CC BY-SA 3.0 & GNU Free Documentation License (GFDL)
If you are the copyright holder of any material contained on our site and intend to remove it, please contact our site administrator for approval.
© 2016-2026 All site design rights belong to S.Y.A.