The Unauthorized Guide to iPhone, iPad, and iPod Repair (2013)
Chapter 18. Recovering Data from Your Broken iDevice
A wise teacher once told me, “Tim, with iDevices there are many shades of ‘dead.’” What this person meant is that a customer’s complaint of “My iPhone is dead” conveys practically no useful information to the technician.
Some common questions in response to the “My iDevice is dead” statement include the following:
![]() Does your iDevice not turn on at all, or does it turn on but doesn’t do anything?
Does your iDevice not turn on at all, or does it turn on but doesn’t do anything?
![]() When did you last charge the iDevice?
When did you last charge the iDevice?
![]() Did any liquid get on or inside the iDevice?
Did any liquid get on or inside the iDevice?
![]() How long has the device not worked?
How long has the device not worked?
![]() What changed in the iDevice’s environment between when it last worked and when it didn’t?
What changed in the iDevice’s environment between when it last worked and when it didn’t?
The list of open-ended diagnostic questions goes on and on. In my experience, most customers express concern that they won’t be able to get to their data anymore now that the iDevice is apparently bricked.
This chapter starts with a detailed consideration of how iDevice users can minimize their risk of data loss in the event of iDevice failure.
Next it describes some scenarios that embrace various forms of iDevice “deadness” and provides you with some strategies for gaining access to iDevice data. For instance, I show you how to move the disk drive from one iDevice to another and mount the disk in the second device for the purposes of data retrieval.
Finally, this chapter shows you how easy it is to extract data from iTunes backups. This conversation involves information security and data encryption and dovetails nicely with what’s covered in Chapter 19, “Before You Sell, Donate, or Recycle Your iDevice.”
Protecting Your Data by Using Apple Services
In a best-case scenario, you (or your customer) avail yourselves of Apple’s services to ensure that your data remains available to you on all of your iDevices. After all, redundancy (that is, keeping data stored in several locations at once) is a cornerstone of fault tolerance in the IT industry.
Our two best friends in this regard are iCloud and iTunes Match.
iCloud
As you probably know, iCloud is Apple’s cloud-based storage service. The service began life as .Mac before becoming MobileMe. “Cloud-based storage” means that the following iDevice user data is stored on Apple’s servers:
![]() Purchased music, movies, TV shows, apps, and books
Purchased music, movies, TV shows, apps, and books
![]() Photos and videos in the Camera Roll
Photos and videos in the Camera Roll
![]() Device settings (for example, Phone Favorites, Wallpaper, and Mail, Contacts, Calendar accounts)
Device settings (for example, Phone Favorites, Wallpaper, and Mail, Contacts, Calendar accounts)
![]() Home screen and app organization
Home screen and app organization
![]() App data (not the apps themselves; only data stored within the apps)
App data (not the apps themselves; only data stored within the apps)
![]() Messages (iMessage, SMS, and MMS)
Messages (iMessage, SMS, and MMS)
![]() Ringtones
Ringtones
![]() Visual Voicemails
Visual Voicemails
In other words, all the contents of an iTunes-based iDevice backup are included in iCloud backups.
What’s ingenious about this service is that you can retrieve the cloud-based resources on any Mac computer or iDevice that shares the same Apple ID. Isn’t that great?
You already know how convenient iCloud backups are. Please do everything you can to encourage your clients to use their free iCloud accounts and purchase additional storage if necessary to back up all of their data.
iTunes Match
iTunes Match is a subscription service in which you store your iTunes music library in the cloud on Apple’s servers. You can then pull down that content to all of your Macs and iDevices. If you listen to music or audiobooks much, like I do, then this service more than pays for itself.
You also have the security of knowing that a dead iDevice isn’t going to interrupt your music and media enjoyment one little bit. You can repair or replace the device, enable iTunes Match in iOS, and BOOM! You have your library back.
Retrieving User Data from a “Dead” iDevice
Remember the watchwords with which I opened up this chapter: “Dead” is a relative term with iDevices. If you have a waterlogged iDevice and if you’ve been studying this book, you now know how to address that situation. (Refer to Chapter 14, “Addressing Water Damage,” for a refresher.)
If you have an iDevice that won’t power on then you now know how to disassemble the unit. Remember that the permanent, solid-state storage is contained in a chip on the logic board. You can therefore take the logic board out of the failed iDevice and install it into the chassis of a known-good device.
Of course, the aforementioned procedure won’t work if you have a damaged logic board; in that case, I hope that you have a recent backup to fall back on.
When you are able to power on the iDevice, you need to connect it to iTunes, take a backup, and then use a third-party utility to drill into the iTunes backup archive and review its contents. I cover that procedure later in this chapter.
Retrieving User Data from a Live iDevice
You may find yourself in a situation where you need to retrieve media from a physically intact iDevice, but for whatever reason you can’t get to the PC or Mac with which you sync the device. As we see in a moment, Apple enables you to sync your iDevice with one, and only one, instance of iTunes. What are we to do?
Music
I once supported iOS devices at a local high school in Nashville. Without question, the biggest concern the kids had when they brought their broken iPods to me was, “Mr. Warner, can you please get my music back?”
This was before iCloud or iTunes Match, so there was the very real possibility that the 40 hours the student spent ripping his or her CDs into the iTunes library might actually go up the flue.
Did you ever wonder why iTunes let you sync your iDevice’s music library with only one computer at a time? How many of you have seen the iTunes message shown in Figure 18.1 when you tried to pull music from an iPod by syncing it with another computer?
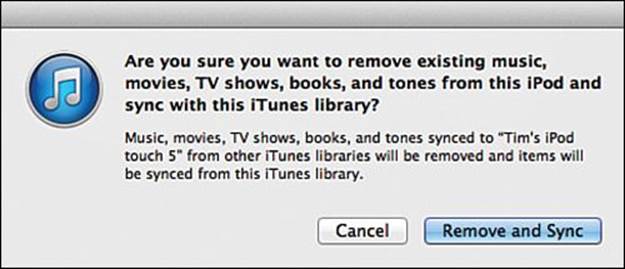
FIGURE 18.1 iTunes lets you sync an iDevice with only one computer.
The answer to this question consists of four letters: RIAA. When Apple introduced the iPod in 2001, they were (and are) subject to media usage restrictions from the Recording Industry Association of American (RIAA) and other music industry-affiliated groups.
From the RIAA’s perspective, the one device/one computer synchronization limit made sense. After all, what would stop somebody from sharing their iTunes library with their friends by dumping the music on multiple host computers?
The typical iDevice customer/music enthusiast can’t imagine the licensing details that go on behind the scenes to support technologies like iTunes Wi-Fi home sharing (find out more at http://is.gd/HUpubd) or iTunes Match. I have some very good friends who work for Broadcast Music International (BMI) here in Nashville, so I have some privileged insight into the situation.
The good news is that third-party development has stepped in to fill the void (although Apple has filled itself with iTunes Match, frankly) by providing us with software to retrieve our media libraries from our iDevices.
Here is a list of some of the most popular iDevice music library retrieval products:
![]() AnyTrans (shown in Figure 18.2; Windows only; http://is.gd/7HnJzT)
AnyTrans (shown in Figure 18.2; Windows only; http://is.gd/7HnJzT)
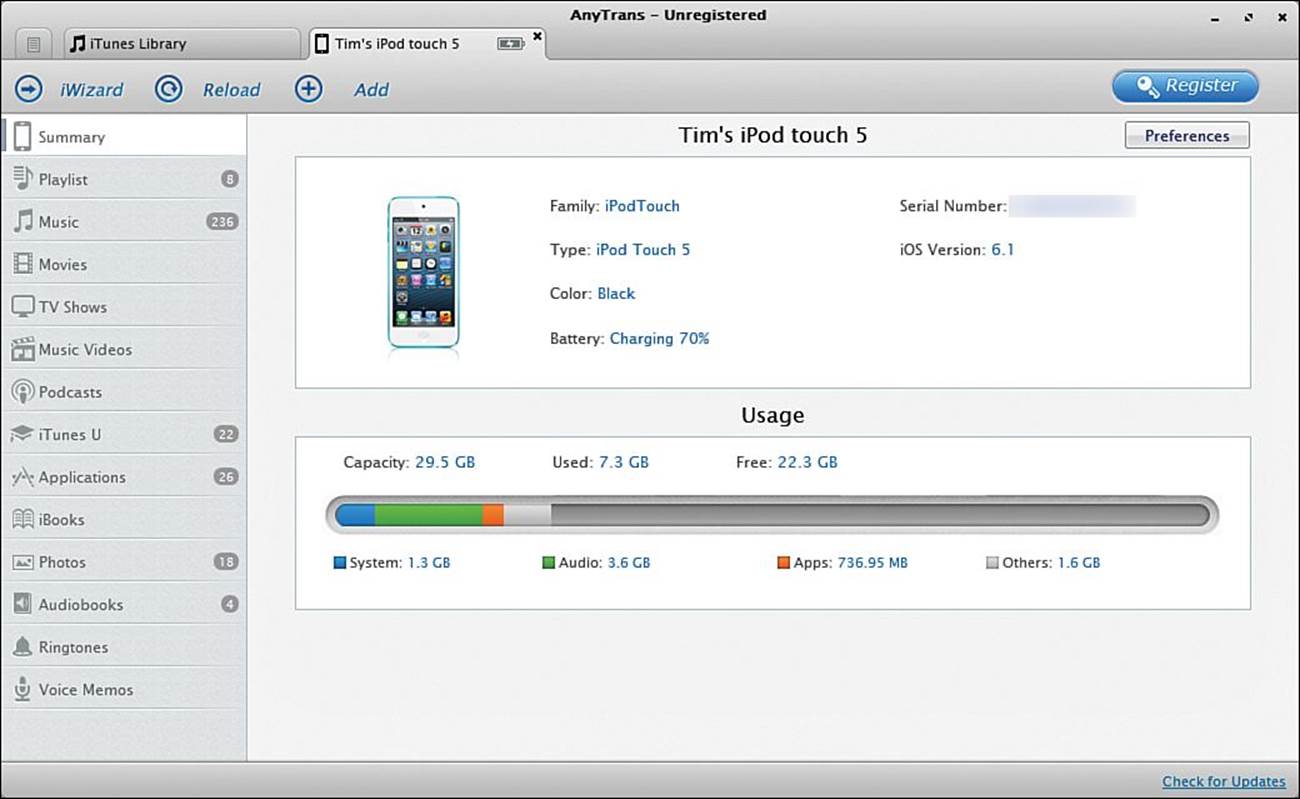
FIGURE 18.2 AnyTrans gives you full control over your iDevice music library.
![]() iRip (Mac and Windows; http://is.gd/y34VVM)
iRip (Mac and Windows; http://is.gd/y34VVM)
![]() Senuti (Mac only; http://is.gd/pYFE6S)
Senuti (Mac only; http://is.gd/pYFE6S)
In closing, I want to let you know that you can always mount the iDevice as a disk in Windows or Mac and access the music library folders directly. This procedure might work as a last-ditch effort when you are pressed for time.
However, pulling music “in the raw” like this means that you lose all of the meaningful metadata surrounding your music library, especially objects like playlists, ratings, and listen counts. That’s the chief advantage (besides ease of use, naturally) that third-party solutions offer us.
Photos
As long as your iDevice doesn’t have passcode protection enabled, or you know the passcode, you can mount the iDevice as a camera in Windows and Mac and import your Camera Roll pictures, as shown in Figure 18.3. That’s all well and good if all you need are the photos you snapped by using your iDevice. However, what if you need ALL of the photos that you previously synced to a computer?
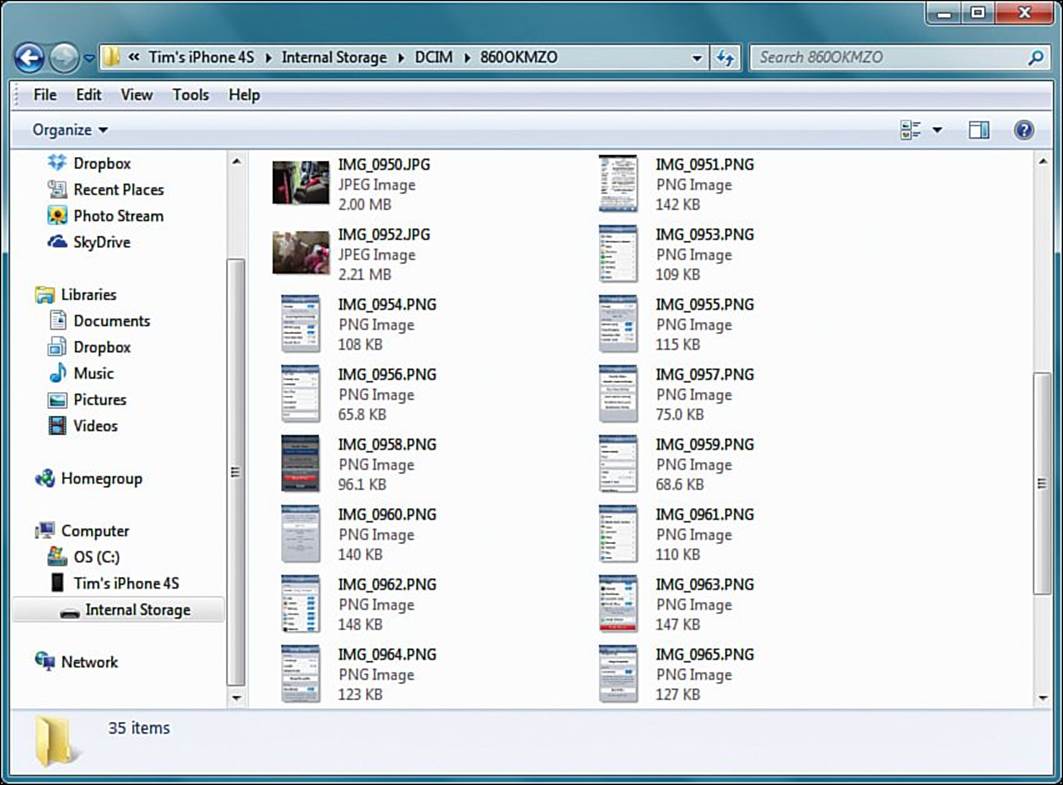
FIGURE 18.3 You can import Camera Roll pictures to your computer without iTunes.
Note: What’s That Again?
This bears repeating: the “Camera Roll” refers to pictures taken with the device itself. The Camera Roll does not include photo albums that you manage from iPhoto or a Windows photo management tool and synchronize with your iDevice.
Again, third-party utilities are your best friend for pulling part or all your iDevice photo data. Here are three popular examples of this type of software:
![]() CopyTrans Photo (Windows only; http://is.gd/OwpzKf)
CopyTrans Photo (Windows only; http://is.gd/OwpzKf)
![]() SyncPod (Mac only; http://is.gd/1uB6II)
SyncPod (Mac only; http://is.gd/1uB6II)
![]() iExplorer (Mac and Windows; http://is.gd/Rzm0mS)
iExplorer (Mac and Windows; http://is.gd/Rzm0mS)
The Rest of Your Stuff
Could I be a little more vague? “The rest of your stuff?” Really? Allow me to be more specific. What if you need to retrieve the following elements from your iDevice:
![]() Contacts
Contacts
![]() Calendar items
Calendar items
![]() SMS and iMessage messages
SMS and iMessage messages
![]() Voice recordings
Voice recordings
![]() Videos
Videos
![]() Voicemail recordings
Voicemail recordings
![]() Notes
Notes
![]() Call history
Call history
![]() Location data
Location data
The best way to do this is to take a backup of the iDevice and (yes, again) use a good third-party utility to extract meaningful content from the iTunes backup. Remember that iTunes backups are ridiculously obfuscated; they are nearly impossible to interpret without the assistance of a separate tool.
Here’s the procedure:
1. Connect the target iDevice to a host computer via the USB cable.
2. If the iDevice is passcode-locked, you see the message shown in the Figure 18.4. If you don’t have the passcode then you can stop right here—you’re hosed. I discuss passcodes more in just a little while.
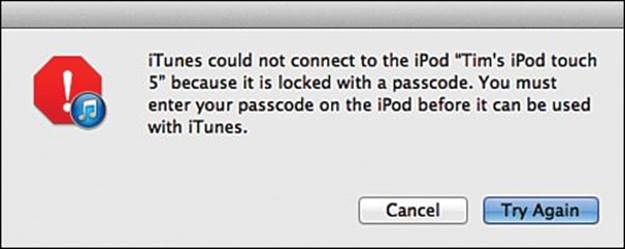
FIGURE 18.4 You need to know the iDevice passcode to connect the device to iTunes.
3. Take a manual backup of the device. Refer to Chapter 3, “Protecting Your iDevice User Data and Settings,” for a reminder of how to do that.
4. Start a third-party iDevice backup extractor program. Here are some suggestions:
![]() iPhone Backup Extractor (Mac and Windows; http://is.gd/XXKljk)
iPhone Backup Extractor (Mac and Windows; http://is.gd/XXKljk)
![]() Wondershare Data Recovery for iTunes (Mac only; http://is.gd/Pwub5f)
Wondershare Data Recovery for iTunes (Mac only; http://is.gd/Pwub5f)
![]() Wondershare Dr. Fone (Windows only; http://is.gd/wOtVsN)
Wondershare Dr. Fone (Windows only; http://is.gd/wOtVsN)
I have had excellent luck with iPhone Backup Extractor. The program works equally well in Windows and in OS X, and you can drill into iTunes backups from iPhones, iPads, and iPod touches. You can see the user interface and some results of backup extraction in Figures 18.5 and 18.6.
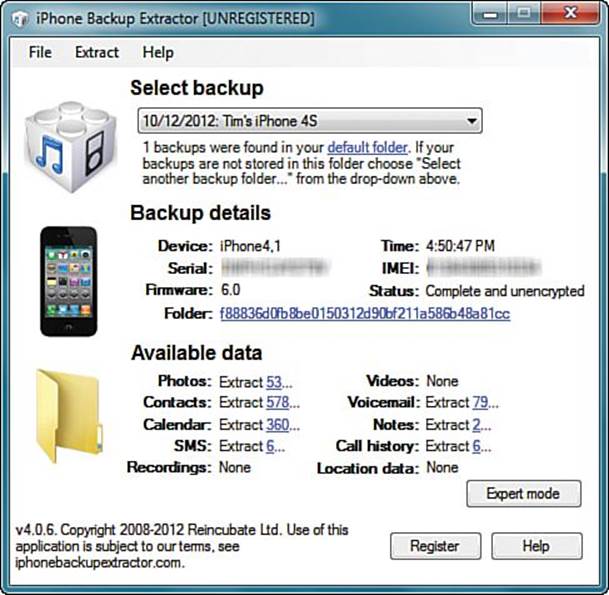
FIGURE 18.5 The iPhone Backup Extractor tool makes short work of digging into iDevice backups.
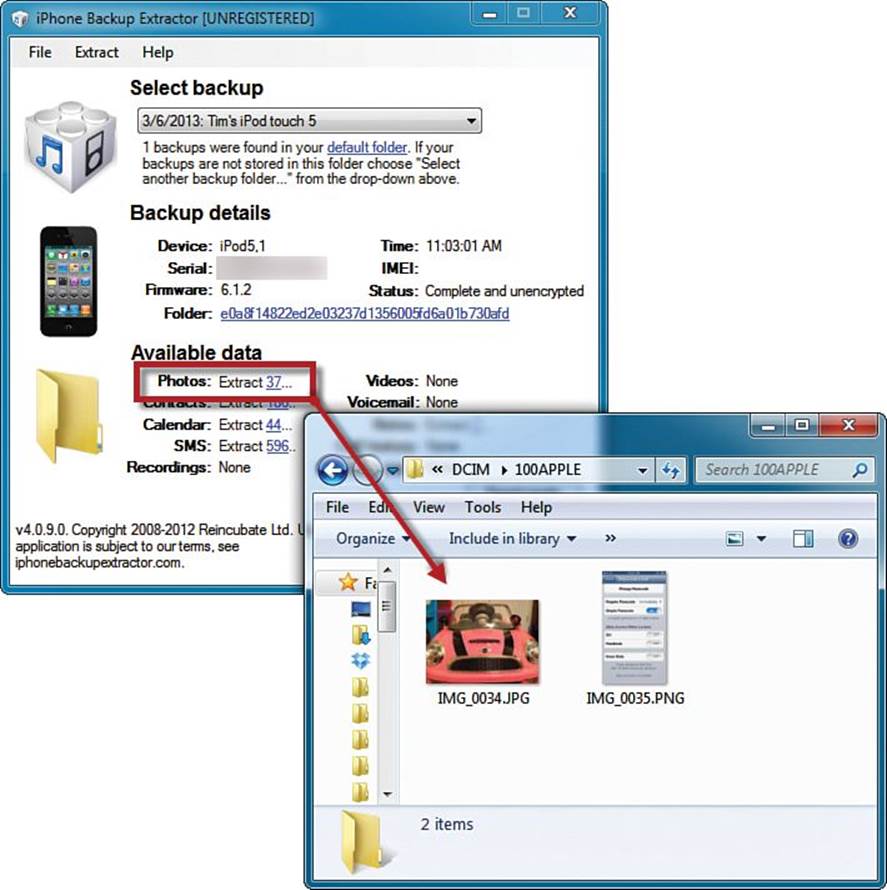
FIGURE 18.6 The iTunes backup contents in human-readable form.
Passcode Security
I’ll tell you, friends—the best way for you to protect your iDevice against theft and data loss is to use a passcode (see Figure 18.7). Let me repeat:
Please set a passcode lock on your iDevice so that unauthorized parties cannot view your personal data.
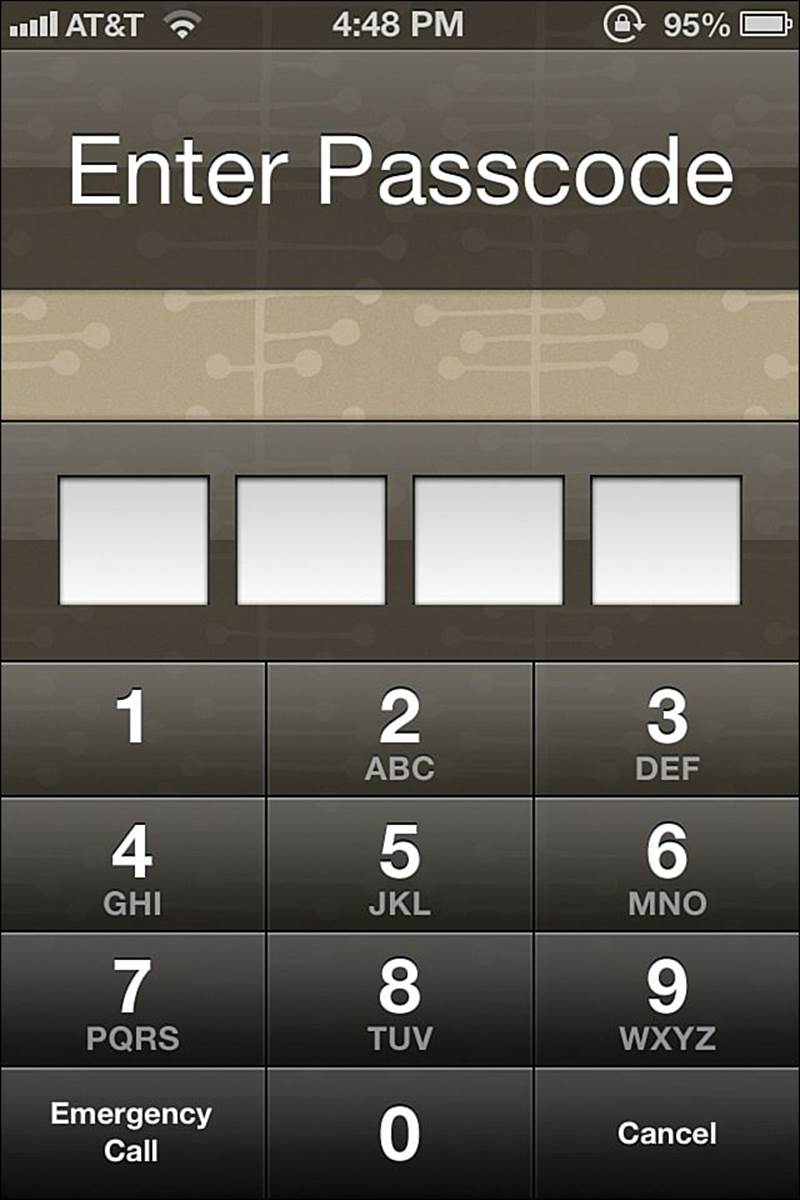
FIGURE 18.7 The passcode prompt on an iDevice.
Not only does a passcode lock protect your iDevice against unauthorized local access, but as described earlier in the chapter, you cannot connect an iDevice to iTunes and perform a data dump without knowing the passcode.
Yes, there exist third-party solutions that can (and do) make short work of decrypting the passcode lock. One notable example is XRY from Micro Systemation (http://is.gd/XCim6v). This is extremely powerful mobile device forensic software that is thankfully available for purchase only by law enforcement, the military, or intelligence agencies.
When you think of it cryptographically, a four-digit passcode gives an attacker a 1 in 10,000 (0000 to 9999) chance of guessing the code. Please consider adding an additional layer of security to your iDevice by using a complex passcode. Here’s the procedure:
1. On your iDevice, navigate to Settings, General, Passcode Lock.
2. Switch the Simple Passcode option to Off.
3. Set a more complex passcode. You can use alphanumeric characters and make the passcode as long as you want.
From now on, you can use the traditional soft keyboard when you are challenged to enter your passcode. This interface is shown in Figure 18.8.
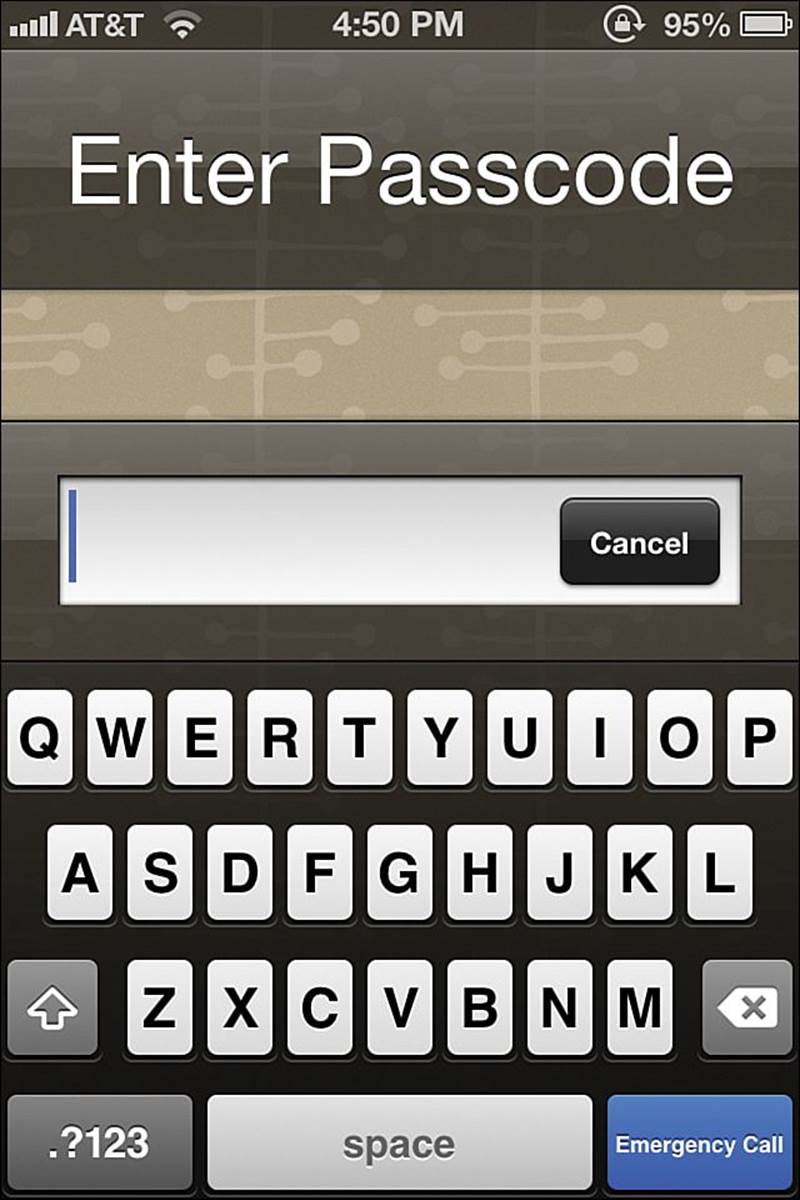
FIGURE 18.8 You can further protect your iDevice by using a complex passcode.
It makes sense to ask your customer to disable the passcode lock prior to handing the iDevice to you for service. But what if the screen is cracked and you cannot enter a passcode at all?
In this case, you can boot the iDevice into Device Firmware Update (DFU) mode and restore the iOS firmware from an iPhone Software File (IPSW) archive.
DFU mode and IPSWs are common terms for iOS jailbreakers. However, you can also employ this special recovery mode to manually restore an iDevice to the current or potentially earlier firmware version.
Here’s the procedure:
1. Download the IPSW file for your target iOS version. Here are some reliable sources for obtaining the files:
![]() iClarified.com (http://is.gd/h9iyWN)
iClarified.com (http://is.gd/h9iyWN)
![]() OSXDaily.com (http://is.gd/smSKSM)
OSXDaily.com (http://is.gd/smSKSM)
![]() IPSWDownloader (http://is.gd/Tl9Uzq)
IPSWDownloader (http://is.gd/Tl9Uzq)
Note: Worth the Cost
If you join the Apple iOS Developer Program ($99 per year; http://is.gd/7uLP2G) you’re allowed to download any IPSW file directly from Apple’s servers.
2. Plug your iDevice into your host computer and start up iTunes. Make sure your iDevice is powered off.
3. Hold down the Sleep/Power button and the Home button for 10 seconds and then release the Sleep/Power button while continuing to hold the Home button. After a few seconds the iDevice screen goes black and you see the iTunes interface messages shown in Figure 18.9.

FIGURE 18.9 iTunes notification that you are in DFU mode.
By booting the iDevice into DFU mode, you bypass the installed iOS. In effect, this is like booting a PC by using a startup DVD instead of the local hard drive.
Note: DFU = Recovery Mode
iTunes software refers to DFU mode as “recovery mode.” Be aware that these two terms are synonymous.
4. In iTunes, hold down the Option (OS X) or Ctrl (Windows) keys and then click Restore. Instead of instructing iTunes to download and apply the latest firmware for your iDevice, you are instead given the opportunity to browse for an IPSW file.
5. Locate and select your target IPSW file. iTunes takes over, restoring the given firmware version.
Note: Save Those SHSH Blobs
You can only restore iOS firmware images for which you have SHSH blobs available on your iDevice. To be proactive, you might want to use Tiny Umbrella (http://thefirmwareumbrella.blogspot.com/) to save your target iDevice’s blobs regularly so that you can potentially downgrade your iOS version if necessary.
6. If you run into a problem, you can take the iDevice out of DFU mode and perform a normal boot by holding the Sleep/Power and Home buttons at the same time until you see the Apple logo. Let go of both buttons simultaneously.
7. After you have the firmware reinstalled, the passcode should be cleared. You can then restore user content by using an iTunes or an iCloud backup.
Encrypted Backups, Anyone?
iTunes allows an iDevice user to encrypt his or her local backups. All you have to do is check the Encrypt local backup option in on your iDevice Summary page in iTunes 11.
After you enable encrypted backups, you are prompted to protect each backup with a password. You need this password in order to restore an iTunes backup in the future.
Caution: Don’t Forget Your Password!
If you lose or forget your password, it is impossible to use the encrypted iTunes backups.
iPhone Backup Extractor can pull data from encrypted iTunes backups, but again, you need to know the password. By way of review, recall that iTunes stores backup archives in the following locations by default:
![]() OS X: ~/Library/Application Support/MobileSync/Backup/
OS X: ~/Library/Application Support/MobileSync/Backup/
![]() Windows 7/Windows 8: \Users\username\AppData\Roaming\Apple Computer\MobileSync\Backup\
Windows 7/Windows 8: \Users\username\AppData\Roaming\Apple Computer\MobileSync\Backup\
In case you were wondering, iCloud backups are encrypted both in transit and on Apple’s servers, with email and notes data as exceptions. For more information, see the following online resources:
![]() Apple Support article: “iCloud security and privacy overview” (http://is.gd/8KKV03)
Apple Support article: “iCloud security and privacy overview” (http://is.gd/8KKV03)
![]() Blog post: “Ask Ars: how safe is my data stored in iCloud?” (http://is.gd/4mjkGi)
Blog post: “Ask Ars: how safe is my data stored in iCloud?” (http://is.gd/4mjkGi)