Digital Sharing for Apple Users: A Take Control Crash Course (2014)
Sync Photos and Videos across Devices
When you take (or import) photos with one of your Apple devices, you probably want them to appear on all your other Apple devices too. The easiest method is to sync them by way of the cloud. iCloud offers two ways to do this—My Photo Stream and iCloud Photo Library (the latter works for videos too). Dropbox offers several additional alternatives.
The techniques in this chapter don’t sync your Mac’s entire iPhoto or Aperture library across devices (for that, read Sync Photo Libraries across Devices), but they make it simple to sync new photos as you go.
iCloud Photo Options
My Photo Stream (which has been around since iCloud appeared) and iCloud Photo Library both sync photos across your devices via the cloud, but they differ in almost every other detail.
My Photo Stream
· Doesn’t count against your iCloud storage quota
· Supports photos only
· Stores only your 1,000 most recent photos on each device
· Stores photos online for 30 days
· Works only over Wi-Fi connections
iCloud Photo Library
· Counts against iCloud storage quota
· Supports photos and videos
· Can store as many photos as you like, for as long as you keep paying
· Works over Wi-Fi or cellular
· Replaces Camera Roll on iOS
· Disables syncing photos with iPhoto or Aperture via iTunes
· Gives you a single library across your iOS devices and the iCloud Web site (and, starting in early 2015, on Macs)
· Uploads original, full-resolution photos but optionally stores smaller, optimized copies on each device
Other iOS Photo Sync Options
Syncing via the cloud is easiest, but you can also move photos to or from an iOS device in these ways:
· iPhoto/Aperture import: To copy files from your iOS device to your Mac, connect your iOS device with a USB cable, open iPhoto or Aperture, and follow the prompts to import new photos and videos.
· iTunes sync: To copy from your Mac to your iOS device, open iTunes and select your iOS device. (It must either be connected with a USB cable or have Wi-Fi syncing enabled.) Then click Photos and choose what you want to copy. This option disappears if you enable iCloud Photo Library.
Warning! If you take photos with your iOS device of, shall we say, an intimate nature and want to reduce the risk that they’ll escape onto the Internet, do not enable any of the syncing features discussed in this chapter!
Set Up iCloud to Sync Photos
You can use My Photo Stream, iCloud Photo Library, or both. But until the Photos app is released for Mac (in early 2015), only iOS can use iCloud Photo Library.
· iOS: Open Settings > iCloud > Photos ①, turn on iCloud Photo Library, Upload to My Photo Stream, or both.
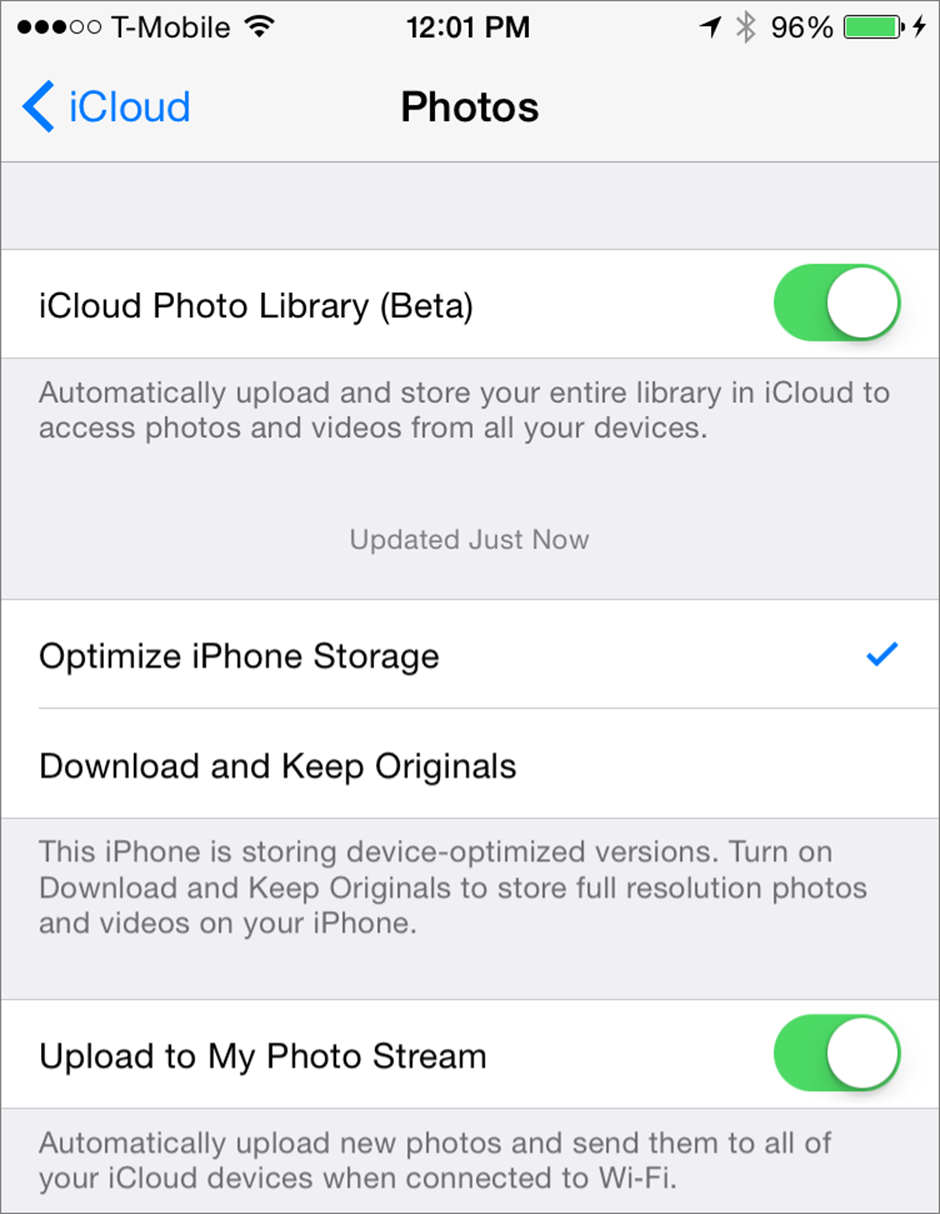
① Turn on iCloud photo syncing options here.
· Mac: Go to System Preferences > iCloud and select Photos. Then click Options and make sure My Photo Stream is selected.
· Apple TV: Go to Settings > iCloud and sign in. Select iCloud Photo Settings followed by Turn On My Photo Stream.
Note: iCloud users get 5 GB of free storage, which is shared among all iCloud features. Additional storage is available for a small fee.
Use iCloud to Sync Photos
With either My Photo Stream or iCloud Photo Library enabled, you don’t have to do anything special after taking photos on an iOS device—they sync to iCloud automatically (assuming, in the case of My Photo Stream, that you’re using Wi-Fi), and from there, to your other devices.
Similarly, if you import photos (say, from your digital camera’s SD card) into iPhoto or Aperture on your Mac, they begin syncing to iCloud immediately.
Sync iOS Screenshots to Mac
Capture an iOS screen by pressing Home and Power at the same time. The image gets saved as a PNG file to Albums > All Photos (or Camera Roll).
Screenshots sync to your Mac via My Photo Stream or iCloud Photo Library. But if you don’t want to open iPhoto or Aperture, use Dropbox instead.
First, in the Dropbox iOS app, go to Settings > Camera Upload. Turn on Camera Upload and Background Uploading. Then do one of the following:
· Open the Dropbox app on your iOS device and photos sync immediately.
· On an iPhone, the Carousel by Dropbox app can upload photos in the background, without being open.
· Plug your iOS device into your Mac with a USB cable. If Camera Upload is enabled in Dropbox on your Mac, the screenshots upload immediately.
The screenshots appear in the Camera Uploads folder in your Dropbox folder.
View Synced Photos
· iOS: Go to Photos > Albums > All Photos (or Camera Roll, if iCloud Photo Library is disabled).
· Mac: In iPhoto or Aperture, select iCloud in the sidebar under Shared then double-click My Photo Stream. Or, at iCloud.com, click Photos.
· Apple TV: Go to iCloud Photos > My Photo Stream.
Dropbox Photo Options
If you use Dropbox, you have a couple of additional ways to sync photos across devices. You can do this instead of using iCloud, or in addition (if you want the security of extra copies).
· Regular syncing: Any photos or videos you manually put in your Dropbox folder (or a subfolder) sync to the cloud, and from there, to your other devices with Dropbox.
· Camera Upload: In the Dropbox Preferences window, click Import ② and select Enable Camera Uploads For; choose Photos only or Photos and Videos, as you prefer, from the pop-up menu.
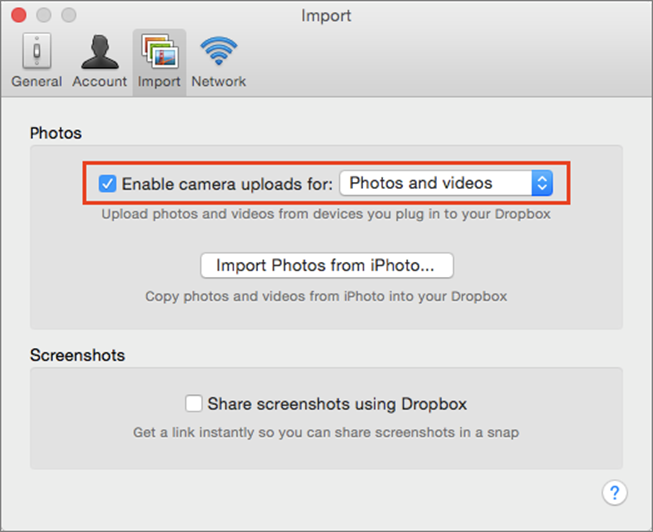
② Enable camera uploads in Dropbox with this checkbox.
Then, whenever you connect a camera or iOS device to your Mac, Dropbox prompts you to activate Camera Upload for that device. Having done so, every time you plug in that device, all your recent photos and videos are copied immediately to the Camera Uploads folder inside your Dropbox folder.
Note: Many other cloud services also support syncing photos. I’m focusing solely on Dropbox in this chapter because it’s the most popular.
Dropbox for Mac Screenshots
On a Mac, you can press Command-Shift-3 to capture your entire screen, or Command-Shift-4 to capture a selected region. Screenshots are saved to the Desktop.
But you may not want them cluttering up your Desktop or mingling with your vacation photos. Dropbox lets you segregate and sync them automatically.
In Dropbox Preferences, click Import and select Share Screenshots Using Dropbox. Now, whenever you take a screenshot with Command-Shift-3 or Command-Shift-4, Dropbox moves it to a Screenshots folder in your Dropbox folder.
Share this tip and chapter on ![]()
![]()
![]()
![]()
![]()
“iCloud Photo Library and My Photo Stream are quite different—here’s how. (You’ll also find setup and usage steps.)”
Discuss “Sync Photos and Videos across Devices” via ![]()