Digital Sharing for Apple Users: A Take Control Crash Course (2014)
Broadcast and Share Photo Albums
A photo album is a hand-selected set of photos (and/or videos), typically covering a specific event or theme. Although you might send a friend a few photos by email, Messages, or some other means (refer back to Send Photos and Videos to Others), such methods aren’t suited to entire albums. Fortunately, several easy methods exist for broadcasting albums so others can see them (but not change them) and for sharing albums (also called “streams” in iCloud) so that others can add their own photos. I cover a few of the simplest options in this chapter.
iCloud Photo Sharing
With iCloud Photo Sharing, you can set up one or more shared photo albums (or “streams”) that contain a subset of your photos or videos (up to 5 minutes long). You can then invite others to subscribe to those albums, which will be available on any of their devices, or optionally on the Web. A shared album can hold up to 5,000 photos or videos.
Share a Photo Album from a Mac
Select one or more photos or videos in your iPhoto or Aperture library. Choose Share > iCloud and click an icon—an existing shared photo stream or New Photo Stream. Then:
· If you clicked an existing shared photo stream, type an optional comment, and click Publish.
· If you clicked New Photo Stream, enter the name(s) or address(es) of the contact(s) with whom you want to share it, enter a name for the photo stream and an optional comment, and then click Share.
iCloud notifies the recipient(s) by email of the newly available shared photo album. Once a recipient joins a shared album, it appears on all devices that are signed in with that user’s iCloud ID.
Letting Subscribers Post
By default, subscribers to shared albums can post their own photos, which you and other subscribers can then see. You can disable this for any shared album.
In Photos for iOS, tap Shared > Album Name > People and turn Subscribers Can Post off.
On a Mac in iPhoto or Aperture, deselect the Subscribers Can Post checkbox when creating a new shared album, before clicking Share.
Tip: I discuss iCloud’s photo sharing features in much more detail in Take Control of iCloud.
Who Can View a Shared Album?
Only iCloud members can join shared photo albums; if you want recipients who are not iCloud members to view the photos, you must use the Public Website option, which creates a public Web page that anyone with the URL can view.
To set this up in Photos for iOS, tap Shared > Album Name > People and turn Public Website on.
On a Mac in iPhoto or Aperture, select the Public Website checkbox when creating a new shared album, before clicking Share.
Note: If you want to share photos with other members of your immediate family, you may find the Family shared stream to be adequate. See Use iCloud Family Sharing.
Share a Photo Album from iOS
1. Open Photos and navigate to the photos or videos you want to use.
2. Tap Select, select the item(s) you want to share, and tap the Share ![]() icon.
icon.
3. Tap iCloud Photo Sharing. Then:
§ If you haven’t created any shared streams yet, enter the name for a new stream and tap Next.
§ If you’ve already set up shared photo streams, iCloud defaults to the most recently used stream; to add the photo(s) to this stream, enter an optional comment and tap Post. To add the photo(s) to a different stream, tap Shared Album and either select an existing album from the list or tap New Shared Album, enter a name for the new stream, and tap Next.
4. Enter the name(s) or address(es) of the contact(s) with whom you want to share and tap Next.
5. Enter an optional comment (up to 200 characters) ①, and tap Post.
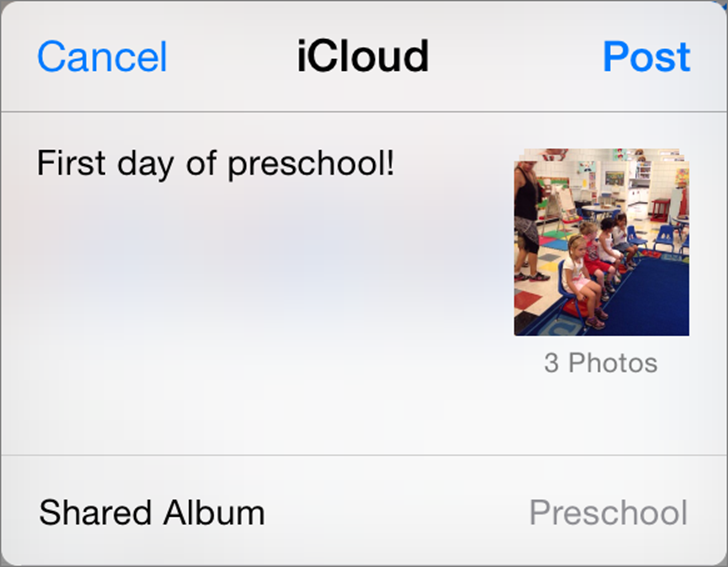
① About to post a shared album from iOS.
Photo Albums on Apple TV
To configure an Apple TV to work with iCloud Photos, go to Settings > iCloud. If your Apple ID isn’t already listed, select Sign In and enter your credentials.
Next, on the same screen, select iCloud Photo Settings. There you can select:
· Turn On (or Off) My Photo Stream: Turn this on to give your Apple TV access to My Photo Stream. You’ll be asked if you want to use iCloud Photos as your screen saver; select Yes or No, as you wish. (If you change your mind later, go to Settings > Screen Saver > Photos and select either iCloud Photos or something else.)
· Turn On (or Off) Photo Sharing: Turn this on to give your Apple TV access to additional photo albums you’ve shared with others, or others have shared with you.
After setting up iCloud Photos on the Settings screen, you can select iCloud Photos on the home screen followed by My Photo Stream, Activity (for recent changes to shared albums, including photos or comments added by other people), or any shared photo album.
While viewing photos in Activity or a photo album someone else has shared with you, you can navigate to a photo, press the center button on the Apple Remote to display it full-screen, and then press the Down arrow to view comments and likes. (In this view, press the center button to like or unlike a photo.)
Flickr
Of the many fine third-party services that let you share photo albums online, only one—Flickr—is built into iPhoto or Aperture. Here’s how to use it.
Select one or more photos or videos in your iPhoto or Aperture library. Choose Share > Flickr. Then:
· To add the photo(s) to an existing set, click that set.
· To create a new Flickr set with the selected items, click New Set. Give the set a name, choose who can view it from the Photos Viewable By pop-up menu, and choose a size from the Photo Size pop-up menu. Then click Publish.
Dropbox Photo Sharing
Dropbox can automatically import your photos, making it easy to share albums with others, even if they aren’t Mac users. Log in at dropbox.com and click the Photos link ② in the upper-left corner. Dropbox displays the contents of your Camera Uploads folder, organized by month.
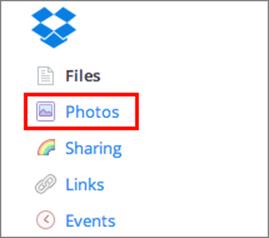
② Click this link in the upper left corner of the Dropbox window to share photos.
Share Items without Making an Album
Select the items and click Share Number Photos (or Videos or Items). In the dialog ③ that opens:
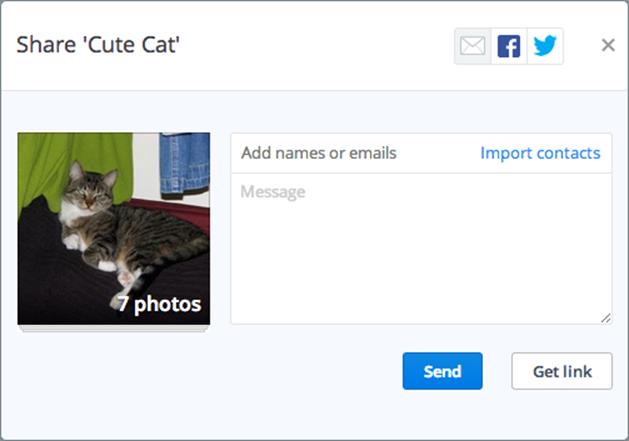
③ In this dialog, you can share photo albums via email (shown here), Facebook, or Twitter.
· Copy the URL to your Clipboard: Click Get Link.
· Email a link: Type the email address(es) of the people you want to invite, enter an optional message, and click Send.
· Share on Facebook: Click the Facebook icon, type a message, and click Share on Facebook.
· Share on Twitter: Click the Twitter icon, optionally edit the pre-filled tweet, and click Tweet.
Create or Add Items to an Album
Select one or more photos or videos, then click the “…” button at the top ④ and, from the pop-up menu, choose Add Number to Album. Click an existing album or click Create New Album, type a name, and press Return.
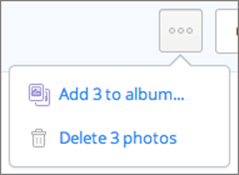
④ This unobtrusive pop-up menu lets you add photos to an album.
Share an Album
Select an album in the list on the left. Make sure no items are selected within it, and then click Share Album and follow the steps for “Share items without making an album,” above.
Share this tip and chapter on ![]()
![]()
![]()
![]()
![]()
“If you share an album with iCloud Photo Sharing, you can set it so other iCloud users can add their own photos to it.”
Discuss “Broadcast and Share Photo Albums” via ![]()
All materials on the site are licensed Creative Commons Attribution-Sharealike 3.0 Unported CC BY-SA 3.0 & GNU Free Documentation License (GFDL)
If you are the copyright holder of any material contained on our site and intend to remove it, please contact our site administrator for approval.
© 2016-2026 All site design rights belong to S.Y.A.