Swift For Dummies (2015)
Part IV. Using Components and Subcomponents
In this part . . .
· Extend framework classes.
· Control access to your classes.
· Create Swift classes.
· Connect properties, variables, outlets, and actions.
· Enumerate values.
· Work with protocols.
· Put Objective-C and Swift together.
Chapter 13. Expanding Objects with Extensions
In This Chapter
![]() Looking into a Swift extension
Looking into a Swift extension
![]() Extending a built-in type with a Swift extension
Extending a built-in type with a Swift extension
![]() Using a complex extension
Using a complex extension
In many object-oriented languages, adding subclasses (or subclassing) is the most common way of expanding or reusing a class. Over the years, however, additional techniques to expand classes have become common as more and more people use object-oriented programming techniques.
When it comes to reusing code and expanding classes, subclassing is now seen as a pretty blunt instrument. With subclassing, a common approach is to start from a basic class (sometimes called a root or base class), and to subclass it to add new functionality or customize existing functionality. The root class is often an abstract class that is not designed to be implemented. In an oft-used example, the root class might be building, and its first-level subclasses might be residential building and commercial building. You could then subclass residential building tosingle-family and multi-family. On and on you go, subclassing and subclassing until you have the specific class you need — perhaps a multi-family residential building consisting of condominiums (as opposed to co-ops or rental units), and with residency restrictions limiting it to a certain income range and age range.
Swift (like Objective-C and some other modern object-oriented languages) allows you to add methods and properties to classes without necessarily subclassing them. This chapter provides an overview of these Swift extensions (sometimes called class extensions).
 Swift extensions are similar in many ways to Objective-C categories. Objective-C class extensions add methods as well as properties and instance variables to classes at compile time; you need access to the source code for the class. Objective-C categories add methods to classes, but you don’t need access to the source code (you also don't need access to the source code to use Swift extensions). Just to make things perhaps a little murkier, Objective-C class extensions are sometimes referred to as anonymous categories: The two concepts are distinctly different but related in that they both can add methods (and in the case of class extensions properties and instance variables) to classes.
Working with a Swift Extension
If you’ve used Objective-C in the past, you may have heard or read about extensions. Yes, they can extend classes without the subclassing architecture, but they’re a little confusing to many people. It’s not unreasonable that the topic of Objective-C extensions is often discussed in the “Advanced” section of documentation and training materials.
You can create a new project from the Xcode template for an iOS Game; it contains an extension that you can use to investigate Swift extensions. Here's how to do that:
1. Create a new project.
2. Use the iOS Game template.
3. In the Options sheet, give it a name (like testSpriteKitGame).
4. Fill in the organization name and identifier as you have done in Chapter 9 and as you see in Figure 13-1.
5. Set the language to Swift and devices to Universal.
6. For Game Technology, choose SpriteKit. This is the only setting that's different for a game template project than from other templates.

Figure 13-1: Create a new project based on the Game template and using SpriteKit.
Now, take a look at the top of GameViewController.swift shown in Listing 13-1. At the top of the file, you’ll find an extension on SKNode.
Listing 13-1: Swift Extension
import UIKit
import SpriteKit
extension SKNode {
class func unarchiveFromFile (file : NSString) ->
SKNode? {
if let path =
NSBundle.mainBundle().pathForResource(file,
ofType: "sks") {
var sceneData = NSData(
contentsOfFile: path,
options: .DataReadingMappedIfSafe,
error: nil)!
var archiver = NSKeyedUnarchiver(
forReadingWithData: sceneData)
archiver.setClass(self.classForKeyedUnarchiver
(), forClassName: "SKScene")
let scene = archiver.decodeObjectForKey
(NSKeyedArchiveRootObjectKey) as GameScene
archiver.finishDecoding()
return scene
} else {
return nil
}
}
}
The purpose of the extension in Listing 13-1 is to add a new method to a class (GameViewController). In order to do that, the extension is actually added to SKNode, which is part of SpriteKit. Figure 13-2 shows the documentation for SKNode. You can find it in Quick Help by typing in the name.

Figure 13-2: Reviewing the SKNode documentation.
This is a good example of the use of an extension because the new method (unarchiveFromFile) is added to:
· SKNode: A class of SpriteKit to which you don't have the source code. After it’s added, it is also available to descendants of SKNode such as . . .
· SKScene: A subclass of SKNode for which you also don't have the source code. After it’s added, it is also available to descendants of SKScene such as . . .
· GameScene: A descendant of SpriteKit, which is a part of the template.
Thus, by adding an extension to SKNode, you can use it as shown in the boldface type in Listing 13-2.
Listing 13-2: Using an Extension in a Local Class
class GameViewController: UIViewController {
override func viewDidLoad() {
super.viewDidLoad()
if let scene = GameScene.unarchiveFromFile
("GameScene") as? GameScene {
// Configure the view.
let skView = self.view as SKView
skView.showsFPS = true
skView.showsNodeCount = true
/* Sprite Kit applies additional optimizations
to improve rendering performance */
skView.ignoresSiblingOrder = true
/* Set the scale mode to scale to fit the window */
scene.scaleMode = .AspectFill
skView.presentScene(scene)
}
}
This section shows you what you’ll end up with. How do you decide where to place the extension? You can work backwards from the code you want to write. Here’s how you might do that:
1. Write the code in Listing 13-2 (or a similar function).
2. Use a yet-unwritten function where you need it.
In Listing 13-2, this is GameScene.unarchiveFromFile. You’ll get a compile error because it doesn't exist. Don’t worry, keep going.
3. Highlight GameScene and look at it in Quick Help.
You see its inheritance chain. Alternatively, you can search on it in your project. In either case, you’ll find that it is a class defined in the template; its superclass is SKScene.
4. Click on the superclass (SKScene) to see it in Quick Help.
You see its description and inheritance chain.
5. Repeat Step 4 to move up the inheritance chain.
Alternatively, you can skip a link in the chain and move up two steps. At each step, review the description. You're looking for the place to add your extension.
6. Decide where to place the class extension based on how broadly you want to make it available.
The higher up the inheritance chain you place it, the more instances of subclasses have access to it.
7. Move up to SKNode, as shown in Figure 13-2.
This is where the template has placed the extension.
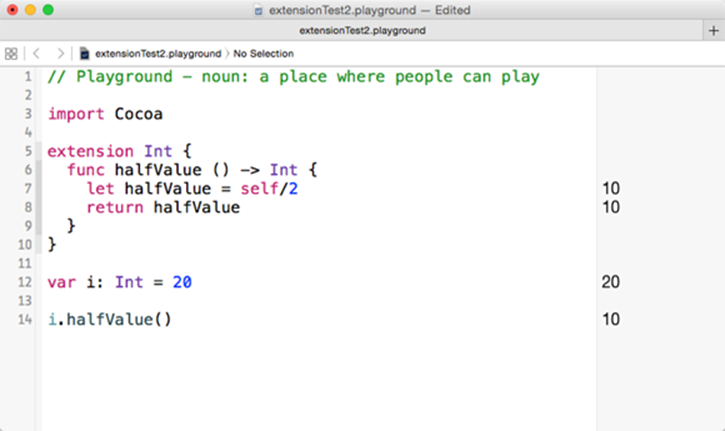
Figure 13-3: Using a playground to test an extension.
 Because it's not difficult to change the class on which you place the extension, you can experiment. Some people like to place the extension on the immediate class where it’s needed or on that class’s superclass. If you need it to be more widely available, just change the code at the top of Listing 13-1 to choose another class for the extension. This is the line of code you would change:
extension SKNode {
Using Swift Extensions with a Built-In Class
Classes, enumerations, and structures in Swift share many features; among them is the fact that any of them can be extended with a Swift extension. Swift extensions can be very lightweight elements, and this section shows you how to build basic Swift extensions onto the Int class. If you’re used to thinking of Objective-C extensions and categories as advanced topics (or even very advanced topics), this section is for you.
You extend a class, enumeration, or structure by creating an extension on it.
The following list offers a series of experiments you can make in a playground to learn about extensions. You start by creating an extension on Int that automatically calculates half of the value of the Int.
1. Create a new playground for Swift.
You can use OS X or iOS for this example.
2. Create and initialize an Int variable called i.
var i: Int = 20
3. Create an extension on the Int class.
By convention, the extension should precede the use of the class. All import statements, extensions, and similar constructs are generally placed at the top of a Swift file, so place this above the line you wrote in Step 2. (Remember, this is a convention, not a requirement.)
extension Int {
}
4. Create a function in the extension.
You can call it halfValue.
func halfValue () -> Int {
}
5. Divide the value of the Int by 2.
Store the result in a variable. Note that self is the value of the Int.
let halfValue = self/2
6. Return halfValue.
return halfValue
7. You can now access the halfValue function you have added with the Int extension.
i.halfValue()
Your example code should look like Listing 13-3.
Listing 13-3: Creating a Simple Extension on Int
extension Int {
func halfValue () -> Int {
let halfValue = self/2
return halfValue
}
}
var i: Int = 20
i.halfValue
Figure 13-3 shows the result in the playground.
Experiment with your playground to see how it behaves as you change the value of i.
This is a very small step, but you can build on it to become more comfortable with extensions. The operation that this extension performs (dividing the value by 2) is very simple and basic. You can make it somewhat more complex by making it operate on another value rather than self. To do that, you modify Steps 4 and 5 in the previous list so that instead of looking like this
func halfValue () -> Int {
let halfValue = self/2
they look like this
func halfValue (intIn: Int) -> Int {
let halfValue = intIn/2
Listing 13-4 shows what the new extension looks like.
Listing 13-4: Modifying the Simple Extension on Int
extension Int {
func halfValue (intIn: Int) -> Int {
let halfValue = self/2
return intIn
}
}
var i: Int = 0
i.halfValue (i)
Figure 13-4 shows the result.
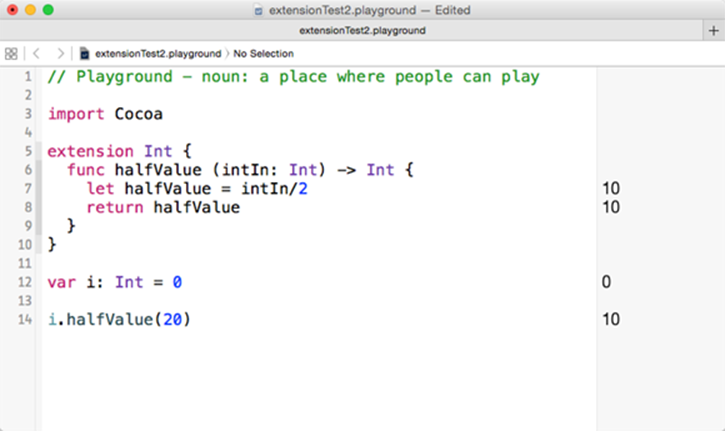
Figure 13-4: Testing a parameter.
You can also test other values, such as
i.halfValue (1234)
Because Swift is strict about typing, you can’t use a Float or Double. As you see in Figure 13-5, you will get an error if you try the following line of code:
i.halfValue (1234.75)
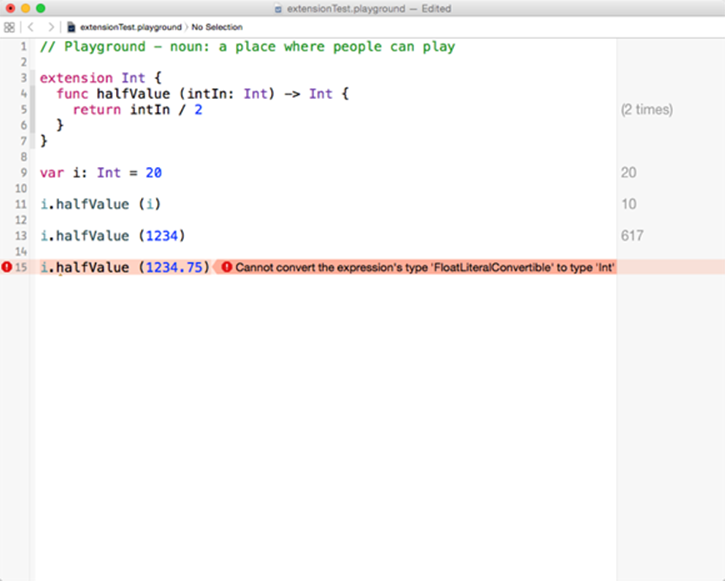
Figure 13-5: Swift doesn’t do type conversions automatically.
The function in the extension expects an Int rather than a Float or Double.
With language constructs such as these lightweight extensions, you may be thinking that you can use Swift structures and enumerations together with extensions in many of the ways that you are used to working with large-scale and heavyweight classes — and you’d be right.