Apple Watch For Dummies (2015)
Part III. It's All in the Wrist
Chapter 10. Pay for Play: Making Mobile Payments With Apple Watch
In This Chapter
![]() Understanding Apple Pay
Understanding Apple Pay
![]() Using Apple Pay on Apple Watch
Using Apple Pay on Apple Watch
![]() Setting up Apple Watch for Apple Pay
Setting up Apple Watch for Apple Pay
![]() Paying with Apple Watch without a nearby iPhone
Paying with Apple Watch without a nearby iPhone
![]() Accessing Passbook on Apple Watch
Accessing Passbook on Apple Watch
![]() Using Apple Watch for deals and rewards
Using Apple Watch for deals and rewards
This chapter looks at how to use Apple Pay on Apple Watch. First, though, a brief primer on what Apple Pay is.
If you own an iPhone 6 or newer, then perhaps you’ve had a chance to try out Apple Pay (www.apple.com/apple-pay) — Apple’s proprietary mobile payment solution that lets you buy goods and services without needing your wallet.
Simply wave your compatible phone over a contactless terminal at a participating retailer — with your finger or thumb on the Touch ID sensor (built into the Home button) — and the transaction is completed. This saves time at retail because you don’t have to dig for the exact change or deal with finding the right credit or debit card in your wallet.
Because of the integrated near field communication (NFC) antenna in the latest iPhones, you don’t need to open an app or even wake up your phone to use it. You don’t even need to look at your phone. As long as your one-of-a-kind fingerprint (or thumbprint) is detected on the Home button — an example of biometrics technology that proves it’s you and only you — you should feel a subtle vibration and hear a small beep to confirm the digital handshake has been made.
If you’re worried about security, Apple Pay doesn’t disclose your financial information to the retailer; a unique numerical token is used instead of actual credit or debit card numbers exchanged with the store.
Apple Pay can also be used to pay for apps in the online App Store, and for this, you can also use the Touch ID sensor built into the Home button of iPad Air 2, iPad mini 3, and newer devices (but you can’t use the tablet to pay at retail). Checking out is as easy as selecting Apple Pay from the list of options and placing your finger or thumb on the Home button.
Before you can use Apple Pay — on any device — you first need to establish your Apple Pay account.
Setting Up Apple Pay
 Setting up your iPhone for Apple Pay involves your Passbook app, which stores such things as boarding passes, movie tickets, store coupons, loyalty cards, and more. It can also store your credit and debit cards too.
To set up Apple Pay on your iPhone, follow these steps:
1. Tap the Passbook app.
This launches the Passbook app.
2. Tap the + sign next to Apple Pay in the upper-right corner.
This lets you add a new card. On a compatible iPad, tap Add Credit or Debit Card. Alternatively, you can also go to Settings, choose Passbook & Apple Pay, and then select Add Credit or Debit Card.
3. If you want to use the same credit or debit card that’s tied to your iTunes/App Store account, enter the card’s security code.
As you likely know, it’s located on the back of your card.
4. To add a new credit or debit card, use your device’s iSight camera (your main rear-facing camera) to capture the information on your credit and debit card or choose to enter it in manually.
You have to fill in additional information it might ask for, such as the security code.
5. Your bank then verifies your information and decides if you can add your card to Apple Pay.
Not all banks are supported, but many are. You may be prompted to provide additional information to verify it’s you — for your own security and privacy.
6. Tap Next after your card is verified.
You can now start using Apple Pay at supported retailers and in the App Store. Keep in mind that the first card you add is your default payment card, but you can go to the Passbook app anytime to pay with a different card (or select a new default in Settings⇒Passbook & Apple Pay). Otherwise, you don’t need to do anything. See the “Looking at the Passbook App” section later in this chapter for more on changing your default card and other options.
 Whenever you use your credit or debit card at a retailer, your card number and identity, including your name, is visible to the retailer. This can cause privacy and security risks. Instead, Apple Pay uses a unique Device Account Number (DAN) for each transaction. This DAN is generated, encrypted (securely block from outsiders), and then stored in the Secure Element — a dedicated chip inside the iPhone, iPad, and Apple Watch. Apple says these numbers are never stored on Apple servers. The DAN and a dynamically generated security code are used to process your payment when purchasing something; therefore, your actual credit or debit card number is never shared by Apple with the retailer.
What happens if you lose your iPhone, iPad, or Apple Watch? Don’t worry about any of them being used to make a purchase because you need your unique finger on the Touch ID sensor (Home button) or a PIN for Apple Watch. If you ever misplace your phone or tablet, use the Find My iPhone feature on the iCloud website www.icloud.com or on another iOS device to quickly put your device in Lost Mode to suspend Apple Pay or you can completely wipe your device clean of any data. Sadly, Apple Watch doesn’t have a Find My Apple Watch feature.
Benefits, loyalties, and privileges
After you’ve attached your favorite credit and debit cards to Apple Pay and you begin shopping with your iPhone or Apple Watch, you’ll notice you still benefit from all the advantages of those cards, such as loyalty rewards (points, cash back, free flights, or whatever), along with any other benefits and security privileges your card company offers.
Using Apple Pay With Your Apple Watch
Because you’re wearing Apple Watch as opposed to holding it, Apple Pay on Apple Watch is even easier and faster to use at retail than an iPhone. Simply wave your Apple Watch over a contactless terminal at a supporting retailer.
Those wearing an Apple Watch can keep their phones tucked away in a purse or pocket — or even left at home if preferred — but the payment process is similar.
To pay for something with your Apple Watch, follow these steps:
1. Step up to a contactless point-of-sale terminal.
Yes, this is the same one used for supported smartphones and NFC-enabled cards, such as Visa’s PayWave, MasterCard’s PayPass, and Amex’s ExpressPay. The person behind you might not be sure what you’re doing. Just smile and proceed to the next step.
2. Double-tap the Side button on Apple Watch.
You’re now ready to make the digital handshake.
3. Hold the face up to the terminal, and within a second or two, a tone and slight vibration confirms your payment information has been successfully sent.
You won’t need to open an Apple Pay app on the watch or anything like that. No wonder Apple calls it “Your wallet. Without a wallet.”
You will, though, have to open the Apple Pay app if you want to switch cards while paying. To do that, follow these steps:
1. Double-tap the Side button to bring up Passbook.
You can also say “Hey, Siri, Passbook” or press the Digital Crown button and find and tap the Passbook app. This is a similar process to paying using Apple Pay, but don’t hold your watch up to the contactless terminal just yet.
2. Swipe up or down with your fingertip or twist the Digital Crown button to browse through your cards.
3. Select the card you want.
4. Hold the Apple Watch face near the NFC reader to pay.
You should feel a slight vibration and hear a small chime to confirm the transaction was successfully completed.
You might start using Apple Pay with your Apple Watch quite a bit. During Apple’s Spring Forward event in early March 2015, Apple CEO Tim Cook proudly confirmed that 2,500 banks as well as roughly 700,000 retail locations (and even some vending machines) now support Apple Pay. Not bad for a technology that only debuted on October 20, 2014 — and just in the United States. (Apple Pay should be available in Canada and the United Kingdom in late 2015.)
 Apple Watch works with any iPhone 5 or newer, but only the iPhone 6 and newer, the latest (2014) iPads and newer, and Apple Watch can use Apple Pay. That said, you can still set up Apple Pay for Apple Watch with an iPhone 5, iPhone 5S, or iPhone 5C because the required Secure Element is in the watch (and not on the older iPhones).
Paying Without a Nearby iPhone
Apple Pay on Apple Watch is secure.
Remember, Apple Pay differs from most other mobile payment solutions because your credit or debit card number is never visible to the retailer — and thus safer to use.
When you add your card information to Apple Watch, that unique and encrypted Device Account Number (DAN) is assigned and stored on a dedicated chip inside the watch (that Secure Element technology, like with the newer iPhones and iPads).
“But wait a sec,” you’re thinking. “Apple Pay on iPhone requires your fingerprint on the Touch ID sensor, so how do I do that on Apple Watch?”
To enable Apple Pay on the watch, you need to create a four-digit passcode using the companion Apple Watch app on your iPhone. This passcode is used to authorize Apple Pay whenever you put the watch on your wrist. Go to My Watch⇒Settings⇒Passcode to enable and create a passcode using the virtual keyboard, as shown in Figure 10-1.
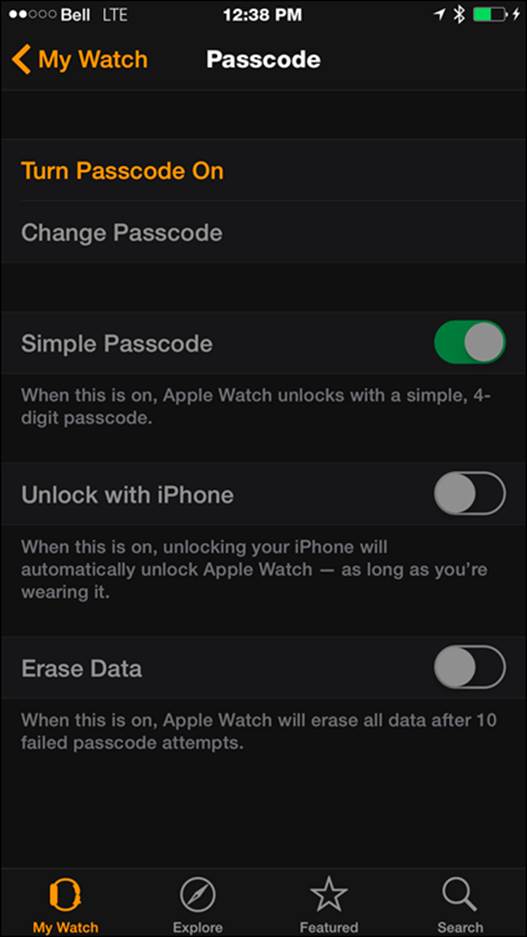
Figure 10-1: Use the virtual keyboard on your iPhone to create your four-digit passcode for your Apple Watch.
And as you might guess, those sensors on the back of the watch aren’t just used for your heartbeat; they know whenever the watch has been taken off. And you must once again type in your secret passcode when you put the Apple Watch back on your wrist.
Clever, eh?
That way, if someone puts on your Apple Watch or tries to use it without slapping it on his or her wrist, your information is safe because the other person won’t know your passcode.
Looking at the Passbook App
Just like the app on your iOS devices — iPhone, iPad, or iPod touch — Passbook is available on Apple Watch, and it also lets you store your airline boarding passes, movie and sports tickets, coupons, loyalty cards, and much more, as shown in Figure 10-2. Think of it as a kind of digital wallet.
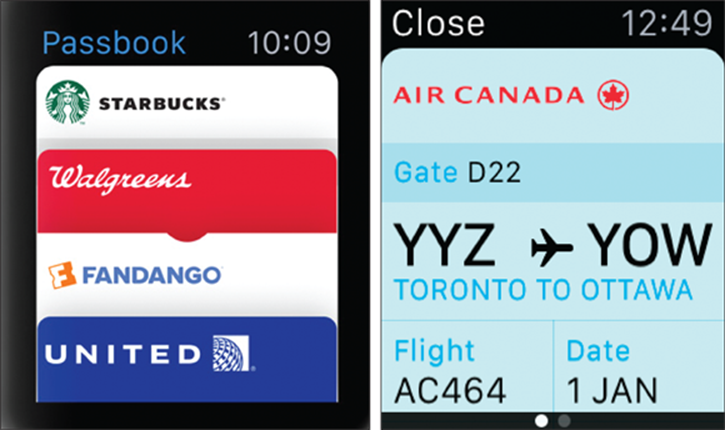
Figure 10-2: Aside from buying something at retail, Passbook stores all your tickets, loyalty cards, event passes, and more.
In other sections in this chapter, I talk about how Passbook also houses your payment cards — credit or debit — for use with Apple Pay and how to change between cards if you like, but here, I cover other things you can do with the Passbook app.
After all, accessing Passbook from your wrist is awesome — like having an airline attendant scan a QR code on your wrist while you’re negotiating an important deal on your iPhone. Plus, location and time services allow Passbook to notify you about relevant information just when you need it, such as gate changes at the airport.
Introduced in iOS 6, Passbook is “a digital representation of information that might otherwise be printed on small pieces of paper or plastic,” Apple says. “They let users take an action in the physical world.”
When you download an app that supports Passbook, you have the option to add it to Passbook. You can flip through these apps — represented by virtual cards — with your fingertip to see each of the services inside Passbook and get them ready for when you need them. Or you can be notified when you step inside of a supported retailer or another location. Of if you need to know other information, such as a cancelled concert.
How to get going?
Passbook is already preinstalled on all iPhones, and if the app you download supports it, Passbook will likely ask you if that particular app can be added to your Passbook. Examples of supported apps include United Airlines, Target, Ticketmaster, Fandango, Walgreens, and Starbucks.
For example, to use the Starbucks app, follow these steps on your iPhone:
1. Download the Starbucks app from the App Store.
2. Sign up for the Starbucks Rewards loyalty program or sign in if you’re already a member.
You’re prompted with this message: “Would you like to add your Starbucks card to your Passbook?”
3. Tap Continue to add Starbucks to Passbook, as shown in Figure 10-3.
This message appears: “Choose your favorite stores, and your Starbucks card will appear on your lock screen when you arrive.”
Let the phone’s GPS locate the nearest Starbucks and then you can select a few as favorites. When you’re done, you should see the Starbucks card pop up in your Passport — with a scannable QR code and cash balance of your account. You can now open up the Passbook app — or hold out your Apple Watch — to have the screen scanned by a barista at the cash register.
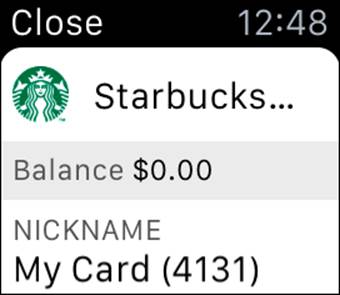
Figure 10-3: Arguably, Starbucks is one of the more popular Passbook-supported loyalty cards. This is what the Starbucks app looks like on your Apple Watch.
Using Apple Watch for Other Deals and Rewards
Apple Watch isn’t just used to make purchases and offer support for loyalty cards; it can also be used in other ways to serve up a richer shopping experience.
Folding in other technologies, Apple Watch can also be used to customize the store experience to suit individual preferences. For example, stores equipped with Apple’s iBeacon location-based technology (developer.apple.com/ibeacon) could identify you from your Apple Watch (and/or nearby iPhone) and welcome you, reward you with points for stepping into a store, notify you about deals, and give personalized suggestions based on previous interests.
Of course, these are things you have to opt into. That is, you must give the store permission first in its downloadable app.
Imagine stepping into a retailer and seeing what you need to know on the Apple Watch screen. It’s still early days, but the technology is there.
Just ask Cyriac Roeding, the celebrated entrepreneur, investor, and cofounder/CEO of shopkick, an app that helps you find deals and earn rewards.
“While it’s still a little early, smartwatches like Apple Watch are a next, natural step in the evolution of the shopping experience,” believes Roeding, whose shopkick app is the most widely used shopping app at retail stores in the United States, according to Nielsen, with approximately 10 million users (as of May 2015).
Roeding says shopkick’s Apple Watch app will offer much of the same experience as the smartphone app “but without you having to take out your phone.” When you walk into one of the 10,000 stores with shopkick’s shopBeacon transmitters — built upon Apple’s location-based iBeacon technology — you’ll be welcomed by name, rewarded with redeemable kicks (points) for walking in the door, and notified of curated deals based on your previous shopping habits. See Figure 10-4 for an example of shopkick’s technology (courtesy of shopkick).

Figure 10-4: A look at shopkick’s shopBeacon transmitter on the wall of a retailer.
“Just like with smartphones, our goal for Apple Watch will be to turn a store you walk into [into] your store. We’ll show you what you need on the watch screen — call it ‘mini shopkick’ — but if there’s more info you’ll need you’ll be directed to open the app on your iPhone,” says Roeding.
shopBeacon’s location technology, which uses ultrasound and Bluetooth low energy (BLE), does not collect any information about you, assures Roeding, because it only sends out information instead of collecting data.