Apple Watch For Dummies (2015)
Part II. Just the Tasks, Ma’am
Chapter 6. In the Know: Staying Informed With Apple Watch
In This Chapter
![]() Accessing weather and stock information
Accessing weather and stock information
![]() Adding information as complications
Adding information as complications
![]() Using Glances for quick takes on what matters
Using Glances for quick takes on what matters
![]() Seeing Notifications on Apple Watch
Seeing Notifications on Apple Watch
![]() Mastering the Calendar for your wrist
Mastering the Calendar for your wrist
![]() Navigating the Maps app
Navigating the Maps app
When people ask me “Why do I need a smartwatch?” I usually answer with something like “convenience.” A wearable device on your wrist is ideal for quick bits of information — when and where you need it. Rather than pulling out your smartphone or your tablet, you can simply glance down with your eyes to get what you need while on the go.
This chapter focuses mostly on how Apple Watch shows you information that’s relevant to you. For example, you can access weather information for today or for the next week. Or even in another city. Or multiple cities. Do you like playing the market or want to see how your own public company is doing? Select which company’s stock price and performance are important in your world — all updated in real time.
I also describe how to add this information to your watch face as one of the complications options. I also cover how to access Glances and Notifications on Apple Watch for a number of installed apps. I round it all off with using Apple Watch for calendar alerts and accessing maps on your wrist.
Accessing Real-Time Weather and Stock Information and Much More
Apple Watch comes with many built-in Apple Watch apps (see Table 1-1 in Chapter 1 for a list of them) — and Weather and Stocks are two of them.
Sure, you can choose not to see this information on your smartwatch if you’re not interested in one or both of these — simply unselect either or both of them in the Apple Watch app on your iPhone, as covered in Chapter 11 — but this information should be timely and interesting for many (hence, Apple adding them in without your having to download specific apps).
Checking the weather
 The Weather app displays your current location’s temperature and a graphical representation of expected precipitation and conditions over much of the day (by the hour) as well as a week-ahead view — and for multiple locations if desired.
To use the Weather app on your Apple Watch, follow these steps:
1. Press the Digital Crown button to go to the Home screen.
2. Tap the Weather app.
Once the app launches, you should see the temperature and weather for your current location, as shown in Figure 6-1. The temperature is in the center of the app, surrounded by a 12-hour look at the day and an associated icon, such as a sun, a cloud, a raincloud, snowflakes, and so on. If you live in the United States, the temperature is displayed in Fahrenheit (a choice you make when setting up the watch); it’s displayed in Celsius in Canada and other countries that use the metric system or if you make that choice yourself. The name of the city is in the top left of the screen and the current time is in the top right.
3. Swipe down with your fingertip or twist the Digital Crown button toward you to scroll down the app. This shows you a ten-day forecast, as shown in Figure 6-2. Or press the screen (Digital Touch) for more information.
The further down you swipe or twist the Digital Crown button, the further ahead in the week you can go. You can see each day’s high and low temperatures and predicted precipitation — all courtesy of the Weather Channel. Scroll back up to the top of the Weather app by twisting the Digital Crown button away from you or use your fingertip to swipe up.
4. To see other cities you’ve selected to keep track of, swipe to the right or left to pull up the weather there, as shown in Figure 6-3. You can change the cities you follow in the Apple Watch app on iPhone; see Chapter 11 for more on doing this.
Small white dots at the bottom of the app’s screen show you how many pages (cities) you’ve selected. You can add or remove cities in the Apple Watch app on the iPhone. Open the app and select My Watch, followed by Settings and then Weather.
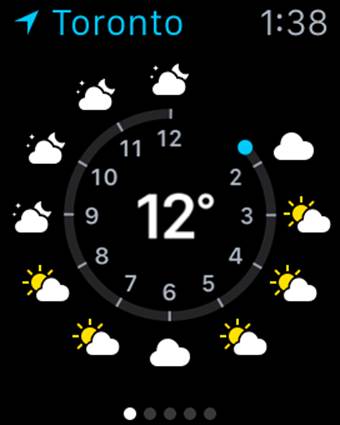
Figure 6-1: Whether it’s a local city or faraway cities, get real-time weather conditions from the Weather app.
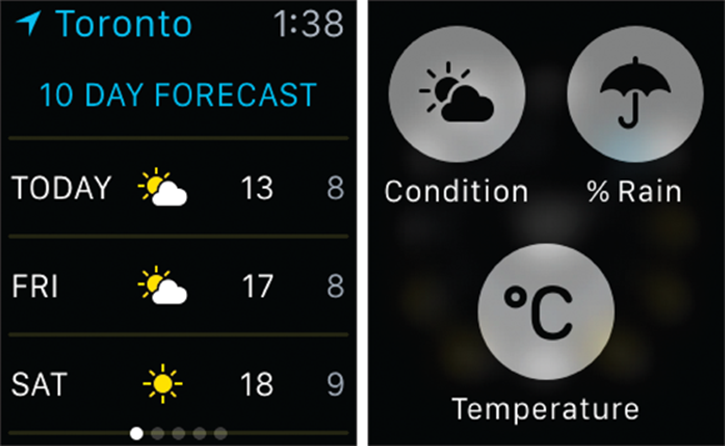
Figure 6-2: The more you scroll down, the more weather information you can see. Or press the screen firmly and select additional information.

Figure 6-3: Flick to the left or right to access weather information in other cities. Customize what you see by using the Apple Watch app on iPhone.
 Don’t forget you can use Siri to call up weather information. Simply say “Hey, Siri” or press and hold the Digital Crown button, followed by a question, such as “What’s it like outside?” or “Do I need a raincoat?” Or give a command, such as “Tell me the weather.” Actually, you can just say “Weather.” If you don’t specify a location — like the examples provided here — Siri assumes you want to know your local information. See Chapter 7 for more on using Siri to help you perform tasks with your Apple Watch.
Following the stock market
 To keep an eye on the stock market, Apple Watch offers you a quick glance at any public company’s stock price and performance for when (and where) you’d like it. It’s similar to the Stocks app on iPhone — but tailored to the smaller Apple Watch screen. The process is similar to looking at the weather — and it’s just as customizable.
To use the Stocks apps on your Apple Watch, follow these steps:
1. Press the Digital Crown button to go to the Home screen.
2. Tap the Stocks app.
If you didn’t tweak what stocks you’d like to see — by going into the Stocks area of the Apple Watch app on iPhone; see Chapter 11 for more on doing this — you should see the current value of major stock indices, such as the Dow Jones Industrial Average, as well as such companies as Apple and Starbucks, as shown in Figure 6-4.
Each company you follow on the stock market is listed by its traded name (such as AAPL for Apple), the current stock price underneath the name (such as $126.41), and whether the stock is up (in green) or down (in red) and by how much, such as a green +1.15.
3. You can learn more information about each company or exchange by tapping its name. Figure 6-5 shows an example.
This includes the full company name, point and percentage changes, and market cap.
You can have a number of companies listed — all organized within the Apple Watch app on iPhone. See Chapter 11 for more on third-party apps.
4. After you’ve selected a company or exchange, swipe down on the Stocks app on Apple Watch to show even more information, such as a graph view that lets you track its performance over the past day, week, month, or six months, as shown in Figure 6-6.
Swipe to the right at any time to go back to the main Stocks app screen with multiple indices and companies listed. You can also ask Siri to tell you the stock price of a given company or the performance of a stock index. You can access Siri by saying “Hey, Siri,” followed by your question or command, or press the Digital Crown button in any app you’re in to ask Siri about a particular company.
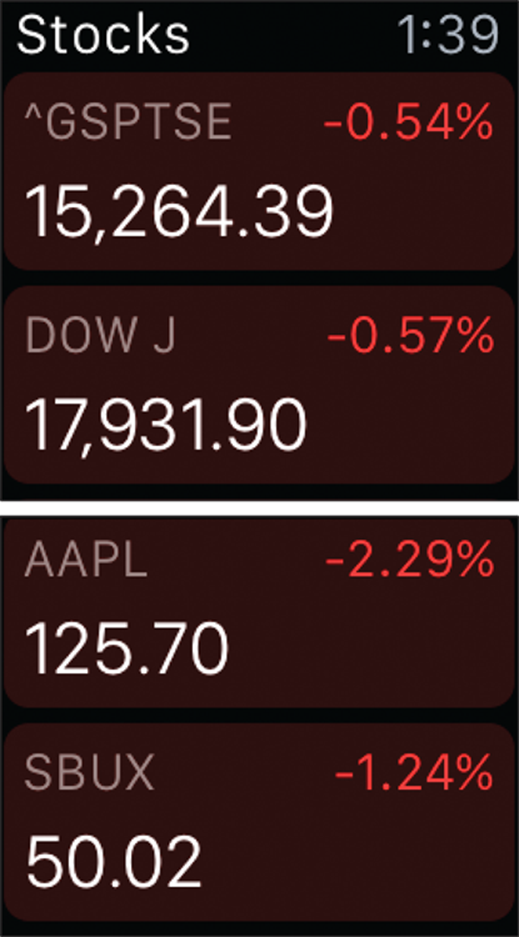
Figure 6-4: See all kinds of stock price and performance information on any publicly traded company.

Figure 6-5: Despite its small screen, Apple Watch can give you a ton of information about the stock market, such as this snapshot of the Dow Jones Industrial Average.

Figure 6-6: Swipe down in the Stocks app for additional information for an exchange, as shown here, or for a publicly traded company.
Adding Weather and Stocks to Your Watch Face Screen
Apple Watch lets you customize your watch face in a variety of different ways — see Chapter 4 for more on doing that — including the option to add complications.
To refresh your memory, complications are extra information you want visible on the watch face itself — such as weather and stocks — so you can see it when you’re checking the time. Depending on which watch face you choose, complications are usually reserved for the four corners of the screen and perhaps the bottom center. When you tap on the piece of information provided, such as the weather, it opens up the corresponding app for a deeper look.
To add weather and stock information — or other complications, such as moon phase, sunrise and sunset information, alarm clocks, timers, and so on — to your watch face, follow these steps:
1. Press and hold the screen when viewing a watch face.
This enables Force Touch and launches the Faces gallery.
2. Swipe left or right to select a clock face you like.
3. Tap Customize near the bottom of the screen to add more information to each watch screen.
You can adjust the color of the hands and add or remove details, such as the second hand, by twisting the Digital Crown button.
4. Swipe to the left to go to the last customization screen, which takes you to complications, as shown in Figure 6-7.
This is where you can add weather and stock quotes to the watch face you’ve selected.
5. Tap the areas you want to customize (seen in green in Figure 6-7) and then twist the Digital Crown button to select what you’d like.
Repeat the process by tapping the other areas of the face you want to change. Remember, you won’t have the same options for all watch faces. The watch face in Figure 6-7 doesn’t allow for stock information, for example, but other watch faces do.
6. Press the Digital Crown button when you’re done customizing.
7. After you make your choices, press the Digital Crown button again to go back to the Home screen.
After you’ve set your watch face, don’t forget you can tap on each of the complications, such as weather or stock quotes, to go directly to the relevant app. See Chapter 4 for more on complications.
Figure 6-7: Add weather, stock information, and more to the preinstalled watch faces. Information varies by the watch face you choose, but this one allows for weather in the lower-left corner.
 You can take a screenshot of whatever you’re doing on Apple Watch. Simply press the Digital Crown button and the Side button at the same time and you should see the screen briefly flash white. Now check your iPhone’s Photos app. Your newly captured image should be there.
Using Glances on Apple Watch
Because Apple Watch is meant to give you a quick look at information that’s relevant to you, you might consider Glances to be a kind of summary screen for many of your apps. You can choose which apps you want Glances for — selected in the Settings area of the Apple Watch app on an iPhone; see Chapter 11 for more on changing settings — but many of the built-in apps support Glances, such as Weather, Stocks, Messages, Mail, Calendar, Activity, Workout, Passbook, Music, and World Clock.
You can use fingertip gestures on the watch’s screen to access your Glances. Chances are, you’ll use Glances quite often, so knowing how to use them will come in handy.
To use Glances on your Apple Watch, follow these steps:
1. Swipe up from the bottom of the watch screen to open Glances.
This bite-sized information is full screen on your watch face, but you can’t scroll down for more information. To go to the app itself, tap the screen, which opens the app related to the information.
2. Swipe left or right to scroll through all your Glances.
You can cycle through every app that has Glances, as shown in Figure 6-8.
Many third-party apps for Apple Watch also support Glances, including social media apps (such as Facebook and Twitter); finance tools (such as Mint); sports apps (such as ESPN); airlines (such as United); news organizations (such as the Wall Street Journal and USA Today); productivity tools (such as Evernote); and so on.
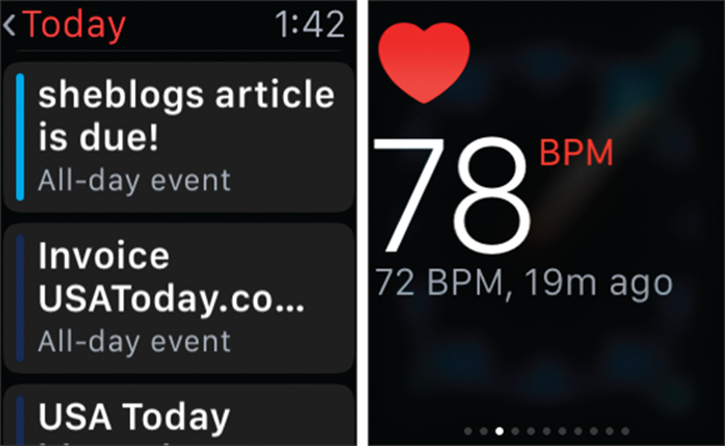
Figure 6-8: Glances are available for most preinstalled apps, such as Calendar and Activity (seen here).
Mastering Notifications on Apple Watch
Just as you swipe up from the watch face screen for Glances, you can swipe down for Notifications. Or they can just appear on your wrist in a timely fashion if you prefer.
As covered in Chapter 11, you can select which apps can give you Notifications on Apple Watch, as shown in Figure 6-9.
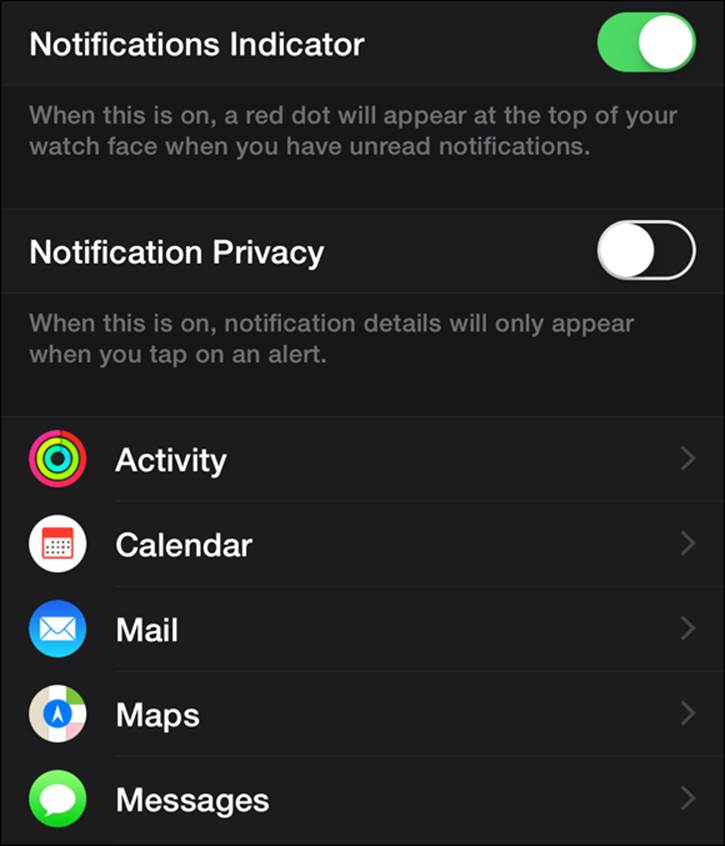
Figure 6-9: In the Apple Watch app on iPhone, you can select which Notifications you’d like on your Apple Watch. In each of the apps installed on your watch — a few are seen here — tap the app and then flick the tab to green to receive Notifications.
Notifications pull information from your iPhone, such as if someone liked your photo on Instagram, if your favorite game wants you to know someone is attacking your virtual kingdom, or if the New York Yankees won the doubleheader. Likewise, a news outlet, such as USA Today, might let you know the president is about to give a speech or if weather is taking a turn for the worse in your area. See Figure 6-10 for a look at a Notification tied to the USA Today app.

Figure 6-10: You can swipe down from the watch face screen to access your Notifications, including from third-party apps.
You should receive a gentle tap on your wrist to tell you about the news based on the apps you choose to give you Notifications.
If you’re not feeling the Notifications on your wrist, you can dial up extra vibration by selecting Prominent Haptic within the Apple Watch’s Sound and Haptics settings area. Now those buzzes on your wrist will feel more pronounced. You can enable Prominent Haptic in the Settings app on Apple Watch.
Just like on your iPhone or iPad, swipe down from the top of the Apple Watch Home screen to access your Notification Center. Here, you can scroll up or down with your finger or you can twist the Digital Crown button to see your next calendar appointment, how your stocks are doing, and perhaps a look at traffic on the way to the office.
To use Notifications on your Apple Watch, follow these steps:
1. From the watch face screen, swipe down from the top of the screen to open the Notification Center.
Remember to start swiping down from the very top of the watch case — on the rim — to successfully pull up the information you want. Swiping from the middle of the screen doesn’t work.
2. Use your fingertip to swipe up and down for additional information or twist the Digital Crown button.
To go back to your Home screen, press the Digital Crown button.
Just as many preinstalled Apple Watch apps support Notifications and are on by default, many third-party apps do too. It’s up to the app developer to add a Notification feature to the app. As shown in Chapter 11, you can enable or disable individual app Notifications in the Settings area of the Apple Watch app on your iPhone.
Accessing Your Calendar on Apple Watch
 Because your Apple Watch is wirelessly tethered to your smartphone, you can access handy calendar information on your wrist. In fact, the Calendar app not only syncs with your iPhone, but it also syncs with iCloud if you use Apple’s popular cloud service to store and access information.
Featuring day, week, and month views — including support for reminders, invitations, Glances, and Notifications — the Calendar app on Apple Watch shows you a list of upcoming events.
To use the Calendar app on your Apple Watch, follow these steps:
1. Press the Digital Crown button to go to the Home screen.
2. Tap the Calendar app.
This launches the Calendar app. By default, you should see the current Today view — with your upcoming events listed in chronological order.
3. Use your fingertip to scroll down to see future dates or twist the Digital Crown button toward you.
Figure 6-11 shows an example of an upcoming event.
This experience is similar to the Calendar app on iPhone. The current time is also listed in the top right of the Calendar app.
4. In the main Calendar app screen, tap the Today tab in the top left to access the Week or Month view. If you want to look at a date (such as Friday, October 16), just tap the day on the calendar for a Day view.
See Figure 6-12 for a look at the Month view.
In Month view, you can swipe left or right to move forward or backward through time or twist the Digital Crown button if you prefer.
Just like you can set Reminders on your iPhone, iPad, or iPod touch, you can activate Siri on your Apple Watch and say something like “At 6 p.m., remind me to call Mom.” It doesn’t make a Calendar entry for this event, but you’re reminded with a sound, a vibration on your wrist, and a text. Remember, Apple Watch has no keyboard, so you must dictate the reminder. See Chapter 7 for more ways to use Siri to help you accomplish tasks with Apple Watch.
5. To add a new event, press and hold the Apple Watch screen while inside the Calendar app.
You’re prompted to tap New and then select a date and time for the event. You’ll also speak into your wrist for the title of your event. You can speak loudly, as Apple’s dictation is quite good, but try to talk clearly and with as little ambient noise around you as possible.
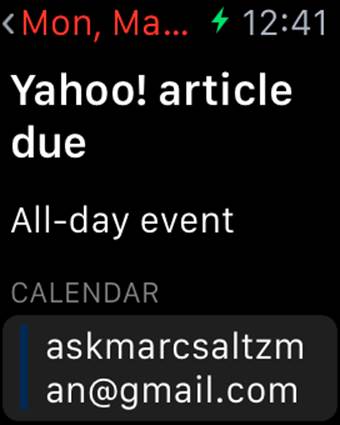
Figure 6-11: The Calendar app offers a look ahead — beyond that day — if you want to preview your upcoming week.
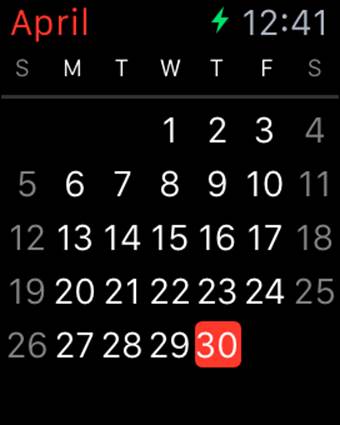
Figure 6-12: See what’s happening a month at a time and then tap a day for a chronological view of what events you have on a given day.
Don’t forget, Apple Watch pulls calendar events from your iPhone. And you don’t always have to manually check your calendar for upcoming appointments because you should receive a Notification about it (and feel a slight pulse). Some users like to be reminded an hour before an event, for example, while others might only want a five-minute reminder. This is all handled in your iPhone’s Calendar app.
Also, when you receive calendar invitations, you can accept or decline immediately and even email the organizer using preset responses.
To accept or decline a Calendar invitation or to reply to the organizer from your Apple Watch, following these steps:
1. If someone sends you a calendar invite via email or message, you should receive a Notification with the proposed meeting date, time, and information, such as “Natalie’s B-Day Party, September 19, 2015, 6 p.m.”
This is where you have a chance to act on it — and you won’t have to reach for your iPhone.
2. Use your finger to swipe down on the Notification or twist the Digital Crown button and then you can tap Accept, Maybe, or Decline.
You can’t suggest an alternative date or time or anything — like you can do with some email programs — but this lets the organizer receive some sort of response.
3. Swipe up to respond to an invitation, firmly press (Digital Touch) the display while you’re looking at the event details, and then choose to call the organizer or send a voice message recording.
You can also perform all these functions inside the Calendar app — instead of via a Notification — by tapping on the meeting details and choosing to accept, decline, or reply.
Don’t forget that you can raise your wrist and say “Hey, Siri” or press and hold the Digital Crown button and then say something like “Add calendar entry, dentist appointment, for 9 a.m. tomorrow.” This spoken text is added to your calendar and synced with your iPhone too.
Or use Siri to ask Apple Watch about upcoming events, such as “What’s on my calendar today?” “What’s next on my calendar?” or “When is my appointment at the dentist?” See Chapter 7 for more ways to use Siri to help you complete tasks with your Apple Watch.
You don’t need your iPhone to receive calendar alerts on your Apple Watch. Therefore, if you go on a run or accidentally leave your iPhone at the office, you can still see existing calendar entries, but you can’t add one. Why? Because Apple Watch doesn’t have a keyboard, you have to use Siri to dictate new appointments, which isn’t possible without the iPhone.
Navigating the Maps App
 Apple Maps — or simply Maps — is one of the built-in Apple Watch apps. It allows you to get directions from your current location to a destination of your choosing — with the app calculating the best route.
You should see — and feel — the turn-by-turn navigation instructions to guide you along the way, and you can always search for nearby businesses, such as a restaurant or a gas station, simply by asking Siri for it.
To use the Maps app on your Apple Watch, follow these steps:
1. Press the Digital Crown button to go to the Home screen.
2. Tap Maps.
This launches the Maps app. An overhead map of your current location appears on the Apple Watch screen, and you can swipe in a given direction to move the map around or you can twist the Digital Crown button if you want to see nearby streets or businesses.
3. Tap the blue icon in the lower left of the screen — as shown in Figure 6-13 — to return to your current location.
This recenters the map to your specific location. You can also zoom in and out by twisting the Digital Crown button.
4. To find a location, press and hold the screen to activate Siri and then speak an address or business name.
5. Tap the blue word Done in the top right of the screen when you’re finished.
The next time you do a search in Maps, you should also see your last searched addresses below the Dictation tab, as shown in Figure 6-14.
A firm press on the screen uses Apple Watch’s Digital Touch feature. If the location is a business, you can tap it on the map to bring up information, such as the address and phone number (which you can call), hours of operation and if it’s open at that exact moment, and its star rating (average user rating out of five stars — via Yelp). You should also see an estimate on how long it might take to get there by foot or by car. Figure 6-15 shows information about a restaurant and how long it might take to travel there.
6. Upon landing on a searched destination in the Maps app, you should see the time to the desired location by car or by foot — so you can tap which mode of transportation you’re using — and you should also see the destination as a pushpin on the map.
Addresses in Messages, Email, Calendar, and other apps are highlighted in blue and underlined, which means they’re tappable. Tap the address, such as 123 Yonge St., and it launches that address in the Maps app for you. Neat, huh?
7. Tap Start to map your route.
And you’re off! Now follow the instructions as you make your way to your destination. If you need to turn right, a steady series of a dozen taps are felt on your wrist at the intersection you’re approaching. To turn left, you should feel three pairs of two taps. Of course, you can also look down at your screen for visual cues (while on foot and not while driving of course!).
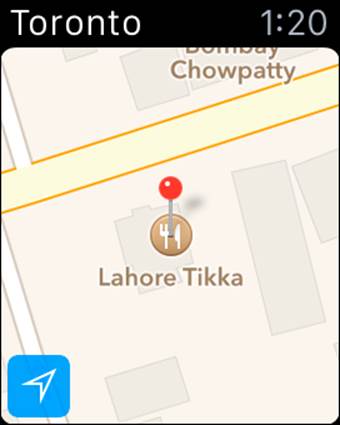
Figure 6-13: The Maps app offers a number of features to help you with directions or find local businesses.
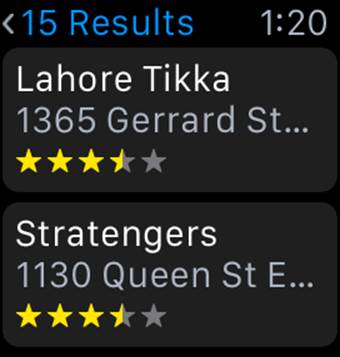
Figure 6-14: Ask and ye shall receive. You need to use your voice to get directions or find a local business.
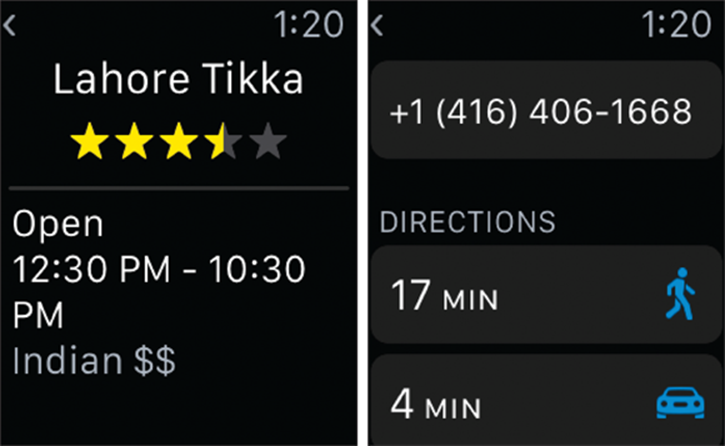
Figure 6-15: Get information on a local business — provided by Yelp — simply by tapping on its name. You can also read customer reviews as well as see how long it might take to get to your destination.
As you can with all other built-in apps, use Siri to access Maps information whenever you like. Either raise your wrist and say “Hey, Siri,” followed by something like “Show me 5 Main Street in Beverly, Kansas” to see it on a map or “Hey, Siri, give me directions to the Golden Gate Bridge.” You can also press the Digital Crown button to activate Siri. See Chapter 7 for more on using Siri to help you perform tasks with your Apple Watch.