C++ All-in-One For Dummies (2009)
Book II
Understanding Objects and Classes
Chapter 6: Building with Design Patterns
In This Chapter
Understanding what design patterns are and how you can use them
Implementing an Observer pattern
Building a Mediator pattern
When you work as a software designer, eventually you start to notice that you do certain things over and over. For example, you may get mad and shut off the computer. But that’s not directly related to software design.
For an example related to software design, whenever we need to keep track of how many instances of a certain class get created, we always create a static member variable called something like int InstanceCount; and in the constructor, we include a line that incrementsInstanceCount; and in the destructor, we put a line that decrements InstanceCount. Further, we typically make InstanceCount private and include a static method that retrieves the value, such as int GetInstanceCount().
We have used this design so many times we know that it works. The first time we used it, we had to think about it and how we would design and implement it. Now, we barely have to think about it; we just do it, sometimes even when we’re driving down the road. Well, maybe not then, but we do use it when we’re designing software. Thus it’s a design pattern that we use.
Way back in 1995, a book came out that became an instant best seller in the computer programming world. It was called Design Patterns: Elements of Reusable Object-Oriented Software, by Erich Gamma, Richard Helm, Ralph Johnson, and John Vlissides. The four authors of this groundbreaking book would become known in the field of programming as The Gang of Four. They drew on a body of knowledge in the field of architecture — not software architecture, but rather the field of those people who build tall buildings, brick-and-mortar style, for Superman to leap over and see through. That kind of architecture has been around for at least two and a half centuries, so the field is just a wee bit more mature than the field of software engineering. And, in the field of designing buildings, people have come up with common ways to design and build buildings and towns, without having to start over from scratch each time with a new set of designs. Some guy (apparently famous in that field) named Christopher Alexander wrote a book in 1977 that teaches building architecture by using patterns. The Gang of Four drew on this knowledge and applied it to software engineering principles. They then wrote their Design Patterns book.
In it, they pointed out something that seems obvious in hindsight (but then again, great discoveries are often deceptively simple): The best software engineers reuse techniques in the sense of patterns. Our description of the class that keeps an instance count is an example of a technique that can be used over and over.
Now, if you heavily explore the field of object-oriented programming (and computer science in general, really), you will keep seeing the term reusable. One of the goals of object-oriented programming is to make code reusable by putting it in classes. You then derive your own classes from these classes, thereby reusing the code in the base classes.
That’s all fine and dandy, but it doesn’t always work. Yes, we could probably put our instance-counting class in a base class and always derive from it. But for some other designs, this doesn’t always work. Instead, software engineers simply apply the same design to a new set of classes. Yes, they reused the design by pulling it from the back dusty caverns of their brains (isn’t that pleasant), but they didn’t actually reuse any code. That’s okay! They drew on experience. And that’s the idea behind design patterns. You don’t just write up your design patterns and stuff them into a bunch of base classes. Instead, you simply know the patterns. Or you keep a list or catalog of them. So in this chapter, we present you with some of the more common design patterns.
Introducing a Simple Pattern: the Singleton
In this section we take you step-by-step through creating a design pattern, so you can see what it is and, more important, how you can use it.
Here’s the situation: You are designing this truly great piece of software that is so good that everybody from the North Pole to the South Pole will not only buy a copy but will invest in your company as well. And while designing the software, you discover many situations where you need a class such that only one instance can exist at any given time.
You’ve come across this many times. For example, you may have a class that represents the computer itself. You want only one instance of it. You also may have a class that represents the planet Earth. Again, you need only one instance. And you might want a class that models the great leader of the universe (you). Again, only one instance. If people try to create a second instance of the class in their code, they will receive a compiler error. How do you do this?
You could spend a couple hours coming up with an approach. Or you could look at a pattern that already exists somewhere, such as what we’re about to show you.
To understand how to create a pattern, you need to first understand an unusual concept that a lot of C++ programmers don’t usually consider: You can make a constructor of a class private or protected! Now why would you do that? It turns out that making a constructor private prevents you from directly creating an instance of a class. We can hear you now, Oh boy! Doesn’t that sound like a useful class, if you can’t make an instance of it? This guy’s a nutjob! But you can make an instance of the class. There’s a trick: You include a static member function that creates the instance for you.
Remember: Static member functions do not have an instance associated with them. You call them directly by giving the class name, two colons, and the function name. But as it happens, the static member function is itself a member of the class, so it can call the constructor and create an instance for you.
One of the more popular examples for basic pattern creation is a singleton class — a class that lets you instantiate only one object. A singleton class is useful because it ensures that only one object is available across an application. Developers often use a singleton to coordinate the activities of other parts of the application.
Here’s how you make a singleton class: First, make the constructor private. Next, add a public static member function that does the following:
1. Checks if a single instance of the class already exists. If so, it returns the instance’s pointer.
2. Creates a new instance and returns its pointer if an instance doesn’t already exist.
Finally, where do you store this single instance? You store its pointer in a static member of the class. Because it’s static, only one member variable is shared throughout the class, rather than a separate variable for each class. Also, make the variable private so that users can’t just modify it at will.
And voilà! You have a singleton class! Here’s how it works: Whenever you need the single instance of the class, you don’t try to create it. (You’ll get a compile error! Yes, the compiler itself won’t let you do it.) Instead, you call the static member function.
The following lines of code are an example of such a class:
class Planet
{
private:
static Planet *inst;
Planet() {}
public:
static Planet *GetInstance();
};
Planet *Planet::inst = 0;
Planet *Planet::GetInstance()
{
if (inst == 0)
{
inst = new Planet();
}
return inst;
}
To use this class, you do not just create an instance directly. Instead, you call the GetInstance member function:
Planet *MyPlanet = Planet::GetInstance();
You call this any time you want to get a copy of the single instance.
 Each time you call GetInstance, you will always get a pointer to the same instance.
Now, take a look at the constructor: It’s private. Therefore, if you attempt something like this somewhere outside the class (such as in main)
Planet MyPlanet;
you get a compiler error. In CodeBlocks, we get this error:
error: `Planet::Planet()’ is private
error: within this context
Or if you try to create a pointer, you get the same error when you call new:
Planet *MyPlanet = new Planet();
When you have a class such as this, you probably also want to ensure that nobody attempts to delete the single instance. Just as you would make the constructor private, you would also make the destructor private, as in the following:
class Planet
{
private:
static Planet *inst;
Planet() {}
~Planet() {}
public:
static Planet *GetInstance();
};
If you try to delete an instance after you obtain it, as in the following
Planet *MyPlanet = Planet::GetInstance();
delete MyPlanet;
then once again you receive an error message, this time for the destructor:
`Planet::~Planet()’ is private
 You may be tempted to make a constructor that takes a parameter. You could pass parameters into the GetInstance member function, which would in turn pass them to the constructor. This would work the first time, but there’s a catch: Remember that after the GetInstancefunction creates the instance, it never does so again. That means it won’t call the constructor again. Therefore, if you have a class that looks like this:
class Planet
{
private:
static Planet *inst;
Planet(string name)
{
cout << “Welcome to “ << name << endl;
}
~Planet() {}
public:
static Planet *GetInstance(string name);
};
and your GetInstance method has this code in it:
Planet *Planet::GetInstance(string name)
{
if (inst == 0)
{
inst = new Planet(name);
}
return inst;
}
and you make two calls like this:
Planet *MyPlanet = Planet::GetInstance(“Earth”);
Planet *MyPlanet2 = Planet::GetInstance(“Venus”);
the results may not be as you expect. You end up with only one instance, which will get created with the first line, the one with “Earth” passed in. In your second call to the GetInstance function, GetInstance will see that an instance already exists and will not even use the“Venus” parameter. So be careful if you’re using parameters in constructors.
Watching an Instance with an Observer
A common task in computer programming is when one or more instances of a class (or different classes) need to keep an eye on a certain object and perform various actions when that object changes. For example, you may be writing a program that monitors various activities around your house when you’re away. Your program could be configurable; you could set it up so the user can choose various actions to take if something goes awry. You might have the following options:
♦ The program saves a note in a file so you can later review it.
♦ The program sends an e-mail to you.
♦ If the computer is linked to a telephone security system, it can notify the police.
♦ The robotic dog can receive a signal to go on high alert.
. . . and so on. Each of these different things can exist in a different class, each with its own code for handling the situation. The one about saving a note to a file is easy; you would open a file, write to it, and close the file. The e-mail one might involve launching Microsoft Outlook, somehow telling it to compose an e-mail, and sending it. To notify the police, your computer would have to be hooked up to an online security system accessible via the phone lines or perhaps via the Internet, and the police would need a similar system at their end. The class for this would send a signal out the lines to the police, much like the way a secret button that notifies the police of a robbery at a gas station works. Finally, you might have a similar contraption hooked up into the brain of your little robotic watchdog, Fido; and when he receives a high-voltage jolt, he can go on high alert and ward off the intruders. Sounds like fun, no? We call all these classes Observer classes (and by this we mean that each class will be derived from a base class called Observer).
Now, you would also have a class whose object detects the problem in the house. This object might be hooked up to an elaborate security system, and when the change takes place, the computer calls a method inside this object. We call this class the Subject class.
So think about what is happening here:
1. When a security issue happens, the computer calls a method inside the single Subject instance.
2. The Observer classes have objects that watch the Subject instance. The method in the Subject class then calls methods in each of the Observer objects. These methods do the appropriate action, whether it’s write to a file, notify the police, zap the robotic dog, or whatever.
Now here’s the catch: The people using your computer program can determine which Observer classes they want to respond to the event (possibly through an options dialog box). But just to be difficult and to make sure that we design this with great flexibility, we’re going to add the following requirement: Over the next year, you might add new Observer classes as they come up. One might signal a helicopter to fly in and chase a robber as he’s making his getaway. But you can’t be sure what you’ll come up with over the next year. All you know is that you may addObserver subclasses and instances of these subclasses. So the point is this: You want to make the Subject class as flexible as possible.
Here are the issues that come up when designing such a set of classes. First, you could just keep a big list of instances inside the Subject class, and whenever an event takes place, the event handler calls a routine in all the Observer instances. The Observer instances then decide whether or not they want to use the information. The problem with this situation is that you have to call into the Observer classes, even if the individual instances don’t want the information. The robotic dog might be sleeping and not want to be bothered by the break-in. Or the police might be on break themselves. (Because this is a serious book, we’ll avoid any donut shop jokes.)
But on the other hand, you could have each Observer instance constantly check the Subject instance, looking for an event. (This process is called polling.) The problem here is that this process can push the computer to its limits, believe it or not: If every single Observer instance is constantly calling into the Subject class, you’re going to have a lot of activity going on for possibly hours on end, keeping the CPU nice and toasty. That’s not a good idea either.
The way you can perform polling without overextending the CPU is by using the Observer pattern. In this pattern, the Observer class contains a method called Respond. Meanwhile, the Subject class includes a list of Observer instances. Further, the Subject class includes a method called Event, which the computer calls whenever something happens, such as a break-in.
Now here’s the twist that makes it work: Your program will add and remove Observer instances to and from the Subject’s list of Observer instances, based on the options the people choose when using your program.
As you can imagine, this is a recurring pattern that a lot of programs use. Although zapping a robotic dog might not be common, other programs use this general model. For example, in some C++ editors, we can open the same document in multiple windows, all under one instance of the editor program. When we change the code in one window, we can immediately see the change in the other windows. Each class probably has a window, and these windows are the Observer classes. The Subject represents the underlying document. Or, for another example, you can open multiple browser windows all looking at the same Web page. As the page comes down from the Internet, it gradually appears in all windows. Again, the windows are associated with the Observer classes, and the actual Web document is associated with a Subject class.
So on to the code already! First, the Observer class contains a member function called Respond. In the Observer class itself, this is a pure abstract function; it’s up to the derived classes to respond to the event in their own ways.
The following lines are an example of the Observer class:
class Observer
{
public:
virtual void Respond() = 0;
};
As you can see, there’s not much there. So we’re going to add some derived classes. Here are a couple:
class Dog : public Observer
{
public:
void Respond();
};
class Police : public Observer
{
protected:
string name;
public:
Police(string myname) { name = myname; }
void Respond();
};
And here are the Respond member functions for these two classes. For now, to keep it simple, we’re just writing something to the console:
void Dog::Respond()
{
cout << “Bark bark” << endl;
}
void Police::Respond()
{
cout << name << “: ‘Drop the weapon! Now!’” << endl;
}
Again, so far there’s nothing particularly interesting about this. These lines of code represent just a couple member functions that do their thing, really. But next, things get exciting. Here we make the Subject class:
class Subject
{
protected:
int Count;
Observer *List[100];
public:
Subject() { Count = 0; }
void AddObserver(Observer *Item);
void RemoveObserver(Observer *Item);
void Event();
};
This class has a list of Observer instances in its List member. The Count member is the number of items in the list. Two methods for adding and removing Observer instances are available: AddObserver and RemoveObserver. A constructor initializes the list (by just setting its count to 0, really), and there’s the famous Event member function.
Here’s the code for the AddObserver and RemoveObserver methods. These functions just manipulate the arrays:
void Subject::AddObserver(Observer *Item)
{
List[Count] = Item;
Count++;
}
void Subject::RemoveObserver(Observer *Item)
{
int i;
bool found = false;
for (i=0; i < Count; i++)
{
if (found)
{
}
else if (List[i] == Item)
{
found = true;
List[i] = List[i+1];
}
}
if (found)
{
Count--;
}
}
The RemoveObserver function uses some little tricks (again, a pattern!) to remove the item. It searches through the list until it finds the item; after that, it continues through the list, pulling items back one slot in the array. And finally, if it found the item, it decreases Count by 1.
And now here’s the fun part! The Event method looks like this:
void Subject::Event()
{
int i;
for (i=0; i < Count; i++)
{
List[i]->Respond();
}
}
This code just climbs through the list, calling Respond for each item in the list. When you put this all together, you can have a main that sets up these items. Here’s one possibility:
Dog Fido;
Police TJHooker(“TJ”);
Police JoeFriday(“Joe”);
Subject Alarm;
Alarm.AddObserver(&Fido);
Alarm.AddObserver(&TJHooker);
Alarm.AddObserver(&JoeFriday);
Alarm.RemoveObserver(&TJHooker);
Alarm.Event();
We make three Observer instances (one dog and two cops) and a Subject instance called Alarm. We then add all three instances to the list; but then TJ Hooker backs out, so we remove him from the list.
Then we call Event. (If this were an actual system, we wouldn’t call Event right now; we would call Event when an actual break-in event occurs.) And when we run this code, we get the responses of each of the registered observers:
Bark bark
Joe: ‘Drop the weapon! Now!’
Notice that TJHooker didn’t respond because he was no longer interested. And so he didn’t receive a notification. He is, however, still an instance.
In this example, the three observers (Fido, TJ Hooker, and Joe Friday) are watching the alarm, ready to respond to it. They are observers, ready for action. The alarm is their subject of observation. That’s why we use the metaphor of Observer and Subject.
Observers and the Standard C++ Library
 If you’re interested in using templates and the Standard C++ Library, you can make the Subject class a bit more sophisticated by using a list rather than an array. You can do this by using the standard list class. The only catch is that the list class doesn’t seem to do well with abstract classes. So you need to “de-abstractify” your Observer class by setting it up like this:
class Observer
{
public:
virtual void Respond() {}
};
Then, you can modify the Subject class and its methods like so:
class Subject
{
protected:
list<Observer *> OList;
public:
void AddObserver(Observer *Item);
void RemoveObserver(Observer *Item);
void Event();
};
void Subject::AddObserver(Observer *Item)
{
OList.push_back(Item);
}
void Subject::RemoveObserver(Observer *Item)
{
OList.remove(Item);
}
void Subject::Event()
{
list<Observer *>::iterator iter;
for (iter = OList.begin(); iter != OList.end(); iter++)
{
Observer *item = (*iter);
item->Respond();
}
}
Note that, in the list, we’re saving pointers to Observer; we’re not saving the Observer instances themselves. That’s because, by default, the list class makes a copy of whatever you put in the array. If you put in an actual instance, the list class will make a copy (which creates problems with derived classes because the list just copies the object being stored as an Observer instance, not a class derived from Observer). With pointers, a copy of a pointer still points to the original object, and therefore the items in the list are the originals (at least their addresses are in the list).
Automatically adding an observer
When you have a program that lets the users configure various observers, you may want to create and delete observers based on the configurations. In that case, it’s possible to add an Observer to a Subject’s list automatically when you create the Observer, and remove theObserver from the list when you delete the Observer. To do this, you can call the AddObserver method from within the constructor and the RemoveObserver method from within the destructor. But to make this work, you need to tell the object who the Subject is. That’s easy; just pass the name as a parameter to the constructor. The following code does this. Note that we had to move the Subject class above the Observer class because the Observer’s constructor and destructor call into Subject. Also, note that we made the AddObserver andRemoveObserver functions protected. But because we want the Observer class to use these functions, we used a little trick called a friend: We put the word friend followed by the word Observer in the Subject class; now the Observer member functions can call the protected and private member functions of Subject. The code for the complete program is in Listing 6-1.
Listing 6-1: Using the Add and Remove Items in the Constructor and Destructor
#include <iostream>
using namespace std;
class Observer;
class Subject
{
friend class Observer;
protected:
int Count;
Observer *List[100];
void AddObserver(Observer *Item);
void RemoveObserver(Observer *Item);
public:
Subject() { Count = 0; }
void Event();
};
class Observer
{
protected:
Subject *subj;
public:
virtual void Respond() = 0;
Observer(Subject *asubj)
{
subj = asubj;
subj->AddObserver(this);
}
virtual ~Observer() { subj->RemoveObserver(this); }
};
class Dog : public Observer
{
public:
void Respond();
Dog(Subject *asubj) : Observer(asubj) {}
};
class Police : public Observer
{
protected:
string name;
public:
Police(Subject *asubj, string myname) : Observer(asubj) { name = myname; }
void Respond();
};
void Dog::Respond()
{
cout << “Bark bark” << endl;
}
void Police::Respond()
{
cout << name << “: ‘Drop the weapon! Now!’” << endl;
}
void Subject::AddObserver(Observer *Item)
{
List[Count] = Item;
Count++;
}
void Subject::RemoveObserver(Observer *Item)
{
int i;
bool found = false;
for (i=0; i < Count; i++)
{
if (found)
{
}
else if (List[i] == Item)
{
found = true;
List[i] = List[i+1];
}
}
if (found)
{
Count--;
}
}
void Subject::Event()
{
int i;
for (i=0; i < Count; i++)
{
List[i]->Respond();
}
}
int main()
{
Subject Alarm;
Police *TJHooker = new Police(&Alarm, “TJ”);
cout << “TJ on the beat” << endl;
Alarm.Event();
cout << endl;
cout << “TJ off for the day” << endl;
delete TJHooker;
Alarm.Event();
return 0;
}
Mediating with a Pattern
Suppose you’re going to design a sophisticated, complex model of a car. You’re going to include the following parts, each of which will have its own class:
♦ The engine
♦ The electrical supply (for the technical folks, we mean the battery and alternator together)
♦ The radio
♦ The wheels
♦ The brakes
♦ The headlights
♦ The air conditioner
♦ The road
Now see if you can keep up (read this as fast as you possibly can): When the electrical supply goes up, the headlights get brighter. When the engine speeds up, the electrical supply increases. When the electrical supply goes down, the radio volume goes down. When the air conditioner turns on, the electrical supply goes down. When the air conditioner turns off, the electrical supply goes up. When the engine increases, the wheels accelerate. When the electric supply increases, the radio volume increases. When the road ascends due to a hill, the speed of the wheels goes down. When the brakes come on, the speed of the wheels decreases. When the electrical supply goes down, the headlights get dimmer. When the engine slows down, the electrical supply decreases. When the road descends due to a hill, the speed of the wheels goes up.
Now your job is to model all this behavior. Sound like fun? Not particularly. In fact, it’s a total mess! How can you model this?
Here’s the problem: You have a million objects (well, eight actually) all interacting with each other in different ways. You could try to make all the objects communicate. In the code, making them communicate would mean that most of the classes would have to contain references to objects of the other classes. That technique could get pretty confusing.
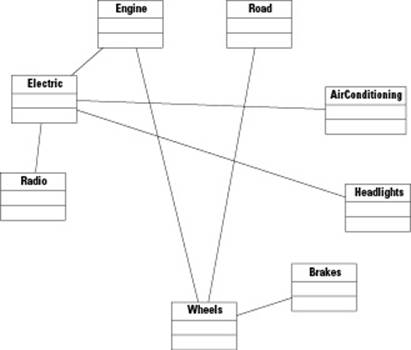
If you followed all this, the UML diagram in Figure 6-1 shows the interactions. As you can see, it’s kind of messy. It’s a little cleaner now in UML form than in the long-winded paragraph earlier, but it’s still messy, and the code itself is still going to be complicated.
Figure 6-1:Sometimes class interactions can be quite messy!
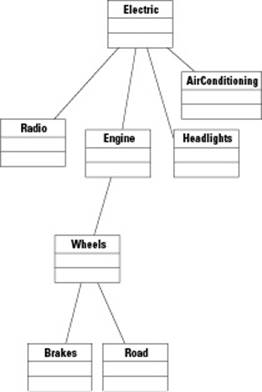
 When you have this kind of a mess, first try to rearrange things visually to see if there’s some way to simplify it. Figure 6-2 shows our cleaned-up version. Looking at this figure, we still get a little confused, but the figure does help us see the connections a bit more clearly.
So now we introduce the theme of this pattern. The idea is that when you have a set of classes that interact in a complex way, a mediator class through which the classes all communicate is often easiest to create. That way, only the mediator class needs to know about all the instances. The instances themselves communicate only with the mediator.
Figure 6-2: You can attempt to clean up the UML just a bit.
In the example, when there’s a hill, the road goes up. The road does not need to know about all the other car parts. Instead, it just informs the mediator of the change. The mediator then informs the necessary car parts.
This may seem like overkill: Why can’t the road just talk directly to the car parts? The idea is that if you enhance this program later, you may want to add more car parts. Rather than having to go through and hook up connections to all the necessary car parts, you just make a connection with the mediator object. Suppose you add a new part called automatic transmission. When the car begins to climb a hill, the automatic transmission might detect this and automatically shift to a lower gear, resulting in an increase to the engine speed. To add this class, you only need to define its behavior and how it responds to various events, and then hook it up to the mediator. You will also modify the mediator so it knows something about the automatic transmission’s behavior. Thus, you don’t need to hook it up to all the other instances.
Figure 6-3 is the revised UML with the addition of a mediator. Now it looks a bit cleaner!
Figure 6-3: A mediator certainly cleans things up!
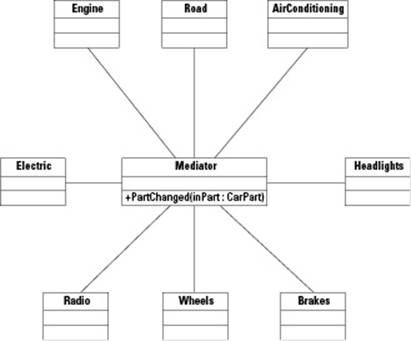
One thing we’re not showing in Figure 6-3 (for the purpose of keeping things uncluttered) is that we’re going to derive all the various car parts (including the road!) from a base class called CarPart. This class will have a single member: a pointer to a Mediator instance. Each of the car parts, then, will inherit a pointer to the Mediator instance.
The Mediator class has a member function called PartChanged. This is the key function: Any time any of the car parts experiences a change, it calls PartChanged. But remember, a car part can experience a change in only two ways: either through an outside force unrelated to the existing classes (such as the driver pushing the gas pedal or turning the steering wheel) or through the Mediator instance. If the change comes from the Mediator instance, it was triggered through one of the other objects.
For example, look at the following steps:
1. The driver pushes the gas pedal by calling a method in the Engine instance.
2. The Engine instance changes its speed and then tells the Mediator of the change.
3. The Mediator instance knows which objects to notify of the change. For this change, it notifies the wheels to spin faster.
Here’s another possible sequence:
1. The road has a hill. To tell the car about the hill, the main routine calls a member function in the Road instance. The hill has a ten-degree incline.
2. The Road instance notifies Mediator of the change.
3. The Mediator instance handles this by figuring out how much to decelerate; it then notifies the wheels to slow down.
So you can see most of the smarts are in the Mediator class.
You may have noticed what seems like a contradiction in things we have told you and other OOP (Object-Oriented People) have told you. Here we’re saying to put the smarts in the Mediator class. Elsewhere you are hearing that objects must be able to do their own work. But that’s not really a contradiction. In fact, the Mediator class is handling all smarts dealing with collaborations between objects. After the Mediator instance figures out, for example, that the wheels must spin faster, it notifies the wheels and tells them to spin faster. That’s when the wheels take over and do their thing. At that point, they know how to spin faster without outside help from other classes and objects. So it’s not a contradiction after all.
Putting up a Façade (pattern)
In the car system example, we felt as though it would be cumbersome to have to manipulate the car system by paying separate attention to all the different parts, such as the engine and the wheels, simultaneously. Imagine what life would be like if you had to drive a car while constantly worrying about every little thing. Instead, we created a class called CarControls through which you can interact with the system. The CarControls class is a pattern itself, called a Façade pattern. A façade is a front of something. (It’s a French word.) This pattern is also a front: It’s the interface into the system through which you interact. That way, you don’t have to keep track of the individual classes. When you add a class through which users can interact with the system, you are using a Façade pattern.
Now take a look at Listing 6-2. This is a header file that contains the class declarations for the car parts.
Listing 6-2: Using the carparts.h File
#ifndef CARPARTS_H_INCLUDED
#define CARPARTS_H_INCLUDED
#include “mediator.h”
class CarControls; // forward reference
class CarPart
{
protected:
Mediator *mediator;
CarPart(Mediator *med) : mediator(med) {}
void Changed();
};
class Engine : public CarPart
{
protected:
friend class Mediator; friend class CarControls;
int RPM;
int Revamount;
public:
Engine(Mediator *med) : CarPart(med),
RPM(0), Revamount(0) {}
void Start();
void PushGasPedal(int amount);
void ReleaseGasPedal(int amount);
void Stop();
};
class Electric : public CarPart
{
protected:
friend class Mediator; friend class CarControls;
int Output;
int ChangedBy;
public:
Electric(Mediator *med) : CarPart(med),
Output(0), ChangedBy(0) {}
void ChangeOutputBy(int amount);
};
class Radio : public CarPart
{
protected:
friend class Mediator; friend class CarControls;
int Volume;
public:
Radio(Mediator *med) : CarPart(med),
Volume(0) {}
void AdjustVolume(int amount) { Volume += amount; }
void SetVolume(int amount) { Volume = amount; }
int GetVolume() { return Volume; }
};
class Wheels : public CarPart
{
protected:
friend class Mediator; friend class CarControls;
int Speed;
public:
Wheels(Mediator *med) : CarPart(med),
Speed(0) {}
int GetSpeed() { return Speed; }
void Accelerate(int amount);
void Decelerate(int amount);
};
class Brakes : public CarPart
{
protected:
friend class Mediator; friend class CarControls;
int Pressure;
public:
Brakes(Mediator *med) : CarPart(med),
Pressure(0) {}
void Apply(int amount);
};
class Headlights : public CarPart
{
protected:
friend class Mediator; friend class CarControls;
int Brightness;
public:
Headlights(Mediator *med) : CarPart(med),
Brightness(0) {}
void TurnOn() { Brightness = 100; }
void TurnOff() { Brightness = 0; }
void Adjust(int Amount);
int GetBrightness() { return Brightness; }
};
class AirConditioner : public CarPart
{
protected:
friend class Mediator; friend class CarControls;
int Level;
int ChangedBy;
public:
AirConditioner(Mediator *med) : CarPart(med),
Level(0), ChangedBy(0) {}
void TurnOn();
void TurnOff();
bool GetLevel() { return Level; }
void SetLevel(int level);
};
class Road : public CarPart
{
protected:
friend class Mediator; friend class CarControls;
int ClimbAngle;
int BumpHeight;
int BumpWhichTire;
public:
Road(Mediator *med) : CarPart(med) {}
void ClimbDescend(int angle);
void Bump(int height, int which);
};
#endif
These classes know little of each other. That’s a good thing. However, they do know all about the mediator, which is fine. In this source, we used an important small feature of the latest ANSI version of C++. Notice the constructor line in the Engine class definition:
Engine(Mediator *med) : CarPart(med),
RPM(0), Revamount(0) {}
After the constructor definition, you see a colon and the name of the base class, CarPart. This calls the base class constructor. Then there’s a comma and the name of a member variable (RPM) and a value in parentheses, which together form an initializer. When you create an instance ofEngine, the RPM variable will get set to the value 0. Further, the Revamount variable will also get set to the value 0. Using the constructor with an initializer causes the constructor to behave just like this code:
Engine(Mediator *med)
{
RPM = 0;
Revamount = 0;
}
Next, in Listing 6-3, is the header file for the mediator along with a special class called CarControls, which provides a central place through which you can control the car. You may have noticed that we gave the CarControls class friend access to the car parts in the carparts.h file. We also included in this file several forward declarations. Remember: This class knows about the various CarParts classes. This file also includes a class derived from Mediator that provides a general interface to the whole system.
Listing 6-3: Using the mediator.h File
#ifndef MEDIATOR_H_INCLUDED
#define MEDIATOR_H_INCLUDED
// Define all of the required forward references.
class CarPart;
class Engine;
class Electric;
class Radio;
class SteeringWheel;
class Wheels;
class Brakes;
class Headlights;
class AirConditioner;
class Road;
class Mediator
{
public:
Engine *MyEngine;
Electric *MyElectric;
Radio *MyRadio;
SteeringWheel *MySteeringWheel;
Wheels *MyWheels;
Brakes *MyBrakes;
Headlights *MyHeadlights;
AirConditioner *MyAirConditioner;
Road *MyRoad;
Mediator();
void PartChanged(CarPart *part);
};
class CarControls : public Mediator {
public:
void StartCar();
void StopCar();
void PushGasPedal(int amount);
void ReleaseGasPedal(int amount);
void PressBrake(int amount);
void Turn(int amount);
void TurnOnRadio();
void TurnOffRadio();
void AdjustRadioVolume(int amount);
void TurnOnHeadlights();
void TurnOffHeadlights();
void ClimbHill(int angle);
void DescendHill(int angle);
void TurnOnAC();
void TurnOffAC();
void AdjustAC(int amount);
int GetSpeed();
CarControls() : Mediator() {}
};
#endif
Next is the code for the member functions for all the car parts. These are in Listing 6-4. Note in these functions that we never, ever call the functions in other car parts. We do, however, call a general Changed method that’s in the car parts base class, CarParts. This calls into theMediator to let it know that a change took place.
The magic words: high cohesion, low coupling
In the world of software engineering, two buzzwords are cohesion and coupling.
Cohesion refers to the process of keeping similarly minded functions grouped together. If you create good classes, this shouldn’t be a problem. Functions involving the wheels should go in the Wheels class, not, for example, the Engine class.
Coupling is a bit more complex. It refers to the process of tying together classes so they can’t function independently. In effect, the classes are coupled. In good object-oriented programming, having lots of coupling is not good. You want your classes to be as independent as possible; you want low coupling. The Mediator pattern helps a great deal toward the low-coupling goal. In the car system example, if we had instead given the Electric class pointers to an Engine instance and a Radio instance, and so on, then we would be forcing these classes to all work dependently. In effect, we would have coupled them. But by using the Mediator instance, each class works only with the Mediator. We have low coupling. You should, therefore, try to design for high cohesion and low coupling. It’s a good thing!
Listing 6-4: Presenting the carparts.cpp File
#include <iostream>
#include “carparts.h”
using namespace std;
void CarPart::Changed()
{
mediator->PartChanged(this);
}
void Engine::Start()
{
RPM = 1000;
Changed();
}
void Engine::PushGasPedal(int amount)
{
Revamount = amount;
RPM += Revamount;
Changed();
}
void Engine::ReleaseGasPedal(int amount)
{
Revamount = amount;
RPM -= Revamount;
Changed();
}
void Engine::Stop()
{
RPM = 0;
Revamount = 0;
Changed();
}
void Electric::ChangeOutputBy(int amount)
{
Output += amount;
ChangedBy = amount;
Changed();
}
void Wheels::Accelerate(int amount)
{
Speed += amount;
Changed();
}
void Wheels::Decelerate(int amount)
{
Speed -= amount;
Changed();
}
void Brakes::Apply(int amount)
{
Pressure = amount;
Changed();
}
void Headlights::Adjust(int Amount)
{
Brightness += Amount;
}
void AirConditioner::TurnOn()
{
ChangedBy = 100 - Level;
Level = 100;
Changed();
}
void AirConditioner::TurnOff()
{
ChangedBy = 0 - Level;
Level = 0;
Changed();
}
void AirConditioner::SetLevel(int newlevel)
{
Level = newlevel;
ChangedBy = newlevel - Level;
Changed();
}
void Road::ClimbDescend(int angle)
{
ClimbAngle = angle;
Changed();
}
void Road::Bump(int height, int which)
{
BumpHeight = height;
BumpWhichTire = which;
Changed();
}
And now, in Listing 6-5, is the mediator source code and the source code for the CarControls class.
Listing 6-5: Using the carparts.cpp File
#include <iostream>
#include “mediator.h”
#include “carparts.h”
using namespace std;
Mediator::Mediator()
{
MyEngine = new Engine(this);
MyElectric = new Electric(this);
MyRadio = new Radio(this);
MyWheels = new Wheels(this);
MyBrakes = new Brakes(this);
MyHeadlights = new Headlights(this);
MyAirConditioner = new AirConditioner(this);
MyRoad = new Road(this);
}
void Mediator::PartChanged(CarPart *part)
{
if (part == MyEngine)
{
if (MyEngine->RPM == 0)
{
MyWheels->Speed = 0;
return;
}
if (MyEngine->Revamount == 0)
{
return;
}
// If engine increases, increase the electric output
MyElectric->ChangeOutputBy
(MyEngine->Revamount / 10);
if (MyEngine->Revamount > 0)
{
MyWheels->Accelerate(
MyEngine->Revamount / 50);
}
}
else if (part == MyElectric)
{
// Dim or brighten the headlights
if (MyHeadlights->Brightness > 0)
MyHeadlights->Adjust(MyElectric->ChangedBy / 20);
if (MyRadio->Volume > 0)
MyRadio->AdjustVolume(MyElectric->ChangedBy / 30);
}
else if (part == MyBrakes)
{
MyWheels->Decelerate(MyBrakes->Pressure / 5);
}
else if (part == MyAirConditioner)
{
MyElectric->ChangeOutputBy(
0 - MyAirConditioner->ChangedBy * 2);
}
else if (part == MyRoad)
{
if (MyRoad->ClimbAngle > 0)
{
MyWheels->Decelerate(MyRoad->ClimbAngle * 2);
MyRoad->ClimbAngle = 0;
}
else if (MyRoad->ClimbAngle < 0)
{
MyWheels->Accelerate(MyRoad->ClimbAngle * -4);
MyRoad->ClimbAngle = 0;
}
}
}
void CarControls::StartCar()
{
MyEngine->Start();
}
void CarControls::StopCar()
{
MyEngine->Stop();
}
void CarControls::PushGasPedal(int amount)
{
MyEngine->PushGasPedal(amount);
}
void CarControls::ReleaseGasPedal(int amount)
{
MyEngine->ReleaseGasPedal(amount);
}
void CarControls::PressBrake(int amount)
{
MyBrakes->Apply(amount);
}
void CarControls::TurnOnRadio()
{
MyRadio->SetVolume(100);
}
void CarControls::TurnOffRadio()
{
MyRadio->SetVolume(0);
}
void CarControls::AdjustRadioVolume(int amount)
{
MyRadio->AdjustVolume(amount);
}
void CarControls::TurnOnHeadlights()
{
MyHeadlights->TurnOn();
}
void CarControls::TurnOffHeadlights()
{
MyHeadlights->TurnOff();
}
void CarControls::ClimbHill(int angle)
{
MyRoad->ClimbDescend(angle);
}
void CarControls::DescendHill(int angle)
{
MyRoad->ClimbDescend( 0 - angle );
}
int CarControls::GetSpeed()
{
return MyWheels->Speed;
}
void CarControls::TurnOnAC()
{
MyAirConditioner->TurnOn();
}
void CarControls::TurnOffAC()
{
MyAirConditioner->TurnOff();
}
void CarControls::AdjustAC(int amount)
{
MyAirConditioner->SetLevel(amount);
}
int main()
{
// Create a new car.
Mediator *MyCar = new Mediator();
// Start the engine.
MyCar->MyEngine->Start();
cout << “Engine Started!” << endl;
// Accelerate.
MyCar->MyWheels->Accelerate(20);
cout << “The car is going: “ << MyCar->MyWheels->GetSpeed() << endl;
// Apply the brakes.
MyCar->MyBrakes->Apply(20);
cout << “Applying the brakes.” << endl;
cout << “The car is going: “ << MyCar->MyWheels->GetSpeed() << endl;
// Stop the car.
MyCar->MyBrakes->Apply(80);
cout << “Applying the brakes.” << endl;
cout << “The car is going: “ << MyCar->MyWheels->GetSpeed() << endl;
// Shut off the engine.
MyCar->MyEngine->Stop();
cout << “Engine Stopped” << endl;
return 0;
}
The CarControls part runs a bit long, but it’s handy because it provides a central interface through which you’ll be able to operate the car. The workhorse of the pattern, however, is in the Mediator class. This is a bunch of if statements that look at the change that took place and then call into other classes to modify the objects of the other classes. That’s the whole goal with the Mediator pattern: It has a Mediator class containing a general function that looks for changes and then changes other classes.
If you look back at Listing 6-4, you can see that, after each change, we call the Changed function. This function is in the base class, and it calls into the Mediator’s PartChanged function, which does all the hard work. Also note that in some of the car parts classes, the Mediatordoesn’t respond to their changes (such as the Wheel class); however, we still call Change in the member functions for the class. The reason is that we may add features whereby the Mediator would respond to these changes. Then we wouldn’t have to check to see whether or not we included a Change method; it’s already there. This helps avoid the bug of wondering why the Mediator isn’t doing what it’s supposed to do if we forgot the call to Change.
At some point, you’ll want to test the new class. The main function in this example does precisely that. The code doesn’t provide a complete test, but it does demonstrate some of what you can do. In this case, the code turns the engine once, accelerates the car, applies the brake a little, applies the brake more to come to a stop, and then stops the engine.
Documenting your work
Imagine that somebody else will use your set of car classes. You have saved your header files and your source files, along with a static library containing the compiled code, on a network drive. Your coworker begins looking at your header files. What does he or she see? A big collection of classes. How does the coworker know how to use the classes? Does the coworker know to use the main Façade class called CarControls? Or will he or she have to just dig through the code to figure out which classes to use and which ones not to?
The answer is no. Instead, clearly document your classes. Somewhere, put together a simple document (no more than a page or two) that explains how to use your class library. Write this document for other programmers to use (but make it readable, please!), and explicitly state that programmers are to interact with the system through the CarControls class. You should then describe the public member functions (the interface) to the CarControls class and provide concrete examples. You might also include a reference section for advanced programmers who want to understand how the whole thing works. But whatever you do, don’t just hand over the classes and expect other people to understand them without sufficient documentation!
All materials on the site are licensed Creative Commons Attribution-Sharealike 3.0 Unported CC BY-SA 3.0 & GNU Free Documentation License (GFDL)
If you are the copyright holder of any material contained on our site and intend to remove it, please contact our site administrator for approval.
© 2016-2025 All site design rights belong to S.Y.A.